
| Download Docs | Site Map | Glossary | |
|
|
|||
| bea.com | products | dev2dev | support | askBEA |
 |
 |
|
|||||||
| e-docs > WebLogic Platform > WebLogic Integration > BPM Topics > Using the Studio > Monitoring Workflows |
|
Using the Studio
|
Monitoring Workflows
The following sections discuss workflow monitoring:
Overview of Workflow Monitoring Tasks
The Studio workflow monitoring features allow workflow designers to perform run-time monitoring to help debug and troubleshoot workflow designs in a design environment, and system administrators to monitor and intervene in the real-time execution of workflows in a production environment.
Additionally, in a production environment, administrators can monitor user and role workloads for manually-assigned tasks.
Finally, business analysts can perform post-run-time data collection on manually assigned tasks to gather and compile historical raw and statistical workload and performance data to determine bottlenecks and inefficiencies in business processes. This section describes the following tasks you can perform:
Note: In order to perform any of the monitoring tasks described in this section, with the exception of viewing user and role worklists, you must have Monitor Instance permission. For more information on permissions, see Assigning Permissions to Users and Roles.
Working with Workflow Instances
A workflow instance is a session of a workflow template definition that has been placed into run time. You can view the status of workflow instances and the current value of variables. In a design environment, you can view instances to help you debug and troubleshoot problems with a workflow design. In a production environment, you can view the status of a running workflow and intervene to update variables or modify tasks.
To view a list of workflow instances:
Figure 10-1 Workflow Instances Dialog Box
For each workflow instance, the following information is displayed:
For performance reasons, the process engine only returns 100 items at a time. If there are additional items, a button (+) appears which, when clicked, will retrieve the next 100 items. When no additional items remain, the button is no longer shown. To update the instances list, click Refresh. From the Workflow Instances dialog box, you can do the following:
Viewing Workflow Instance Status
To view the status of a particular workflow instance, double-click the instance in the list in the Workflow Instances dialog box, or right-click the instance and select Workflow Status from the pop-up menu.
A window is displayed showing either a flowchart or task list representation of the current state of the running workflow. You can use the buttons at the top of the window to do the following:
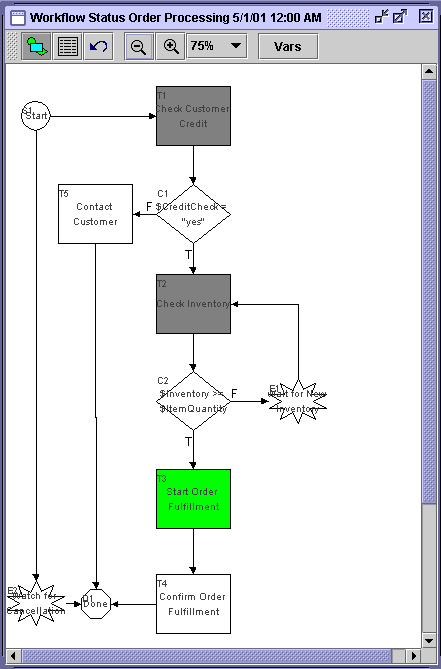
To display a flowchart view of the workflow instance, click the Figure 10-2 Workflow Status Window: Flowchart View
 button.
In the graphical representation, active tasks are green, executed tasks are gray, and the inactive tasks or other nodes are white. (For information on task states, see Understanding Task States.) For debugging purposes, you can use this information to identify where a stoppage has occurred in the workflow. If a task that should have completed is still showing as green, that is, as activated but not executed, this is usually an indication that there is an error in the definition of that node. To display a list of all tasks in the workflow and their status, click the Figure 10-3 Workflow Status Window: List View
 button.
The list view displays the following information for each task:
In addition, the following indications appear:
From the Workflow Instances dialog box, you can also do the following:
Viewing and Updating Workflow Instance Variables
You can view and update the current value of all variables defined for the workflow at any point during its execution.
When debugging workflows at design time, it is a good idea to view variable values to help troubleshoot possible design errors. Even if a workflow appears to have executed correctly, you may find incorrect settings of variable values, which may indicate a design bug.
To view workflow instance variables:
Figure 10-5 View XML Window
To update a variable's value:
Figure 10-6 Set Variable Dialog Box
Note: Because workflow logic often depends on the value of variables, use caution when manually changing the value of a variable. Also be sure that the value you enter is valid for the date type of the variable.
Deleting Workflow Instances
You can delete a single workflow instance or multiple workflow instances according to date.
To delete a single workflow instance:
To delete multiple workflow instances for a template:
Figure 10-7 Delete Workflow Instances Dialog Box
Viewing User and Role Worklists
To view a user worklist, in the folder tree for the desired organization, right-click a user from the list and select Open User Worklist from the pop-up menu. A list of tasks assigned to the user is displayed in the User Worklist dialog box.
Figure 10-8 User Worklist Dialog Box
To view a role worklist, in the folder tree for the desired organization, right-click a role from the list and select Open Role Worklist from the pop-up menu. A list of tasks assigned to the role is displayed in the Role Worklist dialog box. Figure 10-9 Role Worklist Dialog Box
The task list displays the following information for each task:
In addition, the following indications appear:
To refresh the task list for a user or role, click the  button.
From the Role Worklist and User Worklist dialog boxes, you can also do the following:
Changing Task Permissions and Priority
If a task has been defined with Modify at Execution permission, you can change the priority and permissions for a task. (For information, see Defining Task Properties.) This also enables you or a Worklist user to change the task's status and assignment. For more information, see Changing Task Status and Assignment.
To change task permissions and priority:
Figure 10-10 Task Properties Dialog Box
Changing Task Status and Assignment
If a task's permissions allow it, you can intervene in a currently running workflow to reassign tasks to different users or roles, and mark and unmark them done.
Note: Although you can reassign tasks, mark or unmark them done, or change their properties, you cannot execute tasks on worklists invoked from within the Studio. To execute a task, you must do so from the Worklist or custom client application. For more information, see Using the WebLogic Integration Worklist.
Reassigning a Task
If the task has been defined with Reassign at Execution permission, and the task has not already been marked done, you can reassign a task to a different Worklist or custom client user, role, or user in role. (For an explanation of these distinctions and of task assignment, see Setting Up Manual Tasks.)
To reassign a task:
Figure 10-11 Reassign Task Dialog Box
Marking a Task Done
If the task has been defined with Mark Done Without Executing permission, you can mark a task done before it is actually executed by a user.
To mark a task done, from the Workflow Status, User Worklist or Role Worklist dialog boxes, right-click the task you wish to mark done, and from the pop-up menu, select Mark Task as Done. The task's completed date is set to the current date, and the workflow proceeds.
Unmarking a Task Done
If the task has been defined with Unmark If Marked Done permission, you can unmark a task done that has already been completed.
To unmark a task done, from the Workflow Status, User Worklist or Role Worklist dialog boxes, right-click the task you wish to unmark done, and from the pop-up menu, select Unmark Task as Done. The task's status is reset to pending and the completed date is cleared.
Using Workload Reports
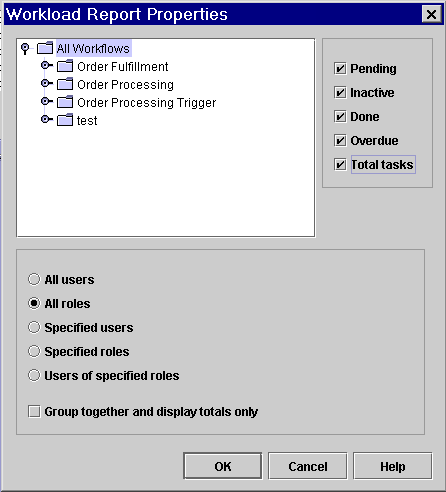
The Studio allows you to view workload reports, showing the number of tasks, by workflow, task, user or role, and task status. In the Studio folder tree, right-click Workload Report, and choose Open from the pop-up menu to display the Workload Report Properties dialog box.
Figure 10-12 Workload Report Properties Dialog Box
Compiling Workload Report Information The workload report will display information according to the selections you make in the Workload Report Properties dialog box:
Viewing Workload Reports
After you make your workload report selections, click OK to display a graphical representation of the current workload.
Figure 10-13 Workload Report Dialog Box
The contents of the report are broken down by user, role, or totals, depending on the options selected. This display may scroll left and right if there is a lot of information. A bar chart indicates the total number of tasks of various state counted. The legend at the top of the window shows what each color represents, depending on the options selected at design time. For more precise indicators, the actual number of tasks is shown above each bar.
Using Statistics Reports
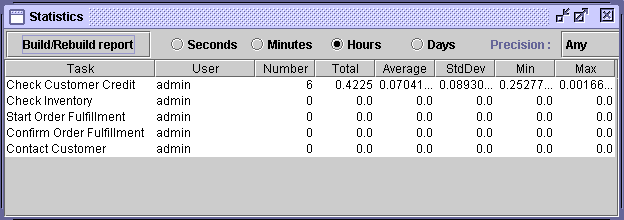
You can view statistics reports that are based on tasks, users, roles, and so on. A statistics report provides statistical information based on historical data kept for completed workflows. It shows number of tasks completed, total time, average time, and minimum and maximum times spent for each task. Standard deviation from the average time is also shown.
Compiling Statistics Report Information
In the Studio folder tree, right-click Statistics Reports and choose Open from the pop-up menu to display the Statistics Report Properties dialog box. The report includes information according to the selections you make in the Statistics Report Properties dialog box.
Figure 10-14 Statistics Report Properties Dialog Box
Viewing Statistics Reports
When you make your statistics report selections, click OK to display the statistics report.
Figure 10-15 Statistics Report
The top of the dialog box has several options:
Several columns are displayed in the report, depending on the options selected at report design time:
Because the report definition is stored separately from the results, the statistics report can be run at any time.

|

|

|