


|
|
A Switch node is used to select one path of execution based on the evaluation of an expression specified on a condition node. A Switch node contains one condition node, one or more case paths, and one default path. At run time, the expression on the condition node is executed, and the resulting value is compared to the values associated with each case path. Execution continues with activities inside the first case path that contains a matching value (case paths are evaluated left-to-right in the Switch node). When no conditions are met, activities defined on the default path are executed.
This section describes how to add a Switch node to your business process, define conditions, and define activities for the alternative paths of execution in the Switch node. It contains the following topics:
How does a Decision node differ from a Switch node?
A Decision node can include one or more conditions to be evaluated at run time. For a scenario in which a Decision node is defined, the business process evaluates the conditions (one on each path) sequentially, and executes the path for the first condition that evaluates as true. (Conditions are evaluated left-to-right in the Decision node.) In other words, if the first condition evaluates to false, the second condition is evaluated. If the second condition evaluates to false, the next condition is evaluated, and so on. The activities defined on the default path are executed if no conditions are met.
A Switch node includes a single condition. For a scenario in which a Switch node is defined, the business process evaluates an expression specified on a single condition node and selects one path of execution based on the evaluation of that expression. The possible paths of execution in a Switch node include one or more case paths, and one default path. Execution continues with activities inside the first case path that contains a matching value. (Case paths are evaluated left-to-right in the Switch node.) If the value resulting from the evaluation of the condition expression does not match any of the case paths, then the activities defined on the default path are executed.
 Show ViewNode Palette from the BEA Workshop for WebLogic Platform menu.
 Switch in the Node Palette.
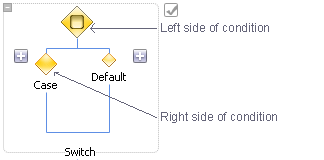
The Design view is updated to contain a Switch node, as shown in Figure 9-1.
Note the following characteristics of the Switch node:
 on either side of the Case tree.
 At run time, the case branch which matches the received data on the node is executed. If no matching case is found, the default path is executed.
 indicates that the design of this node is incomplete. When you complete the design of the node, is replaced by
  . A Switch node is completed when the condition and all cases are fully configured.
To create logic for your Switch node, you must complete the following steps:
The node builder displays options depending on whether you selected Variable or Method.
The following steps describe how to select a business process variable, which is associated with an XML or MFL schema. Select one or more nodes in the schema on which to define a switch or case node.
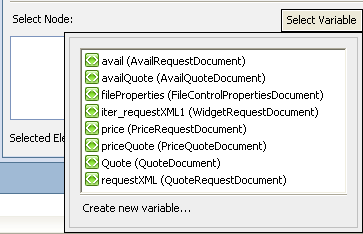
A drop-down list of business process variables in your project is displayed.
For example, if we import an XML Schema (QuoteRequest.xsd) into our project, and create a business process variable (requestXML) of type quoteRequest (based on the QuoteRequest.xsd schema), the requestXML variable is available in the drop-down list of business process variables as shown in Figure 9-2.
| Note: | (To learn about creating business process variables and importing schemas to your project, see Business Process Variables and Data Types and Creating and Importing Schema Files.) |
When you select a variable, a representation of the XML Schema associated with that variable is displayed in the Select Node pane.
The Create Variable dialog box opens.
The Create Variable dialog box closes and your new variable is displayed in the Select Node pane.
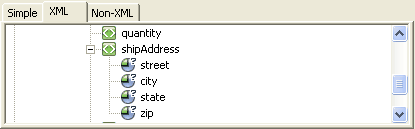
requestXML variable example, Figure 9-3 shows the XML Schema represented when the requestXML variable is selected:
The elements and attributes of an XML document assigned to this variable, are represented as nodes in a hierarchical representation, as shown in the preceding figure. Note that the schema in our example (QuoteRequest.xsd) specifies a root element (quoteRequest), and child elements: customerName, shipAddress, and widgetQuoteRequests. The widgetQuoteRequests element, in turn, specifies a repeating element: widgetQuoteRequest. (A repeating XML element is represented by ![]() in the GUI representation of the Schema.)
in the GUI representation of the Schema.)
street in the preceding example, the $requestXML/ns0:shipAddress/@street) is displayed in the Selected Element field.In the Design view, note that the Condition in your Decision node displays the following icons:
Save.| Note: | To select an existing method, click  on the left side of the Java Method Name field. on the left side of the Java Method Name field. |
The Source view is displayed at the line of code in your Process.java file at which the Java method is written.
In the Design view, note that the Condition in your Switch node displays the following icon:  . It is a representation of the condition you defined in source code to specify the Java method, on which to base the decision. To make any further changes to the condition represented on this node, you must edit the source code in the Source view.
The node builder displays options depending on whether you selected Schema, Method, or Constant or Variable.
For information about how to complete the Case builder when using the Schema option, see Variable (Schema) in the preceding section.
For information about how to complete the Case builder when using the Method option, see Method in the preceding section.
After you define the condition that is evaluated when the flow transitions to the Switch node at run time, you are ready to define the actions on the paths that represent the paths of execution in the flow.
This can be any node that performs the activity appropriate for your business process business logic. For example you can use a control to interact with an external resource, such as a database, a JMS queue, or an EJB.
When you complete the addition of activities on the paths of your Switch node, your decision logic is represented as a series of conditions and actions in your business process.
Grouping Nodes in Your Business Process


|
 is a visual reminder that the condition you defined on this node is based on the evaluation of an XML document.
  is a visual reminder that the condition you defined on this node is based on the evaluation of a MFL file.