|
|
This section describes details on how to use JPDs and Worklist controls to support the integration of business processes with human actors via the Worklist system.
As with other built-in controls in Workshop for WebLogic Platform, you use the controls by adding instances of the controls to your business process. Subsequently, you invoke operations on the controls at the point in the business process at which you want to reach out to one or more human actors.
In this step, you will perform the following tasks:
Information in this section is an extension of the previous section. So, it is assumed that the Loan Application is open, and the myworklist server is up and running.
Perform the following steps to configure access to the Message Broker Channel, and initiate the access using a start event.
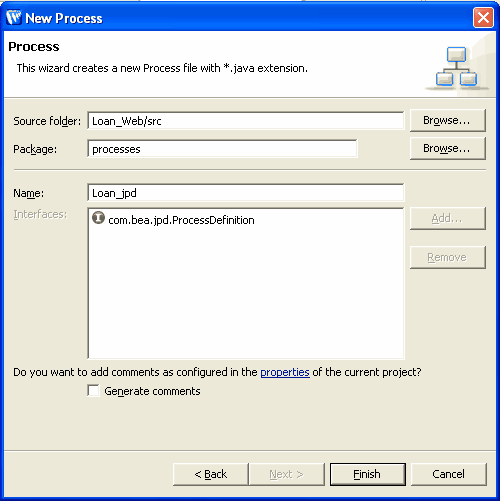
 Folder. This will display the New Folder dialog box. Process and click Next to display the New Process File dialog box.
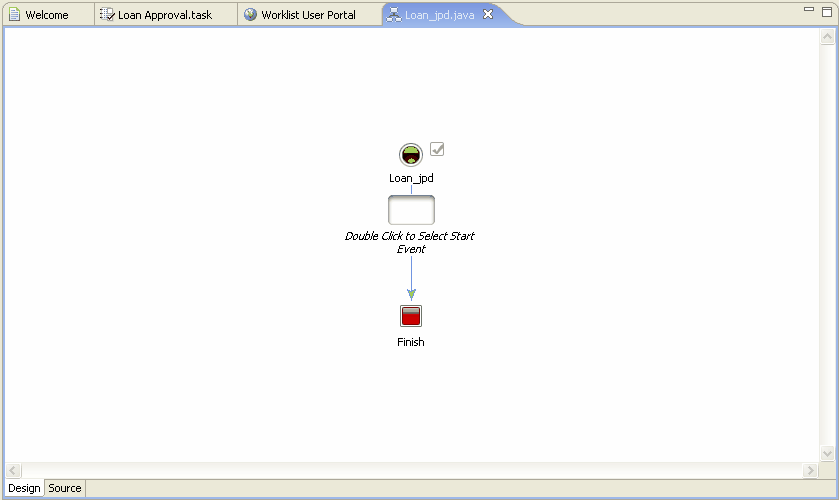
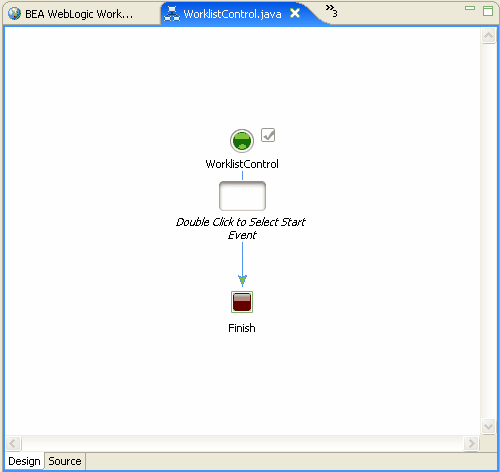
 Loan_jpd.java under the newly created processes folder (see Figure 6-1).The new JPD appears in the Design view (see Figure 6-2).
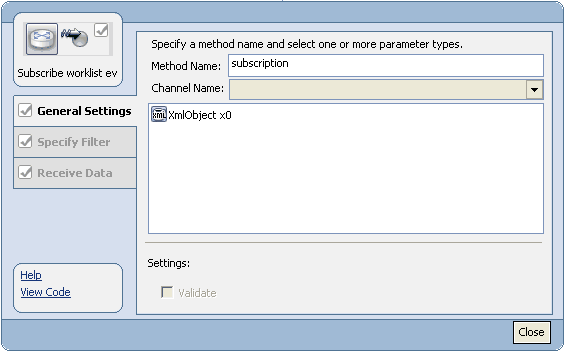
Subscription. Subscription and replace it with Subscribe worklist event. /WorklistEvent as the Channel Name. eventType from the TaskEventMetadata xml tree, and type CREATE as the filter value. Create new variable next to RawData x0 and in the Create Variable dialog box that appears, enter worklistEventData in the Variable Name field, and select com.bea.data.RawData as its type.Create new variable next to TaskEventMetadataDocumentx1 and in the Create Variable dialog box that appears, enter worklistEventMetaData in the Variable Name field, and enter com.bea.wli.worklist.xml.TaskEventMetadataDocument as its type.
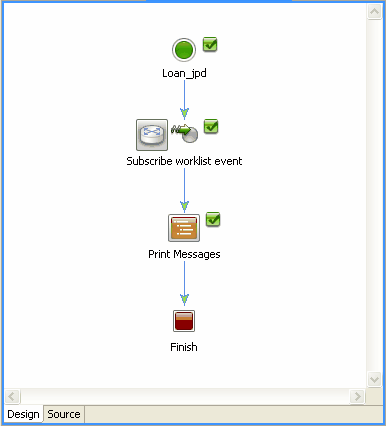
After creating a JPD to subscribe to a Worklist event to start, create and configure a Perform node to echo the event. Perform the following steps:
Perform to insert an action node between Subscription and the Finish nodes. Print Messages, as shown in Figure 6-4. System.out.println("####Got worklist event for loan task type"); ByteArrayInputStream bais = new ByteArrayInputStream(worklistEventData.byteValue());
ObjectInputStream ois = new ObjectInputStream(bais);
TaskEvent event = (TaskEvent)ois.readObject();
System.out.println("####Got TaskEvent data in JPD: " + event.getSummary()); import java.io.ByteArrayInputStream;
import java.io.ObjectInputStream;
import com.bea.wli.worklist.api.events.data.*;
Save or use Ctrl+S to save the file. Run on Server. The Run on Server dialog box is displayed.
This will display the Add and Remove Projects dialog box.
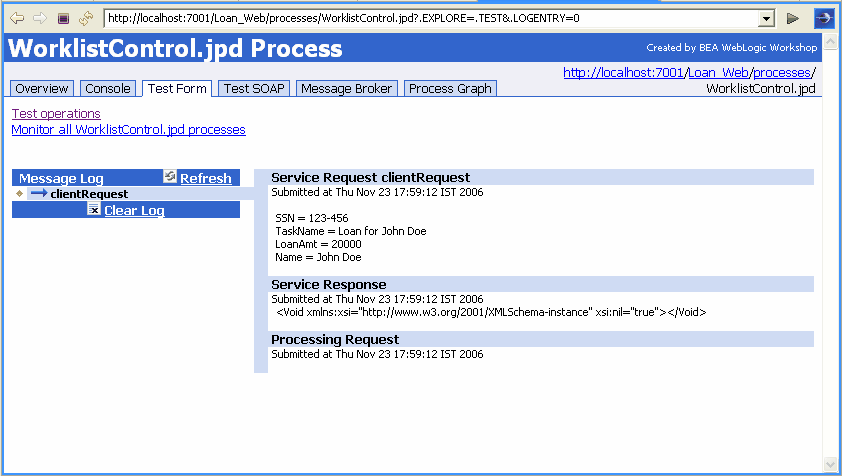
Test the Application by creating a new task instance using the Worklist User Portal. After the task instance has been created, the Worklist event is published to the Message Broker, and a JPD instance is started by the event. Perform the following steps:
http://localhost:7001/Loan_Web
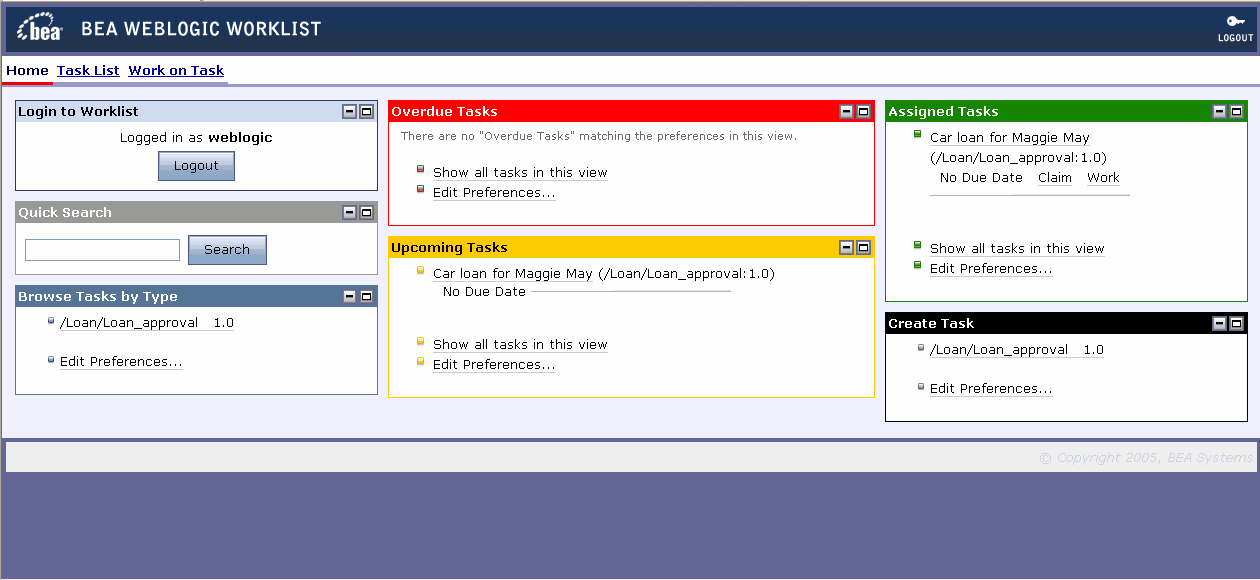
Username: weblogic Password: weblogic weblogic (see Figure 6-5). You can also verify creation of the JPD instance by logging into the WebLogic Worklist Console.
http://localhost:7001/worklistconsole
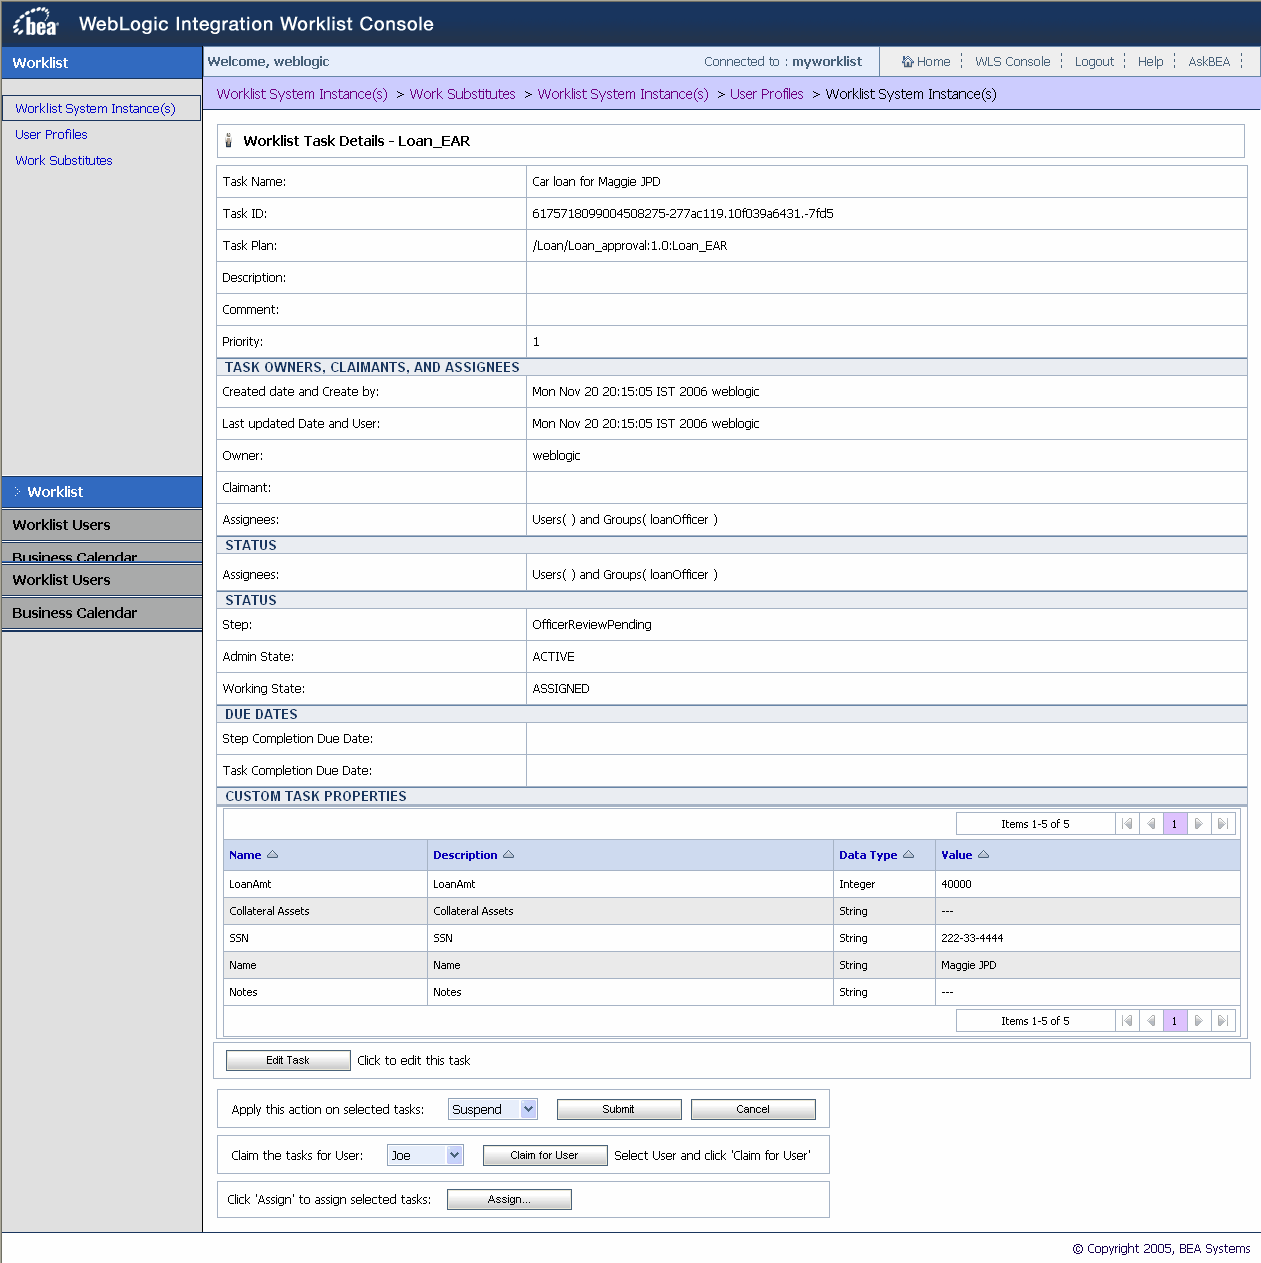
Username: weblogic Password: weblogic The Worklist Task Details is displayed (see Figure 6-6).
In this section, you will create a loan processing task instance using a Task Control in a JPD. During this process, you will create a Worklist JPD (WorklistControl), a Task Control (MyControl), deploy the process, and subsequently create a sample task to validate the task instance creation.
This section details steps on how to create a Worklist JPD.
Process and click Next to display the New Process File dialog box, similar to Figure 6-1. WorklistControl. This will create a JPD process file WorklistControl.java under the processes folder. Click Finish to complete the process.
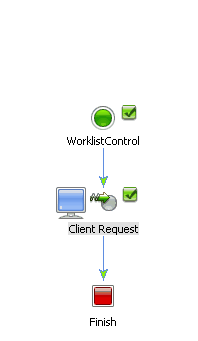
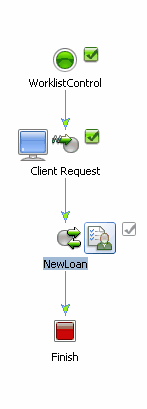
The new JPD appears in the design view (see Figure 6-7).
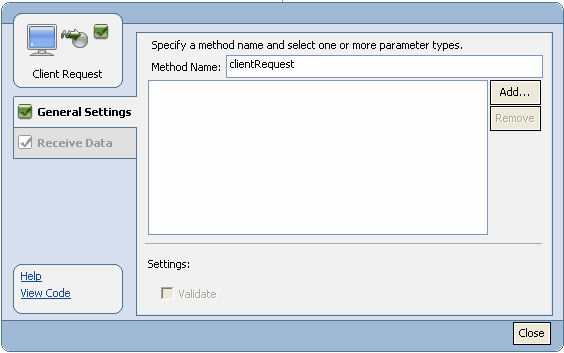
Client Request.
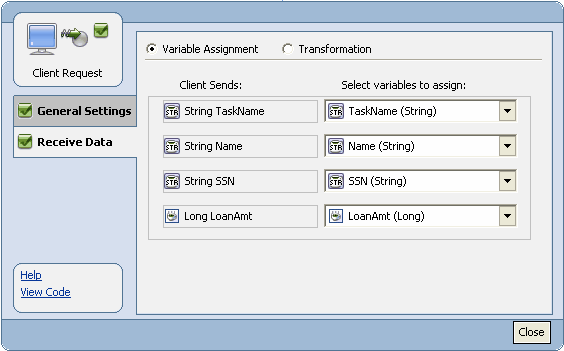
The four new variables of default type are: TaskName(String),Name(String), SSN(String), and LoanAmt(Long).
In this section, you will create a Task Control that will trigger the creation of a task instance.
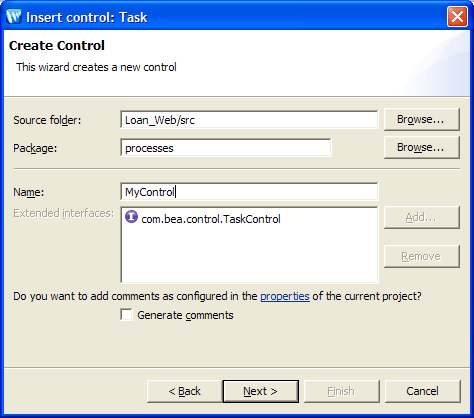
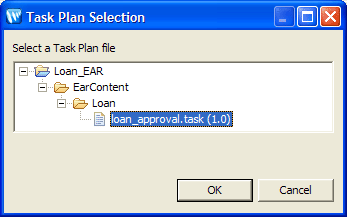
MyControl in the Name field and ensure the other fields have same value as shown in Figure 6-11. Loan_EAR\EarConten\Loan\loan_approval.task.as shown in Figure 6-12. | Note: | If the Data Palette pane is not visible, go to WindowShow ViewOtherWebLogic IntegrationData Palette |
In this section, you will add the task instance creation constructor to the Worklist JPD.
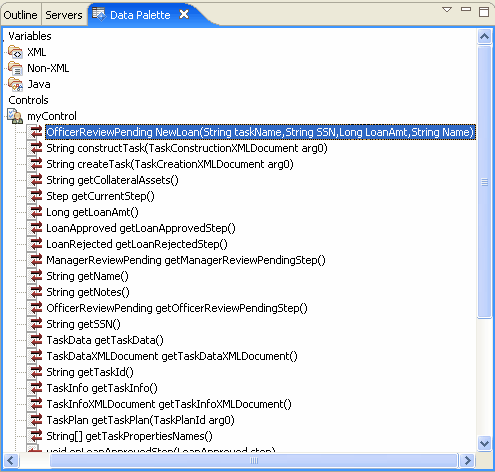
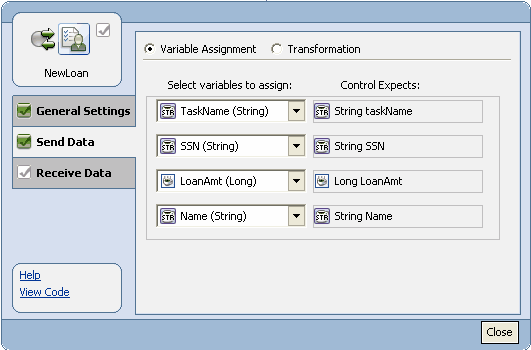
WorklistControl.java file in the Package Explorer pane and select Open WithProcess Editor option. Ensure the JPD is displayed in the Design tab and that you are using the Process Perspective. myControl and select the OfficerReviewPending NewLoan(String taskName, String SSN, Long LoanAmt, String Name) method. As shown in Figure 6-13. Save or use Ctrl+S to save the JPD. In this section, you will deploy the JPD and after successfully deploying the JPD, you will validate it using test values.
Run As option. After successful deployment the JPD process page will be launched in the IDE browser. http://localhost:7001/Loan_Web
Username: John Password: password
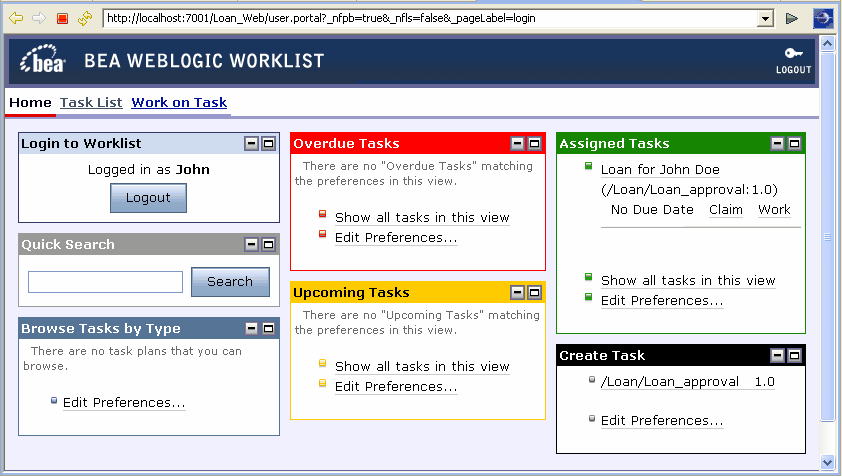
The user John is part of the loanOfficer group and the task instance created should be visible in his Assigned Tasks portlet box.
John, as shown in Figure 6-18.
The Assigned Tasks portlet box displays the Loan for John Doe task. This confirms that a task instance was created by a JPD using a Control.


|