


|

|
|
|
|
Hello Partner Sample
The Hello Partner sample demonstrates communication using the default XOCP messaging protocol. This section discusses the following topics:
Overview of the Hello Partner Sample
Most WebLogic Collaborate conversations take place between trading partners who have both installed WebLogic Collaborate. In such environments, the XOCP protocol is used to exchange messages via a hub. The Hello Partner sample demonstrates all aspects of this process.
What the Sample Demonstrates
The Hello Partner sample demonstrates how two or more trading partners can participate in business communication in a properly configured WebLogic Collaborate environment. Such communication occurs in a networking environment with a hub-and-spoke configuration. XOCP is used to carry messages between two trading partners. A hub and two spokes are created in your local WebLogic Collaborate installation to demonstrate the round-trip path of the message. For each trading partner, the sample demonstrates the following:
In this sample, a JSP-driven Web page initiates a message to the replying trading partner. The trading partner processes the data in the message and sends a reply to the initiating trading partner, which is displayed by a second Web page.
This sample also illustrates the preferred method of handling trading partner message traffic. Public processes are used to manage trading partner message traffic, while private processes are used for message creation, message processing, and links to outside applications.
Hello Partner Sample Scenario Logic
The Hello Partner sample scenario involves two trading partners, one requestor and one replier, both of which communicate via a hub-and-spoke WebLogic Collaborate configuration. The requestor sends a message and waits for a response from the replier. The requestor uses a Web browser to access a JSP page that initializes and sends a message in XML, using JSP tags that are embedded in the browser pages.
The replier receives the message, generates a response, and publishes the response to the requestor in XML. The response is sent to the requestor, and the contents of the reply are displayed in the requestor's JSP page.
Running the Hello Partner sample demonstrates the following events:
Figure 2-1 Hello Partner Sample Scenario Logic
The actual message content used in the sample is relatively simple. The JSP page allows you to select two numbers. These numbers are sent to the Replier, where they are multiplied. The multiplication result is returned.
Setting Up the Hello Partner Sample
The Hello Partner sample is designed to allow you to verify that you have properly installed WebLogic Collaborate. The Hello Partner sample runs in its own database domain, the Sample domain, rather than in your development or production domain. This isolates the database tables used by the Hello Partner sample from any development or production configurations or data you may load into WebLogic Collaborate before or after running Hello Partner.
To load the Hello Partner sample:
From the Start Menu, choose Start
Start the following shell script from the $WLC_HOME/config/samples/shortcuts directory:
sh BulkloadHelloPartner.sh
This shell script loads all data associated with the Hello Partner sample into the Sample database domain in WebLogic Collaborate. This process may take several minutes.
Choose Start
Run the following shell script from the $WLC_HOME/config/samples directory:
sh startWeblogic.sh
When you start WebLogic Collaborate, you will eventually see a message similar to Started Process Integrator. This does not mean that you have also started the WebLogic Process Integrator Studio. Rather, it means that you have started the WebLogic Process Integrator server, which runs in conjunction with WebLogic Collaborate. To start the WebLogic Process Integrator server, you need a file manager application and a Web browser.
On Windows systems:
Choose Start
On UNIX systems:
Run the following shell script from the $WLC_HOME/config/samples/shortcuts directory:
sh studio.sh&
To log in, use the following information:
WLC_HOME\config\samples\workflows\HelloPartnerAndLighweightClient.jar
Select the Activate workflows after import option before you click Import.
Once you have completed this procedure, WebLogic Collaborate will have loaded all Hello Partner sample data and configurations.
Running the Hello Partner Sample
Once you have loaded the Hello Partner sample, you can start it.
To run the Hello Partner sample:
For UNIX, load the following URL:
HTTP://localhost:7001/HelloPartnerLauncher.html
Figure 2-2 JSP Launcher Page
Figure 2-3 JSP Result Page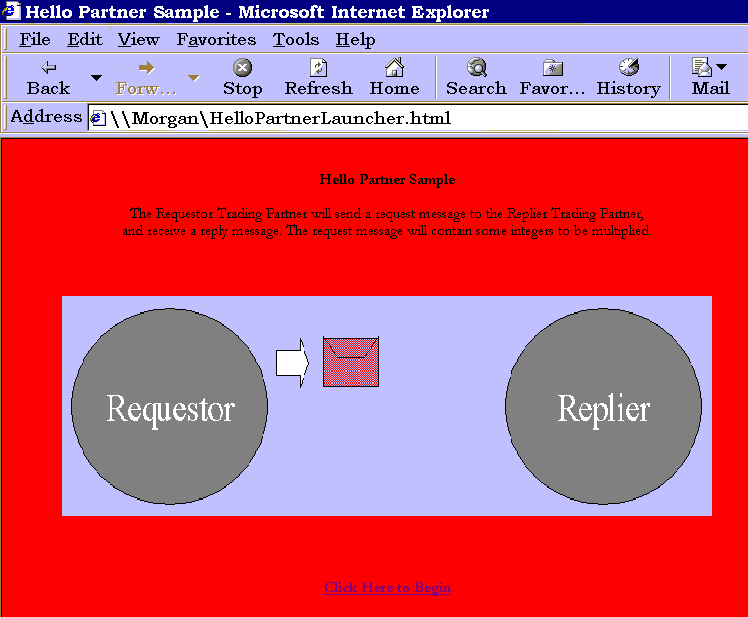
How the Sample Works
A total of four workflows are used in this sample. Two public workflows manage the requestor's and replier's sides of the XOCP message exchange, while two private workflows connect the JSP and the requestor's public workflow on one side, and creates the replier's reply data on the other.
The following sections provide an overview of this process and describe each type of workflow in detail:
Documents Exchanged
The following documents are used in the Hello Partner sample:
Request WLC Message from Requestor Role
This message is sent by the Requestor. It includes the two numbers to be multiplied and is packaged as a document of type multiply-request:
<multiply-request>
	<integer-one>5</integer-one>
	<integer-two>7</integer-two>
</multiply-request>
Reply WLC Message from Replier Role
The following message, sent by the Replier, contains the multiplication product, as well as a generated message:
<multiply-reply>
	<integer-product>35</integer-product>
	<note>Dear RequestorPartner: Here is the product of 7 and 5, from ReplierPartner to RequestorPartner.</note>
</multiply-reply>
XML Message Over JMS from JSP to Trigger Private Workflow
The following message is sent over JMS by the JSP. Its arrival triggers the Requestor's private workflow:
<from-multiply-request-jsp-to-workflow>
	<integer-one>5</integer-one>
	<integer-two>7</integer-two>
</from-multiply-request-jsp-to-workflow>
XML Message Over JMS from Private Workflow to JSP with Result
The following message is sent over JMS from the Requestor's private workflow to the JSP. It contains the product of the multiplication, as well as the text message:
<from-workflow-to-multiply-request-jsp>
	<integer-product>35</integer-product>
	<note>Dear RequestorPartner: Here is the product of 7 and 5 from ReplierPartner to RequestorPartner.</note>
</from-workflow-to-multiply-request-jsp>
XML Event from Replier Public Workflow to Replier Private Workflow
The following XML event contains the request input message, with four parameters (the two multiplication inputs, the name of the requestor, and the name of the replier):
<multiply-inputs>
	<integer-one>5</integer-one>
	<integer-two>7</integer-two>
	<requestor-name>PartnerRequestor</requestor-name>
	<replier-name>PartnerReplier</replier-name>
</multiply-inputs>
XML Event from Replier Private Workflows to Replier Public Workflows
The following XML event contains the reply output of the private workflow:
<multiply-outputs>
	<integer-product>35</integer-product>
	<note>Dear RequestorPartner: Here is the product of 7 and 5 from ReplierPartner to RequestorPartner.</note>
</multiply-outputs>
Requestor Private Workflow
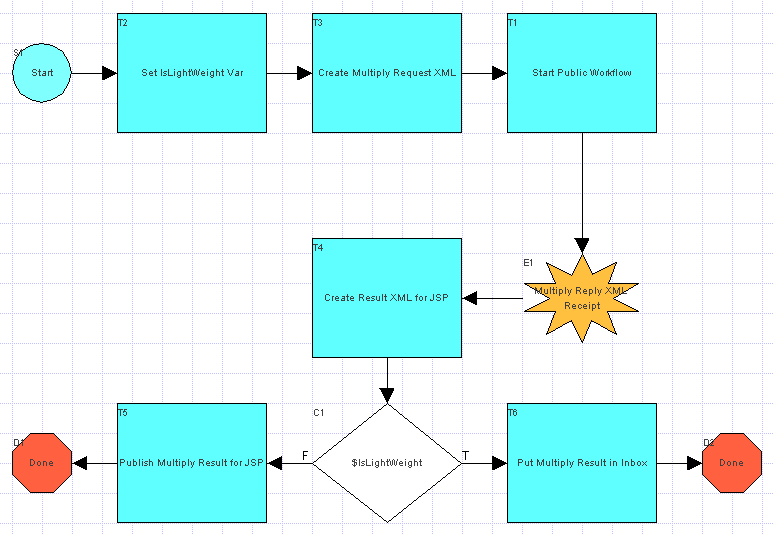
The Requestor private workflow receives the initial request from the JSP, creates a message of the appropriate type, and sends it to the public workflow for transmission. When it receives the reply, it processes the reply message, and sends the results to the JSP. This process is illustrated by the workflow in the following figure.
Figure 2-4 Requestor Private Workflow
Requestor Public Workflow
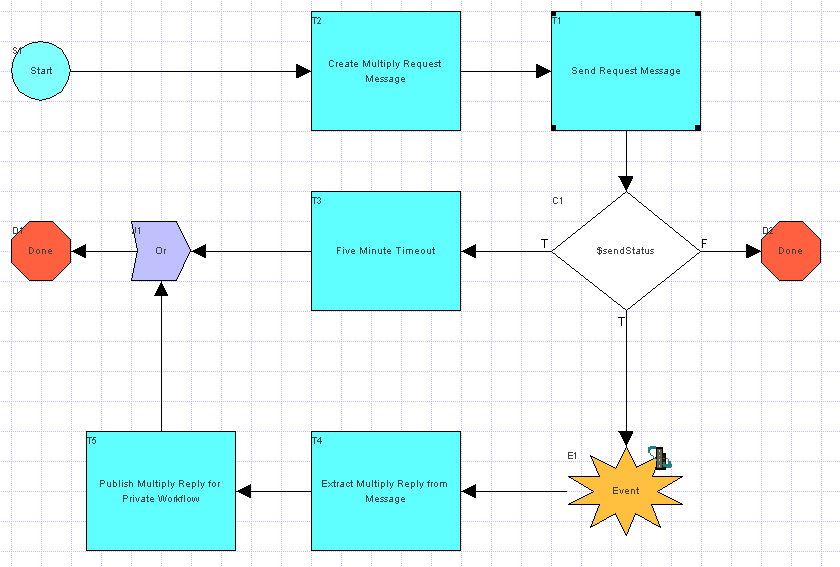
The Requestor public workflow is initiated by the XML event from the private workflow. It creates a message with the request XML, sends the message to the Replier, waits for a response, extracts the response XML from the response message, and then passes the response to the private workflow for processing. The workflow in the following figure illustrates this process.
Figure 2-5 Requestor Public Workflow
Replier Public Workflow
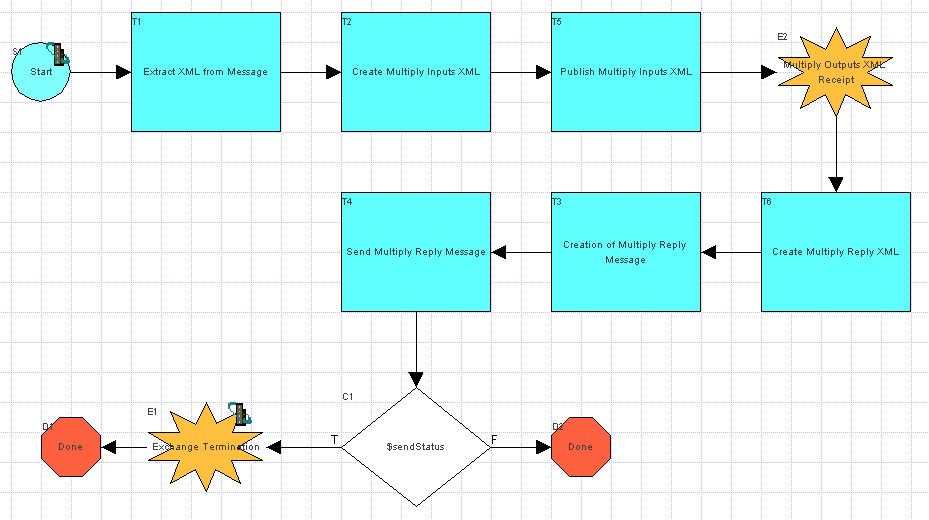
The Replier public workflow is initiated upon receipt of the Requestor's message. It receives the message, extracts the request XML from the message, publishes an XML event containing the request XML to trigger the replier private workflow, receives an XML event back from the replier private workflow, and sends a message containing the response XML back to the requestor as a reply. This process is illustrated by the workflow in the following figure.
Figure 2-6 Replier Public Workflow
Replier Private Workflow
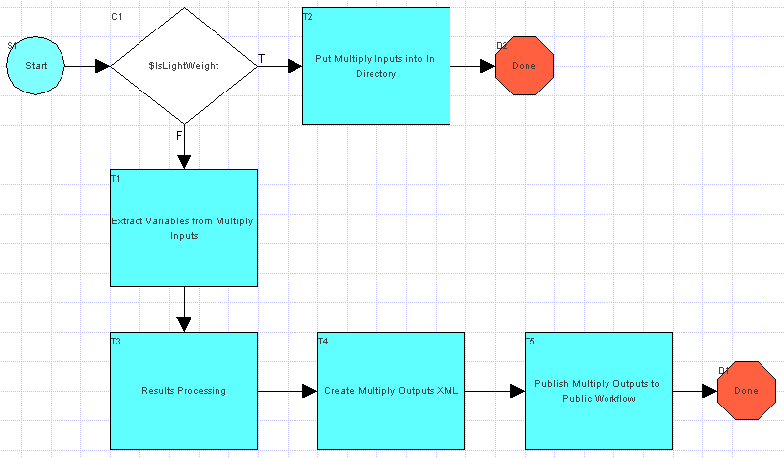
The Replier private workflow is initiated upon receipt of the XML Event containing the request XML from the Replier public workflow. It receives the request, processes the data, generates a reply in an XML document, and publishes the reply XML back to the replier public workflow using an XML Event.
Figure 2-7 Replier Private Workflow

|

|

|
|
|
|
Copyright © 2001 BEA Systems, Inc. All rights reserved.
|