

|
|
|
|
|
|
Configuring WebLogic Integration Clusters
The following sections describe how to configure a clustered deployment for WebLogic Integration:
Understanding WebLogic Integration Clusters
The following sections describe clustering in WebLogic Integration deployments:
About WebLogic Integration Clusters
Clustering allows WebLogic Integration to run on a group of servers that can be managed as a single unit. In a clustered environment, multiple machines share the processing load. WebLogic Integration provides load balancing so that resource requests are distributed proportionately across all machines. A WebLogic Integration deployment can use clustering and load balancing to improve scalability by distributing the workload across nodes. Clustering provides a deployment platform that is more scalable than a single server.
A WebLogic Server domain consists of one and only one administration server, and one or more managed servers. The managed servers in a domain can be organized into clusters. When you configure WebLogic Integration clusterable resources, you can target selected servers or selected clusters. Targeting clusters provides the most flexibility because servers can be added to them, dynamically, to increase capacity.
The topics in this section provide the information you need to configure WebLogic Integration in a clustered environment. Although some background information about how WebLogic Server supports clustering is provided, the focus is on procedures that are specific to configuring WebLogic Integration for a clustered environment.
Before proceeding, we recommend that you review the following sections of the WebLogic Server documentation to obtain a more in-depth understanding of clustering:
http://download.oracle.com/docs/cd/E13222_01/wls/docs61/cluster/index.html
http://download.oracle.com/docs/cd/E13222_01/wls/docs61/adminguide/config.html
http://download.oracle.com/docs/cd/E13222_01/wls/docs61/perform/WLSTuning.html
Designing a Clustered Deployment
The following sections provide the information you need to design a clustered deployment:
Before you begin designing the architecture for your clustered domain, you need to learn how WebLogic Server clusters operate. For general information, see Using WebLogic Server Clusters in the WebLogic Server documentation set, at the following URL:
http://download.oracle.com/docs/cd/E13222_01/wls/docs61/cluster/index.html
For details about basic, multi-tiered, and proxy architectures that are recommended, see Planning WebLogic Server Clusters in Using WebLogic Server Clusters. To learn how WebLogic Integration resources can be partitioned and distributed within a clustered domain, see WebLogic Integration Deployment Resources.
WebLogic Integration Deployment Resources
The following sections describe WebLogic Integration resources that can be deployed in a cluster:
Resource Groups
Resource groups are collections of related deployment resources that are categorized for clustering purposes. Each resource in a resource group must be targeted to the same machine.
Types of Resource Groups
There are two types of resource groups:
List of Resource Groups
The following table describes the resource groups supported by WebLogic Integration.
Table 2-1 Resource Groups for WebLogic Integration Resources
Deployment Containers
The table provided in this section describes the WebLogic Integration deployment resources. These resources can be viewed and modified in the WebLogic Server Administration Console. The table provides the following information for each package or service:
Note: Names shown in italic represent user-defined packages or resource groups that are not part of the default domain.
Table 2-2 WebLogic Integration Deployment Containers
Load Balancing in a WebLogic Integration Cluster
Load balancing distributes the workload proportionally among all the servers in a cluster so that each server can each run at full capacity. The following sections describe load balancing in a WebLogic Integration cluster:
Load Balancing WebLogic Server in a Cluster
WebLogic Server supports load balancing for HTTP session states and clustered objects. For more information, see Using WebLogic Server Clusters in the WebLogic Server documentation set, at the following URL:
http://download.oracle.com/docs/cd/E13222_01/wls/docs61/cluster/index.html
Load Balancing BPM in a Cluster
BPM workflows require an event queue for processing event-based workflows. For more information, see Business Process Management Resources.
Event Queues and Associated Pools
Two types of pools are associated with each BPM event queue:
The following figure illustrates an event queue and the pools associated with it.
Figure 2-1 Event Queue and Associated Pools
The unordered event listener message-driven beans process messages in a nondeterministic order. Although messages are read in first-in, first-out (FIFO) order, messages can be processed out of order after they are read, depending on thread scheduling and the load at the time they are processed. The ordered event listener message-driven beans guarantee that, for a particular order key (WLPIOrderKey), messages are processed in an ordered sequence. To achieve this, a single event listener message-driven bean in a cluster must be configured to process messages for WLPIOrderKey. The message producer is responsible for delivering the messages in the queue in the correct order. Note: WLPIOrderKey is a custom JMS property that BPM uses. You can set this property in the WebLogic Integration Studio or you can set it programmatically. If you are using messages between workflows, you can set WLPIOrderKey in the post-XML event dialog box. For more information, see "Posting an XML Message to a JMS Topic or Queue" in Defining Actions in Using the WebLogic Integration Studio. A single jar file contains both ordered and unordered event listener message-driven beans for a particular queue. The WebLogic Integration installation provides the wli-mdb-ejb.jar file to be read from the default EventQueue. To ensure that the ordered event listener message-driven beans preserve processing order, this jar file must be targeted to one—and only one—server in a cluster. Creating New Pools If you have sufficient processing power on a single server, you can increase the pool size for event listener message-driven beans in the wli-mdb-ejb.jar file. If you want to put more event listener message-driven beans on another server, you need to create a new jar file and a new queue. The pool size and range of WLPIOrderKeys can be changed for wli-mdb-ejb.jar, but they cannot be targeted to another server. To add event listener message-driven beans on another server, you must create a new pool using the MDBGenerator utility. For more information, see "Configuring a Custom Java Message Service Queue" in Customizing WebLogic Integration in Starting, Stopping, and Customizing BEA WebLogic Integration. The following diagram illustrates the default queue (EventQueue) on Server-1 and a user-defined queue (EventQueue-2) on Server-2. The new pool targets a different queue (EventQueue-2), and that queue must be shared with another event listener message-driven bean pool. In this diagram, the custom-generated event listener message-driven beans pull work from the user-defined event queue. Figure 2-2 Event Listener Message-Driven Beans on Another Server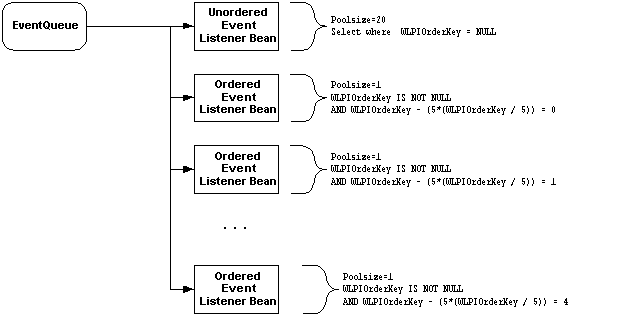
An application must send work to the user-defined queue in order to use the capacity of the custom generated event listener message-driven beans. Requirements for Load Balancing BPM Functionality When load balancing BPM functionality in a WebLogic Integration cluster, you must comply with the following requirements: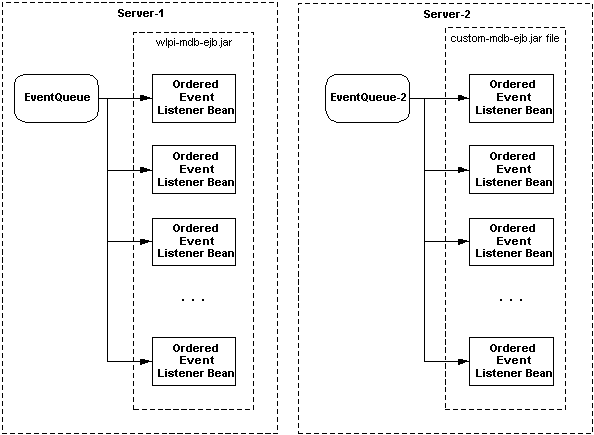
Note: This also applies to the validating queue when using XML validation. The default validating queue is com.bea.wlpi.ValidatingEventQueue.
Load Balancing Application Integration in a Cluster
Application integration does not require partitioning of work within a cluster. It is possible to configure a completely homogenous cluster (that is, one in which all resources have the same server targets), subject to any constraints in the adapters themselves.
In contrast to BPM functionality, it is possible to load balance application integration functionality in a cluster using the default JMS queues and servers. New JMS servers are needed only when the default JMS server is saturated.
Configuring a Clustered Deployment
The following sections describe how to configure a clustered WebLogic Integration deployment:
Configuration Prerequisites
Before configuring WebLogic Integration to run in a clustered environment, you must:
To use WebLogic Server in a clustered configuration, you must have a special cluster license. Contact your BEA representative for information about obtaining a cluster license.
Each WebLogic Server instance requires a unique, static IP address. If multiple servers are run on a single machine, that machine must be configured as a multihomed server. Obtain an IP address for each WebLogic Server instance to be started on each machine in the cluster.
Clustered servers communicate among themselves over multicast and must share a single, exclusive multicast address.
All servers in a domain must be configured with the same listen port. If you have already assigned a listen port to the administration server, you must assign the same port to each managed server.
Note: There are additional requirements when the architecture of the domain includes one or more firewalls. For more information, see Using WebLogic Server Clusters in the WebLogic Server documentation set, at the following URL:
Summary of Basic Configuration Tasks
Configuring WebLogic Integration in a clustered environment involves the following basic tasks:
The instructions are based on two assumptions:
Setting Up a WebLogic Integration Managed Server
The following sections provide instructions for setting up a managed server in two situations:
The information you need for both of these procedures is provided in the following sections. For simplicity, it is assumed that you are adding a managed server to one of the preconfigured domains. If you have created your own domain, the process is similar.
Adding a Managed Server to the Existing Installation
Before multiple instances of WebLogic Server can be supported on the same machine, the machine must be configured as a multihomed host. If you meet this requirement, you can add a managed server to a domain in the existing installation, simply by adding a command file that starts the managed server to the domain directory.
Note: If you are adding a managed server to a domain in which adapters, applications views, and the application integration plug-in are deployed, then the WLI_HOME\config\domain_name directory must also contain the following:
WLI_HOME\config\domain_name\wlai\wlai.managed_svrname.properties
WLI_HOME\config\domain_name\wlai\deploy\*.rar
where *.rar represents any adapters that are available for deployment.
For example, to add a managed server to the WebLogic Integration (config\wlidomain) domain in the existing installation:
copy WLI_HOME\config\wlidomain\startWeblogic.cmd WLI_HOME\config\wlidomain\startManagedWeblogic.cmd
cp WLI_HOME/config/wlidomain/startWeblogic.sh WLI_HOME/config/wlidomain/startManagedWeblogic.sh
-Dweblogic.management.server=virtualhost:7001
Here, virtualhost is the IP address or DNS name assigned to the administration server on the machine, and 7001 is the assigned listen port.
-Dweblogic.Name=managed_svrname
For an example of a modified server start command file, see Sample Managed Server Startup.
Here, managed_svrname is the name of the managed server.
wlai.admin.hostNameandPort=virtualhost:7001
wlai.admin.hostUserID=user
wlai.admin.Password=passwd
wlai.numAsyncServiceRequestProcessors=4
Here, virtualhost is the IP address or DNS name of the administration server, 7001 is the port assigned to the wlidomain administration server, user is a valid user ID (typically system), and passwd is a valid password for the user.
wlai.jms.serverName=managedsvr_jmsserver
wlai.jms.connectionFactoryJNDIName=connection_factory_name
Here, managedsvr_jmsserver is the JMS server for the managed server, and connection_factory_name is the name of the connection factory, if a separate JMS connection factory is required for the server.
acl.access.weblogic.admin.mbean=everyone
Note: In the startManagedWeblogic file that results from the preceding procedure, some unnecessary environment variables are set, but they do not interfere with the execution of the command.
Before you can start the new managed server, you must add it to the configuration for the domain, as described in Adding Managed Servers and Creating Clusters.
Installing a Managed Server in a New Location
The simplest way to set up a managed server in a new location is to:
At a minimum, you must include the following in the domain directory for the managed server:
For example, the pathname for your start command file might be WLI_HOME\config\ABC_Systems\startWeblogic.
Each preconfigured domain contains a SetXxxDomainData command. This file is specific to the preconfigured domains, the domain classpath, and other variables. This file might not exist if you have created your own domain.
If you are adding a managed server to a domain in which adapters, application views, and the application integration plug-in are deployed, the config\domain_name directory must also contain the following:
WLI_HOME\config\domain_name\wlai\wlai.managed_svrname.properties
WLI_HOME\config\domain_name\wlai\deploy\*.rar
where *.rar represents any adapters that are available for deployment.
For example, to add a managed server to the WebLogic Integration (WLI_HOME\config\wlidomain) domain:
Note: The following files are necessary and must not be deleted:
Here, MyResourceAdapter*.rar represents any resource adapters that are available for deployment.
-Dweblogic.management.server=host:7001
Here, host is the IP address or DNS name assigned to the administration server, and 7001 is the assigned listen port.
-Dweblogic.Name=managed_svrname
For an example of a modified server start command file, see Sample Managed Server Startup.
REM load database specific data
call %WLI_HOME%\config\wlidomain\setdbdata || goto error
REM call %WLI_HOME%\config\wlidomain\setdbdata || goto error
Here, managed_svrname is the name of the managed server.
wlai.admin.hostNameandPort=host:7001
wlai.admin.hostUserID=user
wlai.admin.Password=passwd
wlai.numAsyncServiceRequestProcessors=4
Here, host is the IP address or DNS name of the administration server, 7001 is the port assigned to the wlidomain administration server, user is a valid user ID (typically system), and passwd is a valid password for the user.
wlai.jms.serverName=managedsvr_jmsserver
wlai.jms.connectionFactoryJNDIName=connection_factory_name
Here, managedsvr_jmsserver is the JMS server for the managed server, and connection_factory_name is the name of the connection factory, if you require a separate connection factory for this server.
acl.access.weblogic.admin.mbean=everyone
Note: In the startManagedWeblogic file that results from the preceding procedure, some unnecessary environment variables are set, but they do not interfere with the execution of the command.
Before you can start the new managed server, you must add it to the configuration for the domain, as described in Adding Managed Servers and Creating Clusters.
Sample Managed Server Startup
The following code listing shows an example of the start server command for a wlidomain managed server. The modifications from the WLI_HOME\config\wlidomain\startWebLogic command for the default administration server are shown in bold. This code listing represents a single command. It is shown here on multiple lines for the sake of readability. In your command file, however, it is entered as one physical line.
Listing 2-1 Start Server Command for a wlidomain Managed Server
%JAVA_HOME%\bin\java %DB_JVMARGS% -Xmx256m -classpath %SVRCP%
 -Dbea.home=%BEA_HOME% -Dweblogic.home=%WL_HOME%
 -Dweblogic.system.home=%WLI_HOME% -Dweblogic.Domain=wlidomain
 -Dweblogic.management.password=security
 -Dweblogic.management.server=172.20.50.250:7001
 -Dweblogic.Name=managed1 -Dweblogic.RootDirectory=%WLI_HOME%
 -Djava.security.policy=%WL_HOME%\lib\weblogic.policy
 -Dweblogic.management.discover=false weblogic.Server
Adding Managed Servers and Creating Clusters
When you add a managed server to a domain, you perform the following tasks:
All tasks are performed in the WebLogic Server Administration Console. To start the console, see "Starting the WebLogic Server Administration Console" in WebLogic Integration Administration and Design Tools in Starting, Stopping, and Customizing BEA WebLogic Integration.
Creating a Cluster
To create a new cluster:
Note: The valid range of IP addresses for multicast is between 224.0.0.1 and 239.255.255.255. The address must not be used by any other application in the subnet.
The defaults are usually acceptable for an initial configuration.
Creating a Machine
To create a machine:
Creating a Server
To create a server:
The value you specify for the external DNS name can be a host name or a virtual host name for a multihomed machine.
Note: The value of Name must match the name assigned, in the start command, to the managed server. See Setting Up a WebLogic Integration Managed Server.
Assigning an Existing Server to a Machine or Cluster
To assign an existing server to a machine:
To assign an existing server to a cluster:
Configuring JMS Queues for BPM
After adding servers, you need to add JMS queues for BPM. The BPM event listener message-driven bean pool associated with a particular JMS queue must be collocated with the queue's JMS server. For instructions, see "Configuring a Custom Java Message Service Queue" in Customizing WebLogic Integration in Starting, Stopping, and Customizing BEA WebLogic Integration.
Configuring JMS Servers and Queues for Application Integration
This section describes how to configure JMS servers and queues for application integration in a clustered environment. To determine how many JMS servers are required, see Load Balancing Application Integration in a Cluster.
Create a Store and Associate It with a Connection Pool
To create a store and associate it with a connection pool, complete the following steps:
Every JMS server has its own JMSJDBCStore. Every managed server has its own JMS Server. For instructions on creating such a server, see Create a JMS Server and Associate It with the Store.
Create a JMS Server and Associate It with the Store
To create a JMS server and associate it with a JMSJDBCStore, complete the following steps:
For JMS servers for BPM, the JMS server name must match the name used when generating the message-driven bean jar file using the MDBGenerator utility.
Distributing Resources Across Servers or Clusters
After you set up the managed servers to be included in the domain, add definitions for those servers to the configuration, and assign the servers to clusters as required, you are ready to modify the WebLogic Integration resource configuration.
Distribution Guidelines
Before proceeding with this step, make sure you have outlined a deployment plan that conforms to the following guidelines:
Once you have a plan for deploying your resources to the servers and clusters in your domain, the procedure for modifying the resource configuration depends on the resource.
Targeting Resources to Clusters
To target a resource to, or remove a resource from, particular clusters:
Targeting Resources to Servers
To target a resource to, or remove a resource from, a particular server (for example, the administration server):
Starting the Servers in the Domain
After you configure the servers in your domain, you can bring them up in the following order:
cd bea\wlintegration2.1\config\wlidomain
startManagedWeblogic
As the managed server starts, the follow messages are displayed.
Figure 2-3 Managed Server Startup Messages
When startup is complete, you can use the WebLogic Server Administration Console to verify deployments and status. When you are ready to shutdown the server, you can use the WebLogic Server Administration Console as well.


|

|

|
|
|
|
Copyright © 2001 BEA Systems, Inc. All rights reserved.
|