

|
|
|
|
|
|
Tracker
Tracker enables you to monitor your use of WebLogic Integration - Business Connect by providing runtime and archived views of database records of transactions and events. You also can use Tracker to search for and resend documents to your trading partners or resubmit them through the Server application to your translator or business application.
The following topics are provided.
Concepts
Procedures
Windows
Overview of Tracker
Tracker provides runtime and archived views of records or logs that show your organization's inbound and outbound document traffic as well as events, including alert messages of high importance. Runtime views display database records before they have been archived. Archive view shows database records that have been archived. You control the frequency of archiving in the Administrator Schedules information viewer.
Tracker has seven information viewers that display database records of inbound, outbound and rejected documents as well as records about alerts, transactions, events and user activities. You can switch between views of the runtime and database records by selecting Runtime or Archive from the Database table drop-down list at the top left. Click Refresh to make sure the latest records are displayed (see Refreshing the Tracker Display.)
The following provides an overview of the information viewers in Tracker.
Alerts
You can view the date, time, partner ID or combined EDI qualifier and ID, contact name, and contact e-mail address for each alert or notification message. You can also view or print the text of the message.
Traffic
You can view runtime and archive database records for inbound, outbound and rejected documents. There are three Traffic information viewers:
The Inbound Traffic and Outbound Traffic information viewers provide an audit trail for documents you received from or sent to your trading partners. The Rejected Traffic information viewer provides a list of inbound or outbound documents that WebLogic Integration - Business Connect could not process and routed to the rejected directory.
Transactions
You can view a reverse chronological listing of each milestone event in the processing of in and outbound documents. For each transaction event, you can see the date, time, control ID, ID or combined EDI qualifier and ID, status, and any message associated with it.
Refreshing the Tracker Display
To view the latest database records, click Refresh or select View
Tracker database information viewers refresh automatically the first time you display them. Automatic refreshing occurs on the Alerts information viewer when you start Tracker. It also occurs the first time you select another information viewer or change from a runtime to archive display. Apart from the initial display, automatic refreshing does not occur. It is a manual process.
When you click Refresh, the action refreshes records on the currently active information viewer, but not others. For example, say you click Refresh while viewing the Inbound Traffic information viewer. The viewer refreshes the record display. But if you switch to the Outbound Traffic information viewer, you must click Refresh again to also refresh the records displayed in that viewer.
If you want to see continuously updated records of document trading activity, open the server monitor page in a browser by selecting Tools
Filtering Tracker Records
Tracker has filters that enable you to view many or few runtime or archive database records at a time in information viewers. The filter settings persist from one Tracker session to another until you change them. You set filters by information viewer by database view. For example, the filter settings for the runtime view of the Alerts information viewer apply only to that window.
Slightly different filter windows are provided for runtime and archive database views. The only difference is that the default value for the maximum record display is blank for the runtime filter window and is 100 for the archive filter window.
Click Filter or select View
Printing Tracker Records
You can print a list of the records in the currently active information viewer by selecting File
The application prints the data as displayed on the current information viewer, so maximizing the window size before you print yields longer horizontal printed records. Although the records print in landscape format, you might have to adjust the column widths in the information viewers to print the columns of data you want. This is necessary to account for differences in fonts and printers.
You can adjust column widths by placing the cursor over the lines between the columns to make a double-arrow appear. Click and hold the left button to adjust the column widths. You also can click and drag columns to change their locations.
Guidelines for Finding and Reprocessing
You can use Tracker to search for records of documents and, in the case of records of documents in the runtime database, you can submit such documents for reprocessing. Reprocessing involves resending documents to your trading partners or re-submitting documents through WebLogic Integration - Business Connect to your translator or business system. The following guidelines are provided to help you in using the Tracker document find feature. For procedure see Finding Document Records.
Reprocessing Only the Most Recent Document
When you reprocess a document, WebLogic Integration - Business Connect creates a new version of it with a new, unique file name. You can reprocess each file name only once. To reprocess a document more than once, you must select only the most recently processed document.
For example, you attempt to send to your partner a document with the control ID 100000000 and a file name of 56in. The document is rejected. You use Tracker to resubmit this document through WebLogic Integration - Business Connect to your translator. WebLogic Integration - Business Connect names the resubmitted document (control ID 100000000) to file name 68in. To resubmit the document (control ID 100000000) a second time, choose file name 68in in the Find window.
Note: Tracker cannot reprocess completed documents that have been archived. This includes inbound documents that have been placed in the EDI-in directory and outbound documents for which you have received an MDN.
For procedure see Finding Document Records.
Reprocessing Unacknowledged Documents
When you send a document and you have selected the acknowledge documents option in the partner profile, your trading partner sends you an MDN, which acknowledges the receipt, successful decryption and verification of the document.
If your WebLogic Integration - Business Connect system does not receive an acknowledgment, it attempts to resend the transaction up to the limits in the Partner Profile window Preferences tab. If your system still does not receive an acknowledgment, WebLogic Integration - Business Connect generates and sends you an e-mail alert. You can then locate and resend the unacknowledged document.
From the document status drop-down list on the Find window, select Not Acknowledged to search for unacknowledged documents. When you find the documents you want, you can select them and click Reprocess. WebLogic Integration - Business Connect moves the selected documents to an outbound directory for reprocessing and retransmission to your trading partner.
For procedure see Finding Document Records.
Reprocessing Rejected Documents
You can resend rejected outbound documents to your trading partners and resubmit rejected inbound documents to your WebLogic Integration - Business Connect system for reprocessing.
From the document status drop-down list on the Find window, select Rejected to search for rejected documents. Based on the information about these documents, you should correct whatever condition caused the documents to be rejected before you attempt to reprocess them.
When you find the documents you want, you can select them and click Reprocess. Then the following occurs:
For procedure see Finding Document Records. Reprocessing by Control ID A control ID is the unique identifier assigned to a document by a company's translator application. When you locate a document this way, you can resend it to your trading partners or resubmit it to your WebLogic Integration - Business Connect system for reprocessing. In the control ID field on the Find window, type the control ID for the document you need to find. The control ID is an alphanumeric ID that has a maximum length of 12 characters. You must include any leading zeros.
When you find the document you want, you can select them and click Reprocess. Then the following occurs:
For procedure see Finding Document Records. Reprocessing by Partner You can search for documents you sent to or received from a certain partner. When you locate the documents, you can resend outbound documents to your trading partners or resubmit inbound documents to your WebLogic Integration - Business Connect system for reprocessing. From the trading partner drop-down list on the Find window, select the partner associated with the documents you want to find. When you find the documents you want, you can select them and click Reprocess. Then the following occurs:
For procedure see Finding Document Records.
Logging on to Tracker
Use this procedure to start Tracker and log on.
Steps
Manually Archiving Database Records
Use this procedure to force the Server application to archive the runtime database records displayed in Tracker. Activating this feature forces archiving to occur now and overrides the archive schedule, which is accessed from the Schedules information viewer in Administrator. Using this feature also suspends all runtime processing until archiving is completed.
After archiving is completed, you can switch to the archive view in Tracker to review archived database records.
Steps
Clearing Tracker Database Records
Use this procedure to clear the Tracker runtime or archive database records.
Note: If you clear the runtime database, you will permanently lose all records before they have been archived. Also, if you clear the archive database, you will permanently lose all archived records. Be careful when using these functions.
Steps
Finding Document Records
Use this procedure to find runtime and archive records of documents in Tracker. After you have found the documents you want, you can reprocess runtime documents, but not archived documents. Reprocessing involves resending documents to your trading partners or re-submitting documents through WebLogic Integration - Business Connect to your translator or business system. See Guidelines for Finding and Reprocessing.
The document search process enables you to search the Tracker database for one or more documents using a filter and then reprocess them. Searches you can perform include:
Tracker can find only those documents in the backup or rejected directories. Consequently, your ability to find and resend or resubmit documents depends on how often you elect to run the archive process.
You cannot reprocess a document that WebLogic Integration - Business Connect has successfully received from a partner. If you need to reprocess a document that already has been successfully received and processed, ask your partner to send the document to you again.
If you choose the do not back up option for inbound documents in your company profile preferences, you can use Tracker to access documents only in the rejected directory.
If you choose the back up and archive or the back up and delete option in your company profile preferences, the archive process deletes completed documents or moves them to the archive directory. A completed inbound document is one that has been placed in the inbound document directory. A completed outbound document is one for which you have received an MDN (if you requested one). After these completed documents have been moved or deleted, you can no longer search for them or reprocess them using Tracker.
Steps
The following are the steps for setting up a filtered search for documents. You do not have to use all the fields on the Find window to perform a search. The fields are available to help you perform a wide or narrow search.
Figure 17-1 Find Window
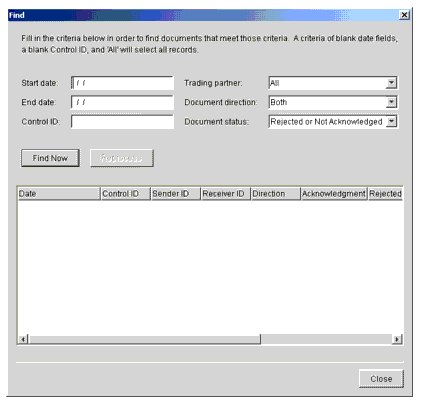
Field Descriptions
The following describes the fields on the Find window for documents that Tracker has found that meet your search criteria. For procedure see Steps.
Alerts Information Viewer
Use the Alerts information viewer to examine records for alerts and notifications.
Access the viewer by selecting Alerts on the Tracker bar.
WebLogic Integration - Business Connect continuously performs self-checks to ensure proper operation. When it detects a problem, WebLogic Integration - Business Connect generates an alert or notification that appears in the Alerts information viewer. Simultaneously, WebLogic Integration - Business Connect sends your point of contact an e-mail message that describes the problem in plain text. Such e-mails are sent if a contact person's e-mail address is provided in the alert or notify mail address fields on the Preferences tab of the Company Profile window.
You can view the text of alerts and notifications by placing the cursor over the record line in the Alerts information viewer, right-clicking and selecting View on the pop-up menu. This displays a pop-up window with the text of the message. You also can copy a message by right-clicking. You can paste copied messages into a text editor.
Figure 17-2 Right-Click a Record and Select View to Display the Message
Description of Alert E-Mail Identified by the word alert in the e-mail subject line, alert messages are sent when WebLogic Integration - Business Connect detects a condition that halts document exchange and requires you to take action. An example is when WebLogic Integration - Business Connect cannot connect to the network or when there is a problem with the WebLogic Integration - Business Connect software. Description of Notification E-Mail Identified by the word notification in the e-mail subject line, notification messages are informational and do not require you to take action. Document exchange continues. WebLogic Integration - Business Connect sends a notification, for example, when it rejects a document or when it receives a binary (non-EDI) document from a partner for which it does not have a partner profile. Figure 17-3 Alerts information Viewer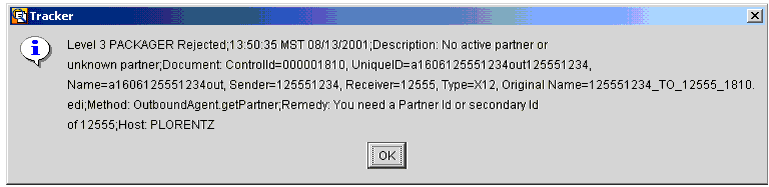
Field Descriptions The following describes the fields on the Alerts information viewer.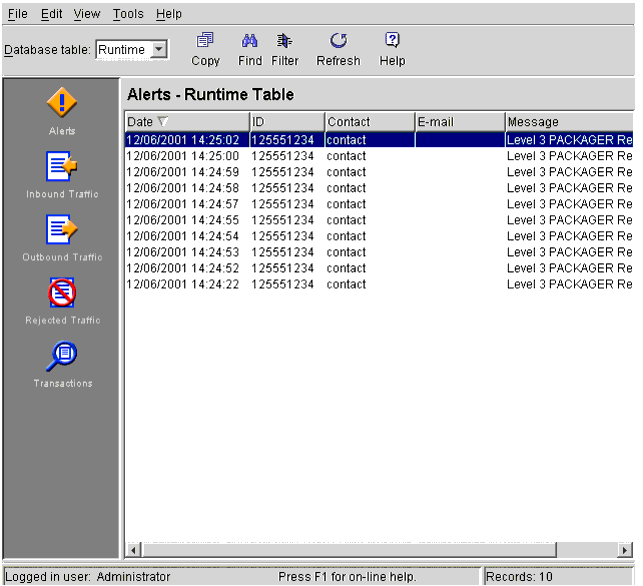
Traffic Information Viewers
Use the Traffic information viewers to view runtime and archive database records for inbound, outbound and rejected documents. There are three Traffic information viewers:
Access each viewer by selecting the corresponding icon on the Tracker bar.
The Inbound Traffic and Outbound Traffic information viewers provide an audit trail for documents you received from or sent to your trading partners.
The Rejected Traffic information viewer provides a list of inbound or outbound documents that WebLogic Integration - Business Connect could not process and routed to the rejected directory.
Reprocessing Documents
You can reprocess documents whose records appear in the runtime database of the Inbound Traffic, Outbound Traffic and Rejected Traffic information viewers. You do this by selecting one or more records, right-clicking, and selecting Reprocess on the pop-up menu. Or, you can select one or more records and select Tools
Reprocessing does the following:
Copying, Viewing, or Deleting Records
You can right-click records in the Traffic information viewers to view an inbound or rejected document or to copy or delete a record. The following describes what you can do in each viewer.
In the Inbound Traffic and Rejected Traffic information viewers you can:
In the Outbound Traffic information viewer you can:
In addition, in the Rejected Traffic information viewer you can double-click a record to view a dialog box with a plain text message about why the document was rejected.
Viewing Documents
In the Inbound Traffic and Rejected Traffic information viewers, you can display the document by right-clicking it and selecting View from the menu as follows:
Figure 17-4 Inbound Traffic information Viewer
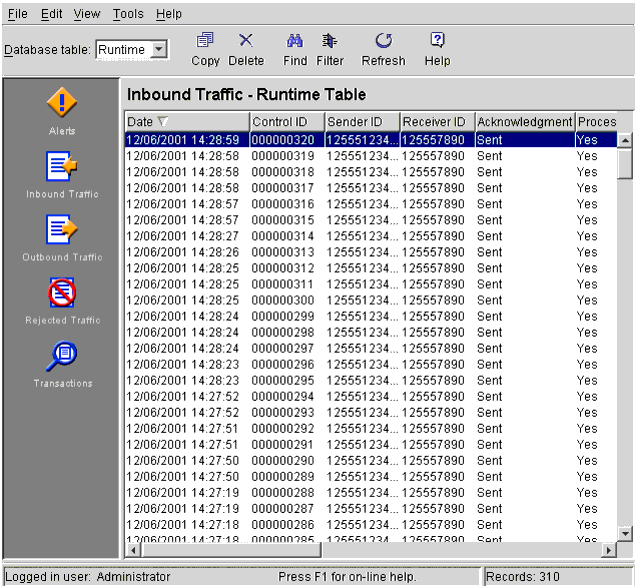
Inbound and Outbound Traffic Field Descriptions
The following describes the fields on the Inbound Traffic and Outbound Traffic information viewers. The fields are on both viewers, except as noted.
Rejected Traffic Field Descriptions
The following describes the fields on the Rejected Traffic information viewer.
Transactions Information Viewer
Use the Transactions information viewer to view records about transaction activity. This viewer provides an audit trail for successfully processed and transmitted documents as they move through the system.
Access the viewer by selecting Transactions on the Tracker bar.
In the Transactions information viewer you can copy a record by right-clicking it and selecting Copy from the pop-up menu. You can then paste the record contents into a text editor.
Figure 17-5 Transactions information Viewer
Field Descriptions The following describes the fields on the Transactions information viewer.![]()

|

|

|
|
|
|
Copyright © 2002 BEA Systems, Inc. All rights reserved.
|