

|
|
|
|
|
|
Tools
The following topics describe some of the tools on the Tools menu in Administrator.
Windows
For other functions on the Tools menu, see the following topics:
API Authentication Window
Use the API Authentication window to set a user name and password for the HTTP or HTTPS server that is built into WebLogic Integration - Business Connect for communicating with an API client.
Select Tools
To set HTTP or HTTPS ports for communications with an API client, see Preferences Ports Tab.
If you use the API HTTPS port for integration, you must generate or load a certificate for the HTTPS server using the certloader tool. See Certificate Tool (certloader).
Figure 13-1 API Authentication Window
Field Descriptions The following describes the fields on the Preferences window API tab. The fields are described once for both HTTP and HTTPS.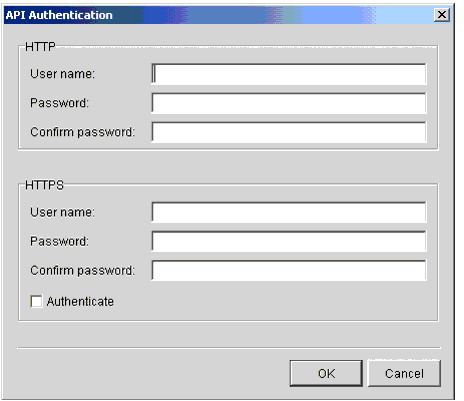
JMS Global Integration for Documents
Use the JMS Integration window Documents tab to configure WebLogic Integration - Business Connect to retrieve outbound documents from or direct inbound documents to a JMS queue. This affects inbound and outbound documents for all active company profiles, all partners and all document types: EDI, XML and binary.
The global treatment of all documents distinguishes this tab from JMS document integration that can be configured for a single company using the Company Profile window Integration tab. For more information see JMS Options Window.
To use the JMS Integration window Documents tab your organization must have JMS experience and a working JMS messaging system.
In addition to completing this tab, you must add the names of the JAR or class files or both in the server.ini or server.bat file in Windows or your environment file in UNIX so the Server application can locate the JMS and JNDI provider. The server.ini and server.bat files are located in the installation directory bin subdirectory. In some cases, you need to add the name of only one JAR file (for example, swiftmq.jar), but you might have to include a series of jars or paths.
To display the JMS Integration window Documents tab, select Tools
The following are related topics:
JMS Integration Details
This API is an input and output source for documents. This is how it works: WebLogic Integration - Business Connect registers as a listener with the JMS server for the designated inbound queue. This means that any JMSMessage placed in the queue by another process is passed to WebLogic Integration - Business Connect, which verifies that it is a BytesMessage (a type of JMSMessage). If verified, WebLogic Integration - Business Connect packages and sends it to the partner. Likewise, every document WebLogic Integration - Business Connect receives from a partner is unpackaged, converted to a BytesMessage and placed on the designated outbound queue.
The API requires that the JMS messages be in the format BytesMessage. WebLogic Integration - Business Connect does not process any other type of JMS Message (such as ObjectMessage). WebLogic Integration - Business Connect performs routing decisions based on JMS message string parameters that must be appended to each BytesMessage sent to it. If the required parameters are omitted, WebLogic Integration - Business Connect does not process the message. WebLogic Integration - Business Connect also places the same parameters on each message that it sends to the outbound queue. The parameters WebLogic Integration - Business Connect uses are described in the following table.
Figure 13-2 JMS Integration Window Documents Tab
Field Descriptions for JMS Integration Documents Tab The following describes the fields on the JMS Integration window Documents tab. The fields are described once for inbound and outbound documents. The Inbound Documents area is for configuring WebLogic Integration - Business Connect to place documents that have been received from partners and unpackaged on a back-end JMS queue. The Outbound Documents area is for configuring WebLogic Integration - Business Connect to poll a back-end JMS queue for documents that are to be retrieved, packaged and sent to partners. Except for the user name and password, you can obtain the information needed to complete the tab from the JMS or JNDI provider's documentation. The information will vary depending on the provider. If you have questions, contact your JMS or JNDI provider.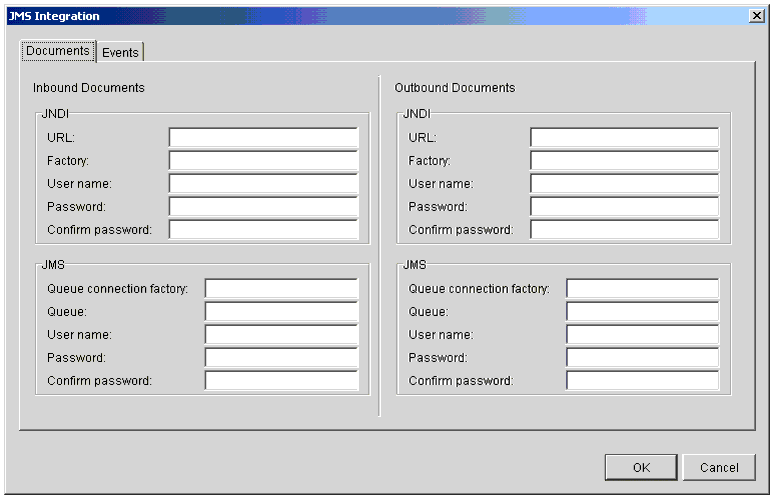
JMS Integration for Events
Use the JMS Integration window Events tab to configure the Server application to publish all events to your system's JMS server and locate the information by calling the JNDI provider in your JMS enterprise messaging system. This features enables persistent event logging to the JMS server.
To use this tab your organization must have JMS experience and a working JMS messaging system.
In addition to completing this tab, you must add the names of the JAR or class files or both in the server.ini or server.bat file in Windows or your environment file in UNIX so the Server application can locate the JMS and JNDI provider. The server.ini and server.bat files are located in the installation directory bin subdirectory. In some cases, you need to add the name of only one JAR file (for example, swiftmq.jar), but you might have to include a series of jars or paths.
To display the JMS Integration window Events tab, select Tools
Figure 13-3 JMS Integration Window Events Tab
Field Descriptions The following describes the fields on the JMS Integration window Events tab.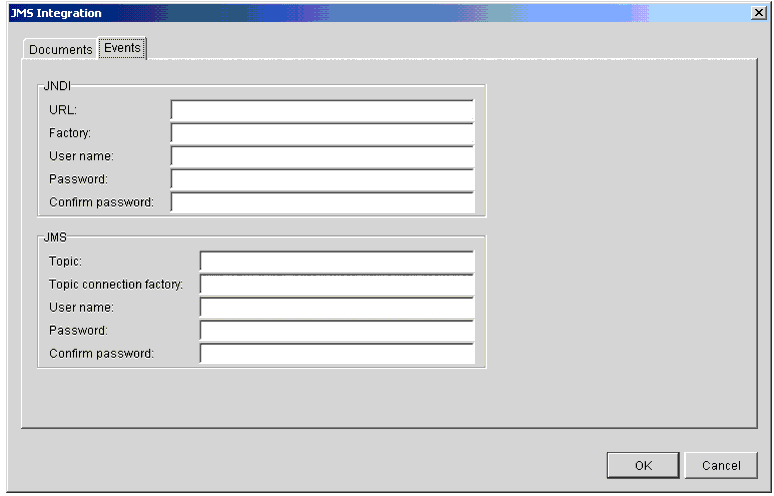
Change Password Window
Use the Change Password window to set or change an optional primary password for the default Administrator user to open the Administrator and Tracker applications. You also can set or change an optional secondary password to require two passwords to open Administrator and Tracker.
By default there is no password for Administrator and Tracker.
Select Tools
Figure 13-4 Change Password Window
Field Descriptions The following describes the fields on the Change Password window.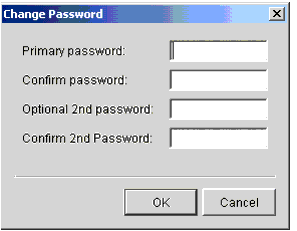
Configure Archive Schedule Window
Use the Configure Archive Schedule window to set a schedule for moving Tracker runtime database records to a historical repository called the archive database. You also can archive the actual documents you have sent or received from partners by choosing the backup and archive options on the Company Profile window Preferences tab. See Company Profile Preferences Tab.
Select Tools
The following topics are provided:
Archiving Overview
By default the archive schedule is set at 12 a.m. Saturday, which means Tracker runtime database records will be moved to the archive database every Saturday at midnight. At the same time, the documents WebLogic Integration - Business Connect has processed are moved from the application's backup directory to the archive directory, if you have elected document archiving.
The Server application must be running for Tracker archiving to occur. If the Server is not running at the scheduled archiving time, archiving will not occur and the runtime and archive databases will not change. If the Server is re-started after the scheduled archiving time, archiving will not take place retroactively. Rather, database records will be archived at the next scheduled time, presuming the Server is running.
There are two ways to turn off archiving: Make the archive schedule inactive or delete the archiving times.
WebLogic Integration - Business Connect writes output of Server application activity to a file called server.log located in the WebLogic Integration - Business Connect logs directory. When you use the View Server Log utility on Windows, you see the contents of this file as it is being written by WebLogic Integration - Business Connect.
The current output of Server application activity is continuously written to a server.log file. When the archive schedule triggers, WebLogic Integration - Business Connect closes the current server.log file, renames it using the current date and time, and begins writing output to a new server.log file. Closed server.log files are named according to the date and time archiving occurred in the following format: server.log.mm-dd-yyyy-hh-mm-AM (or PM).
Figure 13-5 Change Archive Schedule Window
Steps for Changing Archive Schedule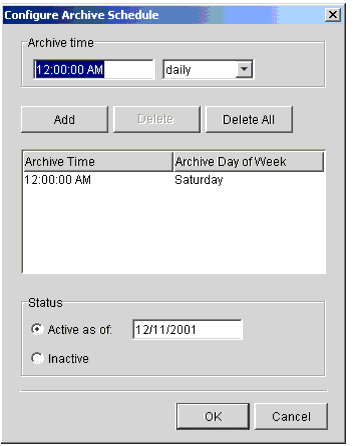
Configure Send Schedule Window
Use the Configure Send Schedule window to control when WebLogic Integration - Business Connect sends outbound documents to your trading partners. The send schedule does not apply to inbound documents, which are processed as soon as they are received. By default the send schedule is set at 15 seconds. For most users this send interval is adequate.
Select Tools
Figure 13-6 Configure Send Schedule Window
Field Descriptions The following describes the fields on the Configure Send Schedule window.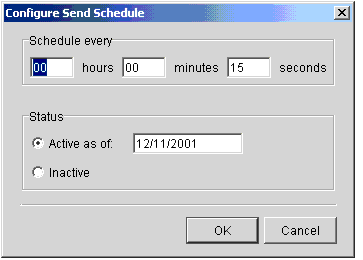
Remove Record Locks Window
Use the Remove Record Locks window to unlock a record in use by another user. This enables you to make changes to the record even though another user already has accessed it.
When a user opens a record (for example, a company profile), WebLogic Integration - Business Connect locks it to prevent other users from changing it. If another user tries to open the record after the first user has accessed it, WebLogic Integration - Business Connect displays a message that another user has accessed the record and that you can only view but not change it. The remove record locks feature allows you to override this lock on open records.
When the second user, who removed the lock, opens the record, both users can edit it. The first user, who opened the record before the second user unlocked and opened it, does not know that another user has opened the same record. Both users can save changes by clicking OK. If both users change the same field in the record, the change made by the last user to click OK prevails.
Select Tools
Figure 13-7 Remove Record Locks Window
Field Descriptions The following describes the fields on the Remove Record Locks window.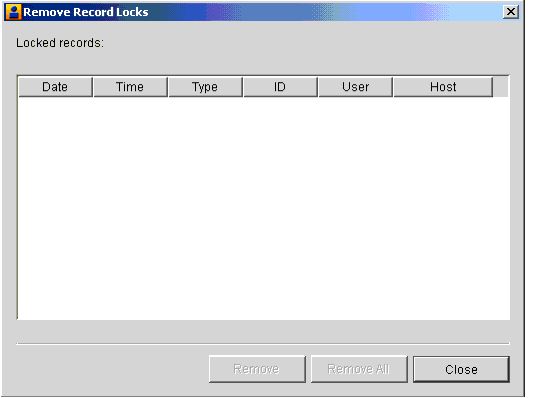
Preferences General Tab
Use the Preferences window General tab to set the name of the computer running the Server application, the event logging level, alert message interval, connection time-out interval and certificate expiration notification period.
Select Tools
Figure 13-8 Preferences Window General Tab (Windows)
Field Descriptions The following describes the fields on the Preferences window General tab.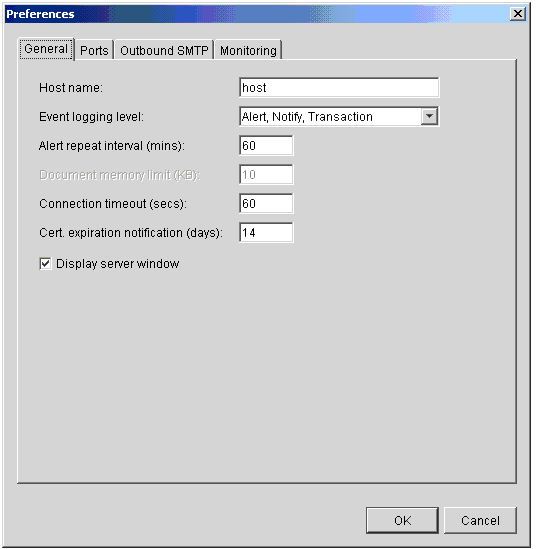
Preferences Ports Tab
Use the Preferences window Ports tab to view or change ports WebLogic Integration - Business Connect uses.
Select Tools
Figure 13-9 Preferences Window Ports Tab
Field Descriptions The following describes the fields on the Preferences window Ports tab.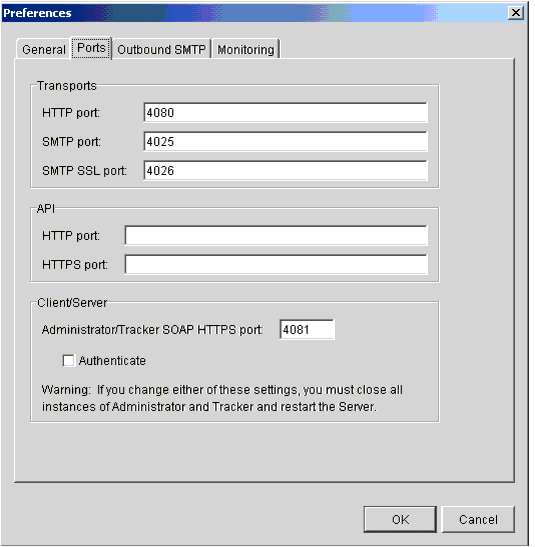
Preferences Outbound SMTP Tab
Use the Preferences window Outbound SMTP tab to designate one SMTP server for sending documents to all partners via the POP transport (SMTP/POP). The information on this tab is used on the Partner Profile window Outbound Protocols tab for the POP transport for the partner profiles you import or create. You must first complete the Preferences window Outbound SMTP tab before importing or creating partner profiles for the information on this tab to become part of the POP transport configuration.
If you want to use different SMTP servers for sending documents to different partners, you have two options. You can complete the Outbound SMTP tab, create or import the partner profile, and then type new values in the SMTP server field on the POP Transport Options window, which is accessed from the Partner Profile window Outbound Protocol tab. Or, you can leave the Outbound SMTP tab blank and add the SMTP server information in the POP configuration for the partner profile.
Select Tools
Figure 13-10 Preferences Window Outbound SMTP Tab
Field Descriptions The following describes the fields on the Preferences window Outbound SMTP tab.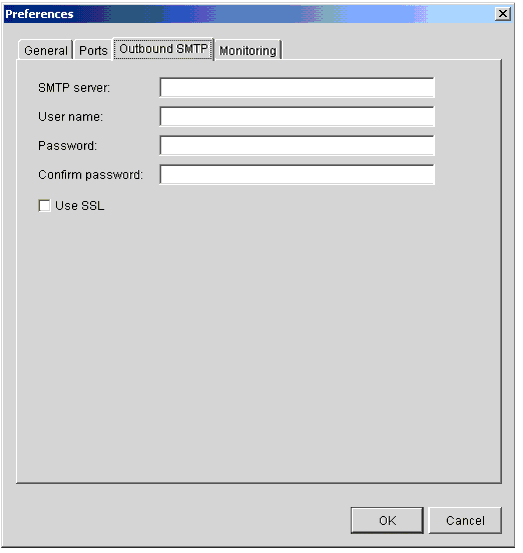
Preferences Monitoring Tab
Use the Preferences window Monitoring tab to set a user name and password that authorizes a user to open the WebLogic Integration - Business Connect server monitor page.
Select Tools
The server monitor page is opened in an Internet browser by selecting Tools
You can set a user name and password that can be used by a single user or that can be shared by two or more users, depending on your organization's security practices. If you do not set a user name and password, any user can access the server monitor page.
Figure 13-11 Preferences Window Monitoring Tab
Field Descriptions Note: The Agent Configuration fields are associated with an unsupported feature. Ignore these fields. The following describes the fields on the Preferences window Monitoring tab.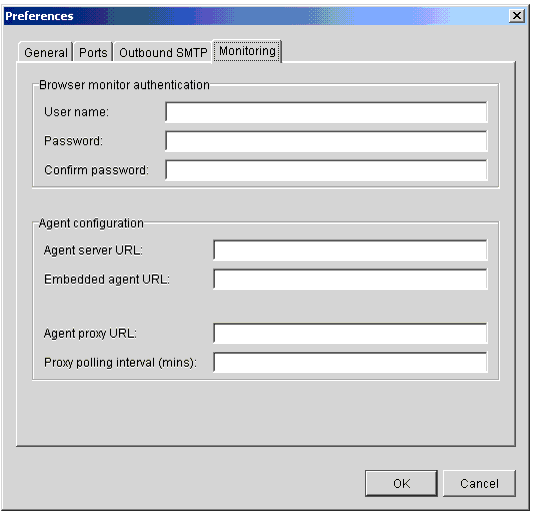

|

|

|
|
|
|
Copyright © 2002 BEA Systems, Inc. All rights reserved.
|