Each WebLogic Portal is pre-configured with a BEA default BEA repository for you to use. The default BEA repository can be library services-enabled which includes content management features such as a customizable content workflows and versioning.
You can use the pre-configured repository, and add additional repositories to suit your needs. If you choose to use a third-party repository, see Connecting to a Third-Party Repository.
When working with BEA repositories, you can choose the default database-based repository or configure a BEA filesystem repository. Both allow you to use BEA’s robust library services to manage your content. Table 3-1 lists the features and advantages of both types.
Table 3-1 Repository Types
Repository
Features
BEA Repository (default)
Pre-configured out-of-the-box.
Library services built-in, such as versioning and content workflows.
Stores all content and metadata in the portal database. No additional configuration necessary, unless you want to use multiple repositories.
BEA Filesystem Repository
Stores published content in a filesystem.
Library services built-in, such as versioning and content workflows.
Can have higher performance than a default BEA repository.
Can be used with legacy content that is stored in a filesystem.
Note:
Does not support transactions as a database-based repository does. If your network connection goes down when adding or modifying content, changes could be lost.
Working with a Default BEA Repository
The default BEA repository comes pre-configured for your portal application. Before using your BEA repository, you need to ensure that library services are enabled and add any custom properties needed for your environment.
Some examples of repository properties include those needed to enable integration with features such as full-text search. Repository properties can also indicate if your repository can work in a streaming environment.
Note:
Library services allow you to version content and use workflows to manage the content creation process, see Adding Content to a BEA Repository for more information about library services.
WebLogic Portal’s library services allow you to version content and use content workflows to route content through an approval and publishing process. If you are using a BEA repository, you should enable library services before organizing your repository. Enabling library services gives you access to content workflows and versioning.
Once you have enabled library services for a repository, they cannot be disabled.
To enable library services:
From the main menu of the Portal Administration Console, select Content > Content Management.
Select Manage | Repositories to view the Repositories tree.
Click the BEA repository for which you want to enable library services.
In the Summary tab, click Library Services to view the Library Services dialog.
Mark the Library Services Enabled check box and click Save.
Modifying a BEA Repository
You can modify the configuration of a BEA repository to suit your environment. For example, you can add custom properties for third-party repositories.You can also configure advanced BEA repository properties, such as cache and search settings, for your repository.
If you want to use full-text search with your BEA repository, you must add full-text search properties to your repository connection. For more information, see the WebLogic Portal Search Guide.
To modify a repository connection:
Select Content > Content Management.
Select Manage | Repositories.
Click the repository you want to modify to view its Summary tab.
In the repository's Summary tab, use the following sections to modify your repository connection.
In the Repository Details section:
Click Repository Details to change the repository class name or make this repository read-only. Table 3-2 provides more information about the connection class property.
Table 3-2 Repository Connection Class Property Values
Repository Property
Definition
Repository Class
For BEA repositories, the connection class is the following:
com.bea.content.spi.internal.RepositoryImpl
If you are using a filesystem repository, the connection class is the following:
You can define properties for repositories within the Virtual Content Repository. For example, if you are using a BEA filesystem repository, additional properties should be added. Table 3-3 lists some examples of repository properties.
Note:
After you disconnect a repository or make any changes to repository properties, Portal Administration Console users must log out and log back in to view the changes.
To add a property to a repository:
From the main menu of the Portal Administration Console, select Content > Content Management.
In the resource tree, click Repositories to view the Manage | Repositories tree.
In the Manage | Repositories resource tree, select the BEA Repository to which you want to add a property.
In the Properties section on the Summary tab, click Add Property.
In the Add Property dialog, enter a name and value for your property.
Click Save.
A summary of the new repository information is displayed in the Summary tab.
Table 3-3 Examples of BEA Repository Properties
Property
Definition
cm_fileSystem_webpath
When using a filesystem repository that is available over the web, this property indicates the path of that filesystem.
cm_fileSystem_webpath
When using a filesystem repository that is available over the web, this property indicates the path of that filesystem if it is accessed via a web server.
webdav_enabled
Used when you want to enable a third-party repository to use WebDAV. WebDav allows users to add content to your repository using Internet Explorer and other WebDAV supported applications. For more information about configuring WebDAV, see Using WebDAV with Your BEA Repository.
WEBDAV_TYPE
Provides the name of the content type to use when adding content to the repository when using WebDAV (Windows Explorer and other WebDAV supported applications). For more information about configuring WebDAV, see Using WebDAV with Your BEA Repository.
cm_fireFederatedEvents
Used to enable events associated with all repository events including content, modifying workflows and modifying content types. For more information about events, see the WebLogic Portal Interaction Guide.
cm_fireRepositoryEvents
Used to enable events associated with content changes. This is used for full-text search. For more information about events, see the WebLogic Portal Interaction Guide.
CM_DATA_SOURCE
Used to associate a data source with a repository. This property is used when you have more than one BEA repository. For more information, see Configuring Additional BEA Repositories.
Editing Advanced Repository Properties
Advanced repository properties include cache settings and enabling different types of search features. Table 3-4 lists the advanced repository properties and how they are used.
Table 3-4 Advanced Repository Properties
Advanced Property
What it does:
Search Enabled
Enables users to search the repository using metadata.
Search Indexing Enabled
Allows content to be indexed for portal search. This enables portal developers to include full-text content search in any portlets that they develop.
Full-Text Search Enabled
Enables users to search the repository using the full-text of the content within the repository.
Streamable
Enables content to be streamed instead of stored in a memory buffer.
Binary Cache
Determines the maximum number of content items that can be cached.
Node Cache
Determines the maximum number of content folders that can be cached.
To edit advanced repository properties:
Select Content > Content Management from the navigation menu at the top of the console.
Select Manage | Repositories.
In the resource tree, click the repository you want to modify to view its Summary tab.
In the Advanced section, click Advanced to view the Edit Advanced Properties for Repository dialog.
In the Edit Advanced Properties for Repository dialog, edit the properties.
When finished making changes, click Save.
Your modifications display in the Advanced section of the Summary page.
Note:
After you disconnect a repository or make any changes to repository properties, Portal Administration Console users must log out and log back in to view the changes.
Disconnecting a Repository
You can disconnect any repository within the Virtual Content Repository. When you disconnect a repository, your portal application can no longer access its content. If you need to delete all content from a repository, you need to delete the content store (database or filesystem). Deleting a datastore or database should be done by a database administrator.
Note:
After you disconnect a repository or make any changes to repository properties, Portal Administration Console users must log out and log back in to view the changes.
To disconnect a repository:
In the Manage | Repositories tree, select the Virtual Content Repository to see a list of repositories in the Browse tab.
In the Browse tab, mark the Disconnect check box for the repository you wish to disconnect.
Click Disconnect.
Note:
If a repository was added manually (not through the Portal Administration Console), you cannot disconnect it using the Portal Administration Console.
Working with a BEA File System Repository
File system repositories allow you to use a file system in tandem with the BEA database to store your content. When you use a file system repository, content binary files are stored in the file system you designate, while the metadata associated with the files (content type information) is stored in the BEA database.
Typically, file system repositories increases performance for data retrieval within your portal. However, not all content management features are compatible with file system repositories, see BEA File System Repository Considerations for more information.
When you use a file system repository, you must organize and manage content according to the same requirements you would have if storing content in a file system. For example, creating a folder in a file system repository creates a folder in the shared directory. For this reason, there are content requirements that help maintain the integrity of the repository and its associated filesystem.
The names of content item must match the name of the binary file associated with it. For example, a content item associated with a binary file called ball.gif must be named ball.gif.
You must always include the file extension when you name or rename content. For example, if you rename a content item called ball.gif to be named ball, the repository will fail to retrieve the content.
Configuring a File System Repository
When you configure a repository within the Virtual Content Repository, you are creating a connection to the repository's datastore. In the case of a file system repository, the datastore is a file system on your network. When you add a connection file system repository, you also need to add custom properties that direct WebLogic Portal to that filesystem.
Before You Begin
The recommended way to implement a file system repository is to modify the properties of the default BEA repository.
The file system or directory where your file system repository will reside must already exist before creating the repository connection.
Creating a Connection to the New Filesystem Repository
Using the Portal Administration Console, edit the connection information for the default BEA repository. If you want to create an additional repository, see Configuring Additional BEA Repositories then return to this section.
Select Content > Content Management from the navigation menu.
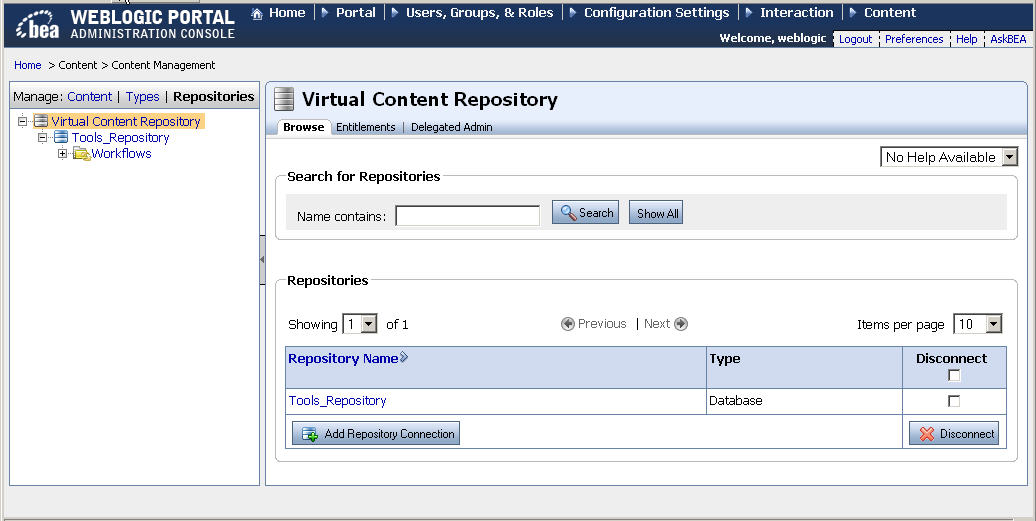
View the Manage | Repositories tree by selecting Repositories. Figure 3-1 shows an example of selecting the Repositories area.
Figure 3-1 Manage Repositories Tree within the Virtual Content Repository
In the Manage | Repositories tree, click the existing BEA repository to view the Repository Summary.
Click Repository Details.
In the Repository Details dialog box, edit the connection class to be the following: com.bea.content.spi.internal.FileSystemRepositoryImpl
Click Save.
In the Properties section, click Add Property.
In the Name field, enter cm_fileSystem_path.
In the Value field, enter the path to the filesystem that contains your content. For example: /home/myData.
Be sure that each machine within your portal application cluster has network access to your filesystem.
Click Save.
If your filesystem is exposed though a web server, you should also set a cm_fileSystem_webpath property. This enables the repository to access content through the web server that the filesystem uses.
To add this property, click Add Property.
In the Key field, type cm_fileSystem_webpath.
In the Value field, enter the URL of your filesystem.
Note:
For example, your cm_fileSystem_path could be set to /home/myData but the same path could be referred externally as http://mydomain.com/data/myData which can be set using the cm_fileSystem_webpath property.
Click Create.
Your filesystem repository appears in the resource tree.
Configuring Additional BEA Repositories
You can create multiple content repositories within the Virtual Content Repository to meet your unique business needs. For example, if you need a physical separation of your content data from your portal application data then you can create multiple BEA repositories.
While multiple repositories can reside in the same database, each repository must store its data in a separate tablespace and have a unique name.
If using library services, you must be working within an XA domain to effectively use multiple repositories.
For large projects with several thousand content items, you can use separate database instances and minimize changes done in the production environment.
Each BEA repository must have a unique name. This is to ensure that each can be indexed and searched individually.
Creating Database Objects for the New Repository
In this step, you create database objects for your additional content management database. This involves three basic steps:
Using BEA scripts to create the new database or database user for your content management repository, depending on your database vendor.
Connecting to your new database.
Running additional BEA scripts to create the content management tables.
For Oracle or DB2 databases, create a new database user for your additional content management database. For SQL Server or Sybase, create a new database for your additional content management database objects.
BEA provides sample scripts which can be copied and used to define the database resources that must be configured prior to running any additional .sql scripts. For each repository, a separate database/database user must be predefined according to the appropriate sample script, see the WebLogic Portal Database Administration Guide for more details.
For Oracle, BEA provides the following sample scripts: WebLogic_HOME/portal/db/oracle/admin/create_tablespaces.sql and create_users.sql.
For SQL Server, BEA provides the following script: WebLogic_HOME/portal/db/sql_server/admin/create_database.sql
For Sybase, BEA provides the following script: WebLogic_HOME/portal/db/sybase/admin/create_devices.sql and create_database.sql
Note:
For both SQL Server and Sybase, the WEBLOGIC_INDEX file group must be defined for indexes created via the database-specific cm_create_tables.sql and cm_create_indexes.sql scripts to execute without errors.
For DB2, BEA provides the following sample scripts: WebLogic_HOME/portal/db/db2/admin/create_tablespaces.sql and create_users.sql
Note:
PointBase is not recommended for a production repository.
Connect to the database as the database user created in
Step 1.
In your domain directory, navigate to the cmrepo_database.properties file.
Using a text editor, edit the cmrepo_database.properties file to match the database that you have created. For more information about this file, see the WebLogic Portal Database Guide.
Run the create_db.cmd/sh file from your domain directory, using the -database.properties parameter to indicate your content management-specific properties file which is called cmrepo_database.properties.
In your domain directory, navigate to the database.properties file.
Using a text editor, edit the database.properties file to match the database that you have created. For more information about this file, see the WebLogic Portal Database Guide.
Run the create_db.cmd/sh file from your domain directory, using the -database.properties parameter to indicate your content management-specific properties file which is called database.properties.
You can now connect your repository to WebLogic Server.
Connecting the New Repository to the Server
To connect the new repository to the server, you need to configure the WebLogic Server to point to the new repository. You do this by creating a new data source for the repository you want to use.
To connect a repository to the WebLogic Server:
Start WebLogic Server for your domain, and log in to the console.
In the Domain Structure tree, go to Services > JDBC > Data Sources. Figure 3-2 shows an example of the Summary of JDBC Data Sources page.
Figure 3-2 Summary of JDBC Data Sources in the WebLogic Server Console
Click Lock & Edit to ensure that the server is locked before proceeding.
In the Data Sources table, click New to view the JDBC Data Source Properties page. Figure 3-3 shows an example of the JDBC Data Source Properties page.
Figure 3-3 Create New JDBC Data Source in the WebLogic Server Console
In the JDBC Data Source Properties page, complete the fields using Table 3-5.
Note:
The data source name and JNDI name need to be unique to the domain.
Table 3-5 JDBC Data Source Properties
Field Name
Input
Name
Enter a unique name for your new JDBC Data Source.
JNDI Name
Enter a unique JNDI name for your new data source. This name is used when you configure your repository.
Database Type
Use the drop-down list to select the database type that corresponds with your repository.
Database Driver
Choose a database driver. If using library services, you must use an XA driver.
Click Next to view the Transaction Options page.
In the Transaction Options page, select any transactions options you require. If you selected an XA driver, there are no transaction options to select.
Note:
If you want to use library services, you must select an XA driver.
Click Next to view the Connection Properties page. Figure 3-4 provides an example of the JDBC Data Source Connection Properties page.
Figure 3-4 JDBC Data Source Connection Properties Page in the WebLogic Server Console
Within the Connection Properties page, use the information in Table 3-6 to complete the dialog fields.
Table 3-6 Connection Properties
Connection Property
Description
Database Name
The name of the database you are using.
Host Name
Enter the host name used for the database you are using.
Port
Enter the port number of the port hosting your database.
Database User Name
Enter the database user name for the database login required for this database.
Password
Enter the database password.
Confirm Password
Enter the database password again to confirm.
Click Next to view the Test Database Configuration page.
Optionally, in the Test Database Configuration page, click Test Configuration. If the database test is successful, click Finish.
Click Next.
In the Select Targets page, select one or more targets to deploy your new data source, typically, AdminServer.
Figure 3-5 Create a New JDBC Data Source—Select Targets
Click Finish.
When finished adding your data source, click Activate Changes to update the server.
Connecting the New BEA Repository to the Virtual Content Repository
After you have configured the new repository, you need to connect it to the Virtual Content Repository. Use the Portal Administration Console to connect to a new repository.
Within the Portal Administration Console, select Content > Content Management from the navigation menu at the top of the console.
Select Manage | Repositories.
In the Manage | Repositories tree, select the Virtual Content Repository.
On the Browse tab, click Add Repository Connection. Figure 3-6 provides an example of the Browse tab within the Repositories section.
Figure 3-6 Browse Tab within the Manage Repositories Window
In the Add Repository Connection dialog, provide the following information:
Table 3-7 Repository Connection Information
Field
Description
Repository Name
The name you give your new repository. For example: MyNewRepository
Use the Datasource JNDI name you created when you connected this repository to your server. The default value of contentDataSource is used for the BEA repository. JNDI names must be unique to the portal domain.
User Name
The user name field is only used when connecting to a third-party repository. When configuring a BEA repository, you can leave this blank.
Password
The password field is only used when connecting to a third-party repository. When configuring a BEA repository, you can leave this blank
Retype Password
Leave this field blank.
Enable Library Services
Unmark this check box if you do not want to use library services with this repository.
Click Save.
Within the Repositories section, click the repository you just created to verify that it has been created and view its Repository Summary.