Within your BEA repository, you can use folders and subfolders to organize content into logical categories. In addition, you can associate folders with content workflows and content types. You can also apply security policies to folders.
Folders allow you to organize your repository in the following ways:
Maintain categories for different areas of content. For example, you can create folders per department such as human resources, ad campaigns, and video content.
Manage your content creation process. When using a library services-enabled repository, you can associate a folder with a content workflow. If a folder is associated with a workflow, all content stored in that folder automatically follows the same process. For more information about content workflows, see Using Content Workflows in Your BEA Repository.
Secure your content files. You can add administration roles to folders that allow or disallow users to access content folders in your repository, using delegated administration. Visitor entitlements can also be applied at the folder level. For more information about securing content, see Managing Content Security.
The BEA repository allows you to use these features at both the folder level and the file level. For example, you can apply security policies on the folders in your repository and maintain workflows and content types at the content level.
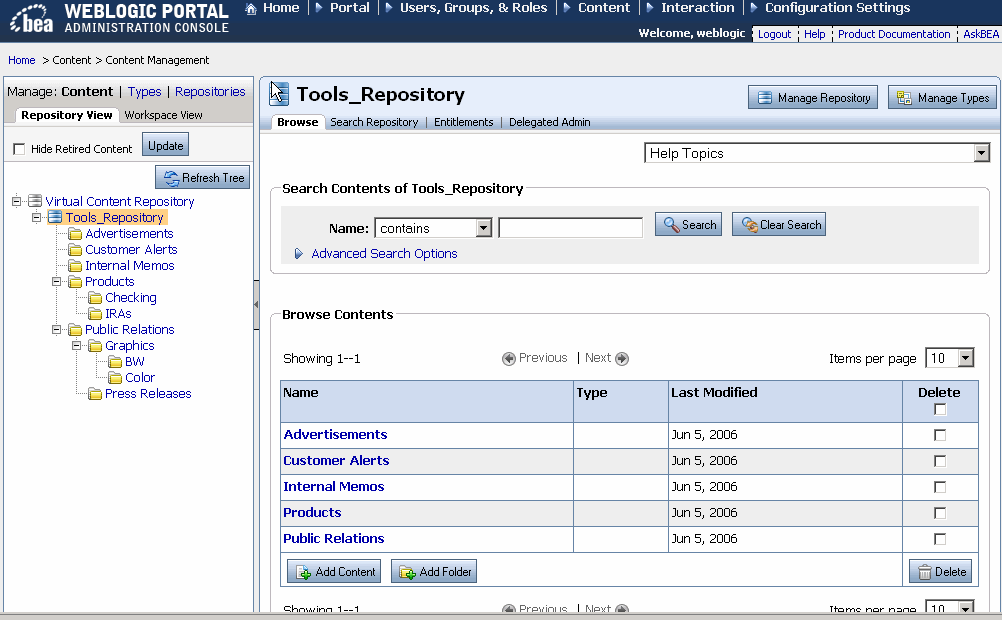
Figure 4-1 shows an example of folders within a repository.
Figure 4-1 An Example Folder Hierarchy within a Repository
You can create folders to help organize your content. When you create folders, you can also associate folders with content workflows and/or content types.
When a content workflow is associated with a content folder, all content within that folder follows the workflow. If content within the folder uses a content type that is also associated with a folder, the content type workflow overrides the folder workflow. For more information about using content workflows, see How Content Workflows Are Inherited.
When a content type is associated with a folder, you can associate content properties with that folder using that content type. In addition, when users add content to the repository with Internet Explorer or other supported Windows applications, the content they add to the folder is automatically associated with that content type. For more information about adding content to your repository using Windows applications, see, Using WebDAV with Your BEA Repository.
Note:
You cannot change the content type associated with a folder after you have assigned it. Additionally, after you create a folder, it cannot be associated with a content type.
Note:
If you are using a filesystem repository, you cannot associate a folder with content type.
The following instructions assume your BEA repository is library services-enabled.
To create a folder
Select Manage | Content in the resource tree.
Select the repository to which you want to add a folder.
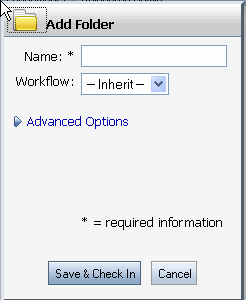
In the Browse section, click Add Folder to view the Add Folder dialog. Table 4-2 shows the Add Folder dialog.
Figure 4-2 Add Folder Dialog
In the Add Folder dialog, type a name for your folder.
Optionally, associate a content workflow with the folder by selecting one from the Workflow drop-down list.
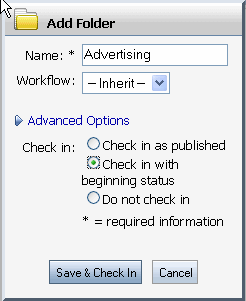
Optionally, select Advanced Options to change the workflow status of the folder itself. By default, new folders are checked into the repository with a published status. By using the Advanced Options, you can choose to have the folder move through the repository workflow, or not to check the folder into the repository. Figure 4-3 shows the available check in options.
Figure 4-3 Using Advanced Options When Creating a New Folder
Click Save and Check In when finished.
The new folder appears in the repository.
Moving a Folder
After you have created the folders you need, you can re-arrange them within your repository if necessary. Moving a folder also moves all content within that folder.
Within the repository, select the folder you want to move.
Right-click the folder you want to move and select Move from the context menu.
The Move Content dialog displays. Click OK.
Navigate to the repository location to which you want to move the folder (for example, under an existing folder or at the repository root).
Right-click the location and select Paste from the context menu.
The Paste Content dialog displays. Click OK.
The folder appears in the new repository location.
Deleting a Folder
When you delete a folder, you also delete content within the folder. If you do not want to delete folder content, use the Move command to move content to another location within the repository before deleting the folder, see Moving a Folder.
To delete a content folder,
From the main menu, select Content > Content Management.
In the Manage | Content resource tree, navigate to the content you wish to delete.
Right-click the content folder you want to delete.
In the Delete dialog, select Delete.
The folder no longer appears in the repository.
Renaming a Folder
You can rename content or a content folder in the BEA repository.
To rename a content item,
In the Manage | Content tree, navigate to the content that you want to rename.
Right-click the content and select Rename.
In the Rename dialog, enter in the new name for the content item and click OK.
The resource tree now shows the new name for the content.
Changing the Content Workflow for a Folder
You can change the content workflow that a content folder uses. For example, if all of your content uses a default workflow, but you would like a particular content folder (and its contents) to follow a different workflow, you can change the workflow associated with that content.
Note:
Content workflows are only available if your repository is library services-enabled.
In some cases, you may not be able to transition to a different workflow, see Creating Content Workflows.
In the main menu, select Content > Content Management.
View the Manage | Content tree by clicking Content at the top of the resource tree.
In the Manage | Content tree, navigate to the folder that you want to edit.
In the resource tree, click the folder you want to edit to view the Summary page.
In the Summary page, click Workflow to view the Update Workflow dialog.
From the Update Workflow dialog, select a content workflow to use and click Update.
The updated workflow information is displayed in the Summary page.