

|
This chapter discusses ways you can modify and configure remote portlets within Workshop for WebLogic.
This chapter includes the following sections:
The look and feel of a portlet determines the appearance of a portlet on the portal desktop. A remote portlet’s look and feel is not linked to a producer, giving you the option of modifying the portlet’s appearance on the consumer. This capability allows you to match the appearance of the consumer portal in which the proxy portlet resides.
Specific procedures for applying a look and feel to a portlet are documented elsewhere. Please refer to the WebLogic Portal Development Guide for detailed information on these topics:
This section explains how to modify a remote portlet’s modes and states and includes these topics:
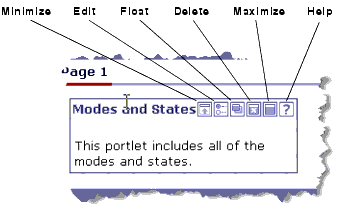
A portlet’s title bar can contain up to six buttons. These buttons provide convenient functions called modes and states.
Figure 5-1 shows an example portlet with all of the modes and states enabled.

For more detailed information on modes and states, how they work, and how to add and configure them in portlets, refer to the Portlet User Guide.
Table 5-1 describes how states are transferred by default from a portlet deployed on a producer to its remote proxy in a consumer application. The table also indicates whether or not the state is editable in the remote portlet.
Table 5-2 describe how modes are transferred by default from a portlet deployed on a producer to its remote proxy in a consumer application. The table also indicates whether or not the mode is editable in the remote portlet. For instance, if the Help mode is set in the portlet deployed on the producer, it is also set in the remote proxy; however, you cannot remove it from the remote proxy. On the other hand, if Help is not set in the portlet deployed on the producer, you are free to add it to the remote portlet.
| Note: | Both the help and the edit mode each reference a file that provides appropriate content for those actions. For example, the help mode references a help file. For these modes to work in a proxy portlet, the files they reference must exist on the consumer in the same relative location as they exist on the producer system. |
All of the modes and states that are available in local portlets are available in their remote proxies. Note, however, that when you create a remote portlet, it is not possible to edit (add or remove) all of the modes and states in the remote portlet. In addition, the Float state is always turned off in a remote portlet by default; however, you are free to add it to the remote portlet in the consumer application if you wish.
The procedure for changing the default mode and state settings in a remote portlet is the same as with a local portlet.
Under some circumstances, a remote portlet may be unable to access its producer. In this case, the consumer throws an exception. This section explains how to handle this exception by displaying an error page.
There are two ways to configure an error page for a remote portlet to be displayed if the remote portlet is unable to connect to its producer. You can configure the page in Workshop for WebLogic or in the remote portlet’s XML file.
| Tip: | For finer control of error handling, consider using interceptors. The interceptor framework is described in The Interceptor Framework. |
This section includes these topics:
To configure an error page for a remote portlet using Workshop for WebLogic:
The Error URI specifies a file path that is relative to the project in which the remote portlet is located.
You can also configure an Error URI in a remote portlet’s .portlet file. To do this, open the .portlet file and add the following element, where the value of the errorUri attribute is the name of the error file to be displayed:
<netuix:proxyPortletContent errorUri="errorFileName.jsp"/>The errorURI attribute specifies a file path that is relative to the project in which the remote portlet is located.
Listing 5-1 shows the complete XML file for a remote portlet, with an example <netuix:proxyPortletContent> element highlighted in bold.
<?xml version="1.0" encoding="UTF-8"?>
<portal:root
xmlns:netuix="http://www.bea.com/servers/netuix/xsd/controls/netuix/1.0.0"
xmlns:portal="http://www.bea.com/servers/netuix/xsd/portal/support/1.0.0"
xmlns:xsi="http://www.w3.org/2001/XMLSchema-instance"
xsi:schemaLocation="http://www.bea.com/servers/netuix/xsd/portal/support/1.0.0 portal-support-1_0_0.xsd">
<netuix:proxyPortlet
cacheExpires="300" definitionLabel="portlet_5_1" description=""
doesUrlTemplateProcessing="true" forkRender="false"
forkable="false" groupId="Consumer" portletHandle="portlet_5"
producerHandle="consumerProducer" renderCacheable="true"
templatesStoredInSession="true" title="Remote Preferences">
<netuix:titlebar><netuix:maximize/><netuix:minimize/></netuix:titlebar>
<netuix:proxyPortletContent errorUri="error.jsp"/></netuix:proxyPortlet>
</portal:root>
Portlet preferences function in remote portlets in much the same way as they do in local portlets. Just as with local portlets, remote portlets can take advantage of portlet preferences to allow users to customize the presentation of the portlet.
This section discusses the use of portlet preferences in remote portlets and includes these topics:
| Note: | This section assumes that you are familiar with the concept of a portlet preference and how to create and configure portlet preferences. If you are unfamiliar with portlet preferences, see the Portlet Development Guide. |
Portlet preferences allow portlets to modify, store, and access pre-defined String values. When these preference values are retrieved by a portlet, they typically affect the way the portlet is displayed for a given user. For example, a stock portfolio portlet might allow users to specify which stocks they want to view. Through a user interface, users select or enter which stocks they want to view in the portlet. The list of stocks is then passed to the server and stored in the database for that particular user. As long as a portlet preference is modifiable, and an interface is provided for editing preferences, every user of a portlet can configure his or her own personal view of the portlet.
A clearly defined API exists for setting and retrieving preferences. Developers can create preferences in Workshop for WebLogic, and administrators can create and edit preferences using the WebLogic Portal Administration Console.
In a federated configuration, the producer stores and manages portlet preferences. When you view or modify the preferences in a remote portlet (on a consumer), the consumer must fetch the preferences from the producer, and modifications must be sent back to the producer where they are stored.
| Note: | Portlet preferences are included in the WebLogic Portal implementation of WSRP producers. Other WSRP producer implementations may not support portlet preferences. |
You can view and modify the portlet preferences for a remote portlet using the WebLogic Portal Administration Console. The Administration Console uses the Portlet Management interface of WSRP to retrieve preferences from the producer and modify them.
| Note: | It is not possible to create or modify portlet preferences in a remote portlet using Workshop for WebLogic. |
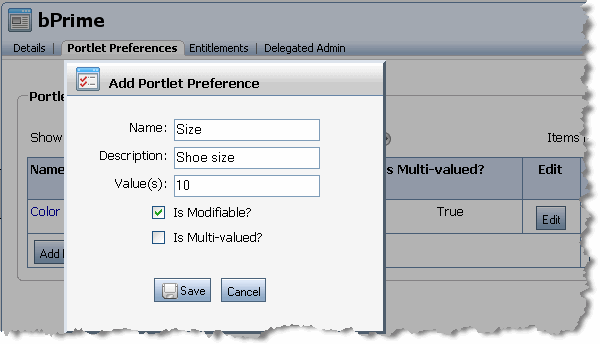
Figure 5-6 shows the interface for creating a portlet preference in the WebLogic Portal Administration Console. A similar interface exists for editing a preference. For instance, you can change the default value for a preference, or make it read-only.

| Tip: | Changes you make to a portlet preference in the Administration Console are scoped either at the Library level or the instance level. If you modify a portlet preference in the Library, all subsequent instances of that portlet will include the change. If you modify an instance (in the Portals folder) only that instance is affected. In other words, if the same portlet is used in several desktops, a new instance of the portlet is generated for each use. When you modify an instance of a portlet, only that instance is modified. Note that the first time a user updates a portlet preference, a new instance of the portlet is created, and the updated preferences are associated with the new instance. The WSRP registration interface provides a way for producers to keep track of new portlet instances created for remote portlets. See Managing Portlet Instances through Registration for more information. |
Portlets can also create, retrieve, and modify preferences programatically by obtaining a javax.portlet.PortletPreferences object. For instance, a page flow portlet can retrieve an instance of this object from the PortletBackingContext object in an action method. For example, the page flow action method shown in Listing 5-2 retrieves from a FormData object a preference set by a user, sets the preferences in a PortletPreferences object, and stores the preferences in the database using the store() method.
   /**
    * @jpf:action
    * @jpf:forward name="success" path="index.jsp"
    */
    protected Forward setColor(ColorForm form) {

       //-- Retrieve a preferences object from the context.
       PortletBackingContext context =
       PortletBackingContext.getPortletBackingContext(getRequest());
       PortletPreferences prefs = context.getPreferences(getRequest());

       //-- Set the user’s preference.
       try {
           prefs.setValue("color", (String)form.getColor()[0]);
       } catch (ReadOnlyException e) {
            e.printStackTrace();
       }

       //-- Store the user’s preference.
       try {
          prefs.store();
       } catch (ValidatorException io) {
          io.printStackTrace();
       } catch (IOException ioe) {
          ioe.printStackTrace();
       }

       return new Forward("success");
    }
As noted previously, for a remote portlet, preferences are hosted and managed on the producer. No preference information is ever stored on the consumer.
This section lists additional information about using portlet preferences in remote portlets.
wsrp-producer-config.xml file.store() method in javax.portlet.PortletPreferences throws an IllegalStateException if a portlet calls the store() method during the render phase of a portlet (that is, during the execution of the getMarkup operation)..portal file or (b) the user accessing the portlet is anonymous (not authenticated). Consumer portlets communicate this to the producer by sending a value of readOnly for the portletStateChange element in the performBlockingInteraction request.cloneBeforeWrite for the portletStateChange element. This value indicates to the producer that it must clone the portlet before making changes to preferences. If a portlet does indeed modify preferences, the producer returns a new portletHandle to the consumer. This new portletHandle replaces the original portletHandle.readWrite indicating that the producer can allow portlets to modify preferences.As discussed previously, whenever a user customizes a portlet by modifying portlet preferences, a new instance of the portlet is created. In the case of a remote portlet, the new instance is created on the producer, and the handle for that instance is returned to the consumer. Of course, as the number of users increases, the number of unique portlet instances can grow large in the producer space. If the consumer decides not to use the producer anymore, the producer needs to have a way of learning this and subsequently removing the portlet instances that are no longer needed. Portlet registration accomplishes this goal.
WebLogic Portal producers support registration by default for complex producers. If registration is enabled, consumers must register with a producer before accessing any of the producer’s portlets. Once registered, the producer returns a registrationHandle to the consumer. The consumer must supply this handle on all future requests until the consumer is deregistered. When a consumer deregisters a portlet, the producer removes all of the portlet instances that were created for that consumer.
Backing files let you programatically add functionality to a portlet by implementing (or extending) a Java class, which enables preprocessing (for example, authentication) prior to rendering the portal controls. You can attach a backing file to a portlet using the Backing File property in the Properties View in Workshop for WebLogic.
Backing files let you implement business logic at certain points of a portlet’s lifecycle. In a local portlet, backing file methods are called in the following order:
A producer, however, executes backing file methods in an order that reflects the type of consumer request, as shown in Table 5-3.
For detailed information about backing files, see the Portlet Development Guide. For an example that uses backing files with remote portlets, see Transferring Custom Data. See also Life Cycle of a Remote Portlet.
Occasionally, a producer is slow to respond to a request from a remote portlet. In this case, the portal application in which the remote portlet is located remains unresponsive until the remote portlet’s response is received. This section explains how to set timeout values for remote portlets.
This section includes these topics:
WebLogic Portal provides two timeout settings for remote portlets:
You can set a default timeout limit for all remote portlets and a timeout limit for an individual remote portlet. The timeout set on an individual portlet takes precedence over the default.
The remote portlet connection timeout only works when a consumer is continually connected to a producer. The timeout is effective only for cases where the producer is slow to respond to a consumer, not for cases where the producer is physically unavailable (the connection is broken), or where a new connection is made. In these cases, the operating system’s TCP timeout takes effect.
To set default timeout values for all remote portlets in a web application, edit one or both of the elements shown in Listing 5-3. These elements appear in the configuration file wsrp-producer-registry.xml located in the WEB-INF directory of each portal web application.
<connection-establishment-timeout-msecs>-1</connection-establishment-timeout-msecs>
<connection-timeout-msecs>120000</connection-timeout-msecs>
| Note: | Timeout values are in milliseconds. |
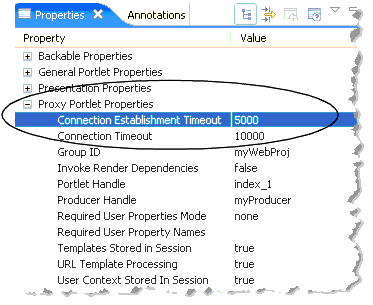
To set a connection establishment and/or a connection timeout for an individual remote portlet, open the Properties view for the portlet in Workshop for WebLogic and set values for the Connection Establishment Timeout and Connection Timeout properties, as shown in Figure 5-7. The timeout values are in milliseconds.

The Interceptor Framework is a consumer-side framework that lets you programatically intercept and modify markup and user interaction-related WSRP messages sent to and received from producers. The framework exposes a set of interfaces that you can implement. These interfaces let you examine the content of a WSRP message and take specific action based on that content. For example, if a producer sends a registration error back to the consumer, an interceptor can detect that error and display an informative message to the user or, perhaps, automatically return the information required to complete the registration.
For more information on creating interceptors, see The Interceptor Framework.
This section lists and describes the set of Proxy Portlet Properties and other portlet properties that of interest to federated portal developers. This section includes these topics:
Table 5-4 lists the Proxy Portlet Properties. These properties appear in the Properties list for remote (proxy) portlets.
For a list of additional portlet properties, see the Portlet Development Guide.


|