
| Download Docs | Site Map | Glossary | |
|
|
|||
| bea.com | products | dev2dev | support | askBEA |
 |
 |
|
|||||||
| e-docs > WebLogic Platform > WebLogic Portal > Commerce and Campaign Features Tour > Registered User Adds a Credit Card |
|
Commerce and Campaign Features Tour
|
Registered User Adds a Credit Card
In this section of the tour, assume that you want to access the Web site to add credit card information to your user profile and to see the status of your last order. (This probably is not a realistic scenario for your customers, but it highlights additional features that are available in the JSP templates.) This section of the tour takes you along the following path:
User Profile Roadmap
Before starting this section of the tour, review Figure 5-1, which is a map of the user profile JSP templates. The arrows in the map represent navigation options that Webflow provides; the darker arrows show the path that this section of the tour describes.
Figure 5-1 JSPs for Modifying the User Profile
Step 1: Access Your User Profile
You can access your user profile from any page on the Web site by clicking View Profile in the left side of the display. This portion of each page comes from the leftside.inc include file. If you are accessing the Web site anonymously WebLogic Portal prompts you to log in before it displays your profile.
To continue the tour...
Log in if WebLogic Portal prompts you.
For information about WebLogic Portal security, see Technical Note: The Security Model.
Step 2: Review Your User Profile
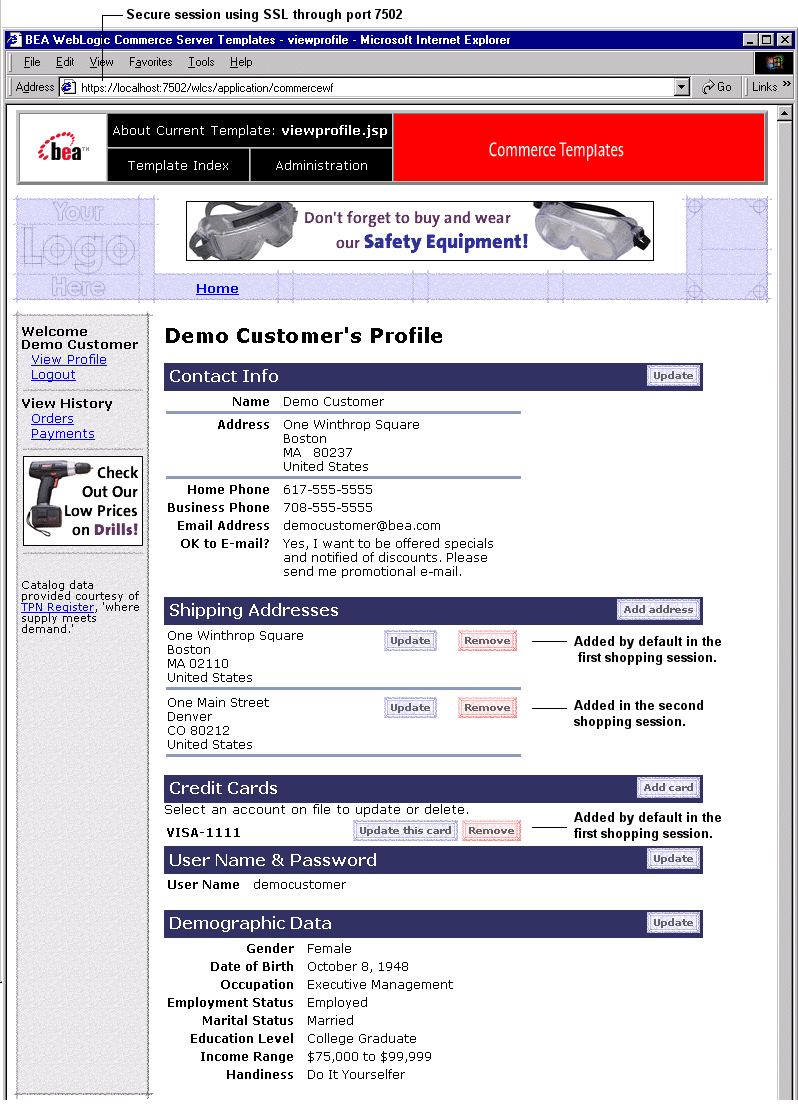
When you click View Profile as an authenticated user, or when you click Log In from login.jsp, WebLogic Portal displays viewprofile.jsp (see Figure 5-2).
Features of viewprofile.jsp
Figure 5-2 Your User Profile
Notice the following features of viewprofile.jsp:
To continue the tour...
Click Add Card.
Step 3: Add a Credit Card
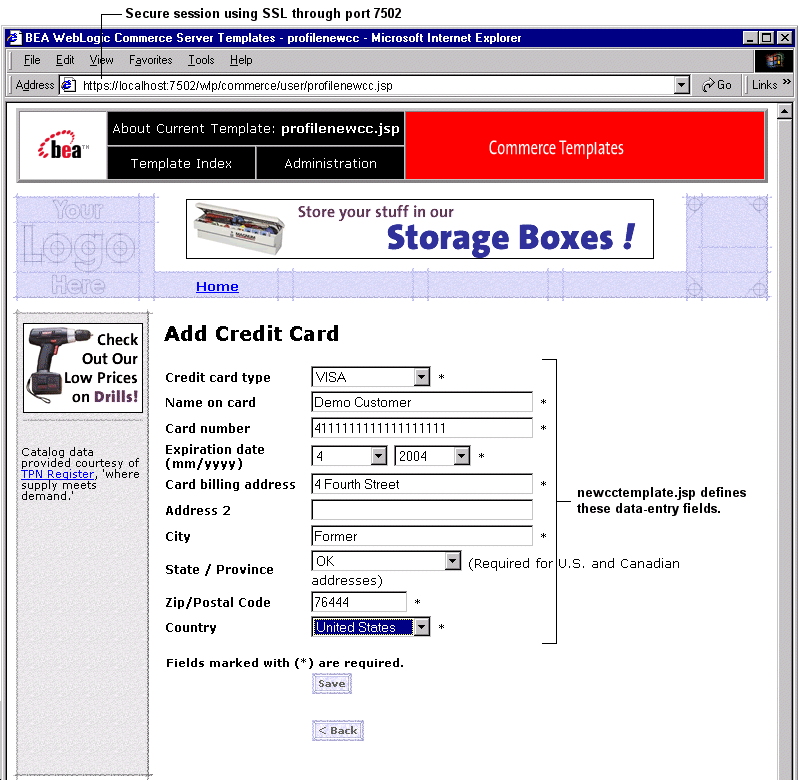
When you click Add Card, WebLogic Portal prompts you to enter credit card information in profilenewcc.jsp (see Figure 5-3).
Features of profilenewcc.jsp
Figure 5-3 Adding a Credit Card
Notice the following features of profilenewcc.jsp:
For information about template include files, see Technical Note: Templates Included Within Templates.
To continue the tour...
Step 4: View Your Order History and Status
When you click Home, WebLogic Portal displays main.jsp, which is the Web site's Home page (see Figure 5-4). Notice that main.jsp uses the HTTP protocol through port 7501; WebLogic Portal does not use SSL for the Home page.
Figure 5-4 Click Orders
For details about main.jsp for authenticated users, see Features of main.jsp for Authenticated Users. To continue the tour... Click Orders, WebLogic Portal displays orderhistory.jsp (see Figure 5-5). Features of orderhistory.jsp Figure 5-5 Order History
Notice the following features of orderhistory.jsp:
<!-- Extract the scrollable model -->
<webflow:getProperty id="orderHistory" property="<%=PipelineSessionConstants.SCROLLABLE_MODEL%>" type="com.beasys.commerce.ebusiness.util.ScrollableModel" scope="session" namespace="sampleapp_main" />
To continue the tour...
Click View to see the order status.
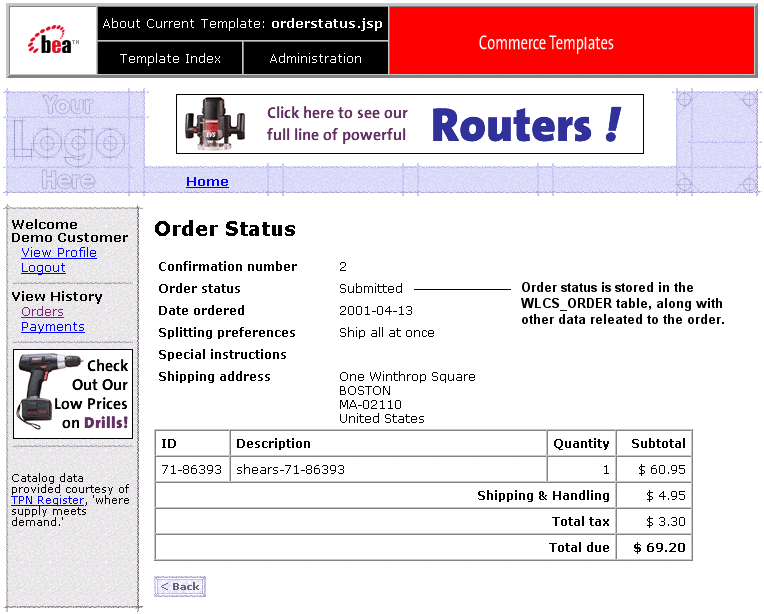
When you click View, WebLogic Portal displays orderstatus.jsp (see Figure 5-6).
Features of orderstatus.jsp
Figure 5-6 Order Status
Notice the following features of orderhistory.jsp:
<!-- define bean to retrieve the CustomerValue -->
<webflow:getProperty id="orderValue" property="<%=PipelineSessionConstants.SELECTED_ORDER%>" type="com.beasys.commerce.ebusiness.order.OrderValue" scope="session" namespace="sampleapp_main" />
<%
Note: The Pipeline assigns only the New or Submitted state to an order. If you want to add states, you must modify the Pipeline.
To continue the tour...
Click Home.
Step 5: Log Out
To end your authenticated session, click Logout. Logging out ends the Pipeline session, clearing your shopping cart and disassociating your username from subsequent events on the Web site (until you log in again).
What's next?
To see an example of how to modify the JSP templates and the Webflow, see Example of Customizing the Templates.

|

|

|