
| Download Docs | Site Map | Glossary | |
|
|
|||
| bea.com | products | dev2dev | support | askBEA |
 |
 |
|
|||||||
| e-docs > WebLogic Platform > WebLogic Portal > Development Guide > Setting Up Portal Navigation |
|
Development Guide
|
Setting Up Portal Navigation
Portal navigation is achieved through the use of Webflow, a mechanism designed to help you build Web applications and maintain a separation between presentation logic and underlying business processes. When the visitor causes an event, such as clicking Next on a page, Webflow determines what the visitor will see next. At appropriate times during a visitor's interaction, the Webflow may also invoke Pipelines, predefined, specialized components used to validate data or to execute back-end business processes.
Because the Webflow's centralized XML configuration files specify the order in which pages are displayed to your Web site's visitors, use of the Webflow mechanism may reduce the amount of work necessary to create and modify the flow of your Web site.
This section contains information on the following subjects:
Building a Webflow
This section shows you how to build a basic Webflow by adding the necessary nodes to the Webflow and connecting those nodes to each other with transitions.
To build a Webflow, you need to complete the following steps:
Completing these steps will provide you with a rudimentary Webflow. Subsequent information in this section will complete the Webflow-building process by showing you how to:
Note: While the procedures outlined here and in subsequent parts of this section imply a specific sequence for creating Webflows and Pipelines, this is done only to facilitate the document and is not required. You can follow whatever sequence is most accommodating to your development needs. For example, you might want to create Pipelines for a Webflow before actually creating the Webflow. Do note that you cannot synchronize a Webflow to an application until the Webflow exists.
Understanding Webflow Components
Before attempting to build and implement a Webflow, you should understand some of the Webflow components you will be using in the ensuing procedures.
Nodes and Transitions
Nodes are the graphical representation of the functionality of a state in the Webflow. Depending on the node type, there are a number of predefined events that may occur (such as a visitor clicking a link on a Web page). When a particular event happens, the Webflow decides which subsequent node to invoke to continue the flow. This process is referred to as a transition, and is illustrated in Figure 9-1.
Figure 9-1 Generic Webflow Transition
Note that, as shown in Figure 9-1, nodes can be referred to as origin or destination nodes, depending on their location in a transition. Types of Nodes There are two main types of nodes: presentation nodes and processor nodes. Each of the presentation and processor nodes can be used as origin or destination nodes within the Webflow. Presentation Nodes Presentation nodes represent states in which the Webflow presents or displays something to a person interacting with the Web application. The form of the presentation can be:
You can also create extension (custom) presentation nodes for use in the Webflow. For more information about extension presentation nodes, see How to Create an Extension Presentation Node.
Processor Nodes
Processor nodes represent states in which the Webflow invokes more specialized components to handle such activities as form validation or the back-end business logic that drives the site's presentation. The processor nodes available for use are described in Table 9-1.
Wildcard Nodes If the Webflow cannot locate a specific presentation or processor node to complete a transition, the Webflow will search for a wildcard presentation or processor node to use as the origin node. Therefore, wildcard presentation nodes and wildcard processor nodes implement default behavior for your Web application. Put another way, wildcard nodes allow you to abstract common functionality and to locate that functionality in a single place in your Webflow. Use Wildcard nodes only when you haven't explicitly defined destination nodes in the Webflow. You may have one wildcard presentation node and one wildcard processor node per namespace. An example of a Wildcard node might be when you want a link called Help (which is present on every page) to always point to a JSP containing help information. To do so, you could use a wildcard presentation origin. Further, you might always want exceptions returned from processor nodes to transition to JSP containing detailed information about the error. You could handle both of these situation with a wildcard processor node. Note: A slight impact on performance might occur if the Webflow must search for a wildcard node, as more processing is involved. Types of Transitions There are two types of transitions: event and exception.
For more information on the events that cause transitions, see Types of Events.
Types of Events
Each node in a Webflow responds to events, which cause transitions (that is, movement from an origin node to a destination node). However, the types of events a node responds to depends on whether the node is a presentation node or a processor node.
Presentation nodes respond to the following events:
In other words, when a visitor to the Web site clicks a link or a button, the Webflow responds to that event. A response might be to transition to another presentation node (such as a JSP) or to a processor node (such as an Input Processor to validate visitor-provided form data).
Processor nodes respond to the following events:
Exceptions occur when an Input Processor or Pipeline does not execute properly, and indicates an error state. Otherwise, these processor nodes return an object that the Webflow can use to continue processing.
Note: Webflow used in portal applications may respond to more events than those described above.
Encoding Webflow URLs
New context parameters ENCODE_URLS, ESCAPE_URLS, ENCODE_STATIC_URLS, and ESCAPE_STATIC_URLS have been added for 70sp5 that control the default setting for URL escaping and encoding in webflow URLs. See WebflowJSPHelper Javadoc for more information regarding escaping and encoding of URLs.
ENCODE_URLS is the default setting indicating whether webflow URLs should be encoded. Allowable param-values are true and false. If not set the default, default is true to ensure backward compatibility.
<context-param>
<param-name>ENCODE_URLS</param-name>
<param-value>false</param-value>
</context-param>
ESCAPE_URLS is the default setting indicating whether webflow URLs should be escaped. Allowable param-values are NO_URL_ESCAPE, ESCAPE_URL, CALCULATE_ESCAPE. If not set the default, default is URL_ESCAPE to ensure backward compatibility.
<context-param>
<param-name>ESCAPE_URLS</param-name>
<param-value>CALCULATE_ESCAPE</param-value>
</context-param>
The above 2 defaults are for the following tags and also for the WebflowJSPHelper createWebflowURL methods that do not have escape or encode as a parameter:
<wf:createWebflowURL/>
<wf:form/>
<wf:validatedForm/>
<portal:createWebflowURL/>
<portal:form/>
<portal:validatedForm/>
<portal:createPortalPageChangeURL/>
<portlet:createWebflowURL/>
<portlet:form/>
<portlet:validatedForm/>
<portlet:createPortletEditURL/>
<portlet:createPortletUneditURL/>
<portlet:createPortletMinimizeURL/>
<portlet:createPortletUnminimizeURL/>
<portlet:createPortletMaximizeURL/>
<portlet:createPortletUnmaximizeURL/>
<portlet:createPortletFloatURL/>
ENCODE_STATIC_URLS it the default setting indicating whether static URLs should be encoded. Allowable param-values are true and false. If not set the default, default is true to ensure backward compatibility.
<context-param>
<param-name>ENCODE_STATIC_URLS</param-name>
<param-value>false</param-value>
</context-param>
ESCAPE_STATIC_URLS is the default setting indicating whether static URLs should be escaped. Allowable param-values are NO_URL_ESCAPE, ESCAPE_URL, CALCULATE_ESCAPE. If not set the default, default is URL_ESCAPE to ensure backward compatibility.
<context-param>
<param-name>ESCAPE_STATIC_URLS</param-name>
<param-value>CALCULATE_ESCAPE</param-value>
</context-param>
The above 2 defaults are for the <wf:createResourceURL/> tag and the WeblfowJSPHelper createStaticResource methods that do not have escape or encode as a parameter.
URLs need to be encoded if you wish to maintain session state and the browser does not accept cookies. URLs will only need to be encoded if the browser does not accept cookies.
URLs must be escaped if they will contain any characters (with some exceptions - see below) that would be encoded using java.net.URLEncoder.encode(). Note however that even when escaping is on the entire URL is not encoded rather the URL will be tokenized using the characters ':', '/', '?', '=', and '&' then the substrings between the tokens are encoded using java.net.URLEncoder.encode(). The tokenizing is necessary so that the URL will still be recognized by the Webflow engine.
Note that escaping is relatively costly and should be avoided if possible but is required if the URL might have any characters other then those ignored by java.net.URLEncoder.encode(), that is any characters other than 'a' through 'z', 'A' through 'Z, '0' through '9', '-', '_', '.', or '*' with the exception of the tokenizing characters mentioned above. If the content of the URL will not be determined until runtime and might contain "illegal" characters you should either have escaping on or use the calculate feature. Calculate should be used with care. For sites that have a small number of URLs that will need escaping using calculate rather then always escaping will result in a performance improvement. But, since calculate first checks the URL then encodes if needed, sites where most URLs need escaping will have poorer performance using calculate rather then escaping all URLs.
Webflow Tools and Buttons
You create Webflows by using the Webflow Editor, as depicted in Figure 9-4. Most activity in which you engage will require selecting either a tool button or a command button. Table 9-2 describes the tool buttons available and Table 9-3 describes the command buttons.
Step 1. Create the Webflow To create a Webflow, use this procedure. Note: This procedure assumes the following:
Figure 9-2 E-Business Control Center with New Drop-Down Menu Open
Step 2. Add Nodes to the Webflow Canvas
A Webflow is composed of two types of nodes: presentation nodes and processor nodes. Each of the presentation and processor nodes can be used as origin or destination nodes within the Webflow. For more information on Webflow nodes, see Understanding Webflow Components.
Add the first node to the Webflow Editor canvas by doing the following:
The node appears on the canvas where you click; for example, if you want the first node to be a Presentation node (that is, a JSP, HTML file, or other presentation file), you would select the Presentation Node tool and then click over the canvas to place the node there.
Figure 9-5 Placement of a Presentation Node
Step 3. Identify the Begin Node
The begin node is used as the starting point for the visitor's interaction with the application. It is designated as the initial entry point or state of the Webflow, which automatically transitions to a presentation or processor node. The begin node is generally a presentation node in the form of a JSP.
If a URL does not specify an origin, namespace, or event, the Webflow mechanism looks for a begin node in the default namespace. Although the begin node is optional, BEA recommends that you have at least one defined in your default namespace.
To identify a node as the begin node, use this procedure:
Note: A webflow can have only one begin node.
Step 4. Create Transitions Between Nodes
With all the nodes placed on the canvas, connect them by creating transitions between them. Create these transitions by using the Event Tool and the Exception Tool, as shown in Table 9-2. The Exception Tool is red and the Event Tool is black.
Adding an Event Transition
To add an Event transition, do the following:
A grey connection port will appear on the node at the transition origin site and, If the connection is permissible, an arrowhead will appear where the transition ends, as shown in Figure 9-10.
Figure 9-10 Node-to-Node Event Transition
If the connection is not allowed (for example if you are trying create an exception link on a presentation node), a red square filled with a red X will appear on the node's edge, as shown in Figure 9-11.
Figure 9-11 Invalid Connection Indicator
Adding an Exception Transition
Use the Exception Tool to connect any nodes that might require exception handling to the node that will do that handling. For example, an input processor might accept data that needs to be validated before it can be passed. If that data contains an error, it might need to throw an exception. The Exception Tool lets you process the exception and display any results or other information. Note that the transition link between the node appears in red.
To add an Event transition, do the following:
A grey connection port will appear on the node at the transition origin site and, If the connection is permissible, an arrowhead will appear where the transition ends.
If the connection is not allowed (for example if you are trying create an exception link on a presentation node), a red square filled with a red X will appear on the node's edge, as shown in Figure 9-11.
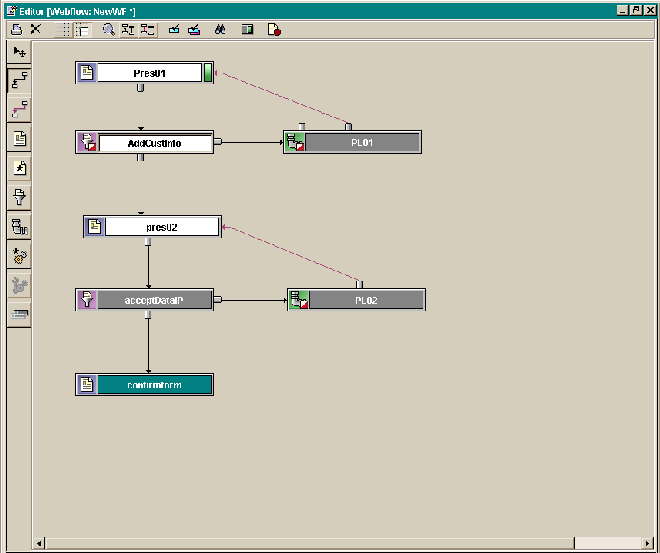
With all nodes in place and connected by the proper transitions, the webflow might appear as the one shown in Figure 9-12.
Figure 9-12 Sample Webflow Layout
Using the Transition Tools In addition to adding a transition (as described in Adding an Event Transition and Adding an Exception Transition), you can also move an existing transition's connection port, add elbows to transitions, and delete a transition. Moving a Connection Port Connection ports accepting transitions are called input connection ports; connection ports where transitions originate are called output connection ports. In some cases, it may be helpful to move the node's connection port. To reposition the connection port on a node, follow these steps:
The connection port associated with a self-referring transition can only be moved along the same node edge.
Moving a Transition to Another Node You can move the end point of a transition (indicated by an arrowhead) from one node to another (assuming that the connection is allowable). Do the following:
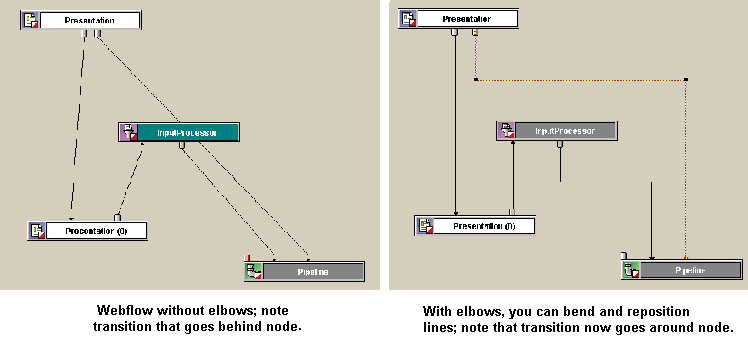
Creating, Moving, and Deleting Elbows in Transition Lines You can also reposition transition lines on an Editor's canvas by moving, creating or deleting elbows. Elbows allow you to bend portions of the transition line, as shown in Figure 9-13, to enhance the appearance of the flow.
Figure 9-13 Elbows in Transitions
To create a new elbow, follow these steps:
To move an elbow in an existing transition, follow these steps:
To delete an existing elbow, follow these steps:
Creating a Pipeline and Adding it to a Webflow
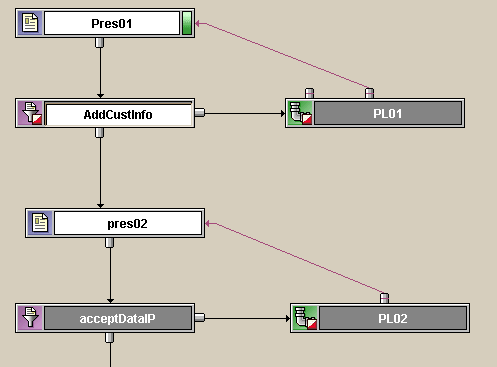
Figure 9-14 is a detailed look at a Webflow. In this example, you will see that two nodes are labeled PL01 and PL02. These nodes are called Pipelines.
Figure 9-14 Webflow Example: Detail Showing Pipeline Nodes
A Pipeline is a type of processor node that is typically used in a Webflow to execute back-end business logic. Each Pipeline is comprised of a number of Pipeline Components that perform specific tasks. BEA provides a number of Pipeline Components that are packaged with the WebLogic Portal product suite that you may want to reuse in your own Pipelines. However, you may also want to create your own Pipeline Components to execute your organization's specific business processes. This section will show you how to create a pipeline by following these steps:
Understanding the Pipeline Editor
As with Webflows, you create a Pipeline and add functionality to it by using the Pipeline Editor in the E-Business Control Center, as shown in Figure 9-15 (see also Figure 9-18).
Figure 9-15 E-Business Control Center with Pipeline Editor Displayed
The Pipeline Editor has a set of display and behavior buttons and a set of command buttons along its top border and a set of tool buttons along its left border. Table 9-5 describes the tool buttons, Table 9-6 describes the display, and behavior buttons and Figure 9-7 describes the command buttons.
The Pipeline Editor uses the same command buttons the Webflow Editor use (see Table 9-3), with the addition of the the button described in Table 9-7.
Understanding what these buttons do and how to use them will make creating Pipelines a quick and easy process. Step 1: Create a New Pipeline Component This section contains the steps needed to create the Pipeline Component used by the Webflow. Note: This procedure assumes the following:
Figure 9-16 New Menu for Selected Pipeline Namespace
Figure 9-19 Pipeline Component Editor
Figure 9-20 Pipeline Component Creator

examples.wlcs.sampleapp.order.pipeline.ValidateBookmarkClass
The completed dialog box might look like the example in Figure 9-21.
Figure 9-21 Completed Pipeline Component Creator Dialog Box
The new Pipeline component appears in the Pipeline components list on the Pipeline Component Editor.
Figure 9-22 Properties Editor—Component Selection
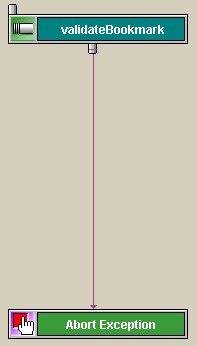
Figure 9-23 validateBookmark - Abort Exception Connection

A message appears explaining that you are about to create a Begin node, as shown in Figure 9-25.
Figure 9-25 Begin Node Message Box
Figure 9-26 validateBookmark as Begin Node
Step 2: Add the New Pipeline Component to the Webflow
Now, you need to add the new pipeline component to a Webflow. To do so, use the following procedure.
Figure 9-28 Properties Editor—Component Selection
Synchronizing the Webflow to the Application
The Webflow that you just created must be synchronized to the Web application in order for it to work. Data synchronization loads the Webflow's and Pipeline's XML definition into the database and the master data repository, which is an in-memory data store.
Warning: All application data is synchronized at once. If you and other developers concurrently synchronize data to a single enterprise application, it is possible to overwrite each others' work or create sets of changes that are incompatible and difficult to debug. To prevent this possibility, synchronize to separate instances of your application.
To synchronize the new pipeline component and the modified Webflow, use the following procedure:
The Webflow is synchronized to the application.
Creating a New Input Processor
As discussed earlier in this section, Input Processors are predefined, specialized Java classes that carry out more complex tasks when invoked by the Webflow mechanism. They are typically used to validate HTML form data or to provide conditional branching within a Web page. BEA has developed a number of Input Processors that are packaged with the WebLogic Portal. While you may want to reuse these processors in your own applications, you might also want to create your own for use in your applications' Webflows.
Creating an Input Processor with the InputProcessor Interface
To create a new Input Processor, you must implement the com.bea.p13n.appflow.webflow.InputProcessor interface by providing the details of the process() method, as shown in Listing 9-1.
Listing 9-1 Implementing Process() for the InputProcessor Interface
public java.lang.Object process(javax.servlet.http.HttpServletRequest req,
                                java.lang.Object requestContext)
                          throws ProcessingException
This interface processes the HttpServletRequest or the PipelineSession present in the HttpSession. The return object can be anything, but it must have a meaningful implementation of toString(). The webflow executor will call toString() on the returned object to generate the event for the processor.
Naming an Input Processor
The name of an Input Processor should end with the suffix IP. For example, an Input Processor that is responsible for deleting a shipping address might be called DeleteShippingAddressIP. This naming convention should help you keep track of Input Processors more easily.
Executing Business Logic with Input Processors
Execution of business (application) logic should typically not be done within Input Processors. Specifically, Input Processors should not call Enterprise JavaBeans (EJBs) or attempt to access a database. All such logic should be implemented in Pipeline Components. Although it is possible to execute this logic within an Input Processor, such logic could not be transactional, and would defeat a primary purpose of the Webflow architecture. By separating business logic from the presentation logic, your Web site is inherently flexible in nature. Modifying or adding functionality can be as simple as creating and plugging in new Pipelines and/or Input Processors.
Extending the InputProcessorSupport Class
Alternately, your new Input Processor can extend the com.bea.p13n.appflow. webflow.InputProcessorSupport class, as shown in Listing 9-2. As its name implies, this abstract class allows you to use static helper methods that provide additional support for an Input Processor. If your new Input Processor class must extend some other class, however, you will not be able to take advantage of the InputProcessorSupport class.
Listing 9-2 Extending the InputProcessorSupport class
public abstract class InputProcessorSupport
                         extends java.lang.Object
                implements InputProcessor, ValidatedFormConstants
Note: For more information about implementing the InputProcessorSupport class, refer to the Javadoc for com.bea.p13n.appflow.webflow.
When you are using the Webflow Editor to specify the properties for an Input Processor node you placed on the canvas, simply include the class name of your newly created Input Processor in the appropriate field. There are no additional activities you need to perform to make your Input Processor work with the existing Webflow mechanism.
Extending Webflow by Creating Extension Presentation and Processor Nodes
If creating new input processors and pipeline components to add to those BEA provides does not meet your needs, you may also choose to extend the Webflow mechanism by creating classes that can be used as Extension (Custom) Presentation or Processor Nodes. Once you create the classes associated with these nodes, you will need to register the new nodes in the webflow-extensions.wfx file. This section shows you how to perform these tasks.
How to Create an Extension Presentation Node
To create an Extension (Custom) Presentation Node, use this procedure:
WebLogic Portal uses an Extension (Custom) Presentation Node named portal, which you can view as an example. Portal uses this extension node to indicate to the portal Webflow that the contents of the portlet are to remain unchanged (that is, it indicates that the last URL should be displayed). The portal node's implementation class is LastContentUrlNodeHandler.java.
How to Create an Extension Processor Node
Extension (Custom) Processors are processors that your organization (as opposed to BEA) develops for use in your applications' Webflows. Imagine you want to create an Extension (Custom) Processor that functions at the same level as an Input Processor processor or Pipeline Processor. Extension Processors may be used to perform activities not currently supported by the Webflow. However, the flow in and out of an Extension Processor is still governed by the Webflow mechanism. Extension Processors are represented as nodes in the Webflow Editor, much like the Input Processor and Pipeline Nodes are, but with a slightly different representation for easy identification.
For example, you may want to create an Extension (Custom) Processor that works with the BEA Rules Engine to support different Webflows based on some condition, such as membership in a customer segment. Another, more simple example might be a layout manager processor that automatically includes a header and footer in your JSP when given the page's body content. In fact, we have already created such a processor.
To create an Extension (Custom) Processor Node, use this procedure:
Listing 9-3 Implementing the Processor Interface
public java.lang.Object process(java.lang.String webapp,
                                java.lang.String namespace,
                                javax.servlet.http.HttpServletRequest request,
                                java.lang.Object requestContext)
                        throws java.lang.Exception
This interface executes the processor indicated by the request. The return object can be anything, but it must have a meaningful implementation of toString(). The webflow executor will call toString() on the returned object to generate the event for the processor.
Note: For instructions on how to register your extension node in the webflow-extensions.wfx file, see Making Your Extension Presentation and Processor Nodes Available in the Webflow and Pipeline Editors.
Making Your Extension Presentation and Processor Nodes Available in the Webflow and Pipeline Editors
After you have created an Extension (Custom) Presentation or Processor Node, you must make that node available to other developers on your team by registering the node in the webflow-extensions.wfx file.
Notes: The webflow-extensions.wfx file resides within the <BEA_HOME>/user_projects/myNEWDomain/beaApps/ portalApp-project/default/webflow/ folder (where <BEA_HOME> is where you installed WebLogic Portal; for example:
bea/user_projects/myNEWDomain/beaApps/portalApp-project/
   default/webflow/
Registering an Extension (Custom) Processor Node will cause its corresponding tool on the Webflow Editor palette to become enabled once you restart the E-Business Control Center.
Registering an Extension Presentation Node
To register an Extension Presentation Node in the webflow-extensions.wfx file, follow these steps:
Registering an Extension Presentation Node provides an example of registering an Extension Presentation Node in the webflow-extensions.wfx file.
Registering an Extension Processor Node
To register an Extension Processor Node in the webflow-extensions.wfx file, follow these steps:

|

|

|