WebLogic Portlets for Siebel Administration Guide
WebLogic Portlets for Siebel Administration Guide
This guide explains how to administer the BEA WebLogic Portal application. The BEA WebLogic Portlets V1.0 application integrates BEA WebLogic Portal application with the Siebel 7.0.4 System.
This guide contains the following sections:
BEA Weblogic Platform Administration Functions
You must have BEA WebLogic Platform administrator privileges in order to perform the following operations after logging in to the BEA WebLogic Administration Portal user interface.
<user1>
<user2>
<example EMPLOYEE >
<example CUSTOMER>
<user1> to Administrator group to make <user1> as administrator
<user1> to <example EMPLOYEE >
<user2> to <example CUSTOMER>
<example CUSTOMER>
<example EMPLOYEE>
<example EMPLOYEE Group> to <example EMPLOYEE Role>
<example CUSTOEMER Group> to <example CUSTOEMER Role>
- Create a new Desktop for that Portal.
- Give Entitlements for Administration book for role <example EMPLOYEE.>
- Give Entitlements for Administration page for role <example EMPLOYEE. >
Note: Refer to WebLogic Administration Portal Tutorial documentation for more details.
Authentication / Logging In
Log in to BEA WebLogic Portlets for Siebel using the administrator account `weblogic'. A default administrator account is already created with the following authentication details:
Username: weblogic
Password: weblogic
To Login to BEA WebLogic Portlets for Siebel as an administrator:
- Type in the URL of the BEA WebLogic Portlets for Siebel system in the address bar and press Enter. The Login screen appears.
Figure 1 Login Screen

- Enter the administrator Username <default UserName: weblogic> and Password. <Default Password: weblogic>.
Note: The Username and Password are case sensitive.
Managing User Privileges
Only the existing BEA WebLogic Portal user(s) can be mapped as the user(s) of BEA WebLogic Portlets for Siebel. This user is also referred to as an EIS (Enterprise Integration System) user. BEA WebLogic Portlets for Siebel has three types of EIS users:
- Customer
- Employee
- Administrator
Customer
A user of type Customer has access to the Siebel tab. This user can perform all the customer related operations.
Employee
A user of type Employee can perform all the customer related operations. In addition to that, an Employee can view the list of all the customers.
Administrator
The Administrator has access to all the operations, which the Customer and the Employee can perform. In addition to that, the Administrator has the privilege to perform administration tasks like Creating EIS Instances, Creating EIS Users, and Setting Up EIS Object Preferences.
Viewing/Creating/Editing/Deleting an EIS Instance
To View the List of EIS Instances:
- Login to BEA WebLogic Portlets as administrator.
- Click the Administration tab.
Figure 2 EIS Administration Screen

- Click the EIS Instance Setup link.
Figure 3 EIS Administration - EIS Application Screen

- Select the EIS Application as Siebel 7.0.4 and click Search. The list of existing EIS instances appears.
Figure 4 EIS Instance Screen

To Create an EIS Instance:
- Login to BEA WebLogic Portlets as administrator.
- Click the Administration tab.
- Click the EIS Instance Setup link.
- Select the EIS Application as Siebel 7.0.4 and click Create.
Figure 5 Create EIS Instance Screen
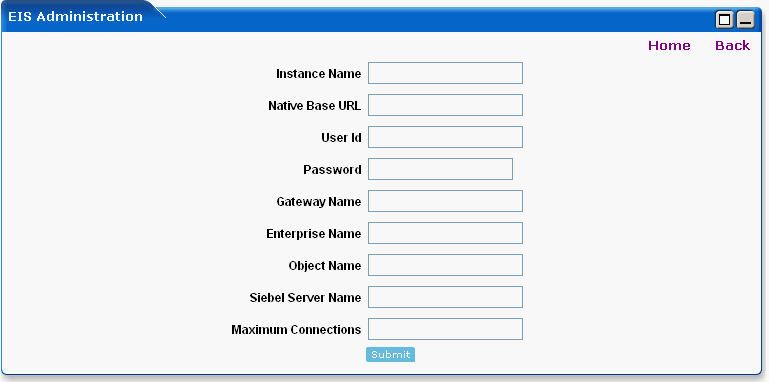
- Enter an Instance Name of your choice.
- Enter the Native Base URL. This is the URL of the Siebel system.
- Enter the User Id and Password for logging in to the Siebel system.
- Enter the Gateway Name of the Siebel system.
- Enter the Enterprise Name.
- Enter the Object Name of the Siebel system.
- Enter the number of Maximum Connections allowed for the Siebel system.
- Click Submit to create the instance.
To Edit an EIS Instance:
- Login to BEA WebLogic Portlets as administrator.
- Click the Administration tab.
- Click the EIS Instance Setup link.
- Select the EIS Application as Siebel 7.0.4 and click Search.
- Click the red pencil icon to edit the required instance.

- Make the necessary changes and click Submit.
To Delete an EIS Instance:
- Login to BEA WebLogic Portlets as administrator.
- Click the Administration tab.
- Click the EIS Instance Setup link.
- Select the EIS Application as Siebel 7.0.4 and click Search. The list of existing EIS instances appears.
- Click the trash bin icon to delete the required EIS instance.

Viewing/Creating/Editing/Deleting an EIS User Mapping
To View the List of EIS User Mappings:
- Login to BEA WebLogic Portlets as administrator.
- Click the Administration tab.
- Click the EIS Credential Mapping Details link.
Figure 6 EIS Credential Mapping - Search Screen
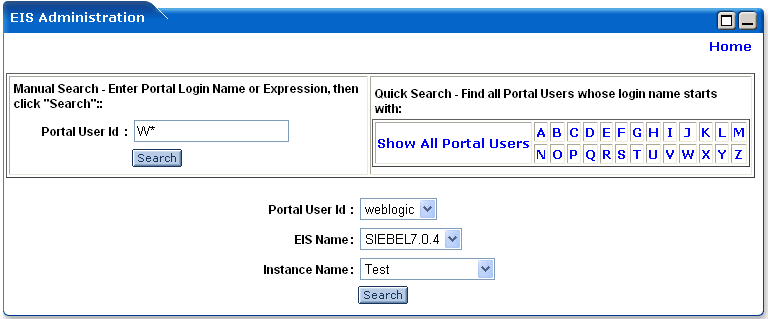
- Use any one of the following search criteria:
- Enter the Portal User Id and click search.
- Click Show All Portal Users link.
- Click on an alphabet with which the user's login name starts.
- The list of Portal Users matching the search criteria is populated in the Portal User Id drop down box. Select the required Portal User Id.
- Select the EIS Name as Siebel 7.0.4.
- Select the Instance Name.
- Click Search. The list of existing EIS User credentials is displayed.
To Map an EIS User to a Portal User:
- Login to BEA WebLogic Portlets as administrator.
- Click the Administration tab.
- Click the EIS Credential Mapping Details link.
- Use any one of the following search criteria:
- Enter the Portal User Id and click search.
- Click Show All Portal Users link.
- Click on an alphabet with which the user's login name starts.
- The list of Portal Users matching the search criteria is populated in the Portal User Id drop down box. Select the required Portal User Id.
- Select the Instance Name.
- Click Search. The list of existing EIS User credentials is displayed.
Figure 7 EIS Credential Mapping - Select User Type Screen
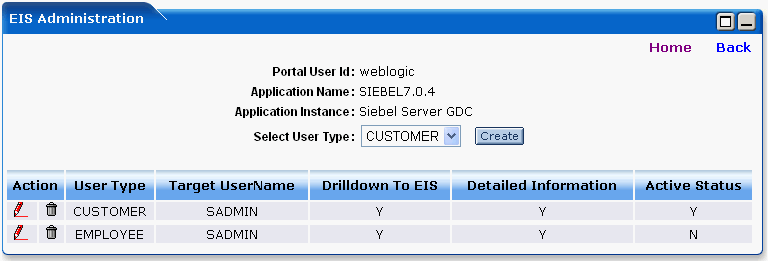
- Select the User Type as either CUSTOMER or EMPLOYEE.
Figure 8 EIS Credential Mapping - Create default Screen
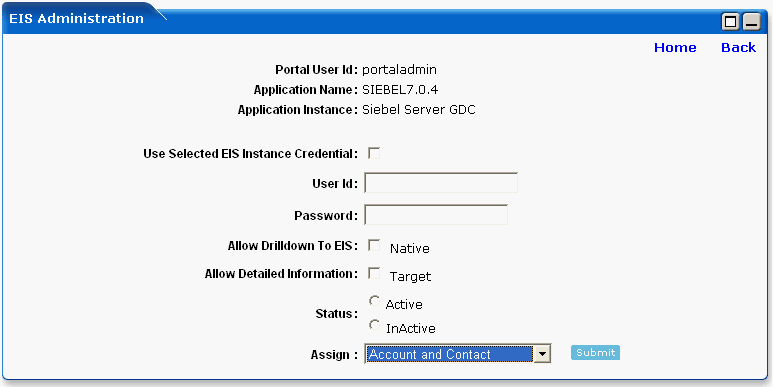
- Selecting the Use Selected EIS Instance Credential option will use the Instance Name information, which you have selected in the previous step.
- Enter the Siebel User Id and Password.
- Selecting the Allow Drilldown To EIS option as Native allows you to view the information in the Portlet though ITS (Internet Transaction Service).
- Selecting the Allow Detailed Information option as Target allows you to view the Siebel window information in the Portlet.
- Select the Status of the user as Active to activate this EIS user account, otherwise select the Status as Inactive. Only one EIS mapping will be active at a given time.
- Select either Account and Contact or Contact with No Account. Selection can be made depending on the requirement. In this case if Account and Contact is selected. Click Submit to proceed.
Figure 9 EIS Credential Mapping - Create assigning Account and Contact search screen
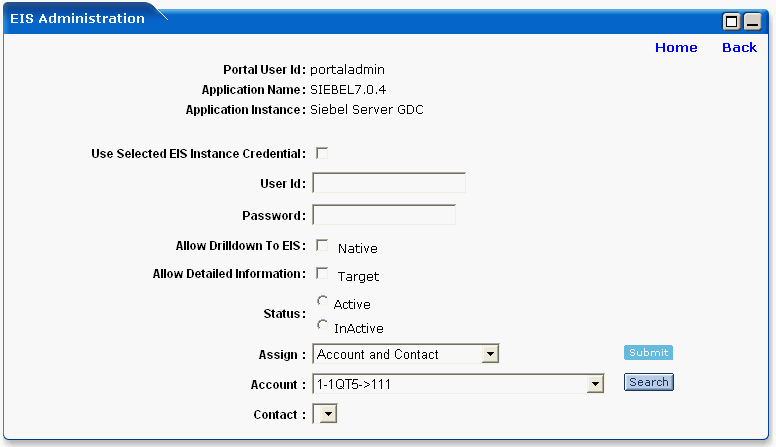
- Select the required Account from the list and then click Search. All the contact details attached to the selected Account are populated in the Contact list.
Figure 10 EIS Credential Mapping - Create assigning Account and Contact search screen
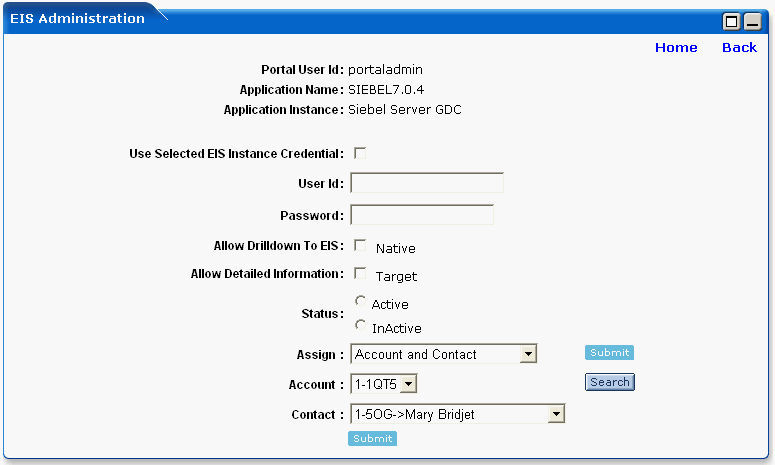
- Select the required contact details.
To Edit an EIS User Mapping:
- Login to BEA WebLogic Portlets as administrator.
- Click the Administration tab.
- Click the EIS Credential Mapping Details link.
- Use any one of the following search criteria:
- Enter the Portal User Id and click search.
- Click Show All Portal Users link.
- Click on an alphabet with which the user's login name starts.
- The list of Portal Users matching the search criteria is populated in the Portal User Id drop down box.
- Select the Portal User Id.
- Select the EIS Name as Siebel 7.0.4.
- Select the Instance Name.
- Click Search. The list of existing EIS User credentials is displayed.
- Click the red pencil icon to edit the required EIS User.

- Make the necessary changes and click Submit.
To Delete an EIS User Mapping:
- Login to BEA WebLogic Portlets as administrator.
- Click the Administration tab.
- Click the EIS Credential Mapping Details link.
- Use any one of the following search criteria:
- Enter the Portal User Id and click search.
- Click Show All Portal Users link.
- Click on an alphabet with which the user's login name starts.
- The list of Portal Users matching the search criteria is populated in the Portal User Id drop down box.
- Select the Portal User Id.
- Select the EIS Name as Siebel 7.0.4.
- Select the Instance Name.
- Click Search. The list of existing EIS User credentials is displayed.
- Click the trash bin icon to delete the required EIS User.

Setting Up EIS Object Preferences
Viewing/Creating/Editing/Deleting a Portlet
To View the List of Portlets:
- Login to BEA WebLogic Portlets as administrator.
- Click the Administration tab.
- Click the Setup EIS Object Preferences link.
- Select the EIS Application Name as Siebel 7.0.4.
- Click Search. The list of Portlets is displayed.
Figure 11 List of Portlets Screen
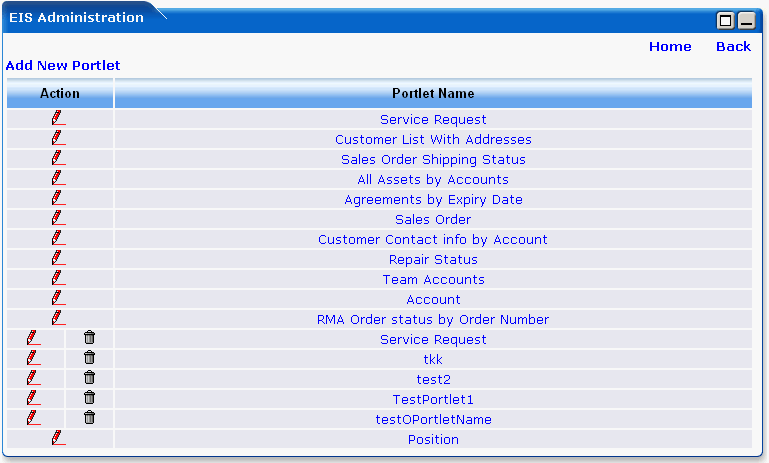
To Create a Portlet:
- Login to BEA WebLogic Portlets as administrator.
- Click the Administration tab.
- Click the Setup EIS Object Preferences link.
- Select the EIS Application Name as Siebel 7.0.4.
- Click the Add New Portlet link.
Figure 12 Portlet Name Screen

- Enter the Portlet name of your choice.
- Click Submit. This Portlet appears in the list of Portlets.
- You can now add new Business Objects for this Portlet.
To Edit the Name of a Portlet:
- Login to BEA WebLogic Portlets as administrator.
- Click the Administration tab.
- Click the Setup EIS Object Preferences link.
- Select the EIS Application Name as Siebel 7.0.4.
- Click Search. The list of Portlets is displayed.
- Click the red pencil icon to edit the name of the required Portlet.

- Make the required changes and click Submit. The Portlet appears in the list of Portlets with the changed name.
To Delete a Portlet:
- Login to BEA WebLogic Portlets as administrator.
- Click the Administration tab.
- Click the Setup EIS Object Preferences link.
- Select the EIS Application Name as Siebel 7.0.4.
- Click Search. The list of Portlets is displayed.
- Click the trash icon to delete the required Portlet.

Viewing/Adding/Editing/Deleting a Business Object for a Portlet
To View the Business Objects for a Portlet:
- Login to BEA WebLogic Portlets as administrator.
- Click the Administration tab.
- Click the Setup EIS Object Preferences link.
- Select the EIS Application Name as Siebel 7.0.4.
- Click Search. The list of existing Portlets appears.
- Click on the name of the required Portlet. The list of Business Objects for that Portlet appears.
Figure 13 List of Business Objects Screen

To Add a Business Object for a Portlet:
- Login to BEA WebLogic Portlets as administrator.
- Click the Administration tab.
- Click the Setup EIS Object Preferences link.
- Select the EIS Application Name as Siebel 7.0.4.
- Click Search. The list of existing Portlets appears.
- Click on the name of the required Portlet.
- Click the Add New Business Object link.
- Enter the Business Object Name.
- Select the Purpose of the Portlet to specify whether it will be used for an UPDATE, VIEW or CREATE operation.
- Click Submit. You can now add new Edit/Display parameters for this Business Object.
To Edit a Business Object for a Portlet:
- Login to BEA WebLogic Portlets as administrator.
- Click the Administration tab.
- Click the Setup EIS Object Preferences link.
- Select the EIS Application Name as Siebel 7.0.4.
- Click Search. The list of existing Portlets appears.
- Click on the name of the required Portlet. The list of Business Objects for that Portlet appears.
- Click the red pencil icon to edit. The list of Edit/Display parameters appears.

- You can now edit the required Edit/Display parameters.
To Delete a Business Object for a Portlet:
- Login to BEA WebLogic Portlets as administrator.
- Click the Administration tab.
- Click the Setup EIS Object Preferences link.
- Select the EIS Application Name as Siebel 7.0.4.
- Click Search. The list of existing Portlets appears.
- Click on the name of the required Portlet. The list of Business Objects for that Portlet appears.
- Click the trash icon to delete the required Business Object.

Viewing/Adding/Editing/Deleting the Edit/Display Parameters for a Business Object
To View the Edit/Display Parameters for a Business Object:
- Login to BEA WebLogic Portlets as administrator.
- Click the Administration tab.
- Click the Setup EIS Object Preferences link.
- Select the EIS Application Name as Siebel 7.0.4.
- Click Search. The list of existing Portlets appears.
- Click on the name of the required Portlet. The list of Business Objects for that Portlet appears.
- Click the red pencil icon. The list of Edit/Display parameters for that Business Object appears.

Figure 14 List of Edit / Display Parameters Screen

To Add the Edit/Display Parameters for a Business Object:
- Login to BEA WebLogic Portlets as administrator.
- Click the Administration tab.
- Click the Setup EIS Object Preferences link.
- Select the EIS Application Name as Siebel 7.0.4.
- Click Search. The list of existing Portlets appears.
- Click on the name of the required Portlet. The list of Business Objects for that Portlet appears.
- Click the red pencil icon.

- Click the Add New Edit Display Parameter link.
Figure 15 Add New Edit / Display Parameters Screen

- Select the Business Component Type as either PRIMARY or SECONDARY.
- The next screen will be displayed.
Figure 16 Add New Edit / Display Table Parameters Screen

- Enter the Business Component Name.
To Edit the Edit/Display Parameters for a Business Object:
- Login to BEA WebLogic Portlets as administrator.
- Click the Administration tab.
- Click the Setup EIS Object Preferences link.
- Select the EIS Application Name as Siebel 7.0.4.
- Click Search. The list of existing Portlets appears.
- Click on the name of the required Portlet. The list of Business Objects for that Portlet appears.
- Click the red pencil icon. The list of Edit/Display parameters for that Business Object appears.

- Click the red pencil icon to edit the required Edit/Display parameter.
To Delete the Edit/Display Parameters for a Business Object:
- Login to BEA WebLogic Portlets as administrator.
- Click the Administration tab.
- Click the Setup EIS Object Preferences link.
- Select the EIS Application Name as Siebel 7.0.4.
- Click Search. The list of existing Portlets appears.
- Click on the name of the required Portlet. The list of Business Objects for that Portlet appears.
- Click the red pencil icon. The list of Edit/Display parameters for that Business Object appears.

- Click the trash icon to delete the required Edit/Display parameter.

Viewing the Log Information
BEA WebLogic Portlets for Siebel logs all the error information in log files. These log files are stored in the portal directory, under the following path:
For example, if the domain used is samples then you will find the logs in <%BEA_HOME%>\bea\weblogic81\samples\domains\portal
where <%BEA_HOME%> is the location where BEA WebLogic Portal is installed.
Troubleshooting
Table 1 Troubleshooting Issues
|
No.
|
Problem
|
Cause
|
|
1
|
Login Failed.
|
Please verify that you have entered the correct username and password.
|
|
2
|
Administrator tab is not visible.
|
Please login using the administrator account
|


