


|
|
These sections explain how to configure JMS application modules for deployment, including JMS application modules packaged with a Java EE enterprise application and globally-available, standalone application modules.
All JMS resources that can be configured in a JMS system module can also be configured and managed as deployable application modules, similar to standard Java EE modules. Deployed JMS application modules are owned by the developer who created and packaged the module, rather than the administrator who deploys the module; therefore, the administrator has more limited control over deployed resources.
For example, administrators can only modify (override) certain properties of the resources specified in the module using the deployment plan (JSR-88) at the time of deployment, but they cannot dynamically add or delete resources. As with other Java EE modules, configuration changes for an application module are stored in a deployment plan for the module, leaving the original module untouched.
Application developers can use these tools to create and deploy (target) system resources
XML file to another directory and rename it, using “-jms.xml” as the file suffix.
In support of the modular deployment model for JMS resources in WebLogic Server 9.x or later, BEA provides a schema for defining WebLogic JMS resources: weblogic-jmsmd.xsd. When you create JMS modules (descriptors), the modules must conform to this schema. IDEs and other tools can validate JMS modules based on the schema.
The weblogic-jmsmd.xsd schema is available online at http://www.bea.com/ns/weblogic/920/weblogic-jmsmd.xsd.
For an explanation of the JMS resource definitions in the schema, see the corresponding system module beans in the “ System Module MBeans” folder of the WebLogic Server MBean Reference. The root bean in the JMS module that represents an entire JMS module is named JMSBean.
JMS application modules can be packaged as part of an Enterprise Application Archive (EAR), as a packaged module. Packaged modules are bundled with an EAR or exploded EAR directory, and are referenced in the weblogic-application.xml descriptor.
The packaged JMS module is deployed along with the Enterprise Application, and the resources defined in this module can optionally be made available only to the enclosing application (i.e., as an application-scoped resource). Such modules are particularly useful when packaged with EJBs (especially MDBs) or Web Applications that use JMS resources. Using packaged modules ensures that an application always has required resources and simplifies the process of moving the application into new environments.
You create packaged JMS modules using an enterprise-level IDE or another development tool that supports editing of XML descriptor files. You then deploy and manage standalone modules using JSR 88-based tools, such as the weblogic.Deployer utility or the WebLogic Administration Console.
| Note: | You can create a packaged JMS module using the Administration Console, then copy the resulting XML file to another directory and rename it, using “-jms.xml” as the file suffix. |
Inside the EAR file, a JMS module must meet the following criteria:
-jms.xml” as the file suffix (for example, MyJMSDescriptor-jms.xml)Follow these steps to configure a packaged JMS module:
config\jms subdirectory of the domain directory, with a “-jms.xml” suffix. When you package a JMS module with an enterprise application, you must reference the JMS resources within the module in all applicable descriptor files of the Java EE application components, including:
When including JMS modules in an enterprise application, you must list each JMS module as a module element of type JMS in the weblogic-application.xml descriptor file packaged with the application, and a path that is relative to the root of the Java EE application. Here’s an example of a reference to a JMS module name Workflows:
<module>
  <name>Workflows</name>
  <type>JMS</type>
  <path>jms/Workflows-jms.xml</path>
</module>
Within any weblogic-foo descriptor file, such as EJB (weblogic-ejb-jar.xml) or WebApp (weblogic.xml), the name of the JMS module is followed by a pound (#) separator character, which is followed by the name of the resource inside the module. For example, a JMS module named Workflows containing a queue named OrderQueue, would have a name of Workflows#OrderQueue.
<resource-env-description>
  <resource-env-ref-name>jms/OrderQueue</resource-env-ref-name>
  <resource-link>Workflows#OrderQueue</resource-link>
</resource-env-description>
Note that the <resource-link> element is unique to WebLogic Server, and is how the resources that are defined in a JMS Module are referenced (linked) from the various other Java EE Application components.
The name element of a JMS Connection Factory resource specified in the JMS module must match the res-ref-name element defined in the referring EJB or WebApp application descriptor file. The res-ref-name element maps the resource name (used by java:comp/env) to a module referenced by an EJB.
For Queue or Topic destination resources specified in the JMS module, the name element must match the res-env-ref field defined in the referring module descriptor file.
That name is how the link is made between the resource referenced in the EJB or Web Application module and the resource defined in the JMS module. For example:
<resource-ref>
  <res-ref-name>jms/OrderQueueFactory</res-ref-name>
  <res-type>javax.jms.ConnectionFactory</res-type>
</resource-ref>
<resource-env-ref>
  <res-env-ref-name>jms/OrderQueue</res-env-ref-name>
  <res-env-ref-type>javax.jms.Queue</res-env-ref-type>
 </resource-env-ref>
The following code snippet is an example of the packaged JMS module, appscopedejbs-jms.xml, referenced by the descriptor files in Figure 5-1 below.
<weblogic-jms xmlns="http://www.bea.com/ns/weblogic/91">
  <connection-factory name="ACF">
  </connection-factory>
  <queue name="AppscopeQueue">
  </queue>
</weblogic-jms>
Figure 5-1 illustrates how a JMS connection factory and queue resources in a packaged JMS module are referenced in an EJB EAR file.
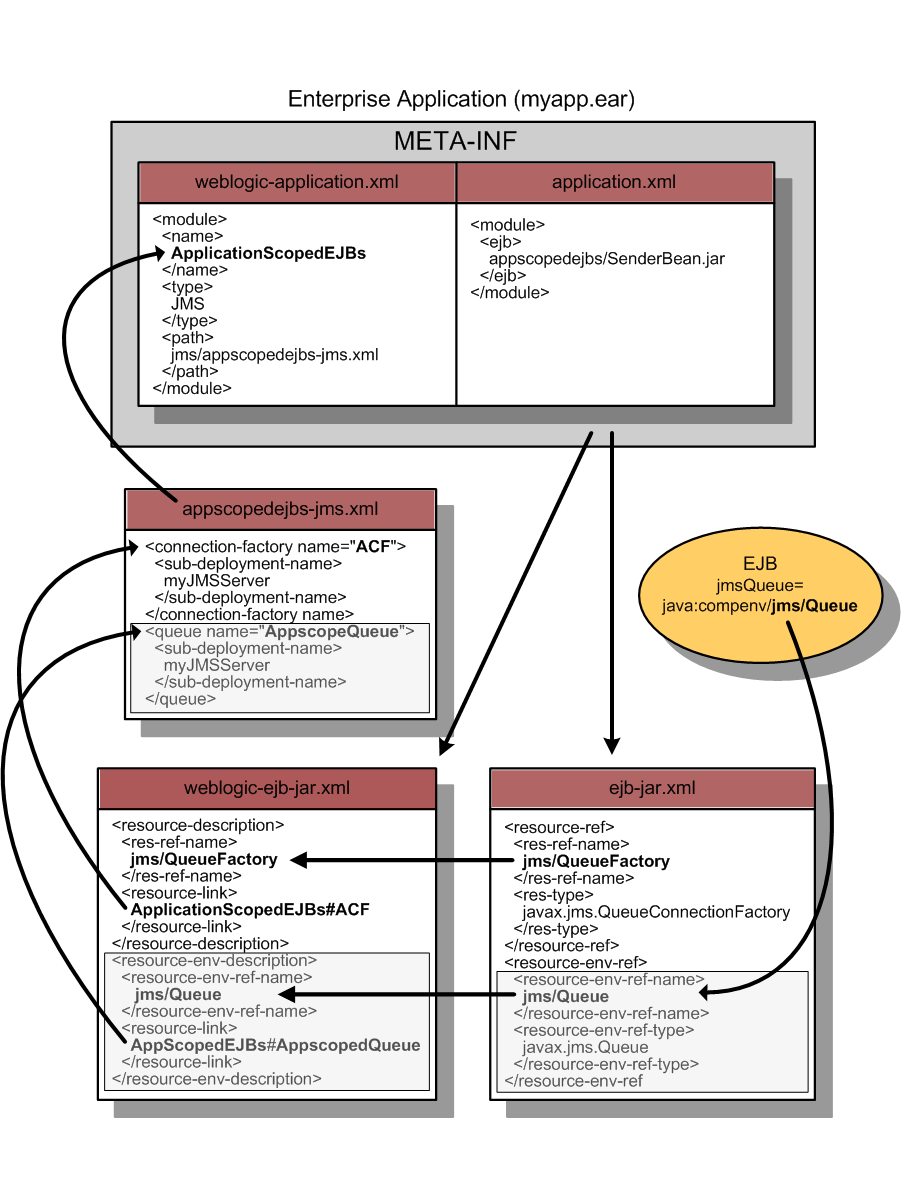
When including JMS modules in an enterprise application, you must list each JMS module as a module element of type JMS in the weblogic-application.xml descriptor file packaged with the application, and a path that is relative to the root of the application. For example:
<module>
  <name>AppScopedEJBs</name>
  <type>JMS</type>
  <path>jms/appscopedejbs-jms.xml</path>
</module>
If EJBs in your application use connection factories through a JMS module packaged with the application, you must list the JMS module as a res-ref element and include the res-ref-name and res-type parameters in the ejb-jar.xml descriptor file packaged with the EJB. This way, the EJB can lookup the JMS Connection Factory in the application’s local context. For example:
<resource-ref>
  <res-ref-name>jms/QueueFactory</res-ref-name>
  <res-type>javax.jms.QueueConnectionFactory</res-type>
</resource-ref>
The res-ref-name element maps the resource name (used by java:comp/env) to a module referenced by an EJB. The res-type element specifies the module type, which in this case, is javax.jms.QueueConnectionFactory.
If EJBs in your application use Queues or Topics through a JMS module packaged with the application, you must list the JMS module as a resource-env-ref element and include the resource-env-ref-name and resource-env-ref-type parameters in the ejb-jar.xml descriptor file packaged with the EJB. This way, the EJB can lookup the JMS Queue or Topic in the application’s the local context. For example:
<resource-env-ref>
  <resource-env-ref-name>jms/Queue</resource-env-ref-name>
  <resource-env-ref-type>javax.jms.Queue</resource-env-ref-type>
</resource-env-ref>
The resource-env-ref-name element maps the destination name to a module referenced by an EJB. The res-type element specifies the name of the Queue, which in this case, is javax.jms.Queue.
You must list the referenced JMS module as a res-ref-name element and include the resource-link parameter in the weblogic-ejb-jar.xml descriptor file packaged with the EJB.
<resource-description>
  <res-ref-name>jms/QueueFactory</res-ref-name>
  <resource-link>AppScopedEJBs#ACF</resource-link>
</resource-description>
The res-ref-name element maps the connection factory name to a module referenced by an EJB. In the resource-link element, the JMS module name is followed by a pound (#) separator character, which is followed by the name of the resource inside the module. So for this example, the JMS module AppScopedEJBs containing the connection factory ACF, would have a name AppScopedEJBs#ACF.
Continuing the example above, the res-ref-name element also maps the Queue name to a module referenced by an EJB. And in the resource-link element, the queue AppScopedQueue, would have a name AppScopedEJBs#AppScopedQueue, as follows:
<resource-env-description>
  <resource-env-ref-name>jms/Queue</resource-env-ref-name>
  <resource-link>AppScopedEJBs#AppScopedQueue</resource-link>
</resource-env-description>You package an application with a JDBC module as you would any other enterprise application. See “ Packaging Applications Using wlpackage” in Developing Applications with WebLogic Server.
The deployment of packaged JMS modules follows the same model as all other components of an application: individual modules can be deployed to a single server, a cluster, or individual members of a cluster.
A recommended best practice for other application components is to use the java:comp/env JNDI environment in order to retrieve references to JMS entities, as described in Referencing JMS Resources In a Java EE Application. (However, this practice is not required.)
By definition, packaged JMS modules are included in an enterprise application, and therefore are deployed when you deploy the enterprise application. For more information about deploying applications with packaged JMS modules, see “ Deploying Applications Using wldeploy” in Developing Applications with WebLogic Server.
A JMS application module can be deployed by itself as a standalone module, in which case the module is available to the server or cluster targeted during the deployment process. JMS modules deployed in this manner can be reconfigured using the weblogic.Deployer utility or the Administration Console, but are not available through JMX or WLST.
However, standalone JMS modules are available using the basic JSR-88 deployment tool provided with WebLogic Server plug-ins (without using WebLogic Server extensions to the API) to configure, deploy, and redeploy Java EE applications and modules to WebLogic Server. For information about WebLogic Server deployment, see “ Understanding WebLogic Server Deployment.”
JMS modules deployed in this manner are called standalone modules. Depending on how they are targeted, the resources inside standalone JMS modules are globally available in a cluster or locally on a server instance. Standalone JMS modules promote sharing and portability of JMS resources. You can create a JMS module and distribute it to other developers. Standalone JMS modules can also be used to move JMS information between domains, such as between the development domain and the production domain, without extensive manual JMS reconfiguration.
You can create JMS standalone modules using an enterprise-level IDE or another development tool that supports editing XML descriptor files. You then deploy and manage standalone modules using WebLogic Server tools, such as the weblogic.Deployer utility or the WebLogic Administration Console.
| Note: | You can create a JMS application module using the Administration Console, then copy the module as a template for use in your applications, using “-jms.xml” as the file suffix. You must also change the Name and JNDI-Name elements of the module before deploying it with your application to avoid a naming conflict in the namespace. |
A standalone JMS module must meet the following criteria:
-jms.xml” as the file suffix (for example, MyJMSDescriptor-jms.xml)Follow these steps to configure a standalone JMS module:
config\jms subdirectory of the domain directory, with a “-jms.xml” suffix. The following code snippet is an example of simple standalone JMS module.
<weblogic-jms xmlns="http://www.bea.com/ns/weblogic/91">
  <connection-factory name="exampleStandAloneCF">
    <jndi-name>exampleStandAloneCF</jndi-name>
  </connection-factory>
  <queue name="ExampleStandAloneQueue">
    <jndi-name>exampleStandAloneQueue</jndi-name>
  </queue>
</weblogic-jms>
The command-line for using the weblogic.Deployer utility to deploy a standalone JMS module (using the example above) would be:
java weblogic.Deployer -adminurl http://localhost:7001 -user weblogic
-password weblogic \
-name ExampleStandAloneJMS \
-targets examplesServer \
-submoduletargets ExampleStandaloneQueue@examplesJMSServer,ExampleStandaloneCF@examplesServer \
-deploy ExampleStandAloneJMSModule-jms.xml
For information about deploying standalone JMS modules, see “ Deploying JDBC and JMS Application Modules.”
When you deploy a standalone JMS module, an app-deployment entry is added to the config.xml file for the domain. For example:
<app-deployment>
  <name>standalone-examples-jms</name>
  <target>MedRecServer</target>
  <module-type>jms</module-type>
  <source-path>C:\modules\standalone-examples-jms.xml</source-path>
  <sub-deployment>
  ...
  </sub-deployment>
  <sub-deployment>
  ...
  </sub-deployment>
</app-deployment>
Note that the source-path for the module can be an absolute path or it can be a relative path from the domain directory. This differs from the descriptor-file-name path for a system resource module, which is relative to the domain\config directory.
JMS resources deployed within standalone modules can be reconfigured using the using the weblogic.Deployer utility or the Administration Console, as long as the resources are considered bindable (such as JNDI names), or tunable (such as destination thresholds). However, standalone resources are not available through WebLogic JMX APIs or the WebLogic Scripting Tool (WLST).
However, standalone JMS modules are available using the basic JSR-88 deployment tool provided with WebLogic Server plug-ins (without using WebLogic Server extensions to the API) to configure, deploy, and redeploy Java EE applications and modules to WebLogic Server. For information about WebLogic Server deployment, see “ Understanding WebLogic Server Deployment.”
Additionally, standalone resources cannot be dynamically added or deleted with any WebLogic Server utility and must be redeployed.
JMS resources, such as connection factories and destinations, are configured with a JNDI name. The runtime implementations of these resources are then bound into JNDI using the given names. In some cases, it is impossible or inconvenient to provide a static JNDI name for these resources.
An example of such a situation is when JMS resources are defined in a JMS module within an application library. In this case, the library can be referenced from multiple applications, each of which receive a copy of the application library (and the JMS module it contains) when they are deployed. If you were to use static JNDI names for the JMS resources in this case, all applications that refer to the library would attempt to bind the same set of JNDI resources at the same static JNDI name.
Therefore, the first application to deploy would successfully bind the JMS resources into JNDI, but subsequent application deployments would fail with exceptions indicating that the JNDI names are already bound.
To avoid this problem, WebLogic Server provides a facility to dynamically generate a JNDI name for the following types of JMS resources:
The facility to generate unique names is based on placing a special character sequence called ${APPNAME} in the JNDI name of the above mentioned JMS resources. If you include ${APPNAME} in the JNDI name element of a JMS resource (either in the JMS module descriptor, or the weblogic-ejb-jar.xml descriptor), the actual JNDI name used at runtime will have the ${APPNAME} string replaced with the effective application ID (name and possibly version) of the application hosting the JMS resource.
| Note: | The ${APPNAME} facility does not imply that you can define your own variables and substitute their values into the JNDI name at runtime. The string ${APPNAME} is treated specially by the JMS implementation, and no other strings of the form ${<some name>} have any special meaning. |
In the case of JMS modules in a local application, at runtime ${APPNAME} becomes the name/ID of the application. For example:
<jndi-name>${APPNAME}/jms/MyConnectionFactory</jndi-name>
When deployed within an application called MyApp, it would result in a runtime JNDI name of:
MyApp/jms/MyConnectionFactory
In the case of JMS modules in an application library, at runtime ${APPNAME} becomes the name/ID of the application which refers to the library (not the name of the library). For example:
<jndi-name>${APPNAME}/jms/MyConnectionFactory</jndi-name>
When deployed within an application library called MyAppLib, and referenced from an application called MyApp, it would result in a runtime JNDI name of:
MyApp/jms/MyConnectionFactory
In the case of JMS modules deployed as stand-alone modules, at runtime ${APPNAME} becomes the name/ID of the stand-alone module. For example:
<jndi-name>${APPNAME}/jms/MyConnectionFactory</jndi-name>
When deployed within a stand-alone JMS module MyJMSModule, it would result in a runtime JNDI name of:
MyJMSModule/jms/MyConnectionFactory
The ${APPNAME} string can be used anywhere you refer to the JNDI name of a JMS resource. For example, in the:
jndi-name or local-jndi-name element of connection-factory elements in the JMS module descriptor.jndi-name or local-jndi-name element of queue or topic elements in the JMS module descriptor.jndi-name element of distributed-queue or distributed-topic elements in the JMS module descriptor.jndi-name element of uniform-distributed-queue or uniform-distributed-topic elements in the JMS module descriptor.destination-jndi-name element of message-destination-descriptor elements in the weblogic-ejb-jar.xml descriptor.| Note: | WebLogic EJB also supports the use of the ${APPNAME} string. |
jndi-name element of weblogic-enterprise-bean elements in the weblogic-ejb-jar.xml descriptor.
In a single-server environment, Weblogic Integration Worklist uses application-scoped JMS resources (e.g., queues and connection factories) to support its modular deployment goals. Application-scoped JMS allows Weblogic Integration to have an application library define the EJBs, JMS resources, etc., needed by Worklist, and then have users simply include Worklist into their application by adding a library-ref to their application. However, this prevents Worklist user from scaling those destinations to the cluster from an application library.
In a clustered environment, users can now substitute the ${APPNAME} string for the queue’s JNDI name at runtime to make the global JNDI names for the queues unique. This way, the JMS ${APPNAME} parameter is replaced at runtime with the application name of the host application being merged to the application library.


|