|
|
|
|
|
|
| | | |
Managing JMS
The following sections explain how to manage the Java Message Service (JMS) for WebLogic Server:
JMS and WebLogic Server
JMS is a standard API for accessing enterprise messaging systems. Specifically, WebLogic JMS:
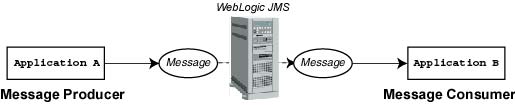
The following figure illustrates WebLogic JMS messaging.
Figure 17-1 WebLogic Server JMS Messaging
As illustrated in the figure, WebLogic JMS accepts messages from producer applications and delivers them to consumer applications.
Using the Administration Console, you define configuration attributes to:
WebLogic JMS provides default values for some configuration attributes; you must provide values for all others. If you specify an invalid value for any configuration attribute, or if you fail to specify a value for an attribute for which a default does not exist, WebLogic Server will not boot JMS when you restart it. A sample examplesJMSServer configuration is provided with the product in the Examples Server. For more information about starting the Examples Server, see "Starting the Default, Examples, and Pet Store Servers" in the Installation Guide.
When you migrate WebLogic Server applications from a previous release, the configuration information will be converted automatically, as described in "Migrating Existing Applications" in Programming WebLogic JMS.
To configure WebLogic JMS attributes, follow the procedures described in the following sections, or in the Administration Console Online Help, to create and configure the JMS objects.
Once WebLogic JMS is configured, applications can send and receive messages using the JMS API. For more information about developing WebLogic JMS applications, refer to "Developing a WebLogic JMS Application" in Programming WebLogic JMS.
Note: To assist with your WebLogic JMS configuration planning, Programming WebLogic JMS provides configuration checklists for the attribute requirements and/or options that support various JMS features.
JMS Configuration Naming Rules
Each server within a domain must have a name that is unique for all configuration objects in the domain. Within a domain, each server, machine, cluster, virtual host, and any other resource type must be named uniquely and must not use the same name as the domain. This unique naming rule also applies to all configurable JMS objects, such as JMS servers, stores, templates, and connection factories.
The one exception to this unique naming rule, however, is for JMS queue and topic destinations on different JMS servers in a domain, as follows:
Starting WebLogic Server and Configuring JMS
The following sections review how to start WebLogic Server and the Administration console, as well as provide a procedure for configuring a basic JMS implementation.
Starting the Default WebLogic Server
The default role for a WebLogic Server is the Administration Server. If a domain consists of only one WebLogic Server, that server is the Administration Server. If a domain consists of multiple WebLogic Servers, you must start the Administration Server first, and then you start the Managed Servers.
For complete information about starting the Administration Server, see Starting and Stopping WebLogic Servers.
Starting the Administration Console
The Administration Console is the Web-based administrator front-end (administrator client interface) to WebLogic Server. You must start the server before you can access the Administration Console for a server.
For complete details about using the Administration Console to configure a WebLogic Server, see Administration Console.
Configuring a Basic JMS Implementation
This section describes how to configure a basic JMS implementation using the Administration Console.
Note: For more information on configuring stores, see Configuring Stores.
Note: For more information on configuring JDBC connection pools, see Configuring and Managing JDBC Connection Pools, MultiPools, and DataSources Using the Administration Console.
Note: For more information on configuring a JMS Template, see Configuring JMS Templates.
Note: For more information on configuring a JMS Server, see Configuring JMS Servers.
Note: For more information on configuring a Destinations, see Configuring Destinations.
Note: For more information on configuring a Connection Factory, see Configuring Connection Factories.
A JMS server manages connections and message requests on behalf of clients.
To create a JMS server, use the Servers node in the Administration Console and define the following:
Note: JMS servers must be uniquely named within a domain. For more information, see JMS Configuration Naming Rules.
Note: The deployment of a JMS server differs from that of a connection factory or template. A JMS server is deployed on a single server. A connection factory or template can be instantiated on multiple servers simultaneously.
For instructions on creating and configuring a JMS server, see "JMS Servers" in the Administration Console Online Help.
Configuring Connection Factories
Connection factories are objects that enable JMS clients to create JMS connections. A connection factory supports concurrent use, enabling multiple threads to access the object simultaneously. You define and configure one or more connection factories to create connections with predefined attributes. WebLogic Server adds them to the JNDI space during startup, and the application then retrieves a connection factory using WebLogic JNDI.
You can establish cluster-wide, transparent access to destinations from any server in the cluster by configuring multiple connection factories and using targets to assign them to WebLogic Servers. Each connection factory can be deployed on multiple WebLogic Servers. For more information on JMS clustering, refer to "WebLogic JMS Fundamentals" in Programming WebLogic JMS.
To configure connection factories, use the Connection Factories node in the Administration Console to define the following:
close() method is allowed to be called from the onMessage() method.
JMS connection factories must be uniquely named within a domain. For more information, see JMS Configuration Naming Rules.
WebLogic JMS defines one connection factory, by default: weblogic.jms.ConnectionFactory. All configuration attributes are set to their default values for this default connection factory. If the default connection factory definition is appropriate for your application, you do not need to configure any additional connection factories for your application.
Note: Using the default connection factory, you have no control over the JMS server on which the connection factory may be deployed. If you would like to target a particular JMS server, create a new connection factory and specify the appropriate JMS server target(s).
For instructions on creating and configuring a connection factory, see "JMS Connection Factories" in the Administration Console Online Help.
Some connection factory attributes are dynamically configurable. When dynamic attributes are modified at run time, the new values become effective for new connections only, and do not affect the behavior of existing connections.
A destination identifies a queue (Point-To-Point) or a topic (Pub/Sub) for a JMS server. After defining a JMS server, configure one or more destination for each JMS server.
You configure destinations explicitly or by configuring a destination template that can be used to define multiple destinations with similar attribute settings, as described in Configuring JMS Templates.
To configure destinations explicitly, use the Destinations node in the Administration Console, and define the following configuration attributes:
Note: JMS destinations have unique naming restrictions within a domain. For more information, see JMS Configuration Naming Rules.
For instructions on creating and configuring a destination, see "JMS Destinations" in the Administration Console Online Help.
Some destination attributes are dynamically configurable. When attributes are modified at run time, only incoming messages are affected; stored messages are not affected.
A JMS template provides an efficient means of defining multiple destinations with similar attribute settings. JMS templates offer the following benefits:
To define the JMS template configuration attributes for destinations, use the Templates node in the Administration Console. The configurable attributes for a JMS template are the same as those configured for a destination. These configuration attributes are inherited by the destinations that use them, with the following exceptions:
Note: JMS templates have unique naming restrictions within a domain. For more information, see JMS Configuration Naming Rules.
Any attributes that are not explicitly defined for a destination are assigned default values. If no default value exists, be sure to specify a value within the JMS template or as a destination attribute override. If you do not do so, the configuration information remains incomplete, the WebLogic JMS configuration fails, and the WebLogic JMS does not boot.
For instructions on creating and configuring a JMS template, see "JMS Templates" in the Administration Console Online Help.
Use destination keys to define the sort order for a specific destination.
To create a destination key, use the Destination Keys node in the Administration Console and define the following configuration attributes:
For instructions on creating and configuring a destination key, see "JMS Destination Keys" in the Administration Console Online Help.
The persistent store consists of a file or database that is used for persistent messaging. To create a file or database store, use the Stores node in the Administration Console and define the following configuration attributes:
Note: JMS stores have unique naming restrictions within a domain. For more information, see JMS Configuration Naming Rules.
Warning: You cannot configure a transaction (XA) connection pool to be used with a JDBC database store For more information, see JMS JDBC Transactions.
JMS persistent stores can increase the amount of memory required during initialization of a WebLogic Server instance as the number of stored messages increases. If initialization fails due to insufficient memory when you are rebooting WebLogic Server, increase the heap size of the Java Virtual Machine (JVM) proportionally to the number of messages that are currently stored in the JMS persistent store. Then, try rebooting the server again. For more information on setting heap sizes, see "Tuning WebLogic Server Applications" in the WebLogic Performance and Tuning Guide.
For instructions on creating and configuring a store, see "JMS File Stores" and "JMS JDBC Stores" for information about file and JDBC database stores, respectively, in the Administration Console Online Help.
About JMS JDBC Stores
Through the use of JDBC, JMS enables you to store persistent messages in a database, which is accessed through a designated JDBC connection pool. The JMS database can be any database that is accessible through a JDBC driver. WebLogic JMS detects some drivers for the following databases:
The weblogic/jms/ddl directory within the weblogic.jar file contains JMS DDL files for these databases, which are actually text files containing the SQL commands that create the JMS database tables. To use a different database, simply copy and edit any one of these .ddl files.
Note: The JMS samples provided with your WebLogic Server distribution are set up to work with the Cloudscape Java database. An evaluation version of Cloudscape is included with WebLogic Server and a demoPool database is provided.
If your existing JMS JDBC stores somehow become corrupted, you can regenerate them using the utils.Schema utility. For more information see, "JDBC Database Utility" in Programming WebLogic JMS.
JMS JDBC Transactions
You cannot configure a transaction (XA) JDBC connection pool to be used with a JMS JDBC store. JMS must use a JDBC connection pool that uses a non-XAResource driver (you cannot use an XA driver or a JTS driver). JMS does the XA support above the JDBC driver.
This is because WebLogic JMS is its own resource manager. That is, JMS itself implements the XAResource and handles the transactions without depending on the database (even when the messages are stored in the database). This means that whenever you are using JMS and a database (even if it is the same database where the JMS messages are stored), then it is two-phase commit transaction. For more information about using transactions with WebLogic JMS, see "Using Transactions with WebLogic JMS" in Programming WebLogic JMS.
From a performance perspective, you may boost your performance if the JDBC connection pool used for the database work exists on the same WebLogic Server as the JMS queue—the transaction will still be two-phase, but it will be handled with less network overhead. Another performance boost might be achieved by using JMS file stores rather than JMS JDBC stores.
JMS JDBC Security
Optionally, you can restrict the access control list (ACL) for the JDBC connection pool. If you restrict this ACL, you still must include the WebLogic Server system user and any user who sends JMS messages in the list. For more information on managing WebLogic Server security, see Managing Security.
About JMS Store Table Prefixes
The JMS database contains two system tables that are generated automatically and are used internally by JMS:
The prefix name uniquely identifies JMS tables in the persistent store. Specifying unique prefixes allows multiple stores to exist in the same database. You configure the prefix via the Administration Console when configuring the JDBC store. A prefix is prepended to table names when the DBMS requires fully qualified names, or when you must differentiate between JMS tables for two WebLogic Servers, enabling multiple tables to be stored on a single DBMS.
Warning: No two JMS stores should be allowed to use the same database tables, as this will result in data corruption.
Specify the prefix using the following format, which will result in a valid table name when prepended to the JMS table name:
[[[catalog.]schema.]prefix]JMSStore
where catalog identifies the set of system tables being referenced by the DBMS and schema translates to the ID of the table owner. For example, in a production database the JMS administrator could maintain a unique table for the Sales department, as follows:
[[[Production.]JMSAdmin.]Sales]JMSStore
Note: For some DBMS vendors, such as Oracle, there is no catalog to set or choose, so this format simplifies to [[schema.]prefix]. For more information, refer to your DBMS documentation for instructions on how to write and use a fully-qualified table name.
Recommended JDBC Connection Pool Settings for JMS Stores
WebLogic Server provides robust JDBC connection pools that can automatically reconnect to failed databases after they come back online, without requiring you to restart WebLogic Server. To take advantage of this capability, and make your use of JMS JDBC stores more robust, configure the following attributes on the JDBC connection pool associated with the JMS JDBC store:
TestConnectionsOnReserve="true"
TestTableName="[[[catalog.]schema.]prefix]JMSState"
Server session pools enable an application to process messages concurrently. After you define a JMS server, optionally, configure one or more session pools for each JMS server.
Use the Session Pools node in the Administration Console and define the following configuration attributes:
For instructions on creating and configuring a session pool, see "JMS Session Pools" in the Administration Console Online Help.
Some session pool attributes are dynamically configurable, but the new values do not take effect until the session pools are restarted.
Configuring Connection Consumers
Connection consumers are queues (Point-To-Point) or topics (Pub/Sub) that retrieve server sessions and process messages. After you define a session pool, configure one or more connection consumers for each session pool.
To configure connection consumers, use the Session Pools node in the Administration Console to define the following configuration attributes:
To create and configure a connection consumer, and for detailed information about each of the connection consumer configuration attributes, see "JMS Connection Consumers" in the Administration Console Online Help.
Using the Administration Console, you can monitor statistics for the following JMS objects: JMS servers, connections, sessions, destinations, message producers, message consumers, server session pools, and durable subscribers.
JMS statistics continue to increment as long as the server is running. Statistics are reset only when the server is rebooted.
Note: For instructions on monitoring JMS connections to WebLogic Server, refer to the Server section in the Administration Console Online Help.
Monitoring JMS Objects
To view JMS monitoring information:
The JMS Servers information is displayed in the right pane.
For detailed information about the information being monitored, see the Administration Console Online Help.
Monitoring Durable Subscribers
To view JMS durable subscribers that are running on destination topics:
The JMS destination information is displayed in a table format in the right pane, with the Durable Subscriber Runtimes column listing the number of durable subscribers running (if any) for the destination topics listed in the table.
For detailed information about the information being monitored, see the Administration Console Online Help.
The following sections explain how to get the most out of your applications by implementing the administrative performance tuning features available with WebLogic JMS.
Persistent Stores
The following sections describe the tuning options available when using persistent stores with WebLogic Server JMS.
Disabling Synchronous Writes to File Stores
By default, WebLogic Server JMS file stores guarantee up-to-the-message integrity by using synchronous writes. Disabling synchronous writes improves file store performance, often quite dramatically, but at the expense of possibly losing sent messages or generating duplicate received messages (even if messages are transactional) in the event of an operating system crash or a hardware failure. Simply shutting down an operating system will not generate these failures, as an operating system flushes all outstanding writes during a normal shutdown. Instead, these failures can be emulated by shutting the power off to a busy server.
Note: At least one JMS vendor disables synchronous writes by default, and this vendor only allows enabling synchronous writes for sends and not for receives.
To disable synchronous writes for all JMS file stores running on a WebLogic server set the following command-line property:
-Dweblogic.JMSFileStore.SynchronousWritesEnabled=false
To disable synchronous writes for a particular JMS file store:
-Dweblogic.JMSFileStore.store-name.SynchronousWritesEnabled=false
If both properties are set, the latter command overrides the former. A log message is generated when synchronous writes are disabled. This can be used to verify that the command-line property is taking effect.
With the message paging feature, you can free up virtual memory during peak message load periods. This feature can greatly benefit applications with large message spaces.
JMS message paging saves memory for both persistent and non-persistent messages, as even persistent messages cache their data in memory. Paged persistent messages continue to be written to the regular backing store (file or database); and paged non-persistent messages are written to the JMS server's messsage paging store, which is configured separately.
A paged-out message does not free all of the memory that it consumes. The message header and message properties remain in memory for use with searching, sorting, and filtering.
IConfiguring Paging
Unless paging is configured and enabled, all messages (even persistent ones) are held in memory. You can configure paging for a new or existing JMS server and/or its destinations through the Administration Console. Using the attributes on the JMS Server node you can specify a paging store for a JMS server, enable bytes and/or messages paging, and configure bytes/messages high and low thresholds to start and stop paging.
Similarly, using the attributes on the Destinations node, you can configure bytes/messages paging for all topics and queues configured on a JMS server. The destinations use the paging store that is configured for the JMS server.
Also, if you use JMS templates to configure multiple destinations, you can use the attributes on the Templates node to configure paging quickly on all your destinations. To override a template's paging configuration for specific destinations, you can enable or disable paging on any destination.
For instructions on configuring a new JMS server, templates, and destinations (Topics or Queues), see "JMS Servers," "JMS Destinations," and "JMS Templates" in the Administration Console Online Help.
Note: For performance tuning purposes, you can modify the paging thresholds to any legal value at any time. Once paging is enabled, however, you cannot dynamically disable it by resetting a byte or message threshold back to -1. To prevent paging from occurring, set the byte/message high threshold to a very large number (maximum is 263 -1), so that paging is not triggered.
Configuring a Paging Store for a JMS Server
Each JMS server must have its own paging store, which is used exclusively for paging out non-persistent messages for the JMS server and its destinations. It's best to use a JMS file store rather than a JMS JDBC store, as the JDBC store will perform poorly in comparison without any real benefit.
To configure a new paging store:
Configuring Paging on a JMS Server
To enable and configure paging on an existing JMS server:
For instructions on configuring a paging store, refer to Configuring a Paging Store for a JMS Server.
Note: Each JMS server must have its own paging store.
Configuring Paging on a JMS Template
JMS templates provide an efficient way to define multiple destinations (topics or queues) with similar attribute settings. To configure paging on a template for destinations, do the following:
Configuring Paging on Destinations
Follow these directions if you are configuring paging on destinations without using a JMS template.
Note: If you use JMS templates to configure your destinations, a destination's explicit Byte/Messages Paging configuration overrides the template's configuration. For more information, refer to Configuring a Destination to Override Paging on a JMS Template and to Configuring JMS.
Configuring a Destination to Override Paging on a JMS Template
Follow these directions if you want to override a template's settings and enable or disable paging on a specific destination.
JMS Paging Attributes
The following sections briefly describe the paging attributes available with WebLogic Server JMS.
JMS Server Paging Attributes
Table 17-1 describes the paging attributes that you define when configuring paging on a JMS Server. For detailed information about other JMS Server attributes, and the valid and default values for them, see "JMS Servers" in the Administration Console Online Help.
JMS Template Paging Attributes
Table 17-3 describes the paging attributes that you define when configuring paging on JMS templates for destinations. For detailed information about other JMS template attributes, and the valid and default values for them, see "JMS Templates" in the Administration Console Online Help.
JMS Destination Paging Attributes
Table 17-3 describes the attributes that you define when configuring paging on destinations. For detailed information about other JMS destination attributes, and valid and default values for them, see "JMS Destinations" in the Administration Console Online Help.
Note: If server paging is enabled, and destination-level paging is disabled for a given destination, than messages on the destination can still be paged if server paging is triggered. However, when destination-level paging is disabled for a given destination, then the destination's high thresholds will not force the destination to page out messages when they are exceeded.
Paging Threshold Attributes
Table 17-4 briefly describes the bytes and messages paging thresholds available with JMS servers, templates, and destinations. For detailed information about other JMS server, template, and destination attributes, and the valid and default values for them, see "JMS Servers," "JMS Destinations," and "JMS Templates" in the Administration Console Online Help.
The thresholds are defined for servers, templates, and destinations as follows:
Recovering from a WebLogic Server Failure
The following sections describe how to restart or replace a WebLogic Server instance in the event of a system failure, and provide programming considerations for gracefully terminating a JMS application following such an event.
Restarting or Replacing WebLogic Server
When a WebLogic Server fails, you can use one of three methods to perform a system recovery:
To restart the failed server instance or start up a new server instance using the same IP address as the failed server, boot the server and start the server processes, as described in Starting and Stopping WebLogic Servers.
To start up a new server instance using a different IP address than the failed server:
Note: JMS persistent stores can increase the amount of memory required during initialization of WebLogic Server as the number of stored messages increases. When rebooting WebLogic Server, if initialization fails due to insufficient memory, increase the heap size of the Java Virtual Machine (JVM) proportionally to the number of messages that are currently stored in the JMS persistent store and try the reboot again.
You may want to program your JMS application to terminate gracefully in the event of a WebLogic Server failure. For example:
|
|
|
|
|
|
|
Copyright © 2001 BEA Systems, Inc. All rights reserved.
|