Administering WebLogic Server XML
The following sections describe XML administration with WebLogic Server:
Overview of Administering WebLogic Server XML
You access the XML Registry through the Administration Console and use it to configure WebLogic Server for XML applications.
To invoke the Administration Console in your browser, enter the following URL:
http://host:port/console
where
- host refers to the computer on which WebLogic Administration server is running.
- port refers to the port number where WebLogic Administration server is listening for connection requests. The default port number for WebLogic Administration server is 7001.
XML Administration Tasks
You create, configure, and use the XML Registry through the Administration Console. The benefits of using the Administration Console XML Registry are as follows:
- Configuration of XML Registry changes take effect automatically at run time, provided you use JAXP in your XML applications.
- When you make changes to the XML Registry, it is not necessary to change your XML application code.
- Entity resolution is done locally. You can use the XML Registry either to define a local copy of an entity or to specify that WebLogic Server cache an entity from the Web for a specified duration and use the cached copy rather than the one out on the Web.
You can use the XML Registry to specify:
- An alternative server-wide XML parser instead of the built-in parser.
- An XML parser per document.
- An alternative server-wide transformer instead of the built-in transformer.
- External entities that are to be resolved by using local copies of the entities. Once you specify these entities, the Administration Server stores local copies of them in the file system and automatically distributes them to the server's parser at parse time. This feature eliminates the need to construct and set SAX EntityResolvers.
- External entities to be cached by WebLogic Server after retrieval from the Web. You specify how long these external entities should be cached before WebLogic Server re-retrieves them and when WebLogic should first retrieve the entities, either at application run time or when WebLogic Server starts.
These capabilities are for use on the server side only.
How the XML Registry Works
You can create as many XML Registries as you like; however, you can associate only one XML Registry with a particular instance of WebLogic Server.
If an instance of WebLogic Server does not have an XML Registry associated with it, then the built-in parser and transformer are used when parsing or transforming documents. In addition, you cannot configure external entity resolution to increase the performance of your XML applications.
Once you associate an XML Registry with an instance of WebLogic Server, all XML configuration options are available for XML applications that use that server.
You can configure the following two types of entries for a given XML registry:
- to configure parsers and transformers.
- to configure external entity resolution.
Note: The XML Registry is case sensitive. For example, if you are configuring a parser for an XML document type whose root element is <CAR>, you must enter CAR in the Root Element Tag field and not car or Car.
Parser Selection Within the XML Registry
The XML Registry is automatically consulted whenever you use JAXP to write your XML applications. WebLogic Server follows an ordered lookup when determining which parser class to load:
- Use the parser defined for a particular document type.
- Use the alternative server-wide parser defined in the XML Registry associated with the WebLogic Server instance.
- Use the built-in Xerces parser.
The process is also true for transformers, except for the first step, because you cannot define a transformer for a particular document type.
Additionally, when WebLogic Server starts, a SAX entity resolver is automatically set so that it can resolve entities that are declared in the registry. As a result, users are not required to modify their XML application code to control the parsers used, or to set the location of local copies of external entities. The parser being used and the location of the external entity is controlled by the XML Registry.
Note: If you elect to use an API provided by a parser instead of JAXP, the XML Registry has no effect on the processing of XML documents. For this reason, it is highly recommended that you always use JAXP in your XML applications.
XML Parser and Transformer Configuration Tasks
By default, WebLogic Server is configured to use the built-in parser and transformer to parse and transform XML documents. In release 6.1, the built-in XML parser is Apache Xerces and the built-in transformer is Apache Xalan. As long as you use the default, you do not have to perform any configuration tasks for your XML applications. If you want to use a parser or transformer other than the built-in, you must use the XML Registry to configure them, as described in the following sections.
Configuring a Parser or Transformer Other Than the Built-In
The following procedure first describes how to create an XML registry that defines SAX and DOM parsers and transformers. It then describes how to associate the new XML Registry with an instance of WebLogic Server so that the server starts to use the new parsers and transformer.
- Start the WebLogic Administration server and invoke the Administration Console in your browser. See Overview of Administering WebLogic Server XML for information on invoking the Administration Console.
- In the left pane, right-click the XML node under the Services node and select Configure a new XML Registry from the drop-down menu. The window to create a new XML registry is displayed, as shown in the following figure:
Figure 4-1 Main XML Registry Window in Administration Console
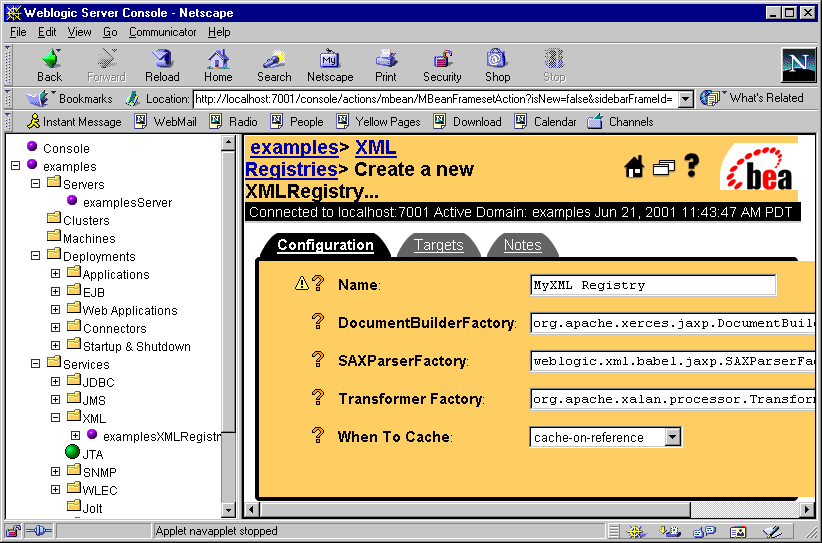
- Enter a unique registry name in the Name field and set the DocumentBuilderFactory, SaxParserFactory, and TransformerFactory fields to the appropriate Factory parser and transformer classes.
For example, to use WebLogic FastParser, enter the following information:
Name: WebLogic FastParser
DocumentBuilderFactory:
SAXParserFactory: weblogic.xml.babel.jaxp.SAXParserFactoryImpl
TransformerFactory:
Note that in the preceding example, DocumentBuilderFactory and TransformerFactory have been left blank. This means that for DOM parsing and transformation, the built-in parser and transformer are used, respectively. The WebLogic FastParser will only be used for SAX parsing.
If you want to directly specify the Apache Xerces parser and Xalan transformer, enter the following information:
Name: Apache Xerces/Xalan Registry
DocumentBuilderFactory: org.apache.xerces.jaxp.DocumentBuilderFactoryImpl
SAXParserFactory: org.apache.xerces.jaxp.SAXParserFactoryImpl
TransformerFactory: org.apache.xalan.processor.TransformerFactoryImpl
- Click the Create button. The XML Registry is created and listed under the XML node in the left pane.
- In the left pane under the Servers node, click the name of the server with which you want to associate the new XML registry.
- In the right pane, select the Services tab.
- Select the XML tab. The window to configure XML properties of WebLogic Server appears in the right pane, as shown in the following figure:
Figure 4-2 Window to Configure XML Properties in Administration Console
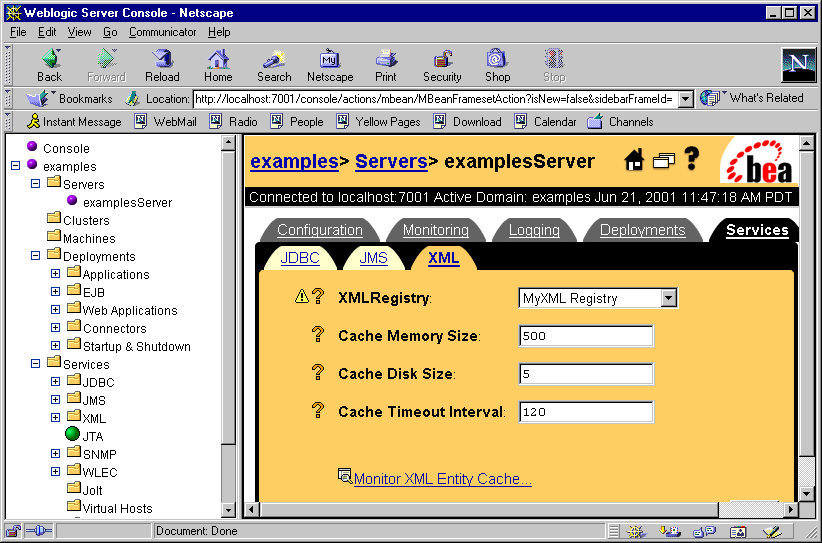
- Select the XML registry name that you want to associate with this server in the XML Registry field and click the Apply button.
- Restart your server so the new settings to take effect.
Configuring a Parser for a Particular Document Type
When you configure a parser for a particular document type, you can use the document's system id, public id, or root element tag to identify the document type.
Note: The following procedure assumes that you are going to create a new XML registry, add the necessary parser registry entries, and associate it with a server. If you have already associated an existing XML registry with your server, skip to step 5.
To configure a parser for a particular document type, follow these steps:
- Start the WebLogic Administration server and invoke the Administration Console in your browser.
See Overview of Administering WebLogic Server XML for information on invoking the Administration Console.
- In the left pane, right-click the XML node under the Services node and select Configure a new XML Registry from the drop-down menu. The window to create a new XML registry is displayed, as shown in Figure 4-1.
- Enter a unique registry name in the Name field. If you want to configure default parsers and transformer for your server, enter the factory class names in the DocumentBuilderFactory, SaxParserFactory, and TransformerFactory fields. Otherwise, leave these fields blank.
- Click the Create button. The XML Registry is created and listed under the XML node in the left pane.
- Under the XML node in the left pane, right-click the XML Parser Select Registry Entry node under your XML registry. Select Configure a New XMLParserSelectRegistryEntry from the drop-down menu. A blank window for entering document type information appears in the right pane, as shown in the following figure:
Figure 4-3 Configuring an XML Parser Using the Administration Console
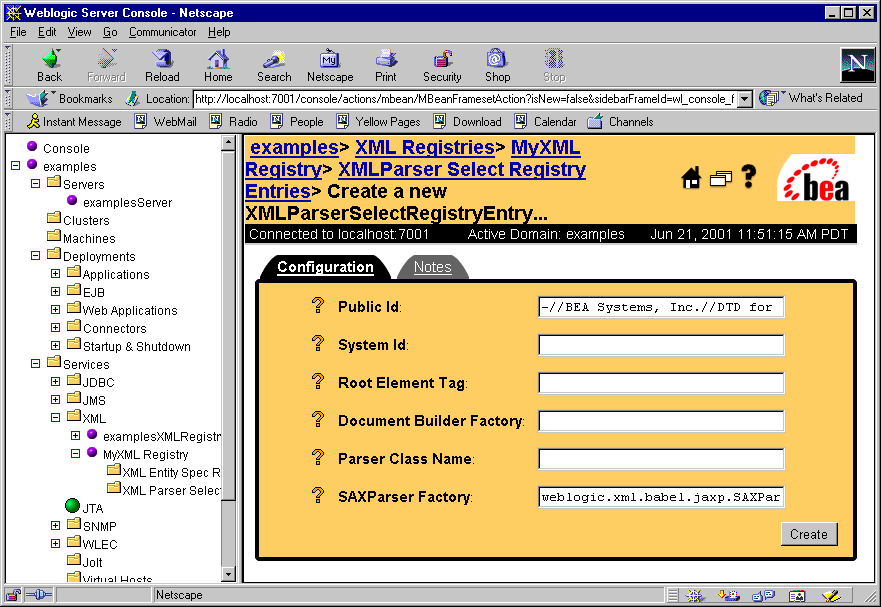
- Enter the document type information in one of the following ways:
- Use either the Public Id or the System Id field to specify the doctype. For example, for the car.xml (see Listing 4-1), enter -//BEA Systems, Inc.//DTD for cars//EN in the Public Id field.
- Specify the Root Element Tag name of the document. For the car.xml example, enter CAR in the Root Element Tag field.
If your XML document defines a namespace, be sure to enter the fully qualified root element tag, such as VEHICLES:CAR.
Listing 4-1 car.xml File
<?xml version="1.0"?>
<!-- This XML document describes a car -->
<!DOCTYPE CAR PUBLIC "-//BEA Systems, Inc.//DTD for cars//EN"
"http://www.bea.com/dtds/car.dtd">
<CAR>
<MAKE>Toyota</MAKE>
<MODEL>Corrolla</MODEL>
<YEAR>1998</YEAR>
<ENGINE>1.5L</ENGINE>
<HP>149</HP>
</CAR>
- Set the DocumentBuilderFactory or SaxParserFactory fields to the appropriate Factory parser classes.
For example, enter weblogic.xml.babel.jaxp.SAXParserFactoryImpl in the SaxParserFactory field to specify that this document type be parsed by WebLogic FastParser.
Note: Do not enter any information in the Parser Class Name field; this field is for backward compatibility with previous versions of WebLogic Server only.
- Click the Create button. The XMLParserSelect registry entry is created.
- In the left pane under the Servers node, click the name of the server with which you want to associate the new XML registry.
- In the right pane, select the Services tab.
- Select the XML tab. The window to configure XML properties of WebLogic Server appears in the right pane, as shown in Figure 4-2.
- In the XML Registry field, select the XML registry name that you want to associate with this server, and click the Apply button.
- Restart your server so the new settings to take effect.
External Entity Configuration Tasks
You can use the XML Registry to configure external entity resolution and to configure and monitor the external entity cache.
Configuring External Entity Resolution
You can configure external entity resolution with WebLogic Server in the following two ways:
- Physically copy the entity files to a directory accessible by WebLogic Administration Server and specify that the Administration Server use the local copy whenever the external entity is referenced in an XML document.
- Specify that a managed WebLogic Server cache external entities that are referenced with a URL or a pathname relative to the Administration server, either at server-startup or when the entity is first referenced.
Caching the external entity in the managed WebLogic Server saves the remote access time and provides a local backup in the event that the Administration server cannot be accessed while an XML document is being parsed, due to the network or the Administration server being down.
You can configure the expiration date a cached entity, at which point WebLogic Server re-retrieves the entity from the URL or Administration server and re-caches it.
Note: In the following procedure it is assumed that you are going to create a new XML registry, add the necessary external entity resolution registry entries, and associate it with a server. If you have already associated an existing XML registry with your server, skip to step 5.
To configure external entity resolution, perform the following steps:
- Start the WebLogic Administration Server and invoke the Administration Console in your browser.
See Overview of Administering WebLogic Server XML for information on invoking the Administration Console.
- Right-click the XML node under the Services node in the left pane and select Configure a new XML Registry from the drop-down menu. The window to create a new XML registry is displayed, as shown in Figure 4-1.
- In the Name field, enter a unique registry name. If you want to configure default parsers and transformer for your server, enter the factory class names in the DocumentBuilderFactory, SaxParserFactory, and TransformerFactory fields. Otherwise, leave these fields blank.
- Click the Create button. The XML Registry is created and listed under the XML node in the left pane.
- Under the XMl node in the left pane, right-click the XML Entity Spec Registry Entry node under your XML registry. Select Configure a New XMLEntitySpecRegistryEntry from the drop-down menu. A blank window for entering entity resolution information appears in the right pane, as shown in the following figure:
Figure 4-4 Configuring External Entities using the Administration Console
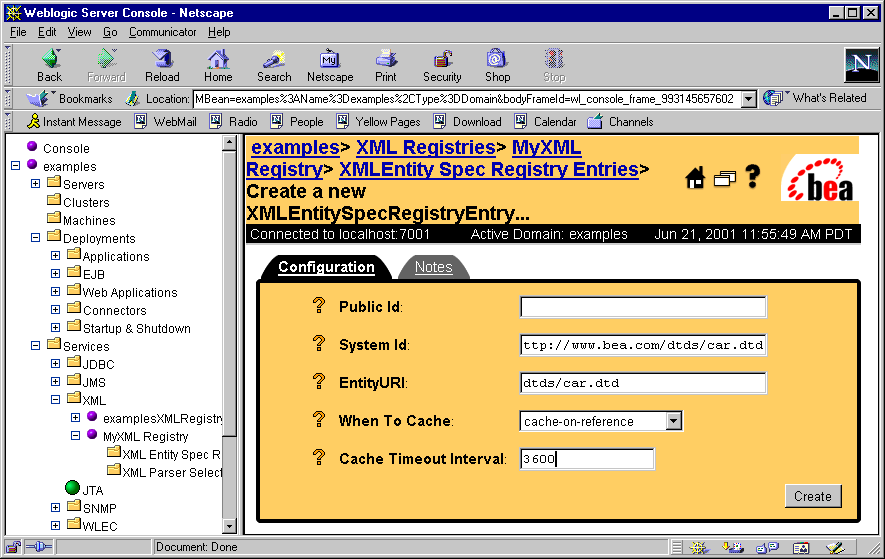
- Enter either the System Id or Public Id that is used to reference the external entity in the XML document. For example, for the following car.xml file, enter http://www.bea.com/dtds/car.dtd for the System Id:
Listing 4-2 car.xml File
<?xml version="1.0"?>
<!-- This XML document describes a car -->
<!DOCTYPE CAR PUBLIC "-//BEA Systems, Inc.//DTD for cars//EN"
"http://www.bea.com/dtds/car.dtd">
<CAR>
<MAKE>Toyota</MAKE>
<MODEL>Corrolla</MODEL>
<YEAR>1998</YEAR>
<ENGINE>1.5L</ENGINE>
<HP>149</HP>
</CAR>
- In the EntityURI field, enter one of the following two entity paths:
- The pathname of the copy of the entity file in the Administration Server. This pathname must be relative to the registries entity directory, which is
BEAHome/wlserver6.1/config/domain/xml/registries/reg_name in the domain configuration directory, where BEAHome is the top-level directory in which the WebLogic Server software is installed, domain is the name of your WebLogic Server domain, and reg_name is the name of the new XML Registry. For example, for the car.xml file, you might enter dtds/car.dtd in the EntityURI field.
- A URL that points to an external entity out on the Web or an entity stored in a repository. For example, enter http://java.sun.com/j2ee/dtds/application_1_2.dtd to reference the DTD for the application.xml file used to describe J2EE Enterprise Applications or use jdbc: to reference an entity in a database.
Use the following protocol declarations to specify an external entity: http://, file://, jdbc:, or ftp://.
- Select one of the following options from the WhenToCache list box:
- cache-on-reference—WebLogic Server caches the external entity referenced by a URL the first time the entity is referenced in an XML document.
- cache-at-initialization—WebLogic Server caches the entity when the server starts.
- defer-to-registry-setting—WebLogic Server uses the default caching setting. See Configuring the External Entity Cache for information on configuring default caching settings.
- In the CacheTimeoutInternal field, enter the number of seconds after which the cached external entity becomes stale, or out-of-date. WebLogic Server re-retrieves the external entity from the specified URL or pathname relative to the Administration server if the cached copy has been in the cache for longer than this amount.
The default value for this field is -1, which means that the global timeout value for WebLogic Server is used. See Configuring the External Entity Cache for information on configuring global cache timeout settings.
- Click the Create button. The XMLEntitySpec registry entry is created.
- In the left pane under the Servers node, click the name of the server with which you want to associate the new XML registry.
- In the right pane, select the Services tab.
- Select the XML tab. The window to configure XML properties of WebLogic Server appears in the right pane, as shown in Figure 4-2.
- In the XML Registry field, select the XML registry name that you want to associate with this server, and click the Apply button.
- Restart your server so the new settings to take effect.
- If you specified that a local copy of the entity be used, rather than caching the one from the Web, copy the entity file into the entity directory. For example, you would copy the car.dtd file to the directory BEAHome/wlserver6.1/config/domain/xml/registries/reg_name/dtds, where BEAHome is the top-level directory in which the WebLogic Server software is installed, domain is the name of your WebLogic Server domain, and reg_name is the name of the new XML Registry.
Configuring the External Entity Cache
You can configure the following properties of the external entity cache:
- Size, in KB, of the cache memory. The default value for this property is 500 KB.
- Size, in MB, of the persistent disk cache. The default value for this property is 5 MB.
- Number of seconds after which external entities in the cache become stale after they have been cached by WebLogic Server. This is the default value for the entire server - you can override this value for specific external entities when you configure the entity. The default value for this property is 120 seconds (2 minutes).
To configure the external entity cache, follow these steps:
- Start the WebLogic Administration server and invoke the Administration Console in your browser.
See Overview of Administering WebLogic Server XML for information on invoking the Administration Console.
- Under the Servers node in the left pane, click the name of the WebLogic Server for which you want to configure the external entity cache.
- Select the Services tab in the right pane.
- Select the XML tab. The window to configure XML properties of WebLogic Server appears in the right pane, as shown in Figure 4-2.
- In the Cache Memory Size field, enter the size, in KB, of the cache memory.
- In the Cache Disk Size field, enter the size, in MB, of the persistent disk cache.
- In the Cache Timeout Interval field, enter the number of seconds after which entities become stale.
- Click the Apply button.
Monitoring the External Entity Cache
A set of statistics that describes the external entity cache is available for you to use to monitor the effectiveness of the cache. These statistics describe:
- The current state of the cache.
- The cumulative activity for the current session.
- The cumulative activity since the cache was created, typically when WebLogic Server started.
To access the statistics, use the J2EE Java Management Extension (JMX) specification with the WebLogic Server Management API to create and deploy Management Beans (or MBeans) to monitor entity external caching in WebLogic Server. Use the following MBean interfaces:
- weblogic.management.runtime.EntityCacheCumulativeRuntimeMBean
- weblogic.management.runtime.EntityCacheCurrentStateRuntimeMBean
- weblogic.management.runtime.EntityCacheRuntimeMBean
The WebLogic Server Management API is fully documented online in JavaDocs.
The following table describes the methods you can use to get statics on the current state of the external entity cache.
Table 4-1 Current State of Cache Statistics
|
Method
|
Description
|
|
getMemoryUsage
|
Returns the number of bytes used to store all memory-resident entries.
|
|
getDiskUsage
|
Returns the number of bytes used to store all disk resident entries.
|
|
getTotalCurrentEntries
|
Returns the number of total entries in the cache.
|
|
getTotalPersistentCurrentEntries
|
Returns the number of persistent entries in the cache.
|
|
getTotalTransientCurrentEntries
|
Returns the number of transient entries in the cache.
|
|
getAvgPercentTransient
|
Returns the percent of entries which are transient.
|
|
getAvgPercentPersistent
|
Returns the percent of entries which are persistent.
|
|
getAvgTimeout
|
Returns the average timeout value for the entries.
|
|
getMinEntryTimeout
|
Returns the smallest timeout value for any current entry.
|
|
getMaxEntryTimeout
|
Returns the largest timeout value for any current entry.
|
|
getAvgPerEntryMemorySize
|
Returns the average memory size of the current entries.
|
|
getMaxEntryMemorySize
|
Returns the largest memory size for any current entry.
|
|
getMinEntryMemorySize
|
Returns the smallest memory size for any current entry.
|
|
getAvgPerEntryDiskSize
|
Returns the average disk size of the current entries.
|
The following table describes the methods you can use to get statics on the cumulative activity of the external entity cache.
Table 4-2 Cumulative Activity of the Cache
|
Method
|
Description
|
|
getTotalCurrentEntries
|
Returns the number of total entries in the cache.
|
|
getTotalPersistentCurrentEntries
|
Returns the number of persistent entries in the cache.
|
|
getTotalTransientCurrentEntries
|
Returns the number of transient entries in the cache.
|
|
getAvgPercentTransient
|
Returns the percent of entries which are transient.
|
|
getAvgPercentPersistent
|
Returns the percent of entries which are persistent.
|
|
getAvgTimeout
|
Returns the average timeout value for the entries.
|
|
getMinEntryTimeout
|
Returns the smallest timeout value for any current entry.
|
|
getMaxEntryTimeout
|
Returns the largest timeout value for any current entry.
|
|
getAvgPerEntryMemorySize
|
Returns the average memory size of the current entries.
|
|
getMaxEntryMemorySize
|
Returns the largest memory size for any current entry.
|
|
getMinEntryMemorySize
|
Returns the smallest memory size for any current entry.
|
|
getAvgPerEntryDiskSize
|
Returns the average disk size of the current entries.
|
|
getTotalNumberMemoryPurges
|
Returns the number of memory purges done.
|
|
getTotalItemsMemoryPurged
|
Returns the total number of items purged in all memory purges.
|
|
getAvgEntrySizeMemoryPurged
|
Returns the average size in bytes of items memory purged.
|
|
getMostRecentMemoryPurge
|
Returns the time of the most recent memory purge.
|
|
getMemoryPurgesPerHour
|
Returns the average number of memory purges per hour.
|
|
getTotalNumberDiskPurges
|
Returns the number of disk purges done.
|
|
getTotalItemsDiskPurged
|
Returns the total number of items purged in all disk purges.
|
|
getAvgEntrySizeDiskPurged
|
Returns the average size in bytes of items disk purged.
|
|
getMostRecentDiskPurge
|
Returns the time of the most recent disk purge.
|
|
getDiskPurgesPerHour
|
Returns the average number of disk purges per hour.
|
|
getTotalNumberOfRejections
|
Returns the number of entries that have been rejected.
|
|
getTotalSizeOfRejections
|
Returns the total size in bytes of all items rejected.
|
|
getPercentRejected
|
Returns the percent of inserts that were rejected.
|
|
getTotalNumberOfRenewals
|
Returns the number of times an stale entry was renewed.
|
|
|
|
Copyright © 2001 BEA Systems, Inc. All rights reserved.
Required browser: Netscape 4.0 or higher, or Microsoft Internet Explorer 4.0 or higher.
|

