|
| e-docs > WebLogic Server > Programming WebLogic Enterprise JavaBeans > Packaging EJBs for the WebLogic Server Container |
|
Programming WebLogic Enterprise JavaBeans
|
Packaging EJBs for the WebLogic Server Container
The following sections describe how to package EJBs into a WebLogic Server container for deployment. They includes a description of the contents of a deployment package, including the source files, deployment descriptors, and the deployment mode.
Required Steps for Packaging EJBs
Packaging EJBs for deployment to WebLogic Server in an EJB container involves the following steps:
Reviewing the EJB Source File Components
To implement entity and session beans, use the following components:
WebLogic Server EJB Deployment Files
Use the following WebLogic Server deployment files to specify the deployment descriptor elements for the EJB.
The deployment files become part of the EJB deployment when the bean is compiled. The XML deployment descriptor files should contain the minimum deployment descriptor settings for the EJB. Once the file exists, it can later be edited using the instructions in Specifying and Editing the EJB Deployment Descriptors. The deployment descriptor files must conform to the correct version of the Document Type Definition (DTD) for each file you use. All element and sub element (attribute) names for each of the EJB XML deployment descriptor files are described in the file's Document Type Definition (DTD) file. For a description of each file, see the following sections.
The ejb-jar.xml file contains the Sun Microsystem-specific EJB DTD. The deployment descriptors in this file describe the enterprise bean's structure and declares its internal dependences and the application assembly information, which describes how the enterprise bean in the ejb-jar file is assembled into an application deployment unit. For a description of the elements in this file, see the JavaSoft specification.
The weblogic-ejb-jar.xml file contains the WebLogic Server-specific EJB DTD that defines the concurrency, caching, clustering, and behavior of EJBs. It also contains descriptors that map available WebLogic Server resources to EJBs. WebLogic Server resources include security role names and data sources such as JDBC pools, JMS connection factories, and other deployed EJBs. For a description of the elements in this file, see weblogic-ejb-jar.xml Document Type Definitions.
The weblogic-cmp-rdbms.xml file contains the WebLogic Server-specific EJB DTD that defines container-managed persistence services. Use this file to specify how the container handles synchronizing the entity beans's instance fields with the data in the database. For a description of the elements in this file, see weblogic-cmp-rdbms- jar.xml Document Type Definitions.
Relationships Among the Deployment Files
Descriptors in weblogic-ejb-jar.xml are linked to EJB names in ejb-jar.xml, to resource names in a running WebLogic Server, and to persistence type data defined in weblogic-cmp-rdbms-jar.xml (for entity EJBs using container-managed persistence). The following diagram shows the relationship among the deployment files and WebLogic Server.
Figure 6-1 The relationship among the components of the deployment files.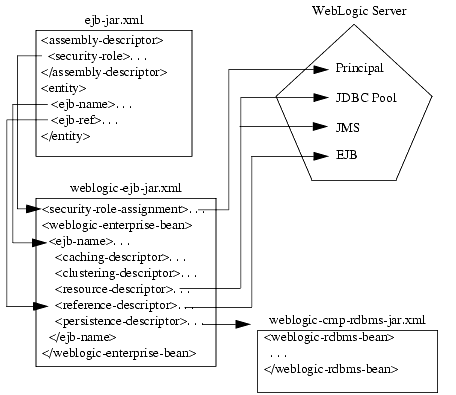
Specifying and Editing the EJB Deployment Descriptors
You specify or edit EJB deployment descriptors by any of the following methods:
You create the basic XML deployment files for the EJB that conforms to the correct version of the Document Type Definition (DTD) for each file. You can use an existing EJB deployment file as a template or copy one from the EJB examples in your WebLogic Server distribution:
SAMPLES_HOME\server\config\examples\applications
Manually Editing EJB Deployment Descriptors
To edit XML deployment descriptor elements manually:
<max-beans-in-cache></max-beans-in-cache>
Using the EJB Deployment Descriptor Editor
To edit the EJB deployment descriptors in the WebLogic Server Administration Console:
Note: For more information on the EJB deployment descriptors, see either the online help in the Administration Console or weblogic-ejb-jar.xml Document Type Definitions, and weblogic-cmp-rdbms- jar.xml Document Type Definitions.
Referencing Other EJBs and Resources
An EJB can look up and use other EJBs deployed in WebLogic Server by specifying an EJB reference in the deployment descriptor. The requirements for creating an EJB reference differ depending on whether the referenced EJB is external to the calling EJB (deployed independently of the calling EJB's application EAR file) or deployed as part of the same application EAR file.
To reference an external EJB, you add a <reference-descriptor> stanza to the calling EJB's weblogic-ejb-jar.xml file. The following XML code shows a sample stanza that references an external EJB:
Figure 6-2 Sample XML code referencing an external EJB
<reference-descriptor>
   <ejb-reference-description>
      <ejb-ref-name>AdminBean</ejb-ref-name>
      <jndi-name>payroll.AdminBean</jndi-name>
   </ejb-reference-description>
76</reference-descriptor>
In the sample stanza, the ejb-ref-name element specifies the name that the calling EJB uses to look up the external EJB. The jndi-name element specifies the global JNDI name to use when looking up the specified ejb-ref-name.
Referencing Application-Scoped EJBs
When you deploy multiple EJBs as part of the same EAR file, WebLogic Server adds the EJB names to the application's local JNDI tree. EJBs and other components of the application can look up other application-scoped components directly in the JNDI tree relative to java:comp/env.
An EJB that references other EJBs deployed as part of the same EAR file does not need to specify a global JNDI name in the weblogic-ejb-jar.xml file. In fact, you can omit the weblogic-ejb-jar.xml file entirely if you do not need other WebLogic-specific features of the deployment descriptor.
To reference an EJB deployed as part of the same EAR file, add an <ejb-local-ref> stanza to the calling EJB's ejb-jar.xml deployment descriptor file. For example:
Figure 6-3 Sample XML code referencing an EJB in the same EAR file
<ejb-local-ref>
   <description>Reference to application EJB</description>
   <ejb-ref-name>ejb1</ejb-ref-name>
   <ejb-ref-type>Session</ejb-ref-type>
   <local-home>mypackage.ejb1.MyHome</home>
   <local>mypackage.ejb1.MyRemote</local>
   <ejb-link>ejb1.jar#myejb</ejb-link>
</ejb-local-ref>
In this example, the ejb-ref-name element indicates the name the calling EJB uses to look up the application-scoped EJB. The ejb-link element maps the indicated <ejb-ref-name> to the other EJB deployed in the EAR file. Note that this example qualifies the <ejb-link> name with the filename that stores the second EJB. Qualifying the EJB name in this manner is necessary when two or more EJBs in the EAR file use the same name; the filename qualifier ensures a unique reference.
For more information about EJB links, see Using EJB Links.
Referencing Application-Scoped JDBC DataSources
EJBs can also access JDBC DataSources that are deployed as part of the same EAR file. DataSources that are identified in the weblogic-application.xml deployment descriptor can be accessed locally from java:comp/env (without referencing the DataSource's global JNDI name). See Configuring Application-Scoped Resources in Configuring Web Applications for more information.
Packaging EJBs into a Deployment Directory
The deployment process begins with a JAR file or a deployment directory that contains the compiled EJB interfaces and implementation classes created by the EJB provider. Regardless of whether the compiled classes are stored in a JAR file or a deployment directory, they must reside in subdirectories that match their Java package structures.
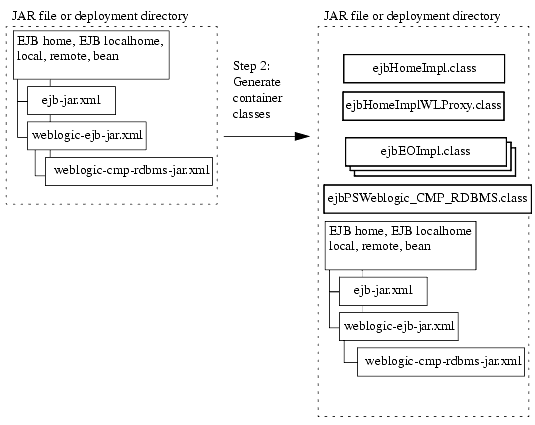
The EJB provider should also supply an EJB compliant ejb-jar.xml file that describes the bundled EJB(s). The ejb-jar.xml file and any other required XML deployment file must reside in a top-level META-INF subdirectory of the JAR or deployment directory. The following diagram shows the first stage of packaging the the EJB and the deployment descriptor files into a deployment directory or JAR file.
Figure 6-4 Packaging the EJB classes and deployment descriptors into a deployment directory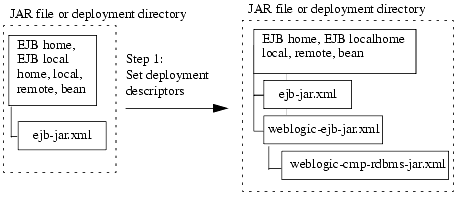
As is, the basic JAR or deployment directory cannot be deployed to WebLogic Server. You must first create and configure the WebLogic-specific deployment descriptor elements in the weblogic-ejb-jar.xml file, and add that file to the deployment directory or ejb.jar file. For more information on creating the deployment descriptor files, see WebLogic Server EJB Deployment Files.
If you are deploying an entity EJB that uses container-managed persistence, you must also add the WebLogic -specific deployment descriptor elements for the bean's persistence type. For WebLogic Server container-managed persistence (CMP) services, the file is generally named weblogic-cmp-rdbms-jar.xml. You require a separate file for each bean that uses CMP. If you use a third-party persistence vendor, the file type as well as its contents may be different from weblogic-cmp-rdbms-jar.xml; refer to your persistence vendor's documentation for details.
If you do not have any of the deployment descriptor files needed for your EJB, you must manually create one. The best method is to copy an existing file and edit the settings to conform to the needs of your EJB. Use the instructions in Specifying and Editing the EJB Deployment Descriptors to create the files.
You create the ejb.jar file with the Java Jar utility (javac). This utility bundles the EJB classes and deployment descriptors into a single Java ARchive (JAR) file that maintains the directory structure. The ejb-jar file is the unit that you deploy to WebLogic Server.
Compiling EJB Classes and Generating EJB Container Classes
For part of the process of building your deployment unit, you need to compile your EJB classes, add your deployment descriptors to the deployment unit, and generate the container classes used to access the deployment unit.
The ejbc compiler generates container classes according to the deployment descriptors you have specified in WebLogic-specific XML deployment descriptor files. For example, if you indicate that your EJBs will be used in a cluster, ejbc creates special cluster-aware classes that will be used for deployment.
You can also use ejbc directly from the command line by supplying the required options and arguments. See ejbcfor more information.
The following figure shows the container classes added to the deployment unit when the JAR file is generated.
Figure 6-5 Generating EJB container classes
Once you have generated the deployment unit, you can designate the file extension as either a JAR, EAR, or WAR archive.
Possible Generated Class Name Collisions
Although infrequent, when you generate classes with ejbc, you may encounter a generated class name collision which could result in a ClassCaastException and other undesireable behavior. This is because the names of the generated classes are based on three keys: the bean class name, the bean class package, and the ejb-name for the bean. This problem occurs when you use an EAR file that contains multiple JAR files and at least two of the JAR files contains an EJB with both the same bean class, package, or classname and both of those EJBs have the same ejb-name in their respective JAR files. If you experience this problem, change the ejb-name of one of the beans to make it unique.
Since the ejb-name is one of the keys on which the file name is based and the ejb-name must be unique within a JAR file, this problem never occurs with two EJBs in the same JAR file. Also, since each EAR file has its own classloader, this problem never occurs with two EJBs in different EAR files.
Loading EJB Classes into WebLogic Server
Classloaders in Weblogic Server are hierarchical. When you start WebLogic Server, the Java system classloader is active and is the parent of all subsequent classloaders that WebLogic Server creates. When WebLogic Server deploys an application, it automatically creates two new classloaders: one for EJBs and one for Web applications. The EJB classloader is a child of the Java system classloader and the Web application classloader is a child of the EJB classloader.
For more information on classloading, see "Classloader Overview" and "About Application Classloaders" in Developing WebLogic Server Applications.
WebLogic Server supports the use of ejb-client.jar files.
The ejb-client.jar contains the home and remote interfaces, the primary key class (as applicable), and the files they reference. WebLogic Server does not add files referenced in your classpath to ejb-client.jar. This enables WebLogic Server to add necessary custom classes to the ejb-client.jar without adding generic classes such as java.lang.String.
For example, the ShoppingCart remote interface might have a method that returns an Item class. Because this remote interface references this class, and it is located in the ejb-jar file, it will be included in the client jar.
You configure the creation of an ejb-client.jar file in the bean's ejb-jar.xml deployment descriptor file.When you compile the bean with ejbc, WebLogic Server creates the ejb-client.jar.
External clients can include the ejb-client.jar in their classpath. Web applications would include the ejb-client.jar in their /lib directory.
Note: WebLogic Server classloading behavior varies, depending on whether or not the client is stand-alone. Stand-alone clients with access to the ejb-client.jar can load the necessary classes over the network. However, for security reasons, programmatic clients running in a server instance cannot load classes over the network.
Use the manifest file to specify that a JAR file can reference another JAR file. Standalone EJBs cannot use the Manifest Class-Path. It is only supported for components that are deployed within an EAR file. The clients should reference the client.jar in the classpath entry of the manifest file.
To use the manifest file to reference another JAR file:
Note: The entry is a list of JAR files separated by spaces.
To place the home/remote interfaces for the EJB in the classpath of the calling component:

|

|

|