Enterprise JavaBean (EJB) controls make it easy for you to use an existing, deployed session or entity EJB from within an application. To create an EJB control, you must first make sure that the EJB's (local or remote) home and business interfaces are available to your application.
Before you can create an EJB Control, the EJB's local or remote interfaces must be known in your application. If the EJB is not part of the application, you make it available by adding the EJB's JAR file to your Workshop for WebLogic application. While the complete EJB JAR file allows Workshop for WebLogic to access the EJB's interfaces, the only classes actually required are the EJB's home and remote interface classes and any other classes used externally by the EJB (for example, as method parameters or method return types). The EJB compiler ejbc is capable of producing a client JAR that will serve this purpose.
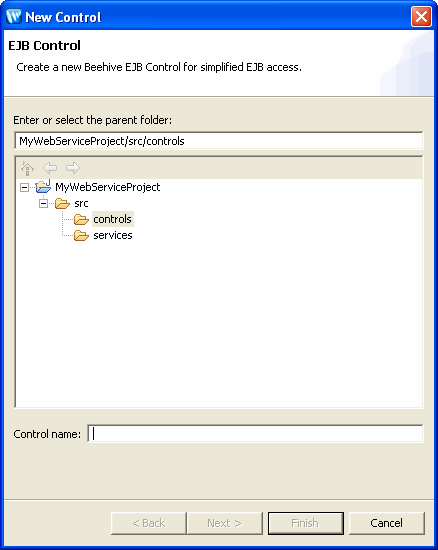
To create a new EJB control:
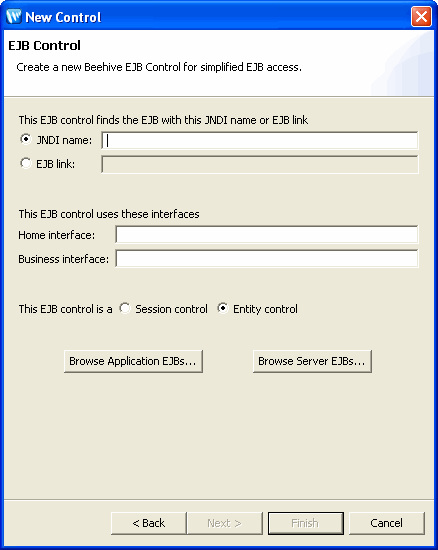
The Browse application EJBs button will return a list
of all the EJBs known within the current application. These are EJBs
developed
in the application as well as EJBs defined in EJB JARs added as modules
to the application. If only the EJB's local interface is defined,
the EJB will
appear in the list with a local ejb-link
reference.
If an EJB's local interface and local JNDI name are defined, the EJB
will
also
appear
with
a local jndi reference. The same analogy applies to remote interfaces.
If the server is running, the Browse server EJBs button will return a list of
all the EJBs known on the server used by the current application. Only
included in this list are EJBs whose remote (home and business) interfaces
are defined.
To insert the EJB control into a web service, web application or another control, see Using an EJB Control.
If you open an EJB control in the editor window, you will notice that the control simply extends the EJB's interfaces. Unlike some other controls, the EJB control's class definition does not contain method declarations that invoke the EJB's methods. In other words, the EJB control only serves to reference the EJB and to expose its methods, and cannot be used to limit access to, or modify, these methods.
To see the EJB methods exposed by the EJB control, insert an EJB control in a web service or page flow.
When you modify the EJB's methods or add additional methods to the interfaces that the EJB control references, you do not need to modify the EJB control (but you must rebuild the EJB). When you modify the name of the used interfaces, the JNDI name (if the EJB control uses the jndi name), or the bean name or EJB JAR name (if the EJB control uses a ejb-link), you must modify the EJB control to reflect these changes.
For more information, consult the Beehive documentation for EJB control.