|
Siebel Business Process Framework: Workflow Guide > Using the Siebel Workflow Development Environment >
Using the Process Designer
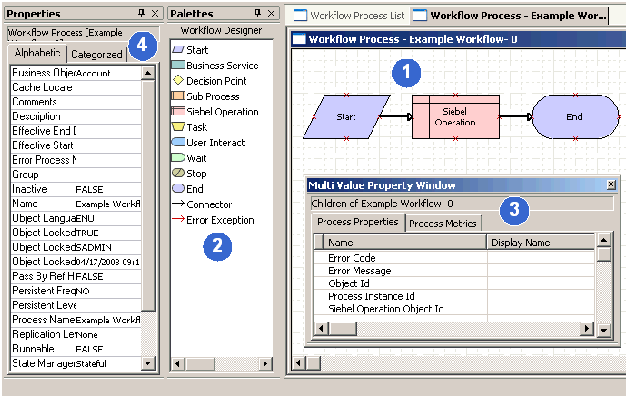
This topic describes how to use the Process Designer to define a workflow process in Siebel Tools. Figure 9 includes the elements of the Process Designer.
Figure 9. Elements of the Process Designer
|
Explanation of Callouts
The Process Designer includes the following items:
- Process Designer Canvas. A work area where you create the workflow process. You right-click the canvas to access a context-sensitive menu that allows you modify the workflow process that Siebel Tools displays on the canvas.
- Workflow Designer Palette. A window that contains icons that represent the various step types you can add to a workflow process. To add a step, you drag, and then drop an icon from the palette to the canvas.
- Multi Value Property Window (MVPW). A window that allows you to define properties for a workflow process and arguments for a workflow process step. For more information, see Using the Multi Value Property Window.
- Properties Window. A window that allows you to define properties for an individual workflow process step or for the overall workflow process. The window is context-sensitive:
Functionality of the Process Designer
You can do the following work in the Process Designer:
- Copy and paste. Copy and paste objects in the canvas.
- Edit shape properties and layout. Define shape colors and other attributes, such as the look of the line, the fill pattern, and the font for labels. You can align shapes and make shapes the same size and color as other shapes in the workflow process.
- Zoom. Zoom in and out on the canvas to view the workflow process at various magnifications.
- Copy drawings. Copy a workflow process into another application, such as a Microsoft Word document. You can right-click the canvas, and then click Copy Drawing.
- Print. Print the workflow process.
- Hide connector names. You can hide the names of connectors and error exception connectors. Hiding a connector name can be helpful to clarify the meaning of the conditional branching that emanates from a start step or a decision point.
Copy and paste functionality in the Process Designer works the same as it does in a typical Windows application. For example, you can use the CTRL+C and CTRL+V keyboard combinations.
|