Release 11g (11.1.1)
Part Number E13881-01
Contents
Previous
Next
| Oracle Fusion Middleware Report Designer's Guide for Oracle Business Intelligence Publisher Release 11g (11.1.1) Part Number E13881-01 | Contents | Previous | Next |
This chapter covers the following topics:
The Template Builder is an add-in to Microsoft Word that simplifies the development of RTF templates. While the Template Builder is not required to create RTF templates, it provides many functions that will increase your productivity.
The Template Builder is tightly integrated with Microsoft Word and enables you to perform the following functions:
Insert data fields
Insert tables
Insert forms
Insert charts
Preview your template with sample XML data
Browse and update the content of form fields
Extract boilerplate text into an XLIFF translation file and test translations
Note that the Template Builder automates insertion of the most frequently used components of an RTF template. RTF templates also support much more complex formatting and processing. For the full description of RTF template features, see Creating an RTF Template.
Your Template Builder installation provides samples and demo files to help you get started. The demos can be accessed from your Windows Start menu as follows:
Start > Programs > Oracle BI Publisher Desktop > Demos
The demos can also be accessed from the BI Publisher\BI Publisher Desktop\demos folder where you installed BI Publisher Desktop (for example: C:\Program Files\Oracle\BI Publisher\BI Publisher Desktop\demos).
The following demos are provided:
Report Demo - demonstrates building a report layout using many key features of the Template Builder, including: connecting to the BI Publisher server, loading data for a report, inserting tables and charts, and defining conditional formatting.
Invoice Demo - demonstrates how to take a prepared layout and use the Template Builder to insert the required fields to fill the template with data at runtime.
Localization Demo - demonstrates the localization capabilities of the Template Builder and shows you how to extract an XLIFF file from the base RTF template. The XLIFF file can then be translated and the translations previewed in the Template Builder.
The sample files are located in the BI Publisher\BI Publisher Desktop\Samples folder. The Samples folder contains three subfolders:
eText templates
PDF templates
RTF templates
The eText and PDF template samples can be used as references to create these types of templates. The Template Builder is only available for the RTF templates. The RTF templates folder contains eight subfolders to provide samples of different types of reports. Refer to the TrainingGuide.html located in the RTF templates folder for additional information on what is contained in each sample.
Your report data model has been created and runs successfully. For information on creating Data Models, see Creating Data Models.
Supported versions of Microsoft Word and Microsoft Windows are installed on your client.
Note: See System Requirements and Certification for the most up-to-date information on supported hardware and software.
The BI Publisher Template Builder has been downloaded and installed on your client.
The Template Builder can be downloaded from the Get Started region of the Home page.
Limitations
The Template Builder does not support bidirectional display of text in the user interface.
When you open Microsoft Word after installing the Template Builder you will notice the Oracle BI Publisher menu.
For versions of Microsoft Word prior to 2007 the menu and toolbar will appear as shown in the following figure:

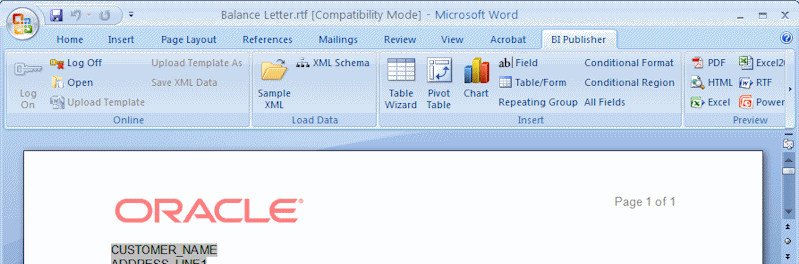
For Microsoft Word 2007 users, the BI Publisher commands display in the ribbon format:
Use the menu (or toolbar) to perform the following:
Insert data fields into your RTF templates
Insert tables, forms, charts, and pivot tables
Preview your template in multiple outputs
Browse and update the content of form fields
Validate your template
Perform calculations on fields within the template
Connect to the Oracle BI Publisher catalog to retrieve data to build your template
Upload your template to the Oracle BI Publisher server
Extract boilerplate text into an XLIFF translation file and test translations
You can build and upload your template via a direct connection with the BI Publisher server, or you can build and upload your template in disconnected mode.
Open Microsoft Word.
From the Oracle BI Publisher menu, select Log On.
Enter your BI Publisher credentials and the URL for the BI Publisher server, for example: http://www.example.com:7001/xmlpserver. (Contact your system administrator if you do not know the URL.)
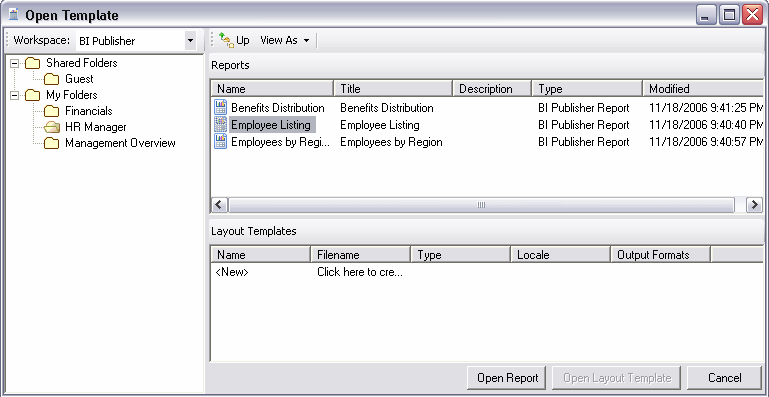
The Open Template dialog presents the same folder structure as the BI Publisher catalog. Select the report or data model for which you want to build a template.
If you selected a data model:
Click Create Report to create a report for this data model in the BI Publisher catalog. This is the report you will upload your template to.
Enter a Report Name and select the folder in which to save it.
Click Save.
The sample data from the data model is loaded to the Template Builder.
If you selected a report:
Click Open Report to load the data to the Template Builder; or double-click <New> in the Layout Templates pane.
Note that any existing templates will be listed in the Layout Templates pane.
Follow the guidelines in this chapter to insert data fields and design your template using features such as tables, charts, and graphics. Use Microsoft Word to apply formatting to fonts and other objects in your template.
For more advanced template options, use the guidelines in Creating an RTF Template.
To upload your template file to the BI Publisher server and add it to your report definition, select Upload Template As from the Oracle BI Publisher menu.
If you have not saved your template, you will be prompted to save it in Rich Text Format.
Enter a name and select a locale in the Upload as New dialog. Note that this is the name that appears under Layouts in the Report Editor. This is also the layout name that will be displayed when a user runs this report.
Configure properties for this layout.
Navigate to the BI Publisher report editor to configure properties for this layout, such as output formats. See Configuring Layouts for more information.
To work in disconnected mode, you must have a sample data file available in your local work environment:
Save a sample data file to your local machine. See Accessing Data for Building Your Template.
Open Microsoft Word with the Template Builder installed.
On the Oracle BI Publisher menu in the Load Data group select Sample XML. Locate your sample data file in your local directory and click Open.
Note: The Template Builder also supports using XML Schema to design an RTF template. However, because the schema contains no data, the preview of your report will also contain no data.
Follow the guidelines in this chapter to insert data fields and design your template using features such as tables, charts, graphics, and other layout components. Use Microsoft Word to apply formatting to fonts and other objects in your template.
For more advanced template options, use the guidelines in Creating an RTF Template.
Upload your layout template file.
In the BI Publisher catalog, open your report in the Report Editor. ClickAdd New Layout.
Complete the fields in the dialog and then select Upload. The template will now appear as a layout for the report.
Configure properties for this layout.
See Configuring Layouts for more information.
The data model defines the XML format that will be merged with the RTF template. The Template Builder requires sample data to build your template. You must load sample data to use most of the template builder functionality.
If you are not connected to BI Publisher, then use the "Loading XML Data from a Local File" procedure. If you are connected, use the "Loading Data from the BI Publisher Catalog" procedure.
One method of loading data to the Template Builder is to save a sample of your report data to a local directory.
For information on saving sample data from your report data model, see the topic Testing Data Models and Generating Sample Data.
If you do not have access to the report data model, but you can access the report, you can alternatively save sample data from the report viewer. To save data from the report viewer:
In the BI Publisher catalog, navigate to the report.
Click Open to run the report in the report viewer.
Click the Actions icon, then click Export, then click Data. You will be prompted to save the XML file.
Save the file to a local directory.
Use the Load Sample XML feature below to load the saved XML file to the Template Builder.
The Load Data group from the Oracle BI Publisher menu enables you to select and load the saved XML file to the Template Builder.
Sample XML - This function allows you to load a sample XML file that contains all fields that you want to insert into your template as a data source. If you are not connected to the BI Publisher server, use this method to load your data.
XML Schema - This function allows you to load an XML Schema file (.xsd) that contains the fields available in your report XML data. The XML schema has the advantage of being complete (a sample XML file may not contain all the fields from the data source). For the preview, the Template Builder can generate dummy sample data for an XML Schema. However, the preview works better if you also upload real sample data.
You can connect directly to the BI Publisher Server to load your BI Publisher report data to the Template Builder to use as sample data for designing layouts. You can also download an existing template to modify it.
To connect to BI Publisher and load a data source:
Log on to the BI Publisher Server: From the Oracle BI Publisher menu, select Log On. For more information on logging in to the BI Publisher server, see Working in Connected Mode.
After you area logged on, you can select Open. The Open Template dialog launches.
Navigate to the folder that contains the report or data model for which you want to create a template.
When you select a report, you can either select from the Layout Templates to open an existing template, select Open Report to load just the XML sample data to create a new layout, or double-click <New> to load the data to the Template Builder to build a new layout.
When you select a data model, you will be prompted to create a report in the catalog.
This section includes the following topics:
This dialog enables you to select data elements from the data source and insert them into the template.
In the Insert group select Field to open the Field dialog. The dialog shows the structure of your loaded data source in a tree view, as shown in the following figure:
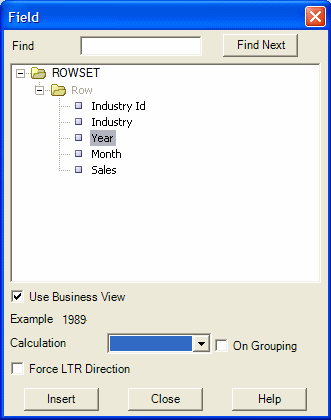
Select a field that represents a single data field (a leaf node of the tree) and select Insert (you can also insert the field by dragging and dropping it into your document, or by double-clicking the field). A text form field with hidden BI Publisher commands is inserted at the cursor position in the template. You may either select and insert additional data fields or close the dialog by clicking the Close button.
The Insert Field dialog fields are:
For an XML document with a large and complicated structure, use the find functionality to find a specific field. Enter a partial string of the field name you are searching into the Find field and click Find Next. The next occurrence of a data element that includes your search expression will be selected. Click the Find Next button again to see the next occurrence.
When you select a field name in the tree view, an example value for this field is shown.
This check box is only needed if you are using the template in a language that prints the characters from right to left, such as Arabic or Hebrew. Use this feature to force left-to-right printing for fields such as phone numbers, addresses, postal codes, or bank account numbers.
This feature enables you to perform aggregation functions on data fields, such as sum, average, count, minimum, and maximum.
For example, if you select sum for a data field, the field will show the sum of all occurring values for this data field, depending on the grouping.
It is important to understand the grouping context (marked by G and E form fields) to know exactly which fields are accumulated. If you insert a data field with an accumulation function into a repeating section (marked by G and E processing instruction form fields), you must select On Grouping to accumulate the data for the occurrences within the group. If you do not want the accumulation to be restricted to the group, you must place the accumulation field outside the group.
The following figure shows an example:
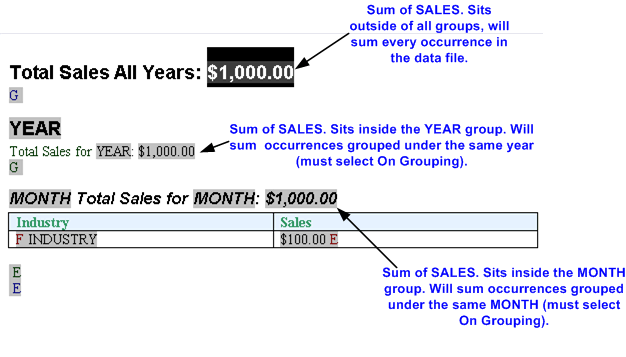
Also note that the data field must be a valid XSL number for the accumulation functions to work. Formatted numbers cannot be processed by BI Publisher (for example a number using a thousands separator: 10,000,000.00 cannot be processed).
For more information on groups in your template using the Template Builder, see Inserting a Repeating Group. Also see Defining Groups in the chapter: Creating an RTF Template.
The Insert Table Wizard enables you to create standard reports. On the Insert menu select Table Wizard.
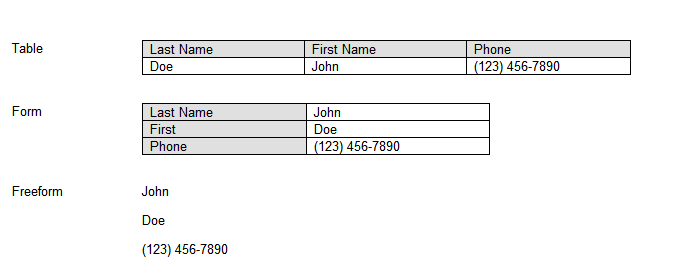
Start by selecting the basic report format. Choose from Table, Form, or Free Form. The following example shows how the each selection will appear in the report. The following figure shows examples of each:
An XML document can include multiple grouped data sets. For example, a purchase order XML document may contain header level information, lines, shipments and contacts.
In this step, select the data group that contains the data required for your table.
For example, in the Balance Letter sample RTF template (found in the Template Builder installed files under Oracle\BI Publisher\BI Publisher Desktop\samples\RTF Templates), the sample XML file contains three data groups as follows:
ARXCOBLX/G_CUSTOMER
ARXCOBLX/G_CUSTOMER/G_CURRENCY
ARXCOBLX/G_CUSTOMER/G_CURRENCY/G_INVOICES
The Table Wizard presents a list of the available data groups in your XML data file. Select the group that contains the data fields for your table.
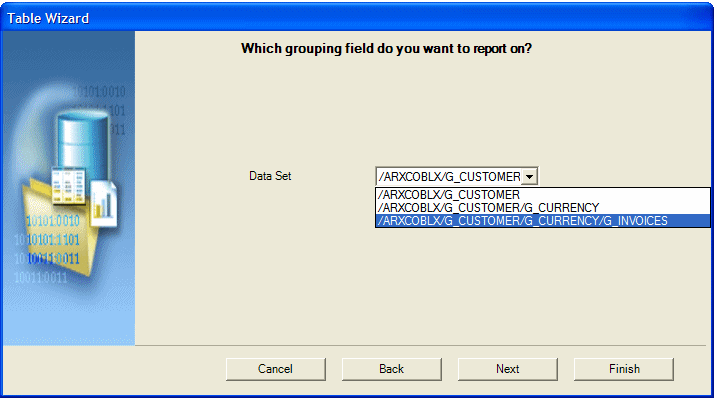
To build a table to list the invoices contained in the data, select:
ARXCOBLX/G_CUSTOMER/G_CURRENCY/G_INVOICES
as your data set.
The Table Wizard presents the data fields from your selected data set.
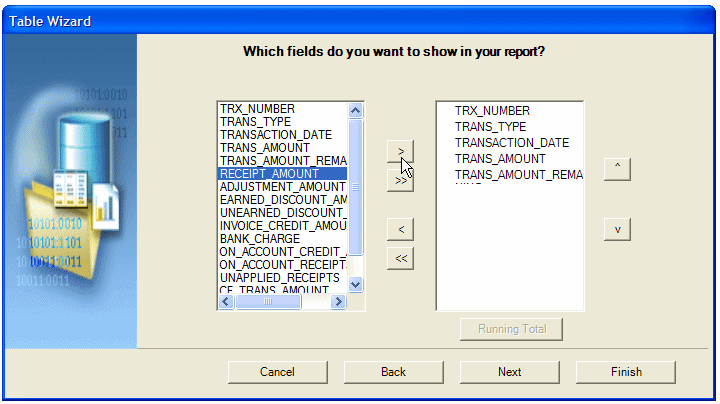
Use the shuttle buttons to select the data fields to show in your table. Use the up and down arrows to reorder the fields after selecting them.
This step enables you to regroup the data by a particular field. This is optional.
For example, if you are building a table of invoices, you may want to group all invoices of a particular type or date to be grouped together in the report.
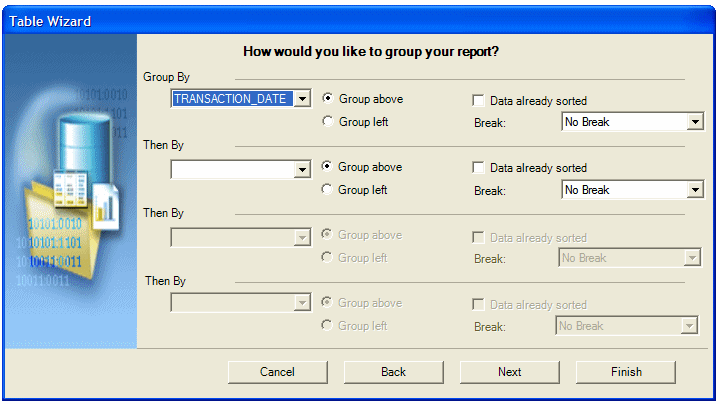
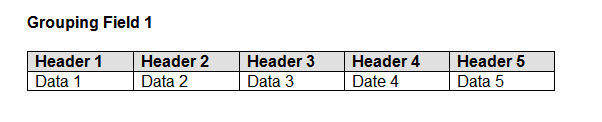
There are two options for grouping: Group Left or Group Above. Group Left will create a nested table. The Group By field will display to the left in the outer table. Group Above will create a new table for each new value of your group by field, displaying the value of the group by field as a table title.
Examples follow:
Group Left groups the group by element occurrences together as shown:
Group Above shows the result as a table with a header:
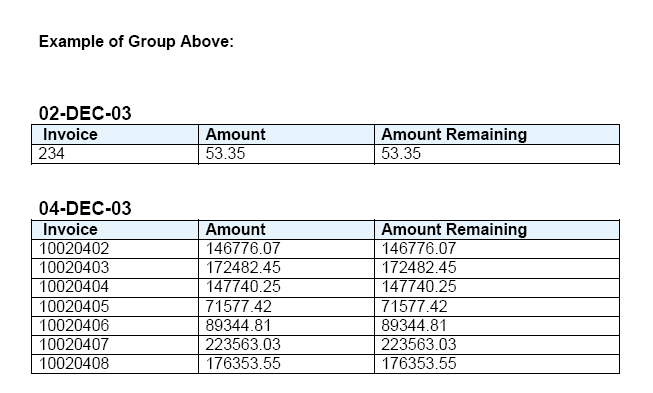
When you select an element to group by, BI Publisher sorts the data by the grouping element. If the data is already sorted by the grouping element, select the Data already sorted check box. This will improve performance.
Use the Break option to insert either a Page break or Section break after each occurrence of this group. Note that a Section break can only be created on the top-level group. The subsequent grouping options only display the Page break option.
Note that a page break will start the next group on a new page; a section break will start the next group on a new page, reset page numbering, reset headers and footers, and reset any running calculations for each occurrence of the group.
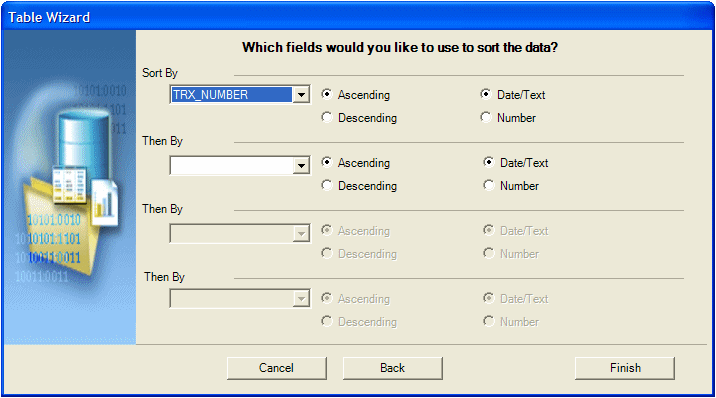
You can sort the data in the table by up to four different fields. Select a field and then define the sorting order (ascending or descending), and select the correct data type for the field. For example, if text is selected, “12” will come before “2” (alphanumerical order). If number is selected, “2” will come before “12”.
Click Finish to create the table and insert it to your Microsoft Word document.
Customize the table by changing fonts, colors, column sizing, borders, shading, and so on, using Microsoft Word formatting commands.
The Insert Table/Form dialog is the most flexible tool of the template builder. It allows you to perform the following tasks:
Create a simple or nested table with a variable number of rows.
Associate a group of data elements, such as a complete invoice or a purchase order line, with a form in the document that will be repeated for each occurrence of the data element.
Select and define a layout for all the data fields in the template.
Group or re-group the data.
The Insert Table/Form dialog shows you two tree view panes. The left pane shows the data source structure, while the right pane shows the elements that will be copied to the template when you click the Insert button.
First select the data fields to insert in the template and then define how to format them. Drag an XML element from the left Data Source pane to the right Template pane. If the XML element has children, you will see a pop-up menu with the following options:
Drop Single Node
Drop All Nodes
Cancel
Select Drop Single Node if you want to move only the selected node or Drop All Nodes if you want to move the node and all its children.
If you drag an additional data field from the left Data Source pane to the right Template pane, it is either inserted at the same level (Same Level) or below the node (Child) where you release the node. The Insert Position box defines where the node is inserted.
Note: If you use the left mouse button for drag and drop, the node and all children are copied. However, if you use the right mouse button for dragging, a dialog pops up when you release the mouse button. The dialog gives you the option to copy either only the selected node or the selected node and all children.
When you select an element in the right Template pane, you will see its properties as well as a preview of how the node will be rendered. There are two kinds of nodes:
Data Fields
Data Groups
Data Field nodes (leaf nodes) do not have any child nodes. They represent simple attributes such as the total amount for an invoice or the subtotal for a purchase order line.
Data Group nodes (parent nodes) are nodes that do have child nodes. Typically, they do not represent data attributes, but groups of data – such as an invoice, a purchase order, a purchase order line or a shipment.
If a Data Field node is selected, its properties are shown in the Properties pane. You have the following options to describe how the Template Builder should show the field:
Calculation
You can select one of the aggregation functions for the data fields. These functions (besides count) only have an effect when there is more than one of the data fields in the context where you use the function.
Force LTR (Left-to-Right) Direction
This option is only needed if you are using the template in a language that displays characters from right to left, such as Arabic or Hebrew. Use this option to force left-to-right printing for fields such as phone numbers, addresses, postal codes, or bank account numbers.
The order in which the data elements are shown reflects the order of the columns in the table. If you want to reorder the columns, change the Insert Position box from Child to Same Level. Then drag the elements into the correct order.
If a Data Group node is selected, its properties are shown in the Properties pane. You have the following options to describe how the Template Builder should render the group:
Style
To display the data as a horizontal table with a header, select Table. To display the fields below each other with labels in a table, use Form. If you want to insert the fields into a free-form text section that should to repeated for this element select Free Form.
Grouping
Grouping is an advanced operation that allows you to group the data by a specific element in the data. For example, you may want to group all your invoices by customer. You can select a child element of the selected element as a grouping criterion. For more information see Grouping.
Show Grouping Value
This property will only be shown if you have selected a node created by the Grouping functionality. By default, the field you have selected to group the data by will be displayed in the report. If you do not want the grouping data field displayed, select No.
Sort By
Select an element by which the data groups are sorted.
Sort Order
If you have selected an element for Sort By you can select if the data should be sorted either ascending or descending.
Sort Data Type
If you have selected an element for Sort By the data is by default sorted as text. That means that 12 will be shown after 111. If the data is numeric, select Number as the sort data type.
Break
This property allows you to insert a page break or a section break between every data group. If you select New Page per Element, then a page break will be inserted between each element after the first occurrence.
Tip: If you wish to insert a page break before the first occurrence of an element, use Microsoft Word's page break command.
If you select New Section per Element, a section break will be created for each data group. A section break has the following effects: it inserts page break, it resets the page numbers and new data can be displayed in the header and footer. You will typically use this option if you want to print multiple documents (for example invoices or purchase orders) to a single PDF file.
Once you have dragged all data fields over and defined the layout, select the Insert button to place the tables and forms at the cursor position in your document.
You can group any Data Group node, by any of its child Data Field Nodes. For example if you have sales data for multiple quarters, you may want to show the sales data organized by quarter. In this case you would group the sales data rows by the quarter element.
Assume the following structure:
   Sales Transaction
       Quarter
       Customer
       Amount
To group the child nodes of a node (Sales Transaction), you select one of the child nodes (Quarter) as the grouping property of the parent node (Sales Transaction). The Template Builder will make this node (e.g. quarter) the parent of the other child nodes (Customer and Amount).
The new structure will look like:
   Sales Transaction
       Quarter
            Customer
            Amount
The grouping criterion (Quarter) now behaves like any other Data Group Node with children. That means that you can define the layout of its children using the Create As Table, Style, Label, Grouping, and Show Grouping Value properties.
The Insert Table/Form Dialog creates two kinds of form fields:
Form fields representing data elements
Form fields with processing instructions for repeating table rows or document sections
Form fields representing data elements are replaced with the data when the template is processed. Form fields indicating repeating sections are shown as for-each and end for-each in the document. (Note: If you have selected the Abbreviated form field display option, the for-each and end for-each form fields will display as F and E.) The section of the document encapsulated by these two elements is repeated, if the associated data element is repeated in the data.
Use the Chart dialog to insert a chart into a template.
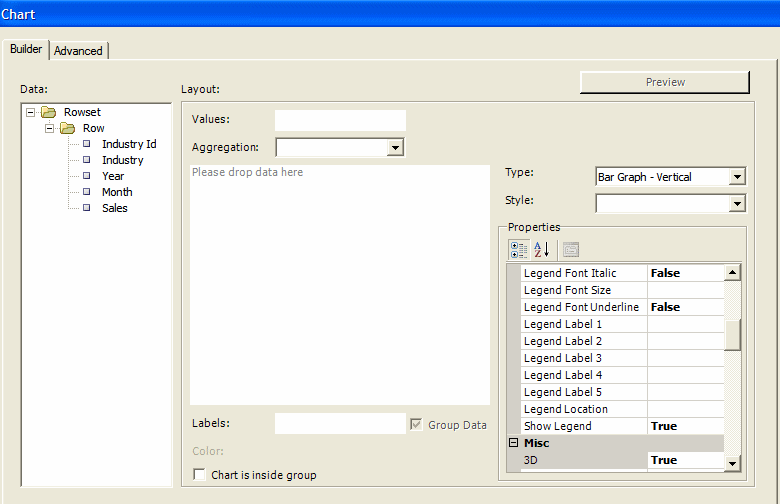
BI Publisher supports a large variety of chart types. Expand the Type list to select the chart type for this template.
Drag and drop the data value you want to measure to the Values field (for example, SALES). You can select multiple Value elements (measures).
Note that the Values field will change depending on the Chart Type you select:
Combination Graph- enables three fields for the Value selections.
Scatter Graph - a scatter graph compares pairs of values. Drag and drop the X and Y data elements to compare.
Bubble Graph - a bubble graph compares sets of three values. Similar to the scatter chart, the third value is displayed as the size of the bubble.
Stock Graph - drag and drop the elements that represent the Open, High, Low, Close, and Volume values for the stock graph.
You can choose to aggregate the Values data as a sum, a count, or an average.
Drag and drop the data element for which you want to see the Value charted (for example, Year). Select Group Data to group the occurrences of the label element before rendering it in the chart. For example, if you are charting Sales by Year, selecting Group Data will accumulate the values for Year, so that only one occurrence of each year will appear in the chart. If you do not select Group Data, then the value for every occurrence of Year in the data will be plotted separately.
If you wish to add a series element to the chart, drag and drop the element to display as a series. Each value will display as a new color in the graph.
Select this box if your chart is inside a grouping and you want the chart to display data only for the occurrences of the data elements within the group.
Select a color scheme and style for your chart.
The properties region enables you to change value and label display names, select color, font, and other display options for your chart. The properties list will change depending on your chart selection.
Click Preview to display the chart with the sample data.
By default the data will be grouped by the Value element and aggregated by sum.
If you deselect the Group Data check box, each occurrence of the value element will be charted and aggregation functions will not be available.
To edit a chart that you have already inserted into your template, right-click the chart and select BI Publisher Chart from the menu. This will invoke the chart dialog to enable you to edit your chart.
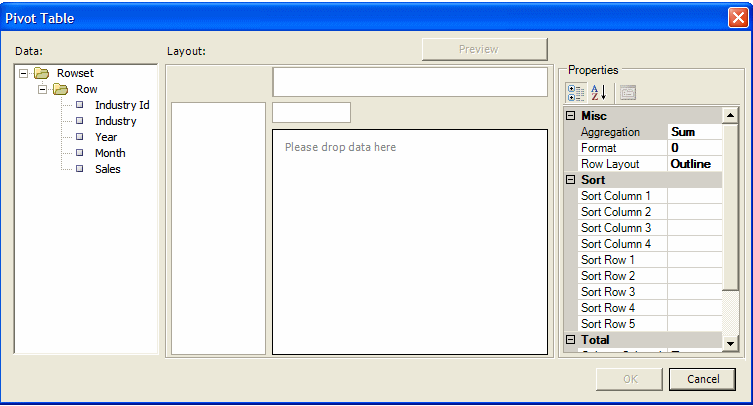
To insert a pivot table
On the BI Publisher menu on the Insert group, click Pivot Table. The Pivot Table dialog presents your data in the left pane with empty Layout panes on the right for you to drag and drop data elements. The following figure shows the Pivot Table dialog:
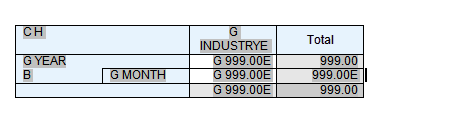
Drag and drop the elements from the Data pane to the Layout pane to build your pivot table structure. The following example Layout shows Sales by Industry accumulated by Year and by Month:
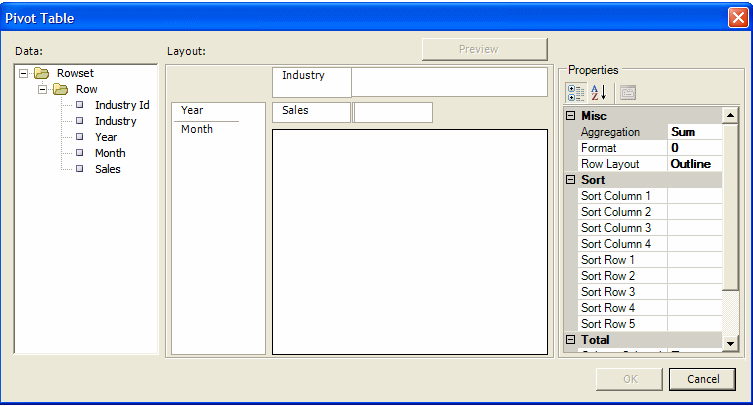
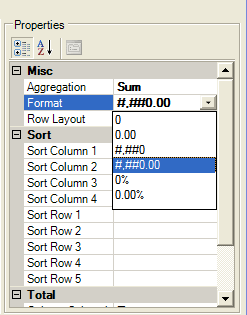
Use the Properties pane to select Aggregation. You can choose Sum, Count, or Average. Then choose a number Format.
By default subtotals for rows and columns are displayed. You can choose not to display the subtotals by setting the properties to False.

Click Preview to see how the pivot table will appear before you insert it into your template. Click OK to insert the pivot table into your template. The pivot table will appear as follows in your template:
At runtime, this pivot table will generate as follows:

To insert a repeating group:
Select the section of the template that contains the elements you want repeated.
On the Oracle BI Publisher menu, in the Insert group, click Repeating Group.
Enter the appropriate fields in the BI Publisher Properties dialog:
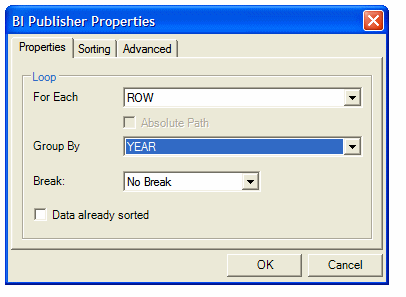
For Each
Select the element that for each occurrence, you want the loop to repeat. When you select the For Each data field you are telling BI Publisher that for each occurrence of the selected field in the data you want the elements and processing instructions contained within the loop to be repeated.
For example, assume your data contains invoice data for customers and you want to create a table with each customer's invoices. In this case, for each customer number you want the table to repeat. You would therefore select the customer number in the For Each field to create a new loop (or group) for each customer.
Note the following about creating repeating groups:
For loops and groupings not inside another group (that is, outer groups or loops) you must select the repeating XML element to be used. For example if the data set is flat, the only repeatable element is /DATA/ROWSET/ROW. In cases with multiple data sources or hierarchical XML you can choose the data set.
If you are creating nested groups (inserting a loop or group inside of another loop in the template), the For Each field is not updateable because it is already defined by the preexisting outer loop. The For Each field will display "Group Item" to inform you that an outer group is already defined.
Absolute Path
Select this check box to use the Absolute Path to the element in the XML structure. This is important if your data contains the same element name grouped under different parent elements.
Group By
Select a field from the list by which you want to group the data. If you just want to create a simple loop, do not select a group by element. Selecting a group by element will actually regroup the data into a new hierarchy based on the group by element.
Break
Use this option to create either a Page break or Section break if you wish to insert a break after each occurrence of this group.
Note that a Section break can only be created on outer groups that surround the whole document. If the selected field is not an outer group, the Section break option will not be available.
Note also that when you insert a section break, the page numbering is reset, headers and footers are reset, and any running calculations will be reset for each occurrence of the group.
To sort the grouped data, select the Sorting tab. You can select up to four sort-by fields. For each sort by field, select the following:
Sort order - select Ascending or Descending.
Data Type - Select Number or Date/Text. It is important that you select the correct data type to achieve the expected sort order.
Note that if you are sorting by four criteria and your XML data element names are long, you may exceed the character length limitation (393 characters) of the Microsoft Word form field.
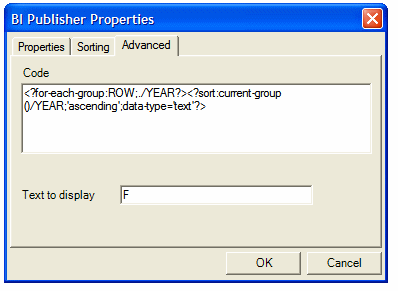
The Advanced tab enables you to edit the code directly and to enter Text to Display for the field.
The Code region displays the code and processing instructions that the Template Builder has inserted for the field. You can edit this if you wish to change the processing instructions for this field.
The Text to Display field shows how this field will display in your template. You can choose to enter descriptive text to enable you to understand each field better when reading the template, or you can enter abbreviated text entries that will be less intrusive to the look and feel of the template.
Note: The default display text can be set as Descriptive or Abbreviated using the Options tab.
The following figure shows the Advanced tab of the Repeating Group BI Publisher Properties dialog:
When you have completed the dialog options, click OK. This will insert the form fields in your template. By default, the beginning for-each form field will display the text "F" and will be inserted at the beginning of the selected template section. At the end of the selection, an "E" form field will be inserted to denote the end of the repeating group.
To create a group around an existing block of text or elements in a template:
Select the block of text. For example, a table row.
Note that if any preexisting BI Publisher tags are included in the block, you must be sure to include the beginning and ending tags. For example, if your block contains any opening for-each, if, or for-each-group tags, you must include the end for-each, end-if, and end for-each-group tags in your selection.
On the Oracle BI Publisher menu, on the Insert group, click Repeating Group.
In the BI Publisher Properties dialog, enter the fields to define the group as described in Inserting a Repeating Group.
Click OK to insert the grouping fields around the block. For example, if the block is a table row, the begin field will be inserted at the beginning of the first cell and the end field will put at the end of the last field.
A conditional region is an area that is surrounded by a conditional statement. If the statement tests true, the area is displayed in the report; if the condition tests false, the area is suppressed from the report.
For example, your data contains sales information. Your report contains a table that displays sales by industry. You want this table in your report to display information for industries with sales amounts lower than 100,000. Using the insert conditional region functionality, you can select the region that contains the sales table and insert the condition that the sales element must be less than 100,000.
Select the region that you want to apply the condition to. For example, if you want to display a table only for a certain condition, select the region that contains the table. Note that the region must be inside a loop.
On the Oracle BI Publisher menu, on the Insert group, click Conditional Region. The following figure shows the BI Publisher dialog for a Conditional Region:
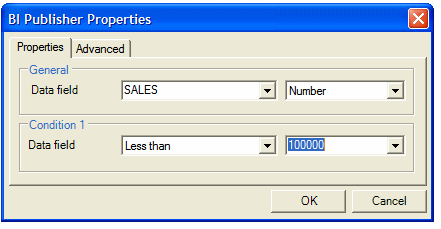
Enter the following fields:
Data Field — Select the field to test for the condition. Select the data type of the field: Number or Date/Text.
(Condition 1) Data field — Select the comparison operator.
Select the value to meet the condition. Note that you may enter an integer, enter text, or select another data element to define a comparison based on the incoming values.
Click OK. The form fields containing the conditional logic are inserted around the region. The beginning form field will display the text "C" and the form field closing the region will display the text "EC".
To edit the conditional region, double-click the inserted form field to launch the dialog for editing; or, right-click the form field and select BI Publisher, then Properties.
Using the Conditional Format feature you can insert simple conditional formats to apply to table rows or cells. The dialog provides several common options that you can select and the Template Builder inserts the code automatically. The Conditional Format dialog supports two conditions per field.
Important: The Conditional Format dialog cannot be used inside of pivot tables. You must insert the conditional formatting logic directly to the appropriate form fields.
To insert a conditional format:
Place the cursor in the table cell of the data element for which you want to define the condition.
On the Oracle BI Publisher menu, on the Insert group, click Conditional Format. The following figure shows the BI Publisher Properties dialog for a Conditional Format:
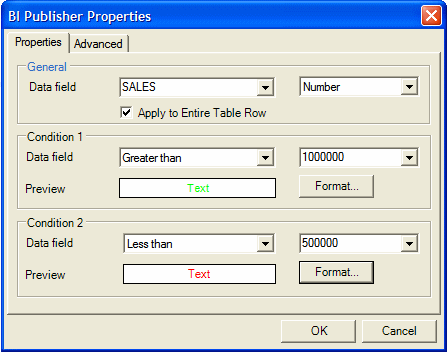
Enter the following in the Conditional Format dialog
Data Field — Select the element to test for the condition and the data type of the element (Number or Date/Text).
Apply to Entire Table Row — If you want the format applied to the entire table row, not just the cell of the selected element, select this box.
Condition 1) Data field — Select the comparison operator.
Select the value to meet the condition. Note that you may enter an integer, enter text, or select another data element to define a comparison based on the incoming values.
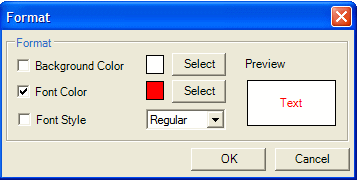
Click Format to define the format you want to apply when the condition is met. Options are background color, font color, and font style (regular, bold, italic, bold italic). Select the box and format of each option you want to apply. After you select the format, the Preview region will display the format chosen.
The following figure shows the Format dialog:
Define a second condition if desired.
Select OK. The conditional format field will be inserted as a form field with the display text "C".
To edit the conditional format, double-click the inserted form field to launch the dialog for editing; or, right-click the form field and select BI Publisher, then Properties.
The Preview menu group enables you to preview your RTF template with sample XML data.
Note: If you have not already done so, you must load sample data to the Template Builder to preview the report. See Accessing Data for Building Your Template.
From the Preview group select the output format. If you have not yet saved your template as an RTF file, you will be prompted to do so.
You must have Adobe Acrobat Reader version 5.0 or higher installed to preview documents in PDF format.
HTML
Launches your default browser to display the report.
EXCEL
To use this option, you must have Microsoft Excel 2003 or later. This format generates MHTML (Microsoft Web archive), which can contain images.
EXCEL 2000
Generates HTML and launches Microsoft Excel to render it. Embedded images such as charts and logos are not supported in this output type. If you do not have Microsoft Excel 2003 or later, use this option.
RTF
Generates the report in Rich Text Format.
PowerPoint
Requires Microsoft PowerPoint 2003 or 2007.
This section describes additional tools provided with the Template Builder to help you validate and edit your template. This section includes:
Once you have inserted a data field (see Inserting a Field) you can view or edit the field properties in the BI Publisher Properties dialog.
To invoke the BI Publisher Properties dialog, perform one of the following:
Double-click the field
Right-click the field, from the menu select BI Publisher, then Properties
The following figure shows the BI Publisher Properties dialog: note the Properties tab, the Advanced tab, and the Word Properties button:
Note: Some fields may only display the Advanced tab.
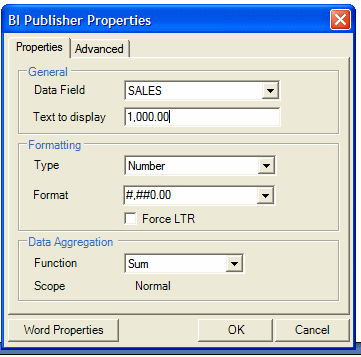
You can set the following properties for a data field:
Data Field — Select the data field from the list of available fields from the loaded data source.
Text to Display — Enter the display text for the form field in the template. This text will be replaced at runtime by the value in the data.
Type — Select the type of data. Options are Regular Text, Number, Date, Current Date, Current Time. The selection in this field will determine the format options.
Format — For any data type except Regular Text, you can select from several number or date display formatting masks or enter your own.
Force LTR — (Force Left-to-Right) Use this check box when you are publishing the template in a language that prints the characters from right to left, such as Arabic or Hebrew. Use this option to force left-to-right printing for fields such as phone numbers, addresses, postal codes, or bank account numbers.
Function — This feature enables you to perform aggregation functions (Sum, Average, Count, Minimum, Maximum) on data fields. For example, if you select sum for a data field, the field will show the sum of all occurring values for this data field depending on the scope (see below). See also Inserting a Field for information on aggregation functions.
Scope (informational only) — This field has two possible values:
Group Item — Indicates that the data field is inside a group. If you choose to perform a function on the field, only the occurrences of the field within the current group will be included in the aggregation.
Normal — Indicates that the field is not inside a group. Aggregation functions will be performed on all occurrences of the field in the data.
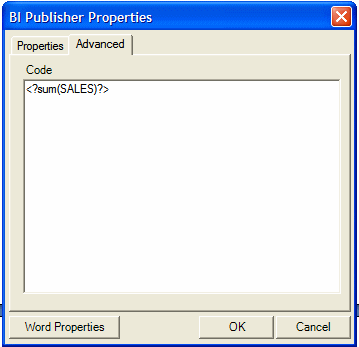
The Advanced tab displays the underlying code. If the code pattern within the form field is not recognized (for example, because you added commands manually to the field), the BI Publisher Properties dialog will display this tab only.
Use this tab to edit or add code to the form field manually. Select OK to update the template. The following figure shows the Advanced tab:
The Word Properties button opens the Microsoft Word Text Form Field Options dialog. You can also use this dialog to set the data type and number format. The underlying code used by BI Publisher is also available by clicking the Add Help Text button.
The Template Builder provides a validation tool to check the template for incorrect use of BI Publisher commands and unsupported elements in the RTF file.
To validate your template:
On the BI Publisher menu, on the Tools group, click Validate Template.
If there are no validation errors, No Error found will be returned. If an error is found, the error will be displayed. You can use the Field Browser to help locate the error.
The field browser dialog provides a fast way to review and update the BI Publisher instructions hidden in the Microsoft Word form fields. This dialog is particularly useful to understand and modify existing templates.
On the Tools group click Field Browser.
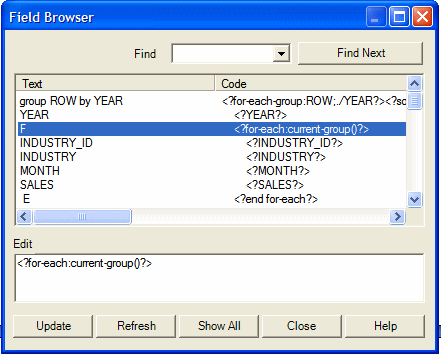
The Field Browser dialog shows a table with the display text of the form field in the Text column and the underlying code instructions in the second Code column. When you select a specific row in the dialog, the matching form field will be selected in the Microsoft Word document.
If you select some part of the text before opening the Field Browser, the dialog only shows the fields in your selection. If no text is selected, the field browser will show all fields in the document.
The options are described in the following table:
| Option | Description |
|---|---|
| Edit | You can update processing instructions directly from the Field Browser dialog. Select a field in the Text table. The Edit box shows the processing instructions for the field. To change the instructions for the field modify the text in the Edit field and click Update. |
| Refresh | The Field Browser dialog is not aware of any form fields that you have added or modified while the dialog is open. Click Refresh to show any changes to the document since the Field Browser dialog has been opened. |
| Show All | If you opened the browser with a part of the document selected you will only see the form fields in the selected area. Click Show All to see all the form fields in the document. |
| Close | Click Close to close the field property browser. The Close button will not automatically update any changes in the edit field, therefore ensure that you select Update if you want to save edits. |
If you used the Open Template dialog to connect to BI Publisher, and load your data to the Template Builder, or if you downloaded an existing template from the BI Publisher catalog, you can upload the new or updated layout back to the report definition on the server. See Working in Connected Mode.
If you downloaded an existing template and wish to upload the modifications to the template, select Upload Template from the Oracle BI Publisher menu.
If this is a new template for the report definition, use the Upload Template As option to upload the layout to the report definition on the server. Also use this option to upload modifications to an existing template under a different name.
The Template Builder provides tools to help you create and test translations for your templates.
There are two options for adding translated templates to your BI Publisher report definition:
Create a separate RTF template that is translated (a localized template)
Generate an XLIFF file from the original template (at runtime the original template is applied for the layout and the XLIFF file is applied for the translation)
Use the first option if the translated template requires a different layout from the original template.
If you only require translation of the text strings of the template layout, use the XLIFF option.
For detailed information on translation concepts and support, see the section Translating Reports and Catalog Objects.
To use the Template Builder translation tools to create your templates for translations, see the following topics in this section:
Extracting Text to an XLIFF File for Translation
Previewing a Translation
Localizing a Template
For a demo on BI Publisher's localization capabilities, see the LocalizationDemo.exe demo provided with your Template Builder installation (located in the BI Publisher\BI Publisher Desktop\demos folder where you installed BI Publisher Desktop).
This menu item allows you to create a standard XLIFF translation file containing the boilerplate text from your template. XLIFF is a standard file format that is understood by many translation software packages. Since an XLIFF is an XML file, you can translate the text in a regular text editor.
A "translatable string" is any text in the template that is intended for display in the published report, such as table headers and field labels. Text supplied at runtime from the data is not translatable, nor is any text that you supply in the Microsoft Word form fields.
From the BI Publisher menu, select Tools, then Translate Template, then Extract Text.
You will be prompted to save the extract file as an XML file type. Enter a name for the extract file and save to the desired location.
If you wish to translate the template yourself, open the .xlf file using a text editor and enter the translated strings in the file. For a detailed description of working with the BI Publisher generated .xlf files, see the topic: Working with Translation Files.
When done, you can Preview the translation. Then upload the file to the BI Publisher report definition.
To preview your template with your translated XLIFF file applied:
From the BI Publisher, in the Tools group, click Translation, then Preview Translation.
You will be prompted to select your saved XLIFF file. Locate the file, and select Open.
The Template Builder will merge the sample data, the translation file, and the RTF template to generate a PDF for you to preview.
Localizing a template means that you are creating a template to be used for a specific language.
Because BI Publisher enables you to extract the boilerplate text strings from your template into an XLIFF file that can be translated and then applied at runtime, if your reports for additional languages only require the translation of these text strings, then you only need to supply translated XLIFF files to accompany your base template.
However, you would localize a template when the requirements for the report in the specific language go beyond the simple translation of the text in the layout.
To save a template as a localized template:
From the Oracle BI Publisher menu, in the Tools group, select Translations, then Localize Template. This will invoke a warning that Localizing your template will overwrite the template. Click OK.
You will be prompted to select the XLIFF translation file. Locate the appropriate file and click Open.
The translated XLIFF file will be applied to the template you currently have open in Microsoft Word.
Save the localized template.
Upload the template file to the appropriate report definition in the BI Publisher catalog. Select the appropriate locale in the upload dialog.
Access the Options dialog as follows: In the Options group, click Options.
The Options dialog contains four tabs: UI, Preview, Build, Connection.
Use the UI Options tab to set options that influence the look and feel of the Template Builder:
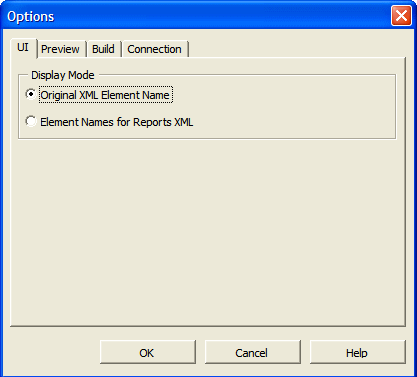
The tree view showing the data source can show either the correct XML tag names of the data source or they can show a slightly modified version that is easier to read. Select the option Element Names for Report XML to show the modified labels. These labels contain no <> characters, use “Title case” and use spaces (“ “) instead of underscores (“_”).
The Preview Options tab allows you to specify options that influence the Preview functionality of the Template Builder.
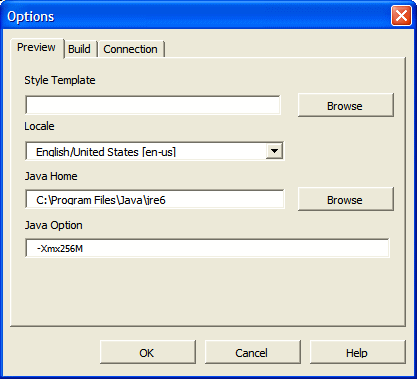
The following table describes the options available from the Preview tab:
| Option | Description |
|---|---|
| Style Template | If you have a BI Publisher Style Template available locally you can specify it here. A style template is an RTF template that contains style information that can be applied to RTF layouts, similar to a style sheet. The style information in the style template is applied to RTF layouts at runtime to achieve a consistent look and feel across your enterprise reports. For more information, Creating and Implementing Style Templates. |
| Locale | You may choose the language and territory used for previewing your template. While this change will not automatically translate any files, it is important to set the correct locale for the preview to use the correct direction of the text (left-to-right or right-to-left), and to correctly set locale-specific date, number, and currency formats. |
| Java Home | The Preview (and export functionality) requires Java code. You can change the path to your JAVA HOME directory. If this option is not specified, the Template Builder assumes that the Java virtual machine (java.exe) is accessible in the PATH specified in your environment variables of Windows. |
| Java Option | Specify the memory to reserve for the Template Builder to process the template. The default value is -Xmx256M. |
Use the Build Options tab to specify options that influence how the Template Builder generates tables and forms.
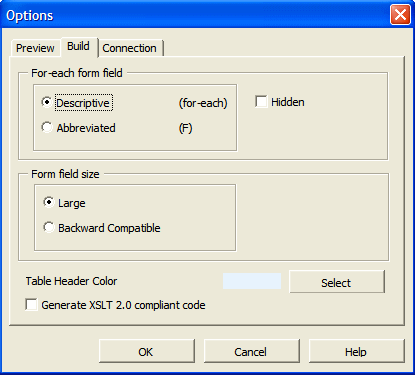
The following table describes the options available from the Build tab:
| Option | Description |
|---|---|
| For-each form field | Choose how the Template Builder creates the form fields for processing instructions in the Insert Table/Form dialog. The Descriptive option (for example: for-each Invoice) renders a descriptive form field for the processing instructions. This option makes the layout template easier to understand. However, the longer fields may distract from the visual layout of the template. Note that the descriptive option does not apply to fields within table cells. The Abbreviated option (for example: F) provides a one letter abbreviation for each instruction. Select the Hidden box to generate the processing instruction form fields using Microsoft Word's hidden font effect. Hidden text is hidden in the Print Preview and you may display or hide the hidden text by changing the Hidden Text setting in the Display group of the Microsoft Word Options. |
| Form Field Size | Large - inserts the BI Publisher code to a document variable. The document variable field can accommodate approximately 48 kilobytes of code line. It is important to note that this setting affects only fields that are created or edited while this option is set. The form fields created with the Large setting cannot be understood by Oracle BI Publisher 10g. If your template is intended for use with the 10g version of BI Publisher, use the Backward Compatibility setting. Backward Compatible - in previous versions of the Template Builder the BI Publisher code was inserted to the Microsoft Word Form Field Help Text box. This limited the length of code that could be inserted for a single form field. By default, the Large option is used because it can accommodate much larger code strings. However, the Large option is not compatible with Oracle BI Publisher 10g. |
| Table Header Color | When you insert a table using the Table Wizard or the Insert Table/Form dialog the Template Builder applies the Table Header Color specified here to the table header background. Customize the default color for your templates. |
| Generate XSLT 2.0 compliant code | BI Publisher uses the XSLT processor provided by Oracle XDK 11.1.0.7.0, which supports the W3C XSL Transformations 1.0 recommendation. The processor also implements the current working drafts of the XSLT and XPath 2.0 standards. For more information about Oracle XDK see Oracle XML Developer's Kit Programmer's Guide 11g. By default, BI Publisher is compatible with XSLT 1.0. If you wish to use XSLT and XPath 2.0 features in your template enable this option. This configuration is performed at the template level. The template-level setting will override the server setting. |
Options on this tab are reserved for a future release.
The Template Builder can be used with a BI Publisher configuration file.
The configuration file must be named xdoconfig.xml and must be stored in the config directory (example path: C:\Program Files\Oracle\BI Publisher Desktop\Template Builder for Word\config) under the BI Publisher directory.
Alternatively, you can use the file name xdo.cfg, which is used by the BI Publisher server. The configuration file allows you to:
Define additional fonts such as Windings to test your templates
Use security settings for PDF files
Refer to the Oracle Fusion Middleware Administrator's and Developer's Guide for Oracle Business Intelligence Publisher for the syntax of the configuration file.
When you install the Template Builder the next time you open Microsoft Word, you will see the Oracle BI Publisher menu.
Note: If you are using Microsoft Word 2007 you may need to modify your Add-In settings: Click the Office Button, then click Word Options, then click Add-Ins.
The Online group of commands enable you to initiate interaction with the BI Publisher application. For more information about working with the online commands, see: Working in Connected Mode.

| Command | Description |
|---|---|
| Log on | Enables you to log in to BI Publisher. Enter your username and password. Select or enter the URL for the BI Publisher Report Server (see your Administrator if you do not know the URL). When you log on, the Open Template dialog is displayed.
Note: You must log in directly to the BI Publisher server. For example: http://www.example.com:7001/xmlpserver. |
| Open | After you log on, this command becomes available to enable you to open a report in the BI Publisher catalog. |
| Upload Template | If you used the Open Template dialog to download a template from the BI Publisher catalog, use this option to upload the updated layout back to the report definition in the catalog. |
| Upload Template As | If you used the Open Template dialog to download a template or to open a report from the catalog, use this option to upload the layout to the report definition in the catalog. Also use this option to upload modifications to an existing template under a different name. |
| Save XML Data | If you are working in connected mode, use this command to save the data to a local directory if you will also need access to the data in disconnected mode. |
The data group of commands enables you to load a saved sample data file or sample schema to the Template Builder. You must load data to use most of the Template Builder functionality. See Accessing Data for Building Your Template for more options for loading data to the Template Builder.
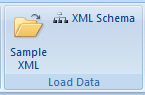
| Command | Description |
|---|---|
| Sample XML | This command enables you to load a previously saved sample XML file from your report data source. If you are not connected to the BI Publisher server, use this method to load your data. |
| XML Schema | This command enables you to load an XML Schema file (.xsd) that contains the fields available in your report XML data. The XML schema has the advantage of being complete (a sample xml file may not contain all the fields from the data source). For the preview, the Template Builder can generate dummy sample data for an XML Schema. However, the preview works better if you also upload real sample data. |
Use the Insert group to insert the layout components to your template. For more information see Inserting Components to the Template.
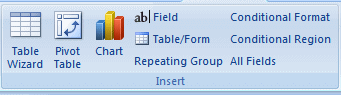
| Command | Description |
|---|---|
| Table Wizard | This function provides a wizard that guides you through the creation of tables used in typical reports. |
| Pivot Table | The Pivot Table function enables you to drag and drop the data elements to a pivot table structure. |
| Chart | BI Publisher does not recognize native Microsoft Word charts. The Insert Chart function allows you to insert a chart that is understood by Oracle BI Publisher. |
| Field | This function allows you to select fields from your data source and insert them into your template.
Note: As a beginner, you should use Insert Fields only for data fields that are unique – none repeating - in your document. See Inserting a Table for additional information on how to insert repetitive fields. |
| Table/Form | Use this function to insert data fields to be organized as a simple or nested table or as a form that is repeated with different data. You may even organize all the data fields for the whole document before inserting them. |
| Repeating Group | Enables you to select or define a group of elements that you want repeated for each occurrence of an element in the data. |
| Conditional Format | Enables you to define simple conditional formats to apply to table rows or cells. |
| Conditional Region | Enables you to insert a conditional statement around a region of the template. |
| All Fields | This function inserts all fields found in the XML data into your document. It will also insert processing instructions into your document that will repeat a section – such as a table row – when the associated XML element is repeated.
Note: XML documents often contain a large number of fields in a deeply nested hierarchy. For example, an Oracle Purchasing purchase order contains purchase order lines, which contain shipments, which contain distributions. The purchase order line alone contains more than 150 data fields. In these cases, you should use the Insert Table/Form function to have more control over which fields are inserted. |
The preview group enables you to preview your RTF template with the sample XML data. . The preview menu offers you PDF, HTML, RTF, PowerPoint, Excel (MHTML format) and EXCEL2000 as output formats. When you select any of these output formats, the Template Builder will merge the data into your template and create the output document.
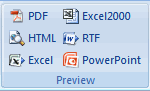
Note: You must have Adobe Acrobat Reader version 5.0 or higher installed to preview documents in PDF format.
For more information about using the commands in the Tools group refer to Template Editing Tools and Using the Template Builder Translation Tools.
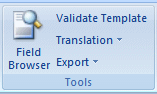
| Command | Description |
|---|---|
| Field Browser | The field browser is a tool for advanced users who need to change the BI Publisher commands hidden in the form fields. It shows the commands behind each form field and allows you to change them. Use this tool to correct flawed RTF templates or to update multiple fields efficiently. |
| Validate Template | The validation function checks the template for incorrect use of BI Publisher commands and unsupported elements in the Word file. |
| Translation | Includes the following subcommands: Extract Text - This command enables you to create a standard XLIFF translation file containing the boilerplate text from your template. XLIFF is a standard file format that is understood by many translation software packages. Because an XLIFF is an XML file, you can translate the text in a text editor. For more information on working with XLIFF files, see Working with Translation Files. Preview Translation - this command enables you to preview your template as a PDF file using a specified XLIFF translation file. This functionality enables you to test translation files. Localize Template - this command applies a translation file to an RTF template. This means that in your current RTF template all boilerplate text is translated. The main function of this feature is to create a language-specific version of a template. |
| Export | Includes the following subcommands: XSL-FO Stylesheet - this function allows you convert the RTF template into an enhanced XSL-FO stylesheet. This function can be used to generate XSL-FO for debugging or further customization. Formatted XML - this function allows you to apply the XSL-FO stylesheet generated from the Word document to the sample data and save the intermediate FO format. This function is mainly for debugging. PDF This function converts the Word document to PDF. |
The options function allows you to define some preferences and options for using BI Publisher and access online help.

See Setting Options for the Template Builder.
![]()
Copyright © 2004, 2010, Oracle and/or its affiliates. All rights reserved.