Oracle WebLogic Server Support: Configuring a Project to Use WebLogic SCA
This document describes the following:
- Configuring a Project to Use WebLogic SCA
- Using Context Help for WebLogic SCA XML Attributes
- Creating Complex Properties Using XML Template
- Creating WebLogic SCA Data-Binding Customization Descriptor
- Deploying WebLogic SCA Application
- Related Information
1. Configuring a Project to Use WebLogic SCA
OEPE provides support for WebLogic SCA container. You use it to populate the Spring context file and bundle as part of any regular Java EE deployment bundles, such as EAR or WAR.Note that prior to using OEPE support for WebLogic SCA in your Eclipse project, you need to configure Oracle WebLogic Server 11g Release 1 (10.3.2) or later at localhost.
1.1 Performing Configuration Steps
You enable your project for WebLogic SCA by adding a facet provided by OEPE, as follows:- Create a dynamic Web project by right-clicking the Project Explorer and selecting New > Dynamic Web Project from the drop-down menu. This opens the New Dynamic Web Project dialog, as Figure 1 shows. Complete the dialog as follows:
- specify the name for your project;
- select Add project to an EAR and provide a new EAR name;
- set the target runtime to Oracle WebLogic Server 11gR1 (10.3.2) or later.
- set the dynamic Web module version;
- click Modify on the Configuration field of the New Dynamic Web Project dialog to open the Project Facets dialog shown in Figure 2. Define the project facets, as follows:
- ensure that WebLogic Web App Extensions facet is selected;
- select Spring facet with version 2.0 or later;
- select WebLogic SCA facet, and then click OK to close the Project Facets dialog.
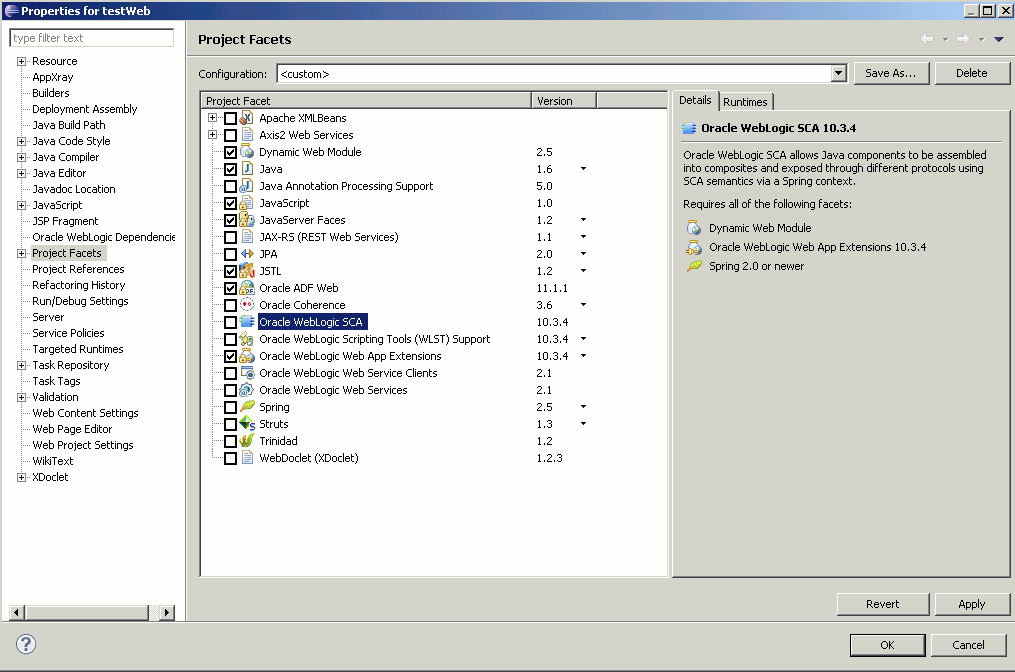
Figure 2. Setting WebLogic SCA Facet
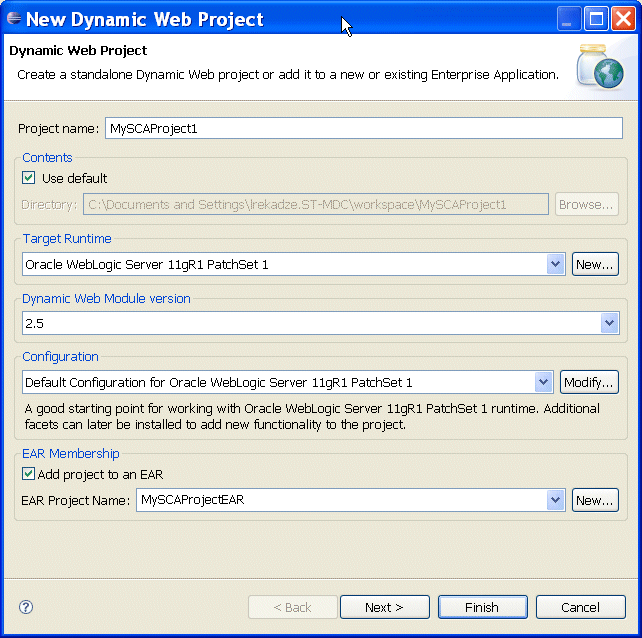
Figure 1. New Dynamic Web Project Dialog
- Click Next on the New Dynamic Web Project dialog.
- You may accept or modify default settings on the next New Dynamic Web Project > Web Module screen, and then click Next. This opens the New Dynamic Web Project > Spring screen, as Figure 3 shows.
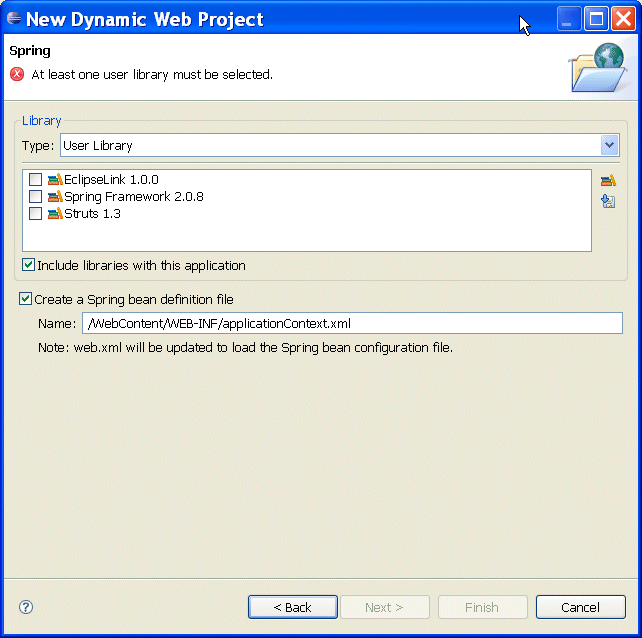
Figure 3. Specifying Spring Library - If you do not see Spring Framework 2.5.6 listed, click Download Library. On the Download Library dialog shown in Figure 4, select Spring Framework 2.5.6 library provided by Oracle, and then click Next. Accept the terms of the Apache License, and then click Finish.

Figure 4. Downloading Spring Library
Note that, if your machine is located inside of a network which requires a proxy to access outside resource such as the Internet, the download may fail due to the fact that Eclipse IDE includes a Web browser to let you access the Internet from within the IDE. In this case, reconfigure your Eclipse IDE proxy settings using Window > Preferences > General > Network Connections, and try again. - Upon the completion of the Spring library download, make sure the Spring Framework 2.5.6 library is selected on the New Dynamic Web Project > Spring dialog. You may choose to select Create a Spring bean definitions file to generated the
applicationContext.xmlfile and trigger the update ofweb.xmlfile to load the Spring bean configuration file, and then click Next. - Click Finish on the New Dynamic Web Project > WebLogic SCA screen that Figure 5 shows to complete your configuration.
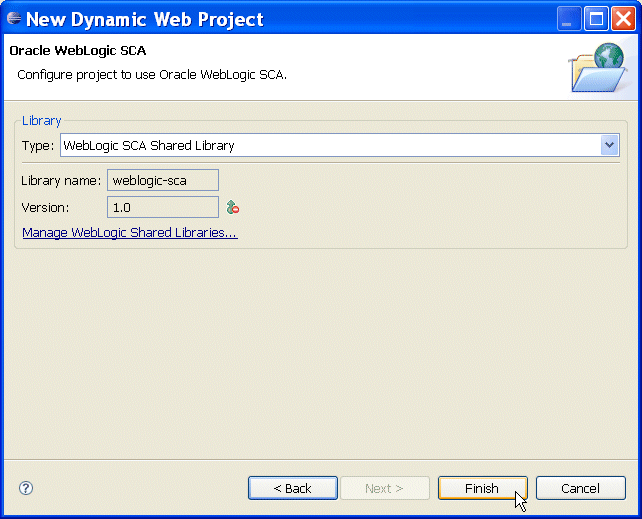
Figure 5. Configuring Project to Use WebLogic SCA
Upon the completion of the configuration, OEPE adds WebLogic SCA shared library and Spring library to your project, as well as creates the spring-context.xml file in your project's META-INF/jsca directory, as Figure 6 shows.

Figure 6. Project Configured to Use WebLogic SCA
You can open the spring-context.xml file, shown in Figure 7, either in source view by double-clicking the file name in the Project Explorer, or in graphical view by right-clicking the file name and selecting Open Graph from the drop-down menu.
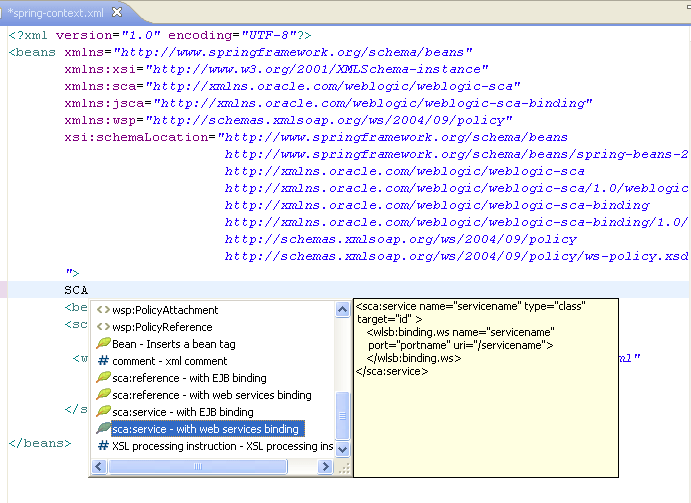
Figure 7. spring-context.xml File
You use the spring-context.xml file to define new beans, specify services, bindings, and so on. OEPE provides templates to facilitate these definitions.
2. Using Context Help for WebLogic SCA XML Attributes
OEPE provides context help for each SCA XML element and attribute. To access help topics, hover the mouse over elements in the XML editor, as Figure 8 shows:
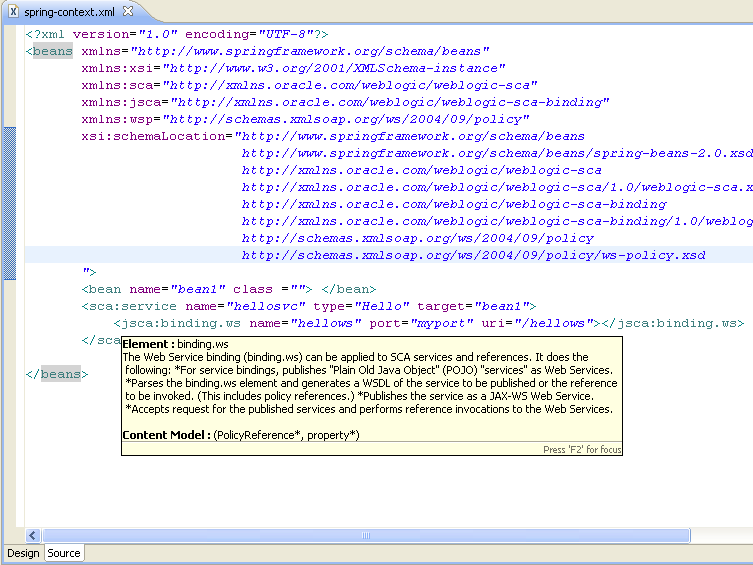
Figure 8. Using Context Help
3. Creating Complex Properties Using XML Template
OEPE provides a set of XML templates that you can use to populate a predefined group of XML elements. This facilitates creating of complex properties in binding specification, such as, for example, the PolicyReference.To invoke an XML template, you type the name of the template (for example, "SCA"), and then press "CTRL + Space" key compbination.
You can use the following XML templates (see Figure 9) for creating WebLogic SCA definitions:
- SCA service with Web services binding
- SCA service with EJB binding
- SCA reference with Web services binding
- SCA reference with EJB binding
Figure 9. WebLogic SCA Template
Inside of WebLogic SCA Service with Web services binding, you can invoke the PolicyReference template (see Figure 10) to further customize the binding security setting, as follows:
- PolicyReference: Username token with message protection: WSS 1.0 X509 with asymmetric binding.
- PolicyReference: Username token with message protection: WSS 1.1 symmetric binding and authentication with plain-text Username Token which is encrypted and signed using the Symmetric key.
- PolicyReference: X509 certificate authentication with message protection (WSS 11).
- PolicyReference: Anonymous with message protection (WSS 11).
- PolicyReference: ID Propagation using SAML token [sender-vouches] with message protection (WSS 11).
- PolicyReference: Username token over SSL.
- PolicyReference: SAML token (Sender Vouches) over SSL.
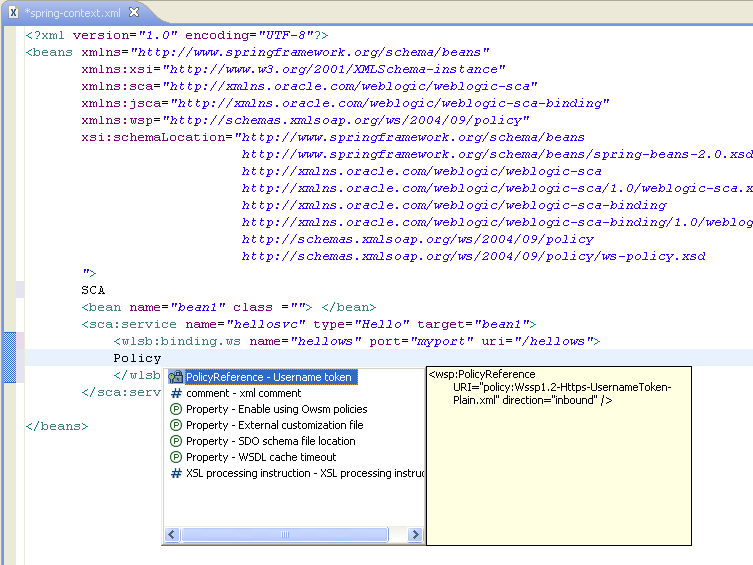
Figure 10. PolicyReference Template
Applicable to both WebLogic SCA Service and SCA Reference, the Property template (see Figure 11) is also available to further customize the binding security setting, as follows:
- Property: SDO schema file location.
- Property: External customization file.
- Property: WSDL cache timeout. Note that this Property (
weblogic.sca.binding.ws.referenceWsdlCacheTimeoutMins) applies to references only. - Property: Enable using Owsm policies.
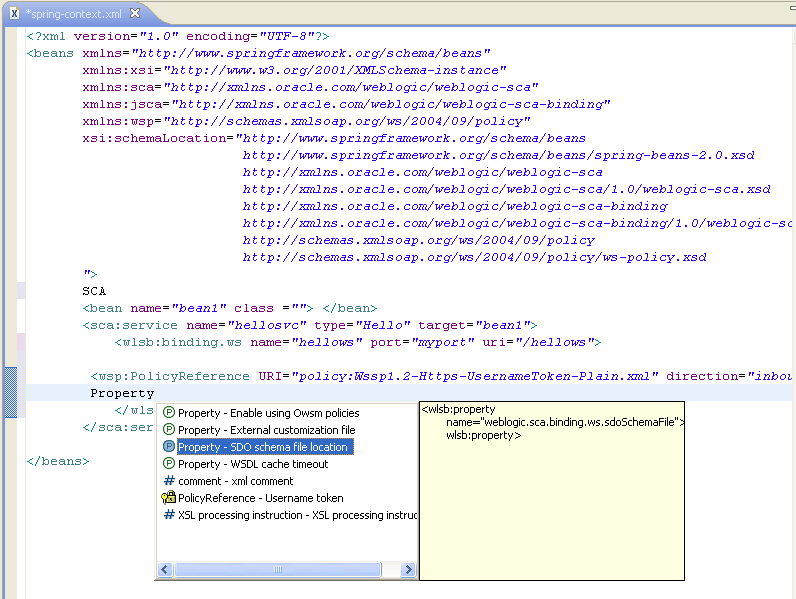
Figure 11. Property Template
4. Creating WebLogic SCA Data-Binding Customization Descriptor
With OEPE, you can create WebLogic SCA data-binding customization descriptor for which the schema file is bundled. This descriptor defines the external mapping metadata for the data-binding framework. The data is used to define the attributes of a particular Java Web service endpoint interface. Each change that you make to the XML will be validated against the schema.You create WebLogic SCA data-binding customization descriptor as follows:
- In the Project Explorer, right-click a Java directory in within your Web project and select New > Other from the drop-down menu to open the New > Select a wizard dialog that Figure 12 shows. From the list of available wizards, select WebLogic Configuration Files > WebLogic SCA Databinding Customization Descriptor, and then click Next.
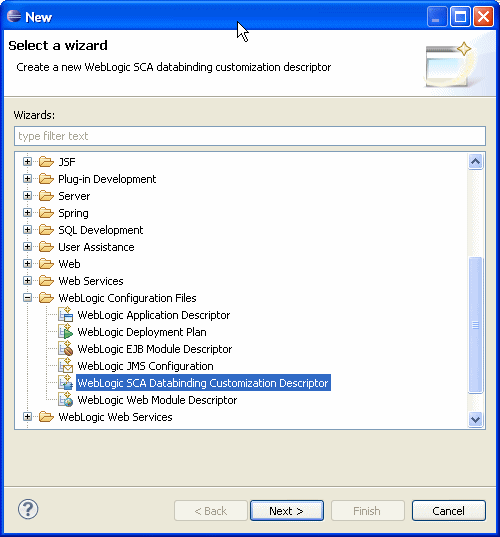
Figure 12. Select Wizard Dialog
- On the New WebLogic SCA Databinding Customization Descriptor that Figure 13 shows, provide the name for the descriptor, specify Java type by completing the Select Java Type that Figure 14 shows, and then click Finish.
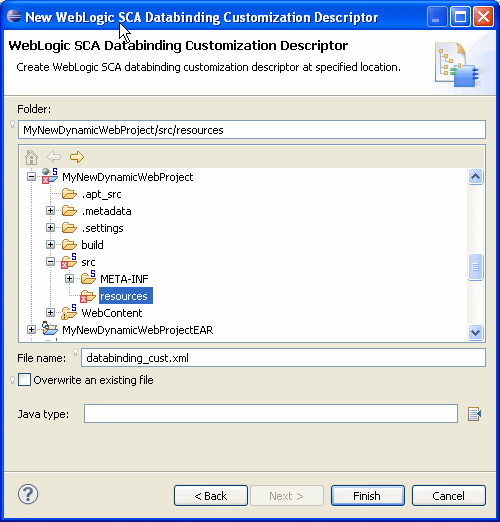
Figure 13. New WebLogic SCA Databinding Customization Descriptor Dialog

Figure 14. Select Java Type Dialog
databinding_cust.xml file has been added to your project.
5. Deploying WebLogic SCA Application
You use Oracle WebLogic Server 11g Release 1 (10.3.2) or later to deploy your dynamic Web project configured for WebLogic SCA, as follows:- Start an instance of Oracle WebLogic Server 11g Release 1 (10.3.2) or later at
localhost. - Open the server configuration (Overview) page by double-clicking on the server name in the Servers view. Ensure that the information is correct. Notice that the domain area does not contain your project's name.
- Add your configured project's EAR to the server, as Figure 15 shows. To do so, right-click Oracle WebLogic Server 11gR1 (10.3.5) at localhost in Servers view, select Add and Remove Projects from the drop-down menu, find your the EAR in the list of projects, and then click Add followed by Finish on the Add and Remove Projects dialog.
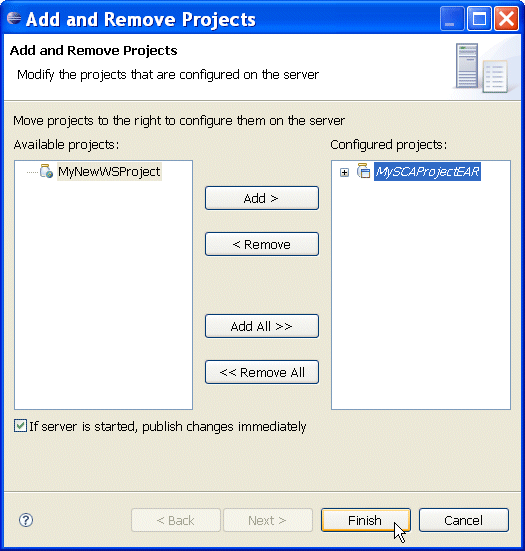
Figure 15. Adding Project to the Server
Now the server configuration page displays the project and its EAR under the base_domain, as Figure 16 shows.

Figure 16. Server Configuration Page
The server console displays the deployment logging information, as Figure 17 shows.
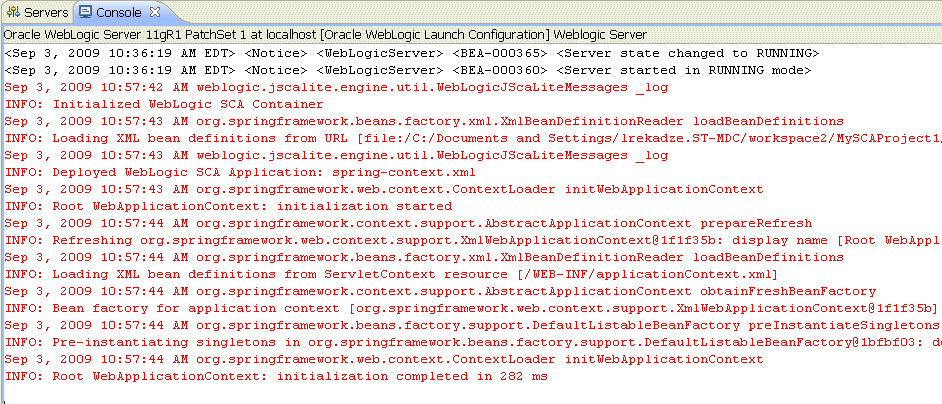
Figure 17. Server Logging Information
You can run your services by right-clicking a sca:service node listed under beans in the spring-context.xml file in the Project Explorer, and then selecting Run As > Run On Server from the drop-down menu, as Figure 18 shows.
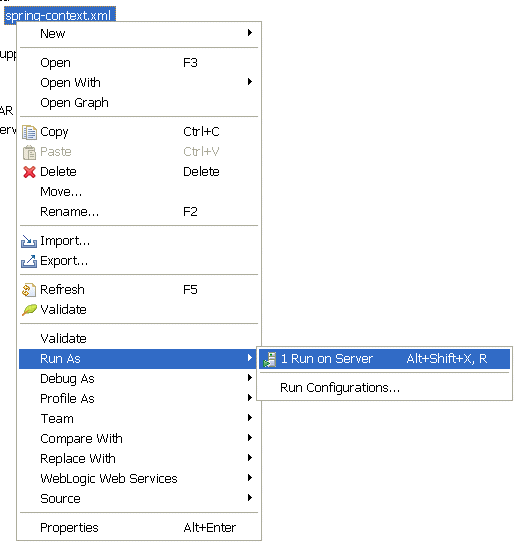
Figure 18. Running the Services
Upon completion of the Run On Server dialogs, a WSDL file, which you can use with other OEPE features, will be created by WebLogic SCA deployment process and will be loaded in a browser.
- Developing WebLogic SCA Applications for Oracle WebLogic Server
- Generating Spring Artifacts
- Generating a Web Service for Spring Service Bean
- Generating a Web Service From a WSDL File
