 Understanding the Branding Theme Development Process Flow
This chapter provides and overview of branding theme development and deployment and discusses how to:
Determine the environment for branding theme development.
Use effective dating to create branding theme versions.
Use default branding themes and branding theme hierarchy.
Understanding the Branding Theme Development Process Flow
This section discusses how to:
Determine branding requirements.
Create and setting up new objects.
Set up the branding feature.
Create and styling headers, footers, and menus.
Assemble branding themes.
Assign roles to themes and creating role precedence lists.
Deploy roles and theme assignments.
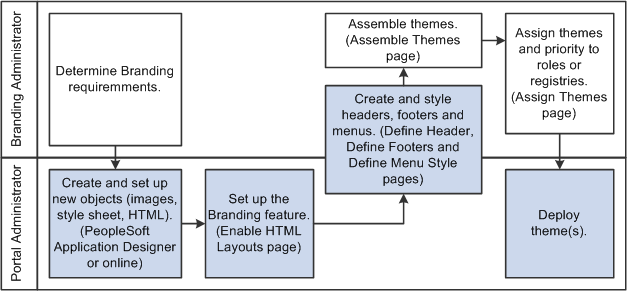
Branding development process flow
 Determining Branding Requirements
To determine the branding requirements of your organization, you most likely will work with a branding administrator, a communications manager, or someone in a similar role, to determine the look and feel that you want to produce on the portal.
The next step is to preview the delivered branding themes and determine one or more themes to implement that match your business requirements
After you identify these themes, you can determine any custom images (such as your company logo), styles, color schemes, and so on that need to be included in the theme(s).
You then provide these styles and images to the portal administrator, so that he or she can transform the design components into objects that you can use with PeopleSoft Enterprise Portal branding.
Creating and Setting Up New Objects
Using the images and color schemes identified as branding requirements, the portal administrator creates new objects using Application Designer or can upload them using the branding pages.
Objects that you might want to upload or modify typically include:
Image objects. Images utilized by the HTML layouts of the header, footer and menu pagelets.
Style sheet objects. Style sheets for borders, fonts, and colors.
Snippets of HTML. Used for adding free-form HTML and other objects, such as dynamic information, to a layout at predefined HTML-configurable positions.
HTML objects. HTML for the header and footer. (If you create your own HTML layouts from scratch.)
Setting Up the Branding Feature
Oracle delivers the PeopleSoft Enterprise Portal branding feature enabled.
Note. If you disable the PeopleSoft Enterprise Portal branding feature, the system reverts to the standard PeopleTools branding functionality, where there is little flexibility for configuration and dynamic changes.
Therefore, the only steps the portal administrator needs to perform to set up the branding feature are:
View the system elements to review and specify elements that sites can override.
Enable the HTML layouts.
Creating and Styling Headers, Footers, and Menus
You must configure the components and elements that you will use in themes, such as headers, footers, style sheets and menus, including the images and links that you will use on these items.
Note. The delivered headers, footers and menus consist of system data. During the upgrade process new system data will overwrite existing system data. Therefore, to support software upgrades, use the Copy Header and Copy Footer features to create headers and footers with unique header and footer names. In the case of menus, create new ones.
The PeopleSoft Enterprise Portal branding application pages allow you to:
Assign and refine images.
Construct links.
Modify delivered headers, footers and so on.
Copy an existing header or footer to use as a starting point for your configuration.
Create versioned (effective-dated) headers and footers.
Select the bar elements to display and use in headers, such as Home, Worklist, Add to My Links, and Signout.
Configure the special elements, like Search options, My Links, homepage Help and homepage tabs.
Assembling Branding Themes
After you configure components and elements, you assemble them into a theme or themes.
Assigning Roles to Themes and Creating Role Precedence Lists
After you define themes, you can create the hierarchy of when specific themes are to appear to different registries or users.
There is a default theme for each of the portal registries and the database as a whole, and you can optionally assign themes to user roles and set the theme priorities. All the theme assignments are effective dated.
If no theme assignments exists, the branding defaults to the database default theme. If no theme is designated as the database default, the branding will fall back to the PeopleTools-delivered look.
See Using Default Branding Themes and Branding Theme Hierarchy.
Deploying Role and Theme Assignments
After you customize branding themes you must deploy the role and theme assignments. The steps to accomplish this task vary, depending on the environment (development or production) that you use to develop the themes.
See Deploying Branding Themes.
Determining the Environment for Branding Theme Development
This section provides and overview and discusses:
Developing in production environments.
Developing in development environments.
Understanding the Development EnvironmentWhen you customize and test branding themes, you personalize, style, and preview headers and footers , as well as restyle menus.
This approach allows you to view and make iterative changes to your work-in-progress. You can perform these actions in the production environment, or in a separate development environment where you migrate all objects and data to the production environment after development and testing are complete.
|
Choice of Environment |
Description/Considerations |
|
Production environment. |
You develop and test branding themes in the production environment. |
|
Development environment. |
You develop and test branding themes outside of the production environment. When the development and testing are complete, migrate all required metadata and objects to the production environment using standard PeopleTools utilities, such as Application Designer Upgrade Copy and PeopleSoft Data Mover scripts. |
Developing in Production Environments
This section highlights the steps and activities for developing themes in the production environment.
|
Step |
Activities |
|
Development and testing. |
|
|
Deployment. |
Developing in Development Environments
This section highlights the steps and activities for developing themes in a development environment.
|
Step |
Activities |
|
Initial set up. |
Verify that the roles in the development environment are the same as those that exist in the production environment. |
|
Development and testing. |
Define headers, footers and menu styles, and then assemble the theme(s). |
|
Deployment. |
Using Effective Dating to Create Branding Themes Versions
Effective dating allows you to store historical data, see changes in your data over time, and enter future data. For example, you may want to track several versions of a branding theme and when they were deployed—that is, made effective.
When you enter a modified version of a theme that is related to an existing design, you don't want to lose or overwrite the data already stored in the database. To retain history, you add a data row identified by the date when the information goes into effect—the effective date. You can use the different action type buttons to look at what has happened up to the currently effective version and plan for the future. The PeopleSoft system categorizes effective-dated rows into the following basic types:
|
Current |
The data row with the date closest to, but not greater than, the system date. Only one row can be the current row. |
|
History |
Data rows that have effective dates earlier than the current data row. |
|
Future |
Data rows that have effective dates later than the system date. |
The action type that you select when on the page dictates whether you can update certain fields and what you can do with each type of row. The following action buttons are located in the toolbar at the bottom of each page on which they are applicable. A grayed out button indicates the page is currently in that mode.
|
|
Use this button to perform the following actions:
When adding new version rows, the effective date must be greater than or equal to the current row. |
|
|
Use this button to perform the following actions:
When adding new version rows, the effective date must be greater than or equal to the current row. |
|
|
Use this button to perform the following actions:
When adding new version rows, there are no effective date restrictions. |
See Also
Configuring Headers and Footers
Using Default Branding Themes and Branding Theme Hierarchy
Branding themes can be active at the PeopleTools, application database, portal site/registry, or role level. The current active theme is based on the following hierarchy:
PeopleTools level. The theme at this level is the hard-coded default.
See Enterprise PeopleTools 8.50 PeopleBook: System and Server Administration , “Using PeopleTools Utilities”, PeopleTools Options
Database level. If the system locates a database default theme as specified in the Assemble Themes page, it will apply that theme as the default, thereby overriding the PeopleTools default. Keep in mind that themes are effective dated, so you must identify the current effective-dated theme. Run the Database Default Theme query to discover the current effective-dated theme.
Portal site/registry level.Themes specified at this level on the Assign Themes page, it take precedence over the PeopleTools hard-coded default theme and any theme designated at the database level. Run the Portal Site Default Theme query to discover the portal site default theme.
Roles level. If themes are assigned at the role level for a portal site or registry, they take precedence over themes assigned at any other level.