 Understanding Community Calendars
This chapter provides an overview of the community calendars feature and discusses how to:
Create community calendars.
Use community calendars.
Create calendar events.
Subscribe to calendar alerts.
Work with the My Events pagelet.
Administer community calendars.
Publish a calendar as a pagelet.
Understanding Community Calendars
Community calendars provide a way for groups to share, organize, and communicate about events that pertain to their organization or group. Calendar membership can be assigned for users or roles and have different privileges including the ability to view, create, and edit the events for a calendar. Users can view calendars online in pagelets or in the full-page view accessible from the pagelet or the menu navigation.
Calendars can be accessed from portals, sites, and workspaces. Calendars exist in a standalone form in portals and sites. Standalone calendars are accessible in portals and sites through the My Community Calendars page under the My Content menu. In workspaces, a calendar is available in the Calendar module that is part of the workspace.
Understanding the My Events Pagelet
The My Events pagelet is a delivered homepage pagelet that shows all of the events a user has access to across portals, sites, and workspaces (if personalized to do so). Users can personalize the appearance of this pagelet to show a monthly, weekly, or daily view and to select one or more calendars from which to retrieve events.
The following example shows the My Events pagelet in a weekly view displaying events from two workspace calendars:
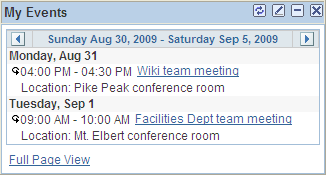
My Events pagelet (weekly view)
See Working With the My Events Pagelet.
Understanding the Calendar Module in Collaborative Workspaces
In a workspace, the Calendar module enables members to manage the workspace calendar to coordinate the activities of the workspace team. A workspace calendar provides a way to share, organize, and communicate about events that pertain to the workspace. Workspace members can also view workspace events in the Calendar pagelet and the Upcoming Events pagelet on the workspace homepage or in the full-page view in the Calendar module. Similar to the My Events pagelet, the Calendar pagelet can simultaneously display events from multiple calendars available from all portals, sites, and workspaces.
See Using the Calendar Module.
Creating Community CalendarsThis section discusses creating community calendars and how to:
Access community calendars.
Create a community calendar.
Assign community calendar participants and privileges.
 Pages Used to Create Community Calendars
|
Page Name |
Definition Name |
Navigation |
Usage |
|
My Community Calendars |
EPPCA_BROWSE |
My Content, My Community Calendars |
View and manage community calendars. |
|
Calendar Properties |
EPPCA_CAL_DETAIL |
|
Maintain the properties for the calendar. |
|
Calendar Security |
EPPCA_CAL_MEM |
Select Calendar Security on the Calendar Properties page. |
Manage calendar members and privileges. |
Accessing Community Calendars
Access the My Community Calendars page (My Content, My Community Calendars).
Use the My Community Calendars page to browse through the list of calendars in the current portal that you are a member of and have permission to view. If you have permission to create a calendar, the Add Calendar button appears on the page.
|
Add Calendar |
Click to create a new calendar. Note. The Add Calendar button only appears for those users who have permission to create a calendar. |
|
Display Active Calendars or Display Inactive Calendars |
If you have created calendars that have been set to a status of inactive, the system displays a drop-down list box on the page the enables you to display either active calendars or all inactive calendars that you have created. |
|
Search |
Click to access the Search Community Calendars page on which you can search for calendar events. |
|
Title |
Click the calendar title to access the calendar. |
|
Properties |
Click to view the Calendar Properties page on which you can modify calendar properties. Note. The Properties link appears only for administrators of the calendar. |
|
Delete |
Click to delete the calendar. Note. The Delete button appears only for administrators of the calendar. |
Creating a Community Calendar
Access the Calendar Properties page (click the Add Calendar button on the My Community Calendars page).
Enter a name for the calendar in the Title field as well as descriptive information about the calendar.
|
Title |
Enter the name of the calendar. The text you enter in this field becomes the title of the calendar. |
|
Description |
Enter a description for the calendar. |
|
Active |
Select this option to make the calendar active and have the calendar appear in the portal or site. If this option is not selected, the calendar is not be available to users. |
|
Publish as Pagelet |
Displays the List Properties - Publish Pagelet Wizard Definition page on which you can publish the calendar pagelet to the homepage. |
Assigning Community Calendar Participants and Privileges
Access the Calendar Security page (select Calendar Security on the Calendar Properties page).
Use the Calendar Security page to assign calendar members and privileges.
|
Member Type |
Select the type of participant you want to add to the calendar:
|
|
Member Name |
Select the role or user ID. |
|
Privilege Set ID |
Select a privilege level you want to assign to the member: Administrator. Administrators can add, edit, or delete calendar events. In addition, they can add and delete calendar members. Contributor. Contributors can add or edit calendar events. They can delete their own calendar events, but not those belonging to others. Viewer. Viewers have read-only access to the calendar and calendar events. |
|
|
Click to view additional information about the actions that the privilege set enables the member to use. |
|
Publish as Pagelet |
Displays the List Properties - Publish Pagelet Wizard Definition page on which you can publish the calendar pagelet to the homepage. |
Using Community CalendarsThis section discusses common elements in working with community calendars and how to:
Select calendar views.
View an event.
Search for an event.
Common Elements Used in This Section|
Add Event |
Click this button to add an event to the calendar. This button appears on all calendar views if you have contributor or administrator privileges for the calendar. |
|
|
Click the Alerts link or this icon to access the Add Alert Subscription page on which you can subscribe to email alerts that keep you informed of updates to the selected calendar. |
|
Search |
Click to access the Search Community Calendars page on which you can search for events in calendars across all portals and sites. |
|
|
Click the Previous button to scroll backward. For example, on the monthly view of the calendar homepage, click this button to display the previous month. In same view, in the left column, click the Previous button to display the list of months for the previous year. |
|
|
Click the Next button to scroll forward. For example, on the weekly view of the calendar homepage, click this button to display the next week. In same view, in the left column, click the Next button to scroll the display of months forward by one month. |
|
|
Indicates a recurring event. |
|
|
Indicates an all-day event. |
|
Go to My Calendars |
Click to access the My Community Calendars page that lists all available calendars within the current portal. |
Pages Used with a Community Calendars|
Page Name |
Definition Name |
Navigation |
Usage |
|
My Community Calendars |
EPPCA_BROWSE |
My Content, My Community Calendars |
Use to select a calendar. |
|
<Calendar> homepage (monthly view) |
EPPCA_MONTHLY |
|
View calendar events for the current month. Note. Monthly is the default view for calendars. |
|
<Calendar> homepage (daily view) |
EPPCA_DAILY |
|
View calendar events for a specific day. |
|
<Calendar> homepage (weekly view) |
EPPCA_WEEKLY |
On the calendar homepage, select Weekly View from the drop-down list box. |
View calendar events for a specific week. Note. The start date for a week is specified on the Regional Settings page. |
|
<Calendar> homepage (yearly view) |
EPPCA_YEARLY |
On the calendar homepage, select Yearly View from the drop-down list box. |
View calendar events for an entire year. |
|
Community Calendar |
EPPCA_MONTHLY EPPCA_DAILY EPPCA_WEEKLY EPPCA_YEARLY |
Click the Full Page View link in the My Events pagelet. |
View events from all of your calendars or for a specific calendar. Note. The default view for this page is the same as the view specified for the My Events pagelet. The default scope is all calendars, regardless of which calendars were selected for the My Events pagelet. |
|
<Calendar> - <Event Title> |
EPPCA_EVENT_VIEW |
|
View the information for an event. Note. This page is referred to as the event view page. |
|
Search Community Calendars |
EPPCA_SEARCH |
|
Search for events in calendars across all portals and sites. |
Selecting Calendar ViewsThis section discusses how to:
Personalize regional settings for calendars.
View your community calendars.
View a monthly calendar.
View a daily calendar.
View a weekly calendar.
View a yearly calendar.
View events from all calendars.
Personalizing Regional Settings for Calendars
Regional settings such as date and time formats for calendars are set on the Regional Settings page. On the portal homepage, select My Personalizations, Regional Settings to personalize your date, time, and number formats. Select settings for afternoon and morning designators (AM/PM or am/pm), date format (MMDDYY, DDMMYY, or YYMMDD), a local time zone, and so on.
See Enterprise PeopleTools 8.50 PeopleBook: Using PeopleSoft Applications, “Setting User Preferences,” Defining Your User Personalizations.
Viewing Your Community Calendars
Access the My Community Calendars page (My Content, My Community Calendars).
Use the My Community Calendars page to browse through the list of calendars in the current portal that you are a member of and have permission to view. On this page, you can access specific calendars, In addition, from this page, you can add a new calendar or manage calendar properties and membership if you have permission to do so.
See Accessing Community Calendars.
Access the monthly view of the calendar homepage (click the link for a calendar on the My Community Calendars page).
Note. The monthly view is the default view for a calendar.
Use the monthly view of the calendar homepage to view dates and events for an entire month.
Event titles appear on the days that have an event scheduled. Hover over an event title to display a tool tip with the event details. Click the event title to access the event view page showing additional event information.
To add an event to this calendar, you can either click the Add Event button or click the (+) link on a specific date in the calendar.
Note. You must have contributor or administrator privileges to add an event to the calendar.
To display a different view of this calendar:
To display a different month, click the month link in the left column. Alternatively, click the Next or Previous arrows in the title bar of the monthly calendar view.
To display a daily view for a specific date, click the link for that date in the calendar. For a daily view of today's date, click the Today field link to the left above the title bar for the calendar.
Alternatively, to display a daily view, select Daily View above the title bar for the calendar.
Note. The date defaults to the first of the month, or the last date viewed in that month.
To display a weekly view for a specific week, click the week number at the left side of the calendar.
Alternatively, to display a weekly view, select Weekly View above the title bar for the calendar.
Note. The week defaults to the first week of the month, or the week containing the last date viewed in that month.
To display a yearly view, select Yearly View above the title bar for the calendar.
Note. The year defaults to the year of the currently displayed month.
Access the daily view of the calendar homepage (click the link for any date on the calendar homepage).
Use the daily view of the calendar homepage to view all events for the specified date.
Click an event title to access the event view page showing additional event information. Click the link for an event contact to view the profile for that person in a separate window.
To add an event to this calendar, click the Add Event button.
Note. You must have contributor or administrator privileges to add an event to the calendar.
To display a different view of this calendar:
To display a daily view for a different date, click the link for that date in one of the months in the left column. Alternatively, click the Next or Previous arrows in the title bar of the daily calendar view. For a daily view of today's date, click the Today field link to the left above the title bar for the calendar.
To display a monthly view of the calendar, select Monthly View above the title bar for the calendar.
Note. The month defaults to the month of the currently displayed date.
To display a weekly view of the calendar, select Weekly View above the title bar for the calendar.
Note. The week defaults to the week of the currently displayed date.
To display a yearly view of the calendar, select Yearly View above the title bar for the calendar.
Note. The year defaults to the year of the currently displayed date.
Access the weekly view of the calendar homepage (select Weekly View in the drop-down list box above the calendar title bar).
Use the weekly view of the calendar homepage to view all events for the specified week.
Click an event title to access the event view page showing additional event information. Click the link for an event contact to view the profile for that person in a separate window.
To add an event to this calendar, click the Add Event button.
Note. You must have contributor or administrator privileges to add an event to the calendar.
To display a different view of this calendar:
To display a weekly view for a different week, click the Next or Previous arrows in the title bar of the weekly calendar view.
To display a daily view of the calendar, click the link for that date in one of the months in the left column. For a daily view of today's date, click the Today field link to the left above the title bar for the calendar.
Alternatively, to display a daily view, select Daily View above the title bar for the calendar.
Note. The date defaults to the first of the week, or the last date viewed in that week.
To display a monthly view of the calendar, select Monthly View above the title bar for the calendar.
Note. The month defaults to the month of the currently displayed week.
To display a yearly view of the calendar, select Yearly View above the title bar for the calendar.
Note. The year defaults to the year of the currently displayed week.
Access the yearly view of the calendar homepage (select Yearly View in the drop-down list box above the calendar title bar).
Use the yearly view of the calendar homepage to view all events for the specified year.
Note. Bold and underlined dates indicate that there is an event associated with that date. Click the date to display the daily view of the calendar for that date.
To add an event to this calendar, click the Add Event button.
Note. You must have contributor or administrator privileges to add an event to the calendar.
To display a different view of this calendar:
To display a yearly view for a different year, click the Next or Previous arrows in the title bar of the yearly calendar view. Alternatively, click the link for that year in the left column.
To display a daily view of the calendar for a specific date that contains an event, click a bold and underlined date.
Alternatively, to display a daily view, select Daily View above the title bar for the calendar.
Note. The date defaults to the last date viewed in the currently displayed year, or today's date in the currently displayed year.
To display a weekly view of the calendar, select Weekly View above the title bar for the calendar.
Note. The week defaults to the week of the last date viewed in the currently displayed year, or the week of today's date in the currently displayed year.
To display a monthly view of the calendar, select Monthly View above the title bar for the calendar.
Note. The month defaults to the month of the last date viewed in the currently displayed year, or the month of today's date in the currently displayed year.
Viewing Events from All Calendars
Access the Community Calendar page (click the Full Page View link in the My Events pagelet.
Use the Community Calendar page to display a combined view of all events from all calendars of which you are a member (which is also known as a unified calendar). You can also view events for a specific calendar on this page.
Note. The default view for this page is the same as the view specified for the My Events pagelet. The default period is the period that was being viewed in the pagelet when you clicked the Full Page View link. The default scope is all calendars, regardless of which calendars were selected for the My Events pagelet.
Leave the Calendar field blank to view events from all calendars. Otherwise, look up or enter the name of a specific calendar to view events for that calendar only.
Similar to a calendar homepage, you can change the period viewed by selecting from the View drop-down list box; by selecting a specific date, week, month, or year; or by navigating with the Next and Previous arrows in the calendar title bar.
See Viewing a Monthly Calendar.
See Viewing a Weekly Calendar.
See Viewing a Yearly Calendar.
Viewing an Event
Access the event view page (click the link for an event on the calendar homepage, or click the link for an event in the My Events pagelet).
|
Export |
Click to export event information to add the event to your personal calendar application. |
|
Alerts |
Click to subscribe to or update email alerts for the event. |
|
Edit Event |
Click to access the Event Details page on which update the event information. Note. This link is displayed only if you are a contributor to the calendar and you created this event, or if you are an administrator of the calendar. |
Exporting an Event to a Personal Calendar
Depending on the options defined in the Installation Options page, the system can either create a calendar event that you can save to your personal default calendar application or it can send you an email with an attachment that enables you to add the event to your calendar. The remarks appear in the body of the calendar event and the title field is the subject of the calendar event.
To export an event to your personal calendar, click the Export link on the event view page.
Searching for an Event
Access the Search Community Calendars page (click the Search link on a calendar homepage, the My Community Calendars page, or the Community Calendars page).
Use the Search Community Calendars page search your calendars for events to which you have access.
|
Search Text |
Enter the search criteria. |
|
Search Tips |
Click to display search syntax and examples on the Search Tips page. |
|
Search In |
Current Calendar — Select to search within the current calendar only. Current Site — Select to search within all calendars of which you are a member in the current site. All Calendars and Sites — Select to search within all calendars of which you are a member across all sites. |
|
Search |
Click to perform the search. |
|
Hide Summaries and Show Summaries |
Click to hide or show the summaries in the search results. |
|
Search Results |
Click a link to view that item. |
|
Return to Community Calendars |
Click to return to the originating page: calendar homepage, My Community Calendars page, or Community Calendars page. |
Creating Calendar EventsThis section discusses how to:
Define calendar events.
Define recurring events.
Pages Used to Create Calendar Events|
Page Name |
Definition Name |
Navigation |
Usage |
|
Event Details |
EPPCA_EVENT_EDIT |
|
Add an event to a calendar or modify the details for an existing event. |
|
Define Recurrences |
EPPCA_RECUR_SEC |
Click Define Recurrence or View Recurrence link on the Event Details page. |
Set the recurrence for an event. |
Defining a Calendar Event
Access the Event Details page (click the Add Event button on a calendar homepage).
Use the Event Details page to define the details for a calendar event.
|
Title |
Enter the title for the event. This text appears on the calendar to identify the event. |
|
Date |
Enter the date of the event. |
|
All Day Event |
Select this option to create an event that is identified as lasting the entire day. |
|
Define Recurrence or View Recurrence |
Select this link to access the Define Recurrences page that enables you to create repeating events. |
|
Start Time and End Time |
Set the start and end times for the event. Note. The start time defaults to the current time; the end time defaults to one hour after the start time. |
|
Location |
Enter information about where the event will take place. This information is displayed in the weekly and daily views of the calendar and appears as tool tip text in the monthly view. |
|
Type |
Enter free-form text describing what type of event you are creating. |
|
Contact |
Select a user name for the contact person. After you select the contact name, their profile name appears next to the fields. You can click the profile name to view the profile page. |
|
Summary |
Enter a summary of the event. |
|
Content Type |
You can add attachments or additional information to the event using the following options:
This additional content is accessible on the event view page. |
|
Notify |
Click to send a notification. Note. The Notify link is enabled after you save the event. |
|
Preview |
Click to display a preview of the event before it is published to the calendar. |
Defining Recurring Events
Access the Define Recurrences page (click the Define Recurrence link or the View Recurrence link on the Event Details page).
Use the Define Recurrence page to define a series of repeating events over time.
|
Date |
Select the date of the first occurrence of the event. |
|
Start Time and End Time |
Set the start and end times for the event. |
|
Type |
Enter the type of recurrence:
|
|
Define Range With |
Select a method to define when the event stops repeating:
|
|
Remove Recurrences |
Click to remove the entire series of recurring events from the calendar. |
Editing a Recurring Event
If you select to edit a recurring event, you are prompted to select either just one occurrence of the recurring event or all events in the series. If you select to edit just one occurrence in the series, the changes you make apply to this date only. You are able to view the Define Recurrence page, but not make any changes to the recurrences. Information attached to the event from the Additional Event Information group box can only be edited when updating the entire series of recurring events since the item is shared across the series of events.
If you choose to edit all events in the series, then all information related to the event is available for editing. The changes you make apply to the entire series of recurring events. To delete the recurring events, click View Recurrences and click Remove Recurrences on the Define Recurrences page.
Using Calendar Alerts and NotificationsThis section provides an overview of calendar alerts and notifications and discusses how to:
Subscribe to calendar alerts.
Update calendar alerts.
Send event notifications.
Understanding Calendar Alerts and Notifications
You can create personal alert subscriptions at the calendar level and at the event level. In addition, any calendar member can send notifications to selected calendar members from any calendar event.
Prior to creating any alerts, calendar alerts must be enabled on the Alerts Setup page. In addition, for alerts to be delivered to subscribers, alert notifications need to be scheduled by the portal administrator.
See Also
Defining Alert Options By Feature
Scheduling Alert Notifications
Pages Used with Calendar Alerts and Notifications|
Page Name |
Definition Name |
Navigation |
Usage |
|
Add Alert Subscription |
EPPAN_ALERTS |
|
Subscribe to an email alert for a calendar or an event. |
|
Update Alerts Subscription |
EPPAN_ALERTS |
|
Update an email alert for a calendar or an event. |
|
Event Notification |
EPPCA_EVENT_NOTIFY |
Click the Notify link on the Event Details page. |
Send email notifications to users associated with the calendar or the event. |
Subscribing to Calendar Alerts
Access the Add Alert Subscription page (when an alert has not yet been defined for this calendar, click the Alerts link from a calendar homepage or from an event view page).
Use the Add Alert Subscription page to create subscriptions for email alerts for the calendar.
|
Calendar |
Select this option to subscribe to an email alert at the calendar level. When selected, you will receive an email update when the date, time, or location fields in any existing event in the calendar are modified or when an event is created or canceled. |
|
Event |
Select this option to subscribe to an email alert at the discussion topic level. When selected, you will receive an email update when the specific event is modified or canceled. If the event is a recurring event, you can only subscribe to alerts for one date in the series using this page. To subscribe to more than one event in the series, you must open each event and subscribe to it individually. Note. This option is available only when accessing this page from the event view page. |
|
View All My Alert Subscriptions |
Click to view the My Alerts page. |
See Also
Maintaining Alert Subscriptions
Updating Calendar Alerts
Access the Update Alerts Subscription page (when an alert has already been defined for this calendar, click the Alerts link on the calendar homepage or on the event view page).
Use the Update Alerts Subscription page to update subscriptions for email alerts for the calendar.
|
Calendar |
Select this option to subscribe to an email alert at the calendar level. |
|
Event |
Select this option to subscribe to an email alert at the discussion topic level. Note. This option is available only when accessing this page from the event view page. |
|
View All My Alert Subscriptions |
Click to view the My Alerts page. |
See Also
Maintaining Alert Subscriptions
Sending Event Notifications
Access the Event Notification page (click the Notify link on the Event Details page).
Use the Event Notification page to send email notifications to users associated with the calendar or the event.
Include in 'To' List
Select the people you want to receive the notification. Selecting any of these options populates the To field with the corresponding users from the calendar. Additionally, you can manually enter email addresses in the To: field.
Note. Addresses for the Cc: and Bcc: fields must be manually entered or copied and pasted from the To: field.
|
All Members |
Sends the notification to all members of the calendar. |
|
Contact |
Sends the notification to the contact for the event. |
|
Me |
Sends the notification to you. |
|
Add Selected to Email |
Populates the To field with email addresses of those people you have selected to receive the notification. |
Use this section of the page to enter additional address information as well as the text of the notification. The system displays the title of the event as the subject of the notification.
|
To, Cc , or Bcc |
Manually enter additional email addresses in these fields. |
|
Subject |
Enter a subject for the email. A default subject is generated by the system. |
|
Message |
Enter the text of the message in this text box. The text appears in the email message along with a URL to the Event Detail page. |
|
Send |
Click to send the email notification. |
Working With the My Events PageletThis section discusses how to:
Personalize the My Events pagelet.
Use the My Events pagelet.
Page Used to Personalize the My Events Pagelet|
Page Name |
Definition Name |
Navigation |
Usage |
|
Personalize My Calendar Events |
EPPCA_CALPGLT_PREF |
|
Select the calendar or calendars to be displayed in the pagelet and specify the view (daily, weekly, or monthly). |
Personalizing the My Events Pagelet
Access the Personalize My Calendar Events page (click the Customize My Events button in the My Events pagelet).
Use the Personalize My Calendar Events page to select the calendar or calendars to be displayed in the pagelet and specify the period (daily, weekly, or monthly).
|
Select Calendars |
Select events from which calendar or calendars are displayed in the My Events pagelet. |
|
Display Events for the |
Select the period to be displayed in the My Events pagelet. Note. This period determines the default period to be used on the Community Calendars page. |
Using the My Events Pagelet
Access the My Events pagelet on the portal homepage.
Use the My Events pagelet to display calendar events from one or more calendars of which you are a member. The My Events pagelet displays what is also known as a unified calendar because events can appear from calendars across all portals, sites, and workspaces.
|
|
Click the Previous button to scroll the calendar display backward one period. |
|
|
Click the Next button to scroll the calendar display forward one period. |
|
<#> |
Click a bold date to view a pop-up list of events scheduled on that date. In this pop-up list, you can select to view detailed event information or to add an event to one of the calendars personalized to display in the pagelet. Note. This feature is available from the monthly view only. |
|
<Event Title> |
Click an event title to access the event view page for that event. Note. This feature is available directly from the daily and weekly views, and from the pop-up list of the monthly view. |
|
|
Indicates a recurring event. |
|
|
Indicates an all-day event. |
|
Full Page View |
Click to access the Community Calendars page that enables you to view events from all of your calendars. Note. This period displayed in the My Events pagelet determines the default period displayed on the Community Calendars page. The default scope is all calendars. |
To view the event pop-up list, click a bold date in the monthly view of the My Events pagelet as shown in this example:
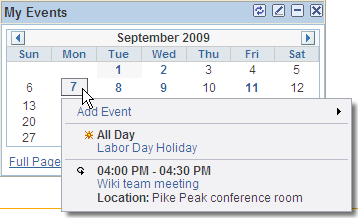
My Events pagelet event pop-up list
From the event pop-up list, you can access the event view page for a listed event or add an event to any of the calendars personalized to display in the pagelet.
Adding an Event from the Event Pop-up List
To add an event from the My Events pagelet:
Click a bold date in the monthly view of the My Events pagelet.
Click the Add Event link in the pop-up list as shown in this example:
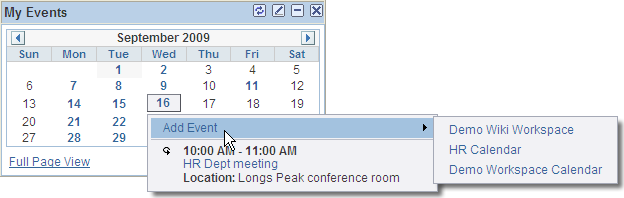
Clicking the Add Event link in the event pop-up list
Select one of the calendars listed to add an event to that calendar.
Note. Only the calendars selected to display in the pagelet on the Personalize My Calendar Events page are listed.
Administering Community CalendarsThis section discusses how to:
Administer community calendars.
Modify privileges for calendars.
Pages Used to Administer Community Calendars|
Page Name |
Definition Name |
Navigation |
Usage |
|
Administer Community Calendars |
EPPCA_INQUIRY |
Portal Administration, Administer Calendars |
Manage calendars. |
|
Administer Community Calendars - Calendar Security |
EPPCA_CAL_MEM |
Click the Privileges link on the Administer Community Calendars page. |
Assign members and privileges to calendars. |
Administering Community Calendars
Access the Administer Community Calendars page (Portal Administration, Administer Calendars).
Use the Administer Community Calendars page to manage calendars and member privileges.
|
Last Modified Before |
Select a date to find calendars that were modified before the date you specify. |
|
Created By |
Select a user ID to return all calendars that the user has created. |
|
Administered By |
Select a user ID to return all calendars for which the specified user is an administrator. |
|
Status |
Select to search for active or inactive calendars, or both. |
|
Keyword |
Enter keywords used in the title and description of the calendar. |
|
Filter |
Click to filter the list of calendars. |
|
Reset |
Click to clear the filter criteria. |
|
Select |
Select a specific calendar. |
|
Title |
Click the title of the calendar to access the calendar homepage. |
|
Privileges |
Click the Privileges link to access the Administer Community Calendars - Calendar Security page. |
|
Select All or Clear All |
Click a link to select or clear the selection of all calendars. |
|
Delete |
Click to delete the selected calendar or calendars. |
Modify Privileges for Calendars
Access the Administer Community Calendars - Calendar Security page (click the Privileges link on the Administer Community Calendars page).
Use the Administer Community Calendars - Calendar Security page to assign list members and privileges similar to the Calendar Security page.
See Assigning Community Calendar Participants and Privileges.
Publishing a Calendar as a Pagelet
This section discusses how to:
Publish a pagelet from a calendar.
Publish a calendar from Pagelet Wizard.
Edit a published pagelet.
Publish a pagelet to multiple portals.
Pages Used to Publish Calendars as Pagelets|
Page Name |
Definition Name |
Navigation |
Usage |
|
Calendar Properties - Publish Pagelet Wizard Definition |
EPPPB_PGLT_PUB |
|
Create a pagelet definition for a calendar. |
|
Pagelet Wizard - Specify Pagelet Information |
PTPPB_WIZ_INFO |
|
Provide information to identify and categorize a pagelet. |
|
Pagelet Wizard - Select Data Source |
PTPPB_WIZ_DATASRC |
|
Select the type of data source for the pagelet. |
|
Pagelet Wizard - Specify Data Source Parameters |
PTPPB_WIZ_DATAPRMS |
|
Configure the data source parameters that are required for data to be displayed in the pagelet. Note. This page is accessible only when you are building a pagelet with a data source that allows modification of associated parameters. |
|
Pagelet Wizard - Specify Data Source Parameter Values |
PTPPB_WIZ_PRMVALS |
Click the Values link on the Pagelet Wizard - Specify Data Source Parameters page. |
Specify prompt values for the end user to select from when personalizing the pagelet. Note. This page is accessible only for data source parameters for which you have selected the User Specified or Admin Specified usage types. |
|
Pagelet Wizard - Select Display Format |
PTPPB_WIZ_DISPFRMT |
|
Specify the data transformation method and display format for the pagelet. |
|
Pagelet Wizard - Specify Display Options |
PTPPB_WIZ_DISP_CUS |
|
Enter the custom formatting details for the pagelet as well as header and footer options. Preview the pagelet. |
|
Pagelet Wizard - Specify Publishing Options |
PTPPB_WIZ_PUBOPT |
|
Specify the manner in which the pagelet is published. Provide registration, caching, and security details, and register the pagelet. |
|
Pagelet Wizard - Pagelet Creation Confirmed |
PTPPB_WIZ_FINISH |
Click the Finish button on the Pagelet Wizard - Specify Publishing Options page. |
Confirm that the creation of the pagelet is complete. |
|
Calendar Properties - Publish as Pagelet |
EPPPB_PGLT_LST |
|
Administer pagelet definitions for a calendar. |
|
Publish to Multiple Portals |
PTPP_PMPUBPRTL |
|
Publish the pagelet definition to additional portals and sites. |
|
Publish Multiple Pagelets |
PTPP_PMPUBPGLT |
|
Publish multiple pagelet definitions to another portal or site. |
Publishing a Pagelet from a Calendar
Access the Calendar Properties - Publish Pagelet Wizard Definition page (click the Publish as Pagelet link on the Calendar Properties page).
Use the Calendar Properties - Publish Pagelet Wizard Definition page to create a pagelet definition for a calendar.
Pagelet
The pagelet title and description from the Calendar Properties page appear in the Pagelet group box. You can edit these two fields, if necessary.
|
Pagelet Title |
Displays the title for the calendar, which can be edited as the title for the pagelet. |
|
Description |
Displays the description for the calendar, which can be edited as the description for the pagelet. |
|
Pagelet Folder |
Select a folder to publish to. Only folders from the current site are available to select. |
|
Pagelet Security |
Select the security options for viewing the pagelet. Available options are: Publish as Public, which enables all users to view the pagelet. Publish with Security Roles, which uses the roles defined on the Calendar Security page when publishing the pagelet. Note. If there are no roles defined on the Calendar Security page, the system automatically selects to publish the pagelet as public. |
Homepage Tabs
Use this group box to define the homepage tab labels and behavior for the pagelet.
|
Homepage Tab |
Select the tabs that will display the pagelet. |
|
Pagelet Behavior |
Select the behavior options for the pagelet. Optional. The pagelet will not automatically appear on the homepage. However, it is available for selection when users personalize their homepages. This setting should not be used for guest homepage pagelets because guest users do not have personalization privileges. Optional-Default. The pagelet will appear on all user homepages if they have access to the pagelet. The pagelet can be removed when users personalize their homepages. This setting should not be used for guest homepage pagelets because guest users do not have personalization privileges. Required-Fixed. The pagelet will appear on all user homepages if they have access to the pagelet. The placement of the pagelet cannot be changed and the pagelet cannot be removed from the homepage. Required. The pagelet will appear on all user homepages if they have access to the pagelet. The placement of the pagelet can be changed, but it cannot be removed from the homepage. |
|
Publish |
Click the Publish button to publish this pagelet and display the Calendar Properties - Publish as Pagelet page, on which you can review or edit the pagelet definition |
Publishing a Calendar from Pagelet Wizard
Pagelets for calendars can be created and published using Pagelet Wizard and then managed from the Calendar Properties page. This section provides an overview of how to use Pagelet Wizard to complete the following six steps:
Step 1: Entering Pagelet Identifying Information.
Step 2: Selecting a Pagelet Data Source.
Step 3: Specifying Data Source Parameters.
Step 3 also includes “Specifying Prompt Values for Data Source Parameters.”
Step 4: Selecting a Pagelet Display Format.
Step 5: Specifying Pagelet Display Options.
Step 6: Specifying Pagelet Publication Options.
Note. If you access Pagelet Wizard from the Go to Pagelet Wizard link, you will be modifying an existing pagelet definition. If you want to create a new pagelet definition, start from the Portal Administration or PeopleTools navigation path.
Where appropriate, this section provides details specific to using Pagelet Wizard to publish a calendar as a pagelet. The PeopleTools 8.50 PeopleBooks provide detailed information on using Pagelet Wizard.
See Enterprise PeopleTools 8.50 PeopleBook: PeopleTools Portal Technology, “Using Pagelet Wizard.”
Step 1: Entering Pagelet Identifying Information
Access the Pagelet Wizard - Specify Pagelet Information page (click the Go to Pagelet Wizard link on the Calendar Properties - Publish Pagelet Wizard Definition page; or Portal Administration, Pagelets, Pagelet Wizard, Pagelet Wizard).
Use the Pagelet Wizard - Specify Pagelet Information page to identify and categorize a pagelet.
See Enterprise PeopleTools 8.50 PeopleBook: PeopleTools Portal Technology, “Using Pagelet Wizard,” Step 1: Entering Pagelet Identifying Information.
Step 2: Selecting a Pagelet Data Source
Access the Pagelet Wizard - Select Data Source page (click the Next button on the Pagelet Wizard - Specify Pagelet Information page).
Use the Pagelet Wizard - Select Data Source page to select the Pagelet Wizard data source type.
|
Data Type |
For calendars, select Community Calendars. |
|
Calendar Source |
Select the type calendar to display in the pagelet: All Calendars or Single Calendar. Selecting All Calendars creates a pagelet similar to the delivered My Events pagelet. Note. The Workspace Calendar option is for internal use. |
|
Calendar ID |
Select the calendar to display in the pagelet. |
Step 3: Specifying Data Source Parameters
Access the Pagelet Wizard - Specify Data Source Parameters page (select Community Calendars as the data type on the Pagelet Wizard - Select Data Source page, then click the Next button).
Use the Pagelet Wizard - Specify Data Source Parameters page to configure the data source parameters that are required for data to be displayed in the pagelet.
Note. This page is accessible only when you are building a pagelet with a data source that allows modification of associated parameters.
|
Field Name |
Displays the name of the data source parameter. For calendars, the following data source parameters can be defined: DATERANGE — Specifies the scope of the calendar: daily, weekly, or monthly. |
|
Description |
Displays a description of the data source parameter. |
|
Usage Type |
Select the type of accessibility that you want to grant for the data source parameter when it appears in the pagelet. Options are:
|
|
Required |
This check box is selected and disabled for parameters specified as administrator-specified, context-sensitive, fixed, and system variable; otherwise, it is selected but enabled for user-specified parameters. |
|
Default Value |
You can enter a value that includes the % and * wildcards at the beginning or end of a value in the Default Value field. Note the following about default values:
|
|
Values |
If you select User Specified or Admin Specified as the usage type, click Values to access the Pagelet Wizard - Specify Data Source Parameter Values page. |
|
Text |
Use the Personalization Instructions group box to enter custom personalization instructions for the pagelet. These personalization instructions appear on the personalization page of the pagelet. Note. Personalization instructions must be translatable. |
Specifying Prompt Values for Data Source Parameters
Access the Pagelet Wizard - Specify Data Source Parameter Values page (click the Values link on the Pagelet Wizard - Specify Data Source Parameters page).
Use the Pagelet Wizard - Specify Data Source Parameter Values page to specify the prompt values, which are displayed to users when they personalize the pagelet. In addition, specify the default value for the parameter.
|
Parameter Value |
Specify the parameter value. |
|
Description |
Provide an optional description of the parameter value. |
|
Default |
Select one value as the default value. If the parameter is required, then a default value is required; otherwise, it is optional. |
Step 4: Selecting a Pagelet Display Format
Access the Pagelet Wizard - Select Display Format page (click the Next button on the Pagelet Wizard - Specify Data Source Parameters page).
Use the Pagelet Wizard - Select Display Format page to specify the data transformation method and display format for the pagelet.
See Enterprise PeopleTools 8.50 PeopleBook: PeopleTools Portal Technology, “Using Pagelet Wizard,” Step 4: Selecting a Pagelet Display Format.
Step 5: Specifying Pagelet Display Options
Access the Pagelet Wizard - Specify Display Options page (select Custom as the display format and click the Next button on the Pagelet Wizard - Select Display Format page}.
Use the Pagelet Wizard - Specify Display Options page to enter the custom formatting details for the pagelet as well as header and footer options, and to preview the pagelet.
Note. If you are modifying an existing pagelet definition or if you modify data source parameter definitions, you might need to reselect the XSL template, regenerate the XSL, or both to have the modified pagelet display actual data.
See Enterprise PeopleTools 8.50 PeopleBook: PeopleTools Portal Technology, “Using Pagelet Wizard,” Step 5: Specifying Pagelet Display Options.
Step 6: Specifying Pagelet Publication Options
Access the Pagelet Wizard - Specify Publishing Options page (click the Next button on the Pagelet Wizard - Specify Display Options page).
Use the Pagelet Wizard - Specify Publishing Options page to specify the type of pagelet that you want to publish. In addition, provide registration, caching, and security details, and register the pagelet.
See Enterprise PeopleTools 8.50 PeopleBook: PeopleTools Portal Technology, “Using Pagelet Wizard,” Step 6: Specifying Pagelet Publication Options.
Editing a Published Pagelet
Access the Calendar Properties - Publish as Pagelet page (click the Publish button on the Calendar Properties - Publish Pagelet Wizard Definition page; or if this calendar has already been published as a pagelet, click the Publish as Pagelet link on the Calendar Properties page).
Use the Calendar Properties - Publish as Pagelet page to review, edit, or add Pagelet Wizard pagelet definitions for this calendar. To edit a pagelet definition, it must be marked as published and have a content reference in the current site.
Note. Pagelets for this calendar published directly from Pagelet Wizard also appear in this list.
|
Edit |
Displays the Calendar Properties - Publish Pagelet Wizard Definition page on which you can make changes to the pagelet definition. |
|
Delete |
Deletes this pagelet definition and the published pagelet content references in all sites. |
|
Add Pagelet |
Adds a new pagelet definition based on the current calendar. |
Publishing a Pagelet to Multiple Portals
Access the Publish to Multiple Portals page (click the Publish Pagelet in Other Sites link on the Calendar Properties - Publish Pagelet Wizard Definition page; or Portal Administration, Pagelets, Publish Pagelets).
Two pages are available for you to publish pagelets to multiple portals:
Use the Publish to Multiple Portals page to publish the pagelet definition to additional portals and sites.
Use the Publish Multiple Pagelets page to publish multiple pagelet definitions to another portal or site.
See Enterprise PeopleTools 8.50 PeopleBook: PeopleTools Portal Technology, “Working With Navigation Pages,” Publishing Pagelets.