3 Setting Up Your Development Environment
This chapter describes how to set up your development environment to integrate an Excel workbook with a Fusion web application. The chapter also describes how to use ADF Desktop Integration on a system with multiple instances of JDeveloper. The chapter concludes by describing how to upgrade and remove ADF Desktop Integration.
This chapter (and the guide as a whole) assumes that you are setting your development environment in Windows XP. If you are using an operating system other than Windows XP, note that the steps of some procedures would be different.
This chapter includes the following sections:
-
Section 3.1, "About Setting Up Your Development Environment"
-
Section 3.2, "Required Oracle ADF Modules and Third-Party Software"
-
Section 3.3, "Enabling Microsoft .NET Programmability Support"
-
Section 3.4, "Allowing ADF Desktop Integration to Access Microsoft Excel"
-
Section 3.8, "Using ADF Desktop Integration on a System with Multiple Instances of JDeveloper"
-
Section 3.9, "Localizing the Setup of Visual Studio Tools for Office"
3.1 About Setting Up Your Development Environment
Setting up your development environment involves making sure that you have the correct versions of JDeveloper, Microsoft Office, and Microsoft Internet Explorer installed, as described in Section 3.2, "Required Oracle ADF Modules and Third-Party Software." You must also enable support for Microsoft .NET programmability, if it is not enabled. For more information about how to enable .NET programmability support, see Section 3.3, "Enabling Microsoft .NET Programmability Support."
After verifying that you have the required software, and have enabled Microsoft .NET programmability, complete the setup of your development environment by:
-
Allowing ADF Desktop Integration to access Microsoft Excel
-
Installing ADF Desktop Integration
Note:
The instructions in this guide assume that you are using Windows XP as the operating system. Note that the steps might be different for different editions of Windows.3.2 Required Oracle ADF Modules and Third-Party Software
Before you begin to integrate your Excel workbook with a Fusion web application, ensure that you have the required Oracle ADF modules and third-party software installed and configured:
-
JDeveloper
Install the current release of JDeveloper. ADF Desktop Integration is available as a JDeveloper feature.
-
Microsoft Windows
Microsoft Windows operating systems support the development and deployment of Excel workbooks that integrate with Fusion web applications. For more information about supported versions of Windows, see the "Oracle JDeveloper and Application Development Framework Certification Information" page on OTN at:
http://www.oracle.com/technetwork/developer-tools/jdev/index-091111.html -
Microsoft Excel
ADF Desktop Integration supports the integration of Fusion web applications with the following types of Excel workbook:
-
Excel Workbook
The default file format for Excel workbooks is the Excel XML-based file format (
.xlsx). -
Excel Macro-Enabled Workbook
Workbooks in this format (
.xlsm) use the Excel XML-based file format and can store VBA macro code.
ADF Desktop Integration does not support the use of other Excel file formats. For more information about supported versions of Excel, see the "Oracle JDeveloper and Application Development Framework Certification Information" page on OTN at:
http://www.oracle.com/technetwork/developer-tools/jdev/index-091111.htmlNote:
Microsoft Excel 2003 or older versions of Microsoft Excel are not supported. -
-
Internet Explorer
Some features in ADF Desktop Integration use a web browser control from the Microsoft .NET Framework. This browser control relies on the local Internet Explorer installation to function properly.
Note that Internet Explorer is the only web browser that supports this feature. For more information about supported versions of Internet Explorer, see the "Oracle JDeveloper and Application Development Framework Certification Information" page on OTN at:
http://www.oracle.com/technetwork/developer-tools/jdev/index-091111.html -
Application server
For information about the application servers that you can use to deploy an application developed using ADF Desktop Integration, see the "Oracle JDeveloper and Application Development Framework Certification Information" page on OTN at:
http://www.oracle.com/technetwork/developer-tools/jdev/index-091111.html
3.3 Enabling Microsoft .NET Programmability Support
Microsoft Excel must have Microsoft .NET programmability support enabled before you can set up ADF Desktop Integration and start development of an Excel workbook that integrates with a Fusion web application. If Microsoft .NET programmability support is enabled during installation of Microsoft Excel, no further action is required.
To enable Microsoft .NET programmability support:
-
Click the Windows Start button, and choose Settings > Control Panel.
-
In the Control Panel, select and open Add or Remove Programs.
-
Select the entry in the Add or Remove Programs dialog for Microsoft Office and click Change.
-
In the Microsoft Office dialog, choose Add or Remove Features, and click Continue.
-
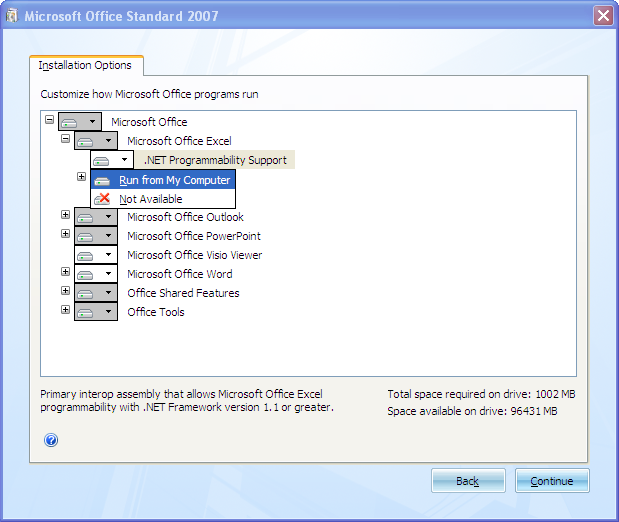
In the Installation Options page, expand Microsoft Office Excel.
-
Select .NET Programmability Support, and choose Run from My Computer from the dropdown list, as shown in Figure 3-1.
-
Click Continue to install the .NET Programmability Support feature, and close the dialog when installation is complete
3.4 Allowing ADF Desktop Integration to Access Microsoft Excel
You must configure Microsoft Excel settings to make it accessible from ADF Desktop Integration. You only need to perform this procedure once.
To allow Excel to run an integrated Excel workbook:
-
Open Excel.
-
Click the Microsoft Office button, and choose Excel Options.
-
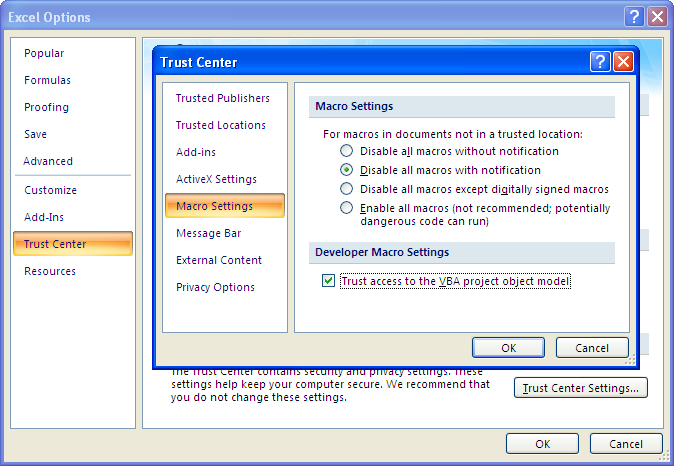
In the Excel Options dialog, choose the Trust Center tab, and then click Trust Center Settings.
-
In the Trust Center dialog, choose the Macro Settings tab, and then click the Trust access to the VBA project object model checkbox, as shown in Figure 3-2.
-
Click OK.
For more information about securing an Excel workbook that is integrated with a Fusion web application, see Chapter 11, "Securing Your Integrated Excel Workbook."
3.5 Installing ADF Desktop Integration
When you run the ADF Desktop Integration setup tool, it verifies whether software in the following list is installed on the system where you want to install the framework. If one or more of these pieces of software is not installed, the setup tool installs it in the order specified.
-
Windows Installer 3.1
-
Microsoft .NET Framework
The Microsoft .NET Framework 3.5 Service Pack 1 provides the runtime and associated files required to run applications developed to target the Microsoft .NET Framework.
Note:
Installation of Microsoft .NET Framework may require you to restart the system where you install it. After the restart, the setup tool automatically recommences to finalize installation. -
Microsoft Visual Studio Tools for Microsoft Office
The Microsoft Visual Studio Tools for the Microsoft Office system (version 3.0 Runtime) Service Pack 1 (x86) is required to run VSTO solutions for the Microsoft Office system.
-
ADF Desktop Integration add-in
You can install the ADF Desktop Integration add-in from JDeveloper, or from the setup tool provided in
MW_HOME\jdeveloper\adfdi. For more information about how to set up ADF Desktop Integration, see Section 3.5.1, "How to Set Up ADF Desktop Integration."Note that the ADF Desktop Integration installation is specific to the current Windows user profile. If you have multiple Windows user profiles on your system, and you want to use ADF Desktop Integration integrated Excel workbooks from some specific user profiles, you must log in to each user profile and install the ADF Desktop Integration add-in. For more information, see Section 3.5.1, "How to Set Up ADF Desktop Integration."
3.5.1 How to Set Up ADF Desktop Integration
The ADF Desktop Integration add-in is available in two editions, the Designer edition and the Runtime edition. Use the Designer edition to create and test integrated Excel workbooks, and the Runtime edition to enable end users to use ADF Desktop Integration and integrated Excel workbooks.
Note:
Do not install both editions of ADF Desktop Integration on the same system.Although you do not require administrator privileges to install the ADF Desktop Integration add-in, administrator privileges may be required to run the installers for additional software that the installer attempts to download and install. You should also ensure that the proxy settings for Internet Explorer are configured to allow access to *.microsoft.com because the installer attempts to automatically download missing prerequisite software from Microsoft's web site.
By default, the installer runs in English. You can change the language that appears by following the instructions in Section 3.9, "Localizing the Setup of Visual Studio Tools for Office."
It may be helpful to have an understanding of ADF Desktop Integration requirements. For more information, see Section 3.5, "Installing ADF Desktop Integration."
To install the Designer edition of ADF Desktop Integration:
-
Open JDeveloper.
-
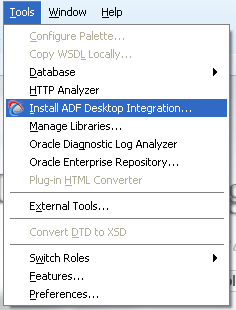
From the Tools menu, choose Install ADF Desktop Integration, as shown in Figure 3-3.
-
Follow the instructions that appear in the dialog boxes to successfully install the required components.
If you encounter an error during the installation process, ensure that you have removed the previous version of ADF Desktop Integration. For more information, see Section 3.6, "Removing ADF Desktop Integration."
-
If prompted, click Yes to restart the system and complete the setup of ADF Desktop Integration.
Tip:
You can also install the Designer edition of ADF Desktop Integration by running thesetup.exe tool available in the MW_HOME\jdeveloper\adfdi\bin\excel\addin\designer directory.Note:
The Install ADF Desktop Integration menu option is available only on the Windows installation of JDeveloper.If multiple instances of JDeveloper are installed, or if you have an existing instance of the ADF Desktop Integration add-in on the system, review the information in Section 3.8, "Using ADF Desktop Integration on a System with Multiple Instances of JDeveloper" before you perform the installation procedure.
If you want to install the Runtime edition of ADF Desktop Integration, see Section I.1, "Installing the Runtime Edition of ADF Desktop Integration."
3.6 Removing ADF Desktop Integration
Use the Microsoft Windows Control Panel to remove the ADF Desktop Integration add-in from the system where you set it up. After removing ADF Desktop Integration, you can no longer use integrated Excel workbooks on this system unless you reinstall ADF Desktop Integration.
To remove the ADF Desktop Integration add-in:
-
Click the Windows Start button and then choose Settings > Control Panel.
-
In the Control Panel, select and open Add or Remove Programs.
-
In the Add or Remove Programs dialog, select the installed ADF Desktop Integration add-in edition, and then click Remove.
Note:
If you have installed ADF Desktop Integration on multiple user profiles, you must remove it from each user profile.3.7 Upgrading ADF Desktop Integration
If you are using an old version of ADF Desktop Integration, you must upgrade to the current version.
To upgrade the ADF Desktop Integration add-in:
-
Uninstall the old version of ADF Desktop Integration. For more information, see Section 3.6, "Removing ADF Desktop Integration."
-
Download and install the latest version of Oracle JDeveloper.
-
Install the new version of ADF Desktop Integration. For more information, see Section 3.5, "Installing ADF Desktop Integration."
Note:
If you do not uninstall the old version of ADF Desktop Integration, an error occurs unless the new installer is in the exact same location as the old installer.To patch existing ADF Desktop Integration framework of Oracle Fusion Middleware 11g Patch Set 1 (Release 11.1.1.2.0) or Patch Set 2 (Release 11.1.1.3.0) environment to make it a Patch Set 3 (Release 11.1.1.4.0) environment, you must upgrade the JRF domains to accommodate changes to ADF shared libraries. For more information see the chapter on post-patching tasks for JRF Infrastructure and ADF shared libraries in the Oracle Fusion Middleware Patching Guide.
3.7.1 How to Migrate an Integrated Excel Workbook to the Current Version of ADF Desktop Integration
When you open the integrated Excel workbook after upgrading the ADF Desktop Integration add-in, the add-in detects and compares the ADF Desktop Integration version information of the workbook with the version installed on the client system. If required, you are asked to upgrade the configuration of the integrated workbook to the version installed on the client.
It may be helpful to have an understanding of ADF Desktop Integration upgrade. For more information, see Section 3.7, "Upgrading ADF Desktop Integration."
To migrate an integrated Excel workbook after upgrading:
-
Open the integrated Excel workbook.
The Migrate Workbook dialog prompts you to migrate the workbook to the current version of ADF Desktop Integration, as shown in Figure 3-4.
If you get one or more Microsoft Office Customization Installer error messages when you open the integrated Excel workbook, ignore the messages and continue. The error messages appear because ADF Desktop Integration cannot remove the old version information from the workbook before Excel detects it and reports the error.
-
Click Yes to migrate the workbook. The ADF Desktop Integration migration process closes the workbook and then reopens it, ready to be used with the current version of ADF Desktop Integration.
3.8 Using ADF Desktop Integration on a System with Multiple Instances of JDeveloper
There can be only one active installation of ADF Desktop Integration on a given system. By default, when you install JDeveloper, ADF Desktop Integration is extracted to MW_HOME\jdeveloper\adfdi . If move to another version of JDeveloper installed in a different directory, you must remove the old version of ADF Desktop Integration, as described in Section 3.6, "Removing ADF Desktop Integration." You must then set up ADF Desktop Integration with the new version of JDeveloper that you are moving to, as described in Section 3.5, "Installing ADF Desktop Integration."
Alternatively, you can set up ADF Desktop Integration in a directory that is independent of your JDeveloper installation. This approach means that you do not have to remove ADF Desktop Integration before moving to a newer version.
To set up ADF Desktop Integration in an independent directory:
-
Create a directory independent of the JDeveloper installation directory. For example, you may create the following directory:
D:\adfdi-excel-setup -
When you move to a newer version of JDeveloper, copy the contents of the following directory:
MW_HOME\jdeveloper\adfdi\bin\excel\addin\designerto:
D:\adfdi-excel-setupwhere
MW_HOMEis the Middleware Home directory. -
Run the
setup.exetool located inD:\adfdi-excel-setup. -
Follow the instructions that appear in the dialog boxes launched by
setup.exeto set up the new version of ADF Desktop Integration. -
If prompted, click Yes to restart the system and complete the setup of ADF Desktop Integration.
WARNING:
After you install ADF Desktop Integration, do not delete the directory where you copied the setup files. You can delete the files after removing ADF Desktop Integration from the system.
3.9 Localizing the Setup of Visual Studio Tools for Office
Follow the instructions in this section to localize the setup of Visual Studio Tools for Office. By default, the installer described in Section 3.5, "Installing ADF Desktop Integration", runs in English. You can download and install a different language pack from the Microsoft Download Center for the language that you want to appear when the installer runs.
This section assumes that no instance of ADF Desktop Integration is present on your system and that your system uses a non-English version of the operating system. If ADF Desktop Integration is present, remove it as described in Section 3.6, "Removing ADF Desktop Integration."
For information about supported operating systems, see Section 3.2, "Required Oracle ADF Modules and Third-Party Software."
To localize the setup of Visual Studio Tools for Office:
-
Download the appropriate language pack (for example, French) for Microsoft Visual Studio Tools for Microsoft Office from the Microsoft Download Center at:
-
Install the language pack that you downloaded in Step 1.
-
Set up ADF Desktop Integration, as described in Section 3.5, "Installing ADF Desktop Integration."


