 Understanding AAF
This chapter provides overviews of Active Analytics Framework (AAF), the use of AAF in CRM, CRM delivered AAF objects, contexts, trigger points, terms, CRM action types, and policies and discusses how to configure actions when building policies.
Understanding AAF
This section discusses:
AAF overview.
AAF and component event processing.
This section discusses AAF from the CRM perspective. For more information about AAF components and how to set them up, refer to the PeopleTools documentation on AAF.
See PeopleSoft Enterprise Components for CRM 9.1 PeopleBook
 AAF Overview
This section discusses:
AAF structure.
Data library.
Action framework.
Policy builder.
AAF Structure
AAF is a decision-making system that invokes actions based upon the evaluation of user-defined business rules. AAF provides a user-friendly environment in which functional users can build business rules using the simple if-then structure.
AAF provides components for setting up the analytic framework, which includes managing the data library, building policies, and managing trigger points and actions. These components provide a mechanism to define flexible business rules (which are called policies) that can be altered without modifying application code. Business analysts and other functional users define policies using an intuitive user interface.
Functional users can create policies that use data elements of various forms and shapes residing in different sources such as the transactional environment, data warehouses, legacy systems, and so on. The data elements are exposed to the business user as terms, which are defined in the AAF data library.
This diagram illustrates the structure of policies, which get evaluated when their triggering events take place:
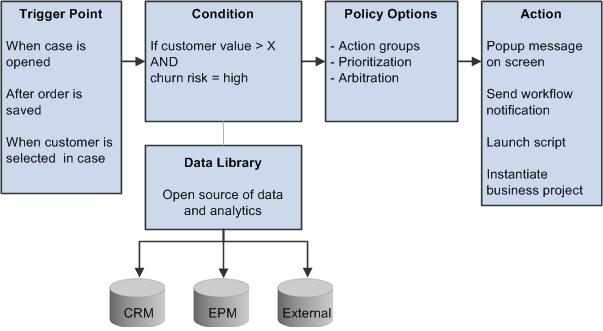
AAF policy structure
The major components of AAF consist of these components:
Data library.
Action framework.
Policy builder.
Data library is a catalog of metadata about information of various shapes that is stored in different data resources. It consists of data elements called terms, which are pointers to disparate pieces of data residing in a data warehouse, an external database, or the operational environment such as PeopleSoft CRM. Terms are essentially metadata, which provide source and access information about the physical data. A term is associated with one or multiple implementations, which refer to the mechanism through which the data is retrieved, derived, or computed. The implementation is responsible for knowing either where the data is physically residing or the algorithm for deriving the value.
In AAF, functional users can reference terms when they build policies in the policy builder. In addition, the data library is used as a common data repository and extraction framework in various CRM applications and functionality. For example:
Correspondence management replaces the use of tokens with terms in correspondence templates.
Real-Time Advisor uses terms as placeholders to form personalized questions and informational texts.
Strategic Account Planning (SAP) and SmartViews use terms to compute and retrieve goal and metric data.
See PeopleSoft Enterprise Components for CRM 9.1 PeopleBook
The action framework provides an infrastructure for IT personnel to define actions that can be associated with policies in the policy builder, and facilitates the invocation of actions at runtime when the conditions of policies are evaluated as true.
An action type refers to a category of actions that can be associated with a policy. For example, display of alert messages, display of product recommendations, and instantiation of business projects are all policies. The action type definition points to a class of similar actions. In some cases, the definition of a category of actions may not contain all the information that is needed by the decision engine in AAF to launch an action.
Therefore, when functional users specify an action when they are creating a policy, they need to provide additional configuration details to ensure the proper invocation of the action. For example, when users associate a business project action in a policy, they need to identify the actual business project in the configuration page that is developed for that action, which gets instantiated by the system.
In addition to creating and managing actions that are triggered in AAF as a result of a positive evaluation of policy conditions, other CRM applications leverage the framework to define actions that would be used by their own application logic, not through AAF. For example, the automated mail processor in the email response management system (ERMS) performs actions on them based on the email category and predefined rules. It uses the action framework to define these email-related actions (such as auto-route and auto-acknowledge), which get triggered by application class methods that are referenced in the application.
See PeopleSoft Enterprise Components for CRM 9.1 PeopleBook
See Understanding Automated Mail Processing.
The policy builder provides a user-friendly environment for functional users to construct policies in a natural business language. A policy consists of three parts—a trigger point, conditions, and actions:
A trigger point is the occurrence of an event that triggers the evaluation of conditions in policies that are associated with it.
Examples are When a customer is presented in a case and After a change request is saved. This is where functional users want the system to drive actions.
A condition is the if statement, which specifies under what circumstance some action would be performed.
Examples are If customer value is high and If the change request status is changed.
An action is the then statement, which is invoked if the associated conditions are evaluated to true.
Examples are Display alert message on screen and Log a change request history entry.
While the policy builder is primarily used in AAF to define and maintain polices, other CRM applications leverage the framework for building conditions and getting condition evaluation. For example, profile management enables users to define AAF conditions, which are evaluated at runtime to determine whether certain profile groups need to be displayed on a customer data model (CDM) component. Real-Time Advisor also takes advantage of AAF condition evaluation in the dialog transition and user segment processing.
The policy builder includes a rich set of tools for functional users to accommodate the creation and modification of policies without assistance from IT personnel. It provides facilities to support an iterative and incremental development process. Policies are validated in the build process before they are deployed.
Please refer to the PeopleTools PeopleBook for a complete discussion on building AAF policies. This documentation also covers other components of the policy builder framework, such as the operator sets, business domains, and trigger types.
See PeopleSoft Enterprise Components for CRM 9.1 PeopleBook
See Understanding Automated Mail Processing.
AAF and Component Event Processing
AAF replaces component event processing, which was the framework that PeopleSoft CRM put in place to automate actions based on the occurrence of events in previous releases. Principle differences between the two architectures include:
The concept of trigger point.
Component event processing: Not applicable. In most cases, component event processing is triggered at SavePreChange or SavePostChange. The behavior is hard-coded in PeopleCode and is not configurable.
AAF: Available to refer to the occurrence of a business event that triggers the evaluation of policies that are associated with it. IT personnel can specify trigger points for each component based on one of these trigger types: Component PostBuild, FieldChange, SavePostChange, and Save PreChange. Refer to the PeopleTools PeopleBook for more information about the implementation of trigger points, which is part of the process that needs to happen to enable components for AAF.
The concept of event.
Component event processing: Available to refer logical statements that define the conditions that trigger an action.
AAF: Events are similar to the if statements of policies, which are the conditions that the decision engine evaluates when it's invoked by a trigger point.
The concept of event handler.
Component event processing: Event handlers are available to associate events with actions and capture additional configuration details. Event handlers are action-specific and component-specific. To associate one event with two actions, you need to access each action-specific event handler and add the event to it.
AAF: Event handlers are similar to the if-then statements of policies, which define the conditions and actions that are invoked if all corresponding conditions are evaluated as true. PeopleSoft CRM delivers action types (replacing event handlers), and they are shared and reusable in the system. When building a policy, users can specify one or multiple action types that are triggered if the policy conditions are evaluated to true.
Unlike the component event processing architecture, in which different event handlers need to be defined for action types and components, AAF uses the policy builder to create policies regardless of the component for which they are defined and the type of actions that are invoked subsequently. In component event processing, the events are built using only data elements that are present in the component for which the event is being defined. In AAF, the conditions can be built using terms whose data can come from different sources.
Use of data elements in conditions.
Component event processing: When you are defining events (the conditions) for a component, only the data elements that are present in the component can be referenced in the events.
AAF: When you are building conditions of a policy, the data elements (the terms) that are specified in conditions can come from different data sources.
Understanding the Use of Active Analytics
Framework in CRM
This section discusses:
AAF categories.
Use of AAF to evaluate policies and invoke actions.
Use of the AAF condition builder.
Use of AAF data library engine to resolve terms.
Integration of action framework of AAF.
AAF Categories
AAF provides a rich set of functionality leveraged fully by a variety of PeopleSoft CRM applications. These AAF features can be broadly classified under four categories:
Requesting AAF services to evaluate all the policies pertaining to a trigger point, and to invoke the relevant actions of the policies whose conditions are evaluated to true.
Requesting AAF services to evaluate conditions.
This category consists of the design time interface for embedding condition builder within applications for creating conditions, and the runtime interface for requesting the framework to evaluate the condition. Applications perform relevant tasks based on the outcome of the evaluation.
Requesting the services of the data library engine within AAF to resolve terms.
The use of the action framework to define actions that are triggered by applications themselves.
Use of AAF to Evaluate Policies and Invoke Actions
The components that are present in AAF are used to build policies. At runtime, applications send requests to the AAF decision engine to evaluate all the policies pertaining to a trigger point. For policies whose conditions are evaluated as true, their associated actions are invoked.
Components that are enabled for this functionality (at least for a single trigger point) include:
360 Degree View.
Agreement.
Case.
Change request.
Company.
Create Self-Service HelpDesk Case.
Create Self-Service Support Case.
Defect.
Financial Account Modification.
First Notice of Loss.
Installed Product.
Lead.
Manage Self-Service HelpDesk Case.
Manage Self-Service Support Case.
Marketing Campaign.
Marketing Content.
Marketing Offer.
My Service Order.
Opportunity.
Order Capture.
Partner.
Person.
Product Registration.
Service Order.
Solution.
Task.
Worker.
Use of the AAF Condition Builder
Applications can embed the condition builder to create conditions within the applications themselves. At runtime, applications perform appropriate tasks based upon the outcome of condition evaluation that is returned by the decision engine. The CRM applications and features that make use of this functionality include:
Profile Management—to create and use AAF conditions to decide whether a profile group is to be displayed on a CDM component. This can be set up when you are assigning a profile group to a CDM component.
Change Management—to decide whether the state transitions are allowed.
Real-Time Advisor—for page transition and customer segmentation.
Order Capture—to decide when to instantiate business projects, perform audits, and order maintenance.
Notification and workflow actions in AAF—to decide whether delayed invocations are sent.
Use of AAF Data Library Engine to Resolve Terms
The AAF Data Library Engine is used by these PeopleSoft CRM applications and features:
Correspondence management—to include dynamic content in correspondence templates.
Real-Time Advisor Dialogs—to include dynamic content in questions as well as in instructional notes.
SAP—to calculate goals.
SmartViews—to calculate goals and metrics.
Call Center applications—to resolve links.
In call center applications, link definitions use AAF terms that are resolved at runtime when a related action is performed from the Case page. The relevant term is specified in the Search Keys section on the Link Details page of that component. At runtime, the resolved term values are used either in constructing a URL or in performing the related action.
Audience Builder—to store term metadata.
Audience builder uses the AAF data library as a repository to store term metadata; it does not use the data library engine to resolve terms. Audience generation in PeopleSoft Marketing is a set-based SQL process. Audience builder develops the following resolution methods to support the set-based SQL processing for audience generation:
Audience Select SQL Object
Audience Select Record.Field
See Using Audiences.
Integration of Action Framework of AAF
The Automated Mail Processor (AMP) of ERMS uses the action framework to define email-specific actions that it can perform on emails at runtime. AMP matches the category of the email with a category rule that is defined in the system, and triggers the associated actions based on the email's threshold value. AMP delivers these actions: auto-response, auto-acknowledge, auto-route, auto-suggest, create case, spam and unsubscribe.
Understanding CRM Delivered Active Analytics
Framework Objects
To make AAF readily available to work with operational CRM, PeopleSoft CRM delivers a significant amount of system data that provides all the needed building blocks to support the application-specific business processes.
System data includes:
Contexts
Trigger points
Terms
Action types
Policies
Important! If Enterprise Portal is used, access CRM-delivered AAF data by navigating to Enterprise Components CRM, Active Analytics Framework. If Enterprise Portal is not used, CRM data is available under Enterprise Components, Active Analytics Framework.
Understanding Contexts
This section discusses:
Context lookup.
Contexts and AAF.
Term selection for contexts.
Context and business process associations.
Context Lookup
PeopleSoft CRM delvers these types of contexts:
Context for policies.
These contexts are used by the decision engine for evaluating policies.
To lookup policies that are associated with certain contexts, use the Manage Policies page. Select Enterprise Components, Active Analytics Framework, Policies, Manage Policies.
Context for terms in automatic workflow notification.
These contexts are used for resolving terms present in a template for sending automatic workflow notification from the stated component.
To lookup contexts that are associated with automatic workflow notifications, use the Context Relationships page. Select Set Up CRM, Common Definitions, Workflow, Context Relationships.
Context for terms in manual notification or correspondence request.
These contexts are used for resolving terms present in a template for sending manual notification or correspondence request from the stated component.
To lookup contexts that are associated with automatic workflow notification, use the Validate Terms and Templates page. Select Set Up CRM, Common Definitions, Correspondence, Validate Terms and Templates.On the Validate Terms and Templates page, click the lookup button for the Context Name field.
Context for terms and conditions in dialogs.
These contexts are used for resolving terms as well as for evaluating conditions present in Real-Time Advisor dialogs.
|
Context for Terms and Conditions in Dialogs |
|||
|
360-Degree View |
Service Order |
Marketing Content |
Manage Self-Service Support Case |
|
Case |
Create Self-Service HelpDesk Case |
Task Context for PIA Task Component |
Installed Product |
|
Client At Risk |
Solution |
Manage Self-Service HelpDesk Case |
Company Online |
|
First Notice of Loss |
Financial Account Modification |
Change Request Self Service |
Defect |
|
Lead |
Agreement |
Worker Online |
Create Self-Service Support Case |
|
My Service Order |
Partner Online |
Marketing Offer |
Person Online |
|
Opportunity |
Marketing Campaign |
Change Request |
— |
|
Order Capture CI |
Product Registration |
Change Request Self Service |
— |
Note. You can make use of the contexts listed in this table only if you have enabled the components associated with the related features.
Contexts and AAF
Contexts are considered foundation objects for AAF. Contexts provide the necessary input data (as specified in context definition) that is needed for resolving the terms by AAF. These terms, for example, can be present in policies, in correspondence templates, or in advisor dialogs.
Contexts are a key component of how the AAF works. The purpose of the context is to describe the computing environment from which the decision engine or the data library engine is invoked and to play a role in selecting the appropriate term implementation to be used at runtime for resolving a term. Please refer to the chapter on managing contexts in the PeopleSoft Enterprise Components for CRM 9.1 PeopleBook to get more information about contexts.
PeopleSoft CRM transactions use AAF for different purposes, such as requesting decision engine for evaluating policies, requesting data library engine for resolving terms in actions that trigger automatic workflow notification, manual notification, and correspondence requests.
AAF also resolves terms and evaluates conditions in PeopleSoft Real-Time Advisor dialogs. In some cases, a single context may not be sufficient to provide the necessary content for delivering all the mentioned functionality for a transaction because some of the features, such as resolving terms that are present in templates that are found as part of correspondence requests, occur outside of the transaction. Therefore, more than one context may be present for a component. The appropriate component-specific context that is used depends upon the functionality that needs to be invoked.
Term Selection for Contexts
Features such as policy builder and condition builder ensure that the terms that are selected for building a policy are resolvable within the trigger point's context. Similarly, terms that are presented in applications such as SAP, SmartViews, and Real-Time Advisor are also resolvable for that application-specific context.
For AAF the system displays all the terms that are present in the subject area of the data library. Therefore, users need to ensure that a term can in fact be resolved within that context before selecting it.
For example, terms that are created for use in correspondence templates are categorized within subfolders under the Correspondence Template Terms subject area. Each subfolder contains application-specific terms that can be resolved using other components. Refer to the Managing Terms section in the PeopleSoft Enterprise Components for CRM 9.1 PeopleBook under the Setting Up the Data Library chapter for more information about identifying contexts in which a term can be resolved.
Context and Business Process Associations
PeopleSoft delivers contexts, business process names, and activity names as system data. Each delivered context has at least one delivered association with a business process name and activity name. Some have two or more. Most of the time during workflow notification, the system-delivered associations provide the values for the business process name and the activity name.
Administrator can create their own relationships using the Context Relationships setup page (select Set Up CRM, Common Definitions, Workflow, Context Relationships). Use this page to define the relationship between business processes and activities that are valid for a particular context. When you are creating a policy, the user won’t have to add a business process or activity because the system automatically adds the fields behind the scenes based on the policy’s context ID.
On the Notification and Workflow action page, the system hides the Business Process Name and Activity Name fields from the user because they can be derived automatically from the context. The system populates these fields by default, based on the context of the policy. If the setup page contains a one-to-one mapping between these fields, then the Business Process Name and Activity Name fields are populated behind the scenes and hidden from the user.
If you set up a one-to-many relationship, then the system displays these fields in a drop-down list box and lists the available values. On the Context Relationships setup page, you can select a default business project-activity relationship. The system uses this default relationship initially in the drop-down list, but users can also select values from the ones that are made available.
Understanding Trigger Points
This section discusses:
Trigger point lookup.
Trigger point vocabulary.
Trigger points and setID based processing.
Trigger Point Lookup
PeopleSoft CRM delivers more than 100 trigger points. The occurrence of a trigger point event invokes the decision engine to evaluate all the policies that are associated with the trigger point and triggers all the relevant actions when the conditions are evaluated to true.
To look up and manage delivered trigger points:
Select Enterprise Components, Active Analytics Framework, Policies, Manage Trigger Point.
Enter a trigger point name, context name, or trigger type name.
Click the Search button.
Click the Trigger Point Name link.
The system displays a search page that lists the active policies and the action names associated with the policy. From this page you can add a new policy or a new policy group. In addition, you can select a policy to view the conditions and actions (IF / THEN statements) associated with the policy.
Note. PeopleSoft delivers trigger points as inactive; make sure to activate the trigger points and policies you need in the system so that policies can be evaluated and appropriate actions taken place at runtime. To activate a trigger point, navigate to Enterprise Components, Active Analytics Framework, Setup, Register Trigger Point.
System-delivered trigger points use a specific vocabulary to denote when they are invoked in the life cycle of a transaction:
When a Support Case is Presented.
This trigger point is invoked when either an existing transaction is opened or a new transaction is created for Support case.
Before a Support Case is Saved.
This trigger point is invoked when the save action is performed either by the application or by the user. The policies that are associated with this trigger point are carried out before the actual save is complete.
After a Support Case is Saved.
This trigger point is invoked after the save action is performed either by the application or by the user. The policies that are associated with this trigger point are carried out after the actual save is complete.
When a Customer is identified in Support Case.
This trigger point is invoked after the selection of a customer.
When a Product is identified in Support Case.
This trigger point is invoked after the selection of a product.
Important! Though the framework supports the registration of new trigger points, exercise caution before including new trigger points.
Trigger Points and SetID Based Processing
For a single trigger point, you can create policies in multiple setIDs. With this approach, the AAF decision engine can invoke different behaviors based on the setID or business unit of the transaction.
In this situation, the application that is requesting the AAF decision engine to evaluate the policies should also specify the relevant setID or business unit. This helps AAF to determine the right set of policies to evaluate, based on PeopleSoft setID processing.
Applications also have an option not to pass the setID or business unit. In this case, AAF uses the default setID that is specified in the AAF Installation component to determine the policies that need to be evaluated.
Transactions, such as the 360 degree view, which does not specify the setID or business unit for which the policies need to be evaluated, can have setID as part of the policy's condition to drive different behaviors. Please refer to the appendix in this PeopleBook for a list of system-delivered trigger points and information about what is specified by transactions for processing each of these trigger points.
Note. The applications refer to the trigger point by specifying the trigger code in their applications. Customers should refrain from making any changes to the trigger code for the trigger points that are delivered with the CRM system. Changes can cause unexpected system behavior.
Understanding Terms
This section discusses:
Term lookup.
Term categories.
Term Lookup
PeopleSoft CRM delivers over 1500 terms across the system. They are categorized by subject areas (a folder structure). The system displays a term selection page to facilitate term lookup, for example, when you are building a policy or creating a correspondence template.
To look up terms by subject area:
Select Enterprise Components, Active Analytics Framework, Policies, Manage Policies.
Click the Build a Policy button.
Select a trigger point name and setID.
Click the Add Condition button.
Click the Select Term link.
The system displays a search page that lists the terms in folders by subject area. You can also click the Switch to Search Mode link to search for terms using these fields: Term Name, Term Type, Configurable, Data Type, Term Label, Status, and Implementation.
Term Categories
PeopleSoft CRM applications deliver a considerable amount of system data pertaining to terms. The terms that are delivered can be broadly classified into the following categories:
Component buffer specific terms.
A vast majority of terms fall under this category. The system resolves these terms using the data that is available in the current operating component buffer. The implementation is specific to the context and the implementation type is context variable. Typically, these terms are present in the relevant application's subject area. For example, case component-specific terms are present under the Call Center.Case Details subject area. Some of these terms may have additional implementations if they need to be resolved from additional contexts.
Note. Terms that are component buffer specific get resolved
when a user accesses data from the component buffer (the implementation type
is context variable). They can be used only in the policies pertaining to
this context, workflow notification specific templates, and conditions, as
well as in the questions of Real-Time Advisor Dialogs pertaining to the context.
If these terms need to be used outside of the operating context (like correspondence
templates), they need to have additional implementations.
Exercise caution when planning to alter the structure of the component
using Application Designer. Change in the component structure can cause invalidation
of term definition and the context variable's definition.
These terms are present in different subfolders within the folder called System Terms. These terms provide information about the operating environment. Most of these terms do not need any additional input from the applications. Hence, these terms can be resolved from any context.
Profile fields that are delivered as system data are also delivered as terms. These profile terms pertain to either an organization or an individual. Organization terms can be found under in the Organizations.Companies subject area; individual terms are present in the Individuals.People subject area.
AAF uses one input to resolve organization terms: the BO ID of the customer. Any context that has BO_ID_CUST_PROFILE as the alias for the customer's BO ID is able to use organization terms. Individual terms need two input values to resolve: the BO ID of the customer and the BO ID of the contact. The contact's BO ID is always used to resolve terms. When it's not available (contact BO ID is 0), the customer's BO ID is used instead. Any context that has BO_ID_CUST_PROFILE as the alias for the customer's BO ID and BO_ID_CNT_PROFILE as the alias for the contact's BO ID can use individual terms.
Note. To see a list of contexts for which a term can be resolved, click the View Applicable Contexts link in the Generic Implementation group box of the term definition.
Profile fields, when activated, are automatically created as terms in the data library. This rule, however, doesn't apply to profile fields that belong to many rows profiles. For profile fields that have choose many as their user type, their terms are not supported in the condition builder.
Profile terms always have a generic implementation. Therefore, any context that has the BO_ID_CUST_PROFILE and BO_ID_CNT_PROFILE aliases can make use of these terms automatically.
Note. CDM-related profile terms get resolved when the system retrieves data from BASICS tables. Therefore, make sure that you configure the role types so they can supply data to these tables (that is, you need to enable the role types for basic data).
PeopleSoft CRM delivers terms to access key performance indicator (KPI) information that is published by PeopleSoft Enterprise Performance Management (EPM). For each of the 19 delivered KPIs, four terms have been created for accessing the resolved value, percentage of target, current target, and assessment. These terms are categorized under different subfolders within the Customer ScoreCard KPIs subject area. Any context that has BO_ID_CUSTOMER as an alias can access all of the terms that are related to the customer dimension. Other dimensions include product, campaign, and business unit. The rest of the terms expect values such as product ID, campaign ID, or business unit to be supplied in the term configuration process. PeopleSoft CRM applications provide the necessary infrastructure to subscribe to the KP_KPI_ASMT_FACTS application message that is published by EPM. The subscription process supplies the KPI data for all the message rows in the CRM database, which can be accessed by KPI terms.
As delivered, the message is inactive. To set up a delivered application message, you must first activate the application message. Then activate the message subscription PeopleCode (KP_KPI_EPM_TERMS), and set the associated message channel to Run mode.
Note. The customer value that is displayed on the toolbar of various CRM transactions comes from the customer value KPI-related attributes that are present in the PS_BC table. These values are supplied by another subscription process using the same application message.
Understanding CRM Action Types
This section provides a method for looking up action types and describes some of the action types that are delivered in PeopleSoft CRM, including:
Workflow.
Business project instantiation.
Branch script instantiation
Show churn reduction scripts.
History tracking.
Installed product relationship processing.
Case relationship processing.
Entitlement balance processing.
Case update.
Self service case update.
Upsell indicator on case.
Case suggest action.
Case task action.
Case survey action.
Case display template action.
Alert message or recommendation display.
Cross sell opportunity, up sell opportunity, and recommendation.
Business process (BPEL) actions.
Sales task action.
Action Type Lookup
PeopleSoft CRM delivers 50 action types that you can use when building your policies. They include appropriate configuration pages for capturing data while setting up actions in policies and the code for performing actions at runtime using the captured data.
To look up the PeopleSoft delivered action types:
Select Enterprise Components, Active Analytics Framework, Action Framework, Register Action Type.
Click the Search button.
Select an action type name.
The system displays a page that lists the action type name, a description of what it does, action behavior, and action type triggers.
Use AAF to trigger workflow actions, which are PeopleSoft CRM objects that can schedule processes and send onetime or repeating notifications. Workflow notifications can be either sent as email or worklist items. The system can process workflow actions immediately or schedule them for later.
You can also use terms to set up run time delay notification actions. You can these notifications on run time data. For example, you can set up multiple delayed notifications for Support, HelpDesk and HR HelpDesk cases, including service level agreements (SLAs), using percent of response and restore minutes. PeopleSoft delivers these terms for Call Center applications.
To create new terms for other applications requires customization, which PeopleSoft does not support. Attachments are also not supported in email that is sent as workflow notifications by AAF.
When AAF triggers notifications or processes that are scheduled in advance, you can associate them with a condition. The action is invoked only if the evaluation of the specified condition is true when the action is scheduled to start.
When AAF sends a notification, the system logs the notification as an interaction, which can be viewed in the 360-degree view or the corresponding interaction list.
In addition to the functionality that's mentioned, some applications perform additional tasks using the post processing feature that is available in the workflow action. Examples are the call center applications and task management.
Call center applications leverage the workflow action's post processing functionality to remove worklist entries. Call center applications use AAF to automatically create worklist entries based on events in the life cycle of a case and remove those entries when they are no longer needed. For example, when a case is assigned, the system sends a worklist entry to the assigned-to agent regarding that case. When the case is closed, that entry is automatically removed from the agent's worklist (the entry is marked as worked). Post processing for workflow action is supported in all the case contexts:
Case
Create Self-Service HelpDesk Case
For the Solution component, you can configure policies using the Notification & Workflow action to send a notification to a user's worklist or email, when a user changes the solution status on a case or service order. Use the After a Solution is Saved trigger point to build your policies. PeopleSoft does not, however, deliver any policies that use the After a Solution is Saved trigger point with the Notification & Workflow action.
Task management leverages the workflow action's post processing functionality to update the task management tables after sending notifications, which helps to prevent duplicate notifications from being sent to task assignees.
The notification and workflow action of AAF uses correspondence templates to send email notifications. It also sends notifications to user and group worklists. An example is service level agreements, with their contracted response and restore times. You can configure terms in a notification action that automatically warn the agent of pending response and restore milestones when the case's task list indicates inaction. The times for notification can even be determined from data entered when the service order is placed. The order capture application leverages post processing as well.
See Setting Up Correspondence Templates.
See Processing Cases.
See Configuring Run Time Delay Notifications.
In addition to sending notifications, you can set up workflow actions to run the application engine or application class processes. Here is the guideline for writing application class-based processes.
The constructor of the application class needs to be coded to accept an instance of the RB_AAF_AF:PostPrcsData class. The application class must have the ActionPrcs method. This method is automatically invoked by the Notification & Workflow action. The ActionPrcs method is responsible for performing tasks that need to be completed. The PostPrcsData object contains ACTION_ID and CONTEXT_OBJECT. Here is the sample application code of an application class-based process:
import RB_AAF_AF:PostPrcsData; class RestoreActual method ActionPrcs(); method RestoreActual(&TM_PostPrcsData As RB_AAF_AF:PostPrcsData); private instance RB_AAF_AF:PostPrcsData &obj_ppdata; end-class; /* Constructor */ method RestoreActual /+ &TM_PostPrcsData as RB_AAF_AF:PostPrcsData +/ &obj_ppdata = &TM_PostPrcsData; end-method; REM +---------------------------------+; REM | Update Restore Actual Date/Time |; REM +---------------------------------+; method ActionPrcs Local Record &recCase = CreateRecord(Record.RC_CASE); &recCase.CASE_ID.Value = RC_CASE.CASE_ID; &recCase.BUSINESS_UNIT.Value = RC_CASE.BUSINESS_UNIT; &recCase.SelectByKey(); &recCase.RC_RESTMET_DATE.Value = %Date; &recCase.RC_RESTMET_TIME.Value = %Time; &recCase.Update(); end-method;
Business Project Instantiation
Use AAF to instantiate business projects, which are structured, workflow-enabled task lists. Specify which business project to instantiate when you are configuring the business project action.
In addition to the functionality that is mentioned, some applications perform additional tasks using the post processing feature that is available in the business project action. Examples are the call center applications, account management, and policy and claim presentment.
Call center applications leverage the business project action's post processing functionality to record the instantiation of business projects in the Related Action page of cases. Post processing for business project action is supported in all the case contexts: Case, Create Self-Service HelpDesk Case, Create Self-Service Support Case, Manage Self-Service HelpDesk Case, and Manage Self-Service Support Case.
In account management, policies are defined for the modify account feature to trigger the business project action from the After modify Account is Saved trigger point. Post processing for business project action is used to associate the business project instance with the corresponding account modification transaction.
In policy and claim presentment, policies are defined for the first notice of loss feature to trigger the business project action from the After FNOL is Saved trigger point. Post processing for business project action is used to associate the business project instance with the first notice of loss transaction.
See First Notice of Loss, Understanding Account and Billing Management, Managing Related Actions, Defining Post Processes.
Use AAF to recommend a script to launch for conducting customer survey or managing churn customers. Specify which script to recommend to end users when you are configuring the branch script action. At runtime, the specified script is displayed as a link in the popup dialog box.
Unlike the business project or workflow action, the branch script action does not support post processing. If you use AAF to recommend branch scripts and end users launch them from transactions such as cases or service orders, the system does not add the branch script instantiation as a related action of the transactions or generate log for the event. Currently, branch scripts are added automatically as related actions of the calling transactions if they are instantiated manually from the transactions.
This action uses AAF to display churn actions that can be taken for customers who are likely to churn. These actions can be viewed on the 360-Degree view of the customer. When configuring the action, specify which scripts to display based on churn scores.
This action is enabled for the After view Churn Action is Selected trigger point. At runtime, when this trigger point takes place, the system searches for the policies that are associated with it and returns the list of scripts from the corresponding action. These scripts are displayed after agents click the Churn icon on the customer 360-Degree view.
See Understanding Churn Management.
Use AAF to add data to a component's history table. The history provides a record of significant events that are related to a component. Capturing event history is similar to an audit, but you have additional flexibility when configuring the data changes that the system captures.
PeopleSoft CRM delivers the history tracking that is related action types for these components:
The case history action type logs information into the Events tab of the Case History page. This is a case-specific action and cannot be used for other applications. The history log indicates the policy for which the log is created. It also shows the original and current term values, which are resolved at runtime, as log details. Users can view case event history items from self service cases; they are marked with the all visibility.
This action is enabled for these trigger points:
After a HelpDesk Case is Saved.
After a New Self-Service HelpDesk Case is Saved.
After a New Self-Service Support Case is Saved.
After a Support Case is Saved.
After an Existing Self-Service HelpDesk Case is Saved.
After an Existing Self-Service Support Case is Saved.
Before a HelpDesk Case is Saved.
Before a New Self-Service HelpDesk Case is Saved.
Before a New Self-Service Support Case is Saved.
Before a Support Case is Saved.
Before an existing Self-Service HelpDesk Case is Saved.
Before an Existing Self-Service Support Case is Saved.
When a HelpDesk Case is Escalated.
When a Support Case is Escalated.
The Solution History action type logs information into the History Page of the Solution component. This is a solution-specific action and cannot be used for other applications. The history log indicates the policy for which the log is created. It also shows the original and current term values, which are resolved at runtime, as log details. This action is enabled for the After a Solution is Saved trigger point.
This action uses AAF to add data to the Installed Product History table to capture significant events in the life of an installed product, service, or asset. The log is presented on the History page of the Installed Product component. This is an installed product-specific action and cannot be used for other applications. During action configuration, functional users specify what text gets logged in the history table for each policy, as well as the specific terms that are captured. Values of original terms (before the change), current terms (after the change), or both can be captured during runtime. This action is enabled for these trigger points:
Before an Installed Product is Saved.
Before Product Registration is Saved.
After an Installed Product is Saved.
After Product Registration is Saved.
At runtime, when any of the enabled trigger points occur, the system searches for the policies that are associated with it and runs the corresponding action to log installed product event history.
The Lead and Opportunity History action type logs information into the History Page of the Lead or Opportunity component. This is a sales-specific action and cannot be used for other applications. The history log indicates the policy for which the log is created. It also shows the original and current term values, which are resolved at runtime, as log details. This action is enabled for these trigger points:
After a Lead is Saved.
After an Opportunity is Saved.
The Change Request History action type logs information into the History Page of the Change Request component. This is a change request-specific action and cannot be used for other applications. The history log indicates the event for which the log is created. It also shows the original and current term values, which are resolved at runtime, as log details.
This action is enabled for the After a Change Request is Saved trigger point.
Installed Product Relationship Processing
This action updates the status and reason code of all child installed products to the value of the parent installed product's status and reason code. The parent status is cascaded only to those children whose status is equal to the original parent status.
This action is enabled for the After an Installed Product is Saved trigger point. It does not require additional action configuration.
Use AAF to cascade status and resolution data from a parent case to its child cases. Only changes to parent cases trigger the action. You typically associate this action with conditions that evaluate the case's status. For example, when you close a global case, you can close all of the global case's child cases and add the global case's successful resolution to all of the child cases.
The child case status is not updated under the following conditions:
The child case is related to a service order that is not canceled, completed, or closed.
The child case status category is out of sync with the parent case.
For example, the child case status has a status category that does not match the status category of the parent case status.
Resolution information cascades differently depending on the parent case's status:
If the parent case has been closed, the action copies the successful resolution from the parent case to the child cases.
If the parent case has been opened, the action changes the child cases' successful resolutions to failed resolutions.
Configuring a case relationship action also specifies the relationship type. Different case relationship workflow rules can be the main difference between two types of relationships.
When the status and resolution cascade to child cases, any status-related workflow for the child cases is triggered, including cascading statuses to the child cases' children.
This action is enabled for these trigger points:
After a HelpDesk Case is Saved.
After a Support Case is Saved.
Note. This action does not apply to self-service cases.
Entitlement Balance Processing
Use AAF to update the number of support or help desk cases remaining in an agreement that covers a specific number of cases and time. You typically associate this action with the creation or cancellation of a case. For example, you can decrease the entitlement balance each time that the customer reports a new case, and you can increase the number if you cancel a case.
In the configuration for the action, define whether this action applies to prepaid cases, time, or both. When time is added to or subtracted from the prepaid balance, the calculation is performed by the total time entry in the Manage Time component for the case. The agreement that is selected on the case determines whether prepaid balance exists, and if yes, whether it's time-based or case-based. Depending on the remaining prepaid amount, the prepaid balance can be negative. This action is enabled for these trigger points:
After a HelpDesk Case is Saved.
After a Support Case is Saved.
Note. This action does not apply to self-service cases.
The Case Update action updates a case with fields that are available on the quick code. The action can be run either synchronously or asynchronously to update fields on the Case page. Fields that can be updated using this action are:
Case information, such as case status, category, specialty type, detail, priority, severity, and impact.
Problem summary and description.
Suggested action (link category, version and name).
Solution search keywords.
Notes summary and description.
Case type and subtype.
Provider group and assigned to.
Product group and product ID.
Error code and error message.
Interested parties (person, name and reason code).
On the Configure Case Update Action page, you can manually enter field values to be updated in the case, or select to use the quick code values for the update. In addition, you can specify options to:
Perform case actions (such as Secured Case).
Resolve the case.
Set the agreement search option.
Business unit is required to choose most of these values. Functional users must set up separate actions for each business unit. When you are setting a field using the Case Update action, the system reacts as if users enter the field value manually. If you define a quick code in the system, then all the fields that the quick code controls are also set for the case. Because many of the fields that the case update action supports are also available in quick code, users should use this action to set a quick code or some other attributes. Unpredictable behavior can result if multiple methods are used to set the same field value.
This action is enabled for these trigger points:
Before a HelpDesk Case is Saved.
Before a Support Case is Saved.
When a Customer is Identified in Case.
When a HelpDesk Case is Escalated.
When a HelpDesk Case is Presented.
When a Product is selected for a HelpDesk Case.
When a Product is Selected for a Support Case.
When a Support Case is Escalated.
When a Support Case is Presented.
When an Agreement is selected on a HelpDesk Case.
When an Agreement is selected on a Support Case.
When an Employee is Identified on a Case.
When a Business Unit is Selected for Support Case.
When a Case Type is Selected for Support Case.
When a Case Type is Selected for HelpDesk Case.
When a Business Unit is Selected for HelpDesk Case.
When a HelpDesk Case Adhoc Notification is sent.
When a Support Case Adhoc Notification is sent.
When a Category is Selected for Support Case.
When a Category is Selected for HelpDesk Case.
When a Product Group is Selected for Support Case.
When a Product Group is Selected for HelpDesk Case.
Self Service Case Update
This action updates the agreement search option for self service cases. You can select not to have the system search for agreements for cases automatically, or select to automatically search for agreements with the single longest (or shortest) response time when this action is invoked.
This action is enabled for these trigger points:
Before a New Self-Service Support Case is Saved.
Before a New Self-Service HelpDesk Case is Saved.
Use AAF to define conditions under which the Upsell button appears on the Case toolbar. The result of this action depends on whether Real Time Advisor is used.
Without Real-Time Advisor
No configuration is required for this action. If the case has a product that is associated with an upsell script, the system displays the Upsell button on the case toolbar when this action is invoked. When users click the Upsell button, the system launches the branch script that is associated with the product for the case and displays the name of the script in the Related Action Summary for the case.
With Real-Time Advisor
When configuring this action, select the advisor dialog that you want the system to launch when a user clicks the Upsell button. In this case, the upsell branch script that's associated with the product is not used. The advisor dialog, when launched, appears in the related action summary for the case. If the system creates an order at the end of the dialog session, it is displayed in the Related Action Summary for the case as well.
This action is enabled for these trigger points:
After a Support Case is Saved.
When a Support Case is Presented.
Use AAF to suggest an action that the agent can perform. Actions that are used for suggestion must be defined on the Link Definition page. The result of this action, which is a suggested action for the agent, appears in the Actions section of the Case page. Suggested actions may not be available in the Related Actions drop-down list box on the Case page. The values that are available in the Related Actions drop-down list box are limited to the actions in the action group for the display template. The actions that are associated with the Suggested Action field on the case do not have this restriction.
This action is enabled for these trigger points:
After a HelpDesk Case is Saved.
After a Support Case is Saved.
Before a HelpDesk Case is Saved.
Before a Support Case is Saved.
When a HelpDesk Case is Presented.
When a Support Case is Presented.
Case Task Action
The Case Task action enables users to automatically create a task for the case based upon user specified conditions. Users can create AAF policies that use the action to create case tasks. The creation of a case task occurs when a case is saved on-line.
This action can be triggered:
After a Support Case is Saved.
After a HelpDesk Case is Saved.
The task action configuration page contains the Task Group Template field where you can select a Task Group Template. To view the Task Group Template page, go to Set Up CRM, Common Definitions, Task Management, Task Group Template. The data in the Task Group Template is used to create the task when Case Task Action is triggered.
See Working with Tasks.
Case Survey Action
The Case Survey action enables users to execute surveys (as dialogs) that are defined in the online marketing application.
This action can be triggered:
After a HelpDesk Case is Saved.
After an Existing Self-Service Support Case is Saved.
After an Existing Self-Service HelpDesk Case is Saved.
After a Support Case is Saved.
See Creating New Defects.
Case Display Template Action
This action type returns a display template that the CRM system then uses to render the Case page.
This action can be triggered:
When a HelpDesk Case is Presented.
When a Support Case is Presented.
When a Business Unit is Selected for a Support Case.
When a Business Unit is selected for a HelpDesk Case.
When a Case Type is Selected for a Support Case.
When a Case Type is selected for a HelpDesk Case.
When a Category is Selected for a Support Case.
When a Category is selected for a HelpDesk Case.
When a Product Group is Selected for a Support Case.
When a Product Group is selected for a HelpDesk Case.
When a Product is Selected for a Support Case.
When a Product is selected for a HelpDesk Case.
After a HelpDesk Case is Saved.
After a Support Case is Saved.
When a New Self-Service Support Case Business Unit is Selected.
When a New Self-Service HelpDesk Case Business Unit is Selected.
When an Existing Self-Service Support Case is Presented.
When an Existing Self-Service HelpDesk Case is Presented.
When a New Self-Service Support Case is Presented.
When a New Self-Service HelpDesk Case is Presented.
See Understanding Display Templates.
Alert Message or Recommendation Display
Use AAF to display information to end users through the HTML pop-up dialog box. The text that is displayed can be either informational or a recommendation of actions that can be launched by clicking the link. The content can be provided by the these action types:
Display alert.
Branch script.
Cross sell opportunity, up sell opportunity, and recommendation-related action types.
Cross Sell Opportunity, Up Sell Opportunity, and Recommendation
The Real-Time Advisor engine provides recommendations for the action types for cross-sell and up-sell opportunities. Depending on the trigger point and the specific action that is used, the action type may display the recommendations in a new window, run a dialog session to get recommendations, or display recommendations in an application. You can trigger these actions from different applications, including PeopleSoft Order Capture, Marketing, Support, and the 360-Degree View.
These action types that fall in this category:
Display Activity Advisor Link.
Display Activity Recommendation.
Recommend Advisor Dialogs.
Recommend Link for OCI (order capture).
Recommendations for OCI.
Start Advisor Session.
Up sell/Cross sell Advice on 360 (360-Degree View).
Business Process Actions
PeopleSoft delivers two actions related to BPEL (business process execution language) processing. They are:
Initiate Business Process.
Complete BP (business process) Worklist Entry.
To facilitate the communication between CRM transactions and the BPEL Engine, PeopleSoft CRM provides an infrastructure that enables users to initiate business processes from CRM transactions. The transactions initiate business processes either by calling an API (application programming interface) directly or by using an AAF action.
Each asynchronous business process instance that is initiated from a CRM transaction is mapped to the initiating transaction. If a BPEL process cannot be initiated, PeopleSoft provides a mechanism to enable the user to resubmit the process. CRM transactions can also send the required data to any BPEL activity, which is expecting input from either the transaction or from a user.
In AAF, use the Initiate Business Process action in policies to automatically initiate business processes. Service operations represent the actual BPEL operation that is initiated when the associated policy is evaluated as true.
Use the Complete BP Worklist Entry action in policies to automatically create external worklist entries. This action sends a response to the BPEL Engine.
Both actions can be triggered from PeopleSoft pages or by component interfaces.
The Complete BP Worklist Entry action can be triggered by the After a HelpDesk Case is Saved trigger point only, whereas the Initiate Business Process action works with the following trigger points:
After a HelpDesk Case is Saved.
After a Lead is Saved.
After Order Capture is Saved.
After a Support Case is Saved.
Convert Lead to Opportunity.
Sales Task
The sales task AAF action populates predefined tasks on the Tasks page of leads and opportunities based on the selected task group template.
As delivered for SHARE and IPROD setIDs, this sales task action is invoked by these AAF trigger points when the AAF policy conditions are met:
Before a Lead is Saved.
Before an Opportunity is Saved.
See Also
Understanding Business Processes
Setting Up PeopleSoft CRM Workflow
Working with Order Capture Business Projects
Setting Up and Managing Agreements and Warranties
Setting Up Task Group Templates for Leads and Opportunities
Understanding PoliciesThis section discusses:
Policy overview
Policy lookup.
Policy Overview
PeopleSoft CRM delivers a list of policies for AAF to invoke actions based on condition evaluation that occurs when triggering events take place. You can activate or change these policies based on your business needs.
To review the list of policies that exist in the system, organize the search view by context and then trigger point, or use the Manage Trigger Point page to view policies by trigger point. Policies are delivered in the In Design status (disabled). Activate them by changing the policy status to Active and making sure that the policy falls within a current time period.
Policy Lookup
To look up the PeopleSoft delivered policies:
Select Enterprise Components, Active Analytics Framework, Policies, Manage Policies.
Select SHARE as the setID.
Click the Search button.
Select a policy.
The system displays a page that lists the trigger point name, a description, and the conditions and actions that are associated with the policy. You can also sort your search by policy name, status, category, start date, end date, trigger point, context, term, action type, and action objective.
Configuring Actions in Policies
This section discusses how to:
Configure display alert actions.
Relate context to business processes and activities.
Configure workflow actions.
Configure run time delay notifications.
Specify process to run in workflow actions.
Specify bind variables.
Configure business project actions.
Configure branch script actions.
Configure display activity actions.
Configure installed product history actions.
Configure sales history actions.
Configure change request history actions.
Configure case history actions.
Configure solution history actions.
Configure case update actions.
Configure self service case update actions.
Configure suggested actions for cases.
Configure case relationship actions.
Configure case entitlement balance actions.
Configure case upsell actions.
Configure advisor actions.
Configure case task actions.
Configure case survey actions.
Configure case display template actions.
Configure business process actions.
Configure business process worklist entry actions.
Configure sales task actions.
Define post processes.
Pages Used to Configure Actions in Policies|
Page Name |
Definition Name |
Navigation |
Usage |
|
EOCF_DSPL_ALRT_CFG |
Enterprise Components, Active Analytics Framework, Policies, Manage Policies Click the Add Actions or Edit Actions button. on the Build a Policy - Edit Actions page or Build a Policy - Add Actions page (EOCF_RULE_ACTION). Then click the Configure button on a row with Display Alert as the action type. |
Define configuration details for the display alert action. |
|
|
RB_AAF_CTXT_BP_REL |
Set Up CRM, Common Definitions, Workflow, Context Relationships |
Use this setup page to define the relationship between context IDs and business processes and activities. |
|
|
RB_AAF_WRKFLOW_CFG |
Click the Configure button on the Build a Policy - Edit Actions page (EOCF_RULE_ACTION) on a row with Notifications & Workflow as the action type. |
Define general information about the workflow action. |
|
|
RB_RUNTIME_DELAY |
Click the Get Delay at Run Time link on the Workflow Configuration page. |
Configure notifications to run at specified times. |
|
|
RB_AAF_ACTNPRCS |
Click the Configure button on the Build a Policy - Edit Actions page on a row with Notifications & Workflow as the action type. Select the Action Processes page. |
Select processes to run when the specified workflow action is triggered. |
|
|
RB_AAF_RULE_BIND |
Click the Binds link on the Workflow Configuration page. |
Specify the value of any variables in the role query. |
|
|
RB_AAF_BUSPROJ_CFG |
Click the Configure button on the Build a Policy - Edit Actions page on a row with Business Project as the action type. |
Specify the business project to instantiate for the business project action. |
|
|
RB_AAF_BSCRIPT_CFG |
Click the Configure button on the Build a Policy - Edit Actions page on a row with Show Churn Reduction Scripts or Recommend Branch Scripts as the action type. |
Specify the scripts to trigger for the branch script action. |
|
|
RA_WAVE_CLA_CONFIG |
Click the Configure button on the Build a Policy - Edit Actions page on a row with Display Activity Recommendation or Display Activity Advisor Link as the action type. |
Specify the recommended activity for the activity advisor action. |
|
|
RF_IPRD_HIST_CFG |
Click the Configure button on the Build a Policy - Edit Actions page on a row with Installed Product History as the action type. |
Define the configuration details for the installed product history action. |
|
|
RSF_HIST_ACT_CFG |
Click the Configure button on the Build a Policy - Edit Actions page on a row with Lead History or Opportunity History as the action type. |
Define the configuration details for the lead and opportunity history action. |
|
|
RG_HIST_ACTION_CFG |
Click the Configure button on the Build a Policy - Edit Actions page on a row with Change Request as the action type. |
Define the configuration details for the change request history action. |
|
|
RC_HIST_ACTION_CFG |
Click the Configure button on the Build a Policy - Edit Actions page on a row with Case History as the action type. |
Define the configuration details for the case history action. |
|
|
RB_HIST_SOLUTN_CFG |
Click the Configure button on the Build a Policy - Edit Actions page on a row with Solution History as the action type. |
Define the configuration details for the solution history action. |
|
|
RC_CASE_ACTION_CFG |
Click the Configure button on the Build a Policy - Edit Actions page on a row with Case Update as the action type. |
Define the configuration details for the case update action. |
|
|
Configure Case Update Action (self-service) |
RC_CASE_SS_ACT_CFG |
Click the Configure button on the Build a Policy - Edit Actions page on a row with Case Self Service Update as the action type. |
Define the configuration details for the self service case update action. |
|
RC_LINK_ACTION_CFG |
Click the Configure button on the Build a Policy - Edit Actions page on a row with Case Suggest Action as the action type. |
Define the configuration details for the suggestion action in cases. |
|
|
RC_REL_ACTION_CFG |
Click the Configure button on the Build a Policy - Edit Actions page on a row with Case Relationship as the action type. |
Define the configuration details for the case relationship action. |
|
|
RC_ENT_ACTION_CFG |
Click the Configure button on the Build a Policy - Edit Actions page on a row with Case Entitlement Balance as the action type. |
Define the configuration details for the entitlement balance action. |
|
|
RC_UPSELL_CFG |
Click the Configure button on the Build a Policy - Edit Actions page on a row with Upsell Indicator on Case as the action type. |
Specify the Advisor dialog and display template to use for the case upsell action. |
|
|
RAD_ACTION_CFG |
Click the Configure button on the Build a Policy - Edit Actions page on a row with UpSell/CrossSell Advice on 360, Recommend Advisor Dialogs, Display Advisor Recommendation, Quiet Advisor, Recommend Link for OCI, Recommendations for OCI or Start Advisor Session as the action type. |
Specify the Advisor dialog and display template to use for the action. |
|
|
RC_TASK_ACT_CFG |
Click the Configure button on the Build a Policy - Edit Actions page on a row with Case Task as the action type. |
Specify conditions to automatically create a task for the case based upon user defined conditions. |
|
|
Configure Case Survey action > |
RC_SURVEY_ACTN_CFG |
Click the Configure button on the Build a Policy - Edit Actions page on a row with Case Survey as the action type. |
Specify conditions to automatically initiate a dialog to conduct surveys after a case is saved. |
|
Configure Display Template Action |
RC_DISP_TMPL_CFG |
Click the Configure button on the Build a Policy - Edit Actions page on a row with Case Display Template as the action type. |
Specify configuration details for the case display template action. |
|
RBB_AAF_INITBPL |
Click the Configure button on the Build a Policy - Edit Actions page on a row with Initiate Business Process as the action type. |
Specify conditions to automatically initiate a business process based upon user defined conditions. |
|
|
RBB_AAF_COMPLETEWL |
Click the Configure button on the Build a Policy - Edit Actions page on a row with Complete BP Worklist Entry as the action type. |
Specify conditions to automatically create an external worklist entry based upon user defined conditions. This action sends a reply back to the BPEL processor. |
|
|
Configure Sales Task Action |
RSF_TASK_ACTION |
Click the Configure button on the Build a Policy - Edit Actions page on a row with Sales Task as the action type. |
Configure sales task actions. |
|
RB_AAF_POSTPRCS |
Enterprise Components, Active Analytics Framework, Action Framework, Define Post-Processes, Define Post-Processes |
Define post processes. |
Configuring Display Alert Actions
Access the Display Alert Configuration page (Enterprise Components, Active Analytics Framework, Policies, Manage Policies).
Use this page to define configuration details for the display alert action.
Relating Context to Business Processes and ActivitiesAccess the Context Relationships page (Set Up CRM, Common Definitions, Workflow, Context Relationships).
Use this setup page to define the relationship between business processes and activities that are valid for this context. Select the radio button that is associated with the business process and activity that you want the system to use as a default.
Note. If the page contains a one-to-one mapping between these fields, then the system populates the Business Process Name and Activity Name fields on the Workflow Configuration page, but hides the fields from the user. If it’s a one-to-many relationship, then the system displays these fields in drop-down list boxes and lists the available values. The relationships that you set up here can also appear on other action-type pages.
Configuring Workflow Actions
Access the Workflow Configuration page (click the Configure button on the Build a Policy - Edit Actions page on a row with Notifications & Workflow as the action type).
Configure Notification
|
Notification Purpose |
Select the purpose of the notification. Options are: Approval Required, Escalation, FYI, Follow-Up Requested, Hold Notification, SLA Warning, Task Assignment Notification, and Update Notification. This field is optional for worklist or email notifications. In this release, task management uses this field as part of the post processing for its Notify Task Assignees workflow policy. To prevent the system from sending duplicate notifications to task assignees, the workflow post processing updates task management tables to indicate what notifications are sent after the policy action is triggered. The notification purpose for this policy is task assignment notification. |
|
Delivery Options |
Select Delay Notification or Notify Immediately. If you select Delay Notification, make additional selections either in the Delay Minutes and Repeat Time fields, or by clicking the Get Delay at Run Time link. |
|
Specify Condition |
Click to access the page to establish a condition for any asynchronous (delayed) action. When you specify a condition here, the action only takes place if the evaluation of the condition is true at the time that the action is scheduled to start. For example, service-level related workflow notifications (which are always sent after a specified delay) alert agents to impending deadlines. Consider an agreement that entitles a customer to one-hour guaranteed recovery time. This agreement is associated with a workflow action that reminds the assigned agent of this guarantee 30 minutes after a new case is created. The system schedules the notification when the case is created. But if the case is closed by the time 30 minutes have passed, the notification becomes irrelevant. An evaluation event can verify that the case is still open before sending the notification. Note. This link does not appear if you selected Notify Immediately in the Notification Options drop down list. |
|
Priority |
Select High, Medium, or Low Used at run time, priority indicates the importance of the notification's contents. The priority also appears on the worklist grid. |
|
Delay Minutes |
Enter the number of minutes after the triggering event occurs that the notification will be sent. If this field is blank, the process runs immediately. Enter this value if Delay Notification is selected as the process notification option. |
|
Repeat Times |
Enter the number of notifications that need to be sent. The system reevaluates the policy conditions before sending repeat notifications. The notification is repeated until the conditions are no longer true. The system gets the delay time that is used between these notifications either in the Delay Minutes field or by capturing the value of the field that is specified in the Run Time Delay link (if the delay time needs to captured at runtime). |
|
Get Delay at Run Time |
Click to access the Run Time Delay page, in which you then select one of two delay options: Record/Field: Specify the record name and the field that contains the delay time (in minutes). Term Name: Specify the term that represents the desired delay time (in minutes). An example would be: Send Notification at <percent> of the final notification time Term Configuration:When a term is configurable, you will see a word wrapped in the greater than and less than symbols (<>). The wrapped word is the configurable value of the term. When you select a configurable term, the system makes the term name a link when you return to the Get Delay at Run Time page. The system displays a field when you click this link. You can then enter a value. Click Done to save the new value in the term. |
|
Send Notification To |
Select the role of the notification recipient. If the system does not find a recipient (for example, if the role is assigned to an agent but the case is unassigned), the system does not send the notification. For notifications that are sent to worklists, be sure that the role returns a list of user IDs. The role can be either a static user list role or a query role that returns user IDs. For notifications that are sent to email addresses, use a query role that returns a list of person IDs or fully qualified email addresses in the format <address>@<service>.<domain>. You should use roles that return person ID or provider group ID, which enables the workflow action to get more information about recipients, such as the their language preferences. |
|
Person ID and Provider Group |
Select the recipient type of this workflow notification, person or provider group. The selection allows the query to return the appropriate ID (either for a person or a provider group) to which the notification should be sent. |
|
Binds |
If the role is a query role (rather than a static user list), click this link to display the Binds Required page, where you enter the bind values for the query that is used in the query role. For every bind, information needs to be provided about how the data will be supplied. The data can come from either a level 0 record field or an alias. The alias is used if the data comes from a child scroll. This alias needs to be part of the context that pertains to the trigger point for which the policy is created. |
|
Business Process Name and Activity Name |
The system populates these fields by default based on the context of the policy. To define the relationships between the context ID and the business process and activity name use the Context Relationship page (go to Set Up CRM, Common Definitions, Workflow, Context Relationships). If the page contains a one-to-one mapping between these fields, then the system populates the Business Process Name and Activity Name fields but hides the fields from the user. If it’s a one-to-many relationship, then the system displays these fields in drop-down list boxes and lists the available values. A user can select a default business process and activity relationship in the setup page. This default relationship is initially populated in the drop-down list boxes. |
|
Event Name |
Select the event that is appropriate for the notification channel (Worklist or Email). |
|
Name |
Select the component interface that triggers the PeopleTools workflow event. This is required for delayed notifications to create the context for which notifications need to be sent. The component interface must contain a method called EvaluateCondition, which is used by the AAF asynchronous (delayed) workflow process to reevaluate the triggering event before a delayed or repeat invocation of the workflow action. The permission list that is required for accessing the component interface and the method is CRCI1000. By default, the system assigns the component interface that is specified on the policy. When such is the case, the Name field is not displayed unless there are multiple contexts for the policy. |
|
Correspondence Template and Language |
Select a correspondence template that you want to use to create the content of the email notification. This is the default template that is used to send email notification if the correspondence template is not specified for the recipient's language in the Language Specific Template grid. The Language field displays the language used for the correspondence template. |
|
Send URL |
Select to include the URL of the corresponding transaction to the email or worklist notification. Some features, such as task management, use their own mechanism to embed the transaction URL in workflow notification. In the case of task management, the URL is represented by a term in the workflow templates for task management. Clear this check box if you are configuring the notification and workflow action for policies that pertain to these features. Note. For the Case component: when the recipient opens the link contained within the email notification, the corresponding case page will be displayed, although the left hand navigation will remain collapsed. |
|
Delayed SLA Notification can be Canceled |
Select this check box to indicate to the system that delayed SLA (service level agreements) can be canceled. |
Language-specific Templates
|
Language Code and Correspondence Template |
Configure the AAF workflow to use different templates for different languages. If the role query of the specified role returns a person ID, the system derives the language from the person's record and identifies the correspondence template that is associated with the recipient's language in this grid. If no template is specified for that language, the system uses the default template to send the email notification. |
|
Add Package |
Click to add a new row to the Language-specific Templates group box. |
See Also
Defining Workflow Actions for Business Projects
Configuring Run Time Delay NotificationsAccess the Run Time Delay page (click the Get Delay at Run Time link on the Workflow Configuration page).
Select Record/Field or Term
|
Record / Field |
Select this radio button if you want to use a record and field name to specify a run time delay for the action. |
|
Record Name |
Select the record that contains the field that you want to use to specify a run time delay for the action. |
|
Field Name |
Select the field that you want to use to specify a run time delay for the action. |
|
Term |
Select this radio button if you want to use a term to specify a run time delay for the action. |
|
Select Term |
Click this link to access the Term search page. Selecting a Term will cause the Notification Application Engine process to use the term instead of the record/field definition. |
|
Term Name |
Displays the name of the term you selected. To enter a value for a term that includes a <percentage> or any other variable, click the link. The system displays the Configure Term section. |
Configure Term
|
Display |
Displays the name of the term that you selected. |
Enter configuration values
|
Percentage |
Enter a number to represent the amount of time that for which you want to delay the notification. |
Specifying Process to Run in Workflow Actions
Access the Action Processes page (click the Configure button on the Build a Policy - Edit Actions page on a row with Notifications & Workflow as the action type, then select the Action Processes page).
Use this page to run application engine or application class processes, with or without sending any workflow actions.
|
Order Number |
If multiple processes are listed, enter a number to specify the order in which the processes run. |
|
Process Type |
Select the type of process to run, Application Engine or Application Class. |
|
Process Name |
Select the process to run. |
|
Run Control Record |
The default run-control record that is used to run the processes is RB_RUN_CNTL_WF. This record uses OPRID and RUN_CNTL_ID as key values. If the processes that are associated with this action require a different run control record, enter that run control record here. |
|
Delay Minutes |
Enter the number of minutes after the triggering event when the process will run. If this field is blank, the process runs immediately. |
|
Repeat Times |
Enter the number of additional processes that need to run after the initial process. The system reevaluates the conditions each time that the process runs. The delay between the process runs is specified in theDelay Minutes field. The process stops if the policy conditions are no longer true. |
Specifying Bind Variables
Access the Binds Required page (click the Binds link on the Workflow Configuration page).
Use this page to specify how the input values are supplied to the bind variables that are needed for the role query.
|
Field Name and Record (Table) Name |
Displays the field for which a value is required and the record (a parent record in the component at level 0) of the field. The system builds the list based on the query role that you select on the Workflow Configuration page. Use the Alias field if the input value comes from any other level. |
|
Bind Constant |
If the value is a constant, enter the value in this field. |
|
Alias |
Enter an alias that is used to supply data to the bind if the data comes from a child row. The alias becomes part of the context that pertains to the trigger point for which this policy is defined. |
See Understanding CRM Action Types.
Configuring Business Project Actions
Access the Business Project Configuration page (click the Configure button on the Build a Policy - Edit Actions page on a row with Business Project as the action type).
Select a business project that AAF instantiates when the evaluation of the policy conditions is true.
See Also
Understanding Business Projects
Configuring Branch Script Actions
Access the Branch Script Configuration page (click the Configure button on the Build a Policy - Edit Actions page on a row with Show Churn Reduction Scripts or Recommend Branch Scripts as the action type).
Select the scripts that AAF runs if the evaluation of the specified policy conditions is true.
See Also
Configuring Display Activity Actions
Access the Activity Advisor Action page (click the Configure button on the Build a Policy - Edit Actions page on a row with Display Activity Recommendation or Display Activity Advisor Link as the action type).
Program Details
|
Program Name and Activity Name |
Select a campaign and an activity within the campaign that are displayed as recommended activity. You must first select a business unit. |
Configuring Installed Product History Actions
Access the Installed Product History Configuration page (click the Configure button on the Build a Policy - Edit Actions page on a row with Installed Product History as the action type).
History Details
|
Description |
Enter the text for the history entry that shows up on the history page of the corresponding CRM component (for example, case, lead, opportunity, or installed product). You can enter terms in angle brackets in the text that will be resolved into real data. |
|
Extract Term Aliases |
Click to populate the grid at the bottom of the page with terms that you entered in the Description field. The term name in the text is an alias (it doesn't need to be the exact name of an existing term in the system). In the grid, specify a term that corresponds to each term alias using the Get Term link. |
|
Display Type |
Select the type of value that the term displays. Options are original value, original value - description, current value and current value - description. For example, if the system enters history records for a change of status, the text is Status changed from {old status} to {new status}. The display type of {old status} can be the original value,, and {new status} the current value. |
Configuring Sales History Actions
Access the Sales History Configuration page (click the Configure button on the Build a Policy - Edit Actions page on a row with Lead History or Opportunity History as the action type).
Use this page to define the configuration details for the lead and opportunity history action.
See Configuring Installed Product History Actions.
Configuring Change Request History Actions
Access the Change Request History Configuration page (click the Configure button on the Build a Policy - Edit Actions page on a row with Change Request as the action type).
See Configuring Installed Product History Actions.
Configuring Case History Actions
Access the Case History Configuration page (click the Configure button on the Build a Policy - Edit Actions page on a row with Case History as the action type).
|
Show in Self-Service |
Select to give self-service users visibility to case history rows. |
|
Page Name |
Select the page that appears when the user clicks the Details button on the Case History page. Values in this drop-down list box include all pages in the agent-facing Case component. Self-service users can view case history, but they cannot access a detail page. Consequently, the system does not display a self-service page. |
See Configuring Installed Product History Actions.
Configuring Solution History Actions
Access the Solution History Configuration page (click the Configure button on the Build a Policy - Edit Actions page on a row with Solution History as the action type).
The Extract Term Aliases button works the same as the Merge Tokens button in other history configuration pages.
See Configuring Installed Product History Actions.
Configuring Case Update Actions
Access the Configure Case Update Action page (click the Configure button on the Build a Policy - Edit Actions page on a row with Case Update as the action type).
Select the field values that you want the system to populate a case with when this action is invoked. You can configure the fields to update a case based on certain conditions. Many of these fields are a subset of the fields that are currently available on the Quick Code page.
Case Update Options
Using the options defined in this section, you can run the Case Update Action either synchronously or asynchronously.
|
Update Options |
Select either Delay Update or Update Immediately. If you select Delay Update, the system displays the Delay Minutes, Repeat times, Specify Condition and Get Delay at Runtime fields. If you select Update Immediately the system hides these fields and the Case is updated when the action is triggered. |
|
Delay Minutes, Specify Condition, and Get Delay at Runtime |
There are three options for specifying the delay minutes:
Note. The selected record field or term should be a numeric value that represents the amount of time in minutes that the attempted update of the Case will be delayed. Also, you can, select only one of the options for any given Case Update Action configuration. If the Delay Minutes field is blank and there is no term or record field specified, the system displays an error message indicating that one of these fields is required when the Update Options field is Delay Update. |
|
Repeat Times |
Enter the number of times an attempt to update the case should occur. Only the first process for an update attempt is scheduled when the event is triggered. When the Delayed Case Update process runs, the system evaluates the delay condition. If the delay condition is true, the system updates the case and no further attempts to repeat the process occurs. If the delay condition is false and a value exists in this field, the number of times the process has been scheduled to attempt an update is compared to the number of requested repeat attempts. If the number of attempted case updates is less than the number specified in the Repeat Times field, then the system schedules a new Delayed Case Update process to run at a time determined by adding the current date and time to the delay minutes. For example, if the Delay Minutes field has a value of 240 minutes and the Repeat Times field has a value of 5 and the event is triggered at 8 am, the case update processes will run every 4 hours for 20 hours based upon the evaluation of the delay condition. Note. The system limits the number of Repeat Times to 10 so the load on the Process Scheduler does not lead to performance degradation. |
Case Update Details
You can use an existing quick code to populate the fields on the Case page. Select the Quick Code option and then a business unit. The system populates the Quick Code field with the values that are associated with the business unit.
You can also enter or select the values for each of the fields that you want the system to update the case with when the Case Update Action is invoked. Select the Case Update option and then enter or select values for each of the fields in the group box.
Note. You can use the Case Visibility Changed policy to update the Secured Case field when the Visibility field on the case is Internal, exclude Case Contact. When the case is made secured, agents who do not belong to the provider group cannot open the case. This prevents the agent from accidentally opening the grievance case from the 360 Degree View and discussing it with the employee in question.
Interested Parties
Select the person ID of the interested party and the reason that they were selected. The system adds the person to the case when the Case Update Action is invoked.
Case Actions
|
Resolved By First Contact |
Select to enable the Resolved by First Contact option on cases. |
|
Secured Case |
Select to marks cases as secured cases. |
|
Responded |
Select to set the Response Met DateTime on cases. The Response Indicator on cases is set to on time (Y) if the actual Response DateTime is less than the entitled Response DateTime. Service Level Agreement (SLA) exceptions are cancelled if the response occurs on time. |
|
Restored |
Select to set the Restore Met DateTime on cases. The Restore Indicator on cases is set to on time (Y) if the actual Restore DateTime is less than the entitled Restore DateTime. SLA exceptions are cancelled if the restore occurs on time. |
Quick Code
Select a business unit and the quick code that you want the system to use when the Case Update action is invoked. The system copies the data present in the quick code instead of copying the data from this action.
Resolve Case
Select one of these options:
Do not Resolve the Case: The system will not take any action to update a solution to resolve the case.
Resolve the Case with no update to Solution or Action status: The system changes the case status to the value set for the resolved case status on the Business Unit - Case Defaults page.
Resolve the Case with this Solution: The system updates the Case Attempted Solutions field and changes the resolution status to Successful Resolution. If you select this radio button, you must also select a solution from the field to the right.
Resolve the Case by updating attempted Solutions in the following statuses: The system resolves the case when the case is in any one of the attempted solution statuses that you specify below this radio button. The system uses the solution that you select to the right of the radio button and sets it to Successful Resolution on the case. You must select at least one Attempted Solution Status.
Automatic Agreement Search
Select one of these options:
Do not search agreement automatically:
Select this option if you do not want the system to search for agreements automatically when the Case Update action is invoked.
Autoselect Single Shortest Response:
Select this option if you want the system to automatically search for agreements with the single shortest response time when the Case Update action is invoked.
Autoselect Single Longest Response:
Select this option if you want the system to automatically search for agreements with the single longest response time when the Case Update action is invoked.
Show Search Result Page for Multiple Matches:
Select this option if you want the system to display the agreement search page when there are multiple matches when the Case Update action is invoked. If you select this option, but the agreement search page is not available (for example, when the search is performed through a back-end process or Component Interface), select one of these options:
Do not Select any Result.
Autoselect Single Shortest Response.
Autoselect Single Longest Response.
Configuring Self Service Case Update ActionsAccess the Configure Case Update Action (self-service) page (click the Configure button on the Build a Policy - Edit Actions page on a row with Case Self Service Update as the action type).
Automatic Agreement Search
Select one of these options:
Do not search agreement automatically:
Select this option if you do not want the system to search for agreements automatically when the Case Update action for self service cases is invoked.
Autoselect Single Shortest Response:
Select this option if you want the system to automatically search for agreements with the single shortest response time when the Case Update action for self service cases is invoked.
Autoselect Single Longest Response:
Select this option if you want the system to automatically search for agreements with the single longest response time when the Case Update action for self service cases is invoked.
Configuring Suggested Actions for Cases
Access the Configure Call Center Suggested Action page (click the Configure button on the Build a Policy - Edit Actions page on a row with Case Suggest Action as the action type)..
Suggested Action Details
|
Link Category and Version |
Select a link category of the suggested action that you want to specify. Options include Benefits, Human Resources, Payroll, Related Actions, Stock, Training, and so on. Values in the Version field change based on the link category that you select. |
|
Link Name |
Select a link definition that appears on the case record as suggested action. Values in this field change based on the link category that you select. |
See Setting Up Links and Related Actions.
Configuring Case Relationship Actions
Access the Configure Call Center Relationship Action page (click the Configure button on the Build a Policy - Edit Actions page on a row with Case Relationship as the action type).
Child Reaction to Parent
|
Relationship Type |
Select a relationship type, global, duplicate, or common. |
|
Reaction |
Select Cascade to cascade data from a parent case to its child cases. Select No Change to deactivate the action. Case relationship actions are valid only for hierarchical case relationships. Data can cascade only from parent to child, not from child to parent and not from one case to an equivalent case. |
Configuring Case Entitlement Balance Actions
Access the Configure Call Center Entitlement Balance Action page (click the Configure button on the Build a Policy - Edit Actions page on a row with Case Entitlement Balance as the action type).
Entitlement Balance Details
|
Prepaid Consumption Action |
Select Increment to add a unit to the prepaid support calls that are available to the customer. Select Decrement to subtract one from the balance. |
|
Billing Type |
Select the billing type: Both by case and by time, Case fee, or Time. |
Configuring Case Upsell Actions
Access the Action Configuration page (click the Configure button on the Build a Policy - Edit Actions page on a row with Upsell Indicator on Case as the action type).
|
Action Detail |
Select either Branch Script or Advisor. If you select Advisor, you must also enter an advisor dialog and template name. If you select Branch Script, the system displays a list of scripts that the agent can choose from. |
Configuring Advisor Actions
Access the Action Configuration page (click the Configure button on the Build a Policy - Edit Actions page on a row with UpSell/CrossSell Advice on 360, Recommend Advisor Dialogs, Display Advisor Recommendation, Quiet Advisor, Recommend Link for OCI, Recommendations for OCI or Start Advisor Session as the action type).
|
Advisor Dialog |
Select the dialog that AAF runs when the evaluation of the specified policy conditions is true. Establish advisor dialogs using the Advisor Workbench. |
|
Template Name |
Select the template to be used with the dialog. Templates are used to control the appearance and behavior of the runtime environment for the end user. |
Configuring Case Task ActionsAccess the Configure Case Task Action page (click the Configure button on the Build a Policy - Edit Actions page on a row with Case Task as the action type).
Select the application usage and Task Group Template that you want the system to use to create a task when this action is triggered.
This action is triggered only after an agent saves a Support case or after an agent saves a HelpDesk case. The new task is populated with the data from the Task Group Template.
In addition, if there is no owner specified on the Task Group Template, the user from the case that triggered the action will be the task owner. The system will default the agent from the case to the task invitee and assignee on the new task.
The system populates the task contact for the task using this criteria:
Company
The system defaults the customer contact from the case to the task contact.
Consumer or Employee
The system defaults the consumer or employee from the case to the task contact. If there is a contact on the case, the system will also default it to the task contact.
Partner
The system defaults the partner contact from the case to the task contact.
Configuring Case Survey ActionsAccess the Configure Case Survey Action page (click the Configure button on the Build a Policy - Edit Actions page on a row with Case Survey as the action type).
Program Details
|
Dialog Name and Action |
Enter a dialog (available in the specified business unit) to be initiated (when the evaluation of corresponding policy is true) to conduct the survey. |
Error Notification Details
|
Error Notification Recipient |
Select the recipient or the group of recipients (who share the same role) to receive notifications if the survey fails to initiate. |
|
Role Name |
Enter a role name if you select Role in the Error Notification Recipient field. |
|
User ID |
Enter the user ID of the recipient if you select User ID in the Error Notification Recipient field. |
Configuring Case Display Template ActionsAccess the Configure Display Template Action page (click the Configure button on the Build a Policy - Edit Actions page on a row with Case Display Template as the action type).
Configure Display Template
|
Template Family |
Select a template family. Available values are based on licensed products that are found in the Installation record. |
|
Display Template |
Select the display template to be used by the system to render the Case page. Available values are returned based on the component (derived from the context of the associated policy that uses this action) and the selected template family. |
Configuring Initiate Business Process ActionsAccess the Initiate Business Process Action Configuration page (click the Configure button on the Build a Policy - Edit Actions page on a row with Initiate Business Process as the action type).
Service Operation
Service operation represents the operation that gets executed on BPEL Engine when the associated policy is evaluated as true. Typically, select Static and specify the service operation that needs to be initiated whenever the policy becomes true. If the service operation is to be specified at runtime, select Dynamic and the term that is used to resolve the service operation name. The term used to resolve the service operation name should return a string. It cannot be a term that accepts parameters (configurable). If the operation that you select represents an asynchronous business process, it is tied to the initiating transaction upon successful submission of the request.
Payload
Select the term that you want to use to send data (initial payload) to the BPEL Engine. A transaction can send the required data to the engine at the time of initiation. The AAF action can get this data by resolving the term specified under in this section. Payload is optional.
If the business process is using a rowset based (structured) message, then the term should return a rowset, If it is using a non-rowset based (unstructured) message, then the term should return the XML string in a message compatible format (for example, the schema BPEL is expecting). Refer to the Integration Broker documentation for further details about messages.
See Enterprise PeopleTools 8.50 PeopleBook: Integration Broker
Configuring Business Process Worklist Entry ActionsAccess the Configuration for External Worklist Entry Completion page (click the Configure button on the Build a Policy - Edit Actions page on a row with Complete BP Worklist Entry as the action type).
Select the service operation that you want to use to reply back to the BPEL process that initiated the external worklist entry. To send specific responses back to the BPEL processor, select a term. If the term has a variable in it, the system displays it as an active link. Click the link to enter a value for the variable. The CREATE_WORKLIST_ITEM service operation delivered by PeopleTools. It is a default service operation that you should use unless you want to use a different service operation that you created on your own.
Because the BPEL Worklist completion action uses a rowset based message, the term returns a rowset of worklist entries which the system marks as complete.
Note. Because BPEL failure notification is not supported in this release, do not use the fields that are displayed in the On Failure group box.
Configuring Sales Task ActionsAccess the Configure Sales Task Action page (click the Configure button on the Build a Policy - Edit Actions page on a row with Sales Task as the action type).
Task Details
|
Application Usage |
Select a usage to refine the list of task group templates available for selection. |
|
Task Group Template |
Select a task group template. At runtime, its associated tasks will be populated to the specified sales component (Lead or Opportunity) when the corresponding policy condition is met. |
See Also
Setting Up Task Group Templates for Leads and Opportunities
Defining Post Processes
Access the Define Post-Process page (Enterprise Components, Active Analytics Framework, Action Framework, Define Post-Processes, Define Post-Processes).
|
Action Type |
Select the action type with which the post process associates. |
|
Context |
Select the context with which the post process associates. |
|
Application Class ID and Application Class Path |
Enter the method and the path of the application class built to execute the post process. |