 Setting Up a Sales Process
This chapter discusses how to:
Set up a sales process.
Set up component field default values.
Set up lead ratings.
Set up assignment weights.
Set up account-based assignment options.
Set up lead reject and turnback reasons.
Set up sales contacts.
Set up sales partners.
Set up sales competitors.
Set up buying criteria.
Set up lead sources.
Set up fallout reasons.
Set up pipeline segments.
Set up templates for importing leads.
Set up the summary page for leads and opportunities.
Set up display templates for leads and opportunities.
Set up task group templates for leads and opportunities.
Setting Up a Sales ProcessTo set up a sales process, use the Sales Process (RSF_SALES_MODEL) component.
This section provides an overview of the sales process and discusses how to:
Define a process.
Clone a process.
 Understanding the Sales Process
Sales efforts typically follow a defined series of stages and tasks. PeopleSoft Enterprise Sales provides the Knowledge Enabled Sales (KES) process, a ready-to-use proprietary sales process that enables you to identify the stages and tasks that an organization's sales process requires. The KES process can also help sales representatives learn how to perform tasks using the organization's best practices.
The KES process includes several stages. Each stage is associated with an opportunity pipeline segment, and every stage includes one or more tasks. You can use the KES process that is provided or you can define sales stages and tasks based on your organization's preferred sales model.
Note that you can enable multiple sales processes at one time. For example, you might have one process for selling within a particular industry and another for selling a particular product or service line. You can relate all the various stages to common pipeline segments to ensure that you analyze pipeline information correctly.
This table lists the KES stages and their tasks. You can modify these stages and tasks to meet your business needs.
Note. The weights included in this table are provided as an example of how the KES process works.
|
Stage |
Weight |
Purpose |
Task |
|
Discover |
10 |
Identify and review knowledge about the customer, industry, and competitors before making the initial sales call in the Qualify stage. |
Complete these tasks during the Discover stage:
|
|
Qualify |
20 |
|
Complete these tasks during the Qualify stage:
|
|
Develop Solution |
20 |
Define a set of products or services to meet the customer's needs and preferences, and obtain a quote for these products or services. |
Complete these tasks during the Develop Solution stage:
|
|
Develop Proposal |
20 |
Create a comprehensive written proposal that identifies how the proposed solution addresses the customer's needs. The proposal includes the quote itself, product descriptions, support policies, and legal information such as warranties. |
Complete these tasks during the Develop Proposal stage:
|
|
Negotiate and Close |
20 |
Discuss the written proposal with the customer and negotiate terms and conditions to win the business. |
Complete these tasks during the Negotiate and Close stage:
|
|
Retain |
10 |
Prepare a plan to manage the customer relationship after closing the opportunity. |
Complete these tasks during the Retain stage:
|
Pages Used to Set Up a Sales Process|
Page Name |
Definition Name |
Navigation |
Usage |
|
RSF_SALES_MODEL |
Set Up CRM, Product Related, Sales, Lead and Opportunity, Sales Process, Sales Process |
Review the KES stages and tasks that make up the sales process delivered with the PeopleSoft system. Define other stages or tasks as necessary. |
|
|
RSF_SLSPRCS_CLONE |
Click the Clone button on the Sales Process page. |
Copy an existing sales process to use as the basis for a new process. |
Defining a Process
Access the Sales Process page (Set Up CRM, Product Related, Sales, Lead and Opportunity, Sales Process, Sales Process).
|
Model and Name |
Displays PSFT (KES) and Knowledge Enabled Sales as the default values if you use the KES process. If you use a different sales process, the process and name appear. You can edit the name on this page. |
|
Select a method for evaluating the progress of opportunities; 100 percent equals closed or completed. Values are:
|
|
|
Hide Tasks and Show Tasks |
Click to hide or display tasks. If you use tasks associated with your sales process, display them. Otherwise, hide the tasks that appear here. |
|
Clone |
Click to access the Clone Sales Process page, where you can copy or clone the sales process to a different setID. You can clone the stages and tasks of the process. |
Sales Stages
|
Stage # (stage number) and Sales Stage |
Displays the sequence number and stage of the process, and lists the associated tasks at the bottom of the page. Click the Add button to create additional stages of the process and associate tasks with them. The system enters the stage sequence number. You can override the sequence numbers to reorder the stages. |
|
Identify the pipeline segment to associate with the stage. In the KES process, pipeline segments include Contact, Develop, Negotiate, Qualify, and Retain. You must specify a pipeline segment to correlate with the stage if you set up pipeline targets for a sales user's pipeline segment quotas on the Sales User page. |
|
|
Weight % (weight percentage) |
Enter the weight percentage that represents that stage's portion of the sales model. For example, if a stage represents half of the sales model, half of the work, half of the time, half of the important landmarks, or half of some other measure, then enter 50 (percent). |
Tasks
|
Task # (task number) and Sales Task |
Displays the sequence number and name of the discrete activity that runs as part of a sales stage. The system enters the sequence number when you add a task. You can override sequence numbers to reorder the tasks. |
Cloning a Process
Access the Clone Sales Process page (click the Clone button on the Sales Process page).
You can copy (or clone) an existing process with its stages and tasks and then make adjustments to create a new process.
Setting Up Component Field Default Values
This section provides an overview of field default values for leads and opportunities and discusses how to set up default values for component fields.
Understanding Field Default Values for Leads and OpportunitiesWhen a sales user creates a lead or opportunity, the lead or opportunity description is a required field. The user can enter a description to identify the lead or opportunity. However, if the user does not enter a description and saves the lead or opportunity, the system saves a default value for the description based on a combination of fields set up on the Component Field Default page.
PeopleSoft Enterprise Sales delivers two default settings for component fields—one for the lead description and one for the opportunity description. These settings specify that the system populates the lead and opportunity descriptions with the name of the customer if the sales user does not enter a description. You can change these default settings by using the Component Field Default page.
Page Used to Set Up Component Field Default
Values|
Page Name |
Definition Name |
Navigation |
Usage |
|
RB_COMP_FLD_DFLT |
Set Up CRM, Common Definitions, Component Configuration, Component Field Default, Component Field Default |
Set up default values to populate required fields if users do not enter values in them. |
Setting Up Default Values for Component
FieldsAccess the Component Field Default page (Set Up CRM, Common Definitions, Component Configuration, Component Field Default, Component Field Default).
Select RSF_LEAD_ENTRY and DESCR50 for the component name and field name, respectively, to modify the settings for the lead description. Select RSF_OPPORTUNITY and OPPORTUNITY_NAME to modify the settings for the opportunity description.
Click the Modify System Data button to edit the fields on the Component Field Default page.
If you enter multiple rows, the system concatenates the values from the rows to form the default value.
|
Return Blank When All Fields Are Blank |
Select this check box to have the system leave the field blank when all the fields in the criteria grid are blank for the transaction. |
|
Max Length (maximum length) |
Select a value for the maximum character length of the default value. Values are None, Same as Field Length, and As Specified. If you select As Specified, enter a value in the Max Length field. |
|
Type |
Values are Field Value, Blank Space, and Static Text. If you select Field Value, you must enter the rowset, record, and field name. |
|
Occurs level |
Enter the level at which the field is located. |
|
Rowset |
Enter the name of the rowset that contains the field. |
|
Record |
Select the record that contains the field name that you use to populate the Description field. |
|
Field Name |
Select the field name that you use to populate the Description field. |
|
Test Value |
If you select Field Value for the type, enter a typical value in this field for testing purposes. Click the Test button to view a potential name. The system retrieves the actual value based on the field during live input. |
|
Test |
Click this button to display the projected lead or opportunity default value, which appears to the right of the button. If you have multiple rows, the system concatenates the values from the rows. |
Setting Up Lead Ratings
To set up lead ratings, use the Lead Ratings (RSF_LEAD_RATING) and Lead Rating by Rate Set Value (RT_RS_TO_LEAD_RATE) components.
This section provides an overview of ratings and rating rules and discusses how to:
Define lead ratings and set workflow triggers.
Set up lead rating rules.
Build conditions for rating rules.
Choose conditions to evaluate.
Map survey values to lead ratings.
Understanding Ratings and Rating Rules
Lead ratings assess the probability that a customer will buy and are usually represented by a term that describes temperature, such as Hot, Warm, or Cold. For leads generated through the TeleSales application, scripted questions and answers provide the information that is used to provide lead ratings. Lead ratings apply to a setID.
For leads that are automatically generated from marketing campaigns, you can automatically generate an initial lead rating from the information gathered by marketing: customer name, potential revenue, geographic region, and so forth. You select relevant information and set up rules that automatically evaluate leads that are generated from marketing campaigns. Rating rules, like ratings, are unique for a setID and are built using the Active Analytics Framework (AAF) in the context of lead management.
See Also
Pages Used to Set Up Lead Ratings|
Page Name |
Definition Name |
Navigation |
Usage |
|
RSF_LEAD_RATING |
Set Up CRM, Product Related, Sales, Lead and Opportunity, Lead Ratings, Lead Ratings |
Define ratings, also called temperatures, that identify the potential of a lead for becoming a sale, and set parameters for triggering workflow. The system sends notifications when a lead or opportunity is not accepted or rejected within a specified time period. Lead ratings are keyed by setID. |
|
|
RSF_RATING_RULES |
Set Up CRM, Product Related, Sales, Lead and Opportunity, Lead Ratings, Rating Rules |
Set up the conditions for assigning a rating to a lead. Lead rating rules are associated to a setID. |
|
|
RSF_CND_BLD_PG |
Click the Add Rule button or the
|
Build rating rules. |
|
|
RSF_SALE_TERM_PG |
Click the Select Term link on the Lead Rating Rules - Edit Rules page. |
Choose a condition to evaluate in the rating rule. |
|
|
RT_RS_TO_LEAD_RATE |
Set Up CRM, Product Related, Sales, Lead and Opportunity, Lead Rating by Rate Set Value, Rate Set Value to Lead Rating |
Map branch script rate-set values to lead ratings. |
Defining Lead Ratings and Setting Workflow
Triggers
Access the Lead Ratings page (Set Up CRM, Product Related, Sales, Lead and Opportunity, Lead Ratings, Lead Ratings).
|
Send Notification |
Select to send an email notification to the worklist explaining that the lead or opportunity with the specified rating has not been accepted or rejected within the allowable time. |
|
Max Time (maximum time) and Unit of Time |
Specify the maximum delay period—expressed in days, hours, or minutes—by which a lead with that rating must either be accepted or rejected. If the lead is not accepted or rejected within that time, then the defined workflow is triggered. |
Setting Up Lead Rating Rules
Access the Rating Rules page (Set Up CRM, Product Related, Sales, Lead and Opportunity, Lead Ratings, Rating Rules).
A lead rating rule is a condition and a rating that the lead received if the condition is met. Lead rating rules are associated with a setID.
|
Rule Name |
Enter a free-form text name for the rule. |
|
Display Condition |
Displays the rule for assigning the rating to the lead. |
|
Rating |
Displays the ratings that you set up on the Lead Ratings page. |
Building Conditions for Rating RulesAccess the Lead Rating Rules - Edit Rules page (click the Add Rule button on the Rating Rules page).
This page enables you to build the condition for a rule. On initial entry to the page, or when you add a term to the condition, the Select Term link appears. After you add a term to the condition, you select an operator from the available values and enter a value to build the condition.
Choosing Conditions to EvaluateAccess the Edit Condition page (click the Select Term link on the Edit Rules page).
This page enables you to select a term that is evaluated as part of a rule. Only conditions that are applicable in the context of lead management appear on this page.
Mapping Survey Values to Lead Ratings
Access the Rate Set Value to Lead Rating page (Set Up CRM, Product Related, Sales, Lead and Opportunity, Lead Rating by Rate Set Value, Rate Set Value to Lead Rating).
When a marketing (or telemarketing) group creates a branch script survey, it defines rate-set values so that the script can translate the overall score into a meaningful rating. You can map those rate-set values to lead ratings here. That way, if the survey score returns the equivalent of a lead rating with the rating category of Qualified, the marketing group can forward the prospect to the sales group as a qualified lead.
See Also
Setting Up Assignment Weights
To set up assignment weights, use the Assignment Weights (RSF_ASSIGN_W_TBL) component.
This section discusses how to define assignment weights.
Page Used to Set Up Assignment Weights|
Page Name |
Definition Name |
Navigation |
Usage |
|
RSF_ASSIGN_W_TBL |
Set Up CRM, Product Related, Sales, Lead and Opportunity, Assignment Weights, Assignment Weights |
Define assignment weights to identify the importance of the criteria that the system uses to determine the assignment of a lead or opportunity to a territory. |
Defining Assignment Weights
Access the Assignment Weights page (Set Up CRM, Product Related, Sales, Lead and Opportunity, Assignment Weights, Assignment Weights).
Predefined assignment weights are delivered with the following anchor weights. You can use or modify these, and you can define different sets for different combinations of setIDs and assignment groups:
0 is ignore.
5 is important.
9 is most important.
Assignment weights are used, along with other criteria, when the system assigns leads and opportunities.
See Also
Defining Criteria and Their Weights
Setting Up Account-Based Assignment OptionsTo define account auto-assignment options for leads and opportunities, use the Account Auto-assignment Options for Lead and Opportunity component.
Use the RSF_ASGN_OPTIONS component interface to load data into the tables for this component.
This section provides an overview of lead and opportunity assignment by customer account and discusses how to set up account-based assignment options.
Understanding Lead and Opportunity Assignment by Customer Account
In addition to using the assignment engine for automatic territory-based assignment, PeopleSoft Enterprise Sales can also be set up to support the automatic assignment of sales representatives to leads and opportunities based on associated customer accounts. This feature enables customer account team members, who are established as sales users, to be assigned to leads and opportunities as sales representatives. These team members do not have to be associated with territories to be considered in the assignment of sales representatives to work on leads and opportunities.
Separate configuration options are provided for enabling customer account-based assignment on leads and on opportunities. You can also set up the system to assign either all account team members or just the owners of the account team (who are also sales users) as sales representatives. If the customer account-based assignment option is enabled, it takes precedence over the territory-based mechanism when automatic lead and opportunity assignment occurs.
See Understanding Sales Representative Assignment.
Customer Account-Based Assignment: Process Flow
This diagram illustrates the process for assigning sales representatives to leads based on the account teams that are associated with leads' customers:
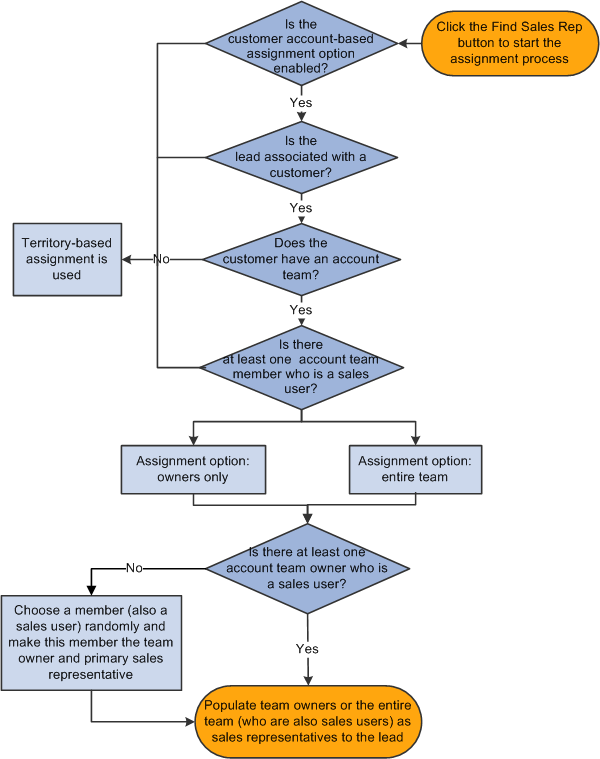
Process flow for assigning sales representatives to leads and opportunities based on the account team that is associated with customers of leads and opportunities
This process applies to both leads and opportunities; leads are used in this example to explain the process. Here is how the process works:
An automatic sales representative assignment request is made.
An example is when a user clicks the Find Sales Rep button on the Assign page of a lead, which invokes the assignment engine.
After confirming that the account-based assignment is set to be enabled for leads, the system checks if a customer is present in the lead.
If yes, the system checks to see if the customer is associated with an account team.
If no, territory-based assignment is used.
If the customer has an account team, the system further checks if the account team has at least one sales user.
If the customer does not have an account team, or none of the account team members are sales users, territory-based assignment is used.
Based on the selected assignment criterion (the entire account team or owners only), the assignment engine populates the qualified account team members to the Assign page of the lead. Specifically:
If the assignment criterion is the entire account team, the system populates all team members who are also sales users to the lead as sales representatives, and make the account team owner the primary sales representative. If there are multiple team owners, one of them is made primary through random selection.
If there are no account team owners, or owners are not sales users, the system makes one of the team members the team owner and this owner becomes the primary sales representative.
Note. It is recommended that you mark one account team member as the owner so that this owner automatically becomes the primary sales representative in customer based-assignment.
If the assignment criterion is owners only, account team members who are both sales users and marked as owners will be assigned to the lead as sales representatives.
Similar to the other assignment criterion, the system makes one of the owners the primary sales representative through random selection. And if no qualified account team owners are available, a random account team member, who is also a sales user, is then selected to become the owner and primary sales representative.
The creator of the lead has a higher priority to be chosen as the primary sales representative if this user is also the owner of the customer's account team.
Page Used to Set Up Account-Based Assignment Options|
Page Name |
Definition Name |
Navigation |
Usage |
|
ASSIGNMENT_OPTIONS |
Set Up CRM, Product Related, Sales, Lead and Opportunity, Assignment Options, Assignment Options |
Enable the automatic assignment of sales representatives to leads and opportunities by customer account. |
Setting Up Account-Based Assignment OptionsAccess the Assignment Options page (Set Up CRM, Product Related, Sales, Lead and Opportunity, Assignment Options, Assignment Options).
This functionality is disabled as delivered.
Account-Based Assignment
|
Use Account Team for Lead Assignment |
Select to enable account-based automatic assignment of sales representatives for leads. |
|
Use Account Team for Opportunity Assignment |
Select to enable account-based automatic assignment of sales representatives for opportunities. |
Assignment Criteria
This section is not available for edit if this assignment is not enabled for the Lead or Opportunity component. The selected criteria applies to all enabled components.
|
Owners Only |
Select for the system to assign only owners of the account team (who are sales users) to the enabled component. |
|
Entire Account Team |
Select for the system to assign all members of the account team (who are sales users) to the enabled component. |
Setting Up Lead Reject and Turnback Reasons
To set up lead reject and turnback reasons, use the Lead Reject Reasons (RSF_LEAD_RJCT_RSN) component.
This section discusses how to set up lead reject and turnback reasons.
Page Used to Set Up Lead Reject and Turnback
Reasons|
Page Name |
Definition Name |
Navigation |
Usage |
|
RSF_LE_RJCT_RSN |
Set Up CRM, Product Related, Sales, Lead and Opportunity, Lead Reject Reasons, Lead Reject/Turnback Reason |
Define reasons, keyed by setID, for sales representatives to use when rejecting or turning back a lead. |
Setting Up Lead Reject and Turnback ReasonsAccess the Lead Reject/Turnback Reason page (Set Up CRM, Product Related, Sales, Lead and Opportunity, Lead Reject Reasons, Lead Reject/Turnback Reason).
Enter codes and descriptions for rejecting a lead.
To reject or turn back a lead, a sales user must identify a reject or turnback reason on the Lead - Summary page. On the Lead Reject/Turnback Reason page, you define the possible reasons that the sales user can select.
See Also
Accepting, Rejecting, or Turning Back a Lead Assignment
Setting Up Sales Contacts
To set up sales contacts, use the Sales Contact (RSF_CONT_SETUP) component. To set up contact roles, use the Contact Roles (RSF_ROLE_CD_TBL) component.
This section discusses how to:
Set up contact support levels.
Set up contact impact levels.
Set up contact titles.
Set up contact departments.
Set up contact roles.
Pages Used to Set Up Sales Contacts|
Page Name |
Definition Name |
Navigation |
Usage |
|
RSF_CONT_SUPPORT |
Set Up CRM, Product Related, Sales, Lead and Opportunity, Sales Contacts, Contact Support |
Set up support levels for describing contacts. |
|
|
RSF_CONT_IMPACT |
Set Up CRM, Product Related, Sales, Lead and Opportunity, Sales Contacts, Contact Impact |
Set up impact levels for describing contacts. |
|
|
RSF_CONT_TITLE |
Set Up CRM, Product Related, Sales, Lead and Opportunity, Sales Contacts, Contact Title |
Set up titles for describing contacts. |
|
|
RSF_CONT_DEPART |
Set Up CRM, Product Related, Sales, Lead and Opportunity, Sales Contacts, Contact Department |
Set up departments for describing contacts. |
|
|
RSF_ROLE_CD_TBL |
Set Up CRM, Product Related, Sales, Lead and Opportunity, Contact Roles, Contact Roles |
Set up roles for describing contacts. |
Setting Up Contact Support Levels
Access the Contact Support page (Set Up CRM, Product Related, Sales, Lead and Opportunity, Sales Contacts, Contact Support).
Create support levels that enable sales users to identify the type of support that a contact shows for moving the sale forward.
Support levels appear on the Impact tab on the Contact grid of the Discover page in the lead and opportunity details components.
See Also
Selecting Customer Contacts for a Lead or Opportunity
Setting Up Contact Impact Levels
Access the Contact Impact page (Set Up CRM, Product Related, Sales, Lead and Opportunity, Sales Contacts, Contact Impact).
Create impact levels that enable sales users to identify the impact that a contact might have on the customer's decision to purchase.
Impact levels appear on the Impact tab in the Contact grid of the Lead - Discover and Opportunity - Discover pages.
See Also
Selecting Customer Contacts for a Lead or Opportunity
Setting Up Contact Titles
Access the Contact Title page (Set Up CRM, Product Related, Sales, Lead and Opportunity, Sales Contacts, Contact Title).
Create titles that enable sales users to identify a contact's position in the customer's organization.
Titles appear on the Organization tab in the Contacts grid of the Lead - Discover and Opportunity - Discover pages.
Note. The contact titles that you set up here are different from the contact roles, which are set up on the Contact Roles page and are used on the Impact tab in theContacts grid of the Lead - Discover and Opportunity - Discover pages. Contact roles are more detailed than titles. For example, you might set up Vice President as a title and Vice President of Purchasing as a role.
See Also
Selecting Customer Contacts for a Lead or Opportunity
Setting Up Contact Departments
Access the Contact Department page (Set Up CRM, Product Related, Sales, Lead and Opportunity, Sales Contacts, Contact Department).
Create departments (for example, Executive, IT, Marketing, and Sales) that enable sales users to identify the department that a contact belongs to in the organization.
Departments appear on the Organization tab in the Contact grid of the Lead - Discover and Opportunity - Discover pages.
See Also
Selecting Customer Contacts for a Lead or Opportunity
Setting Up Contact Roles
Access the Contact Roles page (Set Up CRM, Product Related, Sales, Lead and Opportunity, Contact Roles, Contact Roles).
Define roles (for example, Purchasing Manager, Purchasing Broker, and Vice President of Purchasing) that enable sales users to identify the role that a contact has within the customer's organization.
Contact roles appear on the Contact tab in the Contacts grid of the Lead - Discover and Opportunity - Discover pages.
See Also
Selecting Customer Contacts for a Lead or Opportunity
Setting Up Sales Partners
To set up sales partners, use the Sales Partner (RSF_PARTNER) component.
This section discusses how to:
Set up partner role type and relationship.
Set up business partners and contacts.
Set up partner roles.
Set up partner status values.
Set up partner types.
Set up partner ratings.
Note. PeopleSoft Enterprise Sales provides basic functionality for sales partners. For more robust functionality, use PeopleSoft Partner Relationship Management. This section applies only to systems that do not use PeopleSoft Partner Relationship Management. If you use PeopleSoft Partner Relationship Management, set up sales partners in that application.
See PeopleSoft Partner Relationship Management 9.1 Preface.
Pages Used to Set Up Sales Partners|
Page Name |
Definition Name |
Navigation |
Usage |
|
BO_ROLE_TYPE |
Set Up CRM, Common Definitions, Customer, Role Type, Role Type |
Set up the role type of Partner to describe the relationship of sales partners. |
|
|
BO_REL_VWCFG |
Set Up CRM, Common Definitions, Customer, Configure Relationship Views, Configure Relationship Views |
Configure the partner relationship. |
|
|
RD_COMPANY_DETAILS |
|
Create companies as sales partners. |
|
|
RSF_PARTNR_ROLE |
Set Up CRM, Product Related, Sales, Lead and Opportunity, Sales Partner, Partner Role |
Define roles to describe partners on the sales team. |
|
|
RSF_PARTNR_STAT |
Set Up CRM, Product Related, Sales, Lead and Opportunity, Sales Partner, Partner Status |
Define statuses for partner activity on the sales team. |
|
|
RSF_PARTNR_TYPE |
Set Up CRM, Product Related, Sales, Lead and Opportunity, Sales Partner, Partner Type |
Define types to describe partners on the sales team. |
|
|
RSF_PARTNR_RATE |
Set Up CRM, Product Related, Sales, Lead and Opportunity, Sales Partner, Partner Rating |
Define ratings to describe partners on the sales team. |
Setting Up Partner Role Type and RelationshipAccess the Role Type page (Set Up CRM, Common Definitions, Customer, Role Type, Role Type).
The CRM system delivers the Partner role type that can be used to identify the relationship of an external company or consultant that you want to set up as partners.
See Defining Role Types and Role Categories.
Access the Configure Relationship Views page (Set Up CRM, Common Definitions, Customer, Configure Relationship Views, Configure Relationship Views).
You need to configure the partner relationship before you apply it to partner businesses.
See Configuring the Relationship Viewer.
Setting Up Business Partners and Contacts
Access the Company page (Customers CRM, Add Company, Company).
Enter the following information for the external companies or consultants that you want to set up as partners: business names, addresses, phone numbers, and contact names.
See Maintaining General Company Information.
Setting Up Partner Roles
Access the Partner Role page (Set Up CRM, Product Related, Sales, Lead and Opportunity, Sales Partner, Partner Role).
Enter a partner role ID, status, and description to identify the roles of partners. Add rows to create as many partner roles as you need.
Setting Up Partner Status Values
Access the Partner Status page (Set Up CRM, Product Related, Sales, Lead and Opportunity, Sales Partner, Partner Status).
Enter a partner status ID, status, and description to identify the status of partners' relationship with the organization. Add rows to create as many partner statuses as you need.
Setting Up Partner Types
Access the Partner Type page (Set Up CRM, Product Related, Sales, Lead and Opportunity, Sales Partner, Partner Type).
Enter a partner type ID, status, and description to identify the types of partners with which the organization interacts. Add rows to create as many partner types as you need.
Setting Up Partner Ratings
Access the Partner Rating page (Set Up CRM, Product Related, Sales, Lead and Opportunity, Sales Partner, Partner Rating).
Enter a partner rating, status, and description to rate partners' working relationships or history of success with the organization. Add rows to create as many partner ratings as you need.
Setting Up Sales Competitors
This section discusses how to:
Set up the competitor role type and relationship.
Set up business competitors and contacts.
Pages Used to Set Up Sales Competitors|
Page Name |
Definition Name |
Navigation |
Usage |
|
BO_ROLE_TYPE |
Set Up CRM, Common Definitions, Customer, Role Type, Role Type |
Set up the role type Competitor, which you can apply to various sales competitors. |
|
|
BO_REL_VWCFG |
Set Up CRM, Common Definitions, Customer, Configure Relationship Views, Configure Relationship Views |
Configure the competitor relationship. |
|
|
RD_COMPANY_MAIN_2 |
Customers CRM, Company |
Create companies as sales competitors. |
Setting Up Competitor Role Type and Relationship
Access the Role Type page (Set Up CRM, Common Definitions, Customer, Role Type, Role Type).
Set up the role type Competitor to identify the relationship of an external company or consultant with whom you compete for sales.
See Defining Role Types and Role Categories.
Access the Configure Relationship Views page (Set Up CRM, Common Definitions, Customer, Configure Relationship Views, Configure Relationship Views).
You must also configure the competitor relationship before you apply it to competing businesses.
See Configuring the Relationship Viewer.
Setting Up Business Competitors and Contacts
Access the Company page (Customers CRM, Company).
Enter information about the external companies or consultants that you set up as competitors.
See Maintaining General Company Information.
Setting Up Buying Criteria
To set up buying criteria, use the Sales Buying Criteria (RSF_NEEDS) component.
This section discusses how to:
Set up buying criteria types.
Set up buying criteria impact levels.
Set up buying criteria priority levels.
Set up buying criteria status values.
Note. The system does not display buying criteria fields on the Lead - Propose and Opportunity - Propose pages unless you use display templates to specify that you want to display the buying criteria fields.
See Setting Up Display Templates for Leads and Opportunities.
Pages Used to Set Up Buying Criteria|
Page Name |
Definition Name |
Navigation |
Usage |
|
RSF_NEED_TYPE |
Set Up CRM, Product Related, Sales, Lead and Opportunity, Sales Buying Criteria, Buying Criteria Type |
Define types to describe customer buying criteria. |
|
|
RSF_NEED_IMPACT |
Set Up CRM, Product Related, Lead and Opportunity, Sales, Sales Buying Criteria, Buying Criteria Impact |
Define impact levels to describe customer buying criteria. |
|
|
RSF_NEED_PRIORITY |
Set Up CRM, Product Related, Lead and Opportunity, Sales, Sales Buying Criteria, Buying Criteria Priority |
Define priority levels to describe customer buying criteria. |
|
|
RSF_NEED_STATUS |
Set Up CRM, Product Related, Lead and Opportunity, Sales, Sales Buying Criteria, Buying Criteria Status |
Define statuses to describe customer buying criteria. |
Setting Up Buying Criteria Types
Access the Buying Criteria Type page (Set Up CRM, Product Related, Sales, Lead and Opportunity, Sales Buying Criteria, Buying Criteria Type).
Enter a buying criteria ID, status, and description to identify the types of criteria that influence customer decisions to purchase. Add rows to create as many types as you need.
See Also
Qualifying a Lead or Opportunity
Setting Up Buying Criteria Impact Levels
Access the Buying Criteria Impact page (Set Up CRM, Product Related, Lead and Opportunity, Sales, Sales Buying Criteria, Buying Criteria Impact).
Enter an impact ID, status, and description to identify the impact of buying criteria on customer decisions to purchase. Add rows to create as many impact levels as you need.
See Also
Qualifying a Lead or Opportunity
Setting Up Buying Criteria Priority Levels
Access the Buying Criteria Priority page (Set Up CRM, Product Related, Lead and Opportunity, Sales, Sales Buying Criteria, Buying Criteria Priority).
Enter a priority ID, status, and description to identify the priority of customers' need for a product. Add rows to create as many need priorities as necessary.
See Also
Qualifying a Lead or Opportunity
Setting Up Buying Criteria Status Values
Access the Buying Criteria Status page (Set Up CRM, Product Related, Lead and Opportunity, Sales, Sales Buying Criteria, Buying Criteria Status).
Enter a status ID, status and description to identify the status of customers' need for a product. For example, you might create a buying criteria status of Closed or Open. Add rows to create as many status levels as you need.
See Also
Qualifying a Lead or Opportunity
Setting Up Lead Sources
To set up a lead source, use the Lead Sources (RSF_LEAD_SOURCE) component.
This section discusses how to set up lead sources.
Page Used to Set Up Lead Sources|
Page Name |
Definition Name |
Navigation |
Usage |
|
RSF_LEAD_SOURCE |
Set Up CRM, Product Related, Sales, Lead and Opportunity, Lead Sources, Lead Source |
Identify common sources for leads. |
Setting Up Lead SourcesAccess the Lead Source page (Set Up CRM, Product Related, Sales, Lead and Opportunity, Lead Sources, Lead Source).
Enter a description and status to identify each source that typically produces leads. PeopleSoft Enterprise Sales delivers predefined lead sources, which includes, but not limited to, Agreement, Case, Marketing, Online Marketing, Partner, Sales, and Tech Support. You can modify or delete these, and you can create as many additional lead sources as you need.
When a sales user enters a lead, the system uses Sales as the lead source on the Lead - Qualify page.
Setting Up Fallout Reasons
To set up fallout reasons, use the Fallout Reason (RSF_FALLOUT_RSN) component.
This section discusses how to set up fallout reasons.
Page Used to Set Up Fallout Reasons|
Page Name |
Definition Name |
Navigation |
Usage |
|
RSF_FALLOUT_RSN |
Set Up CRM, Product Related, Sales, Lead and Opportunity, Fallout Reason, Fallout Reason |
Define reasons to describe why an opportunity is lost. |
Setting Up Fallout ReasonsAccess the Fallout Reason page (Set Up CRM, Product Related, Sales, Lead and Opportunity, Fallout Reason, Fallout Reason).
Enter a status, description, and long description (for example, Customer Cancels Purchase, Lost Deal on Price, and Couldn't Meet Delivery Date) to identify the reasons why an opportunity might be lost. Create as many fallout reasons as you need.
Setting Up Pipeline Segments
To set up pipeline segments, use the Pipeline Segments (RSF_SEGMENT) component.
This section discusses how to define pipeline segments.
Page Used to Set Up Pipeline Segments|
Page Name |
Definition Name |
Navigation |
Usage |
|
RSF_SEGMENT |
Set Up CRM, Product Related, Sales, Lead and Opportunity, Pipeline Segment, Pipeline Segments |
Define pipeline segments that correlate to stages of the sales process. |
Defining Pipeline SegmentsAccess the Pipeline Segments page (Set Up CRM, Product Related, Sales, Lead and Opportunity, Pipeline Segment, Pipeline Segments).
Pipeline segments correlate to stages of your sales process. The default segments correlate to the stages of the KES process: Contact, Qualify, Develop, Negotiate, and Retain.
Enter a description and status to identify each pipeline segment to correlate it to the stages of your business process.
Add rows to create additional segments. The system provides default sequence numbers. You can override the sequence numbers to reorder the stages.
Pipeline segments appear on the Segment Pipeline page in the Review Pipeline component.
See Viewing the Opportunity Pipeline.
Note. You can use other sales process definitions—for example, the Miller Heiman process—to define pipeline segments.
Setting Up Templates for Importing Leads
To set up templates for importing sales leads, use the Sales Lead Import Template (RB_IMP_TEMPLATE) component.
This section provides an overview of lead-import templates and discusses how to:
Create a lead-import template.
Rearrange fields on a template.
View the import template map.
Understanding Lead-Import TemplatesWhen you import leads into PeopleSoft Enterprise Sales, the system copies data from a spreadsheet to the Leads table and the Customer Data Model tables. Before you can import leads, you must set up a lead-import template that specifies the mapping between the spreadsheet and the tables. PeopleSoft Enterprise Sales delivers a default template that can be used as delivered. You can create additional templates, if needed. When setting up a lead-import template, you use the Sales Lead Import Templates component to:
Specify the fields to include during the import.
Map the spreadsheet columns to fields in the Lead table.
Set up duplicate checking for leads.
Set up lookup criteria for Customer Data Model fields.
In addition, you can create a spreadsheet template that contains the column headings for fields that you import into PeopleSoft Enterprise Sales.
Pages Used to Set Up Templates for Importing
Leads|
Page Name |
Definition Name |
Navigation |
Usage |
|
RB_IMP_TEMPLATE |
Set Up CRM, Product Related, Sales, Lead and Opportunity, Sales Lead Import Templates, Import Template |
Create templates for importing sales lead data from comma-delimited spreadsheets. |
|
|
Maps |
RB_IMP_TMPL_MAP |
Set Up CRM, Product Related, Sales, Lead and Opportunity, Sales Lead Import Templates, Maps |
View the import template map. |
|
RB_IMP_SEQ_SEC |
Click the Resequence Fields link on the Import Template page. |
Override sequence numbers to rearrange fields on a template. |
Creating a Lead Import Template
Access the Import Template page (Set Up CRM, Product Related, Sales, Lead and Opportunity, Sales Lead Import Templates, Import Template).
Each level of the Leads component interface is included as a collapsible section of the page. Each section lists all of the fields from that level. Select the fields to include in a Microsoft Excel spreadsheet to create a template for importing lead data.
Note. PeopleSoft Enterprise Sales delivers a default template
called LEAD_IMPORT. In the default template, some fields do not have the Include check
box selected. These are system fields that are part of the template for processing
purposes but are typically not included in a spreadsheet containing data to
be imported.
Access the Address Format page to determine the fields used for address
formats specific to a country.
See Setting Up Address Formats and Values.
Select Duplicate Match Method
This section appears only if the CDH integration is activated in your CRM system. The Duplicate Match Method chosen for the template is used as the default method whenever the template is used for Lead Import.
|
Template and Customer Data Hub |
Select the method used for detecting duplicate customers and contacts in leads that are going to be imported to the CRM system. Options are:
|
|
Allow Override |
Select to allow the default method set at the Template level to be overridden during the Lead Import process. |
See Understanding Customer Data Hub Integration.
Select Fields
Expand a component interface level.
|
Include |
Select to include the field during the import of lead data. |
|
Dedup Leads (deduplicate leads) |
Select to enable the system to use this field when searching for duplicate sales leads. If the system finds a sales lead with data that matches the spreadsheet data for all the fields that are duplicate-checked, the lead is marked as a duplicate and held for review. |
|
Match Recname (match record name) |
Select the record in the Customer Data Model table in which the field is stored. |
|
Match Field |
Select the field in the Customer Data Model record that is equivalent to the field name for the lead. |
|
Match Company |
Select this check box for all fields that the system uses to compare existing company data in the Customer Data Model tables against imported data. For all fields with the Match Company check box selected, if the imported data matches existing data, then the system does not add the company to the Customer Data Model tables. |
|
Match Person |
Select this check box for all fields that the system uses to compare existing person data in the Customer Data Model tables against imported data. For all fields with the Match Person check box selected, if the imported data matches existing data, then the system does not add the person to the Customer Data Model tables. |
|
Force Match |
Select this check box to force a match of the imported data with the data in the Customer Data Model table. For example, an email address is typically unique and could be used to force a match of a contact. |
|
Field Name and Description |
Displays the name and description of the field in the Leads table into which the data is imported. |
|
Custom Label |
Enter the label or column heading in the spreadsheet from which the system retrieves data for the field. |
Page Actions
|
Generate Template |
Click to generate the template, after selecting the fields, specifying the custom labels, and resequencing the fields (if necessary). The system generates a Microsoft Excel spreadsheet template (only the column headers are provided) and opens it in a separate window. You can use this as a starting point to enter actual data into the spreadsheet. Generating the template automatically saves the entire page. At any time after the page is saved, you can select the Maps tab to view a list of the column headings and see how the fields correlate to them. Warning! If you manually change a column heading in the Microsoft Excel spreadsheet, the mapping for that field is lost and the system cannot determine how to map that column to a database field. |
|
Resequence Fields |
Click to access the Resequence Import Template page, where you can override sequence numbers to reorder the fields in the template. |
Rearranging Fields on a Template
Access the Import Resequencing page - Resequence Import Template page (Click the Resequence Fields link on the Import Template page).
|
Sequence |
Override the numbers to rearrange the component level fields, if necessary. This option resequences only the fields on the template. It does not affect how fields appear on pages in the components. |
|
Show New Sequence |
Click to view the fields in the new order. |
|
OK |
Click to accept the new sequence and return to the template page. |
|
Cancel |
Click to return to the template page without resequencing. |
Viewing the Import Template Map
Access the Maps page (Set Up CRM, Product Related, Sales, Lead and Opportunity, Sales Lead Import Templates, Maps).
After you generate the template, view a list of the column headings to see how the fields correlate.
Setting Up the Summary Page for Leads and
Opportunities
This section provides an overview of summary pages for leads and opportunities and discusses how to:
Configure the summary page for leads and opportunities.
Precalculate terms that appear on the summary page.
View a list of term updates.
Update business object names.
See Managing a Lead or Opportunity by Using Summary Information.
Understanding Summary Pages for Leads and OpportunitiesThe component summary page is the first page that a user sees on displaying an existing lead or opportunity. Each summary page is composed of a header, which identifies the component as a lead or opportunity, and one or more sections.
Sales delivers a standard setup for leads and opportunities and provides a component for you to modify the delivered setup. The delivered summary page for leads includes the following sections: summary, contacts, tasks, notes, team, products, and quotes. You can add sections or modify sections.
RSF_LEAD_ENTRY is the component name for the lead summary page for leads, and RSF_OPPORTUNITY is the component name for the opportunity summary page.
Pages Used to Set Up the Summary Page for
Leads and Opportunities|
Page Name |
Definition Name |
Navigation |
Usage |
|
Summary Page Setup |
RB_SMRY_GRID |
Set Up CRM, Common Definitions, Component Configuration, Summary Page Setup, Summary Page Setup |
Configure the summary page for leads or opportunities. |
|
Term Selection |
RB_SMRY_SEL_TERM |
Add a new row to the Summary Text Bind Fields grid on the Summary Page Setup page. Select Term in the Type field. Click the Search button. |
Search for a term to appear on the summary page. |
|
Schedule Updates |
RSF_TL_RUN |
Set Up CRM, Product Related, Sales, Lead and Opportunity, Schedule Term Update, Schedule Updates |
Precalculate terms that appear on the Summary page. |
|
View Update Result |
RSF_UPDATE_SRCH |
Set Up CRM, Product Related, Sales, Lead and Opportunity, View Update Result, View Update Result |
View a list of term updates. |
|
Update Business Object Names |
RSF_UPD_BO_ATTR |
Set Up CRM, Product Related, Sales, Lead and Opportunity, Update Business Object Names, Update Business Object Names |
This program corrects the customer, site, and contact names in Lead and Opportunity tables to match with the customer master data. |
Configuring the Summary Page for Leads and
OpportunitiesAccess the Summary Page Setup page (Set Up CRM, Common Definitions, Component Configuration, Summary Page Setup, Summary Page Setup).
Top Summary Box Title
These fields also appear in the Summary Section Title region. The values that you enter in these fields determine the information that displays in the title areas of the report. It is recommended that you do not change the information in the Top Summary Box Title collapsible section.
|
Message Set Number |
Enter the message set number for the PeopleSoft application. In most cases, you use 17833 (Sales Force Automation). |
|
Message Number |
Enter the message number, which determines the section heading. |
|
Title Text |
Displays the text that appears on the summary page. This text is based on the message number that you select. |
Summary Section
This region contains a list of sections that you want to be available on the Summary page of leads and opportunities.
Summary Section Title
Enter a message set number and a message number to identify the title for each section that appears on the Summary page.
Base Scroll Record and Page
The fields on this page region determine the source and placement of the information that appears in the section.
|
Include in Top Summary Box |
Select to include this section in the summary box at the top of the summary page. |
|
Populate With level 0 data |
Select to indicate that the data that is displayed in the section comes from level 0, as opposed to a scroll of information. For example, on the Lead - Summary page, level 0 information is from the highest level RSF_LEAD record. Only the top summary box can contain level 0 information. If this check box is not selected, lower level information from the record appears. For the RSF_LEAD record, this might be the list of contacts or products for the lead. |
|
Seq Nbr (sequence number) |
Enter a sequence number for the section. |
|
Occurs |
Enter the number of rows to include in the section. For example, if the section contains a list of contacts, enter the number of contacts to show. |
|
|
Click to reorder the sections based on changes that you made to the Seq Nbr field. |
|
Base Record |
Select the record that is the source of the data. |
|
Page Name |
Select the subpage, or page region, that is used to view and maintain the records that appear in the summary scroll area. |
|
Parent Page |
Select the parent of the subpage that you use to maintain and view the data. The system transfers to the parent page when the user clicks a link on the summary page. |
Hyperlink Record and Field
|
Record Name |
To include a link in the section, enter the record containing the target field for the link. |
|
Field Name |
To include a link in the section, enter the target field for the link. |
Display Template Section
|
Section ID |
Select a display template section ID for the corresponding summary section (for example, choose COMPETITION section ID for the Competition summary section), which is used by the system to hide the section on the Summary page if its matching detail section is no longer displayed on any other pages of the component (as configured using a display template). When a section ID is specified here, the system checks to see if the corresponding section is visible on any page of the said component. If the section is configured to be displayed on a page of the component, its summary section is also visible. But if an administrator disables the section from being displayed on any pages of the component, then its summary section will be removed from the Summary page accordingly. If a section ID is not specified, no checking is performed and the summary section always appears. An example is the display of the Tasks, Notes, and Call Reports sections on the Summary page for both leads and opportunities. Because the Tasks, Notes, and Call Reports pages do not contain any sections in the core display templates, they cannot be referenced on the summary page setup using section IDs. Therefore, these sections are always displayed on the Summary page even if their corresponding pages are actually hidden from the component through display templates. As delivered, this functionality is only supported on the CORE display templates for leads and opportunities in which the Summary page is configured to be shown. The summary page setup for the Lead component has these sections mapped to corresponding section IDs: Contacts, Competition, and Products. As for the Opportunity component, each of these sections is mapped to a section ID: Contacts, Team, Products, Competition and Quotes. |
Summary Line Text
|
Message Set Number |
Enter the message set number for the PeopleSoft application. In most cases, you use 17833 (Sales Force Automation). |
|
Message Number |
Enter the message number, which determines the text that the system displays in the section. |
|
Summary Text |
The system displays the variables and text that appear in the section. The variables are designated by the percent sign followed by a number; for example, %1. The variables correspond to the numbers in the Summary Text Bind Fields section. |
|
Explain Text |
The system displays an explanation of the text that appears in the section. |
Summary Text Bind Fields
|
Seq (sequence) |
Enter the sequence number. This number is associated with the variable number in the Summary Text field. |
|
Type |
Select Record (default) to enter record information and Term to enter term information. If you select Record, then the Record Name, Field Name, Label, and Formatted fields are enterable. If you select Term, then you must click the Lookup Term button to select a Term Name and enter a value in the Message Nbr (Message Number) field. |
|
Record/Term Name |
Select the record or term that contains the field that the system displays. If you select the Record type, then you select the system name of the record from the available choices. If you select the Term type, then you click the Select Term button to select a term from the lookup page for use in the summary text. |
|
Field Name |
Select the field that the system displays. This field appears only if you select the Record type. |
|
Label |
Select the source of the field that appears on the summary page. This field appears only if you select the Record type. Values are:
For example, a lead type that is represented as QU (Qualified) in the database might have a Short XLAT (short translate) value of Qualified and a Long XLAT (long translate) value of Qualified Lead. |
|
Format Display |
Select to display the formatted display-value of the field. For example, for a currency field, you might have the system display $1,000.00 instead of the value 1000. This field appears only if you select the Record type. |
|
Term Name |
Displays the name of the term that you select. |
|
|
Click to access an untitled page where you can select an AAF (Active Analytics Framework) term that the system displays. |
See Also
PeopleSoft Enterprise CRM 9.1 PeopleBook: Active Analytics Framework
Precalculating Terms That Appear on the Summary PageAccess the Schedule Updates page (Set Up CRM, Product Related, Sales, Lead and Opportunity, Schedule Term Update, Schedule Updates).
Enter the following information and click the Run button. You can save an update and run it multiple times.
|
Update Description |
Enter a description for the set of metrics you select to run. |
|
Enable |
Select to calculate the term when you run the update. |
|
SetID |
Select the setID whose data to use to calculate the term. |
|
Term |
Select the term to calculate. Only terms that were added to the Summary Text Bind Fields for either the Lead or Opportunity component are available in this list. |
Viewing a List of Term UpdatesAccess the View Update Result page (Set Up CRM, Product Related, Sales, Lead and Opportunity, View Update Result, View Update Result).
This page displays a list of the term updates that were run for a given setID and information about the run.
Updating Business Object NamesAccess the Update Business Object Names page (Set Up CRM, Product Related, Sales, Lead and Opportunity, Update Business Object Names, Update Business Object Names).
This Application Engine program synchronizes the customer, site, and contact names in Lead and Opportunity tables to match with the customer master data.
Setting Up Display Templates for Leads and
OpportunitiesPeopleSoft Enterprise Sales provides display templates that enable you to control the appearance and behavior of the Lead and Opportunity components for specific business needs. For the Opportunity component (RSF_OPPORTUNITY), two delivered display templates are available: CORE. and HE_SALES. For the Lead component (RSF_LEAD_ENTRY), PeopleSoft Enterprise Sales delivers three display templates:
CORE
Determines the appearance and behavior of the Lead component for enterprise users.
PRM_SALES
Determines the appearance and behavior of the Lead component for partner users.
FSI_SALES
Determines the appearance and behavior of the Lead component for wealth management referrals.
HE_SALES
Determines the appearance and behavior of the Lead component for higher education users.
See Configuring Display Templates.
Pages Used to Set Up Display Templates for
Leads and Opportunities|
Page Name |
Definition Name |
Navigation |
Usage |
|
Display Template |
RDT_TMPL_PAGE |
Set Up CRM, Common Definitions, Component Configuration, Display Templates, Display Template Details, Display Template |
Set up display templates for leads and opportunities. |
|
Display Template - Page Definition |
RDT_TMPL_SECTN |
Click a page link on the Display Template page. Click the Show Section Details link and select the Security tab of a section. |
Use a functional option with the display template. |
Setting Up Display Templates for Leads and
OpportunitiesAccess the Display Template page (Set Up CRM, Common Definitions, Component Configuration, Display Templates, Display Template Details, Display Template).
This table lists the default configurations for the pages defined for the CORE display template for the Lead and Opportunity components:
|
Page |
Configuration |
|
Summary |
Configure the Summary page by using the Summary Page Setup page. See Setting Up the Summary Page for Leads and Opportunities. The functional option CORE_RSF_SUMMARY determines whether a user can view the Summary page. |
|
Discover |
Displays the Customer, Lead/Opportunity Details, Contacts, and Accept/Reject sections. If you have installed PeopleSoft Partner Relationship Management, enable the Partner section on the display template. |
|
Assign |
Displays the Sales Team Members and Partner sections. If you have installed Partner Relationship Management, disable the Partner section and enable the Add Partner Rep section on the display template. |
|
Qualify |
Displays the Campaign, Competition, and Survey sections. |
|
Propose |
Displays the Product and Quote/Order sections. For opportunities, it also displays the Forecast section. |
Functional Option Used with the Display Template
Access the Display Template - Page Definition page (click a page link on the Display Template page. Click the Show Section Details link and select the Security tab of a section).
You can enter CORE_RSF_ADVANCED in the Functional Option Code field on the Security tab to either display or hide a field or grid tab in the Lead or Opportunity component, depending on the setting of the functional option for a user.
See Setting Up Functional Options.
This table displays the grid tabs and fields in the delivered CORE display template for leads and opportunities that have the value CORE_RSF_ADVANCED in the Functional Option Code field:
|
Page - Section |
Grid Tab or Field |
|
Discover - Contacts |
Phones tab, Impact tab, Organization tab, Correspondence tab |
|
Assign - Sales Team Members |
Territory tab, Additional Details tab, Comments tab |
|
Qualify - Competition |
Comments tab |
|
Qualify - Survey |
Status tab |
|
Propose - Forecast (opportunity only) |
Revenue Type field |
|
Propose - Quote |
Order tab, Audit tab |
To hide or display specific fields or grid tabs in the Lead or Opportunity component, you can edit the CORE display template.
Setting Up Task Group Templates for Leads and OpportunitiesThis section provides an overview of task group templates and discusses how to:
Define task group templates.
Associate task group templates with lead statuses.
Associate task group templates with opportunity sales stages.
Understanding Task Group TemplatesA task group template is a grouping of related tasks performed to accomplish certain goals. When you select a task group template to apply to a component, the system automatically populates the set of predefined tasks on the Tasks page of that component, saving time that you otherwise must spend entering those tasks one by one. Both the Lead and Opportunity components support the use of task group templates, which can be applied in two ways:
Manually, by selecting an existing task group template on the Tasks page.
Automatically, through the use of the AAF policies that populate sales tasks when the corresponding policy condition is met.
Delivered AAF policies are available for populating tasks when the status of leads is set to Open or Rejected, or when the sales stage of opportunities is set to Discover, Qualify Customer, or Develop Solution. You can modify or create new policies for other situations where sales tasks need to be populated by the system.
Note. The system populates sales tasks on leads and opportunities whenever a triggering event occurs (before saving a lead or opportunity) and the conditions of sales tasks-related policies are met, which can take place multiple times. In an example of leads, if you update the status of a lead from New to Open, to Working, then back to Open, and you save the lead every time a status is changed, the system populates the same set of sales tasks twice for the two times when the lead status was changed to Open. Duplicate tasks are allowed on the Tasks page.
Page Used to Set Up Task Group Templates for Leads and Opportunities|
Page Name |
Definition Name |
Navigation |
Usage |
|
Task Group Template |
RB_TSK_GRP_TPL |
Set Up CRM, Common Definitions, Task Management, Task Group Template, Task Group Template |
Define task group templates, which consist of lists of related tasks that can be populated to leads and opportunities. |
Defining Task Group TemplatesDelivered task group templates are available for the Lead (Lead Open and Lead Rejected) and Opportunity components (Opportunity Discover, Opportunity Qualify and Opportunity Solution).
See Defining Task Group Templates.
Associating Task Group Templates with Lead Statuses To associate task group templates with lead status using AAF policies:
Note. The CRM system delivers policies (for IPROD and SHARE setIDs) that populate preset tasks to leads when the lead status is set to Open or Rejected.
Navigate to Enterprise Components, Active Analytics Framework, Policies, Manage Policies.
Click the Build a Policy button.
Enter a policy name and the setID in which the policy is used.
Use Before a Lead is Saved as the trigger point.
Click the Add Condition button.
The Build a Policy - Add Condition page appears.
Click the Select Term link.
In the Select Subject Area section, expand the Sales node, then click the Lead link. Select the Lead Status term on the right column.
A term is selected on the Build a Policy - Add Condition page.
Now, enter an operator and value to finish building the condition.
For example, if this policy needs to be evaluated when the status of leads is set to Rejected, select is changed to as the operator and Rejected as the value.
Click the Done button.
Click the Add Actions button to specify an action for the policy.
Select Sales Task as the action type and enter an action name.
Click the Configure button on the same row. The Configure Sales Task Action page appears.
In the Task Details section, select Lead as the application usage, and an applicable task group template (for example, Lead Rejected).
Click the OK button.
Click the Done button to confirm the action configuration.
Click the Activate button and then the Save button to save the new policy in active mode.
Refer to the “Building and Managing Policies” chapter for more information on how to build and manage AAF policies.
See Also
PeopleSoft Enterprise CRM 9.1 PeopleBook: Active Analytics Framework
Associating Task Group Templates with Opportunity Sales StagesTo associate task group templates with opportunity sale stages using AAF policies:
Note. The CRM system delivers policies (for IPROD and SHARE setIDs) that populate preset tasks to opportunities when the opportunity sales stage is set to Discover, Qualify Customer, or Develop Solution.
Navigate to Enterprise Components, Active Analytics Framework, Policies, Manage Policies.
Click the Build a Policy button.
Enter a policy name and the setID in which the policy is used.
Use Before an Opportunity is Saved as the trigger point.
Click the Add Condition button.
The Build a Policy - Add Condition page appears.
Click the Select Term link.
In the Select Subject Area section, expand the Sales node, then click the Opportunity link.
Select the Opportunity Sales Stage term on the right column.
A term is selected on the Build a Policy - Add Condition page.
Now, enter an operator and value to finish building the condition.
For example, if this policy needs to be evaluated when the sales stage of opportunities is set to Develop Solution, select is changed to as the operator and SOLUTION as the value.
Click the Done button.
Click the Add Actions button to specify an action for the policy.
Select Sales Task as the action type and enter an action name.
Click the Configure button on the same row.
The Configure Sales Task Action page appears.
In the Task Details section, select Opportunity as the application usage, and an applicable task group template (for example, Opportunity Solution).
Click the OK button.
Click the Done button to confirm the action configuration.
Click the Activate button and then the Save button to save the new policy in active mode.
Refer to the “Building and Managing Policies” chapter for more information on how to build and manage AAF policies.
See Also
PeopleSoft Enterprise CRM 9.1 PeopleBook: Active Analytics Framework