| Oracle® R Enterpriseインストレーションおよび管理ガイド リリース1.3.1 for Windows, Linux, Solaris, and AIX E48234-03 |
|


 前 |
 次 |
| Oracle® R Enterpriseインストレーションおよび管理ガイド リリース1.3.1 for Windows, Linux, Solaris, and AIX E48234-03 |
|
前 |
次 |
この付録では、Oracle R EnterpriseをLinuxサーバーおよびWindowsクライアントにインストールするための一般的な手順を説明します。ここでは、次の項目について説明します。
サーバー・コンピュータについて:
サーバーでOracle Linux 5が稼働しています。
サーバーからインターネットおよびOracle Public Yumにアクセスできます。
サーバーにOracle Database Enterprise Edition 12.1がインストールされています。
環境変数:
インストール実行者のLinuxユーザーID:
クライアント・コンピュータについて:
Oracle R Enterpriseをサーバー・コンピュータにインストールするには、まずOracle Databaseがインストールされていること、および第A.1項の指定のとおりに環境が構成されていることを確認します。次に、これらの手順を順序どおりに実行します。
Oracle R DistributionをOracle Public Yumからサーバーにインストールするには、次の手順を実行します。
ルートでログインして/etc/yum.repos.dに移動します(Yumレポジトリ構成ファイルの位置)。
# cd /etc/yum.repos.d
Oracle Linux 5におけるYumレポジトリ構成ファイルの名前はpublic-yum-el5.repoです。/etc/yum.repos.dの内容をリストして、構成ファイルがすでに存在しているかどうか調べます。ファイルが存在しない場合、次のコマンドを実行してファイルをOracle Public Yumからダウンロードします。
# wget http://public-yum.oracle.com/public-yum-el5.repo
テキスト・エディタでpublic-yum-el5.repoを開いて、latestおよびaddonsにenabled=1を指定します。
[el5_latest]
enabled=1

[el5_addons]
enabled=1
次のコマンドを実行してOracle R Distribution 2.15.3をインストールします。
# yum install R-2.15.3
Oracle R Enterprise Serverには、Oracle DatabaseのRQSYSスキーマと、Oracle R Enterpriseパッケージおよび共有ライブラリが含まれます。次の手順に従って、Oracle R Enterprise Serverをダウンロードおよびインストールします。
Oracle R Enterprise Serverをダウンロードするには次の手順を実行します。
Oracle R Enterprise Serverコンポーネントのインストール・ディレクトリを作成します。ディレクトリには任意の名前を使用できます。例:
/home/myhome/myoreserver
Oracle Technology NetworkのOracle R Enterprise Downloadsページに移動します。
ライセンス契約に同意します。
「Oracle R Enterprise Downloads (v1.3.1)」の下から、「Oracle R Enterprise Server Install for Oracle Database on Linux 64 bit (92M)」を選択します。
ファイルを、手順1で作成したインストール・ディレクトリにダウンロードして解凍します。
% cd /home/myhome/myoreserver
% unzip ore-server-linux-x86-64-1.3.1.zip
ファイルを解凍すると、serverサブディレクトリが作成されます。インストール・ディレクトリの内容は、次のようにリストされます。
% ls
ore-server-linux-x86-64-1.3.1.zip
server/
Oracle R Enterprise Serverをインストールするには次の手順を実行します。
serverサブディレクトリに移動します。
% cd server
インストール・スクリプトを実行します。
% ./install.sh
インストール・スクリプトによって、RQSYSスキーマの永続表領域および一時表領域の名前の入力を求めるプロンプトが表示されます。デフォルトの表領域は、SYSAUXおよびTEMPです。デフォルト名をそのまま使用する場合は、[Enter]を押します。
Oracle R Enterprise Client Supporting Packagesは、Oracle R Enterpriseをサポートするオープン・ソースのRパッケージです。Client Supporting Packagesは、クライアントとサーバーの両方にインストールする必要があります。
Oracle R Enterprise Client Supporting Packagesをダウンロードするには、次の手順を実行します。
Oracle R Enterprise Downloadsページに移動します。
ライセンス契約に同意します。
「Oracle R Enterprise Downloads (v1.3.1)」の下から「Oracle R Enterprise Client Supporting Packages for Linux 64-bit Platform (1.2M)」を選択します。
ファイルを、第A.2.2項で作成したインストール・ディレクトリにダウンロードして解凍します。
% cd /home/myhome/myoreserver
% unzip ore-supporting-linux-x86-64-1.3.1.zip
ファイルを解凍すると、supportingサブディレクトリが作成されます。インストール・ディレクトリの内容は、次のようにリストされます。
% ls
ore-server-linux-x86-64-1.3.1.zip
ore-supporting-linux-x86-64-1.3.1.zip
server/
supporting/
supportingサブディレクトリには次のファイルが配置されます。
DBI_0.2-5.zip
ROracle_1.1-9.zip
png_0.1-4.zip
Oracle R Enterprise Client Supporting Packagesをインストールするには、次の手順を実行します。
supportingサブディレクトリに移動して、その内容をリストします。
% cd supporting
% ls
DBI_0.2-5_R_x86_64-unknown-linux-gnu.tar.gz
ROracle_1.1-9_R_x86_64-unknown-linux-gnu.tar.gz
png_0.1-4_R_x86_64-unknown-linux-gnu.tar.gz
パッケージをインストールします。
% ORE CMD INSTALL ROracle_1.1-9_R_x86_64-unknown-linux-gnu.tar.gz
% ORE CMD INSTALL DBI_0.2-5_R_x86_64-unknown-linux-gnu.tar.gz
% ORE CMD INSTALL png_0.1-4_R_x86_64-unknown-linux-gnu.tar.gz
パッケージは$ORACLE_HOME/R/libraryにインストールされます。
次の手順に従って、Oracle R Enterpriseのデータベース・ユーザーを作成します。
Oracle R Enterpriseのserverサブディレクトリに移動します。
% cd /home/myhome/myoreserver/server/
demo_userスクリプトを実行します。
% ./demo_user.sh
スクリプトによって、ユーザー・スキーマの永続表領域および一時表領域の名前の入力を求めるプロンプトが表示されます。デフォルトの表領域は、USERSおよびTEMPです。デフォルト名をそのまま使用する場合は、[Enter]を押します。
スクリプトによって、ユーザー名およびパスワードを入力するように求められます。デフォルト名は、rquserです。デフォルト名を受け入れるには[Enter]を押します。
スクリプトが完了した後、sysdbaでSQL*Plusを起動してOracle R Enterpriseで必要とされるユーザー権限を付与します。ユーザーrquserに対して次を実行します。
% sqlplus /  AS SYSDBA
SQL> GRANT CREATE TABLE TO RQUSER;
SQL> GRANT CREATE PROCEDURE TO RQUSER;
SQL> GRANT CREATE VIEW TO RQUSER;
SQL> GRANT CREATE MINING MODEL TO RQUSER;
SQL> GRANT RQADMIN to RQUSER;
SQL> EXIT;
Oracle R Enterpriseをクライアント・コンピュータにインストールするには、まずWindows環境が第A.1項に指定されている要件を満たしていることを確認します。次に、これらの手順を実行します。
Oracle R Distributionは、Windowsではサポートされません。次の手順に従って、オープン・ソースのRをクライアントにインストールします。
Rのホーム・ページに移動します。
「Download, Packages」の下の「CRAN」を選択します。
CRAN Mirrorの1つを選択します。
「Download R for Windows」を選択します。
「Subdirectories」の下の「base」を選択します。
「Other builds」の下の「Previous releases」を選択します。
「R-2.15.3」をダウンロードします。次の実行可能ファイルがダウンロードされます。
R-2.15.3-win.exe
Windowsエクスプローラで、実行可能ファイルをダブルクリックしてWindows Installer for Rを起動します。
インストーラの指示に従います。
|
注意: インストーラでは、32ビット版と64ビット版Rの両方をインストールするかどうか尋ねられます。Oracle R Enterpriseでは64ビット版Rをインストールする必要があります。32ビット版と64ビット版Rの両方をインストールすることを選択した場合、Oracle R Enterpriseでは64ビット版Rのみを使用するよう注意してください。 |
Oracle R EnterpriseにはOracle Database Clientが必要です。Oracleホーム・ディレクトリにインストールする必要がある完全なDatabase Clientのかわりに、Oracle Instant Clientをインストールすることができます。
Oracle Instant Clientをダウンロードおよびインストールするには、次の手順を実行します。
Oracle R Enterpriseクライアント・コンポーネントのインストール・ディレクトリを作成します。ディレクトリには任意の名前を使用できます。例:
c:\myoreclient
Oracle Technology NetworkのOracle Database Instant Clientページに移動します。
http://www.oracle.com/technetwork/database/features/instant-client/
「See Instant Client Downloads」を選択します。
Instant Client Downloadsページで「Instant Client for Microsoft Windows (x64)」を選択します。
ライセンス契約に同意します。
Oracle Database 12.1の場合は、「Version 12.1.0.1.0」の下の「Instant Client Package - Basic」または「Instant Client Package - Basic Lite」を選択します。
ファイルを、手順1で作成したインストール・ディレクトリに保存します。たとえば、「Basic」パッケージを選択した場合は、次のファイルがダウンロードされます。
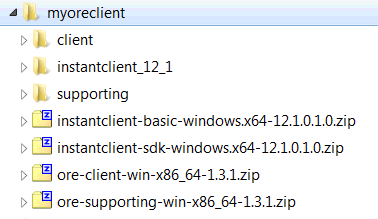
c:\myoreclient\instantclient-basic-windows.x64-12.1.0.1.0.zip
ファイルを解凍します。
ファイルを解凍すると、instantclient_12_1サブディレクトリが作成されます。インストール・ディレクトリの内容は、次のように表示されます。
Instant Client Downloadsページに戻ります。
http://www.oracle.com/technetwork/topics/winx64soft-089540.html
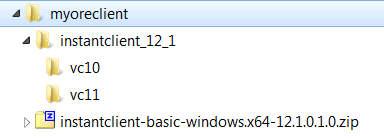
ライセンス契約に合意して、「Instant Client Package - SDK」を選択します。ファイルを手順1で作成したディレクトリに保存します。
c:\myoreclient\instantclient-sdk-windows.x64-12.1.0.1.0.zip
ファイルを解凍します。
ファイルを解凍すると、sdkサブディレクトリが作成されます。インストール・ディレクトリの内容は、次のように表示されます。
環境変数OCI_LIB64およびPATHにInstant Clientのフル・パスを追加します。次の手順では、これらの変数に、この例で使用しているパス、c:\myoreclient\instantclient_12_1を設定しています。
Windowsの「コントロール・パネル」で「システム」を選択します。
「システムの詳細設定」をクリックします。
「詳細設定」タブで、「環境変数」をクリックします。
「システム環境変数」にOCI_LIB64が存在しない場合は作成します。OCI_LIB64の値にc:\oreclient\instantclient_12_1を設定します。
「システム環境変数」でPATHを編集してc:\oreclient\instantclient_12_1を含めます。
|
注意: 環境変数を作成するグラフィカル・ユーザー・インタフェースは、Windowsのバージョンによってわずかに異なる場合があります。 |
次の手順に従って、Oracle R Enterprise Client Packagesをダウンロードおよびインストールします。
Oracle R Enterprise Client Packagesをダウンロードするには、次の手順を実行します。
Oracle Technology NetworkのOracle R Enterprise Downloadsページに移動します。
ライセンス契約に同意します。
「Oracle R Enterprise Client Packages for Windows Platform」を選択します。ファイルを、第A.3.2項で作成したインストール・ディレクトリに保存します。
c:\myoreclient\ore-client-win-x86_64-1.3.1.zip
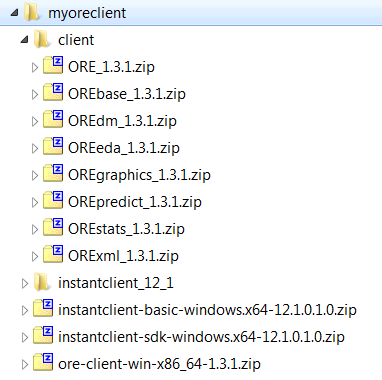
ファイルを解凍します。
ファイルを解凍すると、clientサブディレクトリが作成されます。インストール・ディレクトリの内容は、次のように表示されます。
RコンソールからOracle R Enterprise Client Packagesをインストールするには、次の手順を実行します。
Windowsの「スタート」メニューからRを起動します。32ビット版および64ビット版Rの両方をインストールしている場合は、64ビット版Rを選択してください。
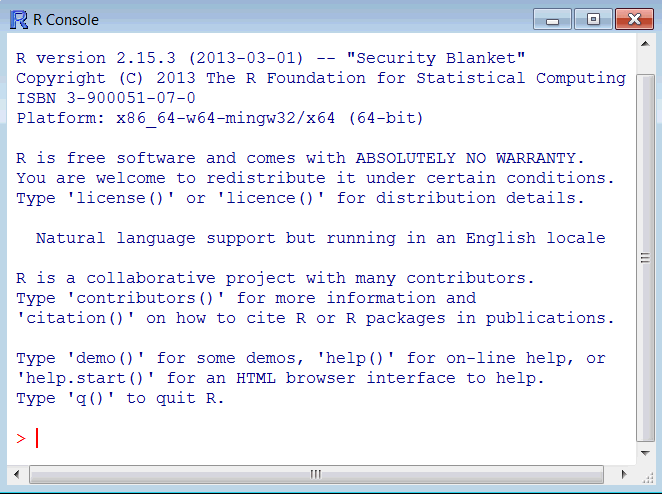
例A-1で示したように、Rコンソールのウィンドウが表示されます。
次に示すようにパッケージをインストールします。
R> install.packages("c:/myoreclient/client/ORE_1.3.1.zip", repos=NULL)
R> install.packages("c:/myoreclient/client/OREbase_1.3.1.zip", repos=NULL)
R> install.packages("c:/myoreclient/client/OREdm_1.3.1.zip", repos=NULL)
R> install.packages("c:/myoreclient/client/OREeda_1.3.1.zip", repos=NULL)
R> install.packages("c:/myoreclient/client/OREgraphics_1.3.1.zip", repos=NULL)
R> install.packages("c:/myoreclient/client/OREpredict_1.3.1.zip", repos=NULL)
R> install.packages("c:/myoreclient/client/OREstats_1.3.1.zip", repos=NULL)
R> install.packages("c:/myoreclient/client/ORExml_1.3.1.zip", repos=NULL)
各パッケージのインストールが正常に完了するごとに、次のメッセージがRコンソールに表示されます。
package 'package_name' successfully unpacked and MD5 sums checked
次の手順に従って、Oracle R Enterprise Client Supporting Packagesをダウンロードおよびインストールします。
Oracle R Enterprise Client Supporting Packagesをダウンロードするには、次の手順を実行します。
Oracle Technology NetworkのOracle R Enterprise Downloadsページに移動します。
ライセンス契約に同意します。
「Oracle R Enterprise Client Supporting Packages for Windows Platform」を選択します。ファイルを、第A.3.2項で作成したインストール・ディレクトリに保存します。
c:\myoreclient\ore-supporting-win-x86_64-1.3.1.zip
ファイルを解凍します。
ファイルを解凍すると、supportingサブディレクトリが作成されます。インストール・ディレクトリの内容は、次のように表示されます。
Client Supporting PackagesをRコンソールからインストールするには、次の手順を実行します。
Windowsの「スタート」メニューからRを起動します。32ビット版および64ビット版Rの両方をインストールしている場合は、64ビット版Rを選択してください。
例A-1で示したように、Rコンソールのウィンドウが表示されます。
次に示すようにパッケージをインストールします。
R> install.packages("c:/myoreclient/supporting/ROracle_1.1-9.zip", repos=NULL)
R> install.packages("c:/myoreclient/supporting/DBI_0.2-5.zip", repos=NULL)
R> install.packages("c:/myoreclient/supporting/png_0.1-4.zip", repos=NULL)
各パッケージのインストールが正常に完了するごとに、次のメッセージがRコンソールに表示されます。
package 'package_name' successfully unpacked and MD5 sums checked
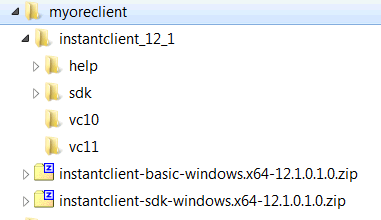
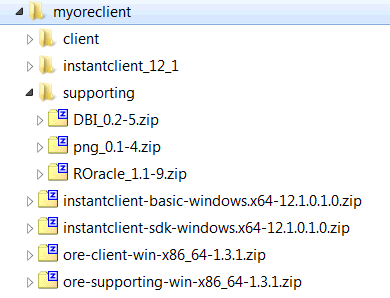
図A-1は、クライアント・コンポーネントをインストールした後のClientのインストール・ディレクトリの構造を示しています。
Oracle R Enterpriseの基本的な機能が動作していることを確認するには、Oracle R Enterprise Serverへの接続を確立して、基本的なコマンドをいくつか実行してOracle R Enterpriseのデモ・プログラムの一部を実行します。
|
注意: Oracle R Enterpriseを起動および使用するには、ユーザーIDにOracle R Enterpriseのインストールに必要とされる権限が必要です。詳細は、第4.2.3項「ユーザー要件」を参照してください。 |
例A-1 Oracle R Enterprise Serverへの接続
Oracle R Enterprise ClientをOracle R Enterprise Serverに接続するには、次の手順を実行します。
Windowsの「スタート」メニューでR x64 2.15.3を選択します。
Rコンソールが表示されます。
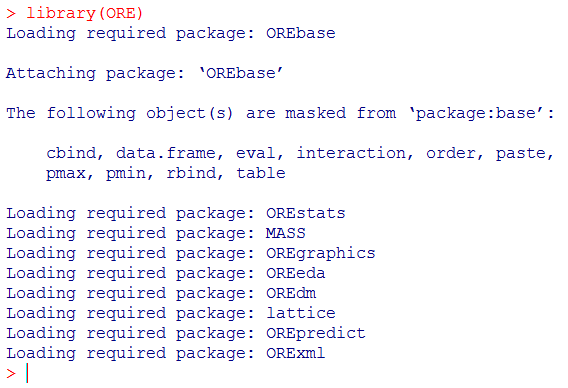
次のコマンドを入力してOracle R Enterpriseを起動します。
R> library(ORE)
次のコマンドを入力してOracle R Enterprise Serverに接続します。次の例では、ユーザーrquserをサーバー・ホストserv1上のデータベースorclに、ポート1521を使用して接続しています。
R> ore.connect(user="rquser", sid="orcl", host="serv1", password="rquserpsw",
               port=1521, all=TRUE)
Loading required package: ROracle
Loading required package: DBI
ore.is.connectedを実行して接続を確認します。接続が正常に確立されている場合は、コマンドによってTRUEが返されます。
R> ore.is.connected()
[1] TRUE
例A-2 RQUSERからアクセスできるデータベース表のリスト
ore.lsコマンドで、現行ユーザーに利用可能なデータ・セットがリストされます。たとえば、TABLE1およびTABLE2がrquserスキーマに存在している場合は、次のように表示されます。
R> ore.ls()
[1] "TABLE1" "TABLE2"
例A-3 Rデータ・フレームのデータ表へのプッシュ
ore.pushコマンドで、Rデータ・フレームがデータ表に、またはデータ表がRデータ・フレームにプッシュされます。例:
R> cars <- ore.push(cars)
例A-4 埋込みR関数の実行
ore.doEvalコマンドで、データベース埋込みRエンジンの指定された関数の実行がスケジュール設定され、実行結果が返されます。
R> ore.doEval(function() { 123 })
[1] 123
例A-5 Oracle R Enterpriseのデモ・スクリプトのリスト
Oracle R Enterpriseのデモ・スクリプトは$ORACLE_HOME/R/library/ORE/demoにあります。demoで、利用可能なデモのリストが表示されます。
R>  demo(package="ORE")

Demos in package 'ORE':

aggregate                    Aggregation
analysis                     Basic analysis & data processing operations
basic                        Basic connectivity to database
binning                      Binning logic
columnfns                    Column functions
cor                          Correlation matrix
crosstab                     Frequency cross tabulations
datastore                    DataStore operations
datetime                     Date/Time operations
derived                      Handling of derived columns
distributions                Distribution, density, and quantile functions
do_eval                      Embedded R processing
freqanalysis                 Frequency cross tabulations
glm                          Generalized Linear Models
graphics                     Demonstrates visual analysis
group_apply                  Embedded R processing by group
hypothesis                   Hyphothesis testing functions
matrix                       Matrix related operations
nulls                        Handling of NULL in SQL vs. NA in R
odm_ai                       Oracle Data Mining: attribute importance
odm_dt                       Oracle Data Mining: decision trees
odm_glm                      Oracle Data Mining: generalized linear models
odm_kmeans                   Oracle Data Mining: enhanced k-means clustering
odm_nb                       Oracle Data Mining: naive Bayes classification
odm_svm                      Oracle Data Mining: support vector machines
push_pull                    RDBMS <-> R data transfer
rank                         Attributed-based ranking of observations
reg                          Ordinary least squares linear regression
row_apply                    Embedded R processing by row chunks
sampling                     Random row sampling and partitioning of an ore.frame
sql_like                     Mapping of R to SQL commands
stepwise                     Stepwise OLS linear regression
summary                      Summary functionality
table_apply                  Embedded R processing of entire table
Oracle R Enterpriseのデモ・スクリプトの一部を実行することにより、インストールが正常に完了したことをさらに確認できます。エラーが発生せずスクリプトが完了した場合、デモは正常に実行されています。
例A-6 aggregateデモの実行
次の例では、aggregateデモが出力の一部を含めて表示されています。
> demo("aggregate", package="ORE")

        demo(aggregate)
        ---- ~~~~~~~~~

Type  <Return>   to start :

> #
> #     O R A C L E  R  E N T E R P R I S E  S A M P L E   L I B R A R Y
> #
> #     Name: aggregate.R
> #     Description: Demonstrates aggregations
> #     See also summary.R
> #
> #
> #
>
> ## Set page width
> options(width = 80)

> # Push the built-in iris data frame to the database
> IRIS_TABLE <- ore.push(iris)

> # Display the class of IRIS_TABLE
> class(IRIS_TABLE)
[1] "ore.frame"
attr(,"package")
[1] "OREbase"

> # Select count(Petal.Length) group by species
> x = aggregate(IRIS_TABLE$Petal.Length,
+               by = list(species = IRIS_TABLE$Species),
+               FUN = length)

> class(x)
[1] "ore.frame"
attr(,"package")
[1] "OREbase"
.
.
.
.
例A-7 row_applyデモの実行
次の例では、row_applyデモが出力の一部を含めて表示されています。
> demo("row_apply", package="ORE")

        demo(row_apply)
        ---- ~~~~~~~~~

Type  <Return>   to start :

> #
> #     O R A C L E  R  E N T E R P R I S E  S A M P L E   L I B R A R Y
> #
> #     Name: row_apply.R
> #     Description: Execute R code on each row
> #
> #
>
> ## Set page width
> options(width = 80)

> # Push the built-in iris data frame to the database
> IRIS_TABLE <- ore.push(iris)

> # Display the class of IRIS_TABLE
> class(IRIS_TABLE)
[1] "ore.frame"
attr(,"package")
[1] "OREbase"

> # Apply given R function to each row
> ore.rowApply(IRIS_TABLE,
+              function(dat) {
+                  # Any R code goes here. Operates on one row of IRIS_TABLE at
+                  # a time
+                  cbind(dat, dat$Petal.Length)
+              })
$`1`
  Sepal.Length Sepal.Width Petal.Length Petal.Width   Species dat$Petal.Length
1          6.4         2.8          5.6         2.1 virginica              5.6

$`2`
  Sepal.Length Sepal.Width Petal.Length Petal.Width   Species dat$Petal.Length
1          7.2           3          5.8         1.6 virginica              5.8

$`3`
  Sepal.Length Sepal.Width Petal.Length Petal.Width   Species dat$Petal.Length
1          7.4         2.8          6.1         1.9 virginica              6.1

$`4`
  Sepal.Length Sepal.Width Petal.Length Petal.Width   Species dat$Petal.Length
1          7.9         3.8          6.4           2 virginica              6.4

$`5`
  Sepal.Length Sepal.Width Petal.Length Petal.Width   Species dat$Petal.Length
1          6.4         2.8          5.6         2.2 virginica              5.6

$`6`
.
.
.
.
例A-8 corデモの実行
次の例では、corデモが出力の一部を含めて表示されています。
> demo ("cor")

        demo(cor)
        ---- ~~~

Type  <Return>   to start :

> #
> #     O R A C L E  R  E N T E R P R I S E  S A M P L E   L I B R A R Y
> #
> #     Name: cor.R
> #     Description: Correlation matrix
> #
> #
> #
>
> ## Set page width
> options(width = 80)

> # Push the built-in iris data frame to the database
> IRIS_TABLE <- ore.push(iris)

> # Display the class of IRIS_TABLE
> class(IRIS_TABLE)
[1] "ore.frame"
attr(,"package")
[1] "OREbase"

> # Remove non numeric columns
> iris_numeric = IRIS_TABLE[, c("Sepal.Length", "Sepal.Width",
+                               "Petal.Length", "Petal.Width")]

> # Pearson's correlation matrix
> cor(iris_numeric, use = "all.obs")
             Sepal.Length Sepal.Width Petal.Length Petal.Width
Sepal.Length    1.0000000  -0.1175698    0.8717538   0.8179411
Sepal.Width    -0.1175698   1.0000000   -0.4284401  -0.3661259
Petal.Length    0.8717538  -0.4284401    1.0000000   0.9628654
Petal.Width     0.8179411  -0.3661259    0.9628654   1.0000000
.
.
.
.

Warning messages:
1: ORE object has no unique key - using random order
2: ORE object has no unique key - using random order
3: ORE object has no unique key - using random order
4: ORE object has no unique key - using random order
例A-9 stepwiseデモの実行
次の例では、stepwiseデモが出力の一部を含めて表示されています。
> demo("stepwise")

        demo(stepwise)
        ---- ~~~~~~~~

Type  <Return>   to start :

> #
> #     O R A C L E  R  E N T E R P R I S E  S A M P L E   L I B R A R Y
> #
> #     Name: stepwise.R
> #     Description: STEPWISE Multivariate Regression
> #
> #
> #
>
> ## Set page width
> options(width = 80)

> # Push the built-in iris data frame to the database
> IRIS_TABLE <- ore.push(iris)

> # Display the class of IRIS_TABLE
> class(IRIS_TABLE)
[1] "ore.frame"
attr(,"package")
[1] "OREbase"

> # Let us first project out the non numeric columns
> IRIS_TABLE = IRIS_TABLE[, c("Sepal.Length", "Sepal.Width",
+                             "Petal.Length", "Petal.Width")]

> # Predict Sepal.Length based on the other 3 numeric columns
> # Do it stepwise
> model = ore.lm(Sepal.Length ~ ., data = IRIS_TABLE)

> model

Call:
ore.lm(formula = Sepal.Length ~ ., data = IRIS_TABLE)

Coefficients:
 (Intercept)   Sepal.Width  Petal.Length   Petal.Width
      1.8560        0.6508        0.7091       -0.5565
.
.
.