 Understanding Pay Cycle Manager
This chapter provides an overview of pay cycle manager, lists common elements, and discusses how to:
Run and manage pay cycles.
Review vouchers selected for payment.
Handle pay cycle exceptions and alerts.
Review draft payments.
View the trial register.
Approve the pay cycle.
Verify payment references.
Produce manual positive payment files.
Restart pay cycles and re-create checks.
Run the Pay Cycle job.
See Also
Setting Up Payment Formats and Payment Forms
Configuring the PeopleSoft Payables Payment Interface
Using Additional Payment Processing Options
(USF) Processing PeopleSoft Payables for U.S. Federal Agencies
Understanding Pay Cycle Manager
This section discusses:
Pay Cycle process flow.
Pay Cycle statuses.
Pay Cycle exceptions.
Draft payments.
Payment formatting.
Separate payments.
Payment sorting.
Check payments that never reach the banking system.
Pay Cycle processing using the PeopleSoft Payables Payment Interface.
Pay Cycle processing using the PeopleSoft Financial Gateway.
Pay Cycle Manager is the focal point for managing payments in PeopleSoft Payables. From the Pay Cycle Manager page, you process each of the Pay Cycle Application Engine process (AP_APY2015) steps necessary to turn bank account, vendor, voucher, and business unit information into actual payments. Use Pay Cycle Manager to initiate the Pay Cycle process, view and send payments to a printer or a file, and create automated clearing house (ACH) files, drafts, electronic funds transfer (EFT) files, wire transfer reports, and positive payment files.
The Pay Cycle Manager integrates much of the data entered into PeopleSoft Payables and uses this payment data not only to create the negotiable documents but also to provide information for reports. Many of the activities of PeopleSoft Payables lead to or come from the Pay Cycle Manager.
 Pay Cycle Process Flow
The individual processes—such as payment selection, payment creation, EFT formatting, printing checks, and creating positive payment files—that turn vouchers into payments are referred to collectively as the pay cycle and are all processed by the Pay Cycle process. Here is a diagram of the process flow for the Pay Cycle process (not all of the processes indicated would necessarily be included in a single pay cycle):
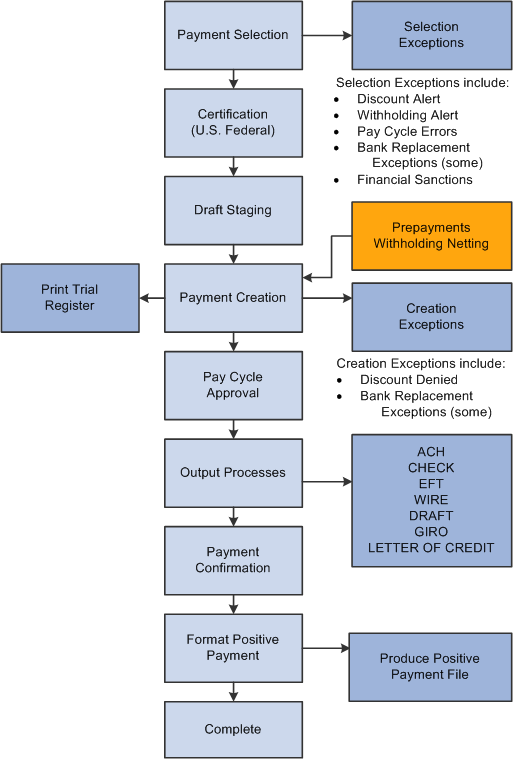
Pay cycle process flow
See Also
Pay Cycle Statuses
The Pay Cycle Manager is the place to go any time during this process of creating payments. It tells you exactly where your payments are in the payment process and keeps you informed of the current status of a pay cycle.
|
Status |
Meaning |
|
Approved |
Pay cycle has been approved. |
|
Certified |
(USF) Pay cycle has been approved by an authorized certifier. For U.S. federal agencies only. |
|
Completed |
The Pay cycle is finished. You can start payment selection again using the next payment dates. |
|
Confirmed |
You have successfully confirmed that the payment references are correct on the Confirm Payment Reference page. |
|
Created |
Payments are ready to print. If EFT payments are being processed, the files are ready to format or be sent through the approval process. |
|
Exceptions |
Pay cycle exceptions have been found. |
|
Formatted |
The formatting process for the positive payment file has finished successfully. |
|
New |
When you create a pay cycle, its status is New. |
|
No work |
No payments have been selected or created for processing. |
|
Printed |
Payments are printed or data has been written to a file. |
|
Rejected |
Pay cycle has been rejected. |
|
Reset |
Pay cycle has been reset. Payment Selection can be run again. |
|
Restarted |
Pay cycle has been restarted and is ready for Payment Creation. |
|
Running |
One of the Pay Cycle processes is currently running. |
|
Selected |
Payment selection has finished successfully. |
|
Staged |
Payment selection has finished successfully and Draft payments have been successfully staged. |
|
To Be Certified |
(USF) Pay cycle is awaiting approval by authorized certifier. U.S. federal agencies only. |
Pay Cycle Exceptions
The Pay Cycle Manager page notifies you of any exceptions that might occur during processing and transfers you to the appropriate page so that you can decide how best to handle these conditions. These exceptions pages include:
Pay Cycle Errors page.
Lost Discount Alert page.
Discounts Denied page.
Withholding exception page.
Bank Replacement Exceptions page.
Pay Cycle Financial Sanction Warnings page.
See Also
(USF) Processing PeopleSoft Payables for U.S. Federal Agencies
Draft Payments
During the Pay Cycle process, draft payments go through three steps:
See Also
Payment Formatting
PeopleSoft Payables provides powerful payment formatting capabilities that let you build a variety of payment forms to meet your business needs. The following table lists the standard payment forms that PeopleSoft Payables provides, along with the output processes called by the Pay Cycle process to produce the payment file:
|
Description |
Output Process Name |
Type of Process |
|
Draft EFT file |
FIN2025 |
SQR |
|
Draft EFT file with advice |
APY2027 APX2027 |
Crystal Check XML Publisher |
|
Stub over check with advice |
APY2021 APY2021X1 |
Crystal Check XML Publisher |
|
Check with separate advice |
APY2021 APY2021X1 |
Crystal Check XML Publisher |
|
Check over stub with overflow |
APY2021 APY2021X1 |
Crystal Check XML Publisher |
|
File copy |
APY2021 APX2021 |
Crystal Check XML Publisher |
|
Stub over draft with advice |
APY2021 APX2021 |
Crystal Check XML Publisher |
|
EFT file |
FIN2025 |
SQR (Structured Query Report) |
|
EFT file with advice |
APY2027 APX2027 |
Crystal Check XML Publisher |
|
Check file layout |
APY2021 APX2021 |
Crystal Check XML Publisher |
|
Giro-EFT file |
APY2021 APX2021 |
Crystal Check XML Publisher |
|
Giro-EFT file with advice |
APY2027 APX2027 |
Crystal Check XML Publisher |
|
Letter of credit advice |
APY2021 APY2028X |
Crystal Check XML Publisher |
|
Positive payment form |
APY2055 |
Crystal Check |
|
Wire report |
APY2027 APX2027 |
Crystal Check XML Publisher |
See Also
Setting Up Payment Formats and Payment Forms
Separate Payments
Typically, multiple scheduled payments to one vendor in a pay cycle are bundled into one payment. This is not the case when the vendor payment options specify separate payments for each scheduled payment,
You can specify:
Separate payments for a scheduled payment upon voucher entry.
Separate payments for a scheduled payment on the Pay Cycle Data Details page after Payment Selection processing.
That the scheduled payments have different payment handling codes. In this scenario, the system produces one payment for each handling code.
Payment Sorting
PeopleSoft Payables sorts payments at two hierarchical levels, payment handling code sequence and sort field sequence.
The first in priority is the payment handling code sequence, which you set up on the Payment Handling Codes page. If you give a high sequence number (the delivered number is 99) to the payment handling code HD or High Dollar Payment (which is applicable not just to dollars, but to any large amount payment), then any payment that is assigned a payment handling code of HD will be among the last to be produced by your output process (that is, printed last), and will therefore be at the top of your pile of checks, ready for any special handling, such as special signatures. This functionality works in conjunction with your bank account setup; when you set up bank accounts, you can select to override the payment handling code on a voucher with the High Dollar Payment code for any voucher that exceeds a specified amount.
The second in priority is the sort sequence by payment field that you define for each form ID on the Sort Fields page. You can define check sorting sequence by any of the following payment fields:
Remit Zip Code
Payment Handling
Bank SetID
Bank Code
Bank Account
Payment Method
Remit SetID
Remit Vendor
Name 1
Note. To print payments in dollar amount order, you must first run a script and configure fields on the Sort Fields page. This is fully discussed in the documentation for Specifying Payment Form Attributes.
See Also
Specifying Payment Form Attributes
Defining Payment Handling Codes
Establishing Payment Sort Fields
Check Payments That Never Reach the Banking SystemAfter the system creates payments, it automatically marks as reconciled those check payments that never reach the banking system, such as:
Voided checks.
Alignment checks.
Overflow checks.
Pay Cycle Processing Using the PeopleSoft Payables Payment Interface
When you process pay cycles that include payments imported through the PeopleSoft Payables Payment Interface, such as payments sourced from PeopleSoft Expenses and PeopleSoft Treasury, you must process the pay cycles serially, one pay cycle at a time. If multiple pay cycles that include imported payments from the same source are run at the same time, payments may be generated more than once for the same source document.
If you are using PeopleSoft Expenses to generate cash advance and expense report payments, after Pay Cycle Manager has finished, you can also perform the PeopleSoft Expenses' Consolidate Vendor Payment process. This process includes the following tools that enable you to review and manage the vendor consolidated payment reconciliation process:
Vendor Payments Crystal report (EXC9000) that contains summarized information of payments for corporate card vendors.
Vendor Payments Export to File Application Engine process (EX_VNDPT_EXP) that creates a flat file of corporate card vendors payments, which can be saved as a spreadsheet.
See Also
Configuring the PeopleSoft Payables Payment Interface
Running Expense Transaction Processes
Pay Cycle Processing Using the PeopleSoft Financial Gateway
This section discusses:
Pay Cycle processing through PeopleSoft Financial Gateway.
Payment cancellation.
Payments in error.
Pay Cycle Processing Through PeopleSoft Financial Gateway
You can submit approved payments electronically through the PeopleSoft Financial Gateway, using Pay Cycle Manager. The PeopleSoft Financial Gateway can be considered a web service agent or service oriented architecture (SOA). It provides certain PeopleSoft financial applications with payment processing capabilities, such as formatting payments, message acknowledgement, security features, and direct communication to financial institutions.
The Pay Cycle Manager settles only payments of EFT, ACH, and WIR payment methods through PeopleSoft Financial Gateway.
For wires, how you settle wires causes different results. When the system settles wires through Pay Cycle Manager, it results in the Pay Cycle process producing just an advice. If the system settles wires through PeopleSoft Financial Gateway, the system uses the defined form ID and layout for the electronic settlement. In addition, the system changes the wire label from wire report to wire because it is no longer simply producing a hard-copy report.
Note. You control whether an approved payment is processed through the PeopleSoft Financial Gateway by selecting a check box on the External Accounts - Payment Methods page. If you do not want a payment settled through PeopleSoft Financial Gateway, you should deselect this check box prior to scheduling payments on the voucher.
Certain PeopleSoft Payables processes help create the PeopleSoft Financial Gateway specific payments:
During the Pay Cycle payment selection and creation processes, the system flags all payments marked for Financial Gateway settlement. This process also:
Groups payments based on certain criteria, which includes layout code and settle through field information.
Validates that the correct payment layout code is used if the bank replacement functionality is used.
During the Voucher Build Application Engine process (AP_VCHRBLD), the system validates the correct layout code.
If the layout code is undefined on the Vendor Pay table (VENDOR_PAY), the process retrieves the default value from the Bank Payment Layout table (BANK_PYMNT_LYT).
If the layout code is defined on the Vendor Pay table, the process validates this value against values stored in the Bank Payment Layout table and ensures that the layout can be settled by PeopleSoft Financial Gateway.
After payment selection and creation, the system inserts these Financial Gateway specific payments into a new pay cycle process row in the pay cycle result grid (PYCYCL_STATRPT) in Pay Cycle Manager. Clicking the Process button causes the system to:
Invoke the Payables Financial Gateway Application Engine process (AP_FG_PROC), which creates payment messages. Payment messages hold both the general settlement information (such as bank, routing, vendor bank, and payment advice information) and payment information. In addition to exchanging messages with the PeopleSoft Financial Gateway, the Payables Financial Gateway process and the AP Payment online Application Class handle various background processing tasks for payments; for example, they populate temporary and staging tables with payment data and update payment statuses.
Assign a unique Financial Gateway payment ID number.
Based on the number defined in maximum transactions per message in the Financial Gateway Installation table (INSTALLATION_FG), the system limits the number of payments held in each payment message. Exceeding this limit triggers the creation of the next payment ID.
You set the payment ID on the Source Registration page in the PeopleSoft Financial Gateway functionality. The batch name is an identification number to represent all the payments for a pay cycle, consisting of a concatenated string of the pay cycle ID number and the pay cycle sequence number.
Load payments to PeopleSoft Financial Gateway tables for further processing and transmittal to the bank after PeopleSoft Financial Gateway receives the payment message from PeopleSoft Payables.
Send acknowledgement messages to PeopleSoft Payables indicating whether the payment dispatch process is successful.
If successful, PeopleSoft Payables updates the payments' status to Loaded. When requested by the PeopleSoft Financial Gateway, the status is then updated.
If unsuccessful, PeopleSoft Financial Gateway sends error messages to PeopleSoft Payables. PeopleSoft Payables consolidates the messages before sending error notification to the user through email (you enable the error notification function by entering a user ID on the Payment Selection Criteria page).
Schedule and transmit the payments to the bank, sending asynchronous acknowledgement messages back to PeopleSoft Payables containing payment information. PeopleSoft Payables uses this information to update the payments' status to Paid, Error, or other statuses. During this part of the process, the Financial Gateway payment information appears on various PeopleSoft Financial Gateway and PeopleSoft Payables inquiry pages.
This diagram shows the integrations between PeopleSoft Payables and PeopleSoft Financial Gateway:
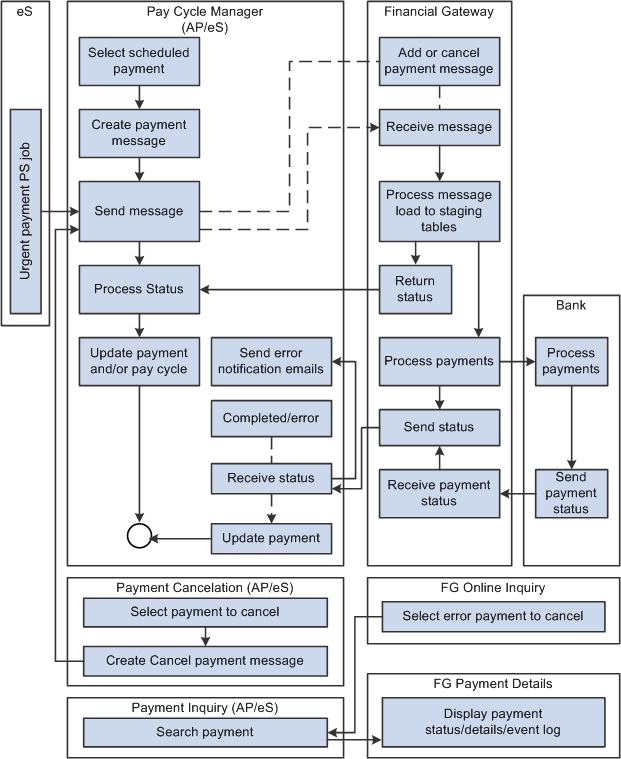
PeopleSoft Payables and PeopleSoft eSettlements payment processing with PeopleSoft Financial Gateway
Note. If the Financial Gateway Application Engine process ends abnormally during processing, you can restart the process using the Process Monitor in the Process Scheduler. The process begins again from where it ended.
When the payment processing is complete, you can use the following pages to review information:
PeopleSoft Payables pages:
Pay Cycle Details (PYCYCL_DATA_INQ).
Pay Cycle Approval (PYCYCL_APPROVAL).
Payment Inquiry (PYMNT_INQ_SRCH).
PeopleSoft Financial Gateway pages:
Review Payments (PMT_INQUIRY).
Review Payment Details (PMT_LIFE_CYCLE_INQ).
Review Payment Files (PMT_FILE_DEFN).
Review Acknowledgement Files (PMT_FILE_ACK_DEFN).
You can cancel payments that display a settlement status of Loaded, Hold, or Error. Canceling a Financial Gateway payment triggers the following system actions:
The system sends a cancel message to PeopleSoft Financial Gateway.
When you use the Mass Payment Cancellation component (AP_PMT_MASS_CNL) to cancel multiple payments, the system sends multiple cancel payments in a message to PeopleSoft Financial Gateway.
PeopleSoft Financial Gateway receives the message, and manages the cancel request depending on the settlement status.
Loaded: Payments with a loaded status may be on the staging table and pending transmission to the bank, or they may be in active transmission to the bank.
If the payment is still pending transmission, PeopleSoft Financial Gateway removes the payment from the staging tables and sends an acknowledgement message back to PeopleSoft Payables. PeopleSoft Payables then updates the payment's status to Canceled.
If the payment is in active transmission, PeopleSoft Financial Gateway prohibits the cancellation and sends an error message to PeopleSoft Payables. For these situations, you must wait for PeopleSoft Payables to display a payment status of Paid, and then cancel the payment.
Hold: For held payments, PeopleSoft Financial Gateway removes the payment from the staging tables and sends an acknowledgement message to PeopleSoft Payables. PeopleSoft Payables then updates the payment's status to Canceled.
Error: PeopleSoft Financial Gateway holds payments on the staging tables due to errors encountered during PeopleSoft Financial Gateway or bank processing. To cancel payments in error, PeopleSoft Financial Gateway updates the staging and update error tables and sends an acknowledgement message to PeopleSoft Payables. PeopleSoft Payables then updates the payment's status to Canceled.
When you cancel multiple payments, use the Mass Cancellation Job page to view errors encountered through the PeopleSoft Financial Gateway.
In some cases, payment statuses may be out of synchronicity between PeopleSoft Payables and PeopleSoft Financial Gateway. When a payment has a Canceled status in PeopleSoft Payables, no messages are transmitted between PeopleSoft Payables and PeopleSoft Financial Gateway. "Out of synch" payment statuses generally occur when users reverse and save a canceled payment. At Save, the system displays a warning message stating that saving the reverse canceled payment may disrupt the synchronization between the two systems.
During processing through the PeopleSoft Financial Gateway functionality, the system marks payments that have processing errors, and sends individual or batch messages to PeopleSoft Payables that the payments cannot be settled. The system then sends payment error notification emails to specified user IDs if you define the required notification parameters, such as user's email address in user preference and user ID in the payment selection criteria. This payment error notification email contains payment error summary information and a link to the Pay Cycle Error page for error correction.
As error payments can be related to different pay cycles, the system first determines if the payment requires email notification, then bundles those errors requiring notification together into a single email.
See Setting Up the PeopleSoft Financial Gateway Integration.
Common Elements Used in This Chapter|
Pay Cycle |
Displays the ID and description of the pay cycle that is being processed. |
|
Remit Vendor |
Displays the remit vendor number. |
|
Total |
Displays the total dollar amount of the selected payments. |
|
Voucher |
Displays the voucher ID. |
|
Sched Pymnts (scheduled payments) |
Displays the total number of scheduled payments. |
|
Seq Number (sequence number) |
Displays the pay cycle sequence number. Each time you process a pay cycle, it is assigned the next sequence number. |
|
Status |
Displays the status of the pay cycle. |
Running and Managing Pay Cycles
This section discusses how to process and manage pay cycles.
Page Used to Run and Manage a Pay Cycle|
Page Name |
Definition Name |
Navigation |
Usage |
|
PYCYCL_MGR |
Accounts Payable, Payments, Pay Cycle Processing, Pay Cycle Manager |
Run and manage the Pay Cycle process, from Payment Selection through output processing (printing checks and advices, producing EFT files, and so forth). Transfer to pay cycle exceptions pages and pay cycle detail and summary data pages, where you can handle exceptions and hold, exempt, or separate payments. View Pay Cycle processing status and results. |
Processing and Managing Pay Cycles
Access the Pay Cycle Manager page (Accounts Payable, Payments, Pay Cycle Processing, Pay Cycle Manager).
Start the pay cycle by clicking the Process button for either Payment Selection or Payment Selection & Creation. The Pay Cycle Manager searches for all banks and payment methods defined for the pay cycle. Each type of output is placed in a row in the Pay Cycle Results grid after the Payment Creation process has finished. You can enter an output destination for each row or accept the output destination that is supplied by default from the User Preferences.
Pay Cycle Processes and Output Processes
Pay cycle processes are the applications that must run before you start receiving output from each bank account or payment method. These processes can consist of Payment Selection, Draft Staging, and Payment Creation, individually. You can run them all together by selecting Payment Selection & Creation. Click the Process button next to the process that you want to perform.
After all pay cycle processes are run, the pay status changes to Created or Approved, depending on whether user approval is required. If approval is required, you perform approval at this point. You are now ready to produce an output file. All output processes are listed in the Pay Cycle Results grid near the bottom of the page. A process button exists for each output process that can be generated for the pay cycle (for example, printing a check for a different bank account, printing an advice, or generating EFT files). After you have run the output process once, the Process button changes to Recreate, which links you to the Recreate Checks page, where you can re-create payments. The Pay Cycle status does not change to Complete until you have finished running all output processes.
Note. (USF) If you are a U.S. federal customer who requires payment schedule certification, this certification must occur after Payment Selection. This means that you must run Payment Selection and Payment Creation separately.
Note. When you run multiple pay cycles in parallel and in large volume, Oracle recommends that you set up different business units and banks in pay cycles to avoid contention issues. Running several pay cycles in parallel for the same bank may cause processing issues.
Common Page Information
|
Selection Criteria |
Click to access the Payment Selection Criteria component (PYCYCL_DEFN) where you can create or update a pay cycle. |
|
Approve |
Click to access the Pay Cycle Approval component (PYCYCL_APPROVAL). The link is active when the pay cycle requires user approval and the pay cycle status is Created. |
|
Trial Register |
Click to access the Register run control component (RUN_APY2030). This link is active after you run both the Payment Selection and Payment Creation subprocesses. |
|
Reference Confirmation |
Click to access the Payment References page, where you can confirm that the system reference number matches the reference number on your preprinted check stock. |
|
Draft Staging Approval |
Click to access the Draft Staging Approval page, where you can approve or reject a draft payment before running Payment Creation. The link is active after you process Draft Staging. |
|
(USF) Pay Cycle Certification |
Click to access the Pay Cycle Certification page, where you can certify or reject a payment schedule before running Payment Creation. For U.S. federal agencies only. You must enable certification for the pay cycle on the Payment Selection Criteria - Preferences page. |
Pay Cycle Status
|
Status |
Displays the current status of the pay cycle. A New status indicates that this is the first time that the pay cycle is being run. See Pay Cycle Statuses. |
|
Pay Through Date |
Displays the last scheduled payment date that a voucher can have to be included for payment in the pay cycle. |
|
Payment Date |
Displays the date that prints on checks or shows on other payment methods in the pay cycle. It can differ from the pay through date. |
|
Schedule Payments Selected |
Displays the number of scheduled payments to be processed. |
|
Refresh |
Refreshes the Pay Cycle Manager page, displaying the most current status. Some Pay Cycle processes must be complete before the next process can start. While these processes are running, the status for the pay cycle is Running. Clicking the Refresh link updates the page so that you can see whether the pay cycle is ready to advance to the next step. |
|
Update Payment Advice |
This button appears if you run a pay cycle with EXPN defined as a source. Clicking this button will encrypt the credit card number for EXPN transactions listed in the payment advice table and remove any related information from the temp table. After you click this button, a message will appear. Click OK to update the Payment Advice table with encrypted credit card numbers, if any, and remove any related information from the temp table. After you click the Update Payment Advice button, it will no longer appear on the page. If you do not click this button, the unencrypted credit card data will be saved to the Payment Advice table. When this paycycle is run again, users can click the button to clean all of the current and previous data. |
|
Summary |
Click to transfer to the Pay Cycle Summary page, where you can view payment information about scheduled payments, summarized by bank account and payment method. This link becomes available after Payment Selection is complete. |
|
Details |
Click to transfer to the Pay Cycle Details page, where you can search scheduled payments by various search criteria, such as business unit, invoice, or vendor ID. You can also hold individual scheduled payments, exempt them from pay cycle processing, or flag them as separate payments. This link becomes available after Payment Selection is complete. |
Each row contains a Process button, a Server field, and a display-only description of an available pay cycle process. Some processes are available only if you are creating certain types of payments. For example, Draft Staging is available only if you are processing draft payments.
Processes are not available and no longer appear after they have been completed.
To run a process, select a server and click the process button for the process row. The server drop-down list box shows only servers that have a status of Running on the Process Monitor Server List page. The system performs validation before a process is initiated to ensure that the Process Scheduler server is currently running.
The standard processes are:
|
Payment Selection |
Runs the Payment Selection process only, so that you can review and handle pay cycle exceptions, take action on individual scheduled payments using the Pay Cycle Details page, and certify payment schedules (for U.S. federal agencies only) before you run the Payment Creation process. If you are processing drafts, run the Payment Selection process alone to enable you to then run the Draft Staging process alone. This enables you to use Draft Staging Approval before you run the Payment Creation process. |
|
Payment Selection & Creation |
Runs all processes in one step, including Payment Selection, Draft Staging (if necessary), and Payment Creation. You cannot perform any exception handling, take action on individual scheduled payments, certify payment schedules (U.S. federal only), or use draft staging approval. Note. This option is unavailable for U.S. federal agencies or for PeopleSoft eSettlements users if Pay Cycle Payment Approval is enabled at buyer registration. |
|
Draft Staging |
Runs the Draft Staging process. Draft staging groups the draft payments, then performs draft rounding and draft optimization, according to your payment selection criteria. You can approve or reject the draft payments on the Draft Staging Approval page. You must either approve or reject draft payments before the Payment Creation process. This option is active only if you are processing draft payments and you have run the Payment Selection process. |
|
Payment Creation |
Runs the Payment Creation process to prepare payments for output processing. This option is available only after you have run the Payment Selection process—or, if draft payments are in your pay cycle, after you have run the Draft Staging process. |
|
Server |
Select a server on which to run the pay cycle reset process. |
|
Reset |
Click to initiate a process to clear all of the scheduled payments currently being processed in the pay cycle. This button is active during Payment Selection if the pay cycle is rejected or if a system error occurs, such as a server running out of storage memory or a power failure. The button remains active until the Pay Cycle status is Approved. |
The links in this group box become active only if pay cycle exceptions exist after the Payment Selection, Payment Creation processes, or both have been run. If a payment is marked with an exception (except for discounts lost exceptions), it is rejected for further processing within the pay cycle. You must either correct or override the exception and run the payment as part of another pay cycle.
|
Pay Cycle Error |
Click to access the Pay Cycle Error page, where you can view errors encountered during this pay cycle run. |
|
Discount Lost |
Click to access the Lost Discount Alert page, where you can review and handle potential lost discounts calculated during the Payment Selection process. |
|
Discount Denied |
Click to access the Discounts Denied page, where you can review discounts that were not taken because they failed discount evaluation (that is, the bank interest earned on the net voucher amount is greater than the amount of the discount that you would gain by paying early). |
|
Withholding |
Click to access the Withholding Exception page so that you can review and handle withholding exceptions generated during pay cycle processing. |
|
Bank Replacement |
Click to access the Bank Replacement Exceptions component, where you can review bank replacement exceptions generated during pay cycle processing. Some bank replacement exceptions appear after Payment Selection; others appear only after Payment Creation. |
|
Financial Sanctions Exceptions |
Click to access the Pay Cycle Financial Sanction Warnings page, where you can review financial sanctions exceptions generated during pay cycle processing. If the system validates the vendors during the Selection process and the vendor's financial sanctions status changes to Review, the system creates payment validation errors for this vendor's payments. The system also adds this vendor to the Financial Sanctions Validation Log page. |
Pay Cycle Results - Main Information tab
When the Payment Creation process is complete, the Pay Cycle Results grid displays a row of data for each output process that must be run to generate payment files and negotiable documents. For EFT payments, because all payments regardless of bank account run as one output process, only one EFT row can appear. For checks, advices, positive payment files, and file copies, each bank account and payment method combination runs as a separate output process. This means that multiple check rows, positive payment rows, and so forth can appear in the grid.
|
Process |
Click to initiate an output process, such as creating an EFT file or printing checks or advices. Note. Depending on the output process, you may need to click the Process button repeatedly when each subprocess within the output process is run. |
|
Recreate |
Click to access the Recreate Checks page, where you can re-create an EFT file or reprint checks. When the button is labeled Recreate Positive Pay, you can click it to re-create a positive payment file. |
|
Server Name |
Select a specific Process Scheduler server from which to run the pay cycle output process. |
|
Output Type |
Displays the resulting output type. Values are: File: Specifies that the pay cycle output is created in a file format. This is used for electronic payment formats, such as EFT or ACH payments. Printer: Specifies that the output is printed on the selected printer. This is used for printed payment formats, such as for system checks or advices. Web: Specifies that the output file is sent to the Report Repository and authorized users can download the output file using the Report Manager. You do not need to specify an output destination if you select this option. If you distribute output files using the Web option, you must set up distribution options using the Process Schedule Manager. When the report or output file is generated in the report repository, select the View link on the Report List page in the Report Manager to access the Report/Log Viewer. Click the report link on the Report/Log Viewer and you will have the option to open the file online or download the report file. |
|
Output Destination |
Specifies the output file directory or the printer name for the output file creation. If File is selected, the Output Destination value is supplied by default from the server file destination specified on the User Preferences - PayCycle page. You can override the default with a valid directory path, but remember that a meta string (such as %%OutputDirectory%%) is not permitted. You must specify a full directory path with a backslash at the end (for example: C:\TEMP\). |
Pay Cycle Results - Additional Info tab
|
Instance |
Displays the process instance for the latest process that you initiated for the row. |
|
Payment File |
Displays the name of the payment output file that is created. |
|
Form ID |
Displays the form ID specified on the bank account definition for the document formatting. |
|
Positive Pymnt (positive payment) |
Specifies the positive payment form ID on the bank account definition for formatting the positive payment file. This applies only to system checks. |
|
File Copy Form |
Displays the form ID specified on the bank account definition for formatting check copy files. You enable file copying and specify the file copy form ID on the External Accounts - Payment Methods page. |
|
First Payment |
Displays the beginning payment reference number for the pay cycle. |
You can reset a payment cycle in the Pay Cycle Manager if you decide against creating any payments for the selected vouchers. This option enables you to deselect vouchers for payment after you run a pay cycle, but before you print the checks. You can reset a pay cycle after Payment Selection, but to reset after Payment Creation requires extra steps. To reset after Payment Creation, go through Pay Cycle Approval to reject the pay cycle. Then perform the reset.
Note. PeopleSoft Payables marks vouchers as selected when Payment Selection runs. No other transactions can occur on the selected vouchers. If you decide not to produce payment files or print checks for these vouchers, reset the selection so that a later pay cycle can reselect the vouchers.
Note. Resetting a pay cycle that is using bank account replacement reverses the bank replacement. For example, assume that a payment is coming from bank account A, and that during the pay cycle, bank account B replaces bank account A. If you reset the pay cycle for this payment, the payment reverts to the original account, which is bank account A.
Note. If EFT and ACH prenotes are included in the pay cycle, the system reverses the prenote status on the Vendor Information component (VNDR_ID) from Pending to New when you reset a pay cycle.
When you have successfully selected your payments, viewed and processed any exceptions, generated payments, approved the pay cycle, produced payment outputs, confirmed payment reference numbering, and formatted and produced the positive payment file (if required), the Pay Cycle Manager shows a status of Completed.
See Also
(USF) Processing PeopleSoft Payables for U.S. Federal Agencies
Reviewing Vouchers Selected for Payment
This section discusses how to:
Review pay cycle data.
Review summary data.
Review a pay cycle summary data chart.
After you complete the Payment Selection process, you might need to review the voucher payments that have been selected for payment, place certain payments on hold, temporarily exclude some from the pay cycle, enforce separate payments for some, or review total payment amounts for the pay cycle by various criteria before you proceed with the Payment Creation process and your output processes.
See Also
Reviewing Voucher, Payment, and Vendor Information
Pages Used to Review Vouchers Selected for Payment|
Page Name |
Definition Name |
Navigation |
Usage |
|
PYCYCL_DATA_INQ |
|
View pay cycle payments using various search criteria and, as long as Payment Creation has not been run, select individual payments for exemption from the pay cycle, place payments on hold, or flag them for separate payment. |
|
|
PYCYCL_DATA_SUM |
|
View pay cycle data summarized by bank account and payment method. |
|
|
MTRC_AP_PYCYCL |
Accounts Payable, Review Accounts Payable Info, Payments, Summary Metric, Pay Cycle Summary Metric |
View pay cycle data summarized by bank account and payment method in a bar chart. |
Reviewing Pay Cycle Data
Access the Pay Cycle Details page (Accounts Payable, Review Accounts Payable Info, Payments, Detail Data, Pay Cycle Details).
Select a pay cycle and click the Search button to view all scheduled voucher payments selected for your current pay cycle. You can limit your search using the other fields. For example, you might want to limit your search to a certain business unit.
Scheduled Payments
You can view selected scheduled payments and take action to hold, exempt, flag as a separate payment, or hold and flag as separate.
|
Voucher ID |
Click to access the Voucher Inquiry page, where you can view details for the voucher. |
|
Action |
Select an action to perform on a selected scheduled payment. This field is available only after you run Payment Selection and before you run Payment Creation. Actions include: Exclude: Excludes the scheduled payment from the pay cycle. Unless you run a future pay cycle with a pay-from date that precedes the payment date on the excluded scheduled payment (and the payment meets the other selection criteria), this payment will not be picked up by a pay cycle again. Hold: Holds the payment from continued processing by the pay cycle. This payment will not be selected by a pay cycle again until you release the hold. Hold & Separate: Places the scheduled payment on hold and separate from any other payments to be paid to the same vendor from the same bank account and payment method. None: Takes no action. The payment remains selected and subject to processing in the current pay cycle run. Separate: Marks the scheduled payment to be paid separately from any other payments to this vendor from this bank account and payment method. Note. The system automatically sets all prepayment vouchers with an action value of None to ensure correct processing. You cannot change this default setting. |
Payment Details
This section displays general payment information, such as bank, account, payment method, and payment date.
Additional Details
This section displays additional payment information, such as pay group ID, EFT layout, and settle by method.
Action Buttons
|
Hold All |
Click to hold all scheduled payments in the pay cycle. These payments will not be selected by a pay cycle until you release the hold. |
|
Exclude All |
Click to exclude all scheduled payments in the pay cycle. These payments will not be selected by a pay cycle unless that pay cycle has a pay-from date that precedes the payment date on the excluded scheduled payment (and the payment meets the other selection criteria). |
|
Separate All |
Click to mark all payments in the pay cycle for separate payment. |
Other Links
|
Pay Cycle Summary |
Click to access the Pay Cycle Summary page, where you can view pay cycle data summarized by bank account and payment method. |
|
Pay Cycle Manager |
Click to access the Pay Cycle Manager page. |
Reviewing Summary Data
Access the Pay Cycle Summary page (Accounts Payable, Review Accounts Payable Info, Payments, Summary Data, Pay Cycle Summary).
Payment Method Summary
|
Pay Method |
Click the payment method code to transfer to the Pay Cycle Details page, where you can view the selected scheduled payments for this payment method. |
|
Totals |
Click to transfer to the Pay Cycle Details page and display all the scheduled payments paid from this bank account. |
Reviewing a Pay Cycle Summary Data Chart
Access the Pay Cycle Summary Metric page (Accounts Payable, Review Accounts Payable Info, Payments, Summary Metric, Pay Cycle Summary Metric).
The Payments by Bank and Method chart is available for a pay cycle when Payment Selection has run, and displays all payment amounts for a single currency in the pay cycle, summarized by bank account and payment method. Clicking a bar on the chart displays the list of vouchers that are summarized and represented on the chart.
|
Pay Cycle |
Select a pay cycle to display its summary data in a chart. |
|
Currency Code |
Select the currency of the pay cycle payments that you want to view. Only one currency can be displayed at a time. |
|
Chart Type |
Select what kind of chart to display. The options are Bar Chart, Horizontal Bar, Horizontal Stacked Bar, Percentage Stacked Bar, and Stacked Bar. After the chart appears, you can change this option and click the Draw Chart button to display the new chart type. |
|
Draw Chart |
Click to display the Pay Cycle Summary chart using the parameters that you specified. |
Handling Pay Cycle Exceptions and Alerts
This section provides overviews of pay cycle alerts and financial sanctions validation and discusses how to:
Handle potential lost discounts.
Handle denied discounts.
View withholding alerts.
View Pay Cycle errors.
View bank replacement exceptions.
View financial sanctions exceptions.
Understanding Pay Cycle Alerts
This section discusses:
General pay cycle alerts.
Discount evaluation alerts.
General Pay Cycle Alerts
After you run the Payment Selection and Payment Creation processes, you may find that one or more of the links in the Pay Cycle Exceptions group box in Pay Cycle Manager becomes available. This means that you have an exception or an alert to view and handle. Some of these exceptions are logged after Payment Selection has finished; you can usually take immediate action to handle these exceptions before continuing with pay cycle processing. Others are logged only after Payment Creation is finished; these can be viewed as informational only, and usually require handling outside of the pay cycle pages before you run them in a later pay cycle.
The Discount Evaluation feature compares the potential interest income with the discount amount and determines whether taking a discount is economically feasible.
PeopleSoft Payables uses the Number of Days in Year to compute the annual discount effective rate. PeopleSoft Payables is delivered with a default number of 360 days, in accordance with U.S. federal specifications; but you can override that default on the External Accounts - Accounts Information page.
During the pay cycle, the system calculates the due dates for vouchers based on the invoice date, invoice receipt date, acceptance date, or constructive receipt date, in conjunction with the payment terms (interest rates versus payment discounts).
If the bank interest income is greater than the amount of the discount, the pay cycle drops the voucher from the process. If a payment is denied, the system provides a discount denied alert so that you can pay the voucher if you choose to.
See Also
Creating, Updating, and Reusing Pay Cycles
Understanding Financial Sanctions Validation
Oracle provides validation of your vendors against financial sanctions lists (for example, the Specially Designated Nationals (SDN) list) at the vendor level, voucher level, and payment level. At the payment level, financial sanctions validation is performed if you:
Select the Financial Sanctions list edit check box on the Payment Selection Criteria - Preferences page for that pay cycle.
If financial sanctions validation is enabled at the installation level, all remit vendors selected for a pay cycle are validated. If financial sanctions validation is enabled at the bank level, only selected remit vendors whose banks are enabled are validated. The system updates the vendor's financial sanctions status on the Vendor Information component.
Run the Financial Sanctions Validation Application Engine process (AP_SDN_VAL).
You can schedule the Financial Sanctions Validation process to run on a predefined schedule using the Process Scheduler, or you can run it on an ad hoc basis.
Note. Financial sanctions validation is performed only on remit vendors with a source transaction of VCHR (Accounts Payable transactions).
At the payment level, the system verifies the financial sanctions status of the vendor during:
The Payment Selection process.
The system does not select payments for a vendor with a financial sanctions status of Blocked or Review. However, if financial sanctions validation is enabled at the bank level and you no longer validate for a particular vendor's bank, the system may select a vendor with a financial sanctions status of Review.
The validation step of the Payment Selection process, only if you select the Financial Sanctions edit list check box on the Payment Selection Criteria - Preferences page for that pay cycle.
Selecting this option enables you to validate your vendors once again before payment creation. If the vendor's financial sanctions status changes to Review, the system creates payment validation errors for this vendor's payments. You can view these payment validation errors on the Pay Cycle Financial Sanction Warnings page.
Note. The system never creates payments for a vendor with a financial sanctions status of Blocked regardless of whether financial sanctions validation is enabled at the installation level or bank level, or is not enabled at either level. If you change how financial sanctions validation is performed (for example, you no longer validate for a particular bank), you must change the financial sanctions status on the vendor from Blocked to Valid or Cleared before you can pay this vendor.
See Understanding Financial Sanctions Validation.
See Entering Identifying Information.
Pages Used to Handle Pay Cycle Exceptions and Alerts|
Page Name |
Definition Name |
Navigation |
Usage |
|
PYCYCL_DSCNT_ALRT |
|
View scheduled payments that you have not included in the current pay cycle with earned discounts that you may lose if you don't pay them before the next payment date. |
|
|
PYCYCL_DSCNT_DENY |
|
View scheduled payments for which the system has denied a discount because waiting for the due date and earning the interest income during that time is better. |
|
|
WTHD_EXCEPTION |
|
View payments for which withholding errors occurred during pay cycle processing. |
|
|
PYCYCL_ERR |
|
View pay cycle processing errors for a pay cycle. Note. You can view general information on financial sanctions exceptions using the Pay Cycle Errors page. Use the Pay Cycle Financial Sanction Warnings page to access detail information about the financial sanctions exceptions. |
|
|
PYCYCL_BANK_EXPTN |
|
Review bank replacement exceptions created during the Payment Selection process. These occur only when you apply a bank replacement rule to replace the bank account (optionally including payment method and currency) for all payments in a pay cycle. |
|
|
PYCYCL_BANK_EXPTN1 |
|
Review bank replacement exceptions created during the Payment Creation process. These occur when you apply a bank replacement rule that includes any of the following options: Replace Bank with Another Bank, Replace by Currency, Replace by Individual Payment Limit, and Replace by Bank Maximum Limit. |
|
|
PYCYCL_FNS_ERR |
|
View detail information about financial sanctions exceptions for a pay cycle. |
Handling Potential Lost Discounts
Access the Lost Discount Alert page (Accounts Payable, Payments, Pay Cycle Exceptions, Review Discount Lost Alert, Lost Discount Alert).
This page alerts you to any discount lost on a pay cycle. If you selected the Include Lost Discount check box on the Payment Selection Criteria - Preferences page for the pay cycle, then all payments with potential lost discounts are automatically paid in the pay cycle, and this page is not applicable. You must view this page after Payment Selection has run and before you run Payment Creation to use the Include button to include a payment with a potential lost discount.
Note. All discount alerts are cleared automatically when you rerun a completed pay cycle.
Note. Lost rebates are not tracked and do not appear on this page.
Voucher Information
|
Appr Stat (approval status) |
Displays the voucher scheduled payment approval status. |
|
Handling |
Displays the payment handling code. You set up payment handling codes on the Payment Handling Codes page. See Payment Sorting. |
|
Separate Payment |
Specifies whether the scheduled payment is a separate payment and prevents it from being grouped with any other payment. If this option is not selected, the scheduled payment is combined with other scheduled payments that are being paid to a vendor from the same bank account using the same payment method. By default, the system groups all payments for a vendor by the payment method, even if the payments are for different business units. In addition to the standard payment groupings, draft payments have added groupings, such as draft maturity date, sight code, or scheduled payment date. You can overrule the default grouping criteria if you set up the Do Not Mix with Other Business Units option for a particular business unit or when you select the Separate payment option. |
|
Hold Payment |
Specifies whether the payment schedule is on hold so that it is not picked up by the pay cycle. The hold option can be set manually or by a scheduled process. For example, the withholding process places on hold those vouchers with withholding exceptions. |
|
Hold Reason |
Displays the reason that the scheduled payment is on hold. |
|
Alert Reason |
Indicates why the alert was issued for the payment. |
|
Payment Message |
Shows any payment message for the payment schedule. |
|
Include |
Click to include the payment in the current pay cycle. This button is active only after you run Payment Selection and before you run Payment Creation. |
Invoice Amounts
|
Gross |
Displays the amount of the payment if a discount is not applied. |
|
Discount Avail (discount available) |
Displays the amount you are in danger of losing if you do not include this payment in the cycle. |
|
Net |
Displays the amount of the payment if the discount is taken. |
See Also
Understanding Pay Cycle Alerts
Handling Denied Discounts
Access the Discount Denied page (Accounts Payable, Payments, Pay Cycle Exceptions, Review Discount Denied Alert, Discount Denied).
The fields on this page are the same as the fields on the Lost Discount Alert page, except that this page shows discounts that were evaluated as not worth taking. If you access the page after running Payment Selection and before running Payment Creation, you can click the Include button to include the scheduled payment in the current pay cycle and take the discount.
See Also
Handling Potential Lost Discounts
Understanding Pay Cycle Alerts
Viewing Withholding Alerts
Access the Withholding Exception page (Accounts Payable, Payments, Pay Cycle Exceptions, Review Withholding Alert, Withholding Exception).
Note. Scheduled payments with withholding exceptions are automatically placed on hold. To make a payment with withholding exceptions available for pay cycle processing, you must modify the voucher or the withholding setup, take the scheduled payment off of hold, and run the payment in a new pay cycle.
|
Entity |
Displays the withholding entity or tax authority. |
|
Type |
Displays the withholding type for the vendor. |
|
Jurisdiction |
Displays the withholding jurisdiction. The jurisdiction defines the different withholding percentages based on where the vendor is located as well as on the classification (or activity) of a given transaction. |
|
Class |
Displays the withholding class that is associated with the withholding type. |
|
Exception |
Contains information relating to the withholding exception. |
See Also
Processing Withholding in PeopleSoft Payables
Viewing Pay Cycle Errors
Access the Pay Cycle Errors page (Accounts Payable, Payments, Pay Cycle Exceptions, Review Pay Cycle Errors, Pay Cycle Errors).
Search Criteria
|
Error Type |
Select the error type you want to view, and click the Search button. Values are:
|
Search Results
The search results grid displays the error type for each error, along with the source of the error (such as voucher entry), the advice ID and advice sequence (which are identical to the voucher ID and payment count), key fields and, in the Message Text field, a description of the error.
See Also
Pay Cycle Processing Using the PeopleSoft Financial Gateway
(USF) Processing PeopleSoft Payables for U.S. Federal Agencies
Viewing Bank Replacement Exceptions
Access the Bank Replacement Exceptions - Schedule Exceptions and Bank Replacement Exceptions - Payment Exceptions pages (Accounts Payable, Payments, Pay Cycle Exceptions, Review Bank Replacement, Bank Replacement Exceptions - Schedule Exceptions).
Schedule exceptions occur during the Payment Selection process, and payment exceptions occur during the Payment Creation process. Schedule exceptions occur only if your bank replacement rule consists of the option to replace all bank accounts in the pay cycle.
Note. Scheduled payments with bank replacement exceptions are dropped from the pay cycle and revert to their original bank account, payment method, and currency upon completion of the pay cycle. They remain available in their original state for future pay cycles.
Viewing Schedule Exceptions
|
Exception Type |
Select the exception type you want to view: All: All exceptions. This is the default. Invalid SetID: The replacement bank account does not match the bank setID on the bank replacement rule. Pay To Bank: Remit-to vendor bank routing information for an electronic payment is missing. Payment Currency: The replacement bank does not have a valid currency. Payment Method: The replacement payment method is not valid for the replacement bank account. |
|
Exceptions |
Displays details about each scheduled payment that has a payment exception of the type indicated in the Exception Type field. |
Viewing Payment Exceptions
|
Exception Type |
Select the exception type you want to view. These are the same as those available on the Bank Replacement Exceptions - Schedule Exceptions page, with these additions: Currency Conversion: Indicates that the conversion from the payment currency to the replacement bank account default currency failed. Insufficient Funds: Indicates that the amount limit on all available replacement bank accounts has been reached, or a large-amount payment exceeds the amount limit of each available replacement bank account. |
|
Exceptions |
Displays details about each created payment that has a payment exception of the type indicated in the Exception Type field, along with details about each scheduled payment included in the created payment. |
See Also
Defining Bank Replacement Rules
Viewing Financial Sanctions Exceptions
Access the Pay Cycle Financial Sanction Warnings page (Accounts Payable, Payments, Pay Cycle Exceptions, Pay Cycle SDN List Exceptions, Pay Cycle Financial Sanction Warnings).
Use this page to access detail information on the financial sanctions exceptions. You can also use the Pay Cycle Errors page to view general information on financial sanctions exceptions.
Voucher
|
Advice ID and Advice Sequence |
Displays the voucher ID and payment count. |
|
Entry ID |
Displays the entity ID of the vendor (for example, passport number). |
|
Financial Sanctions Inquiry |
Click to access the Financial Sanctions Inquiry page. The Financial Sanctions Inquiry enables you to use search criteria to list details about the data in the financial sanctions lists. |
|
Vendor ID |
Displays the vendor ID of the vendor who is a potential match to the financial sanctions lists. |
Name/Address Information
Displays the address, city, and country of the vendor.
Message Detail
Displays the error and description of the error.
Reviewing Draft Payments
This section discusses how to:
Approve staged draft payments.
View details about draft payments.
View details about draft vouchers.
See Also
Pages Used to Review Draft Payments|
Page Name |
Definition Name |
Navigation |
Usage |
|
APD_APPROVE_PNL |
|
Approve or reject draft payments that are created during the Draft Staging Application Engine process (AP_DFT_PROC) in the Pay Cycle process. |
|
|
APD_APPROVE_PNL2 |
|
View a listing of draft payments created in the Draft Staging table. |
|
|
APD_APPROVE_PNL3 |
Accounts Payable, Payments, Drafts, Draft Staging Inquiry, Draft Inquire (Voucher) |
View the scheduled draft payments by Draft Master ID. |
Approving Staged Draft Payments
Access the Draft Staging Approval page (Accounts Payable, Payments, Drafts, Draft Staging Approval).
Note. You must either approve or reject draft payments before you run the Payment Creation process. However, approving or rejecting payments does not affect the draft payment's status. If you selected the Preapprove option on the Preferences page of the Payment Selection Criteria component, then the draft payment status is changed to Approved. If you did not select this option, the drafts that you approve from this page have a draft status of Created.
Main Information Tab
|
|
Click the Draft Staging Key button to access the Draft Staging Inquiry page, where you can review details about the draft payment and the vouchers associated with the draft payment. |
|
Master ID |
Displays the draft master ID for a set of scheduled payments. |
|
# of Draft (number of draft) |
Displays the number of the draft that will be created for the draft master if you selected draft optimization. |
|
Master Status |
Select the option that indicates the status of the draft master: Not Apprv (not approved): Indicates that the scheduled draft payment has not been approved. Approve: Creates draft payments for the scheduled draft payments that are attached to the Master Draft ID. Reject: Clears the draft payments that are grouped into the Draft Master ID. The scheduled payments are rejected or deselected so that no payments are created. |
|
Payment Method |
Indicates whether the draft is a customer-initiated or customer-initiated EFT draft payment. |
|
Draft Amount |
Displays the amount of the draft payment. |
|
Amount (NonDft) (amount non-draft) |
Displays any payment amount that is being paid by an alternate payment method if you specify draft rounding on the Payment Selection Criteria page. |
|
Maturity Dt |
Displays the draft maturity date. |
Additional Information Tab
|
Sch Maturity Dt (scheduled maturity date) |
Displays the draft scheduled maturity date if the maturity date is adjusted as a result of the bank holiday and business calendar options that you selected. |
Additional Page Elements
|
Approve All |
Click to approve all scheduled draft payments shown. |
|
Reject All |
Click to reject all scheduled draft payments shown. |
|
Display Only Not Approved |
Click to see only those scheduled draft payments that are not approved. |
|
Display All |
Click to see all scheduled draft payments, regardless of whether they are approved. |
Viewing Details About Draft Payments
Access the Draft Inquire page (Accounts Payable, Payments, Drafts, Draft Staging Inquiry, Draft Inquire).
|
Draft Master ID |
Displays the scheduled draft payment draft master ID. |
|
Bank |
Displays the vendor's bank. |
|
Bank Account |
Displays the vendor's bank account. |
|
Separate |
Indicates whether the scheduled payment is grouped with other scheduled payments that are also selected for the vendor in the same pay cycle. |
|
Draft Group CD (draft group code) |
Displays the draft payment group code number. |
|
Draft Create Key |
Displays the system-assigned sequence number. It is a child key of Draft Master ID. |
|
Draft Amount |
Displays the total amount of the draft payment. |
|
Stamp Tax |
Displays the amount of any applicable stamp tax. |
|
Alt Payment Method (alternate payment method) |
Displays the payment method by which the draft rounding remaining amount is paid. |
|
Excluded |
Indicates whether draft will be excluded: Y if the draft amount is not to be paid. N if the draft amount is to be paid and will use an alternate payment method if one is specified. |
Viewing Details About Draft Vouchers
Access the Draft Inquire (Voucher) page (Accounts Payable, Payments, Drafts, Draft Staging Inquiry, Draft Inquire (Voucher)).
|
Draft Master ID |
Displays the draft master ID. |
|
Pymnt Nbr (payment number) |
Displays the sequence number of the scheduled payment. |
|
Gross Amount |
Displays the gross amount of the draft payment, excluding any applicable stamp tax minimization amounts. |
Viewing the Trial Register
This section discusses how to use the Trial Register report.
Page Used to View the Trial Register|
Page Name |
Definition Name |
Navigation |
Usage |
|
RUN_APY2030 |
Click the Trial Register link from the Pay Cycle Manager. |
Define run parameters for the Trial Register report (APY2030). Use the report to examine or print a summary of payments by bank account after payment selection and creation, but before you print checks or create EFT or ACH files. |
Using a Trial RegisterAccess the Register page and run the Trial Register report (click the Trial Register link from the Pay Cycle Manager).
After viewing the Trial Register report, you can:
Print it for your records.
Close it and return to the Pay Cycle Manager page to proceed with check printing.
If you find an error in the register:
Reset the pay cycle.
Rectify the problem in the Payment Selection Criteria component.
See Also
Running and Managing Pay Cycles
Approving the Pay Cycle
This section discusses how to approve the pay cycle.
If you have selected user approval on the Payment Selection Criteria - Preferences page, then your pay cycles must be approved after you have completed payment creation and before you run your output processes.
Note. Payments for pay cycles that require user approval are not eligible for posting until the pay cycle has been approved.
Note. (USF) U.S. federal agencies use payment schedule certification rather than approval. You certify payment schedules after payment selection and before payment creation.
See Also
Certifying Federal Payment Schedules
Page Used to Approve the Pay Cycle|
Page Name |
Definition Name |
Navigation |
Usage |
|
PYCYCL_APPROVAL |
|
Verify and approve payments for a pay cycle if your payment selection criteria include a user approval requirement. |
Approving the Pay Cycle
Access the Pay Cycle Approval page (Accounts Payable, Payments, Pay Cycle Approvals, Pay Cycle, Pay Cycle Approval).
Pay Cycle/Payments/Drafts
|
Scheduled Payments |
Displays the number of scheduled payments in the pay cycle. |
|
Paycycle Summary |
Click to access the Pay Cycle Summary page, where you can see details for the pay cycle. |
|
Approve |
Click to approve the pay cycle and continue processing. |
|
Reject |
Click to reject the pay cycle. The Reset button on the Pay Cycle Manager page becomes active, and you can reset the pay cycle. |
This grid displays a row of data for each output process that must be run to generate payment files and negotiable documents. For EFT payments, because all payments regardless of bank account run as one output process, only one EFT row can appear. For checks, advices, positive payment files, and file copies, each bank account and payment method combination runs as a separate output process. This means multiple check rows, positive payment rows, and so forth can appear in the grid.
|
Payment File |
Describes the payment form. |
|
Form ID |
Displays the payment form ID. |
|
Settle by |
Displays the settle through method, either Financial Gateway or Pay Cycle. |
|
Positive Payment Form |
Displays the form ID used for printing a positive payment file. |
|
File Copy Form |
Displays the form ID used for printing the file copy. |
|
First Payment |
Displays the first payment reference. |
See Also
Running and Managing Pay Cycles
Restarting Pay Cycles and Re-creating Checks
Verifying Payment References
This section provides an overview of payment reference verification and discusses how to:
Confirm payment references.
Unconfirm payment references.
See Also
Understanding Payment Reference VerificationWhen you use preprinted stationery, use the Payment Reference page to verify that the system is assigning the correct check numbers. The system assigns the check numbers, based on the last check number used, so you might need to verify that the system is using the correct number. If it isn't, then you might need to change the payment reference number to match the number used on your preprinted form.
Note. To use payment reference confirmation for a bank account, you must select the Confirm Numbers option on the External Accounts - Payment Methods page.
Note. You cannot use the Confirm Payment References feature with Express Payments. You can use the Confirm Payment References feature only with regular pay cycle payments.
Page Used to Verify Payment References|
Page Name |
Definition Name |
Navigation |
Usage |
|
PYMNT_CNFRM |
|
Access through the Pay Cycle Manager or Reference Confirmation component to confirm that the system reference number matches the reference number on your preprinted check stock or to renumber the system-assigned reference numbers. Access through the Reference Unconfirmation component to unconfirm any payment references that you have previously confirmed. |
Confirming Payment References
Access the Reference Confirmation - Payment Reference page (Accounts Payable, Payments, Pay Cycle Approvals, Reference Confirmation, Payment Reference).
Search Criteria
Enter your search criteria and click search to view payment references. Bank setID, bank code, and bank account are required fields.
|
From Ref / To Ref and From Date / Thru Date |
Select to view a range of payment references or a date range. Enter the from and to references or dates in the fields below. |
Actions
|
Renumber All . . . |
Click to renumber the payment references if a discrepancy exists between the system payment references and your preprinted stationery. |
|
Confirm All |
Click to confirm that the system payment reference numbers match those of the printed checks. |
Search Results
This grid displays the payment reference, payee name, payment amount, payment date, and pay cycle status of each payment that meets your selection criteria.
Occasionally you might want to confirm individual reference numbers one at a time. Do this by selecting the appropriate Confirm check box for each payment reference and then saving the page.
Unconfirming Payment References
Access the Reference Unconfirmation - Payment Reference page (Accounts Payable, Payments, Pay Cycle Approvals, Reference Unconfirmation, Payment Reference).
This page is identical to the Reference Confirmation - Payment Reference page except that it enables you to unconfirm payments you have already confirmed. Two ways are available to unconfirm payment references:
Deselect the check box for each payment that you want to unconfirm and save the page.
Click the Unconfirm All button to clear all of the payments on the page.
Producing Manual Positive Payment Files
This section provides an overview of how to produce manual positive payment files and discusses how to produce positive payment files.
Understanding How to Produce Manual Positive Payment FilesIf a payment in your pay cycle is paid from a bank account that requires positive payment files, you see a positive payment output process row for that bank account on the Pay Cycle Manager page after you run Payment Creation for that pay cycle. All you need to do is run the positive payment output process to produce your positive payment file.
Occasionally you may want to produce a positive payment file outside of the normal pay cycle process, such as when you've created manual payments that you want to appear in the positive payment file. In those cases, you use the Manual Positive Payment page to initiate the production of a positive payment file.
Page Used to Produce Manual Positive Payment Files|
Page Name |
Definition Name |
Navigation |
Usage |
|
PYCYCL_POS_PAY |
Accounts Payable, Payments, Pay Cycle Processing, Manual Positive Payment, Manual Positive Payment |
Create a manual positive payment file to send to your bank. This is a text file that your clearinghouse bank can import into its own payment tables. |
Producing Positive Payment FilesAccess the Manual Positive Payment page (Accounts Payable, Payments, Pay Cycle Processing, Manual Positive Payment, Manual Positive Payment).
Specify the bank setID, bank code, and bank account for which want to produce the positive payment file. In addition, specify the following items:
|
Step Group Name |
Specify the step group or the list of pay cycle processes that you want the Pay Cycle process to run to produce the positive payment file. The positive payment output process is part of the Pay Cycle process, although in this case you can run it without running a full pay cycle. See Creating a Pay Cycle. |
Select one of the following processing options:
|
Format and File |
Select to run the positive payment output process and create an output file. |
|
File Only |
Select to create the positive payment output file without rerunning the positive payment output process. This is useful for those times when you previously selected the Format and File option, but the file was not successfully created. |
Click the Process button to create the positive payment file. This transfers you to the Pay Cycle Manager page, where you complete the positive payment file output process.
See Also
Running and Managing Pay Cycles
Restarting Pay Cycles and Re-creating Checks
This section provides an overview of how to restart a pay cycle and discusses how to re-create and reprint checks.
Understanding Pay Cycle RestartWhen you do a restart for the pay cycle, the system assigns the name for the new pay cycle based on the following logic:
The name format is RSTRT#, where # is a number from 1 to 9.
If it is a restart of the original pay cycle, the system scans pay cycles RSTRT1 through RSTRT9 and assigns a name to the first one that it finds unused or with a status of Completed. For example, the restart of paycycle MTHLY is any of RSTRT1 through RSTRT9.
If this is a subsequent attempt at restarting, the system assigns the same pay cycle name it did for the first restart instance and increases the pay cycle sequence number by one. For example, the restart for pay cycle RSTRT3 with pay cycle sequence number 1 is pay cycle RSTRT3 with sequence number 2.
Note. Only nine restarted pay cycles can run at any given time. Any attempt to restart another pay cycle will be unsuccessful if started after nine pay cycles with a status other than Completed have already restarted.
Note. You cannot restart the original pay cycle more than once for the same set of payment reference numbers, regardless of whether you choose to re-create the checks using new reference numbers.
Pages Used to Restart Pay Cycles and Re-create Checks|
Page Name |
Definition Name |
Navigation |
Usage |
|
PYCYCL_RSTRT |
Accounts Payable, Payments, Pay Cycle Processing, Check Restart, Recreate Checks |
Restart or reprint checks for a pay cycle when you have already printed checks. |
|
|
PYCYCL_EMAIL_ADV |
Accounts Payable, Payments, Pay Cycle Processing, Email Payment Advice |
Resend payment advices as needed or as required by vendor |
Re-creating and Reprinting Checks
Access the Recreate Checks page (Accounts Payable, Payments, Pay Cycle Processing, Check Restart, Recreate Checks).
|
Pay Cycle and Seq Num |
Enter the pay cycle and pay cycle sequence number. Every time you run a given pay cycle, the Pay Cycle process increments the sequence number. If you access this page from the Pay Cycle Manager using the Recreate button, the Pay Cycle field is populated with the current pay cycle. The sets of payments represented by the pay cycle and pay cycle sequence number appear in the unlabeled grid below. |
|
Select |
Select this check box for a row of printed payments to make the Check Reprint Parameters group box available for entry. |
|
Payment Method |
Displays the available payment methods Values are: CHK (check): You can re-create a check using the same reference number or a new reference number. BOO (customer-initiated draft): You can only reprint a customer-initiated draft using the same reference number. |
|
Form ID |
Displays the form ID used for the printing format. |
|
First Payment |
Displays the first payment reference number in the set of payments. |
|
Last Payment |
Displays the last payment reference number in the set of payments. |
Check Reprint Parameters
|
From Payment Ref and To Payment Ref |
Displays by default the original references of the first and last payments. Reprint only part of a pay cycle by selecting just some of the reference numbers. |
|
Payment Date |
By default displays the current date, which you can change if necessary. |
|
Alignment Count |
Displays the number of test forms that are generated before the system prints the first check. |
|
Recreate with new reference |
Select to void the original reference numbers (for checks, these are the check numbers) and re-create the payments with new numbers. Note. When you select this option, both the Summary and Details links become unavailable for entry on the Pay Cycle Manager page. |
|
Re-Print using same reference |
Select to reprint the payments using the original reference numbers. For the BOO payment method, only this option is available. |
|
Server |
Select the server from which to run the process. |
|
Process |
Click to restart the pay cycle and initiate the check reprint process. This accesses the Pay Cycle Manager page, where you monitor the process:
The transfer to the Pay Cycle Manager page is necessary to ensure security, to prevent people who are not authorized from using the Recreate Checks page to reprint checks. Oracle strongly recommends that you use security measures to control user access to the Recreate Checks page. |
Note. If you are using preprinted check forms, you must restart the printing and then, after the forms are printed, access the Payment Reference page to update the system-assigned reference numbers to match those of the payment forms.
See Also
Setting Up Payment Formats and Payment Forms
Resending Payment Advices
Access the Email Payment Advice page (Accounts Payable, Payments, Pay Cycle Processing, Email Payment Advice).
|
Pay Cycle |
Select the pay cycle that you want to use to resend email advices. You must enter a pay cycle ID. |
|
Seq Num(Sequence Number) |
Select the sequence number of the pay cycle that you want to use to resend email advices. You must enter a sequence number. |
|
Payment Advice User ID |
Select the user ID that has the appropriate email payment advice user preferences defined. |
|
Vendor Select Option |
Select either Select All or Specify. If you select Specify, the Vendors grid will be populated with vendors that have been included in the selected pay cycle, that have the Enable Email Payment Advice check box selected, and for which the Payment method matches the entries in the Notification group box on the Vendor page. You can remove or add vendors from this list. |
Running the Pay Cycle Job
This section discusses how to run the Pay Cycle job (APPCJOB), which enables you to run the pay cycle from payment selection through the output processes without user intervention.
Page Used to Run the Pay Cycle Job|
Page Name |
Definition Name |
Navigation |
Usage |
|
AP_PCJOB_CREATE |
Accounts Payable, Payments, Pay Cycle Processing, Pay Cycle Job, Pay Cycle Job Request |
Submit a Pay Cycle job to run on Process Scheduler. The Pay Cycle job consists of a lights-out run of the Payment Selection and Payment Creation processes. |
Running the Pay Cycle JobTo run a Pay Cycle job:
When setting up the payment selection criteria for the pay cycle in the Payment Selection Criteria component, select an Approval value of None.
To process a pay cycle using the Pay Cycle job, the status of the pay cycle must be New, Reset, No Work, or Completed. If you select the Automatic Increment Dates option for the pay cycle in the Payment Selection Criteria component, you avoid having to increment the dates for a pay cycle before running the job.
Access the Pay Cycle Job Request page and enter the required information:
Enter a pay cycle ID (created in the Payment Selection Criteria component).
Enter an output server name (the server name supplied by default from the User Preferences page).
Enter an output destination.
This should be a valid directory path. A meta string (such as %%OutputDirectory%%) is not permitted. You must specify a full directory path with a backslash at the end (for example: C:\TEMP\).
Click the Submit Job button to initiate processing.
When the process is complete (the Job status is Processed), review all the output files to ensure that they were generated correctly.
The Pay Cycle job produces only outputs to files; any files that require printing must be printed independently after the job is complete.
If the Job status is No success, view the pay cycle using the Pay Cycle Manager page for more details.
When the Job status is Processed, click Finalize Job.
When you click Finalize, the system enables the Auto Increment flag and increments the date range accordingly. The pay cycle advances to a status of N (new) and you cannot reset it.
Note. Oracle recommends that you use the Pay Cycle Manager page to confirm that all output processes are complete before clicking the Finalize Job button.
Note. Oracle does not recommend that you create a run control for the Pay Cycle job to run on a recurring basis without any oversight because you must return to the Pay Cycle Job Request page after you've submitted the job in order to finalize the pay cycle.
See Also
Running and Managing Pay Cycles