 Understanding Counter Sales
This chapter provides an overview of counter sales, lists prerequisites, and discusses how to:
Enter sales orders in a counter sale environment.
View and refund deposits.
Use the cash drawer.
Understanding Counter Sales
This section discusses:
Counter sales orders fulfillment in PeopleSoft Inventory.
PeopleSoft Billing population for counter sales orders.
Counter sale business process flow.
Back orders and overriding inventory in the counter sale environment.
Payments in the counter sale environment.
Deposit refund.
Counter sales enable you to take an order over the counter and interact directly with the customer. Customers can pick out items and bring them to the counter, or they can order items that are available behind the counter or at a pick up or will call area. At the counter, a clerk rings up the order, accepts payment, issues a receipt, and prints a picking list if some of the items are to be picked elsewhere. The transaction can be completed in a couple of minutes.
You can enter the customer details in these ways:
Through an existing customer already in the system.
Creating a new customer using the Quick Customer Create.
Creating a new customer using the short-term customer functionality.
Creating a new customer using a template customer, such as a cash only customer.
The ship from Inventory business unit entered upon entering the sales order is required when adding a counter sale order. It determines which order lines can be picked up and paid for during the session and it controls other processing requirements for picking item and allocation.
Customers can pay with cash, check, credit card, debit card, procurement card, corporate voucher, or add the order to their account. If some of the items are not available for immediate pick up, a deposit may be required to place the order. When an order is paid in full or partially paid, an invoice number is preassigned in PeopleSoft Order Management and will be passed to the target invoice functionality in PeopleSoft Billing.
For value-added tax (VAT), the schedules are grouped by VAT code, and the tax is calculated and prorated to the schedules.
See Order Processing in a VAT Environment.
The following figure shows a high level view of the counter sale process flow:
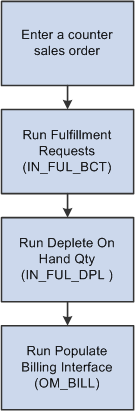
High level counter sale process flow
 Fulfilling Counter Sales orders in PeopleSoft Inventory
When you click the Complete Order button on the counter sales order, a message will be sent to PeopleSoft Inventory. A shipping EIP number is created and assigned to all schedules completed in the current counter sale transaction. In order to complete the fulfillment processing in PeopleSoft Inventory, the Fulfillment Requests process (IN_FUL_BCT) must be run to ship and deplete the counter sale transaction. The Populate Billing process (OM_BILL) will not interface the transaction to billing until the Fulfillment Requests process has completed and successfully shipped and depleted all requested quantities associated with the shipping request.
Note. By default the Fulfillment Request will only ship an order, not deplete it. To have the request depleted as well, the Fulfillment Engine Auto processing options for the transaction Request to Ship must be set to Advance to Depleted. If this is not set up, then the Fulfillment Request will not deplete the order. You will need to run the depletions job at some point as well.
Populating Billing for Counter Sales Orders
The Populate Billing process (OM_BILL) processes all orders and interfaces them to billing once the shipping request process for the assigned EIP Control ID is complete and all activity associated with that EIP Control ID is fully shipped and depleted. All order schedules are assigned an EIP Control ID.
When the Populate Billing process picks up an order schedule associated with an EIP control ID, it will make sure that all demand lines associated with that EIP Control ID are fully shipped and depleted and are also in the current run for the Populate Billing process. If it is not, the Populate Billing process will not process any activity for that EIP Control ID.
All activity assigned to a specific EIP Control ID is assigned the same preassigned invoice number. In order for the total of the invoice and the corresponding paid amount to work out correctly on the invoice, all activity is processed by the Populate Billing process in the same run and put onto a single preassigned invoice. Invoice numbers are preassigned and passed to the Target Invoice field of the Billing Interface tables, so the bill by logic will not be used to group these lines as they are for regular sales orders.
You can optionally select the Only Process Paid Orders option on the run control page of the Populate Billing process to limit processing of fully paid or partially paid activity and exclude on account activity. In doing so, customers can process paid orders regularly, but need to wait to process their on account VAT activity until the end of the month or when it makes sense for the organization.
The system uses the Error and Warning Notification Framework (EWN) to send a message any time that the Populate Billing process cannot bill activity from a given EIP Control ID because all demand lines for that EIP Control ID were not fully shipped and depleted. When the message is displayed, the user will see why activity for the given EIP Control ID cannot be processed. The user will also be provided with a link to Inventory's Transaction Maintenance component where they can see details about why some demand line quantities associated with the EIP Control ID could not be fully shipped. If the order has a valid Owner Id and there is an email address associated with the Owner Id, an email will be sent to the user so they can view the message and correct the problem.
Note. If the order is not appearing in PeopleSoft Billing, you can also check to ensure that the Fulfillment Requests (IN_FUL_BCT) and the Deplete On Hand Qty (IN_FUL_DPL ) processes was run. Order activity assigned to a given EIP Control Id will not be processed by the Populate Billing process until all demand lines assigned to that EIP Control ID are fully shipped and depleted. So if activity is not being picked up by the Populate Billing process, check that the Fulfillment Requests process that was run and that all quantities for all demand lines associated with the EIP Control ID shipped. Additionally, verify that the Deplete On Hand Qty process was run to fully deplete the inventory balances.
For all counter sale orders that are paid up front, total order and weight and volume adjustments are sent to PeopleSoft Billing as adjustments to invoice lines to keep the taxes accurate.
The Populate Billing process will pass the preassigned invoice number to PeopleSoft Billing using the target invoice. If the order was paid in full, then it is not necessary to print an invoice document from PeopleSoft Billing because the counter sales order creates an order number and prints a receipt to be given to the customer. Thus, the printing of these invoices will be suppressed.
Deposit activity (deposit taken, deposit applied, deposit refunded, and deposit refund fees) will be sent over to PeopleSoft Billing to generate bill lines. The distribution account for these lines will be defaulted from the PeopleSoft Order Management business unit. Gift vouchers will be handled as a line on the invoice in Billing. The voucher amount will be on a separate line and would contain a negative amount. PeopleSoft Receivables will not receive the voucher information as part of a payment, but as a net in the amount due on the invoice.
Note. Because PeopleSoft Billing passes the deposit activity to Receivables, we recommend that you set up your installation so Billing creates accounting entries instead of Receivables.
The system does not force receipts to be reconciled prior to the Populate Billing process sending lines to PeopleSoft Billing. In this situation, it is possible for bills to get created that do not contain a corporate voucher line when it should or bills to get created and contain a corporate voucher line when it should not.
See Also
Utilizing the Fulfillment Engine
Understanding the Counter Sale Business Process Flow
Here is a typical business process flow for a counter sale:
The customer brings the products that they want to purchase to the counter.
The sales associate starts a new sale using the Counter Sale menu and enters the customer information.
To add a customer, the sale associate adds them using a short-term customer or uses an existing customer.
The sales associate enters product identification and quantity ordered information for all of the products that the customer wants to purchase and take with them.
Note. The Pick Up and Pick Up Quantity fields are required. The pick-up flag can default from the ship via code on the order line. The pick-up quantity initially defaults from the order quantity. The system places the line on customer pickup hold when the customer pickup flag is selected. This prevents PeopleSoft Inventory from fulfilling (and shipping) the demand. The pickup hold is created as any other order schedule hold (you can see it on the schedule holds page), but it will not show the "S" hold light on the line or the schedule, and you cannot delete it or inactivate it from the hold page. To remove the pickup hold, deselect the pickup flag.
The sales associate saves the order.
The lines are priced and taxes are calculated.
All schedules where the pick-up quantity has been entered will be allocated.
If there is not enough quantity available to satisfy the pick-up quantity requested, the system will reset the pick-up quantity to the quantity that was allocated.
General sales order edits are performed.
If there are items that need to be picked, the sale associate can generate a pick plan and retrieves the items.
After picking the items, the sales associates enters any changes into the system to reflect what was actually picked.
The sales associate confirms the order and makes any back order decisions or corrects any issues prior to accepting payment. The system:
Determines which schedules need further input from the sales associate when there is not enough quantity on-hand to fulfill the customer's request.
The sales associate decides whether to create new shipment schedules for items that cannot be fulfilled in this session (backorders) or to cancel the remainder of the quantity requested.
Note. If the system allows negative inventory, you can override the pick-up quantity.
Performs additional edits needed to continue with the order such as reservations, ATP and delivery estimated processing.
The sales associate informs the customer of the total due.
The customer tenders payment to the sales associate if the order is not on account.
The sales associate enters payment information. For cash payments, the sales associate may give the customer change due.
The sales associate prints a goods receipt.
Note. For product kits, the receipt will display only the product kit parent ID. It will not list the components.
The sales associate completes the order.
The system confirms that payment has been received if the Immediate Payment field is selected for the customer and that serial IDs for the products the customer is taking with them are entered.
Once the order has passed the completion edits, the system:
Removes the customer pick up hold and price protects the schedule for customer pick-up schedules.
Note. Any back order schedules, if created, are also price protected.
Sets the receipt status to Printed.
Sends a ship message to PeopleSoft Inventory. Nonstock and direct ship lines will be depleted when the order is completed.
Note. In order to complete the processing for the order in PeopleSoft Inventory, the Fulfillment Requests process must be run.
The customer takes the items and the receipt.
The customer may need to drive to the pick-up location for the items that are not stocked behind the counter.
We will discuss three common scenarios in the counter sale environment:
The customer takes all the items and pays for the order up front (scenario 1).
The customer takes all the items and pays for part of the order up front (scenario 2).
The customer places an order for items that are not in stock and pays a deposit (scenario 3).
Scenario 1
The customer wants to order 100 of product 10002. The items are in stock and the customer will pay by cash. The CSR:
Enters a counter sale order for the customer.
Enters the product and quantity.
Clicks the pickup check box if it does not default from the ship via code on the line.
Clicks the Save button to save any unsaved order lines and allocate inventory to the order.
Note. Optionally, clicking the Confirm Order button will also save any unsaved order lines.
Prints the pick plan, picks the product, and brings the product to the counter.
Confirms the order.
Enters a cash payment.
Prints the receipt.
Completes the order.
Scenario 2
The customer wants to order 20 of product 10002. The items are in stock and the customer will pay half of the order with cash and the rest on account. The CSR:
Enters a counter sale order for the customer.
Enters the product and quantity.
Clicks the pickup check box if it does not default from the ship via code on the line.
Clicks the Save button to save any unsaved order lines and allocate inventory to the order.
Prints the pick plan, picks the product, and brings the product to the counter.
Confirms the order.
Enters a cash payment for half of the order.
Prints the receipt.
Completes the order.
Scenario 3
The customer wants to order 20 of product 10004, which is not in stock. The customer is required to place a 100 percent deposit for the order and the customer wants the product shipped to his location. The CSR:
Enters a counter sale order for a short-term customer.
Enters the product and quantity.
Checks the on-hand balance and realizes that the product is not in stock.
The CSR asks the customer if he still wants the product. The CSR continues entering the product and deselects the Pick-Up option. The product is handled like a regular line on the sales order.
Confirms the order.
Records a deposit for the order and collects payment for the deposit.
Prints the receipt.
Completes the order.
Understanding Back Orders and Overriding Inventory in the Counter Sale
Environment
To accurately price, tax, bill, and record payment, back orders or special order items are placed on a separate schedule from those marked as customer pickup with quantities that the customer is taking with them.
After the initial process to reserve and allocate, you can change the pick up quantity so that it is less than the quantity ordered for situations where the customer is able to take partial quantities with him or her.
When the sales order is confirmed, the sales order lists all pick up schedules needing a back order decision. The sales associate reviews the items, adjusts the sales order as necessary, and determines which schedule quantities to back order and which ones to cancel. Creating a backorder creates a new shipment schedule on the sales order line. Canceling the backorder quantity adjusts the current shipment schedule down to the same amount as the pickup quantity.
A deposit can be taken for goods that are back ordered, special ordered or are not immediately fulfilled at order time. Deposits cannot be taken for goods that the customer picks up and takes with them at the time the order is placed.
If the CSR has enough quantity for the transaction, and the inventory balances are not correct, and the system allows negative inventory, the CSR may override the pick-up quantity on the sales order line/schedule by using the Picking Feedback page from the sales order. The CSR can increase the pick-up quantity to be greater than what could be initially allocated or optionally they may select limited picking feedback from the main sales order pages under these conditions:
Negative inventory is allowed.
The product being shipped is a not a product kit.
Limited picking feedback is not allowed on product kits. The Picking Feedback page must be used. After using the Picking Feedback for these negative quantities, changes to the pick-up quantity or order quantities on the Sales Order page will delete this information.
Note. Product kits that contain all nonstock items are an exception and the pick-up quantity must be updated on the sales order.
The product is not lot controlled or serial controlled.
Limited picking feedback is not allowed on lot or serial controlled products because the system would not know what lot or serial ID to choose. The Picking Feedback page must be used. After using the Picking Feedback page for these negative quantities, any decrease in the pick-up quantity from the Sales Order page will first reject the negative balance entries.
A default counter sale shipping storage location has been defined at the item or Inventory business unit level. Limited picking feedback is not allowed if a default location has not been defined. The Picking Feedback page must be used.
A prior putaway to this default storage location using the ordered unit of measure (UOM) as a picking UOM is present.
The system is looking for a PHYSICAL_INV record to drive the storage location negative. If one exists, then the pick-up quantity can be overriden from the sales order. If the system does not find a storage location in PHYSICAL_INV then the Picking Feedback page must be used.
As a general rule, after changes have been made to drive a storage location negative, any subsequent changes to the pick-up quantity on the Sales Order page will attempt to adjust the pick-up quantity by first eliminating the negative balance entries. The user should reverify the picking assignments especially if the overrides were not made to the default counter sale shipping storage location.
When a negative inventory transaction is created and shipped, Inventory Batch Picking Feedback is run against the negative entries sent. Depending on how the Inventory UOM Conversion Flag is set, these entries may be converted to another unit of measure and shipped against the storage location in that unit of measure.
The UOM Conversion flag has three possible values:
0 - Use entered UOM.
Note. We recommend that you use an option other than 0 - using the entered UOM could possibly subject the negative inventory demand line to UOM conversion. This flag is defined at the Inventory business unit and Inventory business unit/item level.
1 - Convert to standard UOM.
2 - Convert to default stocking UOM.
See Also
Setting Up Alternate Sources of Supply
Defining Reservation and Backorder Rules
Understanding Payments in the Counter Sale Environment
PeopleSoft Order Management provides support for a counter sales environment where payment is accepted with an order and recorded in a cash drawer. The cash drawer functionality enables you to:
Accept various methods of payment at the time of order entry, including "on account" payments, cash, check, credit cards, procurement cards, debit cards, and corporate vouchers.
Note. Procurement cards behave exactly like normal credit cards. However, there are additional fields that are made available to provide additional transaction data to the purchaser and they are normally limited to certain purchases from an organization, either at a monetary limit per transaction, or by a validation against a list of approved product IDs. Because of this, procurement cards can be used only to pay for items that are picked up at the time the order is placed.
Accept immediate payments on a single order using multiple payment methods, such as splitting an order across two credit cards, or paying cash for some portion of the order and using a debit card for the rest of the order.
Accept a mix of immediate payment (using cash, credit, or debit) and "on account" payment.
Accept deposits from customers for sales orders with special order items.
Cancel an order and issue a refund of deposit to customers.
Cancel an order but not issue a refund of deposit.
Outstanding Account Balances in the Counter Sale Environment
When entering counter sale orders, it is possible to have an outstanding balance for which PeopleSoft Billing will ultimately invoice the customer. This situation could occur if some or all items are backordered and less than a 100 percent deposit is taken, or if goods are picked up by the customer but are not paid for in full at the time of pick up. This remaining balance is referred to as the "on account" balance.
In these situations, Billing will use the payment method from the sales order header when invoicing the customer. If the sales order header payment method is credit card, the credit card indicated on the order header, rather than those entered on the record payments screen, will be used for the on account balance when invoiced by billing.
This credit card should be authorized either at the time the sales order is created or by the batch authorization process at some point after the order is created. When the user chooses to complete a counter sale order, if there is any on account balance which is to be paid on a credit card, the user will receive a warning message. The message will inform the user that the on account credit card should be authorized for the outstanding on account balance. The user will be given two options by this message.
Option one, and the most preferable, is to authorize the credit card during the completion process.
If you choose this option, the authorization will occur behind the scenes as part of the completion process, ensuring that the customer has credit available to cover the outstanding balance, and reserving that credit for future invoicing.
Option two does not authorize the credit card.
The order will be completed with the credit card authorization hold remaining active if one was applied. However, all downstream processing through inventory and billing will be allowed to continue regardless of the status of any credit card authorization holds, or whether the credit card is eventually authorized or not. Under this option, there is no guarantee that the credit card will ever be authorized prior to invoicing. The card can be authorized by returning to the sales order and clicking the Authorize Credit Card link on the Order Entry page, or by the batch credit card authorization job.
Note. We recommend that order activity subject to an active credit card authorization hold be allowed to pass to the Unfulfilled state in Inventory. This will allow a counter sale order with an outstanding on account balance to be confirmed even though the credit card on the order header has yet to be authorized.
Recording Immediate Payment from a Sales Order
When you record an immediate payment, you typically do so during a face-to-face interaction. When you total the sales order, instead of the typical business process for billing "on account," you click the Record Payment button.
You can record payments using one of several payment methods:
Cash: Sometimes the entire order is paid using the cash payment method.
Check: The customer can pay by check.
Credit Card: Occasionally the order is paid with a single credit card using the credit card payment method. The system also allows you to indicate multiple credit card payment amounts on an order, such as in the case where a customer wants to pay a portion of the order using one credit card and another portion using a different credit card.
Mixed Payment Methods: The system enables you to log multiple payment methods, in a combination, against a single order, such as Cash, Credit Card, or Debit Card.
Procurement Card: You cannot use any other form of payment with a procurement card. Procurement cards can be used only to pay for good that are taken with the customer.
Corporate Vouchers: If a customer wants to pay for the order, or part of the order, with a corporate voucher, then you can select the Corporate Voucher payment method and enter the voucher amount in the Amount Tendered field.
Voucher information is passed to Billing as a bill line to reduce the total invoice amount. The voucher distribution code that is defined on the Order Management business unit is used to create the invoice line in Billing.
Note. PeopleSoft Order Management will not track the issuance of gift vouchers or track face value or amount paid for the voucher.
Unknown Payment Method: The system provides a way for you to create and print a receipt when the payment method is unknown.
This is typically used in instances when the delivery truck goes out and delivers to a customer without knowing how the sale is to be paid. In this scenario, you can generate a receipt from the sales order using the Record Payment page. You can then save the receipt in a hold status and print the receipt. After printing, instead of updating the status to printed, the receipt will remain in a hold status. These receipts are not included in the cash drawer reconciliation process until an actual payment method is recorded. When the driver returns and knows the actual method of payment, the receipt can be updated to reflect the actual method of payment.
Note. After you click the Record Payment button, at any time you can save the receipt data from the sales order in a status of new. When you save this data, the system generates a receipt number to record the cash received. Receipts for payments reference the sales order to facilitate payment matching downstream in Accounts Receivable. An invoice number is preassigned for the goods taken. The receipt and invoice numbers are written back to the schedules.
Recording a Deposit with an Order
You can record a deposit for a sales order that contains an unfulfilled item, either from a back order or special order. The cashier can initiate recording of the deposit from the Order Entry page by clicking the Record Payment link. If an unfulfilled order is detected on the sales order and if a deposit has not been already taken for the schedules, then the Record Payment page appears with these fields:
Deposit Required Amount
Record Deposit link
Deposit ID
The Deposit Required Amount will default to the amount of the deposit that should be collected for the current transaction. To edit the deposit required amount, the cashier can click the Change Deposit link. The deposit percentage and deposit amount is shown on the Change Deposit page. Users with appropriate security can update the deposit percentage and or the amount on this page. A separate invoice number will be preassigned for the deposit taken.
See Establishing Feature Function Security.
In most cases, the deposit is considered nonrefundable. However, if the deposit is refundable, you must select the Deposit Refundable check box.
When you collect a deposit and the lines do not ship all at once, rounding issues may occur. Because estimates are determined in PeopleSoft Order Management and variances in partial shipment quantity and prices could result in rounding discrepancies when partial shipment amounts are invoiced, the end result may not be the same as collected in the deposit. You may need to make an adjustment for any discrepancies in PeopleSoft Receivables.
Refunding a Deposit
Refunding a deposit is initiated from the cancellation of a sales order or an order line or schedule. This is different from a return material authorization (RMA), which is a return of goods. In this scenario, the goods have not yet been delivered.
When an order is cancelled, the system checks to see if a deposit has been placed with the order. The system sums the outstanding amounts in the deposit tracking table. If the sum is greater then zero, then a deposit balance exists.
If a deposit is detected upon cancelling an order, then a message appears guiding you to perform a refund. You can navigate to the refund page by selecting Customer Deposits from the Header Menu on the Order Entry page or from the Review Customer Information menu. If an entire order is canceled, then a refund should be issued for the entire balance of all deposits made against the order. If a line or a schedule is cancelled, then the amount to refund will automatically be calculated by the system and prepopulated on the refund page when you navigate there from the Order Entry Header menu. Alternatively, you can initiate a refund for a deposit at any time from the Deposit Refund page in the Review Customer Information menu. When navigating in this manner however, the amount to be refunded will not be prepopulated. The refund amount is displayed on the Order Summary section of the Order Entry Form page.
Prerequisites for Counter Sales
Before you can enter a counter sale order, set up these options:
(Optional) In the customer component, create a template customer.
Create a customer pick-up hold code.
On the Hold Processing page for the Order Management business unit, enter the customer pick up hold code to prevent items from being shipped by the Inventory fulfillment process and select whether you want the order to be able to pass to the released or picked/confirmed state in Inventory fulfillment.
Leaving these flags deselected indicates that the Inventory warehouse will not perform any fulfillment processing on these demand lines.
On the Order Entry Features page for the Order Management business unit, define a deposit and refund fee percent, elect to include pending payments and deposits in credit checking, establish pick plan display, print and sort options, select template customers for the sales order, quote, and RMA.
On the Accounting and Billing page for the Order Management business unit, define a deposit distribution code, refund fee product ID, and voucher distribution code.
On the Setup Fulfillment and Setup Item Fulfillment- Shipping Options page for the Inventory business unit, define the default counter sale shipping location.
The system first checks the Setup Item Fulfillment-Shipping Options page; if the system does not find an option, it uses the location on the Inventory business unit.
On the User Preferences Order - Sales page, establish the order owner for notifications, the default order quantity, the default inventory unit (ship from), and the default cash drawer for the user.
On the Ship Via page, establish the customer pick up option to default the customer pick-up flag to the order line if that ship via code is used.
You would most likely establish a separate ship via code for counter sales. The ship via code can default from the ship to customer (or short-term customer template), the order group, or the buying agreement.
(Optional) On the Order Management page for installation options, set up Verity search for products and customers.
On the customer Bill to Options page, establish the deposit percent and if immediate payment is required.
Set up the cash drawers that will be used when collecting money from a counter sale.
On the Inventory Business Unit setup page, select the tax code for the Inventory business unit for PeopleSoft simple tax.
Note. The location address for the Inventory business unit must be set up and active for any counter sale transaction to process.
Establish feature function security.
See Also
Setting Up and Maintaining a Cash Drawer
Defining Sales Order User Preferences
Defining Items by Business Unit
Setting Up PeopleSoft Order Management Business Units
Establishing Feature Function Security
Entering Sales Orders in a Counter Sale Environment
This section discusses how to:
Enter header information for a counter sale order.
Enter line information for a counter sale order.
Record payments and deposits for a counter sales order.
Change deposit information.
Enter check payments.
Enter payments for credit, debit, and procurement cards.
Use counter sales picking feedback.
Pages Used to Enter Sales Orders|
Page Name |
Definition Name |
Navigation |
Usage |
|
CUST_STERM_CREATE |
|
Create a short-term customer. Note. The option to enter a short-term customer is based on the Default Template setting on the Order Entry Features page for the Order Management business unit. |
|
|
Order Entry Form |
ORDENT_FORM |
Order Management, Quotes and Orders, Create/Update Counter Sale |
Enter a counter sales order. |
|
ORDENT_PICK_FEEDBK |
Click the Picking Feedback link on the Order Entry Form page. |
Adjust the pick quantity for an item, change the storage location, enter serial ID information, lot ID, and ship serial number information. |
|
|
Sales Order Messages |
ORDENT_MESSAGES |
The page appears when the order is saved or confirmed and problems occur processing the order. |
Address issues when confirming an order, such as back order situation or payment hold. |
|
ORDENT_PYMT |
Click the Record Payment link on the Order Entry Form page. |
Record payments and deposits to an order. |
|
|
ORDENT_PYMT_DEP |
Click the Record Deposit link on the Record Payment page. |
Edit the deposit attributes such as deposit percent. |
|
|
ORDENT_PYMT_DEP |
Click the Change Deposit link on the Record Payment page. |
Use to change the deposit. |
|
|
CDR_CHECK_DATA |
Click the Additional Information link on the Record Payment page. |
Add additional information to be associated with a check payment, such as check number or drivers license. |
|
|
CDR_CARD_DATA |
Click the Additional Information link on the Record Payment page. |
Record credit, debit, or procurement card payment details. |
|
|
Complete Order |
ORDENT_COMPLETE |
Click the Complete Order button on the Order Entry Form page. |
Use to view the order number after completing the order. You can add another order or return to this order from the page. |
Entering Header Information for a Counter Sales Order
Access the Order Entry Form page (Order Management, Quotes and Orders, Create/Update Counter Sale).
See Entering Order Header Information.
|
Short-Term Customer |
In add mode, select the option to create a new customer using a customer template.
Note. You must add a customer name, address, and phone on
the Short-Term Customer Setup page and (if the order is paid by credit card)
add credit card information on the Credit Card Data page. |
Header Summary
|
Order Owner |
Displays the owner of the sales order, which is printed on the pick plan and receipt. The value can default from user preferences or from the user when the order is saved. |
|
Sold To |
When you enter new customers using the short-term customer option, the ID is created and displays after the order is saved. |
Line Filter
Use to filter the lines by Line Status, Ship From BU, Pick Up Only, and Section.
Order Line Entry
|
Pick-Up |
Use to indicate that the customer is picking up the product. |
|
Pick Up Quantity |
Displays the default value from the order quantity. |
See Entering Order Line Information.
Price Summary
|
Gross Order Total |
Displays the list price for all schedules of the order. |
|
Line Adjustments |
Displays the adjustments for list price for all schedules. |
|
Order Adjustment |
The total order adjustment amounts can only be applied once to the very first invoice. If the payment for the counter sales order is taken at the counter, then the Order Header Adjustment Billed flag must be set to yes. If there is subsequent order activity with this sales order, additional total order adjustment amounts will not apply. |
|
Total Net Price |
Displays the gross order total due minus the line adjustments and the order adjustments. |
|
Freight Amount |
Displays the freight charges summed for all deliveries. |
|
Freight Tax |
Displays the freight taxes summed for all deliveries with schedules. |
|
Tax Amount |
Displays the sales tax summed for schedules. |
|
Net Order Total |
Displays the total net price plus VAT amount plus freight charge amount plus freight tax plus tax amount. |
|
Total Payment Received |
Displays the total money received from the customer for the order. This amount includes all deposits and payments. |
|
Payment Applied |
Displays the payment that has been applied, used, or refunded. It is calculated as the difference between the total payment received and the order deposit balance. |
|
Order Deposit Balance |
Displays the balance of the total deposits made against the sales order minus any previously applied deposits or refund activity. |
|
Deposit Required Basis |
Displays the sum of the unfulfilled schedules that do not have a deposit placed for them. This basis amount will be used to calculate the amount of a deposit that is to be collected for an order. Note. If you want to take a deposit for a product kit that is direct ship from the vendor, a noninventoried item, or a kit with a noninventoried component, disable the Mark for Billing at Save option on the Order Entry Features page of the Order Management business unit. Otherwise after confirming and saving the order, the deposit cannot be included because the nonstocked product will have already been shipped. |
|
Deposit Percent |
Displays the amount of the deposit to be used against the current order transaction. This amount will be automatically calculated. When calculating this amount, the system will leave enough of the deposit to cover any existing backorders. You can override the system generated amount on the Record Payment page. The deposit percent defaults from the bill to customer and then the Order Entry Feature page for the Order Management business unit. |
|
Deposit Required Amount |
Displays the system calculated amount representing the deposit amount to be collected from the customer for the current transaction. The value is calculated by multiplying the deposit required basis times the deposit percent. You can override the amount on the Record Payment page. |
|
Pickup Amount |
Displays the amount that is currently being picked up (immediately picked up from the counter at the time the order transaction is placed). |
|
Deposit Applied |
Displays the current refund amount available to offset the pick up amount, any remaining monies are used to offset the deposit required basis. For example, suppose an order is completed and payment is taken for an order line that has not been shipped or picked up. Then the order line is cancelled and a new order line is added to the sales order. The system uses the refund amount available for the cancelled order line as a credit to offset the pick up amount first and then the required deposit basis secondarily. |
|
Total Due |
Displays the amount of the order that is due for the current order transaction. |
|
Refund Due |
Displays the refund due to the customer. It is calculated as the current order deposit balance, minus the amount withheld for the back order goods and any offset for the current transaction's pickup amount and basis for required deposit. It is displayed only if there is refund due. |
|
*Payment Required |
This message is displayed if the customer is required to make a payment at the time the order is placed. For example, if there is a total due on the order, and if the customer is marked as an immediate payment customer, then they will be required to pay in full for all items they are taking with them at order time. If the customer is marked as requiring a deposit, then they will be required to pay the deposit required amount at order time for any items that they are not taking with them, for example, backorder or special ordered items. |
|
*Payment Not Required |
This message is displayed if the customer is not required to make a payment at the time the order is placed. For example, if there is a total due on the order, and if the customer is not marked as an immediate payment customer, then the customer has the option to either pay in full, pay in part, or pay later for the items they are taking with them at order time. If the customer is not marked as requiring a deposit, then they will not be required to pay a deposit for any items that they are not taking with them. |
|
Print Pick Plan |
Click this link to print the counter sales pick plan. The pick plan can be configured to suit your business needs. |
|
Picking Feedback |
Click this link to access the Counter Sales Picking Feedback page. |
|
Confirm Order |
Click this button to indicate that you are done creating or changing the order and is ready to move to the next step. After clicking the button, the system determines backorder conditions, prompts for backorder decisions, indicates that the order is ready for payment, and perform edits to confirm the order. Note. Only items that are in the buffer will be confirmed when you click the button. If you are processing a large order that requires chunking, only those rows that are currently viewed online will be confirmed. In addition, you cannot change the quantity for configured products after the button is clicked and the demand is moved to the releasable state in PeopleSoft Inventory. |
|
Record Payment |
Click to access the Record Payment page. If the order has not yet been confirmed, then the system will automatically confirm the order prior to displaying the Record Payment page. |
|
Print Receipt |
Click to print the goods receipt. You can reprint a goods receipt that has been printed for a previously completed order by clicking the Reprint Goods Receipt link from the Header menu at the top of the Order Entry Form page. The document reference number is required on the prompt page. You have the option of printing the receipt as it is or including the current backorder report as of the date you reprint. You can also choose to hide the prices when you reprint the goods receipt. The receipt can be configured to suit your business needs.
Note. In order to view the goods receipt, you will need
to grant full security access to the Web Libraries on your permission list
for the iscripts located in the web library WEBLIB_SCM_UTIL. These iscripts
are HTMLAREA.FieldFormula.IScript_isPrintReady and HTMLAREA.FieldFormula.IScript_PrintDoc. |
|
Complete Order |
Click this button to complete the transaction. Note. Counter sale will use the Document Reference number to distinguish between every completed transaction. If you implement a ten character order number, the maximum number of completed transactions allowed for a single sales order is 99,999. Implementing less characters for the business unit and order number would allow for more complete transactions per order. |
|
Save |
When you click the button, the system performs the same edits that it does for a regular sales orders such as performing lot allocation. Note. You cannot perform lot allocations for a counter sale pick-up item if counter sale allocates the line and sets it to the released state. |
Note. If you click the Record Payment button without first pressing the Confirm Order button, the system automatically performs the confirmation processing first, then it performs the record payment actions. Similarly, if you click the Complete Order button before clicking any of the prior buttons, the system first performs the confirmation process, then does record payment. If the customer is on account and there are no backorders, only clicking the Complete Order button will complete the order without requiring further action by the CSR.
See Recording Payments and Deposits for a Counter Sales Order.
Entering Line Information for a Counter Sales Order
Access the Order Entry Form page (Order Management, Quotes and Orders, Create/Update Counter Sale).
|
Hold |
Displays the hold indicator. When you click the Complete button, the hold is removed for customer pickup holds. On the counter sale, the order is placed on hold at the schedule level to prevent the product from being sent to the customer from PeopleSoft Inventory. The CSR will not be able to view the hold unless they navigate to the Schedule Holds/Change Reasons page. All other holds behave the same as in the regular sales order. |
|
Pick Up |
Flags that the customer is taking the items or is picking them up at the will call area. |
|
Pick Up Quantity |
The quantity defaults from the line and represents the quantity that the customer is taking. If the amount is less than the value in the Quantity field, the balance goes on back order. |
|
Ship From |
This Ship From field is for the counter sale location where the goods are being picked up from. For counter sales, the Ship From BU from the Add page always defaults if the item is stocked in that Inventory business unit regardless of the distribution network assigned to the customer ID. |
Recording Payments and Deposits for a Counter Sales Order
Access the Record Payment page (click the Record Deposit link on the Order Entry Form page).
Note. From this page, you can view only the receipt for the current order transaction. The receipt will typically be in a new or hold status from the sales order.
|
Receipt Number |
Displays a unique value that is auto generated at save time. |
|
Receipt Status |
Select from the available options: New: When you create a receipt, it is in a status of new. When in new status, you can edit all fields on the receipt. The cashier can change the status to a hold status. Printed: After an order is completed, it will have a status of printed. Reconciled:When you reconcile the cash drawer that is associated with the receipt, the status automatically changes from printed to reconciled. At this time, you cannot edit the receipt information. Canceled: If a receipt was entered by mistake, you can mark it as canceled. Canceled receipts are not included in the Cash Drawer reconciliation process. Hold: This status enables the cashier to handle the payment method "unknown" requirement for cash on delivery (COD) scenarios. Cashier can update a hold status to a new or canceled status. These receipts are not included in the Cash Drawer reconciliation process. |
|
Cash Drawer ID |
Displays the cash drawer ID. This value is defaulted from User Preferences page. |
|
Pickup Amount |
Displays the amount of the goods that will be taken by the customer for the current transaction. |
|
Deposit Required Amount |
Displays the system calculated amount representing the deposit amount to be collected from the customer for the current order transaction. This value is calculated by multiplying the deposit required basis with the deposit percent. You can override the amount on the Record Deposit page. This field will not display on the Payment page unless there is a deposit required basis. |
|
Change Deposit |
Click the link to access the Change Deposit page and make changes to the deposit such as the deposit percent or to specify if a deposit is refundable. This link will not display on the Payment page unless there is a deposit required basis. |
|
Deposit ID |
After a deposit is saved, a unique deposit ID will be assigned and will appear in this field. This field will not appear on the Payment page unless there is a Deposit Required Basis. |
|
Total Amount |
Displays the pickup amount plus the deposit required amount. |
|
Deposit Applied |
Displays the amount of the deposit to be used against the transaction. The value is calculated by the system and the amount covers any existing backorders. You can override it on the Payment page if necessary. The field appears only if there is a deposit balance. |
|
Deposit Balance |
Displays the balance of the total deposits made against the sales order minus any previously applied deposits or refund activity. The field appears only if there is a deposit balance greater then zero. |
|
Total Due |
Displays the amount to be collected from the customer. It is the pickup amount plus the deposit required Amount minus the applied deposit. |
|
Payment Amount |
This amount uses the default value from the Total Due field. You can change this value if the customer wants to pay for part of the pickup amount immediately and the balance to be billed to their account. Specify the amount to be paid at this time in the Payment Amount field. If the customer is marked as Immediate Payment Required, then this field will not be editable. |
|
Payment Method |
Values are Cash, Check, Corporate Voucher, Credit Card, Debit Card, and Procurement Card. For checks, click the Additional Information link to access the Check Information page. For credit cards, debit cards, and procurement cards, click the Additional Information link to access the Card Information page. |
|
Amount Tendered |
Enter the amount received from the customer for each payment method. |
|
Remaining Balance |
As amounts are entered into the payment tendered grid, the remaining balance will be updated to reflect how much is still to be collected for the current transaction. This is helpful when collecting money in multiple payment methods. |
|
Non-Cash Received |
Displays the system calculated amount, which is a sum of the amount tendered column for all noncash payments. |
|
Cash Received |
Displays the system generated amount for the amount tendered for cash payments. |
|
Total Tendered |
Displays the amount for all noncash and cash payments, as calculated by the system. |
|
Change Due |
Displays the amount calculated by subtracting the payment amount from the total tendered. |
|
Comments |
The sales associate can enter comments (up to 256 characters). Note. Comments do not print on the goods receipt. |
|
Cashier ID |
Upon saving the page, this field is set to the current user ID. |
|
Date/Time |
Upon saving the page, this field is set to the last update date and time. |
|
Print Receipt |
Click to print the goods receipt. |
|
Complete Order |
Click to complete the order. |
Changing Deposit Information
Access the Change Deposit page (click the Change Deposit link on the Record Payment page).
|
Deposit Required Basis |
Displays the sum of the unfulfilled schedules that do not have a deposit placed for them. This basis amount will be used to calculate the amount of a deposit that is to be collected for an order. |
|
Deposit Percent |
Displays the percentage of the deposit required basis that will be collected for this order transaction. The deposit percentage defaults from the customer Bill to Options page and then from the Order Entry Features page for the Order Management business unit. You can override the percentage from here. The ability to change this amount is controlled through feature security. |
|
Deposit Required Amount |
Displays the system calculated amount representing the deposit amount to be collected from the customer for current order transaction. Calculated by multiplying the deposit required basis times the deposit percent. Alternatively, a flat deposit amount can be entered here. The ability to change this amount is controlled through feature security. |
|
Deposit Refundable |
Select this check box to indicate that a deposit is refundable. Unless you select this check box, the deposit is considered nonrefundable. |
See Also
Establishing Feature Function Security
Entering Check Payments
Access the Additional Information - Check page (click the Additional Information link on the Record Payment page).
Your sales associate can enter as many fields as you require for the check payment.
|
Check Number |
Enter the number for the check. |
|
Authorization |
If you are using a third-party application to authorize the fund, you can enter the number here. |
Entering Payments for Credit, Debit, and Procurement Cards
Access the Additional Information - Card page (click the Additional Information link on the Record Payment page).
See Also
Processing Credit Cards for Immediate Payment
Using Counter Sales Picking Feedback
Access the Counter Sales Picking Feedback page (click the Picking Feedback link on the Order Entry Form page).
The system does not allow configured items or configured kits to be overpicked or under picked or to select demand lines or schedules that are already pegged.
Note. Lot allocations, on the Lot Allocation page, cannot be made for counter sales orders when the customer takes the product with them. Lot can be allocated to demand that is not past the releaseable state in fulfilment. Customer picked up orders are automatically sent to PeopleSoft Inventory in the released state. However, you can specify a lot, and change the automatically selected lot, if the product is controlled at that level on the Picking Feedback page. Also, if the product is defined as a ship serial item, you can enter the ship serial IDs on the Picking Feedback page.
|
Storage Area |
Displays the location that appears by default from the Inventory business unit. You can adjust it here. |
|
Lev 1, Lev 2, Lev 3, and Lev 4 (level 1, level 2, level 3, level 4) |
Specify the level. |
|
Qty Picked (quantity picked) |
Adjust the amount picked. |
|
Lot ID and Serial Number |
If the item is lot controlled or has a serial number, it appears here. |
Viewing and Refunding Deposits
This section discusses how to:
View customer deposits.
Refund deposits.
Zero out deposits.
Pages Used to Refund Deposits|
Page Name |
Definition Name |
Navigation |
Usage |
|
CUST_DEPOSIT |
Order Management, Quotes and Orders, Review Customer Information, Customer Deposits |
Use to view and refund deposits. |
|
|
CUST_DEPOSIT_RFND |
Click the Refund Deposit button on the Customer Deposits page. |
Use to refund deposits for a customer. |
|
|
CUST_DEPOSIT_ZERO |
Click the Zero Refund button on the Customer Deposits page. |
Use to process a nonrefundable deposit. |
Viewing Customer Deposits
Access the Customer Deposits page (Order Management, Quotes and Orders, Review Customer Information, Customer Deposits).
Note. Even though a deposit may have been marked as nonrefundable, the cashier can still decide to refund if necessary as long as they have the appropriate feature security.
Enter search criteria to bring up the deposits for a customer. You must enter either a business unit or setID in addition to the customer. You can further refine the search by including an AR business unit or order number.
If you want to include deposits that have been fully applied, select the Include zero balance deposits check box.
Deposits Collected
|
Deposit ID |
Displays the deposit ID for the customer deposit. Click the link to view additional details about the deposit and to view deposit activity. |
|
Sales Order |
Displays the sales order that the deposit was taken against. |
|
Deposit Amount |
This is the amount that was collected for the order deposit. |
|
Applied Amount |
This is the sum of all amounts that have been applied to the order for this deposit ID. |
|
Refunded Amount |
This displays the total that has been refunded for this deposit ID. |
|
Deposit Balance |
This is the amount that is available to be applied to the sales order or that can be refunded back to the customer. The deposit balance is the deposit amount minus the applied amount minus the refunded amount. |
|
Refundable |
This indicates whether the deposit that was taken was marked as refundable or not at the time the deposit was collected. |
|
Refund Deposit |
Click the button to access the Refund Deposit page and initiate a deposit refund. Note. This option is not available if the total deposit balance is zero. |
|
Zero Refund |
Click the button to access the Zero Out Non-refundable Deposit page and process a nonrefundable deposit. |
The totals for the deposits display at the bottom of the page.
Refunding Deposits
Access the Customer Deposit Refund page (click the Refund Deposit button on the Customer Deposits page).
|
Receipt Status |
This is the status of the refund receipt. |
|
Cash Drawer ID |
The value defaults from Order Management user preferences. |
|
Deposit Balance |
Displays the remaining deposit that has not been applied. You can refund up to this amount. |
|
Amount to be Refunded |
Enter the amount to refund. The amount must be less then the deposit balance. |
|
Refund Fee Percent |
This is the percentage of the amount to be refunded that is to be retained as a fee. This percent defaults from the Order Management business unit. This amount can be changed by a user that has the appropriate feature security. |
|
Refund Fee Amount |
This is the value of the amount to be refunded multiplied by the refund fee percent. This is the amount of the refund that is to be retained as a fee. This amount can be changed by a user that has the appropriate feature security. |
|
Refund Due |
This is the amount to be refunded less the refund fee amount. It represents the refund amount that is owed to the customer. |
|
Calculate |
Click the button to calculate the refund fee amount or the refund due. |
|
Original Payment Method |
Displays the payment method that was used to pay for the deposit. |
|
Payment Amount |
This is the amount of the deposit that was paid in the original payment method. This amount may include a pick up amount as well as the deposit amount that was also saved to the same receipt. So the amount shown here may be greater than the amount that was collected for the deposit. |
|
Refund Payment Method |
Select the method of the refund. Cash: The cashier removes cash from the cash drawer to be handed to the customer. A negative payment gets tracked in the Cash Drawer Receipt table and passed to PeopleSoft Receivables. Note. If the refund amount exceeds the maximum defined for the cash drawer, then cash cannot be used as a payment method for the refund. The refund will have to be issued by credit card or check. Credit Card: The cashier issues a credit to a credit card. A negative payment gets tracked in the Cash Drawer Receipt table and passed to PeopleSoft Receivables. Check: Select Check if the refund is to be credited back to a customer's account or to have a company check issued to the customer. The credit invoice will be sent to PeopleSoft Receivables. From there, a refund check can be manually initiated and a company check will be issued to the customer from PeopleSoft Accounts Payable. A negative payment gets tracked in the Cash Drawer Receipt table and is not passed to Receivables as a payment because an actual check was not issued to the customer at this time. Note. Specifying a check refund will just issue a credit memo to PeopleSoft Receivables (through Billing), but it will not automatically initiate the refunding process in Receivables. This is a separate manual step in Receivables. |
|
Refund Due |
Enter the amount to be refunded to the customer for each payment method. |
|
Comments |
Enter comments about the refund. These comments will be printed on the refund receipt. |
|
Cashier and Date/Time |
These fields are updated when you save the page. |
|
Maximum Refund Override |
You can control how much cash a user and or a drawer is allowed to refund. The maximum refund amounts are defined for the user and the cash drawer. If a user is allowed to refund only 100 USD cash out of a drawer, and if the current refund transaction requires a cash refund that is greater than 100 USD, then a user with access to override this maximum can check this box and bypass the edit on maximum refund. This field can be controlled by feature security. Note. Give update or display access to this field only to those who you would like to be able to override the maximum refund amount for a transaction. |
See Also
Setting Up and Maintaining a Cash Drawer
Zeroing Out Deposits
Access the Zero Out Non-refundable Deposit page (click the Zero Refund button on the Customer Deposits page).
If an order, which had a deposit taken for it, is cancelled and the deposit is not to be refunded back to the customer, then the deposit needs to be processed by filling out this page.
|
Non-Refundable Amount |
Enter the amount of the deposit that is not to be refunded back to the customer. If the amount is for the full deposit balance, then enter the deposit balance here. |
|
Calculate |
Click the button to calculate the refund fee amount, which will be set to the nonrefundable amount. |
|
Save Zero Refund |
Clicking this button will save a deposit activity row similar to a deposit refund activity only the refund fee will be set to one hundred percent. When the Populate Billing process (OM_BILL) is run, an invoice will get created to back out the nonrefundable amount from the customer deposit account and increase the deposit fee revenue account. The invoice created will be a zero amount invoice |
Using the Cash DrawerThis section provides an overview of the process flow for payments and deposits and how they are handled by PeopleSoft Order Management, Accounts Receivable, Billing, and Accounts Payable.
See Also
Setting Up and Maintaining a Cash Drawer
Understanding the Payment Process Flow
The section describes:
Standard order payment processing.
Processing orders with deposits.
Processing refunds for cancelled orders.
The following diagram shows a high level view of the cash receipts payment flow. As cash drawer payments are processed the receipts follow a standard flow.
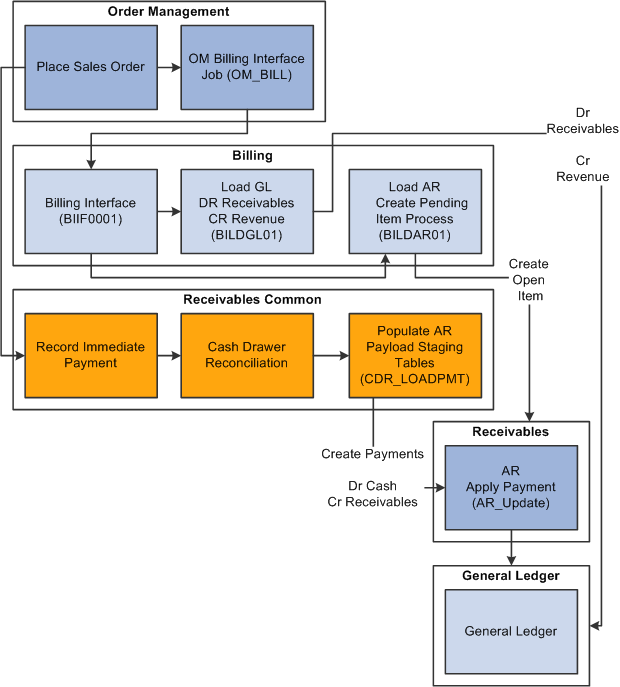
Cash receipts payment flow
Note. It is highly recommended that PeopleSoft Billing to Receivables processes be run prior to Cash Receipt Payments to Receivables processes. This is to help ensure that an open item is created for the invoice prior to the payment matching process. Also, it is recommended that the Receivables Payment Predictor process is run with the #REFS algorithm group.
Standard Order Payment Processing
These sections provide several examples of order payment processing.
Order Is Paid in Full – Open Item for the Invoice Is Created Before the Payment Is Created in Receivables
Suppose you have a counter sale order for 100 USD and the customer pays the order in full at the time of purchase and immediately takes the goods. In this example, the invoice is sent to Accounts Receivable prior to the payment being created in Receivables.
The order is entered and the payment is recorded in the Counter Sale component.
The Order Management Billing process (OM_BILL) sends an invoice to Billing.
Billing creates a pending item in Accounts Receivable.
The Accounts Receivable Update process creates an open item for the invoice.
The customer balance is updated by 100 USD. The open item has both an invoice and a sales order reference.
The cash drawer is reconciled and the Cash Drawer Receipts process (CDR_LOADPMT) sends a payment of 100 USD to Accounts Receivables referencing the sales order.
The Accounts Receivable Payment Interface process creates a payment for 100 USD referencing the same sales order.
The Accounts Receivable Payment Predictor process applies the payment to the open item by matching a payment sales order reference to an open item sales order reference.
This assumes that the Payment Predictor method uses #REFS algorithm group.
The Accounts Receivable Update process updates open item activity and reduces the customer balance by 100 USD.
The table illustrates the accounting events that take place in this example:
|
Event |
Accounts Receivable Open Item |
Accounts Receivable Payment |
Customer Balance |
Accounting Entries |
|
Invoice creates Open Item IT-01 |
100 USD |
100 USD |
DR to Accounts Receivable for 100 USD CR Revenue 100 USD |
|
|
Cash Payment (AR_Payload) |
100 USD |
DR Cash 100 USD |
||
|
Cash Payment applied to Invoice WS-01 |
Closed |
Applied |
0 USD |
CR to Accounts Receivable for 100 USD |
Order Is Paid in Full — The Payment Is Created Before the Open Item for the Invoice Is Created in Receivables
Suppose you have a sales order for 100 USD and the customer pays the order in full at the time of purchase and immediately takes the goods. This example is the same as the above example, except the payment is sent to Accounts Receivable before the invoice is sent. Also in this example, the Accounts Receivable Payment Predictor is configured to create on-account open items for payments not applied.
The order is entered and the payment is recorded in the Counter Sale component.
The cash drawer is reconciled and the Cash Drawer Receipts process (CDR_LOADPMT) sends a payment of 100 USD to Accounts Receivable referencing the sales order.
The Accounts Receivable Payment Interface process (AR_Payload) creates a payment for 100 USD referencing this sales order.
Depending on your system configuration there are different ways the Accounts Receivable Payment Predictor might proceed.
If the Accounts Receivable Payment Predictor process uses the #REFS algorithm group and if the Payment Predictor is configured to create an on-account open item for unapplied payments, then this will occur:
The Payment Predictor process will not find an open item to which it should apply the payment because an open item with an invoice has not been created yet.
The Payment Predictor process will create an on-account pending item for the unapplied payment.
The Accounts Receivable Update process creates an on-account open item for -100 USD and updates the customer balance by -100 USD.
OM_BILL sends an invoice to Billing.
Billing creates a pending item in Accounts Receivable.
The Accounts Receivable Update process creates an open item from invoice and updates the customer balance by 100 USD. Open item references both the invoice and the sales order.
The Accounts Receivable Auto Maintenance process attempts to match the invoice open item and the on-account item.
This assumes the auto maintenance method is set to match by sales order number. The process finds a match because the on-account open item has the sales order number associated with the payment.
The Accounts Receivable Update closes all open items.
The table illustrates the accounting events that take place in this example:
|
Event |
Accounts Receivable Open Item |
Accounts Receivable Payment |
Customer Balance |
Accounting Entries |
|
Cash Payment (AR_Payload) |
100 USD |
Dr Cash 100 USD |
||
|
Payment converted to On-Account WS-05 |
-100 USD (on-account) |
Applied |
-100 USD |
Cr Accounts Receivable 100 USD |
|
Invoice creates Open Item IT-01 |
100 USD (invoice) |
0 USD |
Dr Accounts Receivable 100 USD Cr Revenue 100 USD |
|
|
Invoice Matched with On-Account MT-01 |
On-Account – closed Invoice – closed |
0 USD |
Order Is Paid in Full — The Payment Is Created Before Open Item for the Invoice in Receivables — No Action for Unapplied Items
Suppose you have a sales order for 100 USD. This sales order is paid in full at the time of purchase and the goods are taken immediately. The payment is sent to Accounts Receivable in advance of the invoice. This example is the same as the above example, except that the Accounts Receivable Payment Predictor is configured not to do anything for payments not applied.
The order is entered and the payment is recorded in the Counter Sale component.
The cash drawer is reconciled and the Cash Drawer Receipt (CDR_LOADPMT) process sends a payment of 100 USD to Accounts Receivable which references the sales order.
The Accounts Receivable Payment Interface process (AR_Payload) creates a payment for 100 USD which also references the sales order.
The Accounts Receivable Payment Predictor does nothing for payments not applied, and thus releases the payment for manual matching at a later time.
Note. You must update the payment online in order for it to be picked up by payment predictor again.
The customer balance does not change as a result of this payment.
OM_BILL sends an invoice to Billing.
Billing creates a pending item in Accounts Receivable.
The Accounts Receivable Update process creates an open item from the invoice and updates the customer balance by 100 USD. The open item references both the invoice and the sales order.
You must now manually apply the customer's payment to the invoice open item using the Payment Worksheet.
The Accounts Receivable Update process closes the open items, and updates the customer balance by –100 USD.
The table illustrates the accounting events that take place in this example:
|
Event |
Accounts Receivable Open Item |
Accounts Receivable Payment |
Customer Balance |
Accounting Entries |
|
Cash Payment |
100 USD |
Dr Cash 100 USD |
||
|
Invoice creates Open Item IT-01 |
100 USD |
100 USD |
Dr Accounts Receivable 100 USD Cr Revenue 100 USD |
|
|
Cash Payment Applied to Invoice WS-01 |
Closed |
Applied |
0 USD |
Cr Accounts Receivable 100 USD |
Order Is Paid in Full — Partial Payment Made with a Corporate Voucher Scenario
A sales order is created for 100 USD and paid in full at the time the order is placed. The sales order is partially paid with a 10 USD corporate voucher. The balance of 90 USD is paid with another payment method. In this example, the invoice is sent to Accounts Receivable first. Also in this example, assume the Accounts Receivable Payment Predictor matches payments using the #REFS algorithm group.
The order is entered and the corporate voucher payment is recorded in the Counter Sale component.
The Order Management Billing process (OM_BILL) sends an invoice to Billing for 100 USD.
This same process also sends an invoice line to Billing for -10 USD for the voucher. The invoice total is 90 USD.
Billing creates a pending item in Accounts Receivable.
The Accounts Receivable Update process creates an open item from the invoice and updates the customer balance by 90 USD. The open item references both the invoice and the sales order.
The Cash Drawer is reconciled and the Cash Drawer Receipt (CDR_LOADPMT) process sends a payment of 90 USD to Accounts Receivable which references the sales order.
The Accounts Receivable Payment Interface (AR_PAYLOAD) process creates a payment for 90 USD, which references the sales order.
The Accounts Receivable Payment Predictor applies the payment to the open item by matching the payment invoice reference to the open item invoice reference.
The Accounts Receivable Update process closes the open item.
The table illustrates the accounting events that take place in this example:
|
Event |
Accounts Receivable Open Item |
Accounts Receivable Payment |
Customer Balance |
Accounting Entries |
|
Invoice creates Open Item IT-01 |
90 USD |
90 USD |
Dr Accounts Receivable 90 USD Cr Revenue 100 USD Cr Voucher Discount -10 USD |
|
|
Cash Payment (AR_PAYLOAD) |
90 USD |
Dr Cash 90 USD |
||
|
Cash Payment applied to Invoice WS-01 |
Closed |
Applied |
0 USD |
Cr Accounts Receivable 90 USD |
Sales Order Partial Immediate Pay Remainder on Account Scenario
A sales order is created for 100 USD. The sales order is partially paid, 25 USD, at the time the order is placed, and the balance is to be paid on account. For this example, assume the Accounts Receivable Payment Predictor matches payments with open items using the #REFS algorithm group.
The order is entered and the partial payment or 25 USD is recorded in the Counter Sale component.
The Order Management Billing process, (OM_BILL) sends an invoice to Billing for 100 USD.
Billing creates a pending item in Accounts Receivable.
The Accounts Receivable Update process creates an open item from the invoice and updates the customer balance by 100 USD. The open item references both the invoice and the sales order.
The Cash Drawer is reconciled and the Cash Drawer Receipts (CDR_LOADPMT) process sends a payment of 25 USD to Accounts Receivable which references the sales order.
The Accounts Receivable Payment Interface process (AR_Payload) creates a payment for 25 USD which references the sales order.
The Accounts Receivable Payment Predictor applies the payment to the open item by matching the payment invoice reference to the open item invoice reference.
The Accounts Receivable Update process updates the customer balance to 75 USD.
The table illustrates the accounting events that take place in this example:
|
Event |
Accounts Receivable Open Item |
Accounts Receivable Payment |
Customer Balance |
Accounting Entries |
|
Invoice creates Open Item IT-01 |
100 USD |
100 USD |
Dr Accounts Receivable 100 USD Cr Revenue 100 USD |
|
|
Cash Payment (AR_Payload) |
25 USD |
Dr Cash 25 USD |
||
|
Cash Payment applied to Invoice |
Applied |
25 USD |
Cr Accounts Receivable 25 USD |
Processing Orders with Deposits
These sections provide some examples of how sales orders that contain deposits are processed.
Deposit Payment Scenario
Suppose you have a sales order for 125 USD. The customer is unable to take the goods with them at the time of the order. Perhaps the goods are on backorder or special order. The customer is required to pay a 50 USD deposit for the order. In this example the invoice is sent to Accounts Receivable first.
The order is entered and a deposit payment of 50 USD is recorded in the Counter Sale component.
Note. A deposit can also be recorded in the regular sales order entry component.
OM_BILL sends an invoice for the 50 USD deposit to Billing.
Billing creates a pending item in Accounts Receivable.
An open item is created for 50 USD for the invoice that contains the deposit.
The Cash Drawer is reconciled and the Cash Drawer Receipts (CDR_LOADPMT) process sends a payment of 50 USD to Accounts Receivable which references the sales order.
The Accounts Receivable Payment Interface process (AR_Payload) creates a payment for 50 USD which references the sales order.
The Accounts Receivable Payment Predictor finds an open item to which it should apply the payment.
The payment is applied to the open item and the item is closed.
A balance of 50 USD, the deposit, is shown under Deposits on the Customer Account Overview in Accounts Receivable.
The table illustrates the accounting events that take place in this example:
|
Event |
Accounts Receivable Open Item |
Accounts Receivable Payment |
Customer Balance |
Accounting Entries |
|
Invoice creates Open Item IT-01 |
50 USD |
50 USD |
Dr AR 50 USD Cr Customer Deposits 50 USD |
|
|
Cash Payment (AR_PAYLOAD) |
50 USD |
Dr Cash 50 USD |
||
|
Cash Payment applied to Invoice WS-01 |
Closed |
Applied |
0 USD |
Cr Accounts Receivable 50 USD |
Sales Order Is Fulfilled, Deposit Was Taken When Order Placed- Balance To Be Billed
Continuing with the previous example, where you had a sales order for 125 USD and the customer paid with a deposit of 50 USD, suppose the sales order is shipped and customer is billed for the balance on the sales order.
OM_BILL sends an invoice for 125 USD to Billing.
OM_BILL also sends an invoice line for the deposit applied of -50 USD. The total due on the invoice is 75 USD.
Billing creates pending item in Accounts Receivable for 75 USD.
The Accounts Receivable Update process creates an open item from the invoice and updates the customer balance by 75 USD.
The open item references both the invoice and the sales order.
The customer balance will have 75 USD open as a result of this transaction.
The table illustrates the accounting events that take place in this example:
|
Event |
Accounts Receivable Open Item |
Accounts Receivable Payment |
Customer Balance |
Accounting Entries |
|
Invoice creates Open Item IT-01 |
75 USD (invoice) |
75 USD |
Dr Accounts Receivable 75 USD Cr Revenue 125 USD Cr Customer Deposits -50 USD |
Sales Order Is Fulfilled, Deposit Was Taken When Order Placed - Balance Paid When Goods Are Picked Up
Suppose you have a sales order for 125 USD where the customer paid with a deposit of 50 USD, however in this example the sales order is picked up and paid for by the customer at time of pick up. In this example the invoice is sent to Accounts Receivable first. Also in this example, assume the Accounts Receivable Payment Predictor matches payments with open items using the #REFS algorithm group.
The customer returns to pick up the goods.
The 50 USD deposit is applied to the order and the balance of 75 USD is paid for and recorded in the counter sale component.
OM_BILL sends an invoice for 125 USD to Billing.
OM_BILL also sends an invoice line for the deposit applied of -50 USD. The total due on the invoice is 75 USD.
Billing creates a pending item in Accounts Receivable for 75 USD.
The Accounts Receivable Update process creates an open item from the invoice and updates the customer balance by 75 USD. The open item references both the invoice and the sales order.
The Cash Drawer is reconciled and the Cash Drawer Receipts (CDR_LOADPMT) process sends a payment of 75 USD to Accounts Receivable which references the sales order.
The Accounts Receivable Payment Interface process (AR_Payload) creates a payment for 75 USD which references the sales order.
The Accounts Receivable Payment Predictor applies the payment to the open item by matching the payment sales order reference to the open item invoice reference.
The Accounts Receivable Update process updates open item activity and updates the customer balance by -75 USD.
The Accounts Receivable Update process closes open items.
The table illustrates the accounting events that take place in this example:
|
Event |
Accounts Receivable Open Item |
Accounts Receivable Payment |
Customer Balance |
Accounting Entries |
|
Invoice creates Open Item IT-01 |
75 USD |
75 USD |
Dr AR 75 USD Cr Revenue 125 USD Cr Customer Deposits –50 USD |
|
|
Cash Payment (AR_PAYLOAD) |
75 USD |
Dr Cash 75 USD |
||
|
Cash Payment applied to Invoice WS-01 |
Closed |
Applied |
0 USD |
Cr Accounts Receivable 75 USD |
Payment Plus Deposit Scenario
A sales order is created for 200 USD. This sales order is partially fulfilled. The customer paid for 100 USD worth of goods taken and left a 50 USD deposit for backordered goods. In this case the invoice was sent to Accounts Receivable first. Also in this example, assume the Accounts Receivable Payment Predictor matches payments with open items using the #REFS algorithm group.
The order is entered and the payment of 150 USD is recorded in the Counter Sale component.
The Order Management Billing process (OM_BILL) sends an invoice to Billing for 100 USD for the goods taken.
This same process creates a separate invoice for the deposit taken for 50 USD.
Billing creates two pending items in Accounts Receivable: one for the 100 USD goods invoice and one for 50 USD deposit invoice.
The Accounts Receivable Update process creates open items from invoices, and updates the customer balance by 150 USD. The open items reference both the invoice and the sales order.
The Cash Drawer is reconciled and the Cash Drawer Receipts (CDR_LOADPMT) process sends payment of 150 USD to Accounts Receivable and references the sales order.
The Accounts Receivable Payment Interface process creates a payment for 150 USD which references the sales order.
The Accounts Receivable Payment Predictor applies the payment to one of the open items by matching the payment sales order reference to the open item sales order reference.
The Accounts Receivable Update process closes one of the open items.
The table illustrates the accounting events that take place in this example:
|
Event |
Accounts Receivable Open Item |
Accounts Receivable Payment |
Customer Balance |
Accounting Entries |
|
Invoice creates Open Item IT-01 |
100 USD |
100 USD |
Dr AR 100 USD Cr Revenue 100 USD |
|
|
Invoice creates Open Item IT-01 |
50 USD |
150 USD |
Dr AR 50 USD Cr Customer Deposit 50 USD |
|
|
Cash Payment |
150 USD |
Dr Cash 150 USD |
||
|
Cash Payment applied to Invoice WS-01 |
Closed (one of the items gets closed, for example, the 50 USD) |
Applied |
100 USD |
Cr Accounts Receivable 50 USD |
|
Cash Payment applied to Invoice WS-01 |
Closed (the other item) |
Applied |
0 |
Cr Accounts Receivable 100 |
Partial Payment Plus Deposit Scenario
Similar to the previous scenario, suppose the customer orders 200 USD worth of goods. A portion of the goods can be taken immediately and a portion is backordered. The customer pays a partial payment of 25 USD for 100 USD worth of goods taken. The customer also pays a 50 USD deposit for backordered goods. In this example the invoice is sent to Accounts Receivable first. For this example, assume the Accounts Receivable Payment Predictor matches payments with open items using the #REFS algorithm group.
The order is entered and the payment of 75 USD is recorded in the Counter Sale component.
The Order Management Billing process (OM_BILL) sends an invoice to Billing for 100 USD.
This same process also creates a separate invoice for the deposit taken for 50 USD.
Billing creates pending items in Accounts Receivable: for the 100 USD goods invoice and one for 50 USD deposit invoice.
The Accounts Receivable Update process creates open items from the invoices and updates the customer balance by 150 USD.
The open items reference both the invoice and the sales order.
The Cash Drawer is reconciled and the Cash Drawer Receipts (CDR_LOADPMT) process sends a payment of 75 USD to Accounts Receivable which references the sales order.
The Accounts Receivable Payment Interface process creates a payment for 75 USD which references the sales order.
The Accounts Receivable Payment Predictor applies the payment to one of the open items by matching the payment sales order reference to the open item sales order reference.
Because both open items reference the same sales order it is difficult to predict which of the two invoices will be credited.
For this example, the 75 payment was applied to the deposit invoice to close the item
The Accounts Receivable Update process closes one of the open items, in this case the Deposit invoice.
The table illustrates the accounting events that take place in this example:
|
Event |
Accounts Receivable Open Item |
Accounts Receivable Payment |
Customer Balance |
Accounting Entries |
|
Invoice creates Open Item IT-01 |
100 USD |
100 USD |
Dr Accounts Receivable 100 USD Cr Revenue 100 USD |
|
|
Invoice creates Open Item IT-01 |
50 |
150 USD |
Dr Accounts Receivable 50 USD Cr Customer Deposit 50 USD |
|
|
Cash Payment (AR_PAYLOAD) |
75 USD |
-- |
Dr Cash 75 USD |
|
|
Cash Payment applied to Invoice WS-01 |
Closed the 50 USD payment |
Applied |
75 USD |
Cr Accounts Receivable 75 USD |
Processing Refunds for Cancelled Orders
These sections provide some examples of how refunds are processed when an order is cancelled.
Cancellation of a Sales Order with a Deposit, Full Refund with Company Check Scenario
Suppose you have a sales order for 125 USD where the customer paid with a deposit of 50 USD. The sales order is then cancelled. You allow refunds of deposits and as such a full refund will be given using company check.
Note. The Accounts Receivable business unit must have an associated Accounts Payable business unit and Accounts Payable origin ID. The customer must have a related vendor ID.
The order is cancelled and a refund is recorded in the Customer Deposit component.
The Order Management Billing component (OM_BILL) sends a negative invoice line to Billing for the deposit refund.
Billing creates a pending item for the credit in Accounts Receivable.
An open item is created in Accounts Receivable for -50 USD.
You then manually send a request to an Accounts Receivable clerk to create a refund for the sales order.
Note. There is no automated method for notifying the Accounts Receivable clerk of the check refund.
The Accounts Receivable clerk then manually creates a refund using the Accounts Receivable Maintenance Worksheet.
The on-account item, referencing the sales order, is selected from the worksheet.
The Accounts Receivable Update process updates open item activity and the customer balance by 50 USD.
The Accounts Receivable Refunds Process loads the refunds into the Payables voucher tables.
The Accounts Payable Voucher Posting process builds the voucher payable to the customer.
The Accounts Payable Pay Cycle process creates the payment for 50 USD to customer.
Note. Alternatively, instead of refunding the credit using a company check, the credit can remain on the customer's account and then be applied to a subsequent open item.
The table illustrates the accounting events that take place in this example:
|
Event |
Accounts Receivable Open Item |
Customer Balance |
Accounting Entries |
|
Invoice creates Open Item IT-01 |
-50 USD |
-50 USD |
Dr AR -50 USD Cr Customer Deposit -50 USD |
|
Refund on-account MT-09 |
Closed |
0 USD |
Dr AR 50 USD Cr Refund Control 50 USD |
|
AR Refunds Process |
NA |
NA |
Dr Refund Control 50 USD |
|
AP Voucher Posting |
NA |
NA |
Cr AP 50 USD |
|
AP Pay Cycle |
NA |
NA |
Dr AP 50 USD Cr Cash 50 USD |
Cancellation of a Sales Order with Deposit, Full Cash Refund Scenario
Suppose you have a sales order for 125 USD where the customer paid with a deposit of 50 USD. The sales order is then cancelled and a full cash refund given.
The order is cancelled and a refund is recorded in the Customer Deposit component.
The 50 USD payment is handed back to the customer at order cancellation time.
The Order Management Billing process (OM_BILL) creates a negative invoice line in Billing for the deposit refund.
Billing creates a pending item for the credit in Accounts Receivable.
An open item is created in Accounts Receivable for -50 USD.
The Cash Drawer is reconciled and the Cash Drawer Receipts (CDR_LOADPMT) process sends a payment of -50 USD to Accounts Receivable which references the sales order.
The Accounts Receivable Payment Interface process (AR_Payload) creates a payment for -50 USD which references the sales order.
The Accounts Receivable Payment Predictor applies the payment to the open item by matching the payment sales order reference to the open item sales order reference.
The Accounts Receivable Update process closes the items and updates the customer balance.
The table illustrates the accounting events that take place in this example:
|
Event |
Accounts Receivable Open Item |
Accounts Receivable Payment |
Customer Balance |
Accounting Entries |
|
Invoice creates Open Item IT-01 |
-50 USD |
NA |
-50 USD |
Dr AR -50 USD Cr Customer Deposit -50 USD |
|
Cash Refund payment processed by AR_PAYLOAD |
NA |
-50 USD |
NA |
Dr Cash –50 USD |
|
Cash Payment applied to Invoice WS-01 |
Closed |
Applied |
0 USD |
Cr AR –50 USD |
Cancellation of Sales Order with Deposit, No Refund Scenario
Suppose you have a sales order for 125 USD where the customer paid with a deposit of 50 USD. The sales order is then cancelled however, in this example you do not allow a refund of the deposit.
The order is cancelled and the nonrefundable deposit is processed in the Customer Deposit component (Zero Refund button).
The Order Management Billing process (OM_BILL) sends a negative invoice line for -50 USD to Billing.
The same process also sends an invoice line for a refund fee of 50 USD to Billing.
Billing creates a pending item in Accounts Receivable for 0 USD.
The Accounts Receivable Update process creates an open item from the invoice which references both the invoice and the sales order.
The Accounts Receivable Update process closes the open item.
The table illustrates the accounting events that take place in this example:
|
Event |
Accounts Receivable Open Item |
Accounts Receivable Payment |
Customer Balance |
Accounting Entries |
|
Invoice creates Open Item IT-01 |
0 USD |
0 USD |
Dr AR 0 USD Cr Customer Deposits -50 USD Cr Deposit Refund Fee 50 USD |