 Understanding Contract Agreements
This chapter provides an overview of contract agreements, agreement compliance metrics, lists common elements, and discusses how to:
Use agreement metrics.
Predefine agreements.
Assign agreements to purchasing contracts.
Understanding Contract AgreementsContract agreements and contract compliance.
Agreement use.
 Contract Agreements and Contract Compliance
An agreement is a negotiated set of conditions in a contract. The agreement specifically spells out the conditions and terms that apply to the contract. You use the PeopleSoft Supplier Contract Management system to monitor and validate agreements. Agreements are assigned through PeopleSoft Strategic Sourcing bid factors and Purchasing contract maintenance. This formal tracking process makes it possible for you to ensure that a supplier is in compliance against the agreements in a contract. Agreements are also known as service level agreements (SLAs) and can be created for specific items in a contract (line agreement), for a contract in general (header agreement), and for a group of items (category agreements).
Often, contract terms that reference the contract cannot be measured by the data that is captured on traditional purchase order, receipt, and voucher transactions. These contract terms are considered nontransactional agreements. An example might be that work can only be performed during daylight hours or that site grading must meet certain standards. Within the contract management system, a more generic structure exists for measuring the milestones and compliance factors of nontransactional agreements. This structure is more practical for monitoring and tracking the performance of the supplier against the contract.
An agreement can contain a list of interested parties and a target date for notifying the parties about the contract header, line, or category agreement. You can set up notifications for completion, change of status, the passing of a target date, or reminder days. Notifications can be directed to supplier contacts, internal users, or both.
Agreements can also have clauses assigned to them. After you create agreements, you use the document authoring system to manage any documents that might have been created in support of the agreement. As a part of agreement monitoring, the system manages step verification requirements and responsible parties for monitoring the agreements. The system notifies you using email when an action, such as a scheduled performance review, is needed.
In addition, you can specify that related files need to be created and attached to the contract record. For example, a contract might state that to receive final payment, the supplier must certify that they have returned all company-furnished equipment and intellectual property. You can set up that agreement clause to require the system to attach a certification file to the contract and store it in the system. This action not only helps maintain compliance with the contract, but it also can help uncover cost savings that otherwise might not have been realized.
Contract compliance is divided into two parts. The first part, described in this chapter, involves predefining agreements and assigning agreements to purchasing contracts. The second part is monitoring and analyzing compliance against agreements. That part is discussed in the next chapter.
See Also
Agreement UseFor each agreement, you can define the verification requirement, whether the agreement is compliant with the terms of the contract, as well as when and who to notify when a compliance date is approaching or has passed. Additionally, agreements might have one or many clauses to which they are associated. When you specify agreement codes on a contract or when a PeopleSoft Strategic Sourcing event is awarded and posted to a contract, the system provides the agreement information to the contract by default.
PeopleSoft Strategic Sourcing supports the mapping of bid factors to one or more agreements and the passing of selected negotiated terms into the awarded contract as agreements. If a sourcing event is awarded to a contract and a bid factor on the event has one or more agreements with which it is associated, the system adds those mapped agreements to the awarded contract. If, however, the system does not map agreements to a bid factor and you want to carry the negotiated terms into the contract, you can create an ad hoc agreement for the contract using the bid factor information and responses. You can also manually add a predefined agreement to the contract. In all cases, you can define any additional information that relates to the agreements for that particular contract or delete any information that is not pertinent to the agreement.
After the contract is approved, you can record the result of the contract activities and the agreement verification information, and indicate whether the agreement is compliant. After tracking the agreement's compliance, you can review the activity and status and manually release adjustment vouchers for any bonuses or penalties incurred.
Note. You can use contract agreement capability for sourcing events that are awarded to purchasing contracts only and that are not enabled for sourcing events awarded to purchase orders.
Common Elements Used in This ChapterUsing Agreement MetricsThis section discusses:
Metric measurements.
Metric measurement types.
Steps for implementing metric measurements with agreements.
Metric MeasurementsSupplier Contract Management uses procurement history from PeopleSoft Purchasing to gather transactional agreement compliance information. This enables you to use summaries of purchasing, invoicing, and receiving transactions to measure a vendor's performance and compliance to a contract agreement. The procurement history also provides you with information about procurement trends and can assist you in managing vendor relationships.
To enable the comparison of a vendor's performance against the performance defined in a contract agreement, the system uses underlying metrics as the basis for evaluating whether the agreement is being met. After running the metric process for procurement history, the system calculates agreement compliance for the contracts included in the run. When you define an agreement, you also establish a numeric negotiated result and performance tolerance value. The metric ID determines the meaning of these values. For example, if the Metric ID value is On-time Receipt Performance, the negotiated result amount represents the target percentage for on-time receipts, and the tolerance percentage can represent an acceptable, but not the preferred level of performance below that targeted negotiated percentage. Any percentage below the allowed tolerance is considered unacceptable.
In addition, you can set up alert notifications to inform buyers when an agreement reaches a warning or unacceptable tolerance level. You notify interested parties, such as contract managers and buyers, when a supplier's performance needs to be examined or when the supplier's performance is unacceptable. You set up the notification process for warnings using the Process Notification page. To access the page, select Supplier Contracts, Monitor and Update, Setup Agreements, Workflow Notifications.
You use Supplier Contract Management pages to view summarized performance details and measurements about agreements and to view the acceptable, warning, or unacceptable performance levels for the agreement. You view the actual performance metric percentage using the Performance Details page. The system provides additional performance data along with charted summarizations of the data. Charted data by period includes:
Acceptable percentages.
Warning percentages.
Unacceptable percentages.
Variance percentages, such as over and under and early and late percentages.
You set up agreements to use metric measurements when you define agreement codes. When you select Metric as a result type, you also select the type of measurement (metric ID) that you want to use along with tolerance percentages. You can measure performance based on these metric measurements:
On-time performance by receipt.
On-time performance by quantity.
Quantity performance.
Purchase order and receipt quantity performance.
Quality performance.
An example of using a metric agreement might be when a contract includes an agreement that specifies that the supplier should deliver 95 percent of its shipments on time by aggregate receipt quantity. So by tracking the supplier's performance over time and the supplier fails to meet the 95 percent target over the life of the contract, the contract manager might not want to renew the supplier's contract. The metric provides the information needed to make the decision.
In addition, suppose the contract manager wants to track the vendor's performance on a regular basis. The manager can set up an agreement with a deliverable for on-time performance and track the performance on a daily, weekly, or monthly basis. The system periodically checks the on-time performance metric for the contract and issues an email and worklist alert to the manager or verification step owner if the performance falls below the agreed upon 95 percent threshold. The manager can then contact the supplier or take appropriate action. By evaluating the receiving transactional data and then notifying the interested party if the supplier is not compliant, it becomes easier for contract managers to manage performance on an exception basis. Contract managers can use any of the performance-based metric measurements on this basis.
See Also
Analyzing Procurement Data and Using Group Purchasing Organizations
Metric Measurement TypesYou use the Contract Agreement Definition page to define agreement codes for use with metrics. Using the page, you select to measure the performance against a contract agreement using a metric-based result type. When you select this type, the Metric ID field is made available and you can select the type of metric you want to use to measure performance against negotiated terms of a contract at the header level.
Note. You cannot set up line-level agreements for use with metrics.
The next sections describe the metric measurements available for Supplier Contract Management and how the system processes the measurements.
On-Time Quantity Performance Measurement
This measurement measures the percentage and actual number of shipments that are on time, early, and late for all items within a period as captured within purchasing at receipt time. The system displays the percentage on-time metric, vendor name, and target percentages by period. To calculate the performance, the system:
Retrieves the actual on-time quantity percentage from the procurement history.
Calculates the on-time warning-performance percentage by subtracting the tolerance-performance percentage from the negotiated on-time percentage.
For example, if the negotiated on-time percentage is 90 percent and the performance-tolerance percentage is five percent, then the on-time warning performance percentage is 85 percent. Other calculations include:
If the actual on-time quantity percentage is greater than or equal to the on-time warning performance percentage and less than or equal to the negotiated on-time percentage, then the warning-performance notification condition is met for the contract agreement.
If the actual on-time quantity percentage is less than the on-time warning performance percentage, then the unacceptable-performance condition is met for the contract agreement.
If the warning-performance notification condition is met for the contract agreement and the Warning Performance check box is selected for the verification step with System as the verification method, then the system issues a warning notification.
If the unacceptable-performance notification condition is met for the contract agreement and the Unacceptable Performance check box is selected for the verification step with System as the verification method, then the system issues an unacceptable notification.
On-Time Receipt Performance Measurement
This measurement measures the actual ship on-time percentage based on actual receipt versus quantity as captured within purchasing at receipt time. To calculate the performance, the system:
Retrieves the actual ship on-time percentage from the contract procurement history.
The percentage is based on the number of receipts related to the contract.
Calculates the on-time warning performance percentage by subtracting the tolerance-performance percentage from the negotiated percentage.
Other calculations include:
If the actual ship on-time percentage is greater than or equal to the on-time warning performance percentage and less than or equal to the negotiated on-time percentage, then the warning-performance notification condition is met for the contract agreement.
If the actual ship on-time percentage is less than the on-time warning performance percentage, then the unacceptable-performance condition is met for the contract agreement.
If the warning-performance notification condition is met for the contract agreement and the Warning Performance check box is selected for the verification step with System as the verification method, then the system issues a warning notification.
If the unacceptable-performance notification condition is met for the contract agreement and the Unacceptable Performance check box is selected for the verification step with System as the verification method, then the system issues an unacceptable notification.
PO/Receipt Quantity Performance Measurement
This measurement measures the percentage and actual number of purchase order receipts within the period and tracks the percentage of total ordered versus total received quantities for the contract over time. The measurement includes a purchase order-versus-receipt quantity performance chart that displays the percentage open receipt quantity metric, vendor name, and target percentage by period. To calculate the performance, the system:
Retrieves the actual-quantity open percentage from the procurement history.
Calculates the quantity-open warning performance percentage by subtracting the tolerance-performance percentage from the negotiated percentage.
For example, if the negotiated-received percentage is 95 percent and the performance-tolerance percentage is five percent, then the quantity open on-time warning performance percentage is 90 percent. Other calculations include:
If the actual-quantity open percentage is greater than or equal to the quantity-open warning performance percentage and is less than or equal to the negotiated-correct percentage, then the warning-performance condition is met for the contract agreement.
If the actual-quantity open percentage is less than the quantity-open warning performance percentage, then the unacceptable-performance condition is met for the contract agreement.
If the warning-performance notification condition is met for the contract agreement and the Warning Performance check box is selected for the verification step with System as the verification method, then the system issues a warning notification.
If the unacceptable-performance notification condition is met for the contract agreement and the Unacceptable Performance check box is selected for the verification step with System as the verification method, then the system issues an unacceptable notification.
Quantity Performance Measurement
This measurement measures the percentage and actual number of vendor shipments with correct quantities, over-shipment quantities, and under-shipment quantities by period. The system displays the vendor name, percentage correct, percentage under, percentage over, and target percentage. To calculate the measurement, the system:
Retrieves the actual-correct shipment percentage from the contract procurement history.
Calculates the correct-shipment warning performance percentage by subtracting the tolerance-performance percentage from the negotiated percentage.
For example, if the negotiated correct percentage is 92 percent and the performance-tolerance percentage is three percent, then the correct-shipment warning performance percentage is 89 percent.
Other calculations include:
If the actual-correct shipment percentage is greater than or equal to the correct-shipment warning performance percentage and is less than or equal to the negotiated correct percentage, then the warning-performance notification condition is met for the contract agreement.
If the actual-correct shipment percentage is less than the correct-shipment warning performance tolerance percentage, then the unacceptable-performance condition is met for this contract agreement.
If the warning-performance notification condition is met for the contract agreement and the Warning Performance check box is selected for the verification step with System as the verification method, then the system issues a warning notification.
If the unacceptable-performance notification condition is met for the contract agreement and the Unacceptable Performance check box is selected for the verification step with System as the verification method, then the system issues an unacceptable notification.
Quality Performance Measurement
This measurement measures the percentage and actual number of vendor shipments that are rejected for quality reasons by period. The quality reason is determined by the reason code entered at receipt time. The system displays the percentage net received metric, vendor name, and target percentage along with the rejected and returned percentages. To calculate the measurement, the system:
Retrieves the actual-quantity accepted percentage from the contract procurement history.
Calculates the quantity-accepted warning performance percentage by subtracting the tolerance-performance percentage from the negotiated percentage.
For example if the negotiated net-received percentage is 90 percent and the performance-tolerance percentage is five percent, then the quantity-accepted warning performance percentage is 85 percent.
If the actual-accepted open percentage is greater than or equal to the quantity-accepted warning performance percentage and less than or equal to the negotiated accepted percentage, then the warning-performance notification condition is met for the contract agreement.
If the actual-quantity accepted percentage is less than the quantity-accepted warning performance percentage, then the unacceptable-performance condition is met for this contract agreement.
If the warning-performance notification condition is met for the contract agreement and the Warning Performance check box is selected for the verification step with System as the verification method, then the system issues a warning notification.
If the unacceptable-performance notification condition is met for the contract agreement and the Unacceptable Performance check box is selected for the verification step with System as the verification method, then the system issues an unacceptable notification.
Steps for Implementing Metric Measurements with AgreementsThe Supplier Contract Management metric-based agreements use procurement reporting entities to capture procurement history for each contract. When a contract contains a metric-based agreement, a reporting entry is automatically created for you that is specific for the contract. To have the system automatically generate the reporting entity, you must first:
Add an automatic numbering entry for the Contract Reporting Entity ID number type.
This auto numbering setup is required so that the system can automatically create the reporting entity for the contract when you create new contracts that contain metric-related agreements.
To add the entry:
Select: Set Up Financials/Supply Chain, Common Definitions, Codes and Auto Numbering, Auto Numbering.
Select Rept. ID from the list of values.
The Auto Numbering page appears.
Select REPORT_ENTITY in the Field Name field.
The system also populates the Max Length field with 5 as well as other required information. You can add or update start sequences and descriptions for the auto-numbering details.
Select: Set Up Financials/Supply Chain, Product Related, Procurement Options, Purchasing, Supplier Performance Setup.
The Supplier Performance Setup page appears.
Select an existing reporting entity in the Reporting Entity ID field.
The system references the reporting entity to obtain the default setID and calendar information for each new reporting entity that it creates automatically when you add new contracts that contain metric-related agreements.
See Analyzing Procurement Data and Using Group Purchasing Organizations.
When the system processes the contract ID, it runs the Procurement History Update process (FS_PRCRUPD). The process includes necessary purchase order receipt information for the contract you specify because the system maintains a link between each contract and the hidden reporting entity for the contract. You use the Update Procurement Info page in the Supplier Contract Management Monitor and Update Agreements component to run the process. Next, you can use the Review Supplier Performance page to review the performance for a vendor based on one of the metric measurements.
Note. The Update Procurement Info page in Supplier Contract Management must be used to capture procurement history specific to contracts instead of the version of this component that resides in the PeopleSoft Purchasing Analyze Procurement component.
This example illustrates the process for creating agreements and applying metric measurements for performance against the agreement:
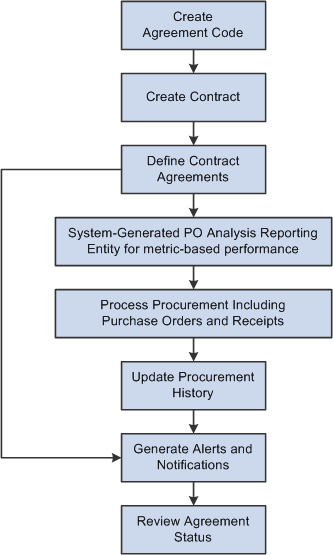
Applying metric measurements for performance process flow
To create and use agreement compliance metrics, use these steps:
Create an agreement code that uses one of the metric measurements and attach the code to a contract.
This includes:
Defining the verification method as System.
Setting up warning and unacceptable performance notifications and details for individual users.
Use the Notification Assignments link on the Contract Agreement Definition page to access the Agreement Notification page.
Set up auto numbering and reporting entities reference on the Supplier Performance Setup page as described earlier in this section.
Run the Procurement History Update process.
This step updates procurement activity for the period and contract that you specify. Make sure that you run the process from within Update Procurement Info component in Supplier Contract Management.
Run the Workflow Notification (CS_NOTIFY_WF) process as needed to generate email and worklist notifications.
The system notifies interested parties defined in notifications when an supplier has an unacceptable performance or a warning performance against a contract agreement. Ensure that the Warning & Unacceptable Performance check box is selected on the Process Notifications page.
Access the Review Agreement Statuses page to review the Cumulative Performance value.
This value provides an overview of the most up-to-date metric cumulative-performance percentages against this contract. The value is based on the current run of the Procurement History Update process for this contract.
Click the Cumulative Performance value to review supplier performance information.
This link accesses the View Vendor Shipment Performance page. You use the page to compare actual performance against target performance. You can also navigate to item details and review receipt information.
The Review Agreement Statuses page provides the supplier's Cumulative Performance value and a link to the View Vendor Shipment Performance page.
Use this page to view the level of acceptance or noncompliance to the agreement. Click the Cumulative Performance link value to review more specific details about the supplier's performance. When you access the View Vendor Shipment Performance page, you can review percentages, time periods, and actual shipment quantity and quality, such as the number of items received and the number rejected.
The View Vendor Shipment Performance page displays results of the most up-to-date cumulative performance percentage of metrics against this contract for the current Update Procurement Info run for this contract. For example, suppose you are tracking quality performance and, using the Contract Entry component, have established that an acceptable level of returns is five percent. Then, if 98 percent of the purchase order receipts for this contract have been received without being rejected for quality reasons, after updating procurement history, the View Status Agreements page displays the cumulative performance value of 98% Acceptable.
Through the Cumulative Performance link value, you can also access additional details of the underlying performance down to the individual receipt level for purchase orders linked to the contract. When you click the Period / Year link, the Performance Details grid box appears:
The Performance Detail grid box provides additional tabs that contain shipping and buyer information. Click the Item ID link to view receipt details for the item.
See Also
Analyzing Procurement Data and Using Group Purchasing Organizations
Reviewing Supplier Performance
Viewing Procurement Analysis Data
Predefining AgreementsThis section discusses how to:
Set up basic agreement information.
Define agreement verification steps.
Assign clauses to agreements.
Assign notifications for agreements and steps.
Process agreement notifications.
Pages Used to Predefine Agreements|
Page Name |
Definition Name |
Navigation |
Usage |
|
CS_AGREE_HDR |
Supplier Contracts, Monitor and Update Agreements, Setup Agreements, Contract Agreement |
Set up basic agreement information for contract agreements. |
|
|
CS_AGREE_CLAUSE |
Click the Clause Assignments link on the Contract Agreement Definition page. |
Assign clauses to agreements. |
|
|
CS_AGREE_WF |
Click the Notification Assignments link on the Contract Agreement Definition page. |
Assign notifications for agreements and steps. |
|
|
CS_RUN_CNTL_WF |
Supplier Contracts, Monitor and Update Agreements, Setup Agreements, Workflow Notifications |
Process agreement notifications. |
Setting Up Basic Agreement InformationAccess the Contract Agreement Definition page (Supplier Contracts, Monitor and Update Agreements, Setup Agreements, Contract Agreement).
Use this page to predefine agreements. After defining the agreement, you can use the agreement code to provide default information from this agreement into a new contract agreement. Agreement codes are defined by setID. SetID records are the same set control group as the PeopleSoft Supplier Contract Management contract set control group.
Defining Agreement Verification StepsAccess the Contract Agreement Definition page (Supplier Contracts, Monitor and Update Agreements, Setup Agreements, Contract Agreement).
Use the Verification Steps grid on the Contract Agreement Definition page to define the verification steps for this agreement.
Comments
Select the Comments tab.
Use this page to enter comments about the verification step to include the email notification that is sent to the approver, collaborator, or reviewer. You can enter up to 254 characters. You can define separate comments for each verification step.
Assigning Clauses to AgreementsAccess the Assign Agreement Clauses page (click the Clause Assignments link on the Contract Agreement Definition page).
Use this page to assign one or more clauses to the contract agreement. The system adds these clauses to the transactional contract when you specify this agreement for either the contract header or contract line.
If you elect to include the agreement information in the contract document, the system incorporates the clauses specified here into the Microsoft Word document. When defining sections for a document, you include agreement information. When that section is used in a document configurator, the system adds clauses associated with the agreements to the document.
Use the Search button to select a clause to include on the contract agreement.
The Title, Full Text, and Reference Text fields are display-only. When you select a clause ID, the system populates these fields with existing clause data. You cannot change this data unless you use the clause maintenance facility. In this case, the clause update is controlled by the document authoring system and could include collaboration and approvals before the approval status makes it available for use again.
Select Body Text
Use this group box to define which type of body text you want to use in the clause. You can select only one type.
|
Full Text |
Select to display the full text of the clause in the agreement document. Full text and by reference text are generation types that the system uses when generating the working Microsoft Word document. You can select either full text or by reference text. |
|
By Reference Text |
Select to include text by reference in the clause. Text by reference indicates a line to which the clause applies and a reference document that describes conditions for the line. The citation of the reference text should be sufficient to describe the contents of the reference, so that reprinting the full text of the clause in the document is not needed. |
|
Title |
Displays the clause title. This value is used with the clause regardless of whether you select Full Text or By Reference Text. |
|
Full Text |
Displays the full text that appears in the clause agreement if you select Full Text in the Select Body Text group box. |
|
Reference Text |
Displays the by reference text that appears in the clause agreement if you select By Reference Text in the Select Body Textgroup box. |
See Also
Assigning Notifications for Agreements and StepsAccess the Agreement Notification page (click the Notification Assignments link on the Contract Agreement Definition page).
Use this page to indicate if notifications will be initiated when a change in status occurs for an agreement or step or if you want to notify the recipient about a pending or past due date.
The system uses these notifications as default values on the contract when the agreement is specified on the contract header or line. The recipients you add here are typically those individuals who are always an interested party when this agreement is included in a contract. At the contract level, you can add additional notifications or delete existing ones. If the interested parties are always different for each contract, you do not need to specify any notifications here. Instead, you can set up the notifications when you create the transaction contract.
|
Sequence |
Displays the notification sequence. This is a system-generated number that identifies the notification. |
|
Notification Type |
Select a notification type. Notification types are triggers for sending notifications to specified recipients, and is a required field. You can add as many recipients as necessary for each notification type. Values are: Agreement: Select if you want to send the notification to the recipient when the status of the agreement changes, or to remind the recipient of an approaching or past target date Agreement and Step: Select if you want to send the notification to the recipient when the status of the agreement or a step changes, or when you want to remind the recipient of an approaching or past target date for either the agreement or step. Verification Step: Select if you want to send the notification to the recipient when the status of a step changes, or to remind the recipient of an approaching or past target date. When you select this option, you must also specify the step number in the Verification Step column. |
|
Verify Step |
Select a verification step to which this notification applies. The system displays this field when you select Verification Step as the value in the Notification Type field. Verification steps define the documents or inspections that might be necessary to fulfill the agreement. |
|
User Type |
Select whether the user is an internal or external user. The system controls the behavior of the remaining fields, depending on your selection. If you select Internal, the system low lights the Allow Updates check box. If you select External, you can indicate if the external user can update the agreement and manually enter users and their email addresses. |
|
Allow Updates |
Select to allow external users to update the agreement verification step (deliverable) when you have enabled supply-side portal access to update the deliverable. This check box is only available for external users. Suppliers can then update this deliverable at any time, but they are notified to do so based on the notification setup for their user IDs. Note. For more information about external users, see the Maintaining Supply-Side Documents and Deliverables chapter. |
|
Recipient Name |
You use this field to enter an external user who is not defined to the system. You must also enter an email address when you enter a recipient. You can also select an internal user, but the system does provide the email address automatically. To populate the User ID and Email Address fields automatically, use the Search Recipient button, described next, to select a recipient. |
|
|
Click this button to search for users based on either their recipient name, user ID, or email address. The system populates the Recipient Name, User ID, and Email Address fields with your selection. |
|
User ID |
Select an user ID to use for this notification. |
|
Specify Email |
Select to use highlight the Email Address field. You can normally use the address that the system placed in the field which will be the default email address for the user ID, or you can override and manually enter an external email address for cases where simple notification is wanted but a user ID does not exist in the system. |
|
Email Address |
Enter an email address for the recipient. This field is required and the system uses it to route notifications. The system automatically populates this field from the user ID's default email. If you are sending a notification to an external user, you can manually enter the address. Make sure the Specify Email check box is selected to send the email. |
Details
Select the Details tab.
Use this tab to set up notification reminder dates for recipients of agreement or step notifications. You can base notifications on a change in status of the agreement or step or as a reminder when a due date is approaching. You can also select to send notifications in all instances or to send notifications for specific reminders.
|
Notify On Status Change |
Select if you want to notify the recipient when a status change occurs in the agreement or verification step. The system sends the notification to all recipients with a notification type set to Agreement or Agreement and Steps when the compliance status of the agreement is changed from Not Set to Cancelled, Compliant, or Not Compliant. If the activity status of the verification step changes from Not Started to Cancelled, Completed, Failed, or In Process and the recipient's notification type is set to Agreement and Steps or Steps (and the step specified is being changed), the system sends a notification. To make changes to the status at the agreement or verification step level, use the Update Agreement Statuses component. |
|
Warning Performance |
Select if you want to warn the recipient about the performance against an agreement. This check box is available when the notification is tied to a verification step that has a system verification method and a metric result type. |
|
Unacceptable Performance |
Select if you want to notify the recipient that the performance against an agreement is unacceptable. This check box is available when the notification is tied to a verification step that has a system verification method and a metric result type. |
|
Reminder Number Of Days Prior |
Enter the number of days that you want a recipient to take action before the agreement or verification step is due. For example, if the target date of the agreement or the due date of the step is set to March 15 and you set the number of days prior to 5, the system does not notify the recipient until five days before March 15 (that is, March 10). If the notification type is Agreement, the system notifies the recipient this number of days before the target date of the agreement. If the notification type is Verification Step, the system notifies the recipient this number of days before the due date of the step. If the notification type is Agreement and Step, the system notifies the recipient this number of days before the target date of the agreement as well as this number of days before the due date of every step. If you leave this field blank, the system does not send reminders. |
|
Final Reminder Days |
Enter the number of days before the target date of the agreement or the due date of the step that you want the system to send a final reminder. This field processes dates the same as the Reminder Number of Days Prior field and represents the last notification before the target date or due date have passed. |
|
Passed Target Date |
Select to indicate that the recipient is to be notified when the target date of the agreement has passed and the compliance status of the agreement is not set to Compliant or the due date of the step has passed and the activity status is not set to Completed. The system notifies the recipient following each run of the Workflow Notifications process until the agreement or step status is set to Compliant/Completed or Canceled. |
Processing Agreement NotificationsAccess the Process Notifications page (Supplier Contracts, Monitor and Update Agreements, Setup Agreements, Workflow Notifications).
Use this page to periodically run the Workflow Notification process. The process initiates the reminders and notifications specified on the agreement. The system always processes notification entries if there has been a status change. Based on the conditions, the system only processes notifications if the compliance status is Not Set or the activity status is Not Started or In Process. The system also updates the statuses and notification flags during the process and keeps any Draft versions of the contract agreement synchronized with the contract.
The process determines which notifications must be sent based on the notification type and the options defined on the Details tab of the Agreement Notification page. If the notification type is Agreement, the process checks for these conditions:
If a quantity is specified for the Reminder Number of Days Prior, the process checks if the current date is less than or equal to the agreement's target date minus the number of days specified. If the condition exists, the process sends a notification.
If a quantity is specified for the Final Reminder Days field, the process checks if the current date is equal to the agreement's target date minus the number of days specified.
If the condition exists, the process sends a final reminder.
If the current date is past the agreement's target date, the process sends a past due reminder, depending on whether the Agreement Past Due check box is selected.
If the notification type is Verification Step, the process checks for these conditions:
If a quantity is specified for the Reminder Number of Days Prior field, the process checks if the current date is equal to the due date of the step minus the number of days specified. If the condition exists, the process sends a notification.
If a quantity is specified for the final reminder days, the process checks if the current date is equal to the due date of the step minus the number of days specified. If the condition exists, the process sends a final reminder.
If the current date is past the due date of the step, the process sends a past due reminder, depending on whether the Verification Past Due check box is selected.
If the notification type is Agreement and Step, the process sends notifications based on the agreement criteria defined on this page as well as for each step that meets the verification step criteria.
|
User ID |
Displays the ID of the user running the process. |
|
Request ID |
Enter a unique identifier for this run control process. |
|
SetID |
Enter a valid setID. If you leave the field blank, the system processes contracts for all setIDs. |
|
Contract ID |
Select a contract for which you want notifications processed. If a contract is not specified, the process creates notifications for all contracts that have agreement notifications specified. If you entered a setID, the system only processes the contracts for that setID. If you do not enter a setID, the system processes all contracts for all setIDs. |
|
Agreement Past Due |
Select if you want the system to issue past due notifications each time this process is run. If the Passed Target Date check box is selected on the Agreement Notification page, the current date is past the target date of the agreement, and the agreement status is not yet set to Compliant, the process issues a past due notification. Therefore, if the agreement is past due by 10 days and this process is run daily, the recipient will have received 10 past due notifications and will continue to receive reminders each time this process is run until the task is set to Compliant or this check box is deselected. If the Passed Target Date check box is not selected for the agreement notification, the system does not send past due reminders, regardless of this setting. |
|
Verification Past Due |
Select if you want the system to issue past due notifications for verification steps each time it runs this process. If the Passed Target Date check box is selected for the verification step, the current date is past the due date of the verification step and the step is not yet set to Completed, the system issues a past due notification. Therefore, if the step is past due by five days, and the system runs this process daily, the recipient will have received five past due notifications and will continue to receive reminders each time this process is run until the task is set to Completed or this check box is deselected. If the Passed Target Date check box is not selected on the workflow of the verification step, the system does not send past due reminders, regardless of the setting for this check box. |
|
Warning & Unacceptable Performance |
Select to use the run control defined for the notification and generate notifications for the contracts that contain system-generated metric performance agreements. These metric-related agreement notifications warn recipients about a supplier's performance against an agreement. Warning and unacceptable percentage ranges for performance are defined for individual contracts. Notifications are tied to verification steps that have a system verification method and a metric result type. |
|
As of Date |
Enter a date that you want to use as the end date for sending notifications. If you select to send warning and unacceptable performance notifications, then this field is required to determine which metric-agreement verification steps in the contract should be considered for notification. If the contract's verification step Due/Start Notify Date field value is less than or equal to the value that you enter in the As of Date field, and the metrics negotiated result is unacceptable or outside of tolerance, then a notification will be sent to the specified users. Setting the As of Date field on the run control provides you more control over when the notifications are sent for metric-related agreements by allowing for an as of date that is prior to today's date. Note. This date is independent of the metric data and date ranges that the system uses to calculate the metric data which is determined by the reporting entity and run control when you updating contract procurement history. |
|
Last Period Only |
Select to indicate that you want to use information from the last period on which to notify recipients of warning or unacceptable supplier performance against contracts. Normally, the system uses the cumulative metric information to determine if notifications are to be sent. This option is useful when you want to monitor the compliance by the last period of metric data that is based on the last run of the Procurement History Update process within PeopleSoft Supplier Contract Management versus monitoring the compliance by cumulative metric data. Note. The last period of data that the system evaluates is dependent on the data stored after running the Procurement History Update process and not the value defined in the As of Date field. |
Assigning Agreements to Purchasing ContractsThis section provides an overview of purchasing contract agreements and discusses how to:
Assign contract header agreements.
Set up header agreement verification steps.
Assign contract header clauses.
Assign contract header notifications.
Assign contract line agreements.
Assign contract line clauses.
Assign contract line notifications.
Understanding Purchasing Contract AgreementsYou can assign predefined agreements to a contract at the header level the line level, and at the category level. Header-level agreements are typically negotiated terms that apply to the entire contract. Line-level agreements are terms that apply only to a specific line item on the contract. When you select an agreement from the agreement library, the system provides the information defined on the agreement by default into the contract. You can modify the information associated with the contract without changing the data on the master agreement. As an alternative, you can also create ad hoc agreements at each level by defining them directly on the contract. Ad hoc agreements are not part of the agreement library, but exist only for the life of the contract for which they were created.
Using category-level agreements, you can assign agreements that apply to a group of items that belong to the category. This saves you from assigning agreements for individual items in the category.
When you install both PeopleSoft Strategic Sourcing and Supplier Contracts Management, you can optionally assign clauses and agreements to the Strategic Sourcing bid factors. The clauses can appear to bidders online during the bid response process as well as on the event Adobe PDF file that the system generates when a sourcing event is posted. The bid factors and responses can also become an agreement and results when the event is converted to a contract.
Pages Used to Assign Agreements to Purchasing Contracts|
Page Name |
Definition Name |
Navigation |
Usage |
|
CS_AGREE_CNT |
Supplier Contracts, Create Contracts and Documents, Contract Entry Click the Contract Agreement link on the Contract Entry page. |
Assign contract header agreements. |
|
|
CS_AGREE_CNT_CLAUS |
Click the Clause Assignment link on the Contract Header Agreement Assignments page. |
Assign contract header clauses. |
|
|
CS_AGREE_CNT_WF |
Click the Notification Assignments link on the Contract Header Agreement Assignments page. |
Assign contract header notifications. |
|
|
CS_AGREE_CLN |
Supplier Contracts, Create Contracts and Documents, Contract Entry Click the
|
Assign contract line agreements. |
|
|
CS_AGREE_CLN_CLAUS |
Click the Clause Assignment link on the Contract Line Agreement Assignments page. |
Assign contract line clauses. |
|
|
CS_AGREE_CLN_WF |
Click the Notification Assignments link on the Contract Line Agreement Assignments page. |
Assign contract line notifications. |
|
|
CS_AGREE_CAT |
Supplier Contracts, Create Contracts and Documents, Contract Entry Click the
|
Assign contract category agreements. |
|
|
CS_AGREE_CAT_CLAUS |
Click the Clause Assignment link on the Contract Category Agreement Assignments page. |
Assign contract line clauses. |
|
|
CS_AGREE_CAT_WF |
Click the Notification Assignments link on the Contract Category Agreement Assignments page. |
Assign contract category notifications. |
Assigning Contract Header AgreementsAccess the Contract Header Agreement Assignments page (Supplier Contracts, Create Contracts and Documents, Contract Entry, and click the Contract Agreement link on the Contract Entry page.
Use this page to assign agreements to a contract. You can select from an existing list of agreements, manually add agreement information, or modify information that was converted from a Strategic Sourcing event. The page initially displays with the basic information about the contract, including the contract ID, status, vendor, and version number.
If you use a predefined agreement code, the information from the agreement appears as default information on the Contract Header Agreement Assignments page. You can change this default information, but changes to the predefined information affect only the specific contract. The changes are not made to the original agreement. The information that you define for the agreement exists only for the life of the contract.
Note. When you select an agreement to assign to the contact, ensure the agreement is effective-dated as of the contract begin date. If the agreement is not effective, the system issues a message when you select a result type.
If agreement terms and verification steps are unique to a particular contract, you can define those terms and steps for the contract without first defining them as an agreement code. In this case, the information is available only for the life of the contract. While agreement information is also copied to another contract, when you use the copy function to create a new contract, the agreement information will not be a part of the agreement library. As with predefined agreement codes, you can add clauses and notifications.
You can also predefine agreement information on a contract if the contract was generated from a PeopleSoft Strategic Sourcing event. You can associate agreement codes with Strategic Sourcing bid factors that are subsequently used with Strategic Sourcing events. When you award a buy auction to a bidder and create a contract, the system converts the bidder's responses to bid factor questions to the agreement information on the contract.
The page contains agreement details and comments as well as the verifications steps and owners who are required to determine if the agreement is compliant or not. A contract can have multiple agreements with each one having a different set of verification steps. You can also assign clauses and notification information for each individual agreement.
When you complete this page, you can create the document for the agreement and its clauses. If a document already exists for the agreement, you need to refresh or re-create the document to incorporate any changes you make to the agreement information.
See Also
Setting Up Basic Agreement Information
Setting Up Header Agreement Verification StepsAccess the Contract Header Agreement Assignments page (Supplier Contracts, Create Contracts and Documents, Contract Entry, and click the Contract Agreement link on the Contract Entry page.
Use the Verification Steps grid on the Contracts Header Agreement Assignments page to define the steps required to validate the agreement. If you previously selected a predefined agreement code, the system automatically populates the steps that can be changed, added to, or deleted. If you are adding an ad hoc agreement or if the agreement information originated from a PeopleSoft Strategic Sourcing event, you can add steps here.
Use the Verification Steps grid box to establish verification methods and verification step owners. To update header agreement statuses, use the Monitor and Update Agreements component to access the Update Agreement Statuses page where you can view and manage verification processes.
Comments
Access the Comments tab.
|
Notification Comments |
Enter a description that the system uses if notifications are associated with the step. |
Assigning Contract Header ClausesAccess the Contract Header Clause Assignments page (click the Clause Assignments link on the Contract Header Agreement Assignments page).
Use this page to assign clauses to contract header agreements. These clauses pertain to the terms of the contract in general. You can alternately assign clauses to specific line items by defining agreements at the line level.
If you add a predefined agreement and clauses are associated with the agreement, those clauses appear here. Likewise, if the contract was created from a PeopleSoft Strategic Sourcing event and bid factors with associated clauses were added to the contract, the system displays them here.
As with verification steps, you can add or delete clauses without affecting the basic agreement or bid factor definition. You cannot change the text of the clause here. Use the Clause Definition page to update clauses. The order in which the clauses were added to each agreement determines the order in which they appear in the document.
See Also
Assigning Clauses to Agreements
Assigning Contract Header NotificationsAccess the Contract Header Notification Assignments page (click the Notification Assignments link on the Contract Header Agreement Assignments page).
Use this page to define who should review this contract header agreement. You can assign notifications for changes in status of the header-level agreements, as well as reminders for the verification steps associated with the header agreements.
If you selected a predefined agreement, the system copies the notifications from that agreement. You can change any attribute about the notification, delete existing notifications, or add additional notifications without affecting the basic agreement.
See Also
Assigning Notifications for Agreements and Steps
Assigning Contract Item Line AgreementsAccess the Contract Item Line Agreement Assignments page (Supplier Contracts, Create Contracts and Documents, Contract Entry, and click the Contract Agreement button for the line item on the Contract Entry page).
Use this page to assign an agreement to a line item on a contract. This feature makes it possible to define contract terms and clauses specific to an item or item category. You can assign agreements to specific line items by clicking the Contract Agreement button in the Lines grid of the Contract Entry page. Use this button to access the Contract Item Line Agreements Assignments page. This page is identical to Contract Header Agreements Assignments page that you use to assign agreements at the contract header level. Field values and the use of the pages are similar.
Use the Verification Steps grid box to establish verification methods and verification step owners. To update item line agreement statuses, use the Monitor and Update Agreements component to access the Update Agreement Statuses page where you can view and manage verification processes.
Note. Metric agreements are not available at the line- and category-agreement level.
See Also
Assigning Contract Header Agreements
Assigning Contract Line ClausesAccess the Contract Line Clause Assignments page (click the Clause Assignment link on the Contract Line Agreement Assignments page).
Use this page to add a clause to an agreement for a contract line item. Click the Description link to access details about the item. You can add additional clauses by clicking the Add a New Row button.
See Also
Assigning Clauses to Agreements
Assigning Contract Item Line NotificationsAccess the Contract Item Line Notification Assignments page (click the Notification Assignments link on the Contract Item Line Agreement Assignments page).
Use this page to define notification assignments for an agreement that is linked to a line item. Click the Description link to access item details
See Also
Assigning Notifications for Agreements and Steps
Assigning Contract Category AgreementsAccess the Contract Category Agreement Assignments page (Supplier Contracts, Create Contracts and Documents, Contract Entry, and click the Contract Agreement button in the Contract Categories grid on the Contract page).
Use this page to assign an agreement to a category on a contract. This feature makes it possible to define contract terms and clauses specific to an entire group of items in a contract category.
Use the Verification Steps grid box to establish verification methods and verification step owners. To update category agreement statuses, use the Monitor and Update Agreements component to access the Update Agreement Statuses page where you can view and manage verification processes.
See Also
Assigning Contract Header Agreements
Assigning Contract Category ClausesAccess the Contract Category Clause Assignments page (click the Clause Assignments link on the Contract Category Agreement Assignments page).
Use this page to add a clause to an agreement for a contract category. The system adds these clauses to the transactional contract document when you specify this agreement for either the contract header or contract line.
See Also
Assigning Clauses to Agreements
Assigning Contract Category NotificationsAccess the Contract Category Notification Assignments page (click the Notifications Assignment link on the Contract Category Agreement Assignments page).
Use this page to define notification assignments for an agreement that is linked to a category. You can indicate to use notifications when a change in status occurs for an agreement or step or if you want to notify the recipient about a pending or past due date.
See Also
Assigning Notifications for Agreements and Steps