 Understanding the Contract Library
This chapter provides overviews of the contract library, document clauses, document sections, document rules, bind variables, document configurators, contract wizards, document types, and contract library searches and discusses how to:
Define contract clauses.
Define contract sections.
Set up contract rules.
Define bind definitions.
Define document configurators.
Set up document types.
Understanding the Contract LibraryThis section provides a list of common elements and discusses the contract library.
 Common Elements Used in This ChapterContract Library
The PeopleSoft Supplier Contract Management document library is an authoring system that enables you to create, track, and reuse a variety of document elements. The contract library contains the reusable building block components for the authoring system. Using the library, you can create reusable rules, clauses, and section elements. These elements are the building blocks for a document configurator which, in turn, you can use to generate a Microsoft Word document. Similar to clauses, sections, and rules, you can reuse document configurators. Documents resulting from a configurator can have different structures based on the data that they contain.
The contract library and document management system bring together transaction information, such as purchase order lines, with the PeopleSoft Supplier Contract Management-generated document. The system formats the document, inserts the appropriate contractual and legal wording for the given situation and agreements, and manages the approvals and execution of the contract.
Establishing document types in the contract library enables you to define criteria for creating a certain type of document. Document types help authors and clause librarians find the right document to meet their requirements. When you set up document types, you define settings, default values, and security for the document.
Along with the capability to import clauses, the library also provides a complete set of searchable contract elements. Among the types of searches that you can perform within PeopleSoft Supplier Contract Management are searches for clauses, sections, rules, document types, and bind variables. You can also search for document configurators and documents and perform full-text and object-specific searches, such as class names, group names for clauses, and generated documents. This search capability enables you to combine searches for certain transactional data along with document search criteria, such as contract amount and item category. After completing a search, you can review the results and then select a value from the resulting list that meets the search criteria.
This flowchart illustrates the elements of the contract library and how the system processes a purchasing contract or ad hoc document from defining building blocks in the library to generating the document to maintaining the document through its life cycle:

Contract library components and document creation process flow for supplier contract documents
The building blocks that appear in the upper section of this flowchart are the elements that are described in this chapter. The document authoring system uses these elements to generate a document. After the Microsoft Word document is available, you can perform authoring tasks and then place the document into its life cycle, which is described in the next chapter.
Understanding Document ClausesThis section discusses:
Clauses.
Effective dating.
Clause status, approval status, and workflow.
Clause text editing.
Bind variables and repeating clauses.
Using tables in clauses.
Dependent clauses.
Alternate clauses.
Clause previews.
Clause imports.
ClausesDocument clauses are the basic building blocks for document content. A clause typically represents a certain portion, paragraph, or paragraph grouping in a contract. After establishing clauses, you can reference them directly in document sections to structure a document section for reuse. You can also reference the clause directly in document configurators and, optionally, indent them to accomplish the structure and appearance of a section in a configurator.
Before defining clauses, you should define appropriate classes to categorize clauses, and if you are using workflow, define approval types for workflow. If you do not have a clause library, then make sure you consider how and what you define as the content within clauses and the level of granularity. This is most important when considering clause approvals, because the approval level is defined at the clause level for both clause approvals and document approvals that use clauses in final documents.
You can create two type of clauses. The general clause is for normal document use. This section mostly describes the use of general clauses. You use the table clause when you want to design, format, and insert Microsoft Word tables into a document. These tables contain a repeating row of information (bind) that you can expand within the table as part of document creation without repeating the clause itself in a contract document. Table clauses enable you retrieve transactional information such as an item list from purchase orders and purchasing contracts and then set up some basic summary calculations for field quantities and amounts expanded within a column. Tables are not as complex as spreadsheet macros, but enable some simple summing of amounts and quantities to be displayed in expanded table columns.
When you are using general clauses:
You cannot attach a table clause as a dependent clause.
Table clauses do not appear in clause lists of values.
You can list a table clause as an alternate for another table clause. If required, you can use multiple rules directly on the configurator instead to determine which table clause it to be included.
If the clause has repeating binds, you cannot attach a table clause with repeating binds at the same level, but you can attach a table with repeating binds at a lower level within the same hierarchy.
See Also
Effective DatingClauses are effective-dated so that the system can keep a history of clause text updates and approval cycles. Effective dating also enables you to make changes to existing clauses for future use without affecting the wording of the current clause, which might be in use in documents. When creating a contract library, you should define the starting effective dates. The system uses these start dates of the contract to determine which valid clauses to include.
Note. Clause librarians should include the Correct History option in rows of history in clause maintenance, especially when new effective-dated changes are commonly added as of today.
Clause Status, Approval Status, and WorkflowClauses have several statuses associated with them. The first is the status for the clause itself and the next is the approval status for the clause. Because clauses are effective-dated, the clause status is typically Active even for clauses that are pending approval. You can manually set a clause status to Inactive to phase out a particular clause.
You use the clause approval status to determine whether a new clause or change to an existing clause for this specific effective date is approved for use. When you add a new clause or change a clause, the system sets the clause status to Active and sets the approval status to Initial. You can submit clauses for approval through the Approval Framework or perform approvals manually, depending on the installation options and user preferences. If you do not set up clauses for approval workflow using installation options, then users with access to the clause page can manually set the clause approval status.
Clause librarians with clause approval permissions can have their newly copied, created, or edited clauses automatically set to approved. The system validates the structure of a clause before it saves or submits the clause for approval. If a clause structure is not valid, the system displays a message and sets the clause to an initial status, regardless of user preference settings.
See Approving Clauses.
Clause Text EditingClause text fields can include user-defined text and bind variables. You use the Clause Definition page in PeopleSoft Supplier Contract Management to insert these elements directly into the clause using plain text. Plain text does not support formatting. You can also use the page to open the clause in Microsoft Word for editing for rich-text formatting.
Note. When you define simple clauses, Microsoft Word editing is not necessary because the system applies basic paragraph styles from the Microsoft Word template that have been set up using the Document Format and Options page. This setup can apply basic formatting, such as body and numbering styles, using a consistent method for the entire contract. If you need to apply special character-based formatting such as making text bold, underlining text, italicizing a specific sentence or word, or applying other rich-text formatting, you can edit the clause directly using Microsoft Word.
Additional considerations for formatting text within Microsoft Word so that it renders correctly using the preview feature and the final assembled document are described later in this book.
See Microsoft Word Integration with Supplier Contract Management.
This example illustrates how a simple clause might appear when you edit it using Microsoft Word. When you edit a clause using Microsoft Word, only the title, full text, and by-reference text are included in the edit. The system does not include other values that appear on the PeopleSoft Internet Architecture page for Microsoft Word maintenance. Only the clause content is available for editing.

Microsoft Word example of how a clause appears during editing
When you open a document using Microsoft Word, the system includes information about the clause. This information appears with instructional components in a gray background in the document and the system displays the structure of the clause and its contents. The displayed information includes the setID, clause ID, effective date, and fields to which the text belongs.
Microsoft Word XML Formatting
When the system generates the Microsoft Word document, the document's storage format is in XML instead of a Microsoft Word .doc template. You can also view the custom XML tags for the Microsoft Word document using a task pane in the document. You can view custom tags using Microsoft Word. To view custom tags:
Select View from the toolbar.
Select Task Pane.
Click the Other Task Panes down arrow and select XML Structure.
The system displays the XML tags for the clause document.
Clauses contain titles, body, and by-reference text, which the system converts into Microsoft WordML when it creates a document. WordML is a Microsoft tool for use with XML language.
See Also
Microsoft Word Integration with Supplier Contract Management
Bind Variables and Repeating ClausesClauses can include bind variables. The system resolves the binds and converts them to text when it generates the document.
Bind variables can be wizard or transactional types. Wizard binds are user-defined variables that you create. Transactional binds are those that you use in clauses that are linked to purchasing contract transactions. Transaction bind variables enable you to map values from the transactional data such as a purchasing contract into the authored contract. For example, referencing bind variable %%CONTRACT_ID%% can map the transactional contract number from the purchasing contract into a title clause when the system generates the contract.
Bind variables also have repeating attributes associated with them that, in turn, are inherited by the clause or section in which they are used. For example, you can use repeating clauses for things such as an item description list by including the bind variable %%ITEM_DESCR%% within the clause title (or body). The bind variable %%ITEM_DESCR%% happens to repeat at level one because the item list is an immediate child record of the contract header, which is at level zero. So you could define a clause having the text:
This inspection process applies to %%ITEM_DESCR%%.
When the system includes this clause for generation against a purchasing contract with three lines, it could appear as follows in the generated document:
1. This inspection process applies to 4 Piece Saltwater Fly.
2. This inspection process applies to Rod and Reel Case Combo.
3. This inspection process applies to Travel Fly Rod.
You can nest the repeating-level clauses and sections as well. For example, a dependent clause could be assigned to an existing parent clause that repeats level two data, such as contract milestones data. This is a child record to the procurement transaction contract line in the parent clause. When nesting repeat structures, the system validates that it uses the proper child repeating clauses with the immediate parent by checking the level and key structures of each bind variable.
Note. Proper setup of nested repeating structures requires some technical expertise. PeopleSoft Supplier Contract Management provides a set of transactional binds for purchasing contracts. Wizard binds are less complex and do not use repeating structures, so they are always at a level zero. You can easily create wizard binds.
A clause can stand alone or be used as a dependent or alternate clause. These are clauses that you can associate with another clause or use instead of another clause. Descriptions of these clauses are in the next sections.
Using Tables in ClausesYou can define a clause for use with Microsoft Word tables. Table clauses enable you to create a table using Microsoft Word and then populate the table with transactional information during document generation. Table clauses also enable the summing of columns in the table using a SUM pseudo bind format. So, as the system resolves bind variables and populates the table, it also calculates amount totals for columns that include the pseudo bind.
A pseudo bind is an existing bind with the $$ symbols before and after the bind instead of the regular %% bind symbols. You use the pseudo bind to instruct the document generator to provide a sum of all table rows where that same bind name occurs as a regular bind. If the system uses the pseudo bind construction with a nonnumeric bind, it treats the bind as regular text and doesn't perform SUM processing.
You can use other clause features including a title and clause text both before and after the table. The system displays the repeating objects in a tabular format.
Note. After you define a clause as a Table clause type, you cannot change the clause type.
Using table clauses you can also:
Control the table formatting, such as style and column width.
You use the Edit Document button to access the Microsoft Word document and to create the table. This enables the available Microsoft Word formatting.
Enter text and select binds for the table before the system displays the table.
You can use the existing Title field on the clause for the text.
Display the title and preceding explanatory text for the table when you view the document.
When you use Microsoft Word, you can add and format text before and after the table. This text prints in the final document as it was formatted in the Microsoft Word document.
Calculate totals for table columns.
This calculation uses a pseudo bind format and only calculates sums. When an existing bind name is wrapped with a $$ tag, such as $$MERCHANDISE_AMT$$, it means that the system should provide the sum of all values for that field in the table. You can place the bind anywhere in the table, but typically you should place it above or below the corresponding bind name.
When the system creates the document, it determines the bind variable by removing the $$ tag and sums the amount for all rows of that bind name in the table. The summing pseudo bind calculates sums for an entire column. It does not perform subtotaling.
The system doesn't log this bind format like normal binds. You cannot edit this reserved bind when you are editing the clause. The system cannot ensure that a bind was entered using a numeric bind. If the pseudo bind is used against an inappropriate bind, such as a nonnumeric bind, the system ignores it.
Calculate totals for table rows.
The system provides some delivered binds that show the sum of amounts within a table row. For example, the bind PO_FREIGHTTAXMISC provides a sum of the freight, tax, and miscellaneous amounts for that purchase order line. If you want to see this sum, you do not need to use a pseudo bind, instead you can use this system provided bind. You can find these binds by accessing the Bind Mappings page.
Suppress repeated key information.
Using fields on the Clause Definition page, you can limit the duplicate key values in a table. This is useful when redundant information, such as item ID and item description, is being presented across different lines in a table.
Note. You cannot create table clauses when you import objects.
Steps for Creating Table Clauses
You use these steps to create a clause table:
Create a clause using the Table value in the Clause Type field.
Load binds into the body of the clause by clicking the Add Variables button.
You can use these binds to populate table cells. Binds that you load must be mapped to a transaction. The system requires at least one repeating bind in a table clause so that it can expand the data during document creation. You can find the repeating binds by accessing the Bind Mappings page and selecting binds where the Level for the Source Record field is one or greater.
Make sure you select the Full Text check box when you add the variable so that the value is placed in the Full Text box for the clause body. After you add the variables and save the clause, the system automatically selects the Repeating Objects check box if you have repeating binds in the clause. Also, when you save the table clause, the system validates the clause and provide error messages.
Click the Edit Document button to access the Microsoft Word version of the document.
Make any document edits and insert a table in the document.
Before you can use the document, you must insert a table in the Microsoft Word document. After inserting the Microsoft Word table, you can move column and row information into the table cells. This includes moving the bind variables into their appropriate cells. In the table clause there should be one row with the repeating bind value within it. For example, you would create a Microsoft Word table with one row within it having the Item ID, Description, and other needed information at that level for the item. During document creation, the system expands this row to include all items included (repeated) that come from the transactional contract. You can also edit the clause title and place text before and after the table.
Save the document and check it in to the clause library.
After establishing the clause values, you can use the clause in a contract document. When you generate the document, the system retrieves the transactional information from the purchase order or purchasing contract and applies the values and summations that you defined in the clause.
Table Clause Examples
When you define table clauses and if you want to, you can use the $$ tag multiple times to enclose summation values. The next example illustrates how bind variables might appear in a Microsoft Word document before they are resolved:
Several considerations for defining table clauses in Microsoft Word include:
All binds from the same bind mapping record must be on the same row of the table. For example, tax and freight are on the same record.
When you are using long bind names, you need to specify fixed column widths when you build the table, so that the bind names can wrap. The final results display wrapped when necessary within the columns that you specify.
The next example illustrates how a table clause might appear after binds have been resolved for a Microsoft Word contract document:
The table illustrates how you would use the Suppress Duplicate Keys check box and Last Key Field Column field to suppress duplicate values. In the example, the Item ID and Shipto columns have been suppressed. This table was defined by selecting theSuppress Duplicate Keys check box and entering 3 in Last Key Field Column field. Starting with the Due Date column, table values are not suppressed.
When you define the table, you can bold fields such as the Totals row in the example. You can apply formatting on the fixed part of the table. If you format a bind, the system applies the same formatting when it resolves the bind.
Note. Table amounts do not line up by decimal points. You can right justify the column in Microsoft Word to correct this.
Table Clause Errors
Several conditions exist that produce system errors and warnings when using table clauses. When there is a problem with validating a table clause, the system displays many of the errors above the Title field when you save the clause. Error conditions include:
When you generate a document with a table clause, but a table does not exist in the full text portion of the clause, the system generates the document with the table clause repeated. .
When you create a table clause and there are no repeating binds, the system displays an error.
When you create a table clause and you enter reference text, the system displays an error.
When you attach a table clause to a rule, the system displays an error.
When you use a nonnumeric bind name as a pseudo bind in a table clause, the system allows the entry, but ignores the bind when it generates the document.
When you use a nonexistent bind name as a pseudo bind in a table clause, the system allows the entry, but ignores the bind when it generates the document.
See Also
Dependent ClausesA dependent clause is a clause that is linked to a parent clause. When you include the parent clause in a section or configurator, the system also uses the dependent clauses that are linked to the parent clause. Any time the system uses a main clause, the dependent clauses appear directly below it in the Microsoft Word document. You can use dependent clauses when they are defined independently, but they are always mandatory when you link them to a parent clause.
You create a dependent clause in the same way that you create any clause. A clause becomes dependent only when you associate it as a dependent clause using the Dependents grid on the Clause Definition page.
To associate a dependent clause with a parent clause, the dependent clause must be effective on or before the parent clause's effective date. This enables you to change the parent clause content and structure over time and include different structures and content based on contract start date.
Dependent clauses are approved separately from parent clauses, but their approval statuses appear on the Clause Definition page. When you are developing a parent clause, this visibility to dependent clauses assists in the approval of the parent clause.
See Defining Dependent Clauses.
Alternate ClausesYou use an alternate clause as a substitute for a parent clause. Similar to a dependent clause, you create an alternate clause in the same way that you create the parent clause. The clause becomes an alternate clause when you assign it as an alternate to another clause. Alternate clauses enable you to specify clauses that can be selected manually as an alternate clause using Research task pane integration with Microsoft Word 2003.
In addition, the system can automatically include alternate clauses based on rules that you set up in the system and associate with the alternate clause. For example, you might have two standard address clauses used in an ad hoc contract. One address clause uses two lines while the other uses three lines. Then, depending on document author responses to wizard questions, the system determines whether the author wants to use the two-line or three-line clause for formatting. You can define the three-line formatted clause as the default clause, but based on wizard responses, the system can collect address-line values during contract generation, find a rule to recognize the wizard response for a two-line clause and, in turn, switch the three-line clause to the two-line clause automatically in the document.
Another example of switching to alternate clauses might include working with specific suppliers. In this case, for an ad hoc document, a wizard response could determine the supplier based on the alternate rule. In the case of a transactional contract, the supplier value might come from a transactional bind value such as VENDOR_ID.
If an alternate rule is not defined using the Rule tab on the Clause Definition page, the system uses these standards to process alternate clauses:
If it adds the clause to the document configurator, it does not use the alternate clause during document generation.
When you use Microsoft Word Task Pane functions to search for clauses, the system lists the alternate clauses and enables them for author selection.
When you use an alternate clause, the system uses only dependent clauses that are assigned to the alternate and not the dependent clauses that are assigned to the main clause. Alternate clauses can include bind variables, but cannot be repeating in nature. This means that they cannot contain bind variables that repeat.
See Bind Variables and Repeating Clauses.
Alternate clauses can have dependent clauses that are used in the document in the same way as dependent clauses.
See Also
Microsoft Word Integration with Supplier Contract Management
Clause PreviewsDuring document preview and generation, the system uses the Microsoft Word template and setup definitions to determine which paragraph style and outline numbering to associate with the clauses in a generated document while preserving special character formatting such as making characters bold or underlining a word.
The system applies these paragraph styles for any clause content that does not have explicit override paragraph styles or lists defined for it within the clause itself. Setting up Microsoft Word templates requires a working knowledge of Microsoft Word and paragraph styles and special consideration for when users can edit clause content and override styles.
Clause ImportsUsing the Import Clause feature, you can import a single clause or group of clauses into the contract library. The system provides for completing a partial clause definition and applies the same edits to clause entry as are present in the online entry.
See Importing Clauses and Sections.
Understanding Document SectionsYou use a document section to create a reusable structure of clauses, rules, and sections that can be nested up to nine indented outline levels and to create rules for use within a document.
Note. You can also use a special Amendment Placeholder section type when creating contract amendments. The system uses the placeholder section as a location in the amendment configurator to record text additions, updates, and deletions that you have made in the main amended document. During system processing, these changes can be automatically extracted and placed in a separate amendment file at the location where the Amendment Placeholder section is defined in the amendment configurator. A given amendment configurator should contain only one Amendment Placeholder section at most.
See Updating Amendment Files Automatically.
The next sections describe section features.
Effective Dating
Sections are effective-dated so that you can make future changes to sections without affecting existing section structures that might already be in use in documents. You should decide which starting effective date to use when creating the contract sections. The system uses the start date of the contract to determine which sections are valid at a point in time and includes the content of the section in the document.
Section Approval Status
Unlike clauses, sections do not use the PeopleSoft Approval Framework for approvals. You maintain approvals for sections using the Section Definition page. Use the User Preferences page for PeopleSoft Supplier Contract Management to define who can approve sections. You can set user preferences for clause librarians so that the sections they create are automatically set to an approved status.
See Setting Up User Preferences.
Section Text Edits
Sections can contain a title and section body, for example, that you can use as an introduction to the document section. The editing functions for a section are similar to those for clauses in that you can edit text directly using the PeopleSoft page, or use Microsoft Word 2003 to modify the section and add text using a rich text format (RTF).
This format is a file type that the system uses to transfer formatted text documents between applications. The format is often used when a document is created in one word processing program but is expected to be edited in another word processing program. With the document authoring system, you use the format between Microsoft Word and the PeopleSoft system.
The following example illustrates how a simple section might appear when you preview it in Microsoft Word. Although sections do not have a formal workflow status, if the section status is not set to Approved, the Microsoft Word document indicates the status in the section title when you are previewing the section. If you were to include a pending section in a document configurator, the unapproved section would be omitted from any final generated document.
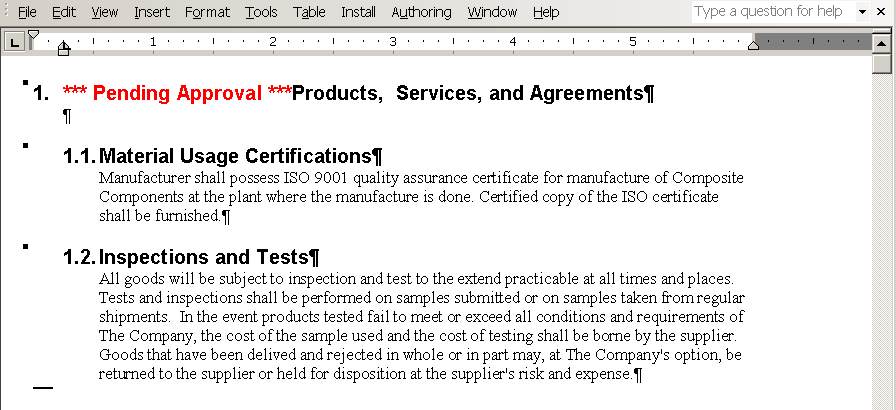
Microsoft Word preview of a section
The previous example illustrates a section that is pending approval. The system generates a message within the section to indicate that it has not been approved. Sections do not use alternates or groups. The section structure can include clauses, other sections, and rules, whereas a clause can have only dependent clauses associated with it.
During document preview and generation, the system uses the Microsoft Word template and setup definitions to determine which paragraph style and outline numbering to associate with the section in a generated document while preserving special character formatting such as making text bold or underlining a word.
The system applies these paragraph styles for any section content that does not have explicit override paragraph styles or lists defined for it within the section itself. Setting up Microsoft Word templates properly requires a working knowledge of Microsoft Word and paragraph styles. For more information about special considerations for editing clause content and overriding styles, see the Microsoft Word Integration with Supplier Contract Management appendix.
See Microsoft Word Integration with Supplier Contract Management.
Section Bind Variables and Repeating Sections
Sections also act similarly to clauses with regard to their use of binds and repeating sections. Sections can contain binds within the section title or section body.
Note. If a section has repeating binds, you cannot attach a table clause with repeating binds at the same level, but you can attach a table with repeating binds at a lower level within the same hierarchy.
See Bind Variables and Repeating Clauses.
Understanding Document RulesA rule is a user-defined set of data and conditions that the system uses to determine whether to include any additional specific clauses or sections in a generated document, or to determine whether an alternate clause is to substitute for the initial clause that was intended for the document.
Rules can reference bind variables, which enables you to retrieve actual field values from a transaction's record or wizard response when the system processes the rule during document generation. So depending on an author's responses to certain wizard questions or other transactional bind values that are specific to the document that the system is generating, you can use the rule to include additional pertinent content within the document.
See Binds.
This list summarizes how you use rules:
Create standard rules to evaluate transactional information.
You can define a rule, for example, to check for a specific vendor. Using the predefined bind variable VENDOR_ID, which is supplied by PeopleSoft Supplier Contract Management, you can retrieve the actual field value for a transactional purchasing contract and include the content that is specific for that vendor.
Create alternate rules to substitute a main clause with an alternate clause.
An example of using an alternate clause might be when a main clause limits liability, but under certain conditions, such as for a specific vendor ID, you need to substitute the liability clause with a modified version. You can do this by creating an alternate rule that checks whether the VENDOR_ID bind variable is XYZ. Using the Clause Definition page, you can add the alternate clause and associated rule in the Alternates grid.
Create standard rules to evaluate wizard responses.
Rules that are used in conjunction with wizard responses provide a powerful tool for controlling additional content in generated documents. You use this feature by defining different wizard variables. Then you define a wizard and its related question groups and questions that are designed to prompt the document author for specific values. You then create a rule for the system to evaluate those values and take the appropriate action to add content in the completed document.
For example, you want to use a rule in a wizard to add an on-site inspection section to a building document. You would use these steps:
Create a wizard that contains the question, "Is an on-site inspection required?"
As a result of step 1, a wizard variable defined as %%ONSITEINSP%% is populated with a yes or no value.
Create a rule called ONSITE that has the criteria to check If ONSITEINSP = Y.
If the rule is true, the system includes the INSPECTION section in the Content Elements grid for the rule.
Place the ONSITE rule in the document configurator where you want to insert the inspection section.
A document author creates a document using the wizard and responds Yes to the inspection question.
The system processes the rule during document generation and, based on the response, determines to include the INSPECTION section in the document.
Note. If you enter an unformatted rule value that requires a formatted value, the system automatically formats the value that you enter.
The next sections describe additional rule features.
See Setting Up Contract Rules.
Effective Dating
Rules are effective-dated so that you can revise them over time without affecting prior versions of the rule. The system includes the correct version of an active rule in document generation based on the start date of the contract. Each rule has its own identifier, and you can control the Active or Inactive status for the rule.
Rule Criteria
You can establish basic rule criteria for both standard and alternate rules with simple operands and binds. Basic queries can reference multiple bind variables and values, but all comparisons must be processed with a simple 'and' or 'or' statement for the criteria. You can also use more advanced rules that use parentheses to combine statements for more complex data sets when needed.
Repeating Rules
A repeating rule is one that has binds that are from a level greater than zero. If the rule is against a child-level transactional repeating record, such as a contract item line for a transaction at level one, the content types and their children that are attached to that rule are transferred into the document for each row of a repeating rule.
Content elements (sections and clauses) that are listed for a rule should not have binds or should have level-zero binds only or the same level binds as the criteria. For example, if the criteria for a transactional contract item is at level one, then the system cannot list content element objects in the rules grid at a level greater than one.
You can include only rules with bind variables that are greater than level zero in a repeating section of the same level. For example, if the rule evaluates a bind variable for the transactional contract item ID at level one, the rule must be included on a section that also contains a bind variable at the same level. Thus, you cannot include rules with bind variables that are greater than level zero on the document configurator directly. Furthermore, if you do require a content element to contain a bind value that is greater than level zero, then the bind variable must be associated with the same record view as the bind that is used within the rule.
Alternate Rules
When rules are attached to alternate clauses, the system uses the rule to determine which of the alternate clauses to use. Each alternate clause can have an associated rule attached to it. The attached rule must have a type of Alternate. The system checks the alternate rules in sequence to find the first alternate for which the rule is true. If none of the rules is true, the system uses the original main clause and does not make a substitution.
During document generation, if a substitution takes place, the system replaces the lead clause information in the document with the alternate clause information.
Note. Substitution of clauses happens for only the lead clause and not the alternate clause. So in the previous example, if the alternate clause itself has alternate clauses and rules defined for it, the system doesn't evaluate those alternate clauses.
Understanding Bind VariablesThis section discusses:
Binds.
Bind definition steps.
System-supplied binds.
Bind use standards.
Use bind variables in document headers and footers.
BindsBinds that you use in PeopleSoft Supplier Contract Management are variable definitions that enable you to map source transactional values, such as a purchase order transactional contract or contract wizard values, to content within clauses, sections, and Microsoft Word templates. When the system processes binds during document generation, the value of the record field that is mapped to the transactional bind variable or the response value of a wizard bind variable replaces the bind variable placeholder in the document. You can also use binds in rules. This enables the inclusion of additional or alternate clauses in documents that you create and maintain.
Binds are stored in a central table that you access using the Binds page. A bind can apply to specific transactions, while others might apply across a variety of transactions.
The system uses binds:
Within the body of text in document clauses and sections.
When you are using bind variables inside body text, the variables must be enclosed within two pairs of percentage symbols (%%): two symbols before the variable and two symbols after the variable. When the system validates binds, it searches for these symbols.
This validation also includes binds that are defined for use with the contract wizard. Wizard binds can exist without any source transaction objects. Binds for the wizard are defined in the CS_BIND table with a CS_BIND_TYPE of Wizard=3.
Within Microsoft Word templates.
This feature involves adding bind variables in the header and footer section of a Microsoft Word template such as the version number, contract number, or amendment number. If a document or Microsoft Word template is setup with transactional bind variables, you need make sure that the transactional sources match when you associate the template to a document configurator. Otherwise, you could have unresolved binds in the header and footer. For example, if you have a contract document with a purchasing contract source transaction type, but the Microsoft Word template associated with the document configurator contains ad hoc bind variables, the system leaves the binds unresolved in the contract document.
Within rules.
When the system processes the bind, it replaces the bind with the real record and field mapping. It then evaluates the rule to determine whether it is true. Binds that are used in rules should always reference the codes, not the XLAT (translate value) values.
Within the bind-mapping definition of the source data transaction.
The system maps the bind to its equivalent record or field in each purchase contract transaction. This mapping provides the link between the bind variable and the record (view) and field from which to retrieve the value. In addition, and because each view's source record has a defined level, the system defines whether the bind is of a repeating nature. For example, a bind variable that is mapped to the contract header for contract amount would be a zero level, which does not repeat, whereas a bind variable that is mapped to the contract item list, which is at level one (multiple items per contract), would inherit a repeating characteristic of level one.
Also, a bind variable that is mapped to contract milestones that are children of a contract line would inherit a repeating characteristic of level two, and so on.
Note. Many of the commonly used source transaction records, views, binds, bind mappings, and bind variables are predefined in the system. You can use the system to include additional views, binds, and bind mappings as needed within the source transactions that are provided.
Within wizards, you use check box binds that enable you to set up multiple yes/no choices for answers to wizard questions. For example, you can use a series of check boxes to group questions to indicate additional content (clauses) that should appear in a contract. There are rules that use each check box bind variable to determine whether a clause should appear based on if it was checked or not when the wizard was invoked. You create wizard binds using the Bind Definition page, and selecting Checkbox in the Field Type field.
The system uses check box binds only within wizards. The bind values are Y (yes) and N (no). The default value is N, and only the Y value controls wizard navigation. After a check box bind is in use, you cannot change it.
Within prompt tables. Prompt tables provide a list of values from which you can select to respond to wizard questions. This is an alternative to setting up a list of valid values for specific fields that already have values in the database. Prompt tables are primarily for ad hoc document generation for which certain values cannot be easily derived from a source transaction, and thus you must be prompted for them. These values are limited to basic codes and do not support multiple key-structured views/tables, such as vendor or item information. After the system stores the value in the bind, you can use the prompt in rules just like any other variable.
PeopleSoft Supplier Contract Management provides prompt tables for currency codes, countries, buyers, Canadian provinces, and U.S. states. Prompt tables are available only in the base language. You cannot assign valid values for prompt tables or navigation for prompt values. Prompt values always go to the next question if one exists.
Within string format masking. A mask defines the number of characters used as input and how the system organizes the data. Setting a mask on a bind variable ensures that when you enter data into the bind variable using the wizard, you enter the data in the proper format. Masking ensures that numeric values and alpha characters are used where they are required and that any special constants are included. When you define the mask for the bind variable, the system displays an example of how the mask will be used in the wizard. You use masking when you have information that is critical to a contract document and that must follow a specific format to be meaningful. For example, a phone number or a special type of identification number, such as a government regulation number or other pre-formatted ID
When you enter information using the wizard, you can enter the data including the mask, or you can enter just the data and the system formats it into the mask. A mask can have three substitution characters. These characters serve as placeholders for the actual values that will be entered when the wizard is invoked. Substitution characters include:
A - alpha character
9 - number
@ - any character
Other characters used in the format will be considered by the system as constants. A mask must have at least one substitution character to be valid. When you associate a mask with a string bind variable, the masked value cannot exceed the field length defined in the Field Length field. Only field lengths of 30 or less may contain masks. The value plus the mask characters must be less than or equal to the field length value.
Within long characters that are a part of the string format feature. Long characters enable you to use the wizard to add larger paragraphs to authored documents rather than 254 text. For example, when adding an ad hoc clause that might not exist in the system but would be specific only to the contract being constructed and not intended to be reused. You define the bind setting using the Long Char value in the Field Length field on the Bind Definition page. You can define navigation only for questions that use a long-character field length. Long-character bind variables have some limitations such as they cannot be used within a rule.
When you run a wizard that uses a long-character question, the system provides an input field. Formatting is limited to what PeopleTools allows for a long edit box. To include paragraphs in the information, press the Enter button on the keyboard.
See Also
Bind Definition StepsTo define and use binds in addition to those that the system supplies:
Define the bind that includes the bind and field types.
Use the Bind Definition page to add these values: Wizard type binds are those that are used with the contract wizard; Transactional type binds originate from a source transaction. These are nonwizard binds, such as those related to the purchasing transactional contract or ad hoc binds.
Review the defined source transaction structures that include the source and parent records.
Map the binds to the view of the source transaction record.
Use bind variables within clauses or rules.
System-Supplied BindsBind setup is intended for advanced users, but the system supplies predefined binds that you can use with fields for transactional purchasing contracts and purchase order contracts. All bind types that the system supplies are TRANS type binds. The binds are mapped based on their description. Descriptions include:
PO contract: Maps to source transactions in the transactional purchasing contract.
Purchase order contract: Maps to source transactions in the transactional purchase order contract.
Ad hoc: Maps to ad hoc source transactions.
Document: Maps to values on the Document Management page for source transactions in ad hoc, purchasing contract and purchase order contract documents.
PeopleSoft Supplier Contract Management delivers the transactional bind types described in this table:
|
Bind Variable |
Description |
Field Type |
|
ADMINISTRATOR |
PO Contract Buyer ID |
String |
|
ADMINISTRATOR_DESCR |
PO Contract Buyer Descr |
String |
|
ADMINISTRATOR_FAX |
PO Contract Buyer FAX |
String |
|
ADMINISTRATOR_PHONE |
PO Contract Buyer Phone |
String |
|
CATEGORY_AGREE_CODE |
Adhoc NDA Number |
String |
|
CATEGORY_AGREE_DESCR |
PO Contract Cat Agree Desr |
String |
|
CATEGORY_AGREE_TARGET_DATE |
PO Contract Cat Target Date |
Date |
|
CAT_AMT_LINE_MAX |
POContract Category Max Amount |
Decimal |
|
CAT_CATEGORY_DESCR |
PO Contract Cat Category Descr |
String |
|
CAT_EXCL_ITEM_ID |
PO Contract Cat Excl Item ID |
String |
|
CAT_EXCL_LINE_NBR |
PO Contract Cat Excl Line Nbr |
Integer |
|
CAT_LINE_NBR |
PO Contract Category Line Nbr |
Integer |
|
CONTRACT_AMT |
PO Contract Amount |
Decimal |
|
CONTRACT_DESCR |
PO Contract Description |
String |
|
CONTRACT_END_DATE |
PO Contract End Date |
Date |
|
CONTRACT_HDR_COMMENTS |
PO Contract Header Comments |
String |
|
CONTRACT_ID |
PO Contract ID |
String |
|
CONTRACT_LINE_COMMENTS |
PO Contract Line Comments |
String |
|
CONTRACT_MAX_AMT |
PO Contract Maximum Amount |
Decimal |
|
CONTRACT_SHIP_COMMENTS |
Contract Ship Comments |
String |
|
CONTRACT_SINGLE_PO_ID |
PO Contract Single Rel PO Num |
String |
|
CONTRACT_START_DATE |
PO Contract Start Date |
Date |
|
CURRENCY_CODE |
PO Contract Currency Code |
String |
|
CURRENCY_CODE_DESCR |
PO Contract Currency Code Desc |
String |
|
CURRENCY_RATE_TYPE |
PO Contract Currency Rate Type |
String |
|
CURRENCY_RATE_TYPE_DESCR |
PO Contract Cur Rate Type Desc |
String |
|
DOC_ADHOC_ID |
Adhoc Document ID |
String |
|
DOC_ADMINISTRATOR |
Adhoc Document Administrator |
String |
|
DOC_AMENDMENT_NBR |
Document Amendment Number |
String |
|
DOC_BEGIN_DATE |
Adhoc Document Begin Date |
String |
|
DOC_CONTACT_ADDRESS1 |
Document Contact Address1 |
String |
|
DOC_CONTACT_ADDRESS2 |
Document Contact Address2 |
String |
|
DOC_CONTACT_ADDRESS3 |
Document Contact Address3 |
String |
|
DOC_CONTACT_ADDRESS4 |
Document Contact Address4 |
String |
|
DOC_CONTACT_CITY |
Document Contact City |
String |
|
DOC_CONTACT_COUNTRY |
Document Contact Country |
String |
|
DOC_CONTACT_COUNTY |
Document Contact County |
String |
|
DOC_CONTACT_EMAIL |
Document Contact Email |
String |
|
DOC_CONTACT_EXTENSION |
Document Contact Extension |
String |
|
DOC_CONTACT_NAME |
Document Contact Name |
String |
|
DOC_CONTACT_PHONE |
Document Contact Phone |
String |
|
DOC_CONTACT_PHONE_COUNTRY_CD |
Document Contact Phone Country |
String |
|
DOC_CONTACT_PHONE_TYPE |
Document Contact Phone Type |
String |
|
DOC_CONTACT_POSTAL |
Document Contact Postal Code |
String |
|
DOC_CONTACT_STATE |
Document Contact State |
String |
|
DOC_CONTACT_TITLE |
Document Contact Title |
String |
|
DOC_DEPTID |
Document Department ID |
String |
|
DOC_EXPIRE_DATE |
Document Expire Date |
Date |
|
DOC_OWNER |
Document Owner |
String |
|
DOC_VERSION_NBR |
Document Version Number |
Decimal |
|
HDR_AGREE_CODE |
PO Contract Hdr Agreement Code |
String |
|
HDR_AGREE_DESCR |
PO Contract Hdr Agreement Desc |
String |
|
HDR_AGREE_TARGET_DATE |
PO Contract Hdr Agree Tgt Date |
Date |
|
ITEM_DESCR |
PO Contract Item Description |
String |
|
ITEM_ID |
PO Contract Item ID |
String |
|
LINE_AGREE_CODE |
PO Contract Line Agreement Cd |
String |
|
LINE_AGREE_DESCR |
PO Contract Line Agreement Dsc |
String |
|
LINE_AGREE_TARGET_DATE |
PO Contract Line Agree Tgt Dt |
Date |
|
LINE_CATEGORY_CODE |
PO Contract Category Code |
String |
|
LINE_CATEGORY_CODE_DESCR |
PO Contract Category Code Desc |
String |
|
LINE_CURRENCY_CD |
PO Contract Line Currency CD |
String |
|
LINE_CURRENCY_CD_DESCR |
PO Contract Line Currency CD |
String |
|
LINE_MERCHANDISE_AMT |
PO Contract Line Merch Amt |
Decimal |
|
LINE_NUMBER |
PO Contract Line Number |
Integer |
|
LINE_QTY_MAX |
PO Contract Line Max Quantity |
Decimal |
|
LINE_QTY_MIN |
PO Contract Line Min Quantity |
Decimal |
|
LINE_STATUS |
PO Contract Line Status |
String |
|
LINE_UOM |
PO Contract Line UOM |
String |
|
MASTER_CONTRACT_ID |
PO Contract Master Contract |
String |
|
MFG_ID |
PO Contract Manufacturer ID |
String |
|
MFG_ITEM_ID |
PO Contract Mfg Item ID |
String |
|
MILESTONE_AMOUNT |
PO Contract Milestone Amount |
Decimal |
|
MILESTONE_NBR |
PO Contract Milestone Number |
Integer |
|
MILESTONE_STATUS |
PO Contract Milestone Status |
String |
|
PAYMENT_TERMS |
PO Contract Payment Terms |
String |
|
PAYMENT_TERMS_DESCR |
PO Contract Payment Terms Desc |
String |
|
PERCENT_COMPLETE |
PO Contract Milestone % Cmplt |
Decimal |
|
PO_CHANGE_ORDER_NBR |
PO Change Order Number |
Integer |
|
PO_DUE_DATE |
PO Due Date |
Date |
|
PO_FREIGHTTAXMISC |
Purchase Order Freight/Tax Sum |
Decimal |
|
PO_FREIGHT_AMT |
Purchase Order Freight Sum |
Decimal |
|
PO_ID |
Purchase Order ID |
String |
|
PO_LINE_NUMBER |
PO Line Number |
Integer |
|
PO_LS_DUE_DATE |
PO Line/Shipment Due Date |
Date |
|
PO_LS_ITEM_DESCR |
PO Line/Shipment Item Descr |
String |
|
PO_LS_ITEM_ID |
PO Line/Shipment Item ID |
String |
|
PO_LS_LINE_NBR |
PO Line/Shipment Line Number |
Integer |
|
PO_LS_LINE_UOM |
PO Line/Shipment PO Line UOM |
String |
|
PO_LS_MERCH_AMT |
PO Line/Ship Merchandise Amt |
Decimal |
|
PO_LS_PRICE |
PO Line/Shipment Price |
Decimal |
|
PO_LS_QTY |
PO Line/Shipment Quantity |
Decimal |
|
PO_MISC_AMT |
Purchase Order Misc Amt Sum |
Decimal |
|
PO_PRICE |
PO Price |
Decimal |
|
PO_QTY |
PO Schedule Quantitiy |
Decimal |
|
PO_SALESTX_AMT |
Purchase Order Sales Tax Sum |
Decimal |
|
PO_SCHEDULE_NBR |
PO Schedule Number |
Integer |
|
PO_USETAX_AMT |
Purchase Order Use Tax Sum |
Decimal |
|
PO_VAT_AMT |
Purchase Order VAT Sum |
Decimal |
|
RENEWAL_DATE |
PO Contract Renewal Date |
Date |
|
REQ_BU |
Requistion Business Unit |
String |
|
REQ_ID |
Requisition ID |
String |
|
RETENTION_AMOUNT |
PO Contract Retention Amount |
Decimal |
|
RETENTION_CD |
PO Contract Retention Code |
String |
|
RETENTION_PERCENT |
PO Contract Retention Percent |
Decimal |
|
SOURCETRANS |
ERP Source Transaction |
Decimal |
|
SPONSOR |
Document Sponsor |
String |
|
USER_CHAR10_1 |
User Defined Char 10 (1) |
String |
|
USER_CHAR10_2 |
User Defined Char 10 (2) |
String |
|
USER_CHAR10_3 |
User Defined Char 10 (3) |
String |
|
USER_CHAR10_4 |
User Defined Char 10 (4) |
String |
|
USER_CHAR10_5 |
User Defined Char 30 (5) |
String |
|
USER_CHAR10_6 |
User Defined Char 30 (6) |
String |
|
USER_CHAR10_7 |
User Defined Char 30 (7) |
String |
|
USER_CHAR10_8 |
User Defined Char 30 (8) |
String |
|
USER_CHAR10_10 |
User Defined Char 60 (10) |
String |
|
USER_CHAR10_9 |
User Defined Char 60 (9) |
String |
|
USER_DATE1 |
User Defined Date (1) |
Date |
|
USER_DATE2 |
User Defined Date (2) |
Date |
|
USER_DATE3 |
User Defined Date (3) |
Date |
|
USER_DATE4 |
User Defined Date (4) |
Date |
|
USER_DATE5 |
User Defined Date (5) |
Date |
|
USER_DECIMAL1 |
User Defined Decimal 23.3 (1) |
Decimal |
|
USER_DECIMAL2 |
User Defined Decimal 23.3 (2) |
Decimal |
|
USER_DECIMAL3 |
User Defined Decimal 23.3 (3) |
Decimal |
|
USER_DECIMAL4 |
User Defined Decimal 11.4 (4) |
Decimal |
|
USER_DECIMAL5 |
User Defined Decimal 11.4 (5) |
Decimal |
|
USER_INTEGER1 |
User Defined Integer (1) |
Integer |
|
USER_INTEGER2 |
User Defined Integer (2) |
Integer |
|
USER_INTEGER3 |
User Defined Integer (3) |
Integer |
|
USER_INTEGER4 |
User Defined Integer (4) |
Integer |
|
USER_INTEGER5 |
User Defined Integer (5) |
Integer |
|
USER_INTEGER6 |
User Defined Integer (6) |
Integer |
|
USER_INTEGER7 |
User Defined Integer (7) |
Integer |
|
USER_INTEGER8 |
User Defined Integer (8) |
Integer |
|
VENDOR_ADDRESS1 |
PO Contract Vendor Address 1 |
String |
|
VENDOR_ADDRESS2 |
PO Contract Vendor Address 2 |
String |
|
VENDOR_ADDRESS3 |
PO Contract Vendor Address 3 |
String |
|
VENDOR_ADDRESS4 |
PO Contract Vendor Address 4 |
String |
|
VENDOR_CITY |
PO Contract Vendor City |
String |
|
VENDOR_CONTRACT_REFERENCE |
PO Contract Reference Number |
String |
|
VENDOR_COUNTRY |
PO Contract Vendor Country |
String |
|
VENDOR_COUNTY |
PO Contract Vendor County |
String |
|
VENDOR_ID |
PO Contract Vendor ID |
String |
|
VENDOR_ITEM ID |
PO Contract Vendor's Item ID |
String |
|
VENDOR_NAME |
PO Contract Vendor name |
String |
|
VENDOR_NAME_SHORT |
PO Contract Vendor Short Name |
String |
|
VENDOR_POSTAL |
PO Contract Vendor Postal Code |
String |
|
VENDOR_STATE |
PO Contract Vendor State |
String |
Bind Use StandardsClauses and sections are stored off the record view name and the level in the child source transaction table. The system uses binds as described in this list:
Clause and section binds use these standards:
Clauses can have a mixture of level zero binds.
Within a clause level, binds can be derived from different level zero record views.
Wizard binds are always implied as level zero binds.
They do not repeat in nature.
Bind levels that are greater than zero cannot be mixed in the same clause, rule, or section because levels that are greater than zero define the repeat nature of the clause, rule, or section itself.
For example, you cannot have a bind on both the contract item ID (level one) and contract item milestone (level two) in the same section title text.
When more than one bind exists within a clause, rule, or section, the bind variables must be mapped to fields within the same record view if the bind level is greater than zero.
For example, you cannot have a repeating clause that references item binds at both level one and contract header level agreements (level one) because as the system generates the document, it must repeat the clause based on one repeating record view.
When bind variables within clauses or sections are children of clauses or sections with bind variables, the record keys for those bind variables must include the key structure of the parent clause or section bind variables.
If children of the parent clause or section have binds, they use these standards:
If a parent clause or section does not repeat, its children can have no binds, level zero binds, or level one binds.
If a parent clause or section repeats at level one, its children can have no binds, level zero binds, level one binds, or level two binds. The level must be greater than or equal to the parent level for binds in the children. For example, a clause containing a line milestone at level two must report to a section or clause above it that repeats on the contract line at level one.
If a primary object repeats at level two, its children can have no binds, level zero, level two, or level three binds. Its level must be equal to or greater than the parent level or it should not have a level. In all of these cases, level zero binds can coexist with any other level binds.
Rule binds use these standards:
When you are adding a rule to a section object, if that rule repeats in that its criteria is dealing with binds at levels greater than zero, the rule can be attached only under a section that is repeating on that same level of information.
Example:
Section repeats on Item
-	Rule If item = 'xxxx' then include clause A
-	Rule if Item = 'yyyy' then include clause B
-	Clause C
-	Clause D
Rules don't limit display data; they are used to include an object in the data.
For example, if you want a rule to represent a kind of item, such as services or a product item, you set the rule in the following way: If item = product, then include the section Products. If item = service, then include the section Services.
Rule A = Products
Rule B = Services
If you want to group the products and services at level one, then use this setup:
Option 1:
Section Services = binds on SERV_ITEMS_VW that points to a view that only brings⇒
 in services.
Section Products = binds on PROD_ITEMS_VW that points to a view that only brings⇒
 in products.
Option 2:
Create a view ITEM_VW that is ordered by category (service or product)
 Section repeats on the item
		Rule A = Products
		Rule B = Services
Binds that the system uses in header and footer sections of the Microsoft Word template use these standards:
You can only include level zero binds – repeating binds are not supported.
All bind variables used must belong to the same source.
See Also
Understanding Document ConfiguratorsA document configurator is a collection of sections, clauses from the library, ad hoc clauses, and rules that compose the overall structure and wording of a document. You create a configurator after you define sections, clauses, and rules and place them in the order that you want within each configurator. When you generate a document, the configurator determines the content and order of the document elements and provides static and dynamic structure within a document. The document configurator can also be related to a wizard that prompts for specific values that can be used by sections, clauses, and rules within the configurator.
Another type of content, the ad hoc clause, is content that you add to the document configurator as you are creating the configuration definition. The system doesn't manage ad hoc clauses the same as clause content in the contract library. It associates the clause with only a single configurator.
You create ad hoc clauses by selecting the Ad Hoc Clause content type on the Insert a Content Row page. This page enables you to enter text for the clause's content description, title, and full text. You can also use Microsoft Word to add rich text by using the Edit in Word button on the Insert a Content Row page. You can upload the edited content into the PeopleSoft system. The process for ad hoc clause creation does not use the Edit Document and Check In features or the clause approval process. Also, ad hoc clauses cannot contain bind variables.
Document configurators are not version or effective-date controlled. However, they are dynamic in that you can introduce changes over time. Changes might include new sections, clauses, or rules. You can define configurators for use with ad hoc contract, purchasing contracts, and purchase order contract documents.
You can create configurators for use with amendments only and include an amendment placeholder section in the amendment document configurator. This functionality is enabled for only the Amend Contract with Amendments option. The system includes the compare results between the last executed contract and recent edits to the main amended contract. The system determines changes to contract documents by using Microsoft Word to compare current contract document to the last created or executed contract. Changes identified by Microsoft Word comparisons include the additions, changes, and deletions of text within the amendment file. The location where you place the amendment placeholder section in the amendment configurator determines where the comparisons appear in the document.
You can also create configurators that use multiple source types so that you can copy a contract from one transaction source to a contract for another source, such as copying an ad hoc contract document to create a purchase order contract document.
Using the View As Of Date feature, you can see the current status and effective date of the element in use. The date is based on the as of date that you can enter. This feature also enables you to preview how the configurator content appears as of a certain date. So the document configurator is essentially a set of pointers back to content in the library, and it is ultimately the contract start date that determines which version of the content is included when you generate document at any time.
Depending on requirements, you can create several configurators that are more static in nature, or create fewer configurators that are more rules-based and that dynamically pull information depending on the rules that are implemented. A Copy From configurator feature enables you to set up a baseline configurator and create other configurators from it. You can also categorize configurators using configurator types and groups.
Note. You can create document configurators either by using the Document Configurator Definition page or by creating a configurator in conjunction with importing clause and section objects. When you create a configurator using the Import Clauses/Sections page, you can apply the structure and contents of a legacy contract and automatically create the configurator.
See Creating a Document Configurator During Object Import.
This example illustrates how contract library elements are brought together and organized in a configurator and how ad hoc clauses and rules can be added from within the configurator:
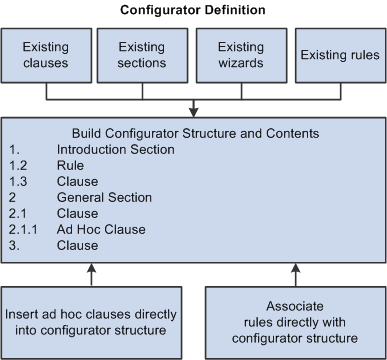
Document configurator flow for creating contract documents
The document configurator references a Microsoft Word template that plays a major role in the resulting format and styles that the system applies to a generated document. You define templates for use with a configurator using the Document Templates and Styles and the Document Format and Options pages in the Supplier Contract Setup menu option.
The settings within this component determine overall Microsoft Word paragraph style names to apply from the Microsoft Word template when the system generates the document. For example, if you are using all numbered sections and clauses, with titles and body text, the system retrieves the style name that is associated with the Numbered Title Style and Body Style Under Numbered Title fields from the Microsoft Word template. The system then applies the styles to all sections and clauses that are included in the configurator during document generation.
Note. The system applies paragraph styles for any clause or section content that does not have an explicit override paragraph style or list defined for it within the clause itself.
Paragraph styles in Microsoft Word and attributes of the outline numbering define what numbering scheme the system uses, indentation for titles and body text, and fonts and font size that are used for the overall text. Because templates have such an impact on document format, you should define Microsoft Word templates to meet document needs prior to generating documents with them.
You need some working knowledge of Microsoft Word and paragraph styles to set up the template properly. As you develop the Microsoft Word template, you should create a trial document configurator and use the Preview feature within the document configurator to review and evaluate the format of the finished document.
During document preview and generation, the system uses the Microsoft Word template and setup definitions to determine which paragraph style and outline numbering to associate with the clauses in a generated document while preserving special character formatting such as making a word bold or underlining a word.
You build configurators as a logical grouping of elements to create a final document from the first to last page, including a table of contents. You do this by inserting references into section, clause, and rule elements in the clause library and, if needed, by adding specific ad hoc clauses for the configurator. After you define the configurator, you can manage elements by either indenting and outdenting or deleting and reinserting the elements. Changing the indentation level of elements within the configurator can also affect the indentation within the generated Microsoft Word document, depending on how you have defined indentation for each outline level within the Microsoft Word template.
Note. Changing the indentation level of elements within the configurator can also affect the indentation within the generated Microsoft Word document. This depends on how you define indentation for each outline level within the Microsoft Word template.
The next example shows how elements might appear in a configurator. The outline positions and content type determine the contents and structure of a configurator that appear in the next Content Elements grid box:
You can expand and collapse configurator elements and view up to nine levels. Four levels appear in the example. For maintenance purposes, the system automatically defines the outline numbering for the configurator element as you maintain the configurator.
See Also
Defining Basic Configurator Information
Viewing and Maintaining Configurator Structures
Understanding Contract WizardsA wizard is a tool that automatically guides document authors to answer questions. It then enables the authors to use the answers to those questions as input to a generated document. The wizard uses wizard binds or rules that can affect a document through alternate clauses or by inserting additional clauses or sections based on the answers. You can define a wizard and use it with one or more document configurators to guide authors during document generation.
You can also define a wizard that helps authors determine what document configurator best meets the needs of the document they are creating when multiple configurators are defined for a document type. You can define configurator selector wizards for document types when multiple configurator IDs are available that you might apply for the selector wizard.
See Also
Using the Contract Document Wizard
Understanding Document TypesDocument types can help you organize and further categorize documents that you use in the document authoring system. Using document types, you can define specific settings, defaults, and security that can help fine-tune the use of each type of document. For example, you can associate a specific configurator with a specific type of document to ensure that the right configuration is used when authors create those types of documents.
The document type structure enables you to standardize life-cycle processing options and default values for all documents that are created for the specified type. For example, you can configure a formal contract document type to enable full life-cycle statuses and functions including executing the document and processing formal amendments. You can also configure other documents, such as a request document, with a more simplified Draft and Approved status option or, even more simple, a Draft and Completed status option.
By using document types, you can simplify the actions that you perform on particular documents such as allowing edits, enabling collaboration, and enabling digital signatures. In addition, you can enable, as needed, user-defined fields and cycle-time properties for document types. These actions make it possible for each type of document to have its own specific and unique attributes.
You can use document types within the requisition flow for requisitions that will require new contracts. In this scenario, you can define a request document and wizard that captures additional information from the requestor. When a document type is set up for the contract request situation, you can specify that the system use this type with a PeopleSoft eProcurement or Purchasing requisition. In this case, along with the requisition, the requestor can generate a supplemental request document by launching a wizard that captures needed information pertaining to the contract request.
The requestor can then provide the required information in the supporting document. When you award the requisition to a contract, the specialist can reference the original request document and make use of any wizard responses within that request document to help drive the content and fill in required data for the actual contract. The benefit of this process is that by the time the contracting specialist becomes involved in the process, the requestor has already been prompted for and provided all of the necessary information.
Other examples for using document types can include statements of work, document summaries, executive summaries, and nondisclosure agreements.
The use of document types requires that you select the Use Document Type check box on the Installation Options page. You can create document types, but the system does not apply them during document creation until the installation option is selected.
Document type features include:
Different approvals for documents of specific document types through the Approval Framework.
Capability to launch a request for a requisition document.
When you use this feature, the system displays a request document link on the Maintain Requisitions page in PeopleSoft Purchasing and on the Create Requisition page in PeopleSoft eProcurement.
Start sequence selection for auto numbering of ad hoc IDs.
Appropriate configurator selection.
Using document types, you can use the system to help you determine the appropriate configurator. You can select a configurator based on either a specific configurator or a configurator selector wizard. A specific configurator always uses the same configurator for the document type, whereas a wizard provides a set of questions for you to answer. Based on the question answers, the system provides the appropriate configurator.
Automatic generation of ad hoc documents.
You use this feature to help streamline the creation of documents. When you select the option, the system automatically generates a document based on all the default values specified for the document type. The system bypasses the Create Document page. So users who may not need to define document details to the level that a contract specialist might need to can more easily create a document. If a wizard is associated with the configurator, the system goes directly to the wizard questions after you enter document key information in add mode as you would do when adding documents from a requisition.
Document type life-cycle statuses and settings for editing, collaboration, and electronic signatures.
Cycle-time and workbench settings.
User-defined fields that provide you a way to define additional user-defined attributes that you can associate to a document.
Security for who can create a type of document and who can view a type of document.
Understanding Contract Library SearchesYou can use the Verity search index for searches in the contract library. Verity searches enable you to search the content of clauses, sections, and current documents. For example, you can use Verity searching to search for clauses and sections by content while creating document configurators. You can also perform Verity searches for content in imported documents and for specific document types.
You perform Verity searches using the Search Contents menu option to set up and to perform the searches. If you do not enable Verity searching, you can still use standard PeopleSoft search pages and prompts for clauses, sections, and rules for searching. However, without Verity searches, you cannot search content such as clause text or the text within a document.
See Also
Searching for Library and Document Contents
Defining Contract ClausesThis section provides overviews of defining dependent clauses and adding bind variables, and discusses how to:
Define clause information.
Define dependent clauses.
Define alternate clauses and related rules.
Associate clauses with clause groups.
Add bind variables to content fields.
Preview clause approvals.
Submit clauses for approval.
Understanding Defining Dependent ClausesUse the Dependents grid to include a list of mandatory clauses that accompany the primary clause. If you add this primary clause to a section or document configurator, any dependent clauses that are listed in this section will always appear after the primary clause when the system generates the document. The dependent clauses appear as indented children for the main clause when displayed within the document configurator, and also in the generated word document, depending on the implementation of paragraph styles and indentation that is specified for outline numbering that is related to the paragraph style.
You cannot select the primary clause to be its own dependent clause. However, dependent clauses can have dependents that can also have dependent clauses. The system checks for looping situations and adjusts them during the document generation process.
Understanding Adding Bind VariablesYou can add bind variables to the Title field, the Full Text field, or the By Reference Text field.
To add a bind variable:
Use the Bind Variable field to select the variable that you want to add.
The system displays details about the predefined variable when you click the Search button.
Alternatively, use the Bind Type field to select a type of bind from which you can add a variable to the clause content.
Click the Search button.
The system displays details about a single bind if you select a specific bind variable, or it displays a list of binds if you selected to search by type. This functionality gives you an opportunity to use the bind or find another one.
From the list of binds, select those that you want to add to the clause.
The system places the variable at the end of the field that you specify, Title, Full Text, or Reference Text. You can move the variable to the location that you want within the document after the system inserts the variable.
Select the location where you want to add the bind variable in the clause.
You can add variables to a single clause element or to multiple elements, including the title, full text, and by-reference text.
PeopleSoft Supplier Contract Management supports a standard set of bind variables that represent PeopleSoft Purchasing transactional elements of the contract and include fields such as %%Vendor Name%%, %%Location%%, and %%Item Description%%.
Pages Used to Define Contract Clauses|
Page Name |
Definition Name |
Navigation |
Usage |
|
CS_CLAUSE_DEFN |
Supplier Contracts, Manage Contract Library, Clauses |
Define clause information. Define dependent clauses. Define alternate clauses and related rules. Submit clauses for approval. |
|
|
CS_OBJS_COPY_SP |
Click the Copy From button on the Clause Definition page. |
Create a clause by coping the clause from an existing clause. After you make the copy, you can incorporate new values into the clause. |
|
|
CS_ASSOC_CLSGRP_SP |
Click the Associate to Clause Group link on the Clause Definition page. |
Associate clauses with clause groups. |
|
|
CS_OBJ_ADDBINDS_SP |
Click the Add Variables button on the Clause Definition page. |
Add a bind variable to the content of a clause. Binds that are used in PeopleSoft Supplier Contract Management are variable definitions that enable you to map source transactional values or contract wizard values into contract clauses. |
|
|
CS_CLS_APPROVAL |
|
Preview clause approvals. This feature is available only when installation options require that clauses must be approved. |
Defining Clause InformationAccess the Clause Definition page (Supplier Contracts, Manage Contract Library, Clauses).
Use this page to define contract clauses. You can also define alternate and dependent clauses, as well as associate the clause with clause groups.
You can define multiple clauses for use in creating documents. You can create clauses directly using this page or by using Microsoft Word, which you can use for more rich-text editing.
When you insert a clause into sections or document configurators, the content format value for the section or configurator determines whether text is used from the Full Text field or the Reference Text field. You use the Reference Text field to enter simple or abbreviated text strings for the clause instead of the entire text in the Full Text field.
|
Copy From |
Click to access the Copy Information From page. The button is available when you are adding a clause, and it enables you to copy an existing clause to create a new clause. When you click the button, the system provides a list of existing clauses. |
|
Associate to Clause Group |
Click to access the Associate to Clause Group page, where you can associate the clause with a clause group. By grouping clauses, you can use them in searching, filtering, and selecting document clauses. You can use a clause group to add groups of clauses that are associated with a group to a configurator. In this case, the group assists in the selection of objects. However, you cannot associate the group itself with a document configurator. |
|
Clause Type |
Select a value to indicate the type of clause you are adding. This field is only available when you are adding a clause. After making a selection, you cannot change the clause type. Values include: General: Indicates the clause is for normal use. This is the default value for the field. Table: Indicates that the clause is for use with tables. This functionality enables you to set up and use tables in documents. Make sure that a table exists as a Microsoft Word document before you select Table. Note. If there are no repeating binds defined for the clause when you save the clause, the system displays a warning that you cannot use the clause, but you can save it. |
|
Library |
Select a library to which you want to assign this clause. You use libraries to group contract clauses and develop an authoring document infrastructure that can support complex solicitation and documents. You define and organize clauses in the library. You can use a clause only in one library definition. You use libraries to associate related clauses. Libraries also facilitate searching for clauses. |
|
Class Name |
Select the clause class with which you want to associate this clause. You use classes to group similar clauses for searches. Class Name is a required field and determines which if any approval types are available for the clause. |
|
Approval Type |
Click to select an approval type for approving clauses. The system bases the available values in this field on the approval types that have been defined for the class name that you selected. Approval types control which, if any, approval routing the clause requires as well as clause usage within documents. The system can provide a default value for the approval type based on the associated class name. |
|
Notes |
Enter informational text that is related to this clause. The system does not use the text for validation. |
|
Effective Date |
Select an effective date. Clauses are effective-dated to enable you to keep a history of clause text and approvals and to make future changes to existing clauses without affecting existing clause terminology that may already be in use on given documents. During document generation, the system uses the start date of the contract to determine which valid clauses to include in a document. As you introduce clause changes, you should select an effective date that represents the effective-dated clauses that you want to include in new contracts. When the system creates new effective-dated rows for the clause, it assigns the new row an approval status of Initial. |
|
Status |
Select a status to assign to the clause. The system requires the Status field with all effective-dated records in PeopleSoft Supplier Contract Management. For clauses, this status is typically Active, even for clauses that are pending approval. When you need to completely deactivate a clause or temporarily put a clause on hold so that the system does not use it in a document, you can set the status to Inactive. This prevents the clause from being included in new documents. |
|
Edited via Word Application (edited using Microsoft Word application) |
This indicator appears if the clause was checked out and edited in Microsoft Word. If the check box is selected and disabled, the document was edited. You may have rich text associated with the clause that would be lost if you were to make edits directly using this page. If you attempt to edit the document, the system displays a warning. |
|
Where Used |
Click to identify where this clause is used, which includes sections and document configurators. Using the where-used search results, you can perform additional where-used searches. For example, you can determine which documents were generated using the document configurator that contained this clause. |
|
Numbered Clause |
Select to indicate that this clause will be numbered in the Microsoft Word document. The clause title is numbered according to the default numbering style that is defined in the Document Format and Options setup page. The check box is selected as the default setting. An example of numbered clauses is:
If you deselect the check box, the clause is not numbered in the document or preview document. For example:
|
|
Insert Page Break Prior |
Select to begin the clause on a new page. The document will contain a page break prior to this clause. This is useful, for example, when you are creating signature pages for the contract. When the system generates WordML, it writes a page break wordml tag before writing out the clause data. |
|
Protect in Document |
Select to indicate that the clause should be protected in a document, meaning that the clause is read-only when you generate the document. This feature enables you to specify that a clause is protected on a clause-by-clause basis when you check in a document. The field is deselected as the default value. When you select to protect the clause, the system displays that the clause is protected in the Content Elements grid on the Document Configurator Definition page. When a clause is protected and the protection is removed using Microsoft Word, and then the document is checked in, the system issues a warning that the clause is protected in the library but was changed in the edited document. |
|
Suppress Duplicate Keys |
Select to suppress duplicate keys in a table clause. When you suppress duplicate keys, the system blanks out the cell value if the bind value is identical to the value in the previous cell. For example if an item ID is the same for five rows, the system only displays the item ID value in the first row of data. When you select this check box, the Last Key Field Column becomes available where you can define the last column to which you want to suppress duplicate values. |
|
Last Key Field Column |
Enter the column position of the last key field in a table clause. A key field is a table column value for a specific field of data. When you define the last column, the system only suppresses duplicate fields for columns up to and including the column indicated by the value that you enter. |
|
Repeating Object |
Indicates whether this clause is repeating in nature. You do not enter this clause attribute. The system derives the value based on the bind variables that are included in the clause. If the system includes a bind variable that repeats, such as %%Item ID%% (level one) in the clause title or text, it sets this check box to selected. The Repeating Object check box is typically deselected for most clauses. Because special rules and edits can be applied as repeating objects, this check box helps you identify when an object is repeating. When you are adding a table clause, the system will select this check box. |
|
Approval Status |
Displays the approval status for the clause. This field is disabled if the system requires the clause to go through the Approval Framework for approval processing. When you use the workflow process, the system automatically updates the field, depending on the approval progress. You define clause approval requirements using installation options. If approval workflow is not required as defined on the Installation Options page, then the default value that is established in user preferences for the person who is creating the clause controls the default value of the approval status. For example, to save time in approving clauses, you could provide the clause librarian the authority to create a clause that is already in the Approved status. This setting also applies when the librarian checks out and edits a document. The system sets the status back to approved upon check-in. The approval status must be set for each new effective-dated row of the clause because each row acts as a new version of the clause. If the system requires approvals, each effective-dated row of the clause must be submitted for approval unless the clause librarian has user preferences permissions for approving clauses. If workflow approvals are required, the Preview Approvals and Submit for Approval buttons also appear on this page. If approvals are not required, the field can also be set manually. Note. If you are approving a table clause, the system requires that the Microsoft Word document contains a formatted table. After you create the table, you can change the clause status to Approved. See Approving Clauses. |
|
Validate Variables |
Click to call validation routines to verify that bind variables in the clause exist and that they are being used correctly in case repeating binds exist. This selection is the same as saving the clause, except that validating bind variables enables you to verify the binds of the clause for use without saving it. The validation also checks that the bind variables are valid and that the dependent clause relationships in the clause are valid when repeating binds are in use. These validations ensure that any dependent clause structures that might repeat contain repeating binds with proper levels and internal key structures relative to binds that the system uses in the main parent clause. If errors occur with the validation, the system populates the Errors grid with the issues. |
|
Add Variables |
Click to search for and add bind variables to the clause title, full text, or reference text. The purpose of adding a variable is to add a placeholder location within the clause that the system will replace by using an actual transactional or wizard value when it generates the document. When you add bind variables using this button, the system places variables at the end of any text within the field to which you are adding the bind. If you know which bind variable to use, you can alternatively type it directly in the clause title, full text, or reference text without using the Add Variable button. Note. After you edit the clause in Microsoft Word, you should not use this button. This changes the value in the PeopleSoft page and causes you to lose any Microsoft Word formatting you may have made to the clause. |
|
Preview Document |
Click to open the clause in a read-only mode using Microsoft Word. During the preview, the system applies paragraph-style formatting from the Microsoft Word template that is defined for the setID. The preview also expands dependent clauses. Note. Numbered clause preview always starts at the first number in the Microsoft Word numbering scheme; however, when the system generates the final document, the numbering changes based on positions in the document. |
|
Edit Document |
Click to edit clause content using Microsoft Word. Before editing documents, you should understand Microsoft Word functionality and integration with PeopleSoft Supplier Contract Management to better help you create the contract library. When you click this button, the system displays the Checked Out By and On fields and creates a Microsoft Word document that includes the title, full text, and reference text fields. You must save this file to the local client system using Microsoft Word before you check the document back into the PeopleSoft system. The system creates a default file name with the setID, clause ID, and effective date of the clause being edited as part of the file name. While you can apply custom formatting using Microsoft Word, you should use the Microsoft Word template and paragraph styles for format processing during document preview and generation. This provides a consistent format of numbering and content for finished documents. Note. You should refrain from applying custom paragraph styles while editing in Microsoft Word. You should limit style changes to character styles, such as changing characters to bold or underlining specific words. After accessing Microsoft Word, you can create or modify the content for the title, full text, and reference text by modifying text within the brackets in Microsoft Word. Note. The system enables Microsoft Word document protection for the clause to protect hidden tags used by PeopleSoft Supplier Contract Management to recognize the title and text fields during check-in. Protection can at times prevent you from performing certain format changes using Microsoft Word. In these cases, you can deactivate the protection, make the change, then activate the protection again. The protection of a clause is typically set up by administrators. See Protected Areas. See Clause Text Editing. |
|
Checked Out By |
Displays the user ID of the person who is editing the clause. |
|
On |
Displays the date on which the clause was checked out for editing. |
|
Cancel Checkout |
Click to cancel the checkout of a clause without checking in any changes. Note. If you saved a local version of the clause, it remains on the local client system. |
|
Check In |
Click to check in the Microsoft Word version of the clause. This process uploads the Microsoft Word version of the clause so that the PeopleSoft system is aware of the rich formatting that you added for the clause. When you click Check In, the system:
Note. The system validates the file you try to upload to ensure that it is an XML file and that it has embedded keys identifying it as the clause that was originally checked out. |
|
Preview Approvals |
Click to view approvers for the clause. This button is available when installation options have been set to require clause approval through the PeopleSoft Approval Framework. When you click this button, you access the Clause Approval Status page, where you can review information about approval stages and paths and who is reviewing or approving the clause. |
|
Submit for Approvals |
Click to initiate the approval process for the clause. This button is available when installation options have been set to require clause approval through the Approval Framework. When you enable clause approvals, the system uses a more formal process for users to review, modify, and approve the clause. The system notifies approvers and reviewers that the clause is waiting for their approval. For clauses that do not require approval, the system displays a secondary page stating that approval isn't required, and automatically approves the clause. See Setting Up Approval Types. See Approving Clauses. |
|
Approval Details |
Click to access the Clause Approval Status page, where you can review information about a clause that has already been sent for approvals or has already been approved. This link is available when installation options have been set to require clause approval through the Approval Framework. |
|
Title |
Enter descriptive text that identifies the clause's content. |
|
Full Text |
Enter the text to use for a clause. You can specify either full text or reference text, but not both, when a clause is referenced in the system for use on, for example, a section or configurator. The text becomes a part of the document when you use this element to generate the document. Click the Expand Full Text button to view a larger portion of the text. You might have to scroll to see all of the text, depending on the amount of text. Click the Collapse Full Text button to reduce the viewing area. Typically, if you have a simple clause without any special formatting, you can use PeopleSoft pages to create the clause and use the Microsoft Word template that is associated with the configurator to control standard numbering, bolding, title font sizes, and text. If you require more detailed formatting, you can leave the title and body text blank and edit directly in Microsoft Word to complete the content. Note. You should not cut and paste from current Microsoft Word documents directly into PeopleSoft pages. Some Microsoft Word characters do not translate correctly. If you do cut and paste into the PeopleSoft page, you need to review the text and clear any formatting issues with the clause in PeopleSoft Supplier Contract Management or by editing the clause in Microsoft Word. |
|
Reference Text |
Enter a reference as additional information concerning the clause. Occasionally, you might need to use more simple references to an existing clause within the library instead of using or repeating the full text of the clause in a document. Reference text enables you to do this. For example, if you have a document that relates to hazardous materials, rather than including an entire clause such as the Federal Acquisition Regulation (FAR) 52.223-3 Hazardous Material Identification and Material Safety Data, site reference to this clause using the reference text when appropriate. Note. If you are using a table clause, you cannot use reference text. Table clause require full text entries. |
Defining Dependent ClausesAccess the Clause Definition page (Supplier Contracts, Manage Contract Library, Clauses).
|
Sequence |
Enter a value that represents the order in which to use dependent clauses. The lowest value is the first clause to be used after the primary clause when the system generates the document. |
|
Numbered |
Select to make this dependent clause a numbered clause that follows the primary clause. The check box is available when you select the Numbered Clause check box for the primary clause. If the check box is deselected, the primary clause is not a numbered clause and, therefore, the dependent clause cannot be numbered. If you select the Numbered Clause check box, then you can decide if you want to continue that numbering for dependent clauses. You can define which dependent clauses are numbered. Note. The system determines the numbering of clauses in the preview of a clause by using paragraph styles and outline numbering that are defined in the default Microsoft Word template for the setID. The system determines the numbering of the clause in an authored document by using the Microsoft Word template that is associated with the document configurator. |
|
Content ID |
Select a clause to use as a dependent clause for this primary clause. When you select this clause, the system uses it along with the primary clause to generate the document. You cannot select the primary clause. For a clause to be valid here, it must have at least one effective-dated row that exists on or before the effective date of the primary clause. |
|
Description |
Displays the description of the clause to use as the dependent clause for the current clause that you are maintaining. Click the Description link to access the Clause Definition page, where you can view or maintain the dependent clause. |
|
Content Format |
Select how you want to represent the text in the document when you use this dependent clause. Select Full to enter the full text for the dependent clause so that it becomes a part of the document. Select Reference to use the reference text that is defined in the dependent clause. |
Statuses
Select the Statuses tab.
The Effective Status column displays whether the dependent clause is at an Active or Inactive status. You cannot select a clause that is inactive; however, if the clause is being updated and has been changed to an Inactive status since it was added as a dependent clause, then this message informs you of the change. If the clause is inactive, the system does not use it in the document as a dependent clause, and does not display an approval status.
The Approval Status column displays the current state of approval for the dependent clause. The states are Initiated, Pending, and Approved. You can assign a dependent clause regardless of its effective or approval status. If the dependent clause has been changed to an Inactive status, the system does not display an approval status.
To check whether a dependent clause has been approved using clause workflow approvals, use the clause Approval Status page. This page provides useful information because you can submit dependent clauses separately for approval, depending on approval types.
The system displays the Prior Approved Rows Exist column if the dependent row that is currently displayed is not approved, but a previously effective-dated row for the dependent clause that was approved does exist.
The system displays the Future Pending Change Exist column when pending rows for this dependent clause need to be approved before you use them.
See Also
Defining Alternate Clauses and Related RulesAccess the Clause Definition page (Supplier Contracts, Manage Contract Library, Clauses).
Use the Alternates grid to define whether the system should potentially use an alternate clause instead of the primary clause. You can list multiple alternate clauses for use instead of the primary clause. Although they might exist, the system does not process any alternate clauses of an alternate clause.
|
Priority |
Enter the importance of this alternate clause in the document. The lower the number, the higher the priority. The priority determines the order in which the system evaluates the alternate clauses, providing that the alternate clause's rule is met. If a rule is true, the system places all objects that are attached to the alternate clause's rule and their children into the document, and it considers no additional alternates. When rules are not met, the system uses the primary clause and all of its dependents. |
|
Alternate Clause |
Select the alternate clause. You cannot select the primary clause that you are working with as an alternate for itself, and you cannot select the same alternate clause twice. If you are not using alternate rules, you can still list alternate clauses. You can select these clauses manually from within a generated Microsoft Word document. See Alternate Clauses. |
|
|
Click the Search button to access the Select a Clause page, where you can initiate a search for a specific clause. The page provides detailed search criteria such as clause effective dates, classes, and groups in which a clause might be used, and dates on which the clause was checked out for editing. |
|
Description |
Click to access the Clause Definition page for the clause you select. |
|
Content Format |
Select how you want to represent the text in the document when you use this alternate clause. Select Full to select the full text for the alternate clause to become a part of the document when you use this clause to generate the document. Select Reference to use the reference text that is defined in the alternate clause. |
|
Approval Status |
Displays the approval status for this alternate clause. You can add alternate clauses that are in the Initial or Pending status. The system uses this field for informational purposes and does not require an Approved status for the system to list the alternate clause. If an alternate clause is not approved and is selected by a rule, the system does not include the unapproved alternate version of the clause in the document. |
Rules
Select the Rules tab.
Use the Rules tab to associate alternate type rules to alternate clauses. The rule determines whether the alternate clause should replace the primary clause. Each alternate clause can have a rule attached. The system checks the alternates in their priority to find the first alternate for which the rule is true, and that alternate becomes the first clause instead of the primary clause in the document. If none of the rules are true, the system does not substitute the alternate clause.
Use the Rule field to select a rule for this alternate clause. Only alternate rules are available for selection, not standard rules. When you make the selection, the system displays a description of the rule. You can click the link to view the rule itself.
Alternate rules can contain only level zero binds; however, you can use an alternate rule on clauses that repeat. When you save the clause definition and a bind that is used in the rule does not meet the document generation requirements, the system displays a message that errors were found with the binds. You cannot approve the clause for use until the errors are resolved. The error also appears in the message area of the clause. The following code is an example of an error message:
Rule JHAR5 cannot be attached as an alternate rule because it contains binds from⇒
 a level > 0. (10420,306)
See Also
Understanding Document Clauses
Associating Clauses with Clause GroupsAccess the Associate to Clause Group page (click the Associate to Clause Group link on the Clause Definition page).
Use the Clause Group field to select a group with which you want to associate this clause. You can associate a clause with multiple groups. Clause groups are user-defined. You can use them to group types of clauses, or you can use them to group a sequential list of common clauses that can go together in documents, but are not mandatory dependencies. You can use these groups in document configurator maintenance to select all clauses by group and include them in the configurator.
Adding Bind Variables to Content FieldsAccess the Add Bind Variables to Content Fields page (click the Add Variables button on the Clause Definition page).
|
Bind Variable |
Displays the bind variable that you selected. You can create binds using the Bind Definition field and then map them to transaction records. |
|
Bind Type |
Select the type of bind to add to this clause. You can use this field to create a list from which you can select a variable. Values are: Transactional: Select to display a list of variables that originate from a source transaction. These are nonwizard binds such as those related to the PeopleSoft Purchasing transactional contract or ad hoc binds. Wizard: Select to display a list of bind variables that are used with the contract wizard. |
|
Field Type |
Displays the type of field that you are adding to the clause. Field types define the structure of the data. Values are: Date Date/Time Decimal Integer String Yes/No |
|
Field Length |
Displays the field length of the bind that you are adding to the clause. |
|
Title |
Select to include this bind variable in the Title field of the clause. |
|
Full Text |
Select to include this bind variable in the Full Text field of the document clause. |
|
By Reference |
Select to include this bind variable in the Reference Text field of the document clause. |
Previewing Clause ApprovalsAccess the Clause Approval Status page (click the Preview Approval button or the Submit for Approval button on the Clause Definition page.
When you click the Preview Approval button, you can preview any approvers and reviewers and comments about the approval. The system displays a message if approvals are not required for the clause. After reviewing the approval stages and paths, you can submit the clause for approval. The Submit for Approval button also enables you to preview clauses before submitting them for workflow approval.
Click the Clause Definition link to return to the Clause Definition page.
See Also
Submitting Clauses for Approval
Approving and Reviewing Documents
Submitting Clauses for ApprovalAccess the Clause Approval Status page (click the Submit for Approval button on the Clause Definition page).
Use this page to review approvers and reviewers, add ad hoc approvers or reviewers, and submit a clause for approval without using the Preview Approval button. When approvals are required, the system routes the approval notifications and sets the contract approval status to Pending after you submit the clause for approval.
If you submit a clause that does not require approvals, the system displays the Clause Approval Status page, which indicates that approvals are not needed and the clause is approved automatically.
If approvals are needed and the approval criteria have been met, the system sets the clause approval status to Pending and sends email and worklist routings to approvers in the first relevant steps based on approval configuration. The Clause Approval Status page displays the updated approval status.
Click the Clause Definition link to return to the Clause Definition page.
Note. If bind variables have not been resolved, the system does not send the clause for approval and displays the errors that exist in the variable definitions.
See Also
Defining Contract SectionsThis section provides an overview of defining sections and discusses how to define sections.
Understanding Defining SectionsUse the Section Definition page to define and maintain a section. Sections provide a method for creating a collection of clauses, other sections, and rules that have a common function or purchase attributes within the contract. For example, information that is necessary for defining the warranty for a custom product might consist of several clauses, because all of the clauses together make up the warranty for the contract. You can include the clauses in a single section. Sections are reusable and nested in document structures and can contain clauses, subsections, and rules. You can include sections explicitly or use inclusion rules on a document configurator. Sections are controlled by a setID.
The Section Definition page is divided into two types of information, section attributes and section structure. The attributes provide basic information about how the section is used and the structure provides the section's component details and statuses. The elements or children of a section can consist of clauses, sections, rules, and tables.
Pages Used to Define Contract Sections|
Page Name |
Definition Name |
Navigation |
Usage |
|
CS_SECTION_DEFN |
Supplier Contracts, Manage Contract Library, Sections |
Define document sections. |
|
|
CS_OBJS_COPY_SP |
Click the Copy From button on the Section Definition page. |
Create a document section by copying it from an existing section. After you make the copy, you can incorporate new values into the section. |
Defining SectionsAccess the Section Definition page (Supplier Contracts, Manage Contract Library, Sections).
The Description field is required.
|
Copy From |
Click to access the Copy Information From page. The button is available when you are adding a section and enables you to copy an existing section to create a new section. When you click the button, the system provides a list of existing sections. |
|
Section Type |
Select the section type that you want to use to organize and control document behavior. Available types are: Amendment Placeholder: Select to identify this section as an amendment section placeholder. You cannot maintain amendment placeholder sections because they are shipped as metadata. The system uses the amendment placeholder to indicate where to insert the changes that you make to the amendment file and then select to automatically update the amended document during the document check-in process. The placeholder section contains added, updated, and deleted text for the main amended document. General: Select to use this as an overall section throughout a document. You can use general sections alone or in conjunction with other sections, for example as subsections. General is the default value for the field. Introduction/Title: Select to use this as an introduction section. You use introduction/title sections to identify document introduction sections, and they are useful if you intend to create documents with a table of contents. If you specify a table of contents on the document configurator, the system places the table of contents from Microsoft Word after the introduction/title section. This functionality enables you to create introduction pages of the contract prior to the table of contents and numbering of terms and conditions. The system requires that introduction/title sections be listed before any general sections in a document configurator. Note. When you use contract agreements and use the system-provided bind variables (%%HDR_AGREE*%% and %%LINE_AGREE*%%) in a section, the system automatically creates a special placeholder section, either SLA-HDR-PLACEHOLDER or SLA-LINE-PLACEHOLDER, for you when the bind value is referenced in a section content. The system prompts you to include this section in the section structure to gather and place any contract-specific agreement clauses in the document configurator using special logic. The system maintains these placeholder sections and you cannot modify them. |
|
Notes |
Enter comments that provide additional information about the section and its use. Notes are informational only and appear only on this page. |
|
Effective Date |
Select an effective date. Sections are effective-dated to enable you to keep a history of section text and approvals and to make future changes to existing sections without affecting existing section terminology that might already be in use for documents. During document generation, the system uses the start date of the contract to determine which sections to include in a document. As you introduce section changes, you should select an effective date that represents the effective-dated sections that you want to include in new contracts. When the system creates new effective-dated rows for the section, it assigns the new row an approval status of Initial. |
|
Status |
Select a status to assign to the section. The system requires the Status field with all effective-dated records in PeopleSoft Supplier Contract Management. For sections, this status is typically Active, even for sections that have not been approved. When you need to deactivate a section or temporarily not use it in documents, you can set the status to Inactive. This status prevents the section from being included in new documents. |
|
Edited via Word Application (edited using Microsoft Word application) |
This indicator displays whether the section has been checked out and edited in Microsoft Word. If the check box is selected and disabled, the document has been edited. This setting indicates that you may have rich text associated with the section that would be lost if you were to make edits directly using this page. If you attempt to edit the document, the system displays a warning. |
|
Where Used |
Click to identify where this section is used in document configurators. Using the where-used search results, you can perform additional where-used searches. For example, this enables you to determine which documents have been generated using the document configurator that contained this section. |
|
Numbered Section |
Select to indicate that this section title should be numbered according to the default numbering style when you preview or generate a document. The check box is selected as the default value. Note. The system determines the numbering of clauses in a section preview by using paragraph styles and outline numbering that is defined in the default Microsoft Word template for the setID. The system determines the numbering of the content within an authored document by using the Microsoft Word template that is associated with the document configurator. |
|
Insert Page Break Prior |
Select to insert a page break prior to this section in the document. You can use page breaks to ensure that a section receives higher visibility in the document. |
|
Repeating Object |
Indicates whether this section is repeating in nature. You do not enter this section attribute. The system derives the value based on the bind variables that are included in the section. If the system includes a bind variable that repeats, such as %%Item ID%% (level one), in the section title or text, it selects this check box. The Repeating Object check box is typically deselected for most sections. But because special rules and edits can be applied as repeating objects, identifying when an object is repeating is helpful. |
|
Approval Status |
Select an approval status. Unlike clauses and documents, sections do not use the PeopleSoft Approval Framework for approval processes. You can set the approval status as long as you have authority to do so. The system validates the setting before it changes the section to the Approved status. Automated approvals can be defined for librarians using the User Preferences page. Valid statuses are: Approved: Select to make the section available for use in generated documents. If you make changes to a section and click Save, the system automatically sets the status back to Initial and you have to manually select Approved. Initial: Select to indicate that the section is not ready for use. This is the default setting when you create or make changes to the section. |
|
Validate Variables |
Click to call validation routines to verify that bind variables in the section exist and that they are being used correctly in case repeating binds exist. This functionality is the same as saving the section, except that validating bind variables enables you to verify the section's binds for use without saving the section. If errors occur with the validation, the system populates the Errors grid with the issues. |
|
Add Variables |
Select to access the Add Bind Variables to Content Fields page, where you can define bind variables for this section. |
|
Preview Document |
Click to open the section in a read-only mode using Microsoft Word. During the preview, the system applies paragraph style formatting from the Microsoft Word template that is defined for the setID. Note. Numbered section previews always start at the first number in the Microsoft Word numbering scheme; however, when the system generates the final document, the numbering changes based on positions in the document. |
|
Edit Document |
Click to edit section content using Microsoft Word. Before editing documents, you should understand the functionality of Microsoft Word and its integration with the PeopleSoft application to better help you create the contract library. See Clause Text Editing. When you click this button, the system displays the Checked Out By and Checked Out On fields and creates a Microsoft Word document that includes the title, full text, and reference text fields. You must save this file to the local client system using Microsoft Word before you check the document back into the PeopleSoft system. The system creates a default file name with the setID, clause ID, and effective date of the section that you are editing as part of the file name. While you can apply custom formatting using Microsoft Word, you should use the Microsoft Word template and paragraph styles for format processing during document preview and generation. Doing so provides a consistent format of numbering and content for finished documents. After accessing Microsoft Word, you can create or modify the section content for the title, full text, and reference text by modifying text within the brackets in Microsoft Word. Note. The system enables Microsoft Word document protection for the section to protect hidden tags that are used by the PeopleSoft application to recognize the title and text fields during check-in. Protection can at times prevent you from performing certain format changes using Microsoft Word. In these cases, you can disable the protection, make the change, then enable the protection again. See Microsoft Word Integration with Supplier Contract Management. |
|
Checked Out By |
Displays the user ID that is editing the section. |
|
Checked Out On |
Displays the date on which the section was checked out for editing. |
|
Cancel Checkout |
Use this button to cancel the checkout of a clause without checking in any changes. Note. If you saved a local version of the section, it remains on the local client system. |
|
Check In |
Click to check in the Microsoft Word version of the section. This process uploads the Microsoft Word version of the section so that the PeopleSoft system is aware of the rich formatting that you added for the section. When you click Check In, the system provides an Upload page with Browse, Upload, and Cancel buttons.
Note. The system validates the file that you try to upload to ensure that it is an XML file and that it has embedded keys identifying it as the section that was originally checked out. |
|
Title |
Enter descriptive text that identifies the section's content. |
|
Full Text |
Enter the text to use for a section. You can specify either full text or reference text, but not both, when a section is referenced in the system for use on, for example, a configurator. The text becomes a part of the document when you use this section to generate the document. |
Section Structure
Use this grid to define the content of a section and how that content flows to produce the contract.
|
Sequence |
Enter a number that orders content in the section. When the system processes the Microsoft Word document, it sequences the elements based on the value that you enter here. You do not have to enter sequential numbers because the system will order the elements for you when you click the Sequence column heading. |
|
Numbered |
Select to make the content within the section numbered as well. The check box is available when you select the Numbered Clause check box for the primary section. If the check box is disabled, the primary section is not a numbered section and, therefore, the dependent clause cannot be numbered. If you select the Numbered Section check box, then you can decide whether you want to continue that numbering for content within the section. You can define which content is numbered. The default value is selected, which means that the system continues to number the content in the section structure when the system generates a document. Note. The system determines the numbering of clauses during a section preview by using paragraph styles and outline numbering that is defined in the default Microsoft Word template for the setID. The system determines the numbering of the content within an authored document by using the Microsoft Word template that is associated with the document configurator. |
|
Content Type |
Select the type for the section element content. Sections can comprise several elements to form a complete document. After you select the content type, use the Content ID field to select a specific element. Values are: Clause: Select to use a required clause as part of this section. Clauses are the basic building blocks of a document. You can use multiple clauses. Rule: Select to use a rule in this section. A rule is a set of conditions that produces specific results to include additional clauses or sections within this section and generated document. Section: Select to use another section as a subsection of this section. |
|
Description |
Click to access the page that describes this element of the section. |
|
Content Format |
Select the text type to include in this clause or section. Values are: Full: Places the entire element in the Full Text section of this section. Reference: Places a reference in the By Reference section. |
Statuses
Select the Statuses tab.
Use this tab to view the effective status and approval status of the section's elements based on the effective date of the section itself. This tab helps you understand the availability and current state of the section's elements. For example, if someone is updating an element, you can use this tab to ensure that the entire section is stable for use.
The Effective Status field values are Active and Inactive. If an element is inactive, you cannot use it to form the structure of a document.
The Approved Status field values are Initial, Approved, and Pending. Unless an element is approved, the system does not include it in the generated document.
Note. Although the system bases the section status that appears here on the effective date of the section itself, within the document configurator you can display the status based on the View As Of Date field in the configurator. Furthermore, during document generation, the system includes the version of the content based on the begin date of the transactional purchasing or ad hoc contract.
Setting Up Contract RulesThis section provides an overview of rules establishment and discusses how to establish rules.
See Also
Understanding Rules EstablishmentUse this page to define rule definitions, criteria, and the content to include when the rule is true. Rules are a set of conditions that when evaluated render a true or false result. When a standard rule type is true, the system includes any additional clauses or sections in the document configurator or within a section in the configurator. The system adds these to the Content Elements grid on the Document Configurator Definition page and into the document when you use the configurator to generate a document.
When an alternate rule type is true, the system substitutes the alternate clause that is defined for the primary clause for which the alternate is a member. Use the Clause Definition page to define the alternate clause. The system bases rules on the transactional-based or wizard-based bind variables that it resolves during document generation and refreshes.
You can define basic or advanced criteria for rules. The difference between basic and advanced criteria is that advanced rules enable you to place parentheses markers around statements in rules and to create combinations of query-types, statements, or both in the rule criteria. As a default value, the system formats the basic criteria as the page setup. To define advanced criteria, click the Show Advance Criteria button. To return to basic criteria, click the Show Basic Criteria button.
Pages Used to Set Up Contract Rules|
Page Name |
Definition Name |
Navigation |
Usage |
|
CS_RULES |
Supplier Contracts, Manage Contract Library, Rules |
Establish rules. |
|
|
CS_RULE_COPY_SP |
Click the Copy From button on the Rules page. |
Create a rule by copying it from an existing rule. After you make the copy, you can incorporate new values into the rule. |
Establishing RulesAccess the Rules page (Supplier Contracts, Manage Contract Library, Rules).
|
Copy From |
Click to access the Copy Information From page. The button is available when you are adding a rule and enables you to copy an existing rule to create the new rule. When you click the button, the system provides a list of existing rules. |
|
Rule Type |
Select a value that determines how the system uses the rule. Values include: Standard: Select to use this rule with any section or configurator. This is the default value for new rules. Alternate: Select to indicate that the rule is tied to an alternate clause. The system defines the alternate clause to include for alternate rules on the parent clause and not within the rule itself. |
Basic Criteria
Use this grid to define basic selection criteria for a rule. This feature enables you to define basic queries to evaluate one or more transactional or wizard bind variables. During document generation or refreshes, the system renders a true or false result and takes the appropriate content action, such as including an additional clause or substituting an alternate clause.
When more than one row of criteria exists within basic criteria, the system can evaluate all rows using and or or statements. Therefore, all rows of the criteria must evaluate as true for the rule to be true for the and statement. For the or statement, if any of the rows of criteria evaluate as true, then the rule is true for the or condition.
Advanced Criteria
Use this grid to define advanced criteria for a rule. Advanced criteria enable you to define more complex sets of criteria. You can use advanced criteria when situations arise in which the basic criteria for a rule is not sufficient. Advanced criteria enable you to place open and close parentheses around one or more criteria and also enables you to use both the AND and OR constructions when needed.
|
Open |
Select the open parenthesis character to signify the start of a group of criteria to enclose. For example, if you have three criteria, you can create a selection criteria of (A or B) and C by placing an open parenthesis on the line for A. |
|
Bind Variable |
Select a bind variable that defines a procedure for retrieving field values from a record. The variable that you select determines the field type that you must use in the Value field. |
|
Operator |
Select a value that determines the action that the system applies to the criteria that you define from the bind variable record and the value in the Value field. For example, suppose that you want to place amounts from the record that are equal to or greater than 100,000 in the document. You use the => operator and enter 100000 in the Value field. You should enter the correct form of the criteria to match the operation that you want the system to perform. Values are: <: Include values that are less than the value that you enter in the Criteria field. <=: Include only values that are less than or equal to the criteria. <>: Include values that are not equal to the value that you enter in the Criteria field. =: Include only values that are equal to the criteria. >=: Include values that are equal to or greater than the criteria. >: Include values that are greater than the criteria. |
|
Value |
Enter the value to use when applying the operators. For example, if you select >= for an item description field and enter 100000 as the criterion, then the system includes only values that are equal to or above that value. |
|
Close |
Select the close parenthesis character to signify the end of a group of criteria to enclose. For example, if you have three criteria, you can create a selection criteria of (A or B) and C by placing a close parenthesis on the line for B. |
|
AND or OR |
Select AND or OR. This field enables you to create or modify statements for the operators and criteria that you enter. Select AND to create additional criteria and apply a logical and between the rule criteria. Select OR to create a logical or between the rule criteria. |
Content Elements
Use this grid to select document elements to which you want to attach standard type rules. This grid appears only for standard rules. After you create alternate rules, the system adds them directly to the dependent clause in the Clause Definition component. Clauses in this grid do not apply alternates.
|
Sequence |
For standard rules, enter the sequence in which the system should add sections and clauses during document generation. |
|
Content Type |
Select either Clause or Section. |
|
Content ID |
Select the clause or section. |
|
Content Format |
Determines which content to include for a clause, either full text or reference text. For sections, the content format is always Full. |
Defining Bind DefinitionsThis section discusses how to:
Search for where binds are used.
Set up bind definitions.
Pages Used to Define Bind Definitions|
Page Name |
Definition Name |
Navigation |
Usage |
|
CS_CONTENTS_XREF |
Supplier Contract, Manage Contract Library, Binds Click the Where Used button on the Bind Definition page. |
Search for where binds are used. |
|
|
CS_BIND_DEFINITION |
Supplier Contract, Manage Contract Library, Binds |
Set up bind definitions. |
Searching for Where Binds Are UsedAccess the Search for All Content Instances page (Supplier Contract, Manage Contract Library, Binds and click the Where Used button on the Bind Definition page).
This page displays all the bind variables that are defined for contracts. The system uses Bind Variables as the default value to perform the search when you select Where Used on the Bind Definition page.
To view or maintain a bind variable usage, click the value in the Description field. You use binds in clauses, sections, and question groups.
See Also
Setting Up Bind DefinitionsAccess the Bind Definition page (Supplier Contract, Manage Contract Library, Binds).
This page example displays a wizard bind type that uses a string field type. You can also select a field length and apply masking to the field value when it is used in a wizard question.
Defining Document ConfiguratorsThis section discusses how to:
Search for document configurators.
Define basic configurator information.
Add multiple elements to document configurators.
Add single elements to document configurators.
View and maintain configurator structures.
View rules used in document configurators.
Validate document configurators.
Preview document configurators in Microsoft Word.
Associate document configurators with configurator groups.
Pages Used to Define Document Configurators|
Page Name |
Definition Name |
Navigation |
Usage |
|
Document Configurator Definition (search) |
CS_TMPL_COPY_SEC |
Supplier Contracts, Manage Contract Library, Document Configurators |
Search for document configurators. |
|
CS_TMPL_TBL |
Supplier Contracts, Manage Contract Library, Document Configurators |
Define basic configurator information. View and maintain configurator structures. Validate document configurators. Preview document configurators. |
|
|
CS_TMPL_COPY_SEC |
Click the Copy From button on the Document Configurator Definition page. |
Create a document configurator by copying values from an existing configurator. After you make the copy, you can incorporate new values into the configurator. |
|
|
CS_CONTENTS_SEARCH |
Click the Add Multiple Objects button on the Document Configurator Definition page. Click the Insert button on the Content Elements grid on the Document Configurator Definition page. |
Add multiple elements to document configurators. Use the Add Multiple Objects button to insert more than one clause or section into the document configurator structure. |
|
|
CS_TMPL_ADD_SEC |
Click the Insert button in the Content Elements grid on the Document Configurator Definition page. |
Add single elements to document configurators. Use the Insert button to insert a single clause, section, rule, or ad hoc clause element. |
|
|
CS_TMPL_RULE_SEC |
Click a rule link in the Content Elements grid on the Document Configurator Definition page. |
View rules used in document configurators. |
|
|
CS_TMPL_ASSOC_GRP |
Click the Associate to Configurator Groups link on the Document Configurator Definition page. |
Associate document configurators with configurator groups. |
Searching for Document ConfiguratorsAccess the Document Configurator search page (Supplier Contracts, Manage Contract Library, Document Configurators).
Use this page to locate existing document configurators. You can search by a setID or search for a specific configurator. You can also search for configurators that are within a configurator type, an availability status, and based on a specific source transaction for which the configurator is used.
After you define the search criteria, click the Search button to retrieve the search results.
|
Wizard ID |
Select a wizard for which you want to search for document configurators. The results provide configurators that use the selected wizard. |
|
Use for Amendments |
Select to search for configurators that are designated for use with amendments. The returned results contain configurators that are used with amendments and that also meet other selection criteria. |
|
Use for Executive Summary |
Select to search for configurators that are designated for use as an executive summary. The returned results contain configurators that are used with amendments and that also meet other selection criteria. |
Defining Basic Configurator InformationAccess the Document Configurator Definition page (Supplier Contracts, Manage Contract Library, Document Configurators).
Use this page to build a collection of sections, clauses, or rules that make up the overall structure and wording of a document. When you generate a document, the configurator determines the content and the order of document elements and provides static and dynamic structure within the document.
Note. You can also develop and create a document configurator during the import of clauses and sections.
See Creating a Document Configurator During Object Import.
|
Copy From |
Click to access the Copy Document Configurator From page. The button is available when you are adding a configurator and enables you to copy an existing document configurator to create a new configurator. When you click the button, the system provides a list of existing document configurators. |
|
Availability Status |
Select a status for the configurator. This selection changes the state that represents the current status of the configurator. This field is disabled if you do not have the authority to update configurator status. You define the authority for changing a configurator status by using the Change Configurator Status check box on the User Preferences page. Values include: Available: Select to make the document configurator available for use. If the configurator is not available, you cannot use it as a template for creating documents. Make sure that you save the configurator to activate the status. In Progress: Select to remove the configurator from general use when you are creating documents. You might want to do this if you are redefining configurator values. In Progress is the default value when you create the configurator. The configurator remains in progress and is unavailable for use until you select Available. Obsolete: Select to indicate that this configurator should not be used to create documents. The system does not remove or delete the configurator and prevents the configurator from being selected to create a document. However, you can open an obsolete configurator and set it to the Available status for document use. |
|
Configurator ID |
Displays the configurator that you selected. If you are adding a configurator, enter a unique identifier. |
|
View As Of Date |
Displays the clause, section, and rules content status as of this date. The system uses today's date as the default value. When you preview a document button, the system selects content based on the date that you enter in the View As Of Date field. This functionality can be useful when determining what format and static approved content (rules are not exploded) would be included for contracts that are generated as of this date. When you change the View As of Date field, the system clears the details of the configurator until you select to refresh or preview the document again. The system also provides a warning if previous changes have not been saved. |
|
Source Transaction |
Select the type of source transaction for which you want to use this configurator. You can select Ad Hoc, Multiple Sources, Purchase Orders, or Purchasing Contracts. The source transaction determines which templates can be used for which document types. For example, you can generate an ad hoc document using an ad hoc configurator only. The source transaction is also important to the configurator content because the content must match the configurator type. For example, an ad hoc configurator should not contain bind variables that are Purchasing Contract types because the system would not resolve the binds during the generation process. The Multiple Sources field value enables you to define a configurator that you can use for ad hoc, purchase order contracts, and purchasing contacts. After you add a configurator using multiple sources as the source transaction, you can use the Applicable Sources grid to select which source transactions to use with the configurator. Transactional bind variables listed within a multi-source configurator must be valid for all sources. For example, you cannot place a bind variable for the purchasing contract ID directly on a multi-source configurator which is also used for purchase orders, because the purchase order document could not resolve this bind. Rules can be useful in this scenario. You can use rules to evaluate the documents source transaction first, then depending on its source when you create the document, then include additional content specific to the source that is being generated. Note. You can use wizard bind values in configurators for both ad hoc and purchasing contract source transactions. |
|
Log at Document Generation |
Select how the system logs warnings during document generation. The system inserts a default value in the field based on the settings that are defined for PeopleSoft Supplier Contract Management installation options. You can override the value. Select Details to create a log that includes important warnings such as bind variables that were not resolved, a list of bind variables that are included in the document, resolved values, expansion of the document as exploded, and a detailed log to trace the wizard responses. This option is useful for evaluating and debugging a configurator when you add a new configurator using wizards and rules. Note. Using the Details log requires more time to process if you are generating a document from a large and more complex configurator. Select Log Warnings and Wizard to log important warnings during document generation as well as an audit log of wizard responses for the document that is generated. After placing a configurator into production, you should use this logging option for larger and more complex document configurators. |
|
Use for Amendments only |
Select to indicate that this document configurator is to be used only for contract amendments. An amendment configurator is used and required only when you are creating separate amendment files as part of the amendment process. |
|
Configurator Type |
Select the type of configurator to which you want to link this configurator. Use configurator types to define the requirements that you can use in document configurators. |
|
Use for Executive Summary |
Select to use this document configurator specifically as an overview of the contract. An executive summary is a supplemental document that summarizes the contract. You can use the document for executive review and approval. This check box is available when you are using document types. After selecting this check box and saving the configurator, you can select this configurator for use with a document type. When you create a document using this feature, the system provides executive summary buttons where you can add a related document that summarized contract information. Using the Document Management page you can view, edit, and refresh the summary. Executive summary documents are not version controlled as is the main document. For executive summary documents, you can maintain only one current version of the summary. Note. The system does not log executive summary history. |
|
Associate to Configurator Groups |
Select to access the Associate to Configurator Groups page, where you can link this configurator to a group. Use configurator groups to group document configurators for organizational needs. When you display a group, you can view individual document configurators that are contained in the group and that relate to the overall configurator use. |
|
Wizard ID |
Select a contract wizard to use with this configurator. Wizards are predefined sets of questions that assist you in formulating a document. The wizard that you associate with the configurator must resolve any wizard binds that are referenced within clauses, sections, or rules for this configurator. Generating trial documents and using various paths that you define in the wizard is the best way to identify problems with the wizard. Note. Although two types of wizards are available in PeopleSoft Supplier Contract Management, only document creation wizards are available when you define a configurator. Configurator selector wizards are for use in document types to guide authors to the appropriate configurator. |
|
Word Template |
Select a Microsoft Word template on which to base this configurator. The template controls the overall formatting and styles of the document. The system provides a default value for this field based on the values on the Document Format and Options page. See Templates. |
|
Include Table of Contents If Available |
Select to indicate that you want the configurator to build a table of contents within the document. The system can build the table of contents only if the Microsoft Word template has been set up to build the contents. If the table of contents is not defined for the Microsoft Word template, the system ignores the value that you enter in this field when you preview and generate the document. When a table of contents is available, the system includes it in the generated Microsoft Word document after the introduction section within the document. You must refresh the table of contents in the Microsoft Word document to generate or refresh the Microsoft Word version of the table of contents. |
|
Description |
Enter a value that describes the use of this document configurator. The system displays the description along with the configurator ID and uses the Description field as a search option. This field is required. |
|
Notes |
Enter free-flow text to use as further instructions or comments about the use of the configurator. The text is not a part of the document configurator itself, but provides easy-to-access instructions to the contract officer about the document configurator's use. |
|
Refresh |
Click to retrieve the last-saved document configurator content. When you initially open the configurator, the Content Element grid does not appear with the configurator elements. When you click the Refresh button, the system displays the full document structure. Note. You must define and save the configurator before you refresh it. Refresh does not save changes. The system reminds you to save when you click Refresh and if you have made changes to the configurator but not saved them. |
|
Preview Document |
Click to open the Microsoft Word version of the document. The system gathers the elements and builds them as they appear in the document configurator outline. The system uses the Microsoft Word template that is associated with the configurator to apply any styles that are defined for content within the previewed document similar to how it will appear for the generated version of the document. This document is not intended for editing. Instead, it provides a preview of included content based on the View As Of Date field value for the configurator. When you preview the document, the system highlights unapproved configurator content that is not controlled by rules. This content can include clauses and sections that are not yet approved and that are listed directly on the configurator. The system uses the View As Of Date field value on which to base the approval. For example, pending clauses might appear during the preview, but the system could exclude their versions from document generation later based on the same configurator and date. This functionality provides more visibility into any issues with content approval statuses. Rules and their content are not exploded as part of preview because they depend on bind values that are not resolved; however, a placeholder appears in the Microsoft Word preview document to show the relative positioning of the rule. The system displays bind values as the variable itself in preview mode. The value appears as (%%VARIABLE%%) in the Microsoft Word preview document. The system displays any repeating content, such as repeating clauses or sections, when it is in the document. Multiple instances of the content are not repeated within the Microsoft Word preview document. |
|
Save |
Click to update the document configurator with any changes that you have made. The system validates elements that are included in the configurator structure when you save the configurator. It also produces messages about problems with building the document. You must resolve the problems to successfully update and save the configurator. |
|
View Outline to Level |
Select the level at which you want to view the document outline. The document configurator controls the elements of a document. You use the Content Elements grid to populate the outline and the Outline Position column to view the levels of an outline. You can view up to nine levels. Note. Depending on the paragraph styles and outline number definitions that are defined for the Microsoft Word template, the configurator numbering scheme and indentation can be different in the actual Microsoft Word documents. In addition, repeating sections and rules that the system resolves to be true and that include various content during document generation will affect the Microsoft Word document numbering. The following example shows how a document configurator outline might appear with four levels:
If you limited the outline view level to two, the outline might look like this:
|
See Adding Single Elements to Document Configurators.
Applicable Sources
Use this grid area to select a combination of transaction sources that you want to use this configurator. You can select all three sources, but must select at least one source if you are using multiple sources as the transaction type. When you save the configurator, the system validates the objects you have linked to the configurator and the applicable sources that you selected. So, you can only attach common clauses, sections, and rules to the configurator.
You can create rules based on source transaction values that you can place into specific sections and clauses based on source to that you can have variations in the configurator. In addition, when you search against configurator template IDs, the system retrieves any multiple source configurators that has the applicable source check box selected.
|
Ad Hoc |
Click to use this configurator to create ad hoc documents along with any other source type that you select. |
|
Purchase Order |
Click to use this configurator to create purchase order documents along with any other source type that you select. |
|
Purchasing Contract |
Click to use this configurator to create purchasing contract documents along with any other source type that you select. |
Configurator History
Use this expandable grid area to review historical information about the configurator. You can view who created the document configurator, when the configurator was created, whether the status has changed, and who has updated the configurator.
Content Elements
The Content Elements grid displays elements that make up this configurator. You can build a document configurator structure by clicking the insert buttons in the right side of the grid.
The next several sections describe the use of this grid and how you build the configurator.
Adding Multiple Elements to Document ConfiguratorsAccess the Select and Add Clauses or Sections to Document Configurator page (click the Add Multiple Objects button on the Document Configurator Definition page).
Use this page to search for and find multiple clauses or sections for use in the document configurator structure. You can add multiple clauses or sections at the same time, which facilitates organizing and building the structure.
Note. Verity searching must be enabled and the Verity search collections built and kept up to date for this page to contain the most accurate information. To add single elements, including ad hoc clauses, clauses, rules, and sections, click the Insert button in the Content Elements grid.
Note. When you are adding single elements, the system does not use the Verity search.
To insert multiple sections or clauses:
Use the Content Type field to select the content type for which you want to search.
You can add only multiple sections or clauses at the same time.
Use the Title or Body Text field to enter any text to use for the search.
You can also use the text search options to further refine the search. Select the Match Case, Exact Word, and Use Thesaurus check boxes to refine the search.
Select or enter the clause attributes to use in the search.
Click the Search button.
The system displays the search results.
Select the elements to include in the configurator structure.
When you select the elements, the system orders them in the sequence that you select. Regardless of the numbering in the current configurator structure, the system adds these elements to the location in the structure from which you selected to insert additional elements.
Note. When you use the Verity search feature to select an element, the results grid is limited to a single page of returned information. If the system returns more than one page of search results, you must reenter the search criteria and select the next page in the sequence to select the element to add to the document configurator. The Chunk Size field on the Installation Options page controls the number of lines that are returned by the Verity search. Large chunk size values can result in performance issues.
Click the OK button.
The system populates the structure with the selections.
Adding Single Elements to Document ConfiguratorsAccess the Insert a Content Row page (click the Insert button in the Content Elements grid on the Document Configurator Definition page).
Use this page to insert a single section, clause, rule, or ad hoc clause to the document configurator structure. When you make the selection and click OK, the system loads the selection into the configurator structure. To add multiple clauses and sections at the same time, click the Insert Multiple Objects button. This multiple object search relies on Verity searching.
Use the Content Type field to select one of these types to insert into the structure:
Ad Hoc Clause: Select to insert ad hoc text that you can copy or compose immediately and that does not require approval as a clause would. You use ad hoc clauses mainly for transitional text; they are simpler than regular clauses because they do not support bind variables within them. When you select to insert an ad hoc clause, the system updates the Content ID field with a system-generated ID for the ad hoc clause. It also displays a page for you to enter title and full-text entries.
You must enter a description and either a title or full-text information. After completing the text, you can edit the document using Microsoft Word. Select the Numbered Clause check box to indicate that the clause should be numbered.
Clause: Select to add a single clause to the document configurator structure. When you select to insert a clause, the system provides the Content ID field for you to perform a clause search.
The system also provides the Content Format field for you to select the type of content format generation to use for the clause. Select Reference for the configurator structure to use a reference that indicates a line to which the clause applies or a reference document that describes conditions for the line. Select Full to use the full text of the clause.
When you select a clause, the system expands its dependent clauses and displays them in the configurator. You can indent and outdent only the main clause itself, because the system processes clause dependents as one object within the configurator.
Rule: Select to add a single, standard rule to the document configurator structure. The system displays a search field for you to find a specific rule. Using standard rules within the configurators enables you to dynamically control the content of the configurator by including additional clauses and or sections in specific locations of the document. The rule can evaluate wizard or transactional bind variables and determine, for example, based on an author's response to wizard question, whether an additional clause should be included.
Section: Select to add a single section to the document configurator structure. The system displays a search field for you to find a section. When you select a section, the system expands the entire section structure and displays it within the document configurator. You can indent and outdent only the section header because the system processes the entire section as one object within the configurator.
Viewing and Maintaining Configurator StructuresAccess the Document Configurator Definition page (Supplier Contracts, Manage Contract Library, Document Configurators).
Use the Content Elements grid to build, maintain, and view details about the configurator structure. This structure represents a document.
|
Outline Position |
Displays a simple numbered position within the outline for this configurator element. The position shows the order and level of indentation only. The system bases the final generated document's outline on the style and formatting that is defined by the Microsoft Word template and the paragraph styles that you defined using setup pages. This style and formatting can be different from the configurator outline. The configurator outline provides you with a basic outline while the generated document applies the actual styles and formatting. Bold characters in the column represent elements with multiple subsections. You can collapse and expand these sections. The level to which the section appears is controlled by the value that you select in the View Outline to Level field. |
|
Content Type |
Displays the type of element that makes up this portion of the document configurator. Types can include sections, clauses, ad hoc clauses, or rules. Often, an element is embedded within another element. When you insert a section or clause containing dependent clauses, the system displays the child elements within the configurator, but you cannot indent or outdent them separately because the rows are linked to the parent section or clause. Also, you cannot insert elements within the structure of a predefined section or between a clause and its dependents from within the configurator. Instead, you must modify the section or parent clause. The system automatically reflects the change in the configurator. Note. You can include an amendment placeholder section in the amendment document configurator. The location where you place the amendment placeholder section in the amendment configurator determines where in the document that the system inserts the results of the comparison between the last executed contract and recent edits to the main amended contract. |
|
Content ID |
Displays the identifier for the configurator element. |
|
Content Description |
Displays the description that applies to the element. You can click the link to view and update the element. Only parent elements are available for maintenance. You can view and update child elements by opening the parent and accessing the child. You can access rules to view how bind variables are applied by the system when you run the wizard associated with the configurator. |
|
|
Click the right arrow to move the configurator element up to the next higher level in the structure. The system adds the element and its children to the bottom of the previous level if the structure permits the move. Depending on the Microsoft Word template that is defined for the configurator and the paragraph styles, the outline numbering and indentation in the configurator can affect the format within the generated document. See Format and Style Considerations in Microsoft Word. For example, if a clause is at level two, when you indent a row, the system moves the element to a level one following the last position in that level. If the last position is 1.4, then the element is added at the 1.5 level. The system also moves any children that are associated with the clause to a corresponding level. So if the original level is two for the clause and 2.1 for the child, the system changes the level to 1.5 for the clause and 1.5.1 for its child. This example of the initial outline shows how the system indents according to the previous description:
After you click the right arrow, the outline appears like this:
After moving the element, the system changes the left arrow to a right arrow. |
|
|
Click the left arrow to move the configurator element down to the next lower level in the structure. The system adds the element and its children as a continuation at the top of the next level if the structure permits the move. For example, if a clause is at level two, when you outdent a row, the system moves the element to a level three in the first position at that level. It also moves any children that are associated with the clause to a corresponding level. After moving the element, the system hides the right arrow if the element can move no further to the right. You can indent to a maximum of nine levels. |
|
|
Select to review indentation information. A few cases occur in which the system doesn't permit the indentation of clauses or sections in the configurator. When this occurs, the system displays the Information button to describe the reason. Typically, you can limit content indentation if the content above it is dynamic and its ultimate indentation is a variable that the system cannot determine in the document configurator. The system restricts the indentation of an immediate row following this row. |
|
|
Click to add more than one section or clause. |
|
|
Click to add a single ad hoc clause, clause, rule, or section. |
|
|
Click to remove a document element from the contents. When you select to delete an element, the system does not copy it for future pasting and the deletion is immediate. |
|
|
Click to cut and copy an element. After cutting an element, you can click the Paste Row button to insert the element below the row that you select. When you cut a content row, the system includes the parent element and all of its children. You can cut only one element at a time, and you must paste the element before you can cut another row. To delete a row, use the Delete button. |
|
|
Click to paste a content element row. You must cut a row before you use the Paste button. The content row and its children will be pasted into the document below the row to which you select to paste the contents. |
Details
Select the Details tab.
Use this page to view the content format and the content title of content elements. The Content Format field displays how the system generates the content of the element. Field values are Reference and Full.
More Details
Select the More Details tab.
Use this page to view approval and content statuses for document configurator elements. Also, you can view whether the content approval status is Initial, Pending, or Approved, whether the content status is Active or Inactive, and the content effective date. The approval status for content is for the effective-dated clause or section. The system bases the effective-dated content on the View As Of Date field value.
The Level field displays the indentation level at which the element resides in the document. For example, a 2 means that the content element is a subsection of a parent element and a 3 means that the content element is a subsection of a subsection.
The Protect field indicates whether the content element is protected when the document is being edited. The field is display-only and the setting is defined on the Clause Definition page.
Viewing Rules Used in Document ConfiguratorsAccess the Rules page (click a rule link in the Content Elements grid on the Document Configurator Definition page).
Use this page to review the details of a rule associated with the document configurator. The rule can be associated directly with the document configurator or be associated to a section. The system uses the effective date based on the value in the As of Date field on the Document Configurator Definition page. The open and close brackets appear only if at least one of the criteria in the rule uses brackets in its definition. The Content Elements grid box displays the contents that are for the selected effective date of the rule.
|
Bind Variable |
Displays a variable that defines a procedure for retrieving field values from a record. |
|
Operator |
Displays the value that determines the action that the system applies to the criteria that you define from the bind variable record and the value in the Value field. |
|
Value |
Displays the value that the system uses when applying the operators. A value might be less than or equal to (<=), for example. |
|
And or Or |
Displays whether this rule contains an and/or statement that creates or modifies statements for the operators and criteria defined for the rule. |
|
Question Mapping |
If a bind variable exists in a wizard, the system displays the wizard question and when it creates and refreshes the document, populates the bind. If a variable is a transactional bind, the system displays the record and field and level associated with the transactional bind. |
|
Question Group |
Displays the question group in which the rule is used. |
See Also
Validating Document ConfiguratorsAccess the Document Configurator Definition page (Supplier Contracts, Manage Contract Library, Document Configurators).
After completing a structure or a portion of the structure, click the Save button. The system performs validation routines to check for conditions such as element placement, valid binds and rules, indent and outdent issues, and repeating clauses. For example, if you have used a title/introduction section in the middle of the document, the system displays an error message when you attempt to save the structure. Title sections must be at the beginning of a document. In this case, you could delete the section and reinsert it at the beginning of the structure.
See Also
Understanding Document Configurators
Previewing Document Configurators in Microsoft WordAccess the Document Configurator Definition page (Supplier Contracts, Manage Contract Library, Document Configurators).
Use the Preview Document button to open a read-only version of the Microsoft Word document for a configurator. Previewing a configurator enables you to view a document representation similar to how it would appear if it were a Microsoft Word document. Previewing a configurator; however, does not resolve bind variables. That is, the system does not expand rules or repeating objects that would be resolved during document generation.
Previewing a configurator also enables you to view a representation of the document before saving any configurator changes. This preview enables you to view configurators based on the View As Of Date field value on the Document Configurator Definition page. You can simulate included content as of the start date of the transactional contract or ad hoc document.
Associating Document Configurators with Configurator GroupsAccess the Associate to Configurator Groups page (click the Associate to Configurator Groups link on the Document Configurator Definition page).
Use this page to link a configurator to a configurator group. A group assists you in organizing and searching for configurators.
See Also
Setting Up Document Configurator Groups and Types
Setting Up Document TypesTo set up document types, use the Document Types (CS_DOCUMENT_TYPE) component.
This section discusses how to define document types.
Pages Used to Set Up Document Types|
Page Name |
Definition Name |
Navigation |
Usage |
|
Document Type |
CS_DOCUMENT_TYPE |
Supplier Contracts, Manage Contract Library, Document Types |
Define document types. |
|
Copy Information From |
CS_DOCTYP_COPY_SEC |
Click the Copy From button on the Document Type page. |
Copy an existing document type to create a new document type. |
Defining Document TypesAccess the Document Type page (Supplier Contracts, Manage Contract Library, Document Types).
Use the Document Type page to create a document type. You can create document types, regardless of whether document types have been selected for use in PeopleSoft Supplier Contract Management installation options; however, the system does not apply them during document creation until the Use Document Types check box has been selected in installation options. After documents have been created using a document type, you cannot deselect the Use Document Types check box in installation options.
|
Document Type |
Displays the document type ID. Document types provide a way to categorize documents. You can define specific settings, defaults, and security that can help fine-tune the use of each type of document. |
|
Source |
Displays the source transaction that was defined when the document type was created. Ad hoc sources are for general use, whereas purchasing contract sources are tied to a purchasing contract. After the source has been defined, you cannot change it. Available source transactions include: Ad Hoc: Used to create stand-alone documents that are not associated with a transactional purchasing contract and to create requests for contracts. Purchase Orders: Used to create contracts based on transactional purchase orders. When you select this source transaction, the Internal Document check box is not available and the Applicable Status field value is set to Full Life Cycle Status. Purchasing Contracts: Used to create contract documents that can reference and include transactional purchasing contract information. If you select Purchasing Contracts, as the source, this page does not display the Enable on PO Requisitions, Automatic Document Generation, and Start Sequence fields. Also, if you select Purchasing Contracts, the page does not enable the Internal Document check box and sets the Applicable Status field to Full Life Cycle Status. You cannot change the value. |
|
Description |
Enter a brief description for this document type. This field is required. The description is what you see in the document type list of values for all pages. |
|
Status |
Select the status of the document type. Values are: Available: Makes the document type available for use. This is the default value for the field. Obsolete: Removes the document type from availability. The system does not validate the status when you change it. Note. If a document type is available, you must provide users the authority to create documents using this document type. Use the Roles with Permission to Create Documents grid box to define the permissions. |
|
Copy From |
Click to create a document type using attributes of an existing document type. You can only copy those document types with the same source transaction as the type you are creating. This button is available when you are creating a document type. When you click Copy From, the system displays the Copy Information From page where you can select a document type. |
|
Delete |
Click to delete this document type from the system. The button is only available if the document type is not in use with a document. The system provides a warning message before you can delete the document type. When you click Yes, the deletion is immediate. |
|
Notes |
Enter any additional information for the document type that might help clarify its use. |
|
Start Sequence |
Select a start sequence for this document type. A start sequence is an ID that links a series of documents for automatic numbering purposes. The sequences that are available on this page are the ones that have been added for the CS_ADHOC_ID field and Contract Ad Hoc ID number type for automatic numbering. The Start Sequence field is not available for purchasing contract sources. The start sequence controls the prefix for numbering. If a start sequence does not exist or the Use Document Type check box is not selected in installation options, you can still use the automatic numbering default value if one has been defined. Note. If you associate the same start sequence with different document types, the system uses the last sequence number across all document types that use the start sequence, which can cause gaps in sequencing for a document type. So if sequencing is important to document numbering, then ensure that you establish a unique start sequence specifically for use with a single document type. You can create numbering sequences using the Auto Numbering page in the Supplier Contracts Setup component. You also use the feature to select the default start sequence. |
|
Internal Document |
Select this check box if you want the document identified as an internal document. Internal documents are those documents that are attached to a document and are intended for internal use, whereas external documents are intended for dispatching to external contacts, such as collaborators or document approvers. If you defined the source transaction as a Purchasing Contract type, the Internal Document check box is not available for use. Note. When the Internal Document check box is selected, the Full Life Cycle Statuses value is not available in the Applicable Statuses field. The applicable status values available are only Draft/Complete and Draft/Approved. |
|
Allow using wizard responses from a prior document |
Select to enable authors who use this document type to be able to copy wizard responses from a different document when creating a new document. The system provides a check box on the Create Document page that authors can also select to use when they want to use responses from another wizard. When an author selects to use another wizard's responses, the system provides a link to select the document that includes the wizard responses. After pulling the responses into the current document, you can change any wizard response. If you select to have the system automatically create a document, you cannot use responses to wizard questions in another document. The system goes directly to the Create Document page. When you select this check box, the Allow copying document from a different source check box is no longer available. |
|
Use Only with PO Requisitions (use only with purchase order requisitions) |
Select to indicate that this document type is a request type of document for use with purchase order requisitions. Documents of this type must be associated with a requisition ID and business unit. This field is available only with an ad hoc source. Using the Use Only with PO Requisitions check box, requestors can define a related document and wizard that captures additional information. When a document type is set up for the contract request, you specify that the system use this type with a PeopleSoft eProcurement or Purchasing requisition. In this case, along with the requisition, the requestor can generate a supplemental request document by launching a wizard that captures needed information pertaining to the contract request. The requestor can then provide the required information in the supporting document as needed. When you award the requisition to a contract, the specialist can reference the original request document and make use of any wizard responses within that request document to help drive the content and fill in required data on the actual contract. See Defining Installation Options for PeopleSoft Supplier Contract Management. |
|
Automatic Document Creation |
Select to enable the system to automatically create a document using all the defaults when you click the Add a Document button. This selection enables you to bypass the Create Document page, where you can normally review and change the defaults before creating the actual document. The system determines whether the configurator selector wizard should be invoked when a document is added on the Document Management page. The system uses the next number in the starting sequence to create the document. This check box is available only for document types using ad hoc as the source. |
|
Log View Action in History |
Select to make the view history available in the document history. The view history provides an audit trail of who accessed the main document or its amendment files. When a user clicks the document's View button, the system records the action for the history. The history is logged when a document is viewed internally and externally. |
|
Allow copying document from a different source |
Select to enable the system to copy documents that use different transaction sources. For example, if this document transaction source type is an ad hoc document, then by selecting this check box, you can copy a document that uses a purchase order transaction source type to create a document. To use multiple sources, you must first define a document configurator for use with multiple source types, and then use that configurator as the configurator ID for a document type. When you select this check box, the Allow using wizard responses from a prior document check box is no longer available. |
Determine Configurator Using
Use this section to define how the system selects a document configurator to use when you generate a document using this document type.
See Adding Authored Documents.
|
Specific Configurator |
Select to indicate that you want to use a specific configurator ID with this document type. Select the configurator using the Configurator ID field. When you create a document using this document type, the system uses the configurator that you define on this page as the default value in the Configurator ID field on the Create Document page. |
|
Configurator Selector |
Select to use a special configurator selector wizard to determine the document configurator to be used with this document type. Select the configurator selector wizard using the Wizard ID field. When you define the document type on the Add a Document page, and click the Add a Document button, the system launches the configurator selector wizard. After you answer wizard questions, the system selects the appropriate configurator and the Create Document page appears. At this point, you can run the configurator selector wizard again, or select another document type to create the document. |
|
Configurator ID |
Select a document configurator. The field is available when you select Specific Configurator. This field is required if you are using the Specific Configurator feature. When you create a document using this document type, the system uses this specific configurator to generate the document. The system bases document types and configurators on source types of ad hoc and purchasing contracts. A configurator and a document type must use the same source type. |
|
Wizard ID |
Select a configurator selector wizard to use with this document type. The field is available when you select the Configurator Selector check box. This field is required if you are using the Configurator Selector feature. When you create a document, the system uses this wizard and its questions to help you select the appropriate configurator to use when generating the document. Only wizards that have been defined as configurator selector wizards are available. Document types do not use document creation wizards. These wizards are available for use with document configurators. |
Life Cycle Options
Use this group box to define life-cycle settings for a document type. Using the check boxes, you can control some of the statuses and buttons that appear on the Document Management page when you use this document type to create a document. These options help you streamline the life-cycle flow for this type of document. Available features in this group box also depend on settings on the Installation Options pages. For example, if you do not select to use external collaboration as an installation option, the External Collaboration check box is not available.
See Document Approval Statuses.
|
Enable Edit |
Select to control edit settings on the Document Management page when you create this type of document. When you select Enable Edit, the Enable Collaboration check box becomes available for entry. |
|
Enable Internal Collaboration |
Select to control internal collaboration settings on the Document Management page when you create this type of document. When you select the Enable Internal Collaboration check box, you can process documents of this type through a collaboration cycle. The Enable Internal Collaboration check box remains inactive until you select the Enable Edit check box. |
|
Enable External Collaboration |
Select to control external collaboration settings on the Document Management page when you create this type of document. This enables a supplier to review the document online using the Supplier Portal. External collaboration must be enabled on the Installation Options page for this check box to be available. |
|
Enable Internal Signatures |
Select to enable internal digital signatures. When you select this check box, the Enable External Signatures check box becomes available for entry. Internal signatures must be enabled on the Installation Options page for this check box to be available. Also, when you select this check box, the system makes three check boxes available to indicate when during the document's life cycle that signatures should be captured for this type of document. You can route documents for signatures, as standalone documents, or as part of the formal approval process. |
|
Enable External Signatures |
Select to enable external users to digitally sign a document online using the Supplier Portal. You cannot enable external signatures until internal signatures have been enabled. In addition, external signatures must be enabled on the Installation Options page for this check box to be available. |
|
Prior to Approvals |
Select to indicate that signatures should be captured prior to submitting the document to the formal approval process. The system provides the Route for Signature button for the contract specialist to route the document for signatures prior to the document being formally approved. This check box becomes available when you select the Enable Internal Signatures check box. |
|
During Approvals |
Indicates that signatures should be captured during the formal approval process. As the document is routed using the Approval Framework, approvers will sign the document as they approve it. This check box becomes available when you select the Enable Internal Signatures check box. |
|
After Approvals |
Indicates that signatures should be captured after the formal approval process. The system provides the Route for Signature button for the contract specialist to route the document for signatures after the document has been approved. This check box becomes available when you select the Enable Internal Signatures check box. |
|
Applicable Statuses |
Select the grouping of statuses that you want to use to process the document through its life cycle. For ad hoc document types, theDraft, Approve Statuses Only value is the default value. You can change this value. For purchasing contract types, the Full Life Cycle Statuses value is the default value. You cannot change the value. Values include: Draft, Approve Statuses Only: Select to set a document's status selections on the Document Management page to Draft or Approve. Draft, Complete Statuses Only: Select to set a document's status selections on the Document Management page to Draft or Complete. Full Life Cycle Statuses: Select to use all life-cycle statuses on the Document Management page. This value is the default value when the source is purchasing contract. Note. After you create a document using this document type, you cannot change the applicable statuses. |
|
Amendment Configurator ID |
Enter the amendment configurator that you want to use when creating amendments for documents of this type. Only configurators with the Use for Amendments only check box selected on the Document Configurator Definition page appear in the list of values. The source transaction on the Document Configurator Definition page must also match the source that is defined on this page. Note. This field is inactive until you select the Full Life Cycle Statuses value in the Applicable Statuses field. |
|
Executive Summary Configurator |
Select a configurator for use with an executive summary document. These are configurators that have been created specifically for use with an executive summary. This is a supplemental document that summarizes the contract. When creating a document using a document type that uses an executive summary configurator, the system generates the document with executive summary attributes. When you access the Document Management page, you can create, view, and edit executive summary documents similar to managing document amendments. |
Cycle and Workbench Settings
Use this section to define the cycle time and workbench settings for a specific document type. For example, you can ensure that contract requirements are achieved in a timely manner by establishing a time frame for completing documents. These settings are initially defined on the Installation Options page, but you can override them on this page.
After defining the settings, you can then use the Find Existing Documents page to access the document workbench. Using the results from document searches, you can view which documents are overdue or close to being late. .
|
Enable Cycle Times |
Use this check box to indicate if cycle times should be enabled for this document type. When you select the check box, you can edit the remaining fields. |
|
Business Calendar |
Select a business calendar to use for document and amendment cycle times. The business calendar is used to determine what days, such as holidays or weekends, that should be removed from any cycle-time calculations. |
|
Complete when Status is |
Select the status at which you want to stop tracking a document's cycle time. You might want to track document cycles during more critical stages when numerous reviewers or approvers are involved in the cycle and not track it for its entire review cycle. Or, the organization might want to track a critical contract document through to when it's executed. You can end document and amendment cycle tracking at these statuses: Approved Dispatched Executed/Complete Pending Approval |
|
Target Cycle Time per Document (days) |
Enter the target number of days that a contract document should take to be completed. |
|
Target Cycle Time per Amendment (days) |
Enter the target number of days that a contract amendment should take to be completed. |
|
Red when X days from Due Date |
Enter the number of days prior to the due date that you want to populate the workbench with a red flag indicator. When a document falls within the number of days that you enter, the system inserts a red flag indicator on the search results for the Find an Existing Document page. |
|
Yellow when X Days from Due Date |
Enter the number of days prior to the due date that you want to populate the workbench with a yellow flag indicator. |
User Defined Fields
Use this section to indicate that you want to use any of the user-defined fields that have been enabled on the User Defined Fields page for this document type. You use the Option for User Defined Fields field to select how you want to apply the user-defined fields for this document type. Field values include:
All User Defined Fields:
Select to use all the user-defined fields that have been enabled at the installation level. This option keeps this document type synchronized with the PeopleSoft Supplier Contract Management installation-wide settings for user-defined fields. You do not have to maintain the fields for a document type because the system automatically updates them. When you select this option, the system does not display the default values.
No User Defined Fields:
Select to not include user-defined fields with this document type. This is the default value for the field.
Select User Defined Fields:
Select to view a list of installed user-defined fields. Using the list, you can select a specific subset of fields that you want to use with this document type. To use a user-defined field, you must enable it by clicking the Enabled check box for each field. You cannot update individual field attributes using this page. Use the User Defined Fields page to update field attributes.
Note. If an enabled user-defined field is required, and you select the Automatic Document Creation check box, the system displays a warning message to remind you that the Create Document page will not be available when you automatically create a document with this document type.
See Setting Up User-Defined Fields.
Roles with Permission to Create Documents
Use this section to add user roles that can use this document type.
|
Role Name |
Select roles that can create documents using this document type. Until a user role has access to this document type, the document type will not appear in that user's list of values. Users can also have multiple roles, so using this grid box, you can, for example, define authority to create a document using this document type in one role, and in the other role enable the user to override a configurator as well as create documents using this document type. |
|
Allow Override Configurator ID |
Select to indicate that the selected roles have the authority to modify the configurator ID for use with this document type. When users have this authority, they can change the Configurator ID field on the Create Document page. |
Users with View Access to Documents of This Type
Use this grid box to define who can access documents that were created using this document type ID. This setting provides only view access and not edit permission.
|
Role Name |
Select a role name to which you want to grant view access. The system validates that users of this role can view any documents of this type. This option provides an extra level of granting view access to a document other than through other areas, but does not supersede those areas. For example, users defined as collaborators on the My Internal Contacts/Collaborators page, users who have administrative rights defined on the User Preferences page, and users who have been assigned as approvers for the approval cycle can still view documents even if their roles are not defined here. |