 Importing Clauses and Sections
This chapter discusses how to:
Import clauses and sections.
Import contract and ad hoc documents.
Importing Clauses and SectionsTo import clause and section objects, use the Clause Import (CS_CLAUSE_IMPORT) component.
This section provides an overview of the clause and section upload process and discusses how to:
Define default values for object attributes.
Import objects to the Import Clauses/Sections page.
Review and update imported clause and section details.
Create clauses and sections, and resolve errors.
Create a document configurator during object import.
Review a document configurator created during object import.
 Understanding the Object Import and Creation Process
PeopleSoft Supplier Contract Management enables you to import legacy clauses, child clauses, and sections that are not currently in the Supplier Contract Management system. Legacy objects are preexisting objects, such as clauses, that were not created using the PeopleSoft system and that do not have custom tagging. To import existing clauses into the system, the clauses must first exist or be saved in a Microsoft Word 2003 Professional XML format.
You can import a single object or use the same object import session to import multiple objects. An import session is typically a one-time setup and compilation of Microsoft Word-based legacy objects that you want to create in the contract library. As part of the import process, you can also control the structure of content as it is imported. For example, you can load a series of clauses by themselves, or optionally, select certain clauses to be sections, child clauses within sections, or dependent clauses within clauses. After you create the clauses, sections, and child clauses, and while you are still within the same session of the import component, you can select to create a new configurator from the content that you just imported. This can be useful and speed the process if you have existing Microsoft Word templates that you want to break out into clauses and create a configurator as part of the import.
Note. You cannot create table clauses when you import clauses.
Note. The configurator creation feature is intended for use by clause librarians only.
Object import sessions are made up of these stages:
Object XML file creation.
Each object (clause) within Microsoft Word must have specific XML tags to meet the structural requirements for system objects. To create these XML files, apply custom import tags to content within the Microsoft Word document that contains objects and save the file as a Microsoft Word 2003 .xml file format. You do this to tag individual clauses in existing Microsoft Word documents.
To complete this stage, edit legacy files on a local drive and prepare them for import to the Import Clauses/Sections page.
See XML Schema.
Object default attribute definition.
Before and during the import of legacy files, you define basic information that you can use as default values for one or multiple objects that you upload. Use the Defaults for Object Attributes section to complete this stage.
Object file import.
You select the XML file that contains the legacy clauses, child clauses, or sections for import. After defining default information, click the Select XML File button to locate and import the files to the Import Clauses/Sections page.
See Changing the Source Transaction For an Imported Ad Hoc Document.
Object creation in the contract library.
Click the Create Selected Objects button to add objects to the contract library. During this stage, you define object import types and you review and fix errors for each object that you select to create.
See Reviewing and Updating Imported Clause and Section Details.
Configurator creation in the contract library.
After you create clauses and before exiting the component, you can also enter a new configurator ID and click the Create Configurator button. This creates a new configurator and adds the content that is listed on the Import Object directly to the new configurator. For simpler existing templates that you might have in Microsoft Word, this feature enables you to create a first draft of the equivalent configurator which can later be modified. After you click the Create button, you can then click the configurator description shown to review and edit the Document Configurator Definition component for the new configurator that you just created.
See Understanding Document Clauses.
Object Import XML Schema
Object import XML schema enables the system to define the structure, content, and semantics for XML documents. PeopleSoft Supplier Contract Management uses a custom-defined import schema that describes the tags that the system uses for various fields.
To support the import of clauses and sections, the PeopleSoft application provides the scmt_clause.xsd schema for elements that are only applicable to clause and section objects. You should install this schema in the Microsoft Word schema library on client machines where users will need to import objects. After adding the schema, the system makes the correct XML elements available for structuring (tagging) individual objects for import. You must install the schema if you have different objects in the same file. The system needs to read each individual object, but it cannot read the object if you do not mark or tag each object.
To attach the scmt_clause.xsd schema on a client machine:
Open a Microsoft Word XML document.
Select Tools from the toolbar, and then select Templates and Add-Ins.
Select the XML Schema tab, and click the Add Schema button.
Locate the scmt_clause.xsd file, and add it to the schema library.
Provide an alias for the schema.
The system uses this alias as part of the tag description.
At a minimum, each clause, child clause, or section must have the XML element new_clause in the Microsoft Word file and it must be saved as a Microsoft Word 2003 .xml file type format. The purpose of the new_clause tag is to mark the beginning and ending of each new object to be imported from the file. If a file does not contain scmt_clause.xsd schema tags, the system parses all the text as a single clause, child clause, or section, depending on the import type that you use to place the object in the contract library. If a file contains multiple objects and you apply XML tags to each new object but leave untagged text between objects, then the system ignores that text during the upload.
This example illustrates how a Microsoft Word file might be structured, including the XML tagging that you apply to clause and section objects, for import into the Supplier Contract Management system:
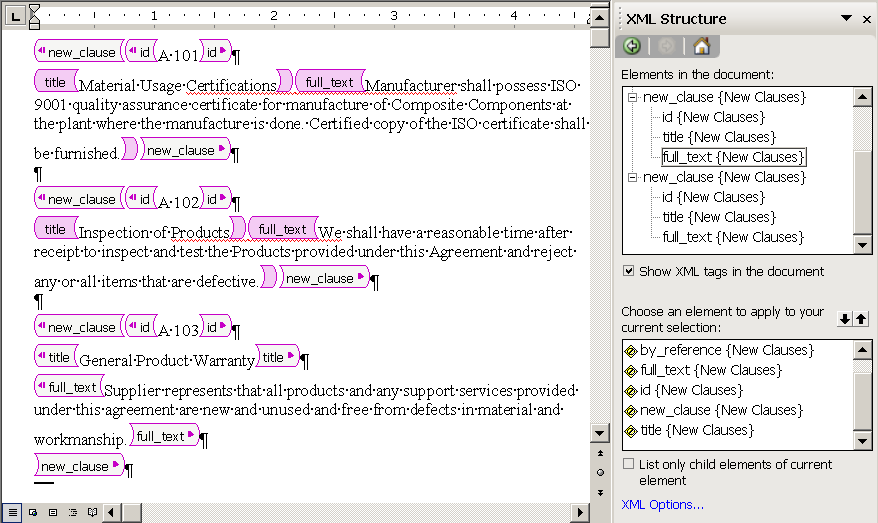
Example of object import XML tags as they appear in a Microsoft Word document
Using the XML file, you map data rows from the import source into the clause or section definition structure of the application. After you add the scmt_clause.xsd schema, the new_clause tag is available for formatting objects for import. As you structure objects, you select the text to which you want to attach a new_clause tag. The tag has these elements for structuring objects:
ID: You can enter an ID for the object that the system can use to name the object when it's created in the document authoring system.
Title: The system uses the value you define for this element as the object title. You can also use the first string of text in the title to create an ID for the clause or section object using the Import Clauses/Sections page.
Full Text: This element provides the Full Text field for the new object.
By Reference: All text within this element is parsed into the By Reference field of the new object.
After you tag all objects within the document that you want to import, you must save the Microsoft Word document as a Microsoft Word 2003 .xml file format. Next, you select the file for uploading on the Import Clauses/Sections page. Complete the import action on this page by selecting the objects to create, defining the import type, and clicking the Create Selected Objects button. If you exit the page and objects from the same selected file remain, then the system discards the objects and you will need to enter the default information and select the XML file again.
Imported Clause Formatting
Because so many varieties of imported content exists from company to company, you might want to consider some points as part of an import to reduce the amount of rework that might be needed to achieve the wanted format of clauses after they are in the library. These points are not requirements and each situation is different. Consider these points to help you during the object implementation process:
Titles
Generally, you should use separate titles with each clause or section that you define, especially when using the system to automatically number the content. Using separate title, each title will be numbered, and the content below it not numbered, enabling you to better create tables of contents base on the title's paragraph style in Microsoft Word if needed.
Numbering
Generally, you might want to strip the numbering in Microsoft Word prior to the import if an existing template and content contains simple numbering, such as when each outer clause is numbered. This is especially true if the template contains text numbering.
Paragraph Styles
Generally, if an existing template and document content contains simple clauses without a lot of indented bulleting and numbering, you should consider removing all paragraph style formatting and keeping the style as normal. This enables you to centrally maintain paragraph styles that you want using the system and have Microsoft Word paragraph styles applied to the document each time you generate it.
See Defining Document Templates and Styles.
This approach may not always be possible when you have more complex clauses. With complex clauses it's possible to specify styles within each Microsoft Word clause. The system can incorporate these styles as it generates the documents and ignores the paragraph style specified in the system's Microsoft Word templates.
When you are not sure about paragraph styles and number, you use the Reveal Formatting feature in Microsoft Word and click on the content within an unprotected preview document in the document configurator to see which paragraph styles and numbering the system will apply when you create the document. Using information from the preview document, you can edit system templates or individual clauses and sections to achieve the format that you want.
Note. You can only create general clauses when using the object import process. You cannot create table clauses. These are clauses designed for use with Microsoft Word tables and summarizations for transactional field values.
Pages Used to Import Objects|
Page Name |
Definition Name |
Navigation |
Usage |
|
CS_CLAUSE_IMP_SUMM |
Supplier Contracts, Manage Contract Library, Import Clauses/Sections |
Define default values for clause and section attributes, select and import object files, review object contents parsed from the uploaded file, and select to create objects in the contract library. Note. The summary and detail view pages for importing objects are the same; only the page layout is different. The summary view uses tabs to summarize information. |
|
|
Show Object Details |
CS_CLAUSE_IMP_DTL |
Supplier Contracts, Manage Contract Library, Import Clauses/Sections Click the Show Detail View button on the Import Clauses/Sections page. |
Define default values for object attributes. Also, upload objects, import and create objects, review and update import object details, and create objects and review errors. Note. The summary and detail view pages for importing objects are the same; only the page layout is different. The summary view uses tabs to summarize information. |
Defining Default Values for Object AttributesAccess the Import Clauses/Sections page (Supplier Contracts, Manage Contract Library, Import Clauses/Sections).
After object clause creation processing, you can review and fix warnings and errors as you work to process uploaded files into the clause library. The system creates error messages on the Error/Warning Message tab for each selected object that it fails to create. You can fix the objects with errors and then select to create the objects again.
The Default for Object Attributes group box for objects uploaded from selected files applies to all objects uploaded from the selected XML file. These attributes save you time when importing multiple objects. While in the same session, you can change the default values by clearing all objects previously uploaded and clicking the Clear Objects button.
Note. All objects are initially imported as clauses. After you upload and import the files, you can redesignate the object type using the Objects to be Created grid. You can designate the object as a clause, child clause, or section before uploading the objects into the contract library. The system does not display values that relate only to clauses when you assign a section import type.
You can override most of the attributes for individual objects after you upload them and before you create them in the contract library. The Objects to be Created grid provides fields in which you can update information for individual objects. For example, you can update the effective date, whether or not an object is numbered, or the library to which a clause object is assigned before you create the object.
See Defining Contract Clauses.
Note. The Show Detail View, Show Summary View, Create Selected Objects, and Clear Objects buttons on this page are not available until you upload an object.
|
SetID |
Select a setID to apply to the objects that you will create. This field is required, and the system uses the same setID for objects uploaded from the same file. |
|
Effective Date |
Select an effective date. The default value for the field is blank. You can also enter a date after you import the clause or section using the Show Detail View or Show Summary View buttons. Effective dates can be overridden for individual objects. Normally, when you initially import objects to create the object library for existing approved objects, you want to enter an effective date in the past. This action makes the object active and available for any contract or ad hoc document that you need to generate based on the contract or ad hoc start date. In addition, after you load an object with a specific effective date, you can reload the object to create a new instance of the object title and body text for the same object ID. This new instance enables you to update new versions of an existing clause or section from an external Microsoft Word document. |
|
Status |
Displays the status of the clause or section. The default value for the field is Active. You cannot change the value because the system imports and creates clauses and sections in the Active status. |
|
Enter Manually |
Select to manually enter the ID for the clause or section or use the value in the id tag from the Microsoft Word XML file. You use the Object ID Numbering Options group box to select how you want to create names for the objects. |
|
Extract from Object Title |
Select to extract the clause, child clause, or section ID from the first string of text within the title tag. The system uses the first string of text in the file. For example, if a clause or section is preceded by a paragraph number with a space between the number and text, then the system uses the number as the ID for the object. If the first string is a word, then the system uses that word as the object ID. If the name contains spaces, then you can tag the object ID using the id tag in the schema. Otherwise, only the characters preceding the space will be extracted as the object ID. |
|
Use Auto Numbering |
Select to use automatic numbering. The system displays the default starting sequence for both clauses and sections, but you can select other values. Using automatic numbering, the system uses NEXT as the clause or section ID when each object is parsed from the uploaded file and added to the Objects to be Created grid box. When you create the object, the system assigns the next number in the specified starting sequences to the clauses and sections. |
|
Clause Start Sequence |
Select the automatic numbering start sequence for a clause. This field becomes available when you select to use auto numbering as the numbering option for clauses. The default value is the sequence that was defined as the default value for clause automatic numbering. When you select to create the selected objects in the contract library, the system uses this sequence and the next available sequence number to number the clause. |
|
Section Start Sequence |
Select the automatic numbering start sequence for a section. This field becomes available when you select to use auto numbering as the numbering option for sections. The default value is the sequence that was defined as the default value for section automatic numbering. When you select to create the selected objects in the contract library, the system uses this sequence and the next available sequence number to number the section. |
|
Library |
Select the library to which you want to assign the clauses that you import and create. You can use the Categorization tab to override this value for individual objects. If you select to import an object as a section, the system ignores the value that you enter in this field because only clauses and child clauses apply are assigned to a library. When you select the import type using the Objects to be Created grid, the system does not display library values for a section. |
|
Class Name |
Select a class to which you want to assign the clauses or child clauses that you import and create. If a default approval type exists for a specific class, the system displays it in the Approval Type field. You can use the Categorization tab to override this value for clauses and child clauses. If you import sections, the system does not use the value in this field, nor does it display the value on the Categorization tab. |
|
Approval Type |
Select an approval type to assign to the clause and child clause objects that you import and create. If the class has a default approval type, you cannot change this field. You can use the Categorization tab to override this value for individual clauses and child clauses. If you import a section, the system ignores the value in this field and does not display a value for the approval type on the Categorization tab. |
|
Approval Status |
Select the status at which you want to set the approval for objects when it's created. If clause approval is required on the Installation Options page, the default value for this field is Initial. You cannot change the value in this field. If clause approvals are not required, you can select Initial or Approved. Approved statuses make objects available for use when they are imported and created. When you set the status to Approved and the object contains bind variables that are not valid, the system creates the object but changes the status from Approved to Initial. The system uses the same approval status for clause, child clause, and section objects. |
|
Notes |
Enter additional information about the use of a single or multiple objects. This text applies to all objects that you import and create using this object import session. You can override this value on the Attributes tab. |
|
Default Description to Title |
Select to indicate that you want the system to use the first 60 characters of the title element in the Microsoft Word XML files as the entry for the Description field. If a title does not exist for the object, the system leaves the Description field blank. You must enter a description before you create the object. |
|
Error on Duplicate Title |
Select to indicate that the system should check whether the title already exists for a clause or section. If a duplicate title does exist, the system will not add the object and places an error message on the Error/Warning Messages tab. |
|
Numbered Object |
Select to indicate that all objects created during this import session should be numbered. After you import the objects, you can manually update the value for each object before creating it in the contract library. Numbered objects apply to all clauses and sections. |
|
Error on Duplicate Description |
Select to indicate that the system should check whether the description already exists for a object in the clause library. If a duplicate description does exist, the system will not add the object and places an error message on the Error/Warning Messages tab. |
|
Protect in Document |
Select to indicate that a clause or section should be protected when it is being included in a contract document. After you import the objects, you can manually update the value for each object before creating it in the contract library. |
|
Select XML File |
Click this button to access the Select XML File to the Import Clauses page. Using that page, select a Microsoft Word XML file that contains the object you want to import. If you are uploading objects from more than one file, the system prompts you to remove or append objects if you have previously uploaded objects in the Objects to be Created grid box. You select one file at a time, but that file can contain multiple objects that the system will segregate upon uploading. Then, you can maintain individual objects using the Objects to be Created grid box in the PeopleSoft system. Files eligible for importing and for object creation must be an XML type file. The system searches the file for new object blocks to upload each object. If the tag is located, then it will look for the attributes of the new_clause, id, title, full text, and by reference tags. If a new_clause tag is not found in the entire file, then the system parses the file content as one object, all text goes into the Full Text field, and the title is left blank. If, within the content of each new object block of text, the system does not find a title tag, it parses all text within the block as full text. Otherwise, the system parses the tagged content according to the content type, such as full text or by reference text. |
See Understanding the Object Import and Creation Process.
Objects to Be Created
Use this grid box to review and change information about objects before you create them. The grid is not populated until you select to upload an XML file.
See Reviewing and Updating Imported Clause and Section Details.
Result of Last Create
Use this section to review the results of the last object creation process you initiated using the Create Selected Objects button. The section has no data until you create or attempt to create objects for placement in the contract library.
See Creating Clauses and Sections and Resolving Errors.
Create Document Configurator
Use this section to create a document configurator after you import objects to the system but before navigating away from the Import Clauses/Sections page. When the page initially appears, the Create button is not available for use. After you import objects and upload them to the contract library, the button becomes available. You can continue to import and upload objects that will be a part of the configurator. You can only create the configurator once, so ensure that you've included all the objects for use with the configurator. After you create the configurator, you can maintain it and add additional objects using the Document Configurator Definition page.
See Creating a Document Configurator During Object Import.
Importing Objects to the Import Clauses/Sections PageAccess the Import Clauses/Sections page (Supplier Contracts, Manage Contract Library, Import Clauses/Sections).
To import and upload a object file from a local system to the Import Clauses/Sections page:
Use the Default for Object Attributes section to enter common data for objects that you want to upload.
Click the Select XML File button.
If you have not loaded other files during this session, go to step 3.
Depending on if you have already uploaded a file during this import session, the system will either append new objects to this grid or remove the objects previously uploaded before uploading the new ones. When prompted, click Yes to append the new objects to the grid or click No to remove all uploaded objects from the grid.
Click the Select XML File button to browse for the file on a local system.
The file must be an XML file and created using Microsoft Word. If the file consists of multiple objects and each object has a specific ID, title, full text, and by reference attributes, then the XML elements should be applied to each object to indicate each object attribute. To tag clauses in the Microsoft Word document you need to first add the PeopleSoft clause schema so that each object in the file can be tagged with the correct new_clause, id, title, full text, and by reference element. Otherwise, the system will not be able to read the uploaded file for individual objects, and will treat the file content as one object.
Click the Upload button.
The system populates the Objects to be Created grid with objects contained in the selected file. The system assigns the same default value attributes to each object uploaded from the file. The title, full text, or by reference attributes are interpreted based on how they are tagged in the file.
Note. The system automatically collapses the Defaults for Object Attributes group box when you return to the page after uploading files.
After uploading the file, the Object ID field appears blank unless you:
Selected a numbering option to extract it from the object title, and the uploaded object has a title tag.
Selected to use automatic numbering; the field will contain NEXT.
When you create objects and the automatic numbering option is selected, the system assigns the new number based on the starting sequence.
Uploaded each object in the file with an id tag.
See Creating Clauses and Sections and Resolving Errors.
Reviewing and Updating Imported Clause and Section DetailsAccess the Import Clauses/Sections page (Supplier Contracts, Manage Contract Library, Import Clauses/Sections).
After uploading the XML file, use the Objects to be Created grid box to review and update objects before you complete the import for the selected file by creating the objects in the contract library. Two display views are available–summary and detail. The summary view that appears in the previous page example enables you to maintain objects using tabs. The detail view enables you to review and maintain all fields for each object on the same page. One button is used to toggle between the two views. This section describes object import using the summary view.
By Reference Text
Select the By Reference Text tab.
Use this tab to view by-reference text that was included with the object import. This field is blank unless an individual object in the file has a by reference tag within a new_clause tag. If the import type is section, values do not appear in this field.
Attributes
Select the Attributes tab.
Use this page to view and update the Import Type and Object ID fields, along with a couple of required fields and notes. If you set up default attribute values, fields on this tab will initially display those values after you upload the selected XML file.
See Defining Clause Information.
|
Effective Date |
Displays the default value that you defined using the default attributes. If you did not enter a default value, the field is blank. You can either enter a value or override the current value. The effective date determines when the object is available for use. This field is required. Effective dates can be overridden for individual objects. Normally, when you initially import objects to create the object library for existing approved objects, you want to enter an effective date in the past. This action makes the object active and available for any contract or ad hoc document that you need to generate based on the contract or ad hoc start date. |
|
Description |
Displays the object description. Clause and section descriptions are required. You can either enter a description or override the default title. |
|
Notes |
Displays the default value you entered in the Notes field. If you did not enter a default value, this field is blank. |
Categorization
Select the Categorization tab.
Use this page to update basic information about objects. Section import types do not have values for Class Name, Approval Type, and Library fields and the Protect in Document check box.
|
Numbered |
Select to indicate that all objects created during this import session should be numbered. The system uses the Numbered feature to determine the use of the paragraph style and numbering as defined within the system's Microsoft Word template with this clause or section when creating a document. See Defining Document Templates and Styles. You can override the value you defined in the Defaults for Object Attributes section. After you import the objects, you can manually update the value for each object before creating it in the contract library. Numbered objects apply to all clauses and sections that you are importing. |
|
Insert Page Break Prior |
Select to indicate that you want a page break before this object in a contract document. |
|
Protect in Document |
Select to indicate that a clause or section should be protected when it is included in a contract document. You can override the value that you defined in the Defaults for Object Attributes section. After you import the objects, you can manually update the value for each object before you create it in the contract library. Section import types do not have values for this field. |
See Defining Clause Information.
Error/Warning Messages
Select the Error/Warning Messages tab.
Use this page to review warnings and error messages resulting from the last object creation process.
See Creating Clauses and Sections and Resolving Errors.
Creating Clauses and Sections and Resolving ErrorsAccess the Import Clauses/Sections page (Supplier Contracts, Manage Contract Library, Import Clauses/Sections).
Use the Objects to be Created grid box to select objects for creation in the contract library. After selecting to create the objects, you use the Error/Warning Message tab to review errors and warnings produced by the system for objects that failed to create. You also use the Result of Last Create section to review how many objects were processed and how many were created.
During the creation process, the system makes three passes through values on this page to process the imported objects. On the first pass, it processes all child clauses. After it creates the child clauses, the system makes a second pass and creates all clauses and clauses with dependents. Finally on the third pass, the system creates sections and sections with a clause structure.
|
Create Selected Objects |
Click this button to create the object or objects you selected in the Objects to be Created grid. The system uses the Clause Definition and Section Definition component to create objects and validates each object for errors and warnings. After creating the object, the system displays the results in the Results of Last Create section and dims all fields for objects that were created successfully. It also provides a link to the Clause Definition or Section Definition page. To view the clause or section, click the View Object button next to the Object ID column on the Content tab. |
|
Clear Objects |
Click this button to remove all objects in the Objects to be Created grid. You cannot cancel the action after you select to deselect the object, and the removal is immediate. You can upload the objects again if you want to continue working with them after you deselect them. You can select to clear the objects in the grid if you want to enter a default value for the Effective Date field so that you do not have to enter a date for all the uploaded objects. This action enables you to set up the default value again and to select the file in which to upload objects. Note. When you clear objects from this page, you also clear values for the document configurator. |
Resolving Import Errors and Warning Messages
Access the Error/Warning Messages tab (Supplier Contracts, Manage Contract Library, Import Clauses/Sections).
The Message column displays all the errors and warnings generated by the system when you selected to create objects. Status indicators display immediately after the system completes processing objects for inclusion in the contract library. The indicators appear next to each selected object and signify if the object was successfully completed, had import errors, or system warnings.
The Import Clauses/Sections page shows errors that the system produced when similar objects that were uploaded to the contract library already existed in the library. You can load similar data into the library, but you must use different effective dates. In that case, the system loads the data and provides a warning message that a new effective-dated row was added.
The system uses the Clause Definition and Section Definition component interfaces to create objects. The system creates the interface, and the interface returns error messages in psmessages of the session object.
This table describes possible errors and how to fix the objects:
|
Error |
Resolution |
|
Cannot add clause because effective-dated row 01/01/xxxx already exists. |
If your intention is to add another effective-dated row, then use an effective date for the clause that is later than the current effective date. Otherwise, enter a different clause ID. |
|
Description for clause was already used for another clause. |
The system has possibly found a duplicate clause or section. Change the clause description or deselect the Error on Duplicate Description check box in the Defaults for Clause Attributes group box as needed. |
|
Description cannot be blank. |
Enter a value in the Description field on the Attributes tab in the Clauses to be Created grid. |
|
Title was already used for another clause. |
The system has possibly found a duplicate clause or section. Change the clause title or deselect the Error on Duplicate Title check box in the Defaults for Clause Attributes group box as needed. |
|
Clause ID field cannot be blank. |
Clause ID is a required field. Enter a unique value in the field. |
|
Effective Date cannot be blank. |
Enter an effective date for the selected clause. It is recommended that you back date effective-dated clauses and sections in the library so that you allow content to be referenced based on the begin date of contracts that you create. |
|
Effective date sequence must be greater than effective date sequence of current record. |
Use the Attributes tab to change the effective date to a date later than the effective date of the existing section or clause. |
This table describes possible warnings and how to fix the objects:
|
Warning |
Resolution |
|
Approval status is set to Approved, but clause contains invalid bind variables - clause is created but status is changed from Approved to Initial. |
Clauses cannot be approved until bind variables are valid. Use the Clause Definition page to access the clause and determine how to fix the bind. |
|
Clause already exists; added a new effective dated row 01/01/xxxx. |
You do not need to take an action. This warning informs you that the system adds a new effective date to the existing clause. |
|
Value for Clause ID is too long and is truncated to 20 characters: <Clause ID value from file> |
No action is needed. |
|
Value for Title is too long and is truncated to 254 characters: <Title value from file> |
No action is needed. |
|
Clause already exists; added a new effective-dated row effective date |
No action is needed. |
|
Dependents will not be updated for existing clause. |
The import process enables you to add child dependent clauses to newly created parent clauses or sections as part of a specific import. These child clauses must be manually added as a dependent clause using the Clause Definition or Section Definition page after you complete the import. |
Viewing Results of the Last Object Creation Process
Access the Result of Last Create grid (Supplier Contracts, Manage Contract Library, Import Clauses/Sections).
Use this section to review how many clauses were processed and how many were created. The results are refreshed upon completing each file upload to the contract library.
Note. Child clauses are included in the clause count column.
|
Clauses Created and Sections Created |
Displays the number of clauses or sections that were added to the contract library during the most recent object creation processing. |
|
Clauses with Errors and Sections with Errors |
Displays the number of clauses and sections that had errors during the last object creation processing. Objects that have errors upon creation are not uploaded to the contract library. |
|
Clauses with Warnings and Sections with Errors |
Displays the number of clauses and sections that had warnings during the last object creation processing. Objects that have warnings are loaded into the contract library, but you should review the object using the Clause Definition or Section Definition page before using it in a document. |
|
Number of clauses processed and Number of sections processed |
Displays the total number of clauses and child clauses and sections that the system evaluated and processed during the most recent object creation upload process. |
|
Last Selected XML File |
Displays the most recent XML file name that was uploaded to this page. If you have imported multiple files, only the last one appears in this field. |
Creating a Document Configurator During Object ImportAccess the Import Clauses/Section page (expand the Create Document Configurator on the Import Clauses/Sections page).
In addition to uploading sections and clauses, you can use the Import Clauses/Sections page to optionally create a document configurator and assign the imported objects to it after you have uploaded all the objects into the contract library. This feature makes it possible for you to create a configurator using an entire legacy document. After you create objects, you can assign the configurator attributes and click the Create button to create the configurator.
Using the Create button provides you an easy method to create the first pass of the configurator. The configurator and its content will likely require further cleanup and editing after you create it because the newly created content and subsequent formatting of the authored document from the system depends on:
The content that you have selected for the import.
The formatting of the content.
The Microsoft Word template that is use by system at the time it assembles the document for the newly created configurator.
You can perform multiple imports to the Import Clauses/Sections page before creating a configurator; however, after you upload the objects into the contract library and exit the Import component, the objects are not eligible for inclusion in any new configurator you have created during the import from within the Import component. When you upload objects to the contract library, the initial configurator Create button becomes unavailable until you import additional objects to the Import Clauses/Sections page. You can only create the configurator once, so ensure that you've imported all the objects for use with the configurator. After you create the configurator , and if you stay within the Import component, you can import additional clauses from another .xml file and select to append those to the newly created configurator. After you exit the component, this feature is no longer allowed, and you must maintain the configurator to add additional objects.
Note. Click the Clear Objects button to remove all objects and to reset the fields for the document configurator.
When creating the document configurator, the system:
Assigns the same setID as specified on the Import Clauses/Sections page.
Sets the configurator availability status to In Process.
Uses the Microsoft Word template that is specified in document and options for the setID.
Adds the date and time that the configurator was updated or created.
Provides user information for who updated or created the configurator.
Adds objects that were successfully created, even if they are unapproved.
After you create the configurator, the Create button is no longer available and the configurator information is dimmed.
|
Configurator ID |
Enter a unique ID for the configurator. You must define configurator details before you click the Create button. If you import additional objects after you create a document configurator, you cannot add them to the configurator. You can use the Document Configurator Definition page to add new objects to the configurator. |
|
Source Transaction |
Select which type of source transaction you want to assign to the configurator. You can use a configurator for only one valid source transaction. Valid values include: Ad Hoc: Select to use this configurator to generate ad hoc contract documents. Multiple Sources: Select to use this configurator to create any combination of source transaction documents, including ad hoc, purchase orders, and purchasing contract documents. Purchase Orders: Select to use this configurator to generate contract documents based on a purchase order. Purchasing Contracts: Select to use this configurator to generate contract documents based on a purchasing contract. |
|
Description |
Enter a description for the configurator. After you create the configurator, the system uses the description as a link to the Document Configurator Definition page, where you can update the configurator and preview the related Microsoft Word document for the configurator that you created. |
|
Create |
Click to add the document configurator to the database. After the system creates the configurator, the Create button is no longer available. Note. You must specify the details for the configurator before you click the Create button. During configurator creation, the system:
|
See Also
Defining Document Configurators
Reviewing a Document Configurator Created During Object ImportThis section provides an example of how the system creates a document configurator during object import and how the configurator appears after it is created.
Access the Import Clauses/Sections page (Supplier Contracts, Manage Contract Library, Import Clauses/Sections).
The previous example shows a simple contract section (Section A-5) with a clause and two child clauses. The objects are sequential for use in the configurator and are already created in the contract library. At this point, you can import another file to append the Objects to be Created grid box or, if you want, define attributes for a configurator based on the objects. To create the configurator, click the Create button.
After creating the configurator, access the Document Configurator Definition page (Supplier Contracts, Manage Contract Library, Document Configurators). Select the configurator that you created when creating objects in the contract library.
This example shows the Content Elements grid on the Document Configurator Definition page:
This example shows the new configurator and the structure that was defined on the Import Clauses/Sections page. The system has applied the sequential order of the objects to outline positions in the configurator. You can click the Preview Document button to view the section. At this point, you can update the configurator using this page.
See Also
Defining Document Configurators
Importing Contract and Ad Hoc DocumentsThis section provides an overview of document import and discusses how to:
Import current document versions.
Import amended contracts.
Import amended contracts and amendments.
Import original contracts and amendment files.
Import previous document versions.
Change the source transaction for an imported ad hoc document.
Understanding Document ImportUsing the Document Management and Contract Entry components, you can import legacy documents or contracts into the document authoring system. Legacy documents are those preexisting contracts and documents that were not created in the document authoring system. For example, you might choose to import a legacy document that is still an active contract so that you can collaborate on it, approve it, and, if the document format is supported by Verity searches, include it in document searches.
You can create imported documents in a Draft or Executed status, and import additional supplemental files or contracts as additional attachments for the current executed version. For active contracts, you should import the current editable version of the contract so that you can use the edit function directly from within the Document Management page to update new versions or amendments of the document. You can import read-only versions, such as a .pdf file; however, to revise the file, you must check out the read-only .pdf file, render a new version of the file from the latest Microsoft Word document, and then check in the newer version of the read-only .pdf file.
Note. Before a document administrator can use the import feature, you must select for the administrator to have import document authority using the User Preferences page.
You can import and then, depending on the type of file, view and edit the document through the document authoring system. Examples of documents that you can import include:
Microsoft Word documents with a variety of extensions, including .doc and .xml.
Microsoft Excel spreadsheets.
Adobe Acrobat documents (.pdf files).
Note. While the document authoring system creates and processes Microsoft Word 2003 documents with .xml extensions, the system does not provide the same level of integration for .xml documents when they have been imported. Microsoft Word .xml files are treated the same as if you imported a .doc file. The system does not recognize them as generated from the Supplier Contract Management application. If you want to use an existing generated .xml contract document as the starting point for a new document, you should use the Copy Document feature from within the Document Management or Contract Entry component. The Copy Document feature enables the reuse of an .xml document and maintains integration between the .xml document and system data, such as bind variables.
See Adding Authored Documents.
After you import a document, you can manage it through a life cycle similar to those documents created using the authoring system. The import options you select determine available statuses and life-cycle tasks. Most contract functions apply to the legacy contracts, except for limitations for refreshing and re-creating documents, the document modification summary, and the generation log. Imported documents are not parsed as a generated document during check in so that you can identify added, changed, and deleted content within the system.
Also, you cannot use all PeopleSoft Approval Framework features for document approval for legacy documents. Only contract documents generated by the document authoring system can use the workflow approval to work at the clause level. For example, if a certain clause has changed, you can use the Approval Framework to notify specific approvers. For imported documents, the Collaborated On, Approved On, and Dispatched On date fields appear as blank on the Document Management page.
You can import the current version of a draft or an executed contract. If the current version is already in an amendment state, then the previous versions can also be imported as long as the amendment number is unique within a contract. Imported documents cannot use the Refresh feature intended for generated documents. Also, after you initially import a document or contract, you can use the Import Prior Document button on the Document Management page to import previously amended versions of the contract or document. This is determined based on the Amendment field. For example, if you specify that the current version you are importing is amendment number 5, the system enables you to import up to four earlier amended versions of the document. The Verity content search will only search for the most current amendment of the contract
If you are using document types, you need to ensure that the document type is set up so that it is usable with imported documents. For example, if you are using document types, the list of values for the imported document status depends on applicable statuses defined on the Document Type page. The settings also affect the import options available to you. For example, if the applicable status is not Full Life Cycle, then you can only import the current document. Other import process options will not be available.
You import legacy contracts and documents as part of the document creation process. The system provides an Import Document button for ad hoc, purchase order, and purchasing contract documents. You can import documents having an ad hoc source or ones related to transactional purchasing contracts or purchase orders depending on their use. When you relate a document to a transactional purchasing contract or purchase order, the transactional contract or purchase order must already exist in the system.
After importing documents, you can:
If the document format permits editing, begin using the Document Management component to edit and revise the document, editing the imported draft document, or creating a new amendment for an imported document already in the executed status.
Add attachments, such as supplement documents to the current version.
See Viewing and Uploading Attachments and Related Documents.
Change attributes in the document authoring system.
Import previously executed versions that were not already imported.
Versions that were imported on the initial import page cannot be changed. You can only import previous versions. The Import Document page displays the previous versions that were imported.
Perform Verity searches to search for content in imported documents for document types that are supported by Verity searching.
Document Import Process
This section provides an example of how you use the import process with legacy contracts. Suppose you have a legacy contract document that you want to track in the document authoring system. You also want to associate the contract with existing PeopleSoft Purchasing transactional records.
You begin by accessing either the purchasing contract, purchase order contract, or the Document Management component, and then you:
Ensure that user preferences are set up to permit users to import documents.
Select to add a document and define the document basic information.
Click the Import Document button.
Define import information, such as the import option, version number, and status date.
Upload the document file containing the legacy contract or document.
Optionally, and when previous versions are available, upload the file.
Import the legacy document and the previous versions you uploaded.
The Document Management page appears so that you can open the document and manage its life cycle.
Use the Import Prior Document button to import previous versions of the document after it is created in the document authoring system.
See Also
Creating and Maintaining Amendments for Supplier Contracts
Pages Used to Import Contract and Ad Hoc Documents|
Page Name |
Definition Name |
Navigation |
Usage |
|
CS_DOC_IMPORT |
|
Import current document versions, amended contracts, amended contracts and amendments, and original contracts and amendments. |
|
|
Import Document |
CS_DOC_IMPORT |
Supplier Contracts, Create Contracts and Documents, Document Management Click the Import Prior Document button on the Document Management page. |
Import previous document versions. |
|
Change Source Transaction |
CS_DOC_ACTIONS_SP2 |
Supplier Contracts, Create Contracts and Documents, Document Management Click the Change to New Source button on the Document Management page. |
Change the source transaction for an imported ad hoc document. |
Importing Current Document VersionsAccess the Import Document page (Supplier Contracts, Create Contracts and Documents, Document Management, and click the Import a Document button).
Use this page to add information about the document that you are going to import. The SetID, Ad Hoc ID, Sponsor, Administrator, Department, Begin Date, Expire Date, and Description fields are the same as the fields on the Create Document and the Document Management pages.
See Common Elements Used in This Chapter.
Note. The User Defined Fields section is available for use with document import when the document type that you specified has been enabled for user-defined fields. Values in the User Defined Fields section are determined by fields selected on the document type and that have been defined using the User Defined Fields page.
You use the Import Option group box to select how you want the system to process the imported document. Depending on the option you select, the Current Version grid box changes to display the appropriate fields for each import option. If you enter data and change the import option, the system deletes the data you entered.
When uploading amended versions of contracts, it is important to select the appropriate option depending on how you intend to maintain future amendments for the contract because the option cannot be changed once and amended contract is imported
|
Current Contract/Document |
Select to import a single contract or document that does not have amendments. This option appears by itself if you are using Document Types and the Document Type's applicable status is set to Draft, Complete Statuses Only, or set to Draft, Approve Statuses Only. When you upload the document, you can set the status to Draft, Completed, Approved, or Executed, depending on the use of a document type and its settings. In Draft status, the Status Date field must have a date less than or equal to today's date. |
|
Amended Contract |
Click to import an amended contract. Select this option if, for this contract, you always make amendments to the main contract and never use a separate amendment file. When you select this option, the system prompts you for the Amendment number that represents the current amendment number for this contract. |
|
Amended Contract and Amendment |
Click to upload an amended contract as well as an amendment file for the amended contract. In this scenario, you are loading a fully amended main contract file (similar to Amended Contract option) plus a separate Amendment file, which calls out just the changes for this current amendment. |
|
Original and Amendment |
Click to import an original executed document and an amendment for the document. In this scenario, you have a current and separate amendment file for the original contract, but never modify the original main contract file itself as part of an amendment. |
|
Type |
Displays the type of file that the system is expecting you to upload as part of this import. For example, whether this is the main contact document or a separate amendment file. Values depend on the import option you selected. For the Current Contract/Document option, the type is Contract Document. |
|
File Name |
Displays the name of the file you imported. The field remains empty until you upload the file containing the document or contract. When you upload the file, the file name appears in this field, and you can click the link to view the file. |
|
Version |
Enter the version at which you want to import a document. This field is required and can be any value greater than zero. This version number is the same version number the system produces when creating or amending authored documents. This value is not the amendment number. |
Details Tab
Select the Details tab.
Use this tab to enter any comments that you might have about the imported document. The system also displays the comment in the document version history.
Importing Amended ContractsAccess the Import Document page and select the Amended Contract import option (Supplier Contracts, Create Contracts and Documents, Document Management and click the Import a Document button).
An amended contract is one that has been amended but does not exist in the system. You can import the amended contract or document and identify as many other amendments for the contract as you need and place them in the document authoring system.
Use the Prior Versions (Optional) grid box to add the original version of the document and the number of amended versions of the file as you want. To specify previous versions enter an amendment number that is greater than zero in the Current Version grid box, and tab to another field. Then, expand the Prior Versions (Optional) grid box.
The system uses the value that you enter in the Amendment field for the current version to determine how many versions of an amended contract that you can upload as previous versions. For example, if you enter 3 in the Amendment field, the system automatically numbers two amended contract versions that you can import using the Prior Versions (Optional) grid box.
The system sets the status for all previous versions to Executed.
|
Type |
Displays the type of file that the system is going to create upon importing the document. Amended Contract: Appears for the current amended contract. This is the version you are going to upload, and you can select the status at which you want to import it. Amended Contract: Appears for previous versions with additional rows based on the value you entered in the current version's Amendment field. The system numbers the amendments based on the amendment number you entered. Original Contract: Appears for you to upload the original contract. If you do not want to import the original contract, leave the row empty. |
|
Version |
Enter a version number. You can define the version for the current and previous versions of amended contracts and original contract. The version numbers do not have to be chronological; however, if the you've entered a version number, you must either import a version or clear the row. |
|
Status Date |
Select a date that you want to use. Status dates are used on the Document Management page to update different values that relate to the status at which you import the document. If you are using document types, these dates depend on the applicable status value for the document type. Ensure that you chronologically order the dates. For example, amendment two must be dated previous to amendment three. You can also use the Status Time field to further define the date chronology. |
See Also
Understanding Contract Document Amendments
Importing Amended Contracts and AmendmentsAccess the Import Document page and select the Amended Contract and Amendment import option (Supplier Contracts, Create Contracts and Documents, Document Management and click the Import a Document button).
Use this page to import an existing amended contract version along with amendment files. The current version displays with two rows that include a paired amended contract and amendment file. You must upload both the amended contract and amendment file, and if you upload previous versions of the amended contract, they must be uploaded as pairs. You can also upload the original contract.
Note. The behavior of the fields on this page is similar to uploading amended contracts.
|
Type |
Displays the type of file that the system is going to create upon importing the document. Amended Contract: Appears for the current amended contract. This is the version you are going to upload, and you can select the status at which you want to import it. The Amended Contract also appears as the type for previous versions with additional rows based on the value you entered in the current version's Amendment field. The system numbers the amendments based on the amendment number you entered. Amendment File: Based on the Amendment number entered, the system creates amended contract and amendment file pairs that you can upload. Original Contract: Appears as a previous version type for you to upload the original contract. If you do not want to import the original contract, leave the row empty. |
Importing Original Contracts and Amendment Files
Access the Upload Document page and select the Original and Amendment import option (Supplier Contracts, Create Contracts and Documents, Document Management and click the Import a Document button).
Use this page to import both an original contract and an amendment file. You can also import previous versions of amendments. If you specify a different version and status date for the original contract, the system creates a separate row in the CS_DOC_HDR_HIST record with information from the original row. If you do not specify a version or date for the original contract, then the system creates the original row with the same version and date as the amendment file.
The Version, Amendment, Status, and Status Date fields are required for the amendment file. Both the original contract and the amendment file must be uploaded.
Based on the amendment number you enter, the system creates amendment file rows that you can upload as previous versions.
Note. The behavior of the fields on this page are similar to uploading amended contracts.
|
Type |
Original Contract: Appears as the current version with an executed status. Amendment File: Appears as the current version without a preassigned status. If you enter an Amendment field value greater than one as the current version, the system provides the appropriate rows in the Prior Versions (Optional) grid box, and sets the status to Executed. |
Importing Previous Document VersionsAccess the Import Document page (Supplier Contracts, Create Contracts and Documents, Document Management and click the Import Prior Document button on the Document Management page).
The Import Prior Document button provides a way to use the Document Management page to import a previous version of a document after you have generated a document. The button is only available when a document is eligible to have a previous version imported. You use this page similar to how you import previous versions when you initially import a document.
Note. If you re-create an imported document, you cannot import previous versions for the document. Ensure that you import any additional previous versions of the document previous to re-creating the document.
Current Version
This grid box displays information about the current version.
If a previous version has already been uploaded, the system displays that information in the Current Version grid box. You cannot change the information. The system also displays the most recent status for the version or amendment. So, if a file was initially imported in a Draft status, but subsequently was executed, then the Status field value is Executed.
When you click the Done with Import button, the system performs the same validations and processing as it does for previous versions when you import a document during document creations. If all the previous versions already exist and there are no files to upload, then the Done with Import button is not available for use.
Prior Versions Optional
This grid box displays information about the previous version that you are going to upload and then import.
|
Type |
Displays the type of imported document the system will create for the previous version. The system uses the CS_DOC_HDR.CS_TWOFILE_AMEND and CS_DOC_HDR.CS_AMENDMENT record fields to determine if previous versions are available and the type of documents that they will be. |
|
Status Date |
Select a date. The date for an earlier amendment must be earlier than the date for the next amendment. The system processes previous versions in chronological order. |
Changing the Source Transaction For an Imported Ad Hoc DocumentAccess the Change Source Transaction page (Supplier Contracts, Create Contracts and Documents, Document Management, and click the Change to New Source button on the Document Management page).
This feature allows you to import a preliminary document such as supplier paper as an initial ad-hoc document, and later when finalized, relate the document to the related Purchasing Contract or Purchase Order.
After importing an ad hoc document, you can change it to either a purchase order, or purchasing contract type of document. This change is permanent and after you make the change, the Change to New Source button is no longer available. You can enter comments about the change and save your changes by clicking the OK button.
|
Source Transaction |
Select a new source transaction type. Values include Purchase Orders and Purchasing Contracts. |
|
Document Type |
Select the document type that you want to control the processing of the imported document. Values for the field depend on the document types that are available for the source transaction you selected. |
|
Business Unitand Purchase Order |
These fields become available when you select the Purchase Order value in the Source Transaction field. |
|
Set IDand Contract ID Order |
These fields become available when you select the Purchasing Contracts value in the Source Transaction field. |