 Understanding Document Life Cycles
This chapter provides overviews of document life cycles and life-cycle statuses and actions and discusses how to:
Add authored documents.
Find authored documents.
Maintain purchasing, purchase order, and ad hoc documents.
Refresh and re-create documents.
Maintain document details.
Create executive summaries.
View and edit documents.
View document version history.
Set up default document preferences.
Collaborate on documents.
View document modification summaries.
View and upload attachments and related documents.
Send documents to internal and external contacts.
Grant document view access.
Dispatch documents.
Approve documents.
Sign documents with digital signatures.
Execute documents.
Define contract amendments.
Compare documents.
Use document-related pagelets.
Deactivate and reactivate documents.
Understanding Document Life CyclesThe document life cycle is the process through which a document goes from its inception to its deactivation. The process ranges from document authoring creation to internal and external collaboration, approval, digital signature, execution, amendment processing, and document deactivation. The life cycle begins when you generate a document that is based on a document configurator and source transaction. Source transactions include:
Ad hoc contracts for general use.
Purchasing contracts for use with PeopleSoft Purchasing contracts.
Purchase order contracts for use with Purchasing purchase orders.
The initial status of a generated document is always Draft. The document stays in this status for initial editing. Subsequent life-cycle statuses can include an optional collaboration statuses, an Approved status with optional workflow, and Dispatched and Executed statuses that are required. During the life cycle, the system tracks all versions and actions that are taken against the document.
For documents that are created from a source transaction of purchasing contract or purchase order, the document life-cycle status is independent of the purchasing contract or purchase order status. This is intentional to account for timing differences between transactional contract execution and document execution. For example, a transactional purchasing contract might be approved for the original contract document execution, yet the current document status could be Draft due to the initiation of a recent amendment.
Unlike the transactional purchasing contract and purchase order documents, you can use authored ad hoc documents for a variety of purposes. The variety and structure of document configurators that you define determine the extent of ad hoc document use. The primary difference between an ad hoc contract and a transactional purchasing contract is that documents that are generated from the purchasing contract (source transaction) are linked to the purchasing contract. The link occurs when the contract number and the values in the authored contract document refer back to specific values (bind variables) in the transactional purchasing contract. The ad hoc document content can reference values from the document management page and wizard bind values.
Also, using document types, you can associate ad hoc documents to purchase order requisitions in PeopleSoft Purchasing and PeopleSoft eProcurement. While creating the ad hoc document, you associate the business unit and the purchase order requisition ID to which you want to link the document. Then, after generating the document, you can click the Attach to Requisitions button to attach the document to the requisition. After attaching the document, you can use the Document Management page to access the requisition and, in turn, use the Requisition page to link back to the Document Management page. Links are available on Purchasing and eProcurement requisition pages to access the document authoring system document.
Ad hoc and purchasing contract documents are similar in that you define their content and structure through a document configurator (sections and clauses), wizards, and wizard bind values.
You use three basic methods to create new documents in the document authoring system. They include:
Create a new document using a document configurator.
This is a more standard creation method where the configurator is used along with the contract library to generate a contract document.
Copy a new document from an existing document.
This method creates a contract document by copying it from an existing contract document. Any bind variables are refreshed to reflect the values in the new contract. This method is available for both ad hoc and purchasing contracts.
Import a document from an external file.
This method enables you to create a document within the document authoring system from an external document. After importing the document, you can perform a limited number of life-cycle tasks for it and the system marks it as an imported document.
Depending on the types of documents you are adding to the system, you might have one or more of these methods available for your use.
This flowchart shows several of the actions, version examples, and statuses through which a document passes as it progresses through its life cycle:
The next sections provide more details about a document's life cycle.
Understanding Life-Cycle Statuses and ActionsDuring a document's life cycle, you can take numerous actions that can change a document's status. The system tracks these actions and statuses. You can review the actions using the Document Version History link.
This section discusses:
Document actions.
Document collaboration statuses.
Document approval statuses.
 Document Actions
As a document goes through its life cycle, the document authoring system tracks the actions and saves detailed accounts of changes that are made to the document. The actions that are performed on a document also determine what buttons are available on the Document Management page. Typically, you initiate an action by clicking an available button. The system makes the appropriate actions available depending on the current status of the document. The system tracks actions against documents using the Document Version History feature.
The next table describes life-cycle actions and the results of those actions in the order that you would typically perform them. The actions apply for initial documents as well as amendments; however, with amendments, additional options are provided depending on the amendment option that you select when originally creating the amendment.
See Understanding Contract Document Amendments.
Life-cycle actions and results include:
|
Action Buttons and Links |
Description and Results |
|
Accept Supplier's Revisions and Finalize |
Click to accept the document updates made by the supply-side user and to set the document to Collaborated status. This button is available for the contract administrator after supply-side users complete their collaboration. The system must be configured to enable external online collaboration with suppliers. The feature is only available if you have a supply-side portal configured for external users to access the system and the document has an external contact and user defined as the primary owner of the document. |
|
Add Attachments/Related Documents |
Click to add attachments and documents that are related to the main document. The attachments can represent supplier papers, internal executive summaries, or other documents that are related to the contract. Attachments that have been added through the Contract page for source transactions of purchasing contract also appear on the Attachments page. Related documents are other documents that are created using Supplier Contract Management that you want to associate as being related to other documents. |
|
Approve |
Click this button to approve the document during formal document approvals. |
|
Approval Details |
Click this link to view a graphical workflow of a document. |
|
Attach to Requisition |
Click this button to attach a document, along with any comments that you enter, back to the purchase order requisition under the header comments. You can attach only one version of a document to a requisition at one time. This button is visible only if the ad hoc document is tied to a requisition ID. The document must be assigned a document type that is set up for use with PO requisitions. |
|
Bypass Approvals |
Click this button to automatically set the document status to Approved, bypassing all approvals. Only administrators with proper authorization can expedite the approval of a contract by taking this action. The system logs this action. If approvals are not required, the system does not display this button. |
|
Cancel Approval Process |
Click to end the approval process. When contract administrators stop the document approval process, the system will set the document status to Draft. |
|
Cancel Collaboration |
Click this button to stop collaboration on a document. This action is performed by the document owner. If you are canceling an internal collaboration cycle and no collaborators have responded to the collaboration request, the system displays a message that indicates that the document status will be set back to Draft. If one or more collaborators have already responded, the document administrator will need to finalize the collaboration before proceeding, so the status is set to Collaborated, Pending Review. If you are canceling an external collaboration cycle and the external user has not started to make any changes, the system sets the document status to Draft. If the external user has already started making changes, the system displays a message that you that those changes will be lost if you proceed to cancel the collaboration. |
|
Cancel Check Out |
Click this button to cancel the check out of a document. Any changes that might have been made to the document are not saved, and the system records the action in the document history. |
|
Cancel Signature Process |
Click to stop the signature process for a contract document. This action rolls back the document to the last editable (.xml) version and removes signatures that may have already been entered on the document. After canceling the signature process, you can change the document and prepare it again for signatures after the changes are complete. |
|
Cancel Signing |
Click to cancel the check out of a document that is being signed. The button only appears for the user who has the document locked for signing and the document administrator. |
|
Change to New Source |
Click to change the source transaction type for an imported ad hoc document. This button only appears for imported ad hoc documents on the Document Management page and enables you to access the Change Source Transaction page. You can change the source from an ad hoc to purchase order or purchasing contract document. The change is permanent and after you make the change, the button is no longer available. |
|
Check In |
Click this button to check in a document. The system provides you prompts to select the checked out file, upload it, and define version updates. When you are checking in an amended contract that is in an amendment cycle, and the amendment option is Amend Contract with Amendment Files, the system provides a prompt that ask you if you want to automatically update the amendment file with the changes made to the amended contract. |
|
Compare Document |
Click this button to compare differences between the current version of the document and a re-created or refreshed version of the current document. This button is available only if you have set up the system for document comparisons. Use installation options to define comparison and rendering settings. |
|
Compare Selected Word Documents |
Click this button to compare two documents that you select on the Document History page. |
|
Compare Revised Documents |
Click this button to compare a suppliers' revised document with the current version of the document. This enables you to better understand what changes may have been made by the supplier. The system opens a new temporary document that shows the changes, just as if you had compared the files using Microsoft Word compare functionality. |
|
Complete Document |
Click this button to indicate that the document is in a completed status. The button appears when a document is tied to a corresponding document type that has been set up with Draft/Complete statuses instead of full life-cycle statuses. When you complete the document, the document is through with modifications and further collaboration is not necessary. |
|
Copy Document |
Click this button to create a document using an existing document. The copy document function creates a new document starting with the source document content then runs a refresh on it to update bind values and content based on the target contract's bind values. |
|
Create Amendment |
Document owners use this action to create a formal amendment to the current executed document. The system sets the document status to Draft and sets the amendment cycle to 1.00, and the portion of the life cycle that pertains to amendments begins. The administrator can still control the versions for the documents. Most actions in this table that apply to the original document also apply to the amended version. The system maintains the executed version of the contract. Multiple handling options for amendment files are available to support the different amendment processes. See Creating and Maintaining Amendments for Supplier Contracts. |
|
Create Document |
After you select a source transaction and document configurator ID, click this button to create the initial draft version of a document. Only users with proper document administrator authority can perform this action. |
|
Deactivate Document |
Document administrators use this action when they determine that the document should not be available for use. The system updates the document status to Inactive. You can use this status to close out contracts. The system displays this message after a document has been deactivated: This Document Has Been Deactivated. The system retains the current document status at the time the document is deactivated. |
|
Decline Signing Document |
Click this button to decline digitally signing the document and enter comments about the document. This could be due to a variety of reasons, such as a signature field is not in the PDF or the document needs revising. The system updates the Document Management page to indicate that the document has been declined. Note. Internal approval of a document and digitally signing it are independent actions. Some users may have to approve the document using PeopleSoft Approval Framework and then sign the document. Depending on your configuration, you might be capturing signatures before, during, or after the approval process when using approvals. |
|
Dispatch |
Click to select and send original documents, attachments, amendments, or any combination of these to suppliers for final signatures. The document owner performs this action. You can also use this action to initiate the collection of digital signatures on the Supplier Portal for external suppliers. The system updates the document status to Dispatched to indicate that the routing to suppliers for signatures is in process. This button appears only when the document is in an Approved status. |
|
Document Details |
Document administrators can click this link to update information about the document including administrator, document type, sponsor, department, description and any user-defined field attributes. For ad hoc documents, you can also change the begin date and expire date of the document. The Document Details page also provides information about document cycle times and document creation and processing activities. |
|
Document Modification Summary |
Click this link to view changes, such as new, changed, or deleted clauses, that have been made to a document. |
|
Document Version History |
Click this link to access the Document History page where you can view the history and version details for a document. |
|
Document View Access |
Click this link to provide viewing permissions for users and to review collaborators who have view permissions. You can assign view access based on the user's role. |
|
Edit Amended Document |
Click this button to edit an amended document. The button is only available when you create an amendment using the amendment option is Amend Contract with Amendments. This option enables you to check out and amend the main contract. You can also edit the amendment file using the Edit Amendment File button. When you check out the amended document, the system updates the Document Management page to indicate that the document is checked out, and provides Check In and Cancel Check Out buttons for the document. |
|
Edit Amendment File |
Click this button to edit an amendment file. This file contains a summary of changes for the amended document. When you check out the file, the system updates the Document Management page to indicate that the file is checked out, and provides Check In and Cancel Check Out buttons for the file. |
|
Edit Document |
Click this button to edit and check in a revised version of a document. Generally, only users with proper document administrator authority can edit the document. However, users who are defined as collaborators (interested parties) can also edit the document during the collaboration cycle if they have edit authority. During the amendment cycle, this button launches one or two files depending on how you are maintaining amendments for the document. |
|
Execute Contract |
Click this button to indicate that the original document has been signed off by all parties and is frozen. Document owners perform this action. At this point you can create an amendment for the document, send it back to contacts, or reset the document to Dispatched status. The system updates the document status to Executed after you click the button. |
|
External Contacts/Signers |
Click this link to add and update external contacts for a document. The system uses values that are defined on the External Contacts page as default values when you send or dispatch documents. In addition, attributes necessary for supplier portal access to documents is also defined here for external users. |
|
Finalize Collaboration |
Click to complete collaboration after all collaborators have responded to the collaboration request. The document owner performs this action. For internal collaboration, the owner should review the current version of the document and review and approve any changes in the document before clicking this button. For external collaboration, when you click the Finalize Collaboration button, the system disregards any supplier or external user changes and continues using the current version of the document. If you want to incorporate some or all of the supplier changes but do not want to take the supplier's version as is, you can check out the original version sent to the supplier and manually make any changes and then check in that document before finalizing it. This might be necessary if the supplier made too many changes and you only want a couple of them, or if the supplier returned the document in an incorrect Microsoft Word format that is not .xml. If you want to use the supplier's version and make it the current version, use the Accept Supplier's Revisions and Finalizebutton. The system updates the document status to Collaborated when collaboration is finalized. |
|
Generation Log |
Click this link to review warnings, wizard information, and configurator expansion information that the system gathers during the generation or re-creation of a document. |
|
Import Document |
Click this button to import prior, executed versions of a document. When the current version is already in an amended state, then you can import prior versions. You can import only one version for each prior amendment number within a contract. |
|
Import Prior Document |
Click this button to access the Import Document page where you can import a prior version of a document after you have generated the document. The button is only available when a document is eligible to have a previous version imported. |
|
Internal Contacts/Signers |
Click this link to view or maintain the internal collaborators and signers defined for the document. |
|
Create/Maintain Executive Summary |
Click to access the Executive Summary page. Using the page you can view, update, refresh, and re-create the executive summary document. |
|
Mark as Reviewed |
Collaborators use this action when they are finished reviewing and potentially changing the document or adding collaboration comments. When the final collaborator marks a document as reviewed, the system sends a notification to the document administrator. |
|
Modify Attachments/Related Documents |
Click to update attachments and documents that are related to the main document. The attachments can represent supplier papers, internal executive summaries, or other documents that are related to the contract. Related documents are other documents that are created using Supplier Contract Management that you wish to associate as being related to other documents. |
|
Modify Collaboration |
Click this button to update the list of collaborators when a document is currently pending collaboration. The system invokes a separate page that enables you to view the status of current collaborators and place new users in the list. Next, you can route the document for collaboration, which sends notifications to those new users that were added to the collaboration process. |
|
Notify Me |
Click this button to create a list of people who should be notified when a document is checked in. The system provides this button when a document is checked out by someone other than yourself. The system inserts a date and time stamp when you enter an email address for the person to be notified. The system provides a Notify When Available Template field on the Installation Options page in which you can select a notification template for use with this button. The Notify Me function is useful when you route a document for internal collaboration and it can be edited on a first-come, first-serve basis. If a user attempts to edit a document and someone else has it checked out, the user can setup a notify option to receive an email when the document becomes available. |
|
Prepare Document for Signing |
Click this button to access the Prepare Document for Signatures page where you can verify that the list of signers is accurate and list those who need to sign the document. Internal signers must be in the list so that they have access to the document and that the system provides them the appropriate tasks on the Document Management page. This action converts (creates a copy) the document to the appropriate signature method defined on the Installation Options page. The available methods are Adobe Acrobat PDF or Microsoft Word DOCX methods. After preparing the document for signature, you cannot make additional changes to the editable version of the document. You use the Internal Contacts List and External Contacts List links to establish document signers. The display of this button on the Document Management page also depends on the document type settings. When internal signatures have been enabled, you can define when a document should be ready for signing, such as prior to, during, or after approvals. Note. The list of signers in the internal contact and external contact list act independently of actual signature fields defined within the document at the time of document preparation. Depending on your needs and signing scenarios, you can establish one or more signature clauses and include them in an authored Microsoft Word document prior to preparing the document for signing. In more complex scenarios, you can use rules to drive which signature clauses are included during document authoring or refresh tasks based on the signature list that you define for each document or based on wizard questions. |
|
Preview Approval |
Click this button to view approvals for the document. When document approvals are required, this action enables administrators to review the approval process prior to submitting the document for approval. You use installation options to indicate whether approval is required for documents. If the system doesn't require approvals, it does not display this button. See Previewing Approvals. |
|
Reactivate Document |
Document administrators use this action to activate a document that has been deactivated. The document remains in the same status that it was in when it was deactivated. |
|
Recreate Document |
Click this button to completely re-create the document and rerun any associated wizard to view and update wizard values. During re-creation, the system removes document contents and does not save any manual edits that have been made to the current document in the re-created document. If you specify a new version when re-creating the document, you can view previously generated and edited versions of the document using the Document Version History link. When you are working with amendments, the amendment processing option that you select determines whether you can re-create the amendment file or the primary document. |
|
Refresh Document |
Click this button to update the bind values in a document. The system uses a copy of the most current version of the document, evaluates any changes to bind variable values that are referenced in the document, and replaces those values in the document with the most current values in the system, such as a purchasing contract. The system also evaluates rules that use bind variables and might change the document content based on the evaluation. When a bind variable is not used in a rule and is not of a repeating nature, such as a contract amount or wizard value, the system replaces the value within the clause. Any editing that has been performed within the related clause is not lost. However, when a bind variable is used in a rule or is of a repeating nature and changes are made, such as changes to a contract line, the system re-creates the entire repeating or rule section and replaces it in the authored document, including any clause text The system produces a new version of the document unless you specify to use the same version as part of the refresh process. When you are refreshing an amendment, the amendment processing option that you select determines whether you can refresh the amendment file or the primary document. |
|
Redispatch |
Click this button to dispatch the document to external users again. This button is only available when the document status is Dispatched. This action can be useful if dealing with multiple external parties, or if need to reroute for signatures. |
|
Reset to Dispatch |
Click this button to reset the document status from Executed to Dispatched. This provides a means to make updates to a document without going through the amendment process. For example, you can fix a minor typographical error in the contract without creating a formal amendment. Only administrators with proper user authorization have access to this button and can reset the executed document to a Dispatched status. |
|
Route Externally |
Click this button to send a document for external collaboration. External collaboration enables you to send documents to the primary document owner for external collaboration. After you submit a document for external collaboration, the system essentially locks the document while waiting for the supplier to respond. However, during this process, contract specialist and administrator can cancel the external collaboration cycle if needed. Note. Routing external feature is only available if you have a supply-side portal configured for external users to access the system and the document has an external contact and the user is defined as the primary owner of the document. This information can be maintained from document to document and defaulted from the vendor definition contact information for a contract collaborator type contact. |
|
Route for Internal Signatures |
This button is available for document administrators when the system is configured to allow routing for signatures before or after approvals. Click the button to send the document to internal signers for their digital/electronic signatures. The system routes the document in sequential order to each person listed as a signer on the Internal Collaborator/Signers page, and who has not yet signed the document. After everyone in the list has signed the document, the system completes the route for internal signature and notifies the document administrator. This button only appears when the document has been prepared for signing and when the document type has been set up to route for internal signatures. You use the Life Cycles Options section on the Document Type page to select routing options. When you select to enable internal signatures in the Life Cycles Option section, the system activates three additional check boxes. If you select the Prior Approvals or After Approvals check box, this button appears. If you select During Approvals this button does not appear on the Document Management page. Note. After a document is prepared for routing, external signatures can be accomplished before or after internal approvals using the Send to Contacts or the Dispatch buttons. |
|
Route Internally |
Click this button to set up collaboration and to send notifications to internal contact users who need to review and provide feedback for the document. Document owners perform this action. The system begins the process using the administrator's default list of collaborators defined on the My Contacts/Collaborators page. You can modify this list to exclude or include additional users before clicking the Route for Collaboration button. The system sends notifications to all users simultaneously. Users who have edit authority can check out and edit the document on a first-come, first-served basis. When the document is sent, the system sets the document status to Pending Collaboration. Only users who have document administrator authority can send the documents. You can apply this action to the original document as well as any amendments. Note. Collaboration is not intended for use with external users. Use the Send to Contacts or Route Externally buttons to send and collect feedback from suppliers. |
|
Send to Contacts (send document to contacts) |
Click this button to send the document to contacts. Document owners perform this action when they want to send the original executed document, current document, document amendments, attachments, or any combination of documents to external or internal contacts. In addition, you can use this button to route the document to external contacts for their digital signature. This routing is online using the Supplier Portal. The document format can be an .xml, .doc, or .pdf file type depending on how the rendering options are set on the Installation Options page for PeopleSoft Supplier Contract Management. When sending documents to contacts, such as vendors, owners can mark the document as checked out, using the Set to Checked Out check box, to prevent internal changes to the document while it is at the supplier's location. When the document is marked as checked out, the Document Management page displays the message: File locked for external review. When a document is prepared for digital signatures, the Send to Contacts button enables you to send the signature-ready PDF file using email, or to use the supplier-side portal if the system is configured for it. To route for external signatures using the supplier-side portal, the document must have an external primary owner that specifies that a signature is required. If multiple signatures are required from an external organization, the primary document owner must route the PDF manually within that organization to capture external signatures and then upload the final, signed document through the supplier-side pages. |
|
Sign Document |
Click this button to lock the document for signing. The button only appears for users who are listed as a signer for the document and have not yet signed the document. This action launches and locks the document and enables you to digitally sign the document and then upload it back to the system. When using approval processing and capturing signatures during the approval process, the user who is approving the document will also see the Sign button on the Document Management page when the approval step is awaiting the user. Note. Signing and approving or denying within a workflow are separate actions. |
|
Sign Document (On Behalf) |
Contract administrators click this button to sign a document on behalf of an internal signer. The system locks the document for signing and opens it for the administrator to sign. After signing, the document needs to be uploaded. This button enables an administrator some flexibility to capture signatures offline if corrections are needed or a user is marked as signed but did not sign the document. |
|
Stop Internal Signatures |
Contract administrators click this button to cancel the internal signature process and access the Stop Route for Internal Signatures page. The system takes the document out of the route for internal signature process and notifies users. |
|
Submit for Approval |
Click this button to start the approval process. When the system requires document approvals, this action submits the document for workflow approval. Administrators take the action after collaborating final internal contract approval. Administrators can add any additional approvers or reviewers for the document. Submitting a document for approval applies to the initial version of the document and amendment processing. If the system is configured to capture internal signatures during approval and there are internal signers listed for the document, then the Sign Document button appears for each user in the approval process at that user's step for approval. Users should sign and upload the document followed by marking the document as approved. After the document is approved, the system updates the document status to Approved. If approvals are not required, the system does not display this button. |
|
Upload a Document Attachment File |
Click to upload a document attachment for the main document. The attachments can represent supplier papers, internal executive summaries, or other documents that are related to the contract. Attachments that have been added through the Contract page for source transactions of purchasing contract also appear on the Attachments page. |
|
Upload another Document Attachment File |
Click to upload a document attachment for the main document. |
|
Upload Prepared Document |
Click this button to upload the prepared for signature document. The button only appears when you are preparing a document for signatures. When preparing a document for signatures using Adobe Acrobat, the document owner must certify and enable usage rights using the Adobe Acrobat Professional version. Adobe Professional is required for all administrators because enabling usage rights for the document enables other signers with the Adobe Reader security to sign the document. When preparing a document for signatures using Word 2007, the document owner must certify and sign the contract document before it is ready to be signed by others. This prevents the document from being accidentally modified by others after it has been certified. Note. For Adobe Acrobat, if the administrator uploads a prepared document which has not had usage rights enabled, then users having just the Adobe Reader are not permitted to add a signature. |
|
Upload Signed Document |
Click this button to upload the signed document after you have digitally signed the document. This action updates the signature status to Signed. If the document is being routed for internal signatures before or after approvals using the Route for Internal Signatures button, the system routes the document to the next signer in the list. |
|
View |
Click to view a delete attachments and documents that are related to the main document. The attachments can represent supplier papers, internal executive summaries, or other documents that are related to the contract. Attachments that have been added through the Contract page for source transactions of purchasing contract also appear on the Attachments page. Related documents are other documents that are created using Supplier Contract Management that you wish to associate as being related to other documents. |
|
View Amended Document |
Click this button to view an amended document. |
|
View Amendment File |
Click this button to view an amendment file. This is a file with the summary of changes in the document. |
|
View Document |
Click to view but not check out a document. Users who have document administrator authority, are defined as collaborators (interested parties), or are approvers of the document, can view the document. |
|
View Executive Summary |
Select to view the executive summary for the contract document. The executive summary is available for all internal users who have view access to the document. The View Executive Summary button is available after the summary has been created. The button is also available during document approval. |
|
View Original Document |
This button appears only when the current document is an amendment, and the amendment option is Amendment Files Only. Click the button to view but not check out the originally executed document. The View Document button appears in addition to this button so that you can view the current amendment. |
|
View Revised Document |
Click this button to open a document that has been collaborated on with an external user (supplier). This button appears on the contract owner's Document Management page after the supplier has completed the review. |
|
Where Used as Related Document |
Click this link to access the Search for All Content Instances page, which provides details about where this document has been added to another document as a related document. You use the Modify Attachments/Related Documents link or the Add Attachments/Related Documents link to add or update related documents. The Where Used as Related Document link automatically appears on documents that have been linked as related documents on other documents. |
Document Collaboration StatusesCollaboration is an optional part of the document life cycle. Documents can go from a Draft status to an Approved status without going through the collaboration cycle. The system tracks the collaboration process and provides messages of the current document status.
This table describes collaboration statuses for documents:
|
Status |
Description |
|
Pending Collaboration |
The document has been routed for collaboration, but not all collaborators have responded. |
|
Pending Internal Review |
The document has been reviewed and updated by the supplier user. It has been returned to the document owner or contract specialist for reconciliation. |
|
In External Collaboration |
The document has been sent to the supplier user (external user) who is designated as the primary document owner on the supplier side. |
|
Collaborated, Pending Review |
The document has been reviewed by all internal collaborators and is awaiting a final review by the document administrator or owner. |
|
Collaborated |
The document has been reviewed by all external or internal collaborators and the document administrator or owner has reviewed and updated the document based on the reviews. |
See Also
Document Approval StatusesApproval statuses are controlled by the Approval Workflow Framework when document approvals are required in Supplier Contract Installation options. When document approvals are not required, the system displays only the Approve button, which the document administrator uses to set the document status to Approved.
When a document progresses through its life cycle, statuses provide the current state of the document and also determine which buttons are available on the Document Management page.
This table describes approval-related statuses for documents:
|
Status |
Description |
|
Pending Approval |
The document has been submitted for approval and is awaiting the approval of one or more users. In addition, the system sets a workflow status for approvers to Pending for each required document approver. You can submit a document for approval while it's in a Draft or Collaborated status. |
|
Approved |
The document has been through all approvers and has been approved by all approvers. You can dispatch and execute the document at this point. |
|
Draft |
When any step is denied during approval workflow, the entire workflow is denied and terminated. The document status is set from Pending Approval to Draft. After reviewing document comments, the document administrator can update the document and begin the approval process again by submitting the document for approval. |
|
Complete |
When using document types, you can set a document to complete by clicking the Complete button. |
See Also
Approving Documents and Document Components
Common Elements Used in This Chapter|
Administrator |
The user ID that indicates who is the administrator for this document. A document administrator has the authority to create, edit, and control the status for documents that he or she creates or documents that are associated with users who have been authorized for document access. If you are creating a purchasing contract document, the system populates this field with the administrator from the purchasing contract. |
|
Approved On |
This is a date field that indicates when the document owner or administrator approved the document. When the system displays this field, the document has been through all approvers in the approval process, the approval process has been canceled, or the approval process has been bypassed. |
|
Configurator ID |
Represents the document configurator that provides the basic structure for the purchasing contract or ad hoc document. The configurator also controls the content of a document. If you are adding a document, you select the configurator from the list or can be derived when a configurator selector wizard is used. You define configurators using the Document Configurators feature in the Manage Contract Library component. When you build the configurator, you select document elements to build the document. The value in the Availability Status field must be Available for the configurator to appear in lists of values. Configurators are based on two sources. The first is a purchase contract transaction and the other is an ad hoc type. When you initially add a document, you select the transaction source that matches the type of document you want to create. Then, only document configurators that match the type of document you want to create are available for selection. |
|
Configurator Selector |
Click this button to launch the configurator selector wizard if one is defined for the given document type. This special type of wizard enables you to develop and use a series of questions that are designed to select the appropriate document configurator for the document that you want to create. The configurator selector wizard automatically runs between the Add Document and Create Document pages, if necessary, based on the document type. The Configurator Selector button also appears on the Create Document page to enable you to run the configurator selector wizard again as needed. |
|
Collaborated On |
This is a date field that indicates when the document completed the collaboration process. When the system displays this field, the document owner or administrator has reviewed and updated the document based on collaborator reviews. You can route the document to contacts or dispatch it. |
|
Contact |
People to whom you might send documents, dispatch documents, or collaborate with during the life cycle of a document. Contacts can be internal or external and their setup information includes name, address, phone, email, and title. |
|
Copy Document |
Click this button when you to create a document by copying an existing document. The button is available only upon initial entry and a document does not exist. |
|
Created On |
This is a date field that indicates when the document was created. The system adds this value when you initially create the document. If you amend the document, the system updates the field. |
|
Department |
Represents the department with which this document is associated. The department might be the group of people who use the document or the group who is responsible for maintaining or digitally signing the document. |
|
Dispatched On |
This date field indicates when the document or an amendment was sent as a formal document to suppliers for signatures. The system updates this field only if a document goes through the approval or collaboration process again and is then dispatched. |
|
Document SetID |
The setID to which all elements in a document, such as clauses, sections, and wizards, belong. |
|
Document Type |
Document types can help you organize and further categorize documents that you use in the document authoring system. Using document types, you can define specific settings, defaults, and security that can help fine-tune the use of each type of document. The use of document types requires that you select the Use Document Type check box on the Installation Options page. This field does not appear if the check box is not selected; however, if it is selected, the field is required. |
|
Document View Access |
Click this link to view and update those users who have view access for the document by role name. |
|
Executed On |
This date field indicates when the document owner or administrator sent the contract as a frozen document. After this date, you cannot edit the document unless you create an amendment or reset the document to dispatch. |
|
External Contacts List |
Click this link to update the external contacts list. When you send a document to contacts, the system uses this list to populate the Send to Contacts page. |
|
Import Document |
Click this button to import a legacy document or a contract. Legacy documents and contracts are those preexisting contract and ad hoc documents that were not created in the document authoring system. The button is only available when a document does not exist. The system places imported documents into the document authoring system. |
|
Imported Document |
This is an indicator that appears on the Document Management page to inform you that a document was imported into the system. Some system features that are available for documents that are created within the system aren't available for those that have been imported. |
|
Last Modified On |
This date field indicates when changes were last made to the document. For example, if an approver or a collaborator made an edit to the document, the date and time of the edit appears in this field. |
|
Save |
Click this button to save an ad hoc or purchasing contract document's attributes prior to creating the formal document. This button is available only on the Create Document page. |
|
Source Transaction |
Indicates whether the document was created for use with a purchasing contract or for ad hoc use. An Ad Hoc document is one that has been created for general use. These documents are not constrained by procurement requirements and can be used for a variety of organizational uses, such as purchasing a one-time miscellaneous item or a service outside of the procurement system. A Purchasing Contract document is tied to a specific contract ID and extracts specific information from the contract to include in the document. The document contains a link back to its source transaction so that you can identify the source from within the document authoring system. A Purchase Order document is linked to a Purchasing purchase order. When you create a document using the ad hoc source, you manually enter a document name. Using a purchasing contract or purchase order, you select the contract or purchase order to which you want to associate the document. |
|
Sponsor |
Select a sponsor for this document. A sponsor should represent a user from the department that is sponsoring the contract. |
|
Vendor ID |
Displays the vendor that is the supplier for the contract. The system populates and displays this field when you create a document based on a contract ID. |
Adding Authored DocumentsThis section provides an overview of how to add authored documents, lists common elements, and discusses how to:
Create ad hoc documents and ad hoc contracts from purchase orders using Document Management.
Create ad hoc documents for requisitions using Document Management.
Copy documents using Document Management.
Import ad hoc or purchase order contract documents.
Create and copy documents using Contract Entry.
Understanding How to Add Authored DocumentsYou can add authored documents for use with purchasing contracts, as stand-alone ad hoc documents or as ad hoc documents that are linked to purchase requisitions. The series of pages that you use to add documents is similar for all methods, but some differences exist depending on values you select to add the document.
See Adding Purchasing Contract Documents.
To add documents into the document management system, you can use these methods:
Create standard ad hoc contracts or purchase order contracts from a document configurator ID from within the Document Management component.
Create documents for use with PeopleSoft eProcurement and Purchasing requisitions.
Create ad hoc or purchase order contracts by copying documents using the Document Management component.
Create ad hoc or purchase order contracts using document import.
Create purchase order contracts using the Contract Entry component.
Create purchase order contract documents by copying documents using the Contract Entry component.
Understanding Document Copies
Using the Copy Document feature, you can create ad hoc, purchase order documents and purchasing contract documents by copying them from existing documents. This saves time when a new contract contains essentially the same edits that may have been done on a prior contract. The Copy Document page provides document attributes on which you can search for existing documents that meet criteria you enter. When using document types, the search is limited to documents with the same type as you specify for the document that you are creating. The system does not use a document configurator to build documents that you create using the copy document method, but rather it copies the document from the existing contract document and refreshes any content of the document based on the target document's transaction information included in bind variables for the document.
When using multi-source configurators, the system enables the copying of documents from different source transactions as long as the to and from documents use the same multi-source configurator within the document type.
Note. You can specify rules within a multi-source configurator to include or exclude content from the document for each source so that the source and target document can include different content. For content that does not change due to rules or refreshed bind information, changing any edits made to the source document are preserved as much as possible in the target.
Note. The system does not copy amendment files or imported documents.
When you are using the Copy Document button on the Add a Document page, the system provides a convenient method to find and copy an existing ad hoc purchase order document, or purchasing contract document from which you can create a new document. Using the button, you access the Copy Document page, where you can perform a search for the document that you want to copy. After retrieving the document, the system displays the Create Document page for you to define attributes for the new document.
After you select the document attributes, click the Create Document button to create continue to create the document. If the current configurator uses a wizard, the system runs the wizard using default values from the corresponding wizard in the document from which you are copying. You can override these values. The system then creates the document and displays the Document Management page.
See Copying Existing Purchasing Contract Documents.
See Copying Documents Using Document Management.
Pages Used to Add Authored Documents|
Page Name |
Definition Name |
Navigation |
Usage |
|
CS_DOC_ADD |
Supplier Contracts, Create Contracts and Documents, Document Management |
Create ad hoc documents and ad hoc contracts from purchase orders using Document Management. |
|
|
CS_DOC_CREATE |
Click the Add a Document button on the Add a Document page. |
Create ad hoc documents for requisitions. |
|
|
CS_DOC_MAINT |
Supplier Contracts, Create Contracts and Documents, Document Management. Enter document attributes on the Add a Document page, and click the Create Document button. |
Define basic information about purchasing contracts or ad hoc documents. When you click the Create Document button, the system generates the document and the Document Management page appears with the actions that you can take to manage a document through its life cycle. |
|
|
Copy Document |
CS_DOC_COPY_SEC |
Supplier Contracts, Create Contracts and Documents, Document Management Click the Copy Document button on the Add a Document page. Select the document from which you to copy the new document. |
Copy ad hoc or purchase order contracts using Document Management. |
|
Import Document |
CS_DOC_IMPORT |
Supplier Contracts, Create Contracts and Documents, Document Management Click the Import a Document button on the Add a Document page. |
Importing ad hoc or purchase order contract documents. |
Creating Ad Hoc Documents and Ad Hoc Contracts from Purchasing Contracts
and Purchase Orders Using Document ManagementAccess the Add a Document page (Supplier Contracts, Create Contracts and Documents, Document Management).
Use this page to select a source transaction (Ad HocPurchase Order, or Purchasing Contracts) and enter the key information pertaining to the document to be added. Based on the source transaction that you select, either the Contract ID, PO ID, or the Ad Hoc ID field appears. The Description field is required, and if you are creating a purchasing contract document, the system enters the description from the purchasing contract. If you are creating a purchase order document, the system uses the purchase order description as the default value for purchase order ID.
|
Contract ID |
Select the purchasing contract for which you want to create a document. This field is only available when you select to create a purchasing contract document. |
|
PO ID(purchase order ID) |
Select the purchase order for which you want to create a document. This field is only available when you select to create a purchase order document. |
|
Ad Hoc ID |
Enter a name for the ad hoc document. This field is only available for ad hoc source transactions. If you are using automatic numbering for the ad hoc ID, the system places NEXT in the Ad Hoc ID field. Then, when you click the Add a Document button, the system assigns the document ID beginning with the start sequence that is defined for the given document type. If a start sequence is not defined at the document type level, then the system uses the default start sequence defined in the auto numbering setup. The rest of the ID depends on the length of the field and the last number assigned to a document. Note. You can override the NEXT value in the Ad Hoc field; however, if users can override the value, the naming schema can be disrupted. |
|
Document Type |
Select a document type for use with this document. When creating a document the valid list of document types for a user is controlled by the roles associated with the document type definition. If installation options have been set to use the document type, the Document Type field is required. If the Use Document Type installation option has not been selected, the Document Type field does not appear on this page. |
|
Add a Document |
Click to create the document based on a document configurator ID. |
|
Copy Document |
Click to create the document as a copy of another document in the system. You can copy a document that is based on a different source transaction if the document type has been set up to allow copying a document from a different source transaction. The system determines the document combinations that can be copied by using the document configurator Applicable Sources grid settings. These settings define the other source transactions documents that can be copied for documents that use the configurator. |
|
Import a Document |
Click to import a legacy document or a contract. Note. Depending on user preference settings, this button may not be visible for all users. |
|
Find an Existing Document |
Click to access the Find an Existing Document page to search for existing documents. |
Note. If the document is based on a document type that points to a configurator selection wizard to determine which is the best configurator for the document, the system will launch the wizard after you click the Add a Document button. These questions guide you in selecting a configurator to use with the new document. When the wizard is complete, the system automatically assigns the configurator ID.
See Understanding the Contract Wizard.
Note. If the document type you are using has the Automatic Document Creation check box selected, when you click the Add a Document button, the system immediately generates the document using the values specified in the document type and bypasses the Create Document page.
Access the Create Document page by clicking the Add a Document button.
Use these pages to review and enter supplemental information and to create the contract document for ad hoc, purchase orders, and purchasing contract documents.
|
Document Type |
Select to change the document type that you entered on the Add a Document page. Depending on the type you select, the fields that are displayed on this page might change. This field is only visible if Document Types are enabled. |
|
Configurator Selector |
Click to run the wizard that will select the configurator based on the answers to wizard question. The button is only available if document types are enabled and the document type selected is defined to use a configurator selector wizard. |
|
Configurator ID |
If you use a document type that has a specific configurator ID defined for it, the system automatically populates the Configurator ID field based on the document type. Or, if you are using a configurator selector wizard, the system populates the field when you complete the configurator selector wizard's questions. The Configurator ID field is only available if document types are not enabled, or if you are using document types and the user has configurator override capability defined on the document type. |
|
Begin Date |
For Ad Hoc documents only, this date represents the start date of the document. For example, this might be the begin date of the contract. The system uses this date to determine which effective content to use from the configurator ID when creating the document. The system does not display this date for PeopleSoft Purchasing contract documents. Their begin date is already specified in the contract itself. |
|
Expire Date |
For Ad Hoc documents only, this date represents the end date of the document, such as the end date of the contract. The system does not display this date for PeopleSoft Purchasing contract documents. Their expire date is already specified in the contract itself. |
|
Description |
Enter a description for the document. For purchasing contract source types, the system displays the description from the actual purchasing contract. You can override the description. |
|
Cycle Start Date |
Displays the current date. Only users who are set up with full document access on their user preferences can override the date. The start date establishes a cycle start date on which to track cycle times for contract document and amendment creation, approval, and execution. Using the cycle start and end dates, you can track documents to ensure that they meet time requirements. |
|
Cycle End Date |
Displays the date based on the number of days of cycle time and the cycle calendar that has been set up on the Installation Options page. The system adds the defined cycle time from the start date to arrive at the end date. The system calculates the date using the calendar to only include actual working days. Only users who are set up with full document access on their user preferences can override the date with a new value. You use these cycle dates on the Document Management search results to identify contract documents that have stalled or are not progressing through the collaboration and approval cycle. See Cycle Time Settings. Note. When you are creating new documents, user-defined fields appear on the Document Management page. When you are maintaining existing documents, user-defined fields appear on the Document Details page. |
|
Use Wizard Responses from Document |
Select to use the responses to a set of wizard questions from another document to create this document. The system displays and uses the responses from the wizard or the original document when the bind variable between the original document's wizard and this documents wizard match. You can override individual responses as you go through the questions. This button is available when you are using document types that have the Allow using wizard responses from a prior document check box selected. This feature is available for all document types, but is primarily used with purchasing contracts when you most likely would want to pull answers from an ad hoc contract request document into the formal purchasing contract document as a starting point for the contract specialist to work from. For example, when a purchasing contract is created from an awarded requisition and you add a document for that contract, the system displays a page indicating that the contract ID is linked to one or more requisitions, which are tied to ad hoc contract request documents, and asks you whether you want to use the answers from those documents to create this document. You can also use this feature to do general copying of wizard responses from document to document. For example, you might have a contract document containing several wizard responses in it, and wish to create a summary document with only selected key responses from the original document in it. In this case when you add the summary document the system can display the Use Wizard Responses from Document field. Click the Select Document link to select a document and select the contract document. When you create the summary document, the system runs the summary document's wizard and uses the answers from the original contract as default values for the wizard questions. |
|
Select Document |
Click to select the document that contains the wizard responses that you want to use. The link becomes available when you select to use wizard responses from another document within the Document Type definition page. |
|
Create Document |
Click to create the document. The system initiates the document generation process, expands the configurator, resolves binds and rules, and populates the generation log. If generation errors occur, the system displays a message. When the document is complete, the Document Management page appears with the appropriate buttons and links available for you to begin the document's life cycle. Note. If the document configurator uses a wizard, the system presents the questions to the document author before generating the document. |
|
Import Document |
Click to import an document that was created outside of Supplier Contract Management. You can import a document into purchasing contract, purchase order contract, and ad hoc contract source transactions types. |
|
Internal Contacts/Signers |
Click to access the internal contacts list where you can add internal collaborators and configure the signing settings. |
|
External Contacts/Signers |
Click to access the external contacts list where you can add external collaborators, enable supplier portal access, and configure the signing settings. |
|
Document View Access |
Click to view or grant access authority to contract documents for user roles and collaborators. |
Note. For purchasing contract and purchase order source types, you need to create the transactional data before adding a contract document. The Defining Supplier Contracts chapter describes the creation process and highlights how you use PeopleSoft Supplier Contract Management with contracts.
See Also
Creating Purchasing Contracts (Contract Entry)
Creating Ad Hoc Documents for Requisitions Using Document ManagementAccess the Add a Document page (Supplier Contracts, Create Contracts and Documents, Document Management).
When you select a document type that is for use with a requisition, the system updates the Add a Document page with two fields. This enables you to link to requisitions created in PeopleSoft eProcurement or Purchasing.
Document types make it possible for you to create documents and wizards for requisitions that will eventually turn into new contracts. Requisition documents define a request document and wizard that capture additional information from the requestor. When you award the requisition to a contract or purchase order and then create the contract document from that source, you can reference the original request document and make use of any wizard responses within that request document to help drive the content and fill in required data for the actual contract. The benefit of this process is that by the time the contracting specialist becomes involved in the process, the requestor has already been prompted for and provided all of the necessary information.
|
Request BU (request business unit) |
Select the business unit in which the requisitions exists. This field is only visible when using a document type that is setup to link to an eProcurement or Purchasing requisition. Note. If you access this page directly from an eProcurement or Purchasing requisition page, the system automatically populates the field. |
|
Requisition ID |
Select the requisition to which you want to attach this document. This field is only available when you are using a document type that is setup to use a requisition. When the system creates the document, it provides a link from the Document Management page to the requisition in PeopleSoft Purchasing or eProcurement. In addition, you can access the document in the document authoring system using links from Purchasing or eProcurement requisition pages. After the requisition is approved, buyers can use the document as supplemental information as they progress through the requisition process. Note. If you access this page directly from an eProcurement or Purchasing application requisition page, the system updates this field. |
Note. Steps for creating an ad hoc document for use with requisitions are the same as for a stand-alone ad hoc document, except that you must be using a document type that enables you to link to the requisition ID when you add the document. You can also launch document creation from Purchasing or eProcurement requisition pages.
If a wizard has been defined for the document type, the system launches the wizard when you click the Add a Document button. After you respond to wizard questions, the system creates the document and the Document Management page appears.
If a wizard has not been defined for the document type, the system displays the Create Document page for you to select a document type.
Use this page to define document attributes for the requisition document. You can also import a document to use with the requisition.
See Adding Purchasing Contract Documents.
Copying Documents Using Document ManagementAccess the Copy Document page (Click the Copy Document button on the Add a Document page).
Use this page to search for existing documents. The page content depends the type of document that you selected to copy on the Add a Document page. The search criteria for ad hoc documents, is related to document attributes defined for a document. For purchasing contracts, additional search criteria relates to contract information. And, for purchase order documents, the search criteria relates to purchase order information.
The Copy From Source and SetID fields appear when you are using a document configurator that has been defined for use with multiple transaction sources. This enables you to copy a document, for example, from an ad hoc document to a purchase order contract document when both documents use the same configurator. Also, the document type must allow copying from one source to another. When you select the source type to copy from and select a setID, the system verifies the setID and business unit corresponding to the ID, and makes only those documents for the copy from source type available for you to select. When you select to copy a multiple source document, the system displays an indicator on the Create Document page that the document is copied, its set ID, and document ID.
After you click the Search button, the system provides you the documents matching the search criteria that you enter. Select the Sel (select) check box to choose the document that you want to copy. Use the Documents tab to view basic information about the documents that are retrieved in the search, and use the More Details tab to view the document's status, begin date, and expiration date. You must have security access to the document before you can copy it. The system provides a warning if the document is not in an Approved, Collaborated, Complete, Dispatched, or an Executed status, and if a separate amendment exists for the document you want to copy. Only the latest version of the main contract will be copied.
The system performs searches based on matching source transactions, existing contract documents, contract process options, and document types. You cannot copy imported documents. The search results are limited to those contracts that match the selection criteria you define.
Searches also include the following criteria:
The document must already exist.
The source transaction must be of the same type, unless you select a multiple source configurator
Documents returned in the search must match document type.
Purchase order contracts, must match contract process options.
So, if you are searching for a particular contract and the process option does not match, that contract will not appear in the search results.
After you select the document that you want to copy, click the OK button. The Create Document page appears with information about the document that you are going to copy and the document you are going to create.
You cannot update the document type or configurator ID, but you can define attributes for the new document. Click the Create Document button to complete the copy process. If the document you are copying uses a wizard, the system launches the wizard when you click the Create Document button. After the system copies the document, it displays the Document Management page where you can maintain the new document.
Note. You can specify rules within a multi-source configurator to include or exclude content from the document for each source so that the source and target document can include different content. For content that does not change due to rules or refreshed bind information, changing edits made to the source document are preserved as much as possible in the target.
Note. The system tracks whether a contract was created through contract copy and what contract was used as the source of the copied contract, it can be viewed using the Document Version History link on the Document Management page.
Importing Contract DocumentsAccess the Import Document page (click the Import a Document button on the Add a Document page).
Using the Document Management and Contract Entry components, you can import legacy documents or contracts into the document authoring system. Legacy documents are those preexisting contracts and documents that were not created in the document authoring system. For example, you may choose to import legacy documents that are still active contracts so that you can collaborate on, approve, and, if the document format is supported for Verity searches, include for document searches.
See Also
Importing Contract and Ad Hoc Documents
Creating and Copying Contracts Using Contract EntryAccess the Contract page (Supplier Contracts, Create Contracts and Documents, Contract Entry).
Use this page to initiate the creation of ad hoc, purchase order, and purchasing contract documents. You can:
Create a document directly by clicking the Add a Document button.
Access a document by using the Maintain Document button.
Create a contract and document by clicking the Copy From Contract link.
When you copy a new contract from an existing contract and that contract already has a document, the system enables you to copy the document from the existing document for the contract you are creating.
See Also
Adding Purchasing Contract Documents
Finding Authored DocumentsThis section describes how to find an existing document.
Page Used to Find Authored Documents |
Page Name |
Definition Name |
Navigation |
Usage |
|
Find an Existing Document |
CS_DOC_FIND |
Supplier Contracts, Create Contracts and Documents, Document Management Click the Find an Existing Document link for a purchasing contract or ad hoc document on the Add a Document page. |
Find an existing document. |
Finding an Existing DocumentAccess the Find an Existing Document page (Supplier Contracts, Create Contracts and Documents, Document Management, and click the Find an Existing Document link for a purchasing contract or ad hoc document on the Add a Document page.
Use this page to search for documents based on any of the various combinations of search criteria fields. For example, if a document is stalled in an internal collaboration where multiple organizations and multiple collaborators are behind schedule, you can view the status of the document, such as the user on whom the document is awaiting. On the Find an Existing Document page, check boxes are available that enable you to perform a more granular selection of documents in various statuses. An option is also provided to save the search settings so that common settings and the start page can appear as default values.
To search on the cycle start date, due date, or cycle status values in the Addition Search Criteria section, you must enable document cycle times and define time restraints for completing contract documents. The system uses the number of days cycle time along with the document's due date to calculate time remaining for collaboration and approvals. The system also provides red, yellow, and green indicators as warnings for when a document is nearing its due date.
After you enter search criteria and retrieve search results, you can view and maintain information about documents in the search results, along with deleting the document from the system. The search results are for the current version of a document. To access other versions of the document, you can access the Document Management page and review the document history.
Note. When you search for Purchasing contracts or purchase order type contract IDs, you can use the % wildcard to find like values. For example, if you enter %50, the system returns results that contain the 50 value.
|
Source Transaction |
Select a source transaction type on which to base the search. You can only search on a single source transaction at a time. Available source transactions are Ad Hoc, Purchase Orders, and Purchasing Contracts. The source transaction that you select determines which fields are available on this page. |
|
Document Type |
Select a document type to narrow down the results to only documents that are associated to that document type. |
|
Set ID |
Select a setID on which to base the search. |
|
Business Unit |
Select a business unit ID on which to base the search. This field is available when you select a purchase order source transaction. |
|
Ad Hoc ID |
Select a specific ad hoc contract ID on which to base the search. This field is available when you are using an ad hoc source transaction. |
|
PO ID (purchase order number) |
Select a PO ID on which to base the search. This field is available when you select a purchase order source transaction. |
|
Contract ID |
Select a contract on which to base the search. This field is available when you select a purchasing contract source transaction. |
|
Vendor SetID |
Select a vendor set ID on which to base the search. This field is available when you select either a purchase order or purchasing contract source transaction. |
|
Vendor ID |
Select a set ID on which to base the search. This field is available when you select either a purchase order or purchasing contract source. |
|
All Statuses |
Select this check box if you want to search for documents in any status. If you do not select this check box, then you can select individual statuses on which to base your search. |
|
Draft/Collaborated |
Select if you want to only include documents in the search results that are in a Draft or Collaborated status. |
|
Pending Approval |
Select if you want to only include documents in the search results that are pending approval. |
|
Pending Internal Signatures |
Select if you want to only include documents in the search results that are pending internal signatures. |
|
Pending Internal Collaboration/Review |
Select if you want to only include documents in the search results that are pending internal collaboration or reviews. |
|
Approved |
Select if you want to only include documents in the search results that have been approved. |
|
Pending External Signatures |
Select if you want to only include documents in the search results that are in pending external signatures. |
|
Internal Collaboration Statuses |
Select if you want to only include documents in the search results that are in internal collaboration statuses. These statuses include Pending Collaboration, Pending Review, and Collaborated. |
|
Pending External Collaboration/Review |
Select if you want to only include documents in the search results that are in external collaboration statuses. |
|
Dispatched |
Select if you want to only include documents in the search results that are in a Dispatched status. |
|
Executed/Complete |
Select if you want to only include documents in the search results that are in an Executed or Complete status. |
Additional Search Criteria
Expand this group box to view and select search criteria that further limit the search results. When you expand the group box, the system also displays the User Defined Field group box if user-defined fields have been selected for use with PeopleSoft Supplier Contract Management.
|
Awaiting User |
Select a user for whom you want to view all documents that are waiting an action by that user such as a check-in, signature, collaboration review, or approval. If you do not select a specific user, the search results will contain documents awaiting all users and that meet other search criteria you enter. |
|
Configurator ID |
Select a document configurator on which you want to base this search. |
|
Document State |
Select a document state. A state can be active of inactive, and you can include either state in the search or include both states in the search. Inactive documents are those that have been deactivated using the Deactivate button on the Document Management page. The default value for the field is All Active Documents. |
|
Request BU (requisition business unit) |
Select the business unit in which you want to search for documents that are tied to a specific Business Unit and Requisition ID combination. The Use with PO Requisition check box must be selected on the Installation Options page to use requisition documents. |
|
Requisition ID |
Select a Requisition ID to narrow the search results to only those documents tied to a specific requisition. |
|
From Begin Date and To Begin Date |
Select a from and to begin date to establish a begin date range on which to base the document search. |
|
From Expire Date and To Expire Date |
Select a from and to expire date to establish an expiry date range on which to base the document search. |
|
From Cycle Start Date and To Cycle Start Date |
Select a from and to cycle start date to establish a cycle start date range on which to base the document search. The system searches for documents that have start dates within the date range that you enter. |
|
From Cycle Due Date and To Cycle Due Date |
Select a from and to cycle due date to establish a cycle due date range on which to base the document search. The system searches for documents that have due dates within the date range that you enter. |
|
More than X Days in Status |
Enter a numeric value that represents the number of days that a document has been in a specific status. This enables you to monitor contracts that may have stalled or might be nearing their due dates, but may not have triggered a caution or warning yet. For example, a sensitive contract document may have been pending collaboration for more than five days, but hasn't triggered a cycle status warning. You might not want to wait before intervening in the collaboration. |
|
Cycle Status |
Select a specific cycle status on which to base a search. For example, you can set the cycle status to Red to narrow the search results to only those documents that are in a Red status, meaning they are nearing their estimated target completion date, but are still not completed. Green: Indicates that the document or amendment is on schedule. Red: Indicates that the document or amendment is close to or past its target cycle-end date and is not yet complete. Yellow: Indicates that the document or amendment is nearing its target cycle-end date. Note. The setup details for determining when the number of cycle days that a document has been in a status is defined using the Cycle Time Settings grid on the Installation Options page. The values in the Red number of days prior to Due Date and Yellow number of days prior to Due Date fields determine the search results. |
|
Search |
Click to initiate a document search that populates the lower part of the page. |
|
Clear |
Click to clear any entered search criteria. |
|
Save Search Criteria |
Click this button to save the search criteria that you entered for this page. The system saves the search criteria by user ID, so each user can set up their own default search criteria. You can save search values for a single set of default values that the system will use for all document search pages. Anytime you navigate to this page, the saved criteria will automatically populate the page. The saved data remains the default value until you change the search parameters and save the search criteria again. So, you can change the search criteria multiple times, but until you save the values, the system uses the saved search criteria. Note. If you are navigating from the Document Management page directly, the system maintains the search criteria and the list of documents that was last used. |
|
Delete Saved Criteria |
Click to delete any previously saved search criteria if it is no longer needed. |
|
Add a Document |
Click to access the Add a Document page where you can create a new document. |
User Defined Fields
This group box displays the user-defined fields that have been enabled for Supplier Contract Management and on which you can base a document search. If you select to search using a specific document type, the system displays the subset of user-defined field defined for the document type if the document type is set up to override default user-defined fields.
Values in this box depend on the fields and labels that have been selected for the user-defined fields. Fields types that might appear include:
Character
These fields are aligned on the left side of the page with the labels that were assigned to them. Along with a prompt if a prompt table value has been defined for the field. tables so that if they are setup that way, that they are swapped with the prompt table version of the field. The system matches character fields with like values for the value that you enter for the search.
Date
Search conditions for this field type are date to and from ranges. The name provided for the label appears with the From Date and To Date fields.
Decimal
Search conditions for this field type include a range of values.
Integer
The system matches integer fields exactly as you enter them for the search.
Search Results
Access the Document tab.
|
Delete |
Click to mark this document for removal from the system. When you select the Delete Selected Documents button, the system deletes the selected documents, and they are no longer available for use. You can only delete contract documents that are in a Draft status. |
|
Document Keys |
Click the link to access the Document Management page for a contract document, where you can maintain the document. Document keys are based on the source transaction:
|
|
Document Version |
Displays the version of the document. To access the document, click the Document Keys link to access the Document Management page where you can view version history. Note. This document version is not the same as the purchasing contract version that is used to control and maintain contract versions on the Contract Entry page. |
|
Amendment |
Displays the number of amendments that have been created for the document. |
|
Document Status |
Displays the status of the document. Status values include: Draft Pending Approval Collaborated, Pending Review (internal and external) Collaborated (internal and external) Pending Collaboration (internal and external) Pending Approval Approved Dispatched Executed Completed |
|
Days in Status |
Displays the number of days that a document has been at the status that appears in the Document Status field. |
|
Awaiting User |
Displays the user ID for the user on which the document is awaiting an action. When the document is not awaiting a specific action, such as collaboration, approval or check-in, the system displays the document owner as the awaiting user, because the owner is ultimately responsible for the document in all other states. Note. When the Multiple Users link appears as the awaiting user, it indicates that the document is waiting on more than one user. To view all users, click the link. The system displays the Internal Contacts List page or the approval routing that relates to the document status. |
|
Checked Out |
Displays the value Yes if the document is currently checked out. The user ID who has the document checked out, is displayed in the Awaiting User field. |
|
Cycle Start Date |
Displays the date on which the document's cycle started. |
|
Cycle Due Date |
Displays the date on which the document should be completed. |
|
Status |
Displays the document's cycle status using symbols. The symbols include a: Green check mark: Indicates that the document has completed its cycle based on the values defined at the document type or the installation option level. Green circle: Indicates that the document is still within the current cycle and is not close to its target due date. Yellow triangle: Indicates that the document is within the defined yellow days on the corresponding document type from the target due date. Red square: Indicates that the document is within the defined red days on the corresponding document type from the target due date. |
|
Delete Selected Documents |
Click to delete the documents that you have selected in the Delete column. When you delete a document, it is no longer available for use by the system. The deletion process removes the structures and files related to the ad hoc, purchase order, or purchasing contract document. The deletion includes the files stored on the FTP servers and applicable rows in the database. After you delete documents you might need to rebuild the Verity indexes, depending on when the indexes were last run. Rebuilding the index removes the deleted documents from Verity search results. |
Details
Access the Details tab.
Several fields on the Details tab are the same as those on the Documents tab and in the page search options. For more information, see those field descriptions.
|
Inactive |
Displays as selected when the document has been deactivated using the Deactivate Document button on the Document Management page. You can reactivate the document using the Reactivate Document button on the Document Management page. |
|
Document ID |
Displays the system-assigned number for this document. The system assigns these numbers as it creates ad hoc, purchase order, and purchasing contract documents. |
Maintaining Contract DocumentsThis section discusses how to maintain documents.
Page Used to Maintain Contract Documents|
Page Name |
Definition Name |
Navigation |
Usage |
|
CS_DOC_MAINT |
|
Maintain documents. |
Maintaining DocumentsAccess the Document Management page (Click the Find an Existing Document link for a purchasing contract, purchase order, or ad hoc document on the Add a Document page).
The Document Management page controls the document authoring system. The actions that you take to manage document life cycles begin here. Depending on the type and status of the document, the system displays different fields and buttons as the document goes through its life cycle.
This section describes the Document Management page as you use it for purchasing contract and ad hoc documents. Terms that are not defined here are listed in the Common Elements Used in This Chapter section. The Life-Cycle Statuses and Actions section also provides more detailed information about this page.
Note. The document status of the document along with its collaboration and approval status determine the actions that you can perform against the document. The action links and buttons on this page will vary. For a complete listing of the links and buttons, see the Document Actions table.
See Document Actions.
These fields and buttons are available:
|
Return to Document Search |
Click to access the Document Search page, where you can search for another document. The search page will be displayed with the last set of search criteria and results shown. |
|
Ad Hoc ID |
Displays the ad hoc identifier. The field only appears for ad hoc source transactions. |
|
Contract ID |
Displays the system-defined identifier for the PeopleSoft Purchasing contract for which you are creating or maintaining documents. The field only appears for purchasing contract source transactions. . |
|
PO ID |
Displays the system-defined identifier for the PeopleSoft Purchasing purchase order for which you are creating or maintaining documents. The field only appears for purchase order source transactions. |
|
Document Type |
Displays the document type that was used to create the document. . |
|
BU/Requisition (business unit/requisition) |
Click this link to access PeopleSoft Purchasing and PeopleSoft eProcurement requisition pages for this business unit and requisition. This field appears only if the document is tied to a requisition. |
|
Amendment Configurator ID |
Displays the amendment configurator ID that was used to create the amendment. The system displays this field when a configurator has been established for an amendment and is defined as a use for amendments-only document. |
|
Document Details |
Click to access the Document Details page, where you can update the administrator, document type, sponsor, department, document description, and user-defined fields. |
|
Description |
Displays either a contract description or a user-defined description for the document that is identified in the Document ID field. Use the Document Details link to add or update the description. |
|
Version |
Displays the current version of the document. The system automatically updates the version of a document. The system updates versions each time that the document is checked in, refreshed, recreated or amended. You can control whether the system updates the version by selecting the Allow Check in as Same Version check box on the Document Formatting and Options page. When you select the check box, the system provides an additional option for you to indicate that you want to use the same version when you check in the document. |
|
Add Attachments/Related Documents and Modify Attachments/Related Documents |
Click to access the Attachments and Related Documents page, where you can add or view existing attachments and related documents, upload additional attachments, and set external or internal use for the attachment. An extra grid appears that displays attachments that were added to Purchasing contracts using the Contract page. Related documents are other document within the document authoring system that you can link to the current document. When you link one document to another document, you can use the Where Used as Related Document link for that document to access the Search for All Content Instances page that provides details about where the document has been added to another document as a related document. See Viewing and Uploading Attachments and Related Documents. |
|
Status |
Displays the current status of the document. Along with approval and collaboration requirements, the document status can also be determined by the document type. You define the statuses that a specific document type should use. For example, you can reduce the number of statuses that a document goes through by selecting values that use only two statuses for a document as it goes through its life cycle. Newly generated documents start with a status of Draft. Field values can be Draft, Pending Collaboration, Collaborate Pending Review, Pending External Collaboration, Pending Internal Review, Collaborated, Pending Approval, Approved, Dispatched, Completed,and Executed. If document approvals are not required, the Pending Approval status is not applicable. |
|
View Document |
Click to open a document or amendment as read-only in Microsoft Word. This action does not check out the document, but rather enables collaborators, approvers, and reviewers who have view-only authority to review or collaborate on the document. After reviewing the document, these individuals can include their comments through the collaboration or approval process. Note. The system restricts view-only access for a specific document to the document administrators and users who are defined as internal contacts or collaborators for this specific document. To add interested parties who can view the document at any time, add them to the collaborator list for the document. Note. You can view a variety of documents. The type of document is described by the button name. For more information about the individual buttons, see the Document Actions table. See Document Actions. |
|
Edit Document |
Click to check out a document or amendment and edit it using Microsoft Word. The buttons are available if a document is not checked out. Upon check out, the system records the date and time and who checked out the document, and locks it to prevent another user from accessing it or updating any statuses. Collaborators and approvers who have edit authority can open the document and enter their edits in the Microsoft Word version of the document. Note. The system restricts the editing of specific documents and amendments to users with document administrator authority and those users who are defined as collaborators with edit authority. You define these settings through user preferences or on the External Collaborators page. See Viewing and Editing Documents. Note. For more information about the individual buttons, see the Document Actions table. This is an alphabetic display of all buttons and actions available on the Document Management page. See Document Actions. |
|
Document Version History |
Click to access the Document History page, where you view a complete history of actions taken with the document, including status changes, check-out history, and previous versions of the document. This page provides the complete audit trail of the document. |
|
Route Internally |
Click to access the Internal Contacts/Collaborators page, where you can review and update collaborator information, provide collaboration instructions, and route the document for collaboration and approval. |
|
Preview Approval |
Click to access the Document Approval Status page, where you can preview the stages, paths, approvers, and reviewers who plan for the document. The page displays this button only if you have enabled installation options for document approvals. See Previewing Approvals. |
|
Submit for Approval |
Click to submit the document for approval. The page displays this button only if you have enabled installation options for document approvals. When you submit a document for approval, and approvals are not required, the Document Approval Status page displays a message that approvals are not required. In this case, if you click the Submit for Approval button, the system sets the contract status to Approved. If approvals are required and you submit the document for approval, the system displays the Document Status Approval page, where you can review and edit who is going to approve the document. |
|
Bypass Approvals |
Click to bypass approvals. This means that as a document administrator, you can select to approve the document immediately. When you click this button, the system sets the approval status to Approved and does not route the document for approval. Note. To authorize an administrator to bypass approvals, you must select the Bypass Approvals check box for the user. To access the setting, select Supplier Contracts, Supplier Contracts Setup, Define User Preferences. |
|
Internal Contacts/Signers |
Click to access the Internal Contacts/Collaborators page, where you can review and update contacts and collaborators for this document. Along with providing details about collaborator authorities, you can also provide instructions and comments about the collaboration process and route the document for collaboration. |
|
External Contacts/Signers |
Click to access the External Contacts page, where you can add or update information about external contacts. This information includes the contact's name, title, email, phone, and address. The system uses this information when you click the Send to Contacts or Dispatch button. Contacts that you define here are default values for sending documents to contacts and for dispatching documents. |
|
Document Modifications Summary |
Click to access the Document Modification Summary page, where you can review the plain text version of certain document content, such as clause information that has been changed, added, or deleted from the document. The system tracks this information each time you check in a document. The summary represents deviations from the original document or last executed document. Tracking this information enables approvers in the document approval process to better track document changes. The system processes specific clause changes when the text in hidden clause tags in the document is modified so that it differs from the clause that was originally included in the document. The system does not track formatting changes, such as using different font sizes or changing text to bold. Note. By using the Microsoft Word Change Tracking feature, you can track specific user-detailed changes to the contract for each version of the stored contract. If you add text to the document outside of the clause tags, the system tracks the information as an add, but does not associate the new text with a clause ID. |
|
Document View Access |
Click to provide viewing permissions for users and to review collaborators who have view permissions for this document. You assign user permissions based on the user's role. |
|
Send to Contacts |
Click to send the current version of this document and related attachments to internal and external contacts. Contacts can review the document and edit it if they have the authority. When you click the button, the system displays the Send to Contacts page, where you can review and update information about contacts. This button also supports sending document amendments. |
|
Refresh Document |
Click to access the Refresh Document Options page, where you can define document versions for the refresh. You use this option when you want to update the document with only changes to binds and rules. The content structure can also change based on evaluation of rules. See Refreshing Documents. |
|
Recreate Document |
Click to access the Recreate Document page, where you can completely rebuild a document. This means that the system starts from the beginning and uses the most current contents based on the specified configurator. You can use a different configurator to re-create a document. |
|
Attach to Requisition |
Click to attach the document along with any comments you enter back to the purchase order requisition under the header comments. You can attach only one version of a document to a requisition at any one time. See Creating Ad Hoc Documents for Requisitions Using Document Management. |
|
Compare Documents |
Click to access the Compare Documents page. You use this option to compare differences between the current version of the document and a re-created or refreshed version of the current document. This feature can be useful to perform what-if scenarios to identify any differences between a re-created or refreshed copy of the document and the current document. This feature uses the Microsoft Word Compare Documents function, which requires special setup before you can use it. |
|
Deactivate Document |
Click to remove a document from use. The document's status remains the same. Deactivated documents are not available for selection. When you click the Deactivate button, the page displays a deactivate message and enables the Reactivate button. |
|
Reactivate Document |
Click to activate a deactivated document. This action makes the document available for use. When you click the Reactivate button, the page displays the document at the same status it was when it was deactivated and enables the appropriate buttons. |
|
Where Used as Related Document |
Click to access the Search for All Content Instances page, which provides details about where this document has been added to another document as a related document. This link appears for a document that has been used as a related document. The search provides links to the documents to which this document has added as a related document. |
|
Generation Log |
Click to access the Generation Log page, where you can review warnings, wizard information, and configurator expansion information that the system gathers during the generation or re-creation of the document. Information in the log depends on the value for the Log at Document Generation field on the Document Configurator Definition page. You can select to track generation warnings and wizard values only, or you can select to track extended details for the generation process. A typical error that the system records might be a result of bind variables that were not found in the document. Detail log generation includes extended details about the history of wizard responses, bind variable resolutions, rule resolutions, copying documents, and details on expansion of the configurator. This information is useful when you are implementing a new document configurator or for auditing purposes. |
Refreshing and Re-creating DocumentsThis section provides an overview of document refresh and re-creation and discusses how to:
Refresh documents.
Re-create documents.
Understanding Document Refresh and Re-creationRefreshing and re-creating documents enables you to update or re-create a document based on changes that might have occurred in related bind values or the contract library. You use the Refresh button to update the document based on changes to wizard or transactional binds.
Use the Refresh button when you want the content from the current generated version of the document to remain the same, but need to update changed bind variables, or wizard variables with their new values. If repeat or rule binds do not change, the resulting contract should remain the same as the prior version, with the exception of the bind value changes. However, if a repeating or rule bind variable changes, the entire section that contains that variable will be rebuilt.
You use the Recreate Document button to completely re-create the document. Re-creation is the same as creating a new document. Using re-creation, you can also change configurators to rebuild the document. For example, during contract negotiations, numerous changes might have been made to the original document. The contract team determines that the original document better suited the contract needs, so they re-create the document based on the original configurator to re-create the document.
Warning! When you re-create a document, the system creates a new document using the latest transaction or wizard. Any changes that have been made to the document will be lost
Version numbering options for refreshed or re-created documents include keeping the same version, changing a minor version number, or changing a major version number. You can use the same version feature only if you have set up document options to enable the feature. To enable the feature, select Supplier Contract Management, Supplier Contracts Setup, Document Format and Options.
See Also
Generating Microsoft Word Documents
Refreshing Microsoft Word Documents
Pages Used to Refresh and Re-create Documents|
Page Name |
Definition Name |
Navigation |
Usage |
|
CS_DOC_VERSIONS_SP |
Supplier Contracts, Create Contracts and Documents, Document Management Click the Refresh Document button on the Document Management page. |
Refresh documents. |
|
|
CS_DOC_VERSIONS_SP |
Supplier Contracts, Create Contracts and Documents, Document Management Click the Recreate Document button on the Document Management page. |
Re-create documents. |
Refreshing DocumentsAccess the Refresh Document Options page (click the Refresh Document button on the Document Management page).
Use this page to indicate what version to use for the newly refreshed document. The system checks for binds in the document to determine what has changed. For example, a bind variable value may change in the wizard or the purchasing contract transaction. The Refresh function evaluates changes in the content based on changes in the variables. In addition, depending on the installation options defined, the system can automatically update any version or amendment bind variables with the new values.
Click the OK button to continue with the refresh. Click the Cancel button to return to the Document Management page without refreshing the document.
Note. The Refresh Document Options page changes based on the document's life-cycle status. When you are creating an amendment, the system includes the Amendment Options, Refresh Main Contract File, Refresh Amendment File, and Amendment Configurator ID fields on this page.
|
Amendment Option |
Displays the option that the system used to create the amendment. The system displays this field only when the current document is in an amendment cycle. The following list describes how the system processes an amendment:
|
|
Same Version |
Select to keep the same version of the document when you refresh or re-create a document. This overwrites older versions of the document with the same version number. Unlike the minor and major versions, the version that appears with this field is the current version. If you select this check box, the system uses this version after the refresh or re-creation process. This check box is available only if you enable the feature on the Document Format and Options page. |
|
Minor Version |
Select to use the minor version that appears in this field as the next version of the document after you refresh or re-create it. The difference between a minor and major update depends on organizational standards for version control. The system increments minor versions using decimals. For example, if the current version is 2.02, the next incremental minor version becomes 2.03. When re-creating or refreshing amendments, the system also updates the version number. |
|
Major Version |
Select to use the major version that appears in this field as the next version of the document after you refresh or re-create it. The system increments major versions by one. Therefore, if the current version is 2.02 and you use the next incremental major version, the new version becomes 3.00. The system increments the minor version updates as 3.01, 3.02, and so on. When re-creating or refreshing amendments, the system also updates the version number. |
|
Refresh Main Contract File |
This check box appears only when you use the Amend Contract with Amendment Files amendment option. When the current document is in an amendment cycle, you can select to refresh the current version of the main amended contract in the system. This could be in addition to refreshing the separate amendment file that is paired with the main amended contract. An example might be if you have wizard bind values that extend the warranty period of a contract and those values have changed. And, suppose that you are using the Amend Contract with Amendment Files amendment option to track the change with the amended contract and in the separate amendment file. Then, refreshing the main contract file in this case updates the current main amended contract file with the new warranty value. When you refresh the document, you also can update wizard questions and answers. |
|
Refresh Amendment File |
Select to refresh only the amendment file that is attached to the main document. This option applies only when the amendment option is Amend Contract with Amendment Files and the current document is in an amendment cycle. |
|
Update Amendment File |
Select to update the amendment file automatically with compared adds, changes, and deleted text that you have made to the main amended contract document. When selecting this check box, a server-side compare is performed between the last executed main contract document and the latest version that has been checked in. Those changes are inserted into the location in the separate amendment document based on the location of the amendment placeholder section in the amendment configurator. This option enables you to edit only the main contract and have the comparison performed for you to extract changes to the separate amendment file as a starting point for edits within the separate amendment file. This option applies only when the amendment option is Amend Contract with Amendment Files and the current document is in an amendment cycle and the amendment file's configurator ID has an amendment placeholder section defined within the structure. |
|
Comments |
Enter any comments that you have about the purpose of the refresh. These comments appear in the document's version history on the Comments tab. |
See Also
Refreshing Microsoft Word Documents
Re-creating DocumentsAccess the Recreate Document Options page (Click the Recreate Document button on the Document Management page).
Use this page to update configurators and versions, define which contract elements to re-create, and make comments about the re-creation of the document. The Recreate Document Options page is similar to the Refresh Document Options page, except that you can apply different document types and configurators to re-create the new document, and the document is rebuilt, not updated. Also, depending on the installation options defined, the system can automatically update any version or amendment bind variables with the new values.
Note. The Recreate Document Options page changes based on the document's life-cycle status. When you are creating an amendment, the system includes the Amendment Options, Refresh Main Contract File, Refresh Amendment File, and Amendment Configurator ID fields on this page.
See Creating Document Amendments.
Click the OK button to continue with the re-creation. Click the Cancel button to return to the Document Management page without re-creating the document.
|
Document Type |
Select a document type to use when re-creating the document. Document types are available for use only if selected on the Installation Options page. The field appears with the document type value that was used to initially create the document. You can change the type, but if the document was created using a document type, you cannot clear the field. |
|
Configurator ID |
Select the document configurator to rebuild this document. The default value for the field is the configurator the system that was used to create the document or the configurator that was used the last time that the document was re-created. Because you are building the document from the start, the system generates a version of the document based on the configurator ID that you enter and the original date of the document. The system low-lights the field when document types are enabled and the user does not have override capability as specified on the document type. . |
|
Configurator Selector |
Click to run the configurator selector wizard. The system makes the button available when you select a document type that uses a wizard to select the configurator ID. |
|
Amendment Configurator ID |
Select the document configurator to rebuild contract amendments that are associated with the document. This field is available when the current document is in an amendment cycle and a separate amendment file is being used. This occurs when you select either the Amend Contract with Amendments or the Amendment Files Only amendment process options. |
|
Recreate Main Contract File |
This check box applies only when the amendment process option is Amend Contract with Amendment Files. When the current document is in an amendment cycle, you can select to re-create the current version of the main amended contract in the system. For example, this could be in addition to re-creating the separate amendment file that is paired with the main amended contract. Warning! If the last executed main contract file contains any manual edits, you should not select this option. It causes the newly generated main document file to lose any prior executed changes. The system default value for the check box is deselected. |
|
Recreate Amendment File |
Select to re-create only the amendment file that is attached to the main document. This option applies only when the amendment process option is Amend Contract with Amendment Files and the current document is in an amendment cycle. |
|
Update Amendment File |
Select to update the amendment file automatically with compared adds, changes, and deleted text that you have made to the main amended contract document. When selecting this check box, a server-side compare is performed between the last executed main contract document and the latest version that has been checked in. Those changes are inserted into the location in the separate amendment document based on the location of the amendment placeholder section in the amendment configurator. This option enables you to edit only the main contract and have the comparison performed for you to extract changes to the separate amendment file as a starting point for edits within the separate amendment file. This option applies only when the amendment option is Amend Contract with Amendment Files and the current document is in an amendment cycle and the amendment file's configurator ID has an amendment placeholder section defined within the structure. |
See Also
Generating Microsoft Word Documents
Maintaining Document DetailsThis section discusses how to maintain document details (click the Document Details link on the Document Management page).
Page Used to Maintain Document Details|
Page Name |
Definition Name |
Navigation |
Usage |
|
CS_DOC_CHANGE_SP |
Supplier Contracts, Create Contracts, Document Management Click the Document Details link on the Document Management page. |
Maintain document details. |
Maintaining DetailsAccess the Document Details page (click the Document Details link on the Document Management page).
Document detail attributes provide additional details about a document that you can maintain. For example, the document sponsor and department represent the sponsoring user and organization for the document. You can also maintain the begin and expiration dates on this page for ad hoc contracts.
If you are using document types and want to change the type, it must match the current configurator ID. If you want to use a different configurator ID, you must re-create the document.
For contracts that are related to purchasing, the Begin Date and Expire Date fields do not appear because the purchasing contract or purchase order contact already contains a begin and expiration date. The attribute details on the Document Management page always represent the current attributes for the ad hoc, purchasing contract, or purchase order document. Purchasing and purchase order contracts supplement other page values that are associated with the transactional contract itself. You can reference attributes as bind variables in documents, and you can perform searches based on document detail attributes.
You can also use this page to view and update corresponding user-defined fields associated to the document. In addition, if you are an authorized specialist, depending on the settings on the User Preferences page, you can change the cycle start and due dates. The page also provides history related to when the document was created, collaborated, approved, executed, and dispatched. The system updates information on this page as the document goes through its life cycle.
Creating Executive SummariesThis section provides an overview of executive summaries and discusses how to create an executive summary.
Understanding Executive SummariesExecutive summaries provide a way to generate a single, secondary-summary document along with the authored document for the purpose of initial contract executive review. You can build an executive summary document to go along with the regular contract document. The executive summary document uses its own separate configurator that you maintain similar to the main document configurator, and in which you can include wizard and transactional responses used in the main contract creation to populate executive summary documents. The executive summary document can be edited separately from the main contract document and can be re-created or refreshed similar to the main document.
Note. The system does not log executive summary version history.
To prepare to use executive summaries:
Create a document configurator for use with executive summaries.
Select the Use for Executive Summary check box on the Document Configurator Definition page.
Assign an executive summary configurator to a document type.
When you create a document type, the system provides the configurators available for use with executive summaries. Use the Life Cycle Options grid on the Document Type page to select an executive summary configurator. When you create a document that also includes an executive summary configurator, the system displays the Create Executive Summary button on the Document Management page
Pages Used to Create Executive Summaries|
Page Name |
Definition Name |
Navigation |
Usage |
|
CS_DOC_EX_SUMM |
Supplier Contracts, Create Contracts and Documents, Document Management Click the Create Executive Summary button on the Document Management page. |
Create an executive summary. |
|
|
CS_DOC_ACTIONS_SP |
Click the Create Executive Summary button on the Executive Summary page. |
Enter comments for an executive summary. |
Creating an Executive SummaryAccess the Executive Summary page (Supplier Contracts, Create Contracts and Documents, Document Management and click the Create Executive Summary button).
You use this page to create and update a corresponding executive summary document. To create an executive summary:
Click the Create Executive Summary button on the Document Management page.
The system displays the Executive Summary page where you can select which executive summary to use.
Click the Create Executive Summary button.
The system displays a comments page where you can enter comments about the summary.
Click OK.
The system creates the summary and returns to the Document Management page where the Maintain Executive Summary page is now available.
After creating the summary, use the Document Management page to click the Maintain Executive Summary button and access the Executive Summary page. You use this page to view, update, re-create, or refresh the separate executive document as you would with the regular contract documents. The system allows only one current executive summary per document because it doesn't support individual version control as it does with the main contract document.
You can update the executive summary document on the Executive Summary page by clicking on the Edit Document button, updating the document, and then clicking the Check In Document button to replace the existing version of the summary.
Note. While the system does not track version history, changes to executive summary documents are provided in the document history.
Viewing and Editing DocumentsThis section provides an overview of document edits and discusses how to:
Edit documents.
Check in documents.
View documents.
Cancel document checkout.
Understanding Document EditsYou can edit documents using Microsoft Office Word 2003 by checking out the document and downloading it to the local system, where you can work with the document offline. To use Microsoft Word, you must configure it for use with the PeopleSoft system.
PeopleSoft Supplier Contract Management and Microsoft Word 2003 use XML to describe the structure of the document. The system represents content, such as clauses, sections, and bind variables, with text that is surrounded by specialized strings of text called tags. For example, a bind variable called Company could be represented in XML with the starting tag bindval, followed by Company and the name of the bind variable, and ending with another tag. The system processes clauses in a similar manner using a contract_obj XML tag.
See Microsoft Word Integration with Supplier Contract Management.
During editing and check-in, the XML tags enable the system and Microsoft Word to communicate properly. Because the XML tag structure defines the structure, Microsoft Word provides the capability to protect the XML tags that the PeopleSoft system uses to prevent damage to the tag structure. If you alter or delete the tags in Microsoft Word, you risk losing the mapping between the two applications.
You can use installation options to indicate how the system processes a document when you check out the document for editing. You can set the document to automatically open with track changes enabled and protect bind values in the document. If you do not set installation options to automatically track changes in a document, you can manually select to track changes while you are in the Microsoft Word document.
This example illustrates how a Microsoft Word document might appear when you open it for editing and the XML tags appear:
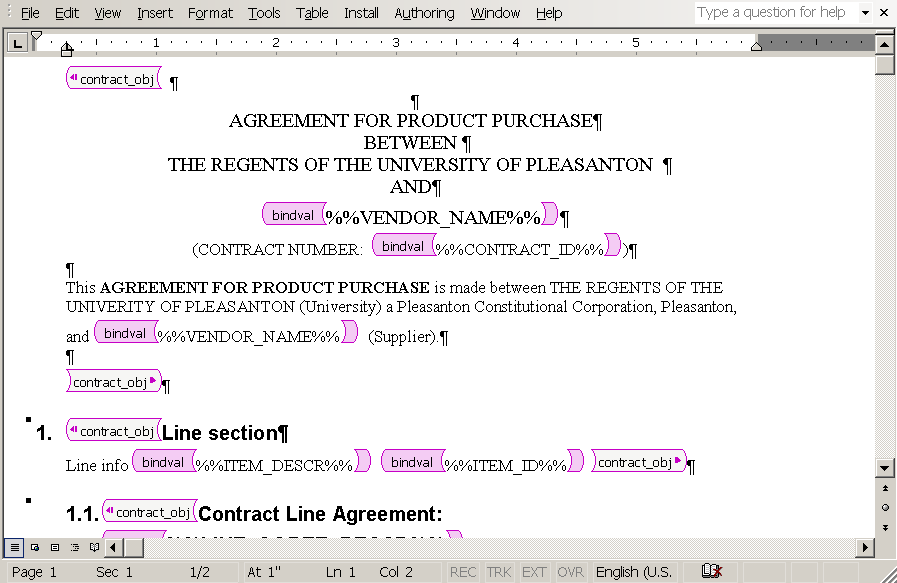
Example of Microsoft Word document and XML tags when you open the document for editing
As you check out, edit, and check in documents, you should be aware of several considerations and conditions as you process the document. Many of these are described in Appendix A: Microsoft Word Integration with Supplier Contract Management.
See Microsoft Word Integration with Supplier Contract Management.
See (Optional) Setting Up PeopleSoft Integration Broker for Microsoft Word and Adobe Integration.
See Clause Text Editing.
See Defining Installation Options for PeopleSoft Supplier Contract Management.
Document Checkout
You check out a document when you use the Edit Document button on the Document Management page to either review or update the document. When you check out a document, it remains available for viewing, but the system prevents other users from editing it. You can also cancel the checkout.
When you check out a document, the system creates a single file and opens the document in Microsoft Word. The system can also automatically download multiple files when you check out files for editing during amendment processing. If you are comparing documents or opening an amended document using Amend Contracts with Amendments as the amendment process option, the system sends the amendment along with the original document when you select to edit the files. It also provides instructions for multiple file check-in sequences.
The system provides a Notify Me button when a document is checked out by another user. Click the button to add user email addresses for those who the system should notify when the document is checked back into the PeopleSoft system. This enables you to be notified as soon as the document is checked in.
The system uses a Notify When Available template for sending notifications to users who you define for notification. To update the template, use the Notify When Available Template field on the Installation Options page.
Document Check In
Use the Check In button to upload the document file back in to the PeopleSoft system. After you check in the document, the Check In button is no longer available. The button also is not available when the document is checked out and you are not the user who checked out the document.
After you finish editing the Microsoft Word document, you must save the document as an .xml document type. When you click the Check In button, the system prompts you for information to upload the file. Locate and upload the field from the client machine. If all validations pass, the system updates the version of the document with any document changes as part of the check-in process. The document also is available for workflow processing.
If you are checking in an amended contract using two-file amendment processing, where you are maintaining amended changes in both the main contract and separate amendment file, and the amendment configurator has specified an amendment placeholder section in it, an additional check box appears that enables you to automatically update the amendment file.
This feature enables you to use the two-file amendment functionality, but begin by making amendment changes only to the main contract to the point that all main changes are complete. You can select this check box on final check in or during a refresh as an alternative, which initiates server-side processing to:
Compare the last executed document with the current main contract.
Extract those changes.
Place the changes in a separate amendment file as a starting point for authoring a separate amendment file.
In cases where you have setup the system and configurator to use amendment placeholder sections, the system first displays edit buttons for separate amendment file editing only after you select the Update Amendment File option at least once.
Note. The check-in and uploading of the document does not delete the local files from the client machine. You should delete these files periodically.
When you check in a document, the system:
Parses the Microsoft Word file and saves the plain text of the document.
The system uses the plain-text version of the document for Verity index searches and for indicating clause additions, changes, and deletion if you use clause approvals during document approvals.
Validates that the XML file is a Microsoft Word document file.
If you are attempting to check in a file that is not a Microsoft Word XML document file, the system displays an error message and ends the check-in process.
Validates that the file you are checking in is linked to the correct contract ID if the document is a purchasing contract type document.
If the document belongs to a different contract, the system displays an error message that indicates that the contract you are checking in does not match the contract that appears on the Document Management page. You cannot continue until you select the correct file to upload. For ad hoc documents, the system does a similar check using the ad hoc document ID.
Updates any bind variable values that exist in the document version or amendment to match the current version and amendment numbers.
The system processing depends on the setting on the Installation Options page. If the Update Version and Amendment Binds check box is selected, the system makes the update.
Issues a warning if a new bind variable has been added during editing.
The system also suggests whether a refresh is necessary to resolve the value of the bind variable. In this case, after checking in the document, you must click the Refresh Document button on the Document Management page to update the document to include the new transactional values.
See Also
Refreshing and Re-creating Documents
Pages Used to View and Edit Documents|
Page Name |
Definition Name |
Navigation |
Usage |
|
CS_DOC_MAINT |
Supplier Contracts, Create Contracts and Documents, Document Management |
Edit documents. View documents. Cancel document checkout. |
|
|
List of People to Notify |
CS_DOC_NOTIFY_SP |
Click the Notify Me button on the Document Management page. |
Define users who should be notified when a document that is checked out is checked in. When you enter an user's email address, the system inserts a date and time stamp for when the user was defined. You can select which template to use with the notification by selecting a value in the Notify When Available Template field on the Installation Options page. |
|
CS_DOC_VERSIONS_SP |
Supplier Contracts, Create Contracts and Documents, Document Management Click the Check In button on the Document Management page. |
Check in documents. |
Editing DocumentsAccess the Document Management page (Supplier Contracts, Create Contracts and Documents, Document Management).
When you edit a document, the system places it on the local computer in a directory that you specify. The file remains in the directory even after it is checked in. You can cancel the checkout.
When you check out a document for editing, the buttons for other document actions are hidden. The system also updates information about the document, such as to whom the document is checked out and when it was checked out. When the file is checked in, the system displays the last modified date.
To edit a document, click the Edit Document button. The File Download page appears:
The page appears with several options for processing the file.
Note. If you are editing an amended document or comparing documents, the system displays this page for each document.
See Amendment Processing.
|
Open |
Select to open the file for immediate review. This enables you to view and edit the content of the file. You must save the file to a directory after you open it in order to check changes back in. Note. Opening Microsoft Word files directly using the browser might invoke a Microsoft Word browser plug-in. While this supports Microsoft Office Word 2003, WordML and XML, you should configure client machines to open Microsoft Word 2003 directly on the desktop. See the Microsoft web page for more information. See Microsoft Word Integration with Supplier Contract Management. |
|
Save |
Select to save the file in a directory on the local computer. Note. Make sure that you do not have files with similar names in the directory to which you are sending the document. While you can overwrite an identical file to check out the file, when you check in the document, you must ensure that you have the correct document. |
|
Cancel |
Select to cancel checking out the file. This enables you to select certain amendments to open while canceling the checkout of others. |
|
More Info (more information) |
Select to access the Microsoft Internet Explorer Help utility and web page, where you can view more information about downloading files. |
To complete the editing process:
Click the Save button.
The Save As page appears, where you can define the file location. The file name for the document is set by the system and should not be changed. It must remain as an Microsoft Word 2003 .xml file format after you complete edits. Select a folder where you want to save the document on the local computer.
Click the Save button.
After the file is downloaded, the Download Complete page appears.
Click the Open button.
The system launches Microsoft Word and opens the document for editing. You can also click the Open Folder button to open the folder in which you placed the file.
When you check out multiple files, you process them at the same time, but you must open each one and save it individually. The same is true for checking in files.
Checking In DocumentsAccess the Check In Document page (click the Check In button on the Document Management page).
Use this page to select the version and enter a brief description of the changes. The page appears when you click the Check In button. If you have also checked out amendments, the system displays a message that multiple files are to be uploaded and provides instructions on the page.
|
Version |
Select the option for how you want the version to increment for the file that you are checking in. |
|
Same Version |
Select to use the version that appears in this field as the current document version when you check in the document. This version number appears when the system references the document. This option is available only if you have selected the Allow Check-In as Same Version check box on the Document Format and Options page. |
|
Minor Version |
Select to use this version as the current document version when you check in the document. This version number appears when the system references the document. This is also the default version when you check in the document. Minor versions begin with 0.01 as the version number. |
|
Major Version |
Select to change the updated document version to reflect major changes. For example, major changes might occur when milestones are reached in the contract's status. Major versions must be selected and begin with 1.00 as the version number. |
|
Update Amendment File |
Select to update the amendment file automatically with compared adds, changes, and deleted text that you have made to the main amended contract document. When selecting this check box, a server-side compare is performed between the last executed main contract document and the latest version that has been checked in. Those changes are inserted into the location in the separate amendment document based on the location of the amendment placeholder section in the amendment configurator. This option enables you to edit only the main contract and have the comparison performed for you to extract changes to the separate amendment file as a starting point for edits within the separate amendment file. This option applies only when the amendment option is Amend Contract with Amendment Files and the current document is in an amendment cycle and the amendment file's configurator ID has an amendment placeholder section defined within the structure. |
|
Comments |
Enter a description for the changes that were made to the document. The comments that you enter appear in the document's history. To view comments for all versions of the document, click the Document Version History link on the Document Management page. |
To locate the document for check-in:
Click OK to proceed, and a prompt appears for you to enter the filename and path to locate the file that you are checking in.
Either enter the file name and path or click the Browse button to locate the checked out document.
The Choose file page appears.

Choose file page
To check in the document:
Select the document from its location.
The system highlights the selection.
Click the Open button.
The check-in page appears with the file name and path.
Click the Upload button.
The system uploads the updated version of the document into the library.
The system validates the file when you upload it and provides messages about the check-in process.
Note. The check-in and upload process does not delete local files from the client machine. These files should be deleted periodically.
Viewing DocumentsAccess the Document Management page (click the View Document button on the Document Management page).
The View Document button launches the current version of the document in Microsoft Word, but does not check it out. If you have checked out the document, the view document function opens a version of the document that is prior to the document that is checked out. The view does not include any edits that may have been made to the checked out document.
To view documents, click the View Document button. The File Download page appears.
See Also
Canceling Document CheckoutAccess the Document Management page (click the Cancel Check Out button on the Document Management page).
The Cancel Check Out button is available only when a document has been checked out. You might want to cancel the check out if you learn that the document does not require an update after you access it.
When you cancel the check out, any updates that you made to the document will be lost. The system makes the document available for editing after you cancel the check out.
Viewing Document Version HistoryThis section discusses how to:
View document history.
View source version history.
View attachment and related document history.
View dispatch history.
View collaboration history.
View generation history.
Pages Used to View Document Version HistoryViewing Document HistoryAccess the Document History page (click the Document Version History link on the Document Management page).
You view document history based on all actions that have been taken against the document or on a specific action. To limit the amount of data to review, select a specific action in the Document Action field. If you want to compare documents, you can limit the returned document actions and make document comparisons easier by selecting:
** Summary Statuses Only **
Select to limit the search to the 18 most basic document actions, such as dispatching, deactivating, importing, approving and executing documents.
** Summary Statuses + Edits **
Select to limit the search to the 18 most basic document actions, plus 6 additional actions such as accepting a supplier version, checking in, refreshing and rebuilding documents.
If you are viewing the history of a purchase order document or purchasing contract, the View Source Version History link appears. Click this link to view and compare information about when the contract document was created or refreshed compared to history relating to the purchasing contract or the purchase order transaction, such as change orders or contract versions, along with a history of changes to the purchase order or purchasing contract.
See Viewing Source Version History.
|
Select |
Select to mark this document version as one of the versions that you want to compare. You must select two documents to compare. The system displays a warning message when you click the Compare Selected Documents button if you select one or more than two documents. |
|
Date/Time |
Displays when the action took place for updated version history for the document. |
|
Document Action |
Displays the action that was performed against the document. |
|
Last User to Take Action |
Displays who performed the action against the document. |
|
Version |
Displays the version of the document against which the action took place. Click the link to view a copy of the document as it was updated after the action was complete. This version is not the same as the version used to tract changes to the transactional contract. Note. The version link is present for all actions taken against the document management page even if the document did not change specific to that action Note. If you check in documents using the same version, links that appear for rows pertaining to that specific version number link to the current version of the Microsoft Word document. This happens because the previous history of the document was overwritten when the document was checked in as the same version. |
|
Amendment |
Displays when separate amendment files are associated with the document. Click the link to access the amendment to view its state when the update was made. When multiple amendments exist, the system assigns a number to them. You can click the number to view a specific amendment. |
|
View Attachments |
Displays when an attachment has been added to a contract ID or ad hoc document ID. Click the link to access the Attachment History page, where you can select an attachment to view and view its history. |
|
|
Click the View Executive Summary button to view the executive summary document. |
|
Details |
Displays when an action has more details associated with it, such as dispatch details, collaboration details, and so on. |
|
View |
Displays who has viewed the document. The view history provides an audit trail of who accessed the main document or its amendment files. When a user clicks the document's View button, the system records the action for the history. The history is logged when a document is viewed internally, and externally. Select the Log View Action in History check box on the Document Type page to make this history available. |
|
Compare Selected Documents |
Click to compare the two documents that you have selected. This enables you to compare any two document versions in history versus using the Compare Documents button on the Document Management page. That button only enables you to compare the current against a refreshed, re-created, or last executed version. Using the Compare Selected Documents button, the system creates a temporary version that provides you a Microsoft Word document highlighting the differences between the two selected documents. Note. Comparing selected documents requires that you prepare the system to use the compare feature which includes selecting to enable compare functionality on the Installation Options page. |
Comments Tab
Select the Comments tab.
Use the page to review all comments for a document or comments pertaining to specific actions that were performed against the document. The system generates comments for certain actions such as refresh and generate.
Document Details Tab
Select the Document Details tab.
Use this tab to review the status of the document, document type, administrator, filename, amendment file name, configurator ID, amendment configurator ID, document ID, and import type when specific actions were taken. You can also review cycle start and end times and how long it took the document to go through the review cycle.
Viewing Source Version HistoryAccess the PO History vs Document History or the PO Contract Version History vs Document History page (click the View Source Version History link on the Document History page). The page title changes based on the type of source transaction you are viewing.
You use this page to compare purchase order or purchasing contract history with the history of a contract document. This helps you understand contract versions in which, for example, document amendments were created or the document was dispatched. The system displays the source history chronologically in ascending or descending order.
You can have a change order without an amendment, have an amendment without a change order and have an amendment with a change order.
|
Description |
Displays the type of system action that was performed on the source transaction or document. Values for the field depend on whether the source transaction is a purchase order or purchasing contract transaction. For example, after creating a document for a purchasing contract, the field displays the Initial Contract Created value. Then, if you are using version control and create a new contract version, the field displays the Contract Version Created value. Also, each time the document is updated, the system records the description, such as when the contract document was amended or dispatched. |
|
Source Version |
Displays the version of the purchasing contract or change order number of the purchase order on which the corresponding description is based. |
|
Document Version |
Displays the document version at which the document action took place. Values appear in this field for only document updates. The versions include major and minor versions. |
|
Amendment |
Displays the amendment number. The amendment number corresponds to the document version. |
|
Date |
Displays the date on which the action in the Description field took place. |
|
Time Value |
Displays the time that the action took place. The system does not record time values for purchase order and purchasing contract actions. |
Viewing Attachment and Related Document HistoryAccess the Attachment and Related Document History page (click the Document Version History link on the Document Management page, and click the View Attachments button on the Document History page).
See Viewing and Uploading Attachments and Related Documents.
Use this page to view the history of attachments, related documents, and purchase order attachments, and to access a read-only version of the attachment or document. An attachment is an additional, stand-alone document that is attached to the document. A related document is another document-authoring system document and can include imported documents. A purchase order attachment is an attachment that was uploaded using the Contract Entry component. The PO Contract Attachments grid appears only for purchasing contracts and when an attachment has been added to the contract.
The Contract ID and Ad Hoc ID fields display the ID for either the ad hoc or the contract document to which the attachments and documents belong.
Attachments
This grid displays information about an uploaded attachment. The Description tab contains the document description.
|
Allow for Email |
Select to enable this attachment to be included when you send the document to contacts or when you dispatch the document. |
|
File Name |
Displays the name that the system uses to upload the file and attach it to this document. |
|
Title |
Displays the name that is assigned to the attachment. |
|
View |
Click to open the attachment for this document. This is a read-only version of the file. |
PO Contract Attachments
This grid displays information about an attachment that was uploaded for the contract and included as part of the purchasing contract document.
|
Email to Vendor |
Displays whether the Email to Vendor check box on the Contract Entry Header Comments page is selected. If it is selected, the system includes the attachment with the email for this document. You cannot update the field using the document authoring system. |
|
Comment Type |
Displays the type of comment that was entered for the header. |
|
Attached File |
Displays the name of the file. You assign this name when you upload the file. |
|
View |
Click to view the attachment. |
Related Documents
This grid displays information about documents that have been added to the current document as related documents. The Details tab contains the document's state, such as active, its version, and whether amendments exist for the related document.
|
Allow for Email |
Select to enable this document to be emailed. If the document has its own dispatch step, you cannot include it in the dispatch step for the current document. |
|
Source Transaction |
Displays whether the document is an ad hoc or purchasing contracts document. |
|
Ad Hoc ID and Contract ID |
Displays the ID for the related document. |
|
Internal |
Displays whether the document is for internal use only. |
|
Document Status |
Displays the current status of the related document, regardless of the status it was at when it was added as a related document. |
Viewing Dispatch HistoryAccess the Dispatch History page (click the Details link for dispatched or sent documents on the Document History page).
Use this page to review to whom this document was dispatched or when the dispatch action was taken. The page is available only when you select a document with the Dispatch or Sent Document document action.
See Also
Sending Documents to Internal and External Contacts
Viewing Collaboration HistoryAccess the Collaboration History page (click the Details link for collaborated documents on the Document History page).
Use this page to view which collaborators have reviewed a document and when they collaborated on it.
See Also
Viewing Generation HistoryAccess the Generation History page (click the Details link for rebuilt and re-created documents and amendments on the Document History page).
Use this page to view document processing history for ad hoc, purchase order contract, and purchasing contract documents. This information indicates system processing conditions and any errors that were produced during the document's generation.
Note. The Generation Log link on the Document Management page provides the generation history for the current document version.
See Also
Viewing Document Generation Logs
Setting Up Default Document PreferencesThis section discusses how to define default document preferences.
Page Used to Set Up My Default Document Preferences|
Page Name |
Definition Name |
Navigation |
Usage |
|
CS_OPR_PREFERENCE |
Supplier Contracts, Create Contracts and Documents, My Default Document Preferences |
Define default document preferences. |
Defining Default Document PreferencesAccess the My Default Document Preferences page (Supplier Contracts, Create Contracts and Documents, My Default Document Preferences).
Use this page to add a list of users who will serve as contacts, interested parties, collaborators, and digital signers for documents. Collaborators are users other than the primary owner of the contract who can view contracts during or after collaboration, and if needed, edit the contract during the collaboration process. Collaborators are users who are defined in the PeopleSoft system. You also use the page to define roles that you want to have view access for documents.
|
User |
Select users whom you want to define as default collaborators for contracts that you create. The system automatically includes these users in the contacts list for each document at the time of its initial creation. You can add other users when you route the document. |
|
Collaborator |
Select to indicate that the user is automatically defined as a collaborator on documents that are created by this user ID. During document reviews, collaborators can view the document and make comments; however, unless they have been authorized, they cannot edit the document. |
|
Can Edit During Collaboration |
Select to indicate that the collaborator can edit documents during the collaboration process. If collaborators can edit the document, then they can check out the document and enter their changes. After collaboration is complete, the document administrator can check out the document, review the input, decide which changes to accept, and check in the document. Note. If you leave both the Collaborator and the Can Edit During Collaboration check boxes deselected, you can associate these users as interested parties to a specific contract for read-only access any time during the contract's life cycle. |
Signing Settings
Select the Signing Settings tab.
Use this tab to set up digital signature information for internal users. The tab is only available when the Enable Internal Signatures check box is selected on the Installation Options page. Digital signatures enable internal users to digitally sign a document using Adobe Acrobat or Microsoft Word signature features. Typically, the electronic version of the contract can replace the paper-based version.
|
User |
Select the user ID for the user who you want to sign your documents. |
|
Required to Sign the Document |
Select this check box to indicate that this internal user is required to sign any contract documents created by the current user ID. |
|
Visible Signer |
Select this check box to indicate that this user is a visible signer. A visible signer must provide a visible electronic form of their handwritten signature on the contract paper-based document. An invisible signer is a signer whose digital signature is not actually visible on the contract document. The invisible signer signature serves mainly as a security indicator that the user has verified the contents of the document. |
|
Sign Order |
Enter a numeric value that indicates the order in which the user will sign the document. The system uses this value to sequentially route the document to the signers when it routes the document for signatures. |
|
Signing Title |
Enter a job title that describes the collaborator's position related to the contract document. |
See Signing Documents Using Digital Signatures.
Role Level View Access
Use this grid box to select the role for which you want the users to have view access for your documents. Select a role value using the Role Name field.
See Also
Understanding Document Collaboration
Understanding How to Use Digital Signatures
Collaborating on DocumentsThis section provides an overview of document collaboration and discusses how to:
Define and review collaborator information.
Route documents for internal collaboration.
Route documents for external collaboration.
Modify collaboration.
Cancel collaboration.
Respond to collaboration requests.
Finalize internal collaboration.
Finalize external collaboration.
Understanding Document CollaborationCollaboration is the process of reviewing and negotiating the terms of a clause or document. Collaborators are users other than the primary owner of the contract who can change or review documents and transactions. Collaborators can be internal users or external users.
Collaboration is a negotiation step in the approval of documents within the PeopleSoft system; however, it does not use PeopleSoft Approval Framework. Instead, document collaboration is set up using the PeopleSoft standard workflow and worklist entries for collaborators. Collaboration is an optional step for all contracts and is not required to move a contract into the approval process. When you collaborate on a purchasing contract or ad hoc document, you use Microsoft Word to review and change the document and then use the Collaboration process to share and track the collaboration.
The system provides a default list of collaborators to the document based on the list of collaborators that were identified on the My Internal Contacts/Collaborators page for the document administrator when the document was initially created. You can add and delete collaborators anytime throughout the life cycle and during a collaboration cycle.
You can initiate multiple collaboration cycles until a document is dispatched. Throughout the document life cycle, the document administrator and users who have authority for the document administrator can access the Document Management page.
You can also insert general users who are interested parties to have view-only access to the document. Use the Internal Contacts/Collaborators page for a specific document, list the user name, and leave the Collaborator and Edit During Collaboration check boxes deselected.
Document Collaboration for Internal Users
Internal collaboration begins when you create a purchase order contract, purchasing contract, or an ad hoc document and want to ensure that it meets the needs of all organizations. The document comprises PeopleSoft metadata and a Microsoft Word document.
For example, suppose that as the contract owner, you want to collaborate on the development of a waste-disposal contract document. After determining the team, you route the document for review. The first reviewer is a hazardous material specialist who replaces the standard hazardous-material, special-handling clause with one that has more detail about the type and nature of the materials and the required safety equipment for handlers.
The second reviewer notices that the contract doesn't meet the vehicle weight limit for the designated location, and reduces the limit from 12 to 10 tons based on new bridge standards to the access area. The last reviewer adds a one percent incentive bonus if the entire contract is processed with no inspector citations for handling violations in any of the monthly reports. As the owner of the contract, you realize that the budget does not have resources for bonuses, so you deny the last update, but approve the first two. You can then post the contract for suppliers to review.
While the previous example illustrates users as first, second, and last, the collaboration process routes to all three simultaneously and the check out of the document is accomplished through a first-come, first-served basis.
At any point during collaboration, the contract owner or an authorized alternate can stop the collaboration process. This cancels all worklist entries and sets the contract status back to Draft if no one has collaborated on it yet. If some collaborators have already collaborated on the contract and the process is stopped, the system sets the status to Collaborated Pending Review.
These steps describe the collaboration process:
The document owner, contract specialist, or administrator adds a new contract or ad hoc document, or opens an existing document.
If the status on the Contract Entry page is Draft, the administrator can:
View and edit a list of collaborators that appears by default from the contract owner's collaborator list.
The administrator can delete collaborators as long as the collaborator does not have the contract checked out and has not reviewed the document.
Route the contract for internal collaboration.
The system displays a message if collaborators have not been defined. Email and worklist routings are sent to all collaborators, and the contract status is set to Pending Collaboration.
The administrator or contract specialist routes the contract for collaboration.
This routing can also be an external routing that is sent to a single external user.
The collaborator accesses the system and then the Document Management page using one of these methods:
Approval worklist.
Email link.
Directly through the Supplier Contract Management menus.
Collaborators perform their edits or reviews using the Document Management page.
Collaborators click the Edit Document button to edit a copy of the document using Microsoft Word or the View Document button to review a read-only copy. You control the edit access for each collaborator by setting the collaborator options on the collaborator list page.
Collaborators use the Document Management page to enter their comments, and then click the Mark as Reviewed button.
The system completes the worklist entry and changes the status for the collaborator's entry. If the collaborator is the final collaborator, the system updates the contract status to Collaborated/Pending Review and sends the owner a notification to review and accept or reject the changes that were made by the collaborators.
If the collaborator does not take an action, the worklist entry remains the same with no approval action taken.
After internal collaboration is complete, the administrator must review and accept or reject the changes and suggestions that were made in the document.
After reviewing the approvals and checking out the document, the administrator can make changes to the document and accept or deny approver updates. When finished, the administrator checks in the revised version of the document.
The administrator clicks the Finalize Collaboration button.
The system updates the contract status to Collaborated.
Document Collaboration for External Users
External collaboration is the process of sending contract documents to an external user for review and updates and who then uploads the document where administrators or contract specialist can manually incorporate the reviews into a new version of the document.
You can route documents for external collaboration to only a single supplier user, who is defined as the primary on the Vendor Contacts page. This external user can then route the document to gather inputs from the supplier side. During external collaboration, the system stages all files for review on the external side and keeps the files distinct from the current core files. The administrator reconciles the returned files to decide to accept the files or manually copy or paste changes into the official copies. Attachments are also staged so that new attachments added by the external user will have to be accepted before they become part of the core attachments.
External collaboration provides additional collaboration statuses.
Note. External collaboration statuses are not available to supplier users. The statuses can only be viewed by employee users. The system provides supplier users with text that indicate where the document is in the life cycle, and whether they are required to take an action on the document.
The external collaboration statuses include:
Collaborated
This status indicates that the external collaboration is complete. At this point the supplier can re-send the document for external editing or upload the document to the system for internal collaboration, where the administrator can either route the document for collaboration or submit it to the approval process.
In External Collaboration
This status indicates that the document is in collaboration by the supplier user.
Pending Internal Review
This status indicates to the administrators or specialists that they need to reconcile the changes that the supplier made with the actual contract document and to finalize, accept, and reject changes.
This flowchart illustrates the different paths that a document can use to go through external collaboration statuses, beginning with the Draft status and ending by submission for approvals:
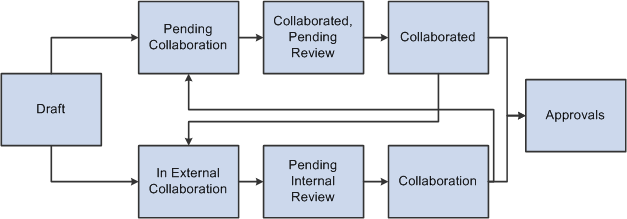
External collaboration statuses
The next flowchart illustrates system processes that take place when a document is sent for external collaboration. The system uses email and worklist notifications to send and receive notices and stages files while the document is in review:
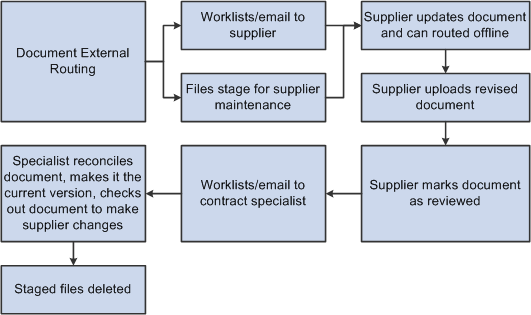
External Collaboration processing flow
The system protects the document while it is in collaboration by keeping the files separate from the actual contract document. These are staged files and are used until the collaborated document is accepted. At the end of the process, the system deleted these staged files.
See Also
Pages Used to Collaborate on Documents|
Page Name |
Definition Name |
Navigation |
Usage |
|
CS_DOC_COLLAB |
Supplier Contracts, Create Contracts and Documents, Document Management Click the Collaboration Details link on the Document Management page. |
Route documents for internal collaboration. |
|
|
Route for External Collaboration |
CS_DOC_COLL_EXT_SP |
Click the Route Externally button on the Document Management page. |
Route documents for external collaboration. |
|
CS_DOC_MAINT |
Supplier Contracts, Create Contracts and Documents, Document Management |
Modify collaboration. Cancel collaboration. Respond to collaboration requests. Finalize collaboration. |
Routing Documents for Internal CollaborationAccess the Internal Contacts/Collaborators page (click the Route Internally button on the Document Management page).
Collaboration is optional. The system does not use approval framework in the process because of the need to add and remove reviewers throughout the process. If collaboration is activated, you cannot submit the document for approval. Likewise, if the document has been approved, you cannot route it for collaboration.
Note. The system warns you if an internal collaborator in the list is not available and the user has an alternate person to be notified in her absence. The system provides the administrator an option to substitute the alternate user that is specified and leave the original collaborator on the list as a view only user.
The system initially populates the page with user ID that have been defined using the Internal Contacts List page.
You use this page as a document administrator or as a collaborator to take action on a collaboration. Using the page you can:
Add or remove collaborators.
Route documents for collaboration.
Add comments for a document
View the collaboration status for the supplier document
Note. The Document Collaboration page is available only to the owner or administrator of the document.
|
Ad Hoc ID |
Displays the ad hoc document that you are submitting for collaboration. This field appears when you select an ad hoc document. Ad hoc documents are those that are not linked to a contract or work order. |
|
Contract ID |
Displays the contract to which this document is linked. This field appears when you select a document that is linked to a transactional Purchasing contract. |
|
PO ID (purchase order ID) |
Displays the purchase order on which the contract document is based. This field appears when you select a document that is linked to a transactional purchase order. |
|
Vendor ID |
Displays the vendor to which the contract applies. This field appears when you select a document that is linked to a transactional purchasing contract. |
|
User |
Select a user ID to add to the list of collaborators for this contract or ad hoc document. You can delete users if they do not have the document checked out or if the user has not collaborated the document. |
|
Collaborator |
Select to indicate that this user is a collaborator for this document. When the document is routed for collaboration, the system notifies this user. |
|
Can Edit During Collaboration |
Select to indicate that the corresponding collaborator can edit the Microsoft Word document. If you do not select this check box, the collaborator can access the document only as read-only. |
|
Collaboration Status |
Displays the status of the collaborator's response to the document. When you initially send the collaboration request, the status is Collaboration Pending. After the collaborator marks the request as reviewed, the status changes to Collaboration Complete. |
|
Date Time |
Displays when the collaborator performed a collaboration task against the document. |
|
Collaboration Instructions |
Enter comments or instructions concerning the collaboration of this document. After completing the instructions, click the Save button. The system removes the instructions and appends them in the Collaboration Comments section. |
|
Collaboration Comments |
Displays comments that the administrator and collaborators have entered. You can expand the field. |
|
Route Internally |
Click to initiate the routing of the document for internal collaboration. The system generates emails and worklist entries, updates user entries to the status of Collaboration Pending, and changes the contract status to Pending Collaboration. If no collaborators have been identified for notification, the system produces an error message. |
|
Return to Document Management |
Click to return to the Document Management page, where you can perform other tasks that are related to the document. |
Routing Documents for External CollaborationAccess the Route for External Collaboration page (click the Route Externally button on the Document Management page).
This page displays a list of people who are defined as external users for this document. You use the page to maintain external contact attributes, provide collaboration instructions, route a document externally, and during amendment cycles define whether amendment or amended files will be routed for collaboration. .
|
User |
Displays external users who have been defined on the External Contacts List page. |
|
Allow Document View Access |
Indicates whether the external user has view access for the document. With view access, users can open and view a document. This value is assigned using the External Contacts List page. |
|
Primary Doc Owner (primary document owner) |
Indicates if the external user is designated as the primary document owner. This is the external user who is responsible for coordinating the document's review with other external users and then uploading the reviewed back to the PeopleSoft system. The primary document owner can make changes, but only one external user can be the primary document owner at a time. |
|
Owner for this Collaboration (primary document owner) |
Indicates which external user should be designated as the owner for this collaboration cycle. This enables you to assign an owner other than the primary document owner to be responsible for the collaboration of the document and for coordinating the document's review with other external users and then uploading the reviewed document back to the PeopleSoft system. Only one external user can be the owner for a collaboration cycle. When you select this check box, the system also selects the Can Edit During Collaboration check box to provide edit authority to the collaborator. |
|
Can Edit During Collaboration |
Indicates whether the corresponding external user can edit the contract document. |
|
Collaborate on Main File |
Select to indicate that this user should collaborate on the core document file. This check box is available when you are sending an amended document for external collaboration and the amendment option is Amend Contract with Amendments. |
|
Collaborate on Amendment File |
Select to indicate that this user should collaborate on the amendment file. This check box is available when you are sending an amended document for external collaboration that has the additional amendment file. You can provide collaboration authority for the main file, amendment file, or both. The main and amendment files are staged for review on the external side and kept distinct from the core document files. |
|
Route Externally |
Click to route the document for external collaboration. The system sends an email or worklist notification to the primary document owner's primary email address that is defined in the PeopleSoft system. The user preference determines if the notification is an email or worklist notification. |
Modifying CollaborationAccess the Document Management page (Supplier Contracts, Create Contracts and Documents, Document Management).
When a document is in collaboration, the administrator can click the Modify Collaboration button to add additional collaborators and route notification to those new users without taking the document out of the collaboration process.
Canceling CollaborationAccess the Document Management page (Supplier Contracts, Create Contracts and Documents, Document Management).
After a document has been sent for collaboration, you can stop the collaboration. Click the Cancel Collaboration button. If a collaborator has not responded to the collaboration request, the system displays a message that indicates that the document status will be set back to Draft.
If the collaboration process has started, the system displays a message that indicates that the collaboration status will be set to Collaboration Pending Review. This gives the document administrator an opportunity to review the document or other collaborator comments before stopping the collaboration.
Responding to Collaboration RequestsAccess the Document Management page (Supplier Contracts, Create Contracts and Documents, Document Management).
Use this page to collaborate on a document. You access the worklist, and the request appears for you to respond to the collaboration. When you click the link for the document, this page appears with additional fields in which you enter comments and respond to the request.
|
Add Collaboration Comments |
Enter any comments that you might have about the document, such as changes that you made if you edited the document. |
|
Save |
Click to save the comments that you entered in the Add Collaboration Comments section. When you save the comments, the system clears the section and appends the comments to any that may already exist in the Collaboration Comments section. |
|
Mark as Reviewed |
Click to respond to the collaboration request. The system removes the document link from the worklist and updates the collaboration status to Collaboration Completed on the Internal Contacts/Collaborators page. |
Finalizing Internal CollaborationAccess the Document Management page (Supplier Contracts, Create Contracts and Documents, Document Management).
Use this page after reviewing and accepting or rejecting any changes that collaborators made to the Microsoft Word document. Click the Finalize Collaboration button after the review.
After a contract or ad hoc document has been finalized, the status of the document changes to Collaborated. At this point, the document administrator can start another round of collaborations with the document, send it to external contacts, or route the document for workflow approval if required.
Finalizing External CollaborationAccess the Document Management page (Supplier Contracts, Create Contracts and Documents, Document Management).
External collaboration is when you send contract documents to supply-side users to review and comment about documents. You use this page to reconcile the collaboration and take it to either internal approvals or dispatch it for approval.
|
Accept Supplier's Revisions and Finalize |
Click to accept the document updates made by the supply-side user and to set the document to Collaborated status. This button is available for the contract administrator after the supply-side users completer their collaboration. This button is not available if the supplier did not check in an acceptable format for the file. For example, if they checked in a .doc file instead of an .xml file. In this case, the contract administrator must manually apply any valid changes. When you click the button, the system displays the Accept Supplier's Revised Documents page. You use the page to maintain the document version and to add comments about the document. |
|
Finalize Collaboration |
Click to set the document to Collaborated status. Contract administrators use this option when they want to manually apply any suggested changes to the current version of the document by using the Edit or Check In buttons at the bottom of the page. After they have made the changes manually, they can click this button to complete the collaboration process. This button is available for the contract administrator after supply-side users complete their collaboration. Note. If you finalize collaboration without accepting suppliers revisions or attachments the revisions will be excluded from version control and kept only in the document history. |
|
View Revised Document |
Click to open a document that has been collaborated on with an external user (supplier). This button appears on the contract owner's Document Management page after the supplier has completed the review. |
|
Compare Revised Documents |
Click to compare a supply-side revised document with the current version of the document. This enables you to better understand what changes may have been made by the supplier. The system opens a new temporary document that shows the changes, just as if you had compared the files using Microsoft Word compare functionality. |
Viewing Document Modification SummariesThis section discusses viewing document changes.
Page Used to View Document Modification Summaries|
Page Name |
Definition Name |
Navigation |
Usage |
|
CS_DOC_MODS_SUMM |
Supplier Contracts, Create Contracts and Documents, Document Management Click the Document Modification Summary link on the Document Management page. |
View document changes. |
Viewing Document ChangesAccess the Document Modification Summary page (click the Document Modification Summary link on the Document Management page).
Use this page to view content that has been added, deleted, or changed in a document or a document amendment. Each time that a contract or amendment is edited and checked in, the system tracks and displays the summary plain-text version of changes on this page. When the changes pertain to clauses, you can use this page to help determine which clause changes in a document require workflow approval. The system can use the changes to include specific users in a workflow approval process.
This page is not intended for detailed change tracking of the document. To track detailed changes of a document, use the Microsoft Word Track Changes feature.
See Approving Documents and Document Components.
|
Action |
Displays the type of action that is performed on the contract clause. The system displays clauses against which these actions are performed:
|
|
Content ID |
Displays the content against which the system performed an action. If a clause is not associated with the update, the field is empty. |
|
Numbered |
Displays the number of the content that has been updated. The number is applied when numbering is in the Microsoft Word document. |
|
Last Checked In |
Displays the date and time that the document content was last checked in. |
|
Last Created or Executed |
Displays the last time that the content was created or executed in a document. |
Viewing and Uploading Attachments and Related DocumentsThis section discusses how to view and upload attachments and related documents.
Page Used to View and Upload Attachments and Related Documents|
Page Name |
Definition Name |
Navigation |
Usage |
|
CS_DOC_ATTACH_SEC |
Supplier Contracts, Create Contracts and Documents, Document Management Click the Add Attachment/Related Documents link or the Modify Attachments/Related Documents link on the Document Management page. |
View and upload attachments and related documents. |
Viewing and Uploading Attachments and Related DocumentsAccess the Attachments and Related Documents page (click the Add Attachment/Related Documents link or the Modify Attachments/Related Documents link on the Document Management page.
An attachment is any document that you want to associate with the document. Unlike documents, these attachments are not generated by the authoring system. Instead, they are stored along with the document and made available to support the document. You can use these attachments for additional information, including internal executive summaries, a supplemental contract addendum, supplier paper, and so on. The system stores the history of attachments that are associated with each version of the authored document in the document history.
Note. After contract documents have been executed, you can no longer add attachments or related documents. If you reset the contract to Dispatch status or create an agreement, you can add attachments.
You can designate an attachment as external. When you designate an attachment for external use, you can send it to external contacts by using the Send to Contacts button or the Dispatch to Contracts button.
You can also link to other documents that are defined in the document management system. These can be system-defined or imported documents that are managed using Supplier Contract Management.
In addition, for documents that have a source transaction type of purchase order or purchasing contract, you can view attachments that exist on the purchasing transactional contract from within this attachments page. You can send these attachments to contacts who are defined as external contacts for the document. Only those attachments that have been set to send to vendors from within the PeopleSoft Purchasing contract are eligible for dispatches using email.
After uploading attachments and linking related documents, click OK to save the updates. If you define a document as a related document, the system displays the Where Used as a Related Document link on the Document Management page for the current contract document.
Attachments
Use this grid to maintain attachment information. An attachment is an additional stand-alone document that is attached to the current document. Select the Description tab to add a document description.
|
Upload a Document Attachment File Upload another Document Attachment File |
Click to initiate the upload process that you use to browse other sources for attachments to use with this document. This link is available as long as the contract document is not in an Executed status. |
|
Allow Email Dispatch |
Select to indicate that this attachment should be available for external contacts when the document with which it is associated is sent or dispatched to contacts for review. When you send or dispatch a document for external review, you can include attachments. If this check box is selected, the system highlights the Attachments check box on the Send to Contacts and Dispatch pages. Then you can determine whether to send the attachment. If you do not select this check box, the system disables the Attachments check box for sending and dispatching and the attachment cannot be included with the document. |
|
File Name |
Displays the name that you assigned to the file when you uploaded it to the document authoring system. For tracking and informational purposes, this should be the same file name as the file name in the directory. |
|
Title |
Enter a description of the attachment. The system includes this description in history records. You can enter up to 254 characters in the field. |
|
View |
Click to open a read-only copy of the selected attachment. |
|
Delete |
Click to remove an attachment from the document. The attachment is removed immediately, but you must click OK to save the page and the deletions. |
PO Contract Attachments
Use this grid to view attachments that were uploaded using the Purchasing Header Comments page. To access the page, use the Edit Comments link on the Contract page. The grid displays the settings that were made in PeopleSoft Purchasing.
|
Email to Vendor |
Appears if the Email to Vendor check box on the Contract Entry Header Comments page is selected. If this check box is selected, the attachment is included with email for this document. You cannot update the field in the document authoring system. |
|
Comment Type |
Displays the comment type from Purchasing. |
|
Attached File |
File name of the attachment that was assigned in Purchasing. |
|
View |
Click to open the attachment from the Purchasing contract. |
Related Documents
Use this grid to link other documents as related documents to this document. Related documents can be any type of existing ad hoc, purchasing contract, or purchase order document, and you can only add a document once. Select the Details tab to view the document's state, its version, and whether amendments exist for the related document.
|
Allow Email Dispatch |
Select to indicate that this related document should be available for external contacts when the document with which it is associated is sent or dispatched to contacts for review. Note. You cannot include a related document for email dispatch when the corresponding document has it's own dispatch step. You can include only documents that do not have their own dispatch step in the email. |
|
Visible to Supplier |
Select to indicate that this related document should be to external users. |
|
Source Transaction |
Displays whether the document is an ad hoc, purchase order, or purchasing contract document. Based on the values that you select in this field, the system adds the Set ID, Business Unit ID, Contract ID, and PO Number fields. |
|
Set ID |
Select the setID from which to select an ad hoc or purchasing contract document. |
|
Business Unit ID |
Select the business unit from which to select a purchase order contract document. This field is available for purchase order contract documents. |
|
Ad Hoc ID |
Select the related ad hoc document. |
|
Contract ID |
Select the related ad hoc document. |
|
PO Number (purchase order number) |
Select the related ad hoc document. |
|
|
Select to access the related document where you can view and maintain the document details. |
|
Internal |
Displays whether the document is for internal use only. This value is based on the Internal Document check box on the Document Type page. If the check box is selected, a check mark appears in the Internal field. |
|
Document Status |
Displays the current status of the related document, regardless of the status it was at when it was added as a related document. |
Sending Documents to Internal and External ContactsThis section provides an overview of external contacts and discusses how to:
Maintain external contact lists.
Send documents to contacts.
Understanding External ContactsThe External Contacts feature supports collaboration with external system users. It enables you to send a copy of the document using email to external contacts, such as a supplier during the Draft stage, and for final dispatch prior to executing the document. The supplier can update the document with revisions or suggested changes that the organization's buyers or contracting officers can review. The buyer can accept or reject those changes and propose further changes to the supplier in an iterative process until both parties have agreed upon a final version. When collaboration through email is complete, you can dispatch and execute the document.
When you send documents to external contacts, the file format is in Microsoft WordML. Suppliers must use Microsoft Word 2003 or a later version to make edits directly in the version of the contract that is sent to them. If the external contract does not have Microsoft Word 2003, the document can be sent as a .doc-formatted Microsoft Word document. The external user can make edits and send the document back to you. You will have to manually enter any returned supplier edits in the document.
You can also send attachments with the documents you send to external contacts. The system sends the attachments in their program format. For example, you can send Microsoft Excel speadsheets or Adobe documents in their native format and the contact can open and review the attachments.
Warning! When you compare Microsoft Word documents, you do not use comparisons within the current document. For contract modifications in previous Microsoft Word versions, all internal custom tags do not exist and so accepting comparisons with a Microsoft Word 2003 version deletes custom tags. This causes the document and clauses to be unrecognizable in the PeopleSoft system.
See Also
Understanding Document Comparisons and Rendering
Understanding Microsoft Word Integration with Supplier Contract Management
Pages Used to Send Documents to Internal and External Contacts|
Page Name |
Definition Name |
Navigation |
Usage |
|
CS_DOC_INT_CONT_SP |
Supplier Contracts, Create Contracts and Documents, Document Management Click the Internal Contacts List link on the Document Management page. |
Maintain internal contacts. |
|
|
CS_CONTACT_SEC |
Click the External Contacts List link on the Document Management page. |
Maintain external contacts. |
|
|
CS_DOC_DSPTCH_SEC |
Click the Send to Contacts button on the Document Management page. |
Send documents to contacts. |
Maintaining Internal Contact ListsAccess the Internal Contacts List page (Supplier Contracts, Create Contracts and Documents, Document Management, and click the Internal Contacts List link on the Document Management page).
|
User |
Select users that you want to define as collaborators for this document. |
|
Collaborator |
Select to indicate that the user is a collaborator for this documents. During document reviews, collaborators can view the document and make comments; however, unless they have been authorized, they cannot edit the document. |
|
Edit/Check In |
Select to indicate that this collaborator can edit this document during the collaboration process. If collaborators can edit the document, then they can check out the document and enter their changes. If you leave both the Collaborator and the Can Edit During Collaboration check boxes deselecteded, you can associate these users as interested parties to a specific contract for read-only access any time during the contract's life cycle. |
|
Collaboration Status |
Displays the current internal collaboration status for this document. Internal collaboration statues include Pending Collaboration, Collaborated, Pending Review, and Collaborated. When the document completes collaboration, the field displays Collaborated and the system inserts the date in the Collaborated On field. |
|
Collaborated On |
Displays the date on which the document completed internal collaboration. |
Signing Settings
Use this tab to set up digital signature information for internal users. The tab is only available when the Enable Internal Signatures check box is selected on the Installation Options page.
|
Required to Sign the Document |
Select this check box to indicate that this internal user is required to sign any contract documents created by the current user ID. |
|
Visible Signer |
Select this check box to indicate that this user is a visible signer. A visible signer must provide a visible electronic form of their handwritten signature on the contract paper-based document. An invisible signer is a signer whose digital signature is not actually visible on the contract document. The invisible signer signature serves mainly as a security indicator that the user has verified the contents of the document. |
|
Sign Order |
Enter a numeric value that indicates the order in which the user will sign the document. The system uses this value to sequentially route the document to the signers when it routes the document for signatures. |
|
Signing Title |
Enter a job title that describes the collaborator's position related to the contract document. |
|
Signed Status |
Displays the status related to whether a signer has signed a document. Values include: Initial Signed Pending Signature Replaced by Alternate Signed by Proxy Marked as signed Declined |
|
Signed DTTM |
Displays when the document was signed. |
|
Recycle Sign Status to Initial |
Click to reset the signed status to Initial. The system updates the document's signed status for this user to Initial. The user has to sign the document again. |
|
Mark as Signed |
Click to set the current row to a signed status of Marked as Signed. Administrators can use this button to indicate that particular users have signed the document offline. |
Maintaining External Contact ListsAccess the External Contacts page (Supplier Contracts, Create Contracts and Documents, Document Management , and click the External Contacts List link on the Document Management page).
External contacts are those who you want to receive documents when you use the Send to Contacts page. Each document has its own external contact list. After you complete this page, the external contacts become the default values for when you send the document. In addition, the information that you maintain on this page is associated with system bind variables that are predefined so that the bind can be included as content in the document when you generate the document.
Note. If you do not select a value in the External User field, you must enter a name in the Contact Name field. When you only enter a name, the Allow Document View Access and Primary Document Owner check boxes will not be available. This enables the system to track and control external users who are authorized to view and own documents.
This page appears based on whether the document is an ad hoc document or a purchasing contract document. For purchasing documents, the page includes the vendor location for that contract. It also includes an Update From Vendor Contacts button that enables you to insert a vendor contact who has been identified as a contract collaborator using the Contacts page in the Vendor component. The system uses the contract's most current active row to select the contact. If the most current row is inactive, the system does not insert the contact as a default value on this page.
To support updating vendor contacts, a contact type of Contract Collaborator is available on the Contacts page. To access the page, select Vendors, Vendor Information, Add/Update, Vendor, Contact.
|
Contact ID |
Displays the system-assigned number that uniquely identifies this external contact. As you add contacts, the number is increased by one. |
|
Allow Document View Access |
Select to provide this external user with view access to documents associated with this contract. You use the Document View Access link on the Document Management page to authorize internal users to view documents. |
|
Primary Document Owner |
Select to indicate that this external user is the primary document owner for all online external collaborations and approvals for documents associated with this contract. This check box becomes available after you select a user ID. The system verifies that there is only one external user defined as the primary document owner. If there is another primary document owner defined for the contract, the system displays a warning message. To override a previously defined primary document owner, select the check box. |
|
Required to Sign Document |
Select to indicate that this external user is required to provide a digital signature for documents associated with this contract. The field is available when you select the Enable External Signatures check box on the Installation Options page. |
Sending Documents to ContactsAccess the Send to Contacts page (click the Send to Contacts button on the Document Management page).
Information on this page is similar to the information that is shown for dispatching documents. The difference is that sending documents to contacts is intended for collaborative development of the contract with external parties and can be performed multiple times as required, whereas dispatching is intended for the final submission of the documents for signing and execution for the original contract and any amendments.
If you want to send related documents to contacts, you must be using document types that use applicable statuses of Draft, Complete Statuses Only and Draft, Approve Statuses Only. Then, documents that you create using those applicable statuses can be sent as related documents. The system prevents you from selecting to send documents that have their own dispatch setup.
See Also
Granting Document View AccessThis section discusses how to grant view access.
Page Used to Grant Document View Access|
Page Name |
Definition Name |
Navigation |
Usage |
|
Document Access |
CS_DOC_ROLE_ACCESS |
Supplier Contracts, Create Contracts and Documents, Document Management Click the Send to Contacts button on the Document Management page. |
Grant view access. |
Granting View AccessAccess the Document Access page (Supplier Contracts, Create Contracts and Documents, Document Management, and click the Document View Access button on the Document Management page).
Use this page to provide viewing permissions for internal users and to review collaborators who have view permissions for this document. This enables you to associate view access roles for the document to enable broader user access to certain documents. Document administrators can also predefine a default set of roles so that certain roles can be supplied by default to newly generated documents automatically. You assign user permissions based on the user's role. Use the Role Name field to select the roles. Users with this role can only view the document. They cannot edit the document.
The system automatically updates the Collaborator Users with View Access grid with values from the Role Level View Access grid on the My Internal Contacts/Collaborators page. In addition, if document types are enabled, the system uses the view access information that is specified for the document type when you generate the document.
Dispatching DocumentsThis section provides an overview of document dispatch and discusses how to:
Dispatch documents.
Reset documents to dispatched.
Understanding Document DispatchDispatching a document is the process of formally distributing and recording the distribution of ad hoc, purchase order contract, and purchasing contract documents and, when appropriate, their amendments and attachments. You dispatch a document to obtain the signatures of external contract participants. While you can send documents to contacts for collaboration and review throughout their life cycles, you should perform this action each time that you intend to obtain a formal document for the original contract and each amendment. After a document status becomes Dispatch, the next available status is Executed that indicates the version of the document has been signed by all parties.
The dispatch process provides a structure to store external contact information and methods for sending documents using email or manual methods. The process also records the dispatch and updates the status when the document is dispatched for signatures. When email deliveries are not available, the process enables you to record dispatch activities when you send the document out using other manual processes, such as mail or facsimile.
When the system dispatches a document, it updates the document history to indicate that the document has been sent and records any status changes. It stores the process options history, which you can view using the Document Version History link on the Document Management page.
Pages Used to Dispatch Documents|
Page Name |
Definition Name |
Navigation |
Usage |
|
CS_DOC_DSPTCH_SEC |
Supplier Contracts, Create Contracts and Documents, Document Management Click the Dispatch button on the Document Management page. |
Dispatch documents to contacts. |
|
|
CS_DOC_MAINT |
Supplier Contracts, Create Contracts and Documents, Document Management |
Reset documents to dispatched. |
Dispatching DocumentsAccess the Dispatch page (click the Dispatch button on the Document Management page).
Use this page to dispatch documents and their amendments and attachments. Depending on the type of document that you are dispatching, the page displays the Ad Hoc ID, Contract ID, or PO ID (purchase order ID) field.
|
Vendor |
Displays the vendor on the purchasing contract. |
|
Version |
Displays the version of the document. |
|
Amendment |
Displays the number of amendments belonging to this purchasing contract or ad hoc document. |
|
Administrator |
Displays the administrator. |
|
Administrator Email ID |
Displays the email address for the administrator. |
|
Delivery Method |
Select to determine how to send the document to the contact. The contact can be an external or internal contact. Methods are: Email: Select to indicate that the document and notification will be sent by email. When you select email, the system populates the Description field with the setID and document description and highlights the Files to Be Sent grid. If you select this option, you must enter at least one email address. Manual: Select to manually control the delivery of the document. You can deliver the physical document by another means. This might include documents that you send by mail or facsimile. The system has no actions or requirements when you select this option. The manual process implies that the document has been provided to one or more of the contacts that are listed on the External Contacts page. When you select Manual, the system disables the contacts list and the Files to Be Sent field. You can indicate that the document has been checked out for their review, but you cannot send a copy to the administrator. Email and Online Signatures: Select to indicate that the document needs to be signed by the supplier online instead of using the Supplier Portal. This option locks the document until the external contact responds back using the Supplier Portal or the document check out is cancelled by the document administrator. |
|
Send as File Type |
The file type is the application format that you use as the basis to dispatch a document. Values include: Adobe PDF Format:Select to send the file in an Adobe Acrobat PDF format. See Understanding How to Use Digital Signatures. Word 2003 XML: Select to send the document by email in a Microsoft Word .xml format. See Installing and Configuring Microsoft Word and Acrobat Components on Workstations. Word Document: Select to send the document by email in a Microsoft Word .doc format. This is for use with contacts who might not have Microsoft Word 2003 available, but still want to view the document. Any edits will have to be manually entered into the Microsoft Word 2003 .xml file. This check box appears when you select to render documents in a .doc version using installation options. |
|
Preview PDF |
Click to preview the document in a PDF format. The system launches a new page and displays the document with any edits. |
|
Subject |
Displays a system-generated description of the document to be reviewed. |
|
Description |
Displays a system-generated description of the document when you send the document to contacts by email. The description is made up of the setID and document description. You can enter additional information in the field. The system uses the field values as the body of the email message that it sends. |
Files to Be Sent
Use this group box to define which files the system should include when you send the document by email. You must select at least one file or the system displays an error message when you send the notification. The file list changes depending on the context of the dispatch. For example, amendment file options are included only if the document is in an amendment cycle. The system disables all fields in this box if you are manually routing the files.
|
Original Executed Document |
Select to send the original document. This option is available when you are sending separate amendment files, which include files for the amendment process options Amend Contract with Amendment Files and Amendment Files Only, and you also want to send the originally executed document for informational purposes. |
|
Current Document |
Select to send the current document to contacts. This option applies for dispatching the current version of the original contract, or the current version of the edited main document during an amendment cycle and when the amendment process option is Amend Contract with Amendment Files. |
|
Amendment Files |
Select to route separate amendment files that are associated with the document. This option applies when an amended contract is being dispatched and the amendment process option is Amend Contract with Amendment Files or Amendment Files Only. When you select this option, the system enables additional selections for sending amendments. |
|
Most Recent Only |
Select to send only the most recent amendment file with the email. The system does not send any previous amendment files. |
|
All |
Select to send all amendment files with this email. This includes all amendment files for all past amendment cycles. |
|
Attachments |
Select to include the attachments for this document in the email. If the attachment has been selected for external use, this check box is enabled. If the External option has not been selected on the Attachments page, then the check box will not be available on this page. After you select the Attachment check box, the system enables the Attachment grid so that you can select individual attachments. |
|
Related Documents |
Select to include related documents in the email with this document. Related documents are those documents that have been created or imported into the document management system. If you attempt to select a related document that has its own dispatch setup, the system prevents the selection. You can attach only related documents that have a document type that uses these applicable statuses: Draft, Complete Statuses Only and Draft, Approve Statuses Only. |
|
Set to Checked Out |
Select to set the document to checked out when you send the notification. When you select this option, the system displays this message on the Document Management page: File locked for external review. This option prevents other users from editing the document while the contacts are reviewing it. This field is available for email and manual notifications. Note. When you select this check box, the document is marked as checked out to you on behalf of the supplier so that other edits cannot be made while it is being reviewed by external contacts. You can email the latest version of the contract at the time of dispatch. When you receive the supplier comments, you can cancel the checkout and check out the current document to incorporate any supplier changes. |
|
Send Copy to Administrator |
Select to indicate that this notification and document should go to the contract administrator or owner. If the administrator does not have a valid email address, the system displays a warning. |
Contacts
Use this grid to add contacts for this email routing. The grid initially appears with default contacts that are defined for this document, but you can add additional contacts by clicking the Add button. Use the External Contacts List link on the Document Management page to define default document contacts. The grid is not available if you are sending documents using a manual process.
You can also select to send the email to all contacts or clear all contacts and select only those contacts to whom you want to send the email.
|
Selected |
Select these check boxes to mark contacts to whom you are sending the routing. You must select one contact. You can use the Select All and Clear All links to select multiple contacts. |
|
Contact ID |
Displays the system-defined sequence number for the contact. |
|
Name |
Displays the person to whom the email will be sent containing the dispatched document and any attachments and related documents that you select. |
|
Title |
Displays the position that is defined for contact. |
|
Email ID |
Displays the email address for the contact. |
|
Description |
Indicates the origin of the contact. For example, you can add ad hoc contacts for a document or use contacts that are pulled from the Vendor component's Contacts page. This is applicable only if the document is tied to a purchasing contract transaction. The description values are Ad Hod Contact and Vendor Contact. |
Attachments
This grid displays the attachments that will be sent to contacts along with the document. The Selected check boxes are available and selected as the default value when you select the Attachments check box in the Files to be Sent group box.
The Origin field indicates how the attachment was added to the document. If the attachment was attached to the purchasing contract, the field contains the value Purchasing Contracts Only. If the attachment was added using the authoring system, the field displays Doc Management. If you add attachments from within contract entry and then create a document, the system makes the attachments available for the Dispatch process.
The system displays the Comment Type field, which is information that is specific to the purchasing contract attachments. Click the View link to open the attachment as a read-only file.
This grid displays the related documents that will be sent to contacts along with the document. The Selected check boxes are available and selected as the default values when you select the Related Documents check box in the Files to be Sent group box.
To view the document, click the document link. The document's source transaction, version, approval status, and state also appear. And, if the document has been amended, the number of amendments appear.
See Also
Viewing and Uploading Attachments and Related Documents
Resetting Documents to DispatchedAccess the Document Management page (Supplier Contracts, Create Contracts and Documents, Document Management).
Click the Reset to Dispatch button on this page to set the executed document's status back to Dispatched. This enables you to edit the document and send it to contacts for further review and updates. When you click the button, the system updates the Document Management page with the Send to Contacts and Execute Contract buttons. This enables you to resend the document for additional reviews or to edit the document.
See Also
Approving DocumentsThis section discusses how to approve a document.
Page Used to Approve Documents|
Page Name |
Definition Name |
Navigation |
Usage |
|
CS_DOC_MAINT |
Supplier Contracts, Create Contracts and Documents, Document Management |
Approve a document. |
Approving a DocumentAccess the Document Management page (Supplier Contracts, Create Contracts and Documents, Document Management).
Click the Worklist link, filter the worklist using Approval Routing, and click the link for the document that you want to approve or deny. Using this page, you can perform a number of tasks that relate to document review, approval, and denial. These tasks are processed through approvals using approval framework.
See Also
Configuring PeopleSoft Approval Framework for Use with Supplier Contract Management
Approving Documents and Document Components
Signing Documents Using Digital SignaturesThis section provides an overview of digital signatures and discusses how to:
Prepare documents for signature.
Routing documents for internal signatures.
Sign internal documents using digital signatures.
Understanding How to Use Digital SignaturesDigital signatures are cryptographically-based signature assurance schemes that make it possible for PeopleSoft Supplier Contract Management to provide full online contract document processing. They are often used in the context of public key infrastructure (PKI) schemes in which the public key used in the signature scheme is tied to a user by a digital identity certificate issued by a certificate authority, usually run by a third-party commercial firm. PeopleSoft Supplier Contract Management supports the ability to lock down the Microsoft Word version of a contract and prepare an equivalent and separate PDF file or .docx file that the system uses to capture signatures only. You can run this prepare process and capture signatures in an internal or external order, as well as before, during, or after approvals for capturing internal signatures. After the contract or amendment has been executed, the Microsoft Word version of the latest document is made available again for the next amendment cycle.
Note. When you have the Document Types check box deselected on the Installation Options page, you cannot control the collection of digital signatures, such as before, after and during approvals, the same as you can when you have the check box selected.
Note. Preparing your system for digital signing and setting up digital signatures is described in the Setting Up PeopleSoft Supplier Contract Management chapter.
See Setting Up Digital Signatures.
Note. The requirement for using the .docx format is that all signers, both internal users and external suppliers, must use Microsoft Word 2007. Unlike the PDF format the .docx format is still a Microsoft Word document and in certain statuses can be edited. After the first signature, for example, the contract specialist, is placed on the document and the .docx file can no longer be modified itself unless all signatures are cleared. Therefore, you should take care when using a .docx format to ensure that the contract specialist signs the document as part of the prepare process, and as a follow-up ensure that the document signatures have not been cleared by other users.
Internal and external users (supplier-side) who intend to sign a contract document or amendment can use digital signatures. You can route a document intended for digital signatures in several ways:
Internally where you can configure to route the document manually using a sequential list of users before, or after approvals or both before and after approvals. You can also route the document during approvals in which case any approver designated as required to sign will be provided a button to do so during approval.
Externally where you can capture needed signatures of prepared document before internal approvals by using the Send to Contacts button, or after approvals using the Send to Contacts or Dispatch buttons. When an external portal is enabled for suppliers, they can sign the document online instead of passing documents through emails.
The document type along with installation options control how the system processes and routes documents. To insert signature blocks for Adobe PDF files you create postscript files that are inserted as image objects into the Microsoft Word version of the signature clauses. Then, you can use the clause directly on the configurators or use rules to insert alternative signature clauses based on the organization's needs.
See Setting Up Digital Signatures.
The next set of steps describes the process for using digital signatures with Adobe Acrobat. The processes for Adobe PDF signatures and Microsoft Word 2007 are similar. However, the features within each process regarding signing a document may be different as specified by the software vendors. When using Adobe PDF, most users should require only the Adobe PDF Reader and a digital certificate to sign a document after an administrator has enabled the signature rights using Acrobat Professional. Likewise, using Microsoft Word 2007 and .docx format for signatures means each signer must be using Microsoft Word 2007 to add a signature. When using Microsoft Word 2007, the .docx format is used only for signature file and purpose. The .xml format is always the file format for Microsoft Word editing.
After setting up and preparing to use digital signatures, you prepare and route documents using these steps:
Create a document with internal or external signing requirements.
Obtain any required approvals before sending the document for internal signatures.
This depends on whether the document type requires approvals before signatures.
Click the Prepare Document for Signature button on the Document Management page.
This also enables you to validate the internal and external lists of signers and to indicate if a signer is a visible signer. Click the OK button to convert the document into the signature format. The system creates the document, checks it out, launches the file and displays a message indicating what you should do to the file depending on whether it's a .docx or PDF. In the case of an Adobe PDF, you enable the usage rights so that others having only the Adobe Reader can sign the document. In the case of Word 2007 .docx file, you should certify the document and make the first signature to prevent editing of the document. In both cases the document is locked until the specialist checks in a certified document.
Note. If you are creating an Adobe PDF, the system displays a message that the document is pending certification that you need to enable Adobe usage rights. To ensure that the system opens the document in an Acrobat Adobe PDF format, launch Adobe Acrobat 8 Professional from the Start menu. After accessing the application, select Edit, Preferences, Internet and deselect the Display PDF in Browser check box. The setting applies to both Adobe Acrobat Professional and Standard and Adobe Reader files and prevents the system from opening the PDF in a browser format.
.
The next examples illustrates how a converted PDF file appears with its signature blocks:
The signature blocks appear at the bottom of the page. The system applies the visible digital signature to these blocks when the appropriate users sign the document. You create the signature blocks by creating a clause with the information and the imbedded images. Then you use the clause in the document configurator to build the document.
Save the file.
Click the Upload Prepared Document button on the Document Management page.
You can also view the document or cancel the signature process after preparing the document and before uploading it. After the document is uploaded, the system updates the document status to Prepared/Awaiting Signatures and provides the signing details for the document along with the options that appear next:
Contract administrators can use the Sign Document (On Behalf) button to access the document and sign it on behalf of another internal user. Click the Route for Internal Signatures button to send the document to internal users who are listed as signers for the document.
Click the Route for Internal Signatures button.
The internal signer accesses the document and applies the digital ID.
For more information about signing an external document, see the Signing Internal Documents Using Digital Signatures later in this section.
When the last internal signer signs the document, the system updates the internal signature status to Signed as shown in this example:
Depending on the signature flow, the contact administrator can, for example, send the document for internal approvals or send it for internals signatures before sending it to external users.
The contract administrator routes the document to external signers by clicking the Send to Contacts or Dispatchbutton, depending on where in the life cycle they wish to gather external signatures. .
Select Email and Online Signatures in the Delivery Method field.
This option is intended for use with the supplier portal. The system automatically inserts a URL in the Description field. You use this method to send the document to an external user to sign online. You can also lock the document and route it offline using email and upload it after receiving the signed document.
When suppliers receive the email, they can link back to the supplier portal and sign the document.
Click OK.
The system updates the Document Management page with the new signature process update as appears in this example:
The updated information indicates that the document has been sent to an external user and is pending his signature. To stop the signing process for the supplier, click the Cancel Supplier Signing button.
You can define the level of external user access to executed documents. You use installation options to indicate if the user can view the document online, view only executed versions or all collaborated and executed documents.
After the external user signs and uploads the document, the system updates the document status.
The next example shows that the internal and external signature statues are Signed:
After a contract document is signed by external and internal user, you can continue with any other required actions to complete the document, or if needed, send it to the supplier user again.
Pages Used to Digitally Sign Documents|
Page Name |
Definition Name |
Navigation |
Usage |
|
Prepare Document for Signatures |
CS_DOC_PREPSIGN_SP |
Supplier Contracts, Create Contracts and Documents, Document Management Click the Prepare Document for Signing button on the Document Management page. |
Preparing documents for signature. |
|
Route for Internal Signatures |
CS_DOC_ROUTE_SIGN |
Click the Route for Internal Signatures button on the Document Management page. |
Routing documents for internal signatures. |
|
Document Management |
CS_DOC_MAINT |
Click Worklist on the Home page, select the Sign Review value in the Work List Filters field, and click the document link. |
Sign internal documents using digital signatures. |
|
Cancel All Signatures |
CS_DOC_ACTIONS_SP |
Click the Cancel Signature Process button on the Document Management page. |
Confirm that you want to cancel the signature process and to enter comments about the cancellation. |
|
Cancel Supplier Signatures |
CS_DOC_ACTIONS_SP |
Click the Cancel Supplier Signing button on the Document Management page. |
Cancel the external signature process. |
|
Stop Route for Internal Signatures |
CS_DOC_ACTIONS_SP |
Click the Stop Internal Signatures button on the Document Management page. |
Cancel the internal signature process. |
|
Decline Signing Document |
CS_DOC_ACTIONS_SP |
Click the Decline Signing Document button on the Document Management page. |
Decline signing a contract document and to enter comments about the denial. |
Preparing Documents for SignatureAccess the Prepare Documents for Signatures page (click the Prepare Document for Signing button on the Document Management page).
This page provides you a chance to verify the list of internal and external signers before dispatching the document. You can review the signers and make sure that the list contains the correct people who need to sign the document. Internal signers must be in this to have access to the document and see the correct buttons. If you want to change the list, use the Internal Contacts List page or External Contacts page to make the changes.
The display of this button on the Document Management page also depends on the document type settings. When internal signatures have been enabled, you can define when a document should be ready for signing, such as prior to, during, or after approvals.
Click OK to convert the document to its proper format, either Microsoft Word or Adobe PDF. If you are preparing a PDF, before others can sign the document, you need to enable the usage rights for Adobe Reader. You can enable this in the document that was launched, save the document and upload it back into the system. The document will remain checked out in your name until you upload the prepared document.
|
User |
Displays the user ID for an internal user. You use the Internal Contacts/Signers link on the Document Management page to define internal users collaboration and signing settings. The values you define on the Signing Settings tab appear on this page. |
|
Signing Title |
This field is optional and displays the title that was defined on the Internal Contacts List page for this user. You use the Signing Settings tab to define the signing title. The field is provided if you intend to bind it into the authored document. |
|
Displays as selected when this signer has been defined as a visible contract document signer on the Internal Contacts List page. Visible signatures appear on a contract document as opposed to invisible signers, who do not appear in the formal document. |
|
Sign Order |
Displays the sequence in which this user will sign the contract document. The system determines the signing order based on the order that you enter on the Internal Contacts List page. When routing the document manually for signatures outside of workflow approval, sign order values are used for sequential routing. |
External List of Signers
Use this grid box to view external signers and their attributes that have been defined on the External Contacts page. The values that you define on that page appear in this grid box.
Routing Documents for Internal SignaturesAccess the page Route for Internal Signatures page (click the Route for Internal Signatures button on the Document Management page).
This page displays the internal users to whom the system will route the document for signature. The document is routed based on the sign order. You can add and delete signers. Use the Instructions field to provide additional signing information.
|
User |
Select a user to include for the internal signature routing. |
|
Required to Sign Document |
Select to indicate that this internal user is required to sign the document. When you select this check box, the Visible Signer and Sign Order fields become available for entry. This field controls the visibility of the Sign Document button when the contract is routed to the user. When a user is not required to sign the document, then the user is considered a collaborator or viewer for the document and is not provided signing authority for the document. The user will not see the Sign button or be included in signature routings. |
|
Visible Signer |
Select to indicate that this internal user's signature will be visible on the contract document. The field is available if the Required to Sign Document check box is selected. Visible signers are those signers whose signature labels appear on a contract document. Unlike visible signatures, you can also set up a signer with an invisible signature. You can only see an invisible signature in the signature properties of the document, and not in the document itself. |
|
Sign Order |
Select to indicate that this internal user's signature will be visible on the contract document. The field is available if the Required to Sign Document check box is selected. If a user is not a visible signer |
|
Signed Status |
Displays the status related to whether a signer has signed a document. Values include: Initial Signed Pending Signature Replaced by Alternate Signed by Proxy Marked as signed Declined |
|
Signed DTTM (signed date and time) |
Displays when an internal signer has signed the document and indicates when the signer completed the document. |
Signing Internal Documents Using Digital SignaturesAccess the page Document Management page (click Worklist on the Home page, select the Sign Review value in the Work List Filters field, and click the document link).
The system displays the Document Management page with the document's status and provides a message that indicates the document is being routed for internal signatures. You must have a digital ID established to sign the document. You can establish the ID online using Adobe pages.
See Understanding How to Set Up Digital Signatures.
Use the Signing Details section to view the internal and external signature statuses, view any comments, and view the routing history of the document.
|
Sign Document |
Click to launch the Microsoft Word .docx or Adobe PDF file and lock the file from any further actions. When the file opens, the system replaces this button with the Upload Signed Document button. |
|
Decline Signing Document |
Click to decline signing the document. The system displays the launch the Decline Signing Document page where you can enter comments about the action. |
To sign a document:
Click the Sign Document button.
The system opens the digital signature file.
Apply the signature using either the Adobe or Microsoft Word format and save the document.
Click the Upload Signed Document button.
The system checks the document similar to how it runs the check-in process. It updates the document status and provides a date and time stamp for the signer's row in the internal list of signers page. Signers can still view the document and perform tasks that are available on the page.
Executing DocumentsThis section discusses how to execute documents.
Page Used to Execute Documents|
Page Name |
Definition Name |
Navigation |
Usage |
|
CS_DOC_MAINT |
Supplier Contracts, Create Contracts and Documents, Document Management |
Execute documents. |
Executing DocumentsAccess the Document Management page (Supplier Contracts, Create Contracts and Documents, Document Management).
Click the Execute Contract button to formalize the completion of the contract. An executed contract is one that has been through all of the collaboration and approval and the owner has determined that it is ready for use in managing contracts with suppliers.
When you execute the document, the system also provides additional methods of maintaining the contract in case changes occur. The system provides an option to send the contract back to Dispatched status. If an amendment is required, the system provides a method for creating and processing the amendment through its life cycle.
Defining Contract AmendmentsThis section discusses how to create an amendment.
Page Used to Define Contract Amendments|
Page Name |
Definition Name |
Navigation |
Usage |
|
Create an Amended Version |
CS_DOC_VERSIONS_SP |
Supplier Contracts, Create Contracts and Documents, Document Management Click the Create Amendment button on the Document Management page. |
Create an amendment. |
Create an AmendmentAccess the Create an Amended Version page (click the Create Amendment button on the Document Management page).
After you execute a document, you can update it with amendments. The amendment process uses many of the life-cycle features that are described in this chapter. In addition, you can perform amendment processing using one of these process options:
Amend Contract Only: This option supports a single-document process that you use to make changes to the original document that has been executed. The system makes a new copy of the executed document at the beginning of the amendment process.
Amend Contract with Amendments: This option supports a two-document process that you use to make changes to both the original executed document and a newly created amendment file. A new amendment file is created for each amendment cycle. When you create an amendment using the Amend Contract with Amendments process option, the system provides view and edit buttons for both the amended document and amendment file. This makes it possible to automatically update the amendment file using updates that you made to the amended document.
See Updating Amendment Files Automatically.
Amendment Files Only: This option supports a single-document process that you use to make changes to the a newly created amendment file. The system creates a new amendment file for each amendment cycle.
Detailed documentation regarding amendment processing options is described in a separate chapter.
See Also
Creating and Maintaining Amendments for Supplier Contracts
Comparing DocumentsThis section provides overviews of document comparisons and document comparison setup and discusses how to compare documents.
Understanding Document ComparisonsDocument comparisons enable you to view a comparison of the current document with another temporary version of the document. The temporary version provides you a preview of changes that will occur in a document before you actually make the decision to re-create or refresh the document. You cannot edit the temporary version. Based on the options that you select to compare, the file that the system opens is exactly what you would view if you did a manual Microsoft Word compare between the two specified types of files. The system automatically runs the Microsoft Word compare in the background and shows you the result of that comparison.
The Compare feature is useful if you want to view what changes you might lose if you refreshed or re-created the document. For example, some manual edits could be lost based on refreshing or re-creating the document. Or you can view what new transactional data changes you might gain by refreshing or re-creating the document. You can also compare the current document with the last-executed document to see what changes have been made since the last time the document was approved and executed.
Document Comparison SetupYou use installation options to enable document comparisons. You must also prepare the system to use the compare feature.
See Also
Understanding Document Comparisons and Rendering
Page Used to Compare Documents|
Page Name |
Definition Name |
Navigation |
Usage |
|
Compare Documents |
CS_DOC_COMPARE_SP |
Supplier Contracts, Create Contracts and Documents, Document Management Click the Compare Documents button on the Document Management page. |
Compare documents. |
Comparing DocumentsAccess the Compare Documents page (click the Compare Documents button on the Document Management page).
Use this page to select which version of a document you want to compare with a current document. The document that you open using the Compare feature is a temporary Microsoft Word file. This means that you cannot edit and upload the document. However, you can use the document to copy text to another document.
You use the Compare Against field to select which type of comparison you want to make.
|
Recreated Document |
Click to compare the current document with a temporarily re-created version of the document. It presents a temporary document as though it has been re-created and compares it with the current version to help you identify the differences. You cannot edit and upload this resulting compared output file. |
|
Refreshed Document |
Click to compare the current document with a temporary refreshed version of the document. It presents a temporary document as though it had been refreshed and compares it with the current version to help you identify the differences. You cannot edit and upload the resulting compared output file. |
|
Last Executed Document |
Click to compare the current document against the last-executed document. The system displays this option only during amendment cycles. It presents a temporary document that is a comparison between the current version and the last-executed version to help identify the changes that were made since the last document execution. The button is not available initially because the document has not been executed. You cannot edit and upload the resulting compared output file. |
Note. In addition to this compare capability, you can also select any two Microsoft Word document versions within document history and run a comparison there as well.
See Also
Understanding Document Comparisons
Using Document-Related PageletsSupplier Contract Management provides employee- and supplier-facing pagelets that collaborators, document administrators, and suppliers can use to view documents. You can select to display the pagelets using the Content link on the Home page. The pages include:
Documents Pending Action (Internal)
Documents by Due Date (Internal)
Documents Pending Review (External)
This section discusses the pages used to view documents.
Pages Used With Document-Related Pagelets|
Page Name |
Definition Name |
Navigation |
Usage |
|
CS_DOC_PND_PGLT |
Opens on login. |
View a list of contract documents that are pending your check in, review, approval, or signature. Documents are shown sorted by the cycle due date and created date and amendment created date. This is a general pagelet intended for any administrator or frequent contract collaborator. |
|
|
CS_DOC_DUE_PGLT |
Opens on login. |
View a list of the most recent upcoming documents ordered by due date. The pagelet includes documents due for you as an administrator as well as other administrator's documents for which you have authorized document access. Only documents with an assigned cycle due date are displayed on the pagelet. |
|
|
CS_SUPP_PEND_PGLT |
Opens on login. |
View a list of documents that are pending your review for collaboration or signature. This is an external supplier-side pagelet intended for use with a supplier-facing portal. When a document is routed for external collaboration or sent for online signatures, the document will be displayed on this pagelet for the external user who needs to collaborate or sign the document. |
Deactivating and Reactivating DocumentsThis section discusses how to:
Deactivate documents.
Reactivate documents.
Page Used to Deactivate and Reactivate Documents|
Page Name |
Definition Name |
Navigation |
Usage |
|
CS_DOC_MAINT |
Supplier Contracts, Create Contracts and Documents, Document Management |
Deactivate documents. Reactivate documents that have been deactivated. |
Deactivating DocumentsAccess the Document Management page (Supplier Contracts, Create Contracts and Documents, Document Management).
When you click the Deactivate Document button, the system removes the document from general use. This means that you cannot select the document or perform actions against it unless you reactivate it. The system records the deactivation in the version history.
Elements of the document, such as its clauses, amendments, and attachments, remain associated with the document. The system leaves the document status at its current status when you deactivate it and displays an indicator that the document has been deactivated. If you reactivate the document, the document is activated with the same status.
You can access a deactivated document through the search utility. Use the Document Status field to search for All Documents or Inactive Documents Only. Select the deactivated document. After you access the Document Management page, you can reactivate the document.
Reactivating DocumentsAccess the Document Management page (Supplier Contracts, Create Contracts and Documents, Document Management).
You can reactivate a document after it has been deactivated. To reactivate a document:
Locate the deactivated document using the search utility.
Select the document.
Click the Reactivate Document button.
The system activates the document at the same status that it was at when it was deactivated.
See Also
Generating Microsoft Word Documents