10g (10.1.3.5.0)
Part Number E14293-01
Contents
Previous
Next
| Oracle Application Server Adapter for Oracle Applications User's Guide 10g (10.1.3.5.0) Part Number E14293-01 | Contents | Previous | Next |
This chapter covers the following topics:
OracleAS Adapter for Oracle Applications uses interface tables to insert and update data in Oracle Applications, and uses views to retrieve data from Oracle Applications. This chapter describes the following interfaces:
Interface Tables
Interface Views
OracleAS Adapter for Oracle Applications use interface tables to insert data in Oracle Applications. For example, by using interface tables, you can insert a purchase order into Oracle Applications to generate the sales order automatically. Data is never loaded directly into Oracle Applications base tables. Instead, data is first loaded into interface tables, and then Oracle-supplied concurrent programs move data from interface tables to base tables. This ensures that all business logic and processing is handled using Oracle components.
OracleAS Adapter for Oracle Applications use open interface tables to integrate with Oracle Applications through direct database access. The OracleAS Adapter for Oracle Applications inserts data into the open interface tables. These interface tables can be used only for insert operations and support only an inbound connection into Oracle Applications.
Interface tables are intermediate tables into which the data is inserted first. Once the data gets inserted into the interface tables, the data is validated, and then transferred to the base tables. Base tables are real application tables that reside in the application database. The data that resides in the interface tables is transferred to the base tables using concurrent programs. A concurrent program is an instance of an execution file. Concurrent programs are scheduled in Oracle Applications to move data from interface tables to base tables. These programs perform the application-level checks and run validation before inserting data into base tables.
OraclesAS Adapter for Oracle Applications uses interface views to retrieve data from Oracle Applications. For example, by using the views, you can retrieve information about your customers from the required tables in Oracle Applications.
OracleAS Adapter for Oracle Applications uses interface views to retrieve data from Oracle Applications. Views allow only simple definition. By using the views, you can get synchronous data access to Oracle Applications. In OracleAS Adapter for Oracle Applications, interface views are created on base tables as well as interface tables. These views can be used only for select operations.
In the Oracle Applications 11.5.10 release, you cannot work on multiple interface views. A work around to address this would be to create a view that spans multiple views.
This section describes how to configure the OracleAS Adapter for Oracle Applications to use interface tables. It describes the steps to configure OracleAS Adapter for Oracle Applications using the Adapter Configuration Wizard in Oracle JDeveloper.
Prerequisites to Configure Interface Tables
Define primary keys on all the interface tables being used.
Define parent-child relationships among all the interface tables used.
Following is a list of the procedures required to accomplish the design-time tasks.
To create a new BPEL project
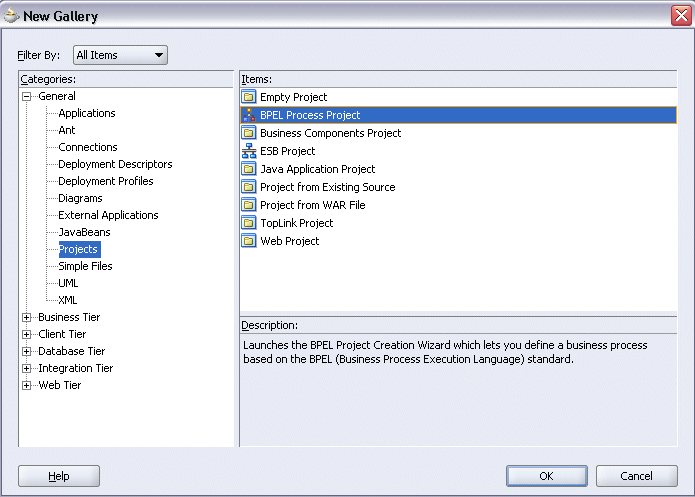
Open JDeveloper BPEL Designer.
From the File menu, select New. The New Gallery dialog box appears.
Select All Items from the Filter By list. This displays a list of available categories.
Expand the General node, and then select Projects.
Select BPEL Process Project from the Items list.
Creating a New BPEL Process Project
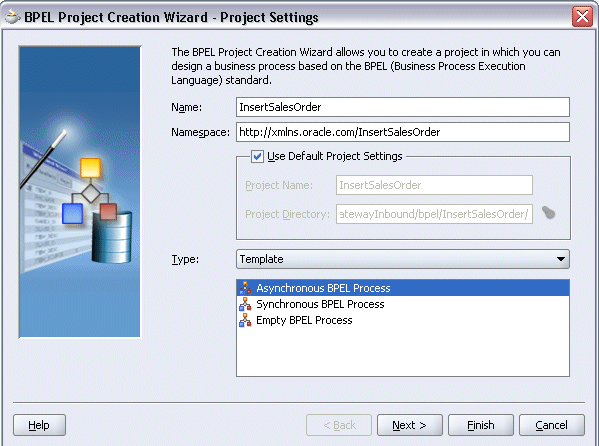
Click OK. The BPEL Project Creation Wizard - Project Settings dialog box appears.
In the Name field, enter a descriptive name. For example, enter InsertSalesOrder.
Keep the default selection Use Default Project Settings unchanged.
Keep the default selection Template as the Type field. Select Asynchronous BPEL Process as the BPEL process type.
Specifying New BPEL Project Settings
Click OK.
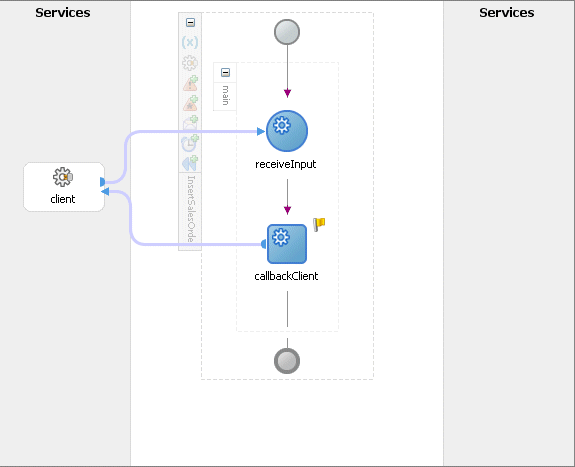
A new asynchronous BPEL process is created with the receiveInput and callbackClient activities.
The required source files including bpel.xml, InsertSalesOrder.bpel, and InsertSalesOrder.wsdl are also generated.
New BPEL Process Project
This section describes how to add a partner link to your BPEL process. A partner link defines the link name, type, and the role of the BPEL process that interacts with the partner service.
To add a partner link
In JDeveloper BPEL Designer, click Services in the Component palette.
Drag and drop Oracle Applications icon into the border area of the process diagram.
The Adapter Configuration Wizard appears.
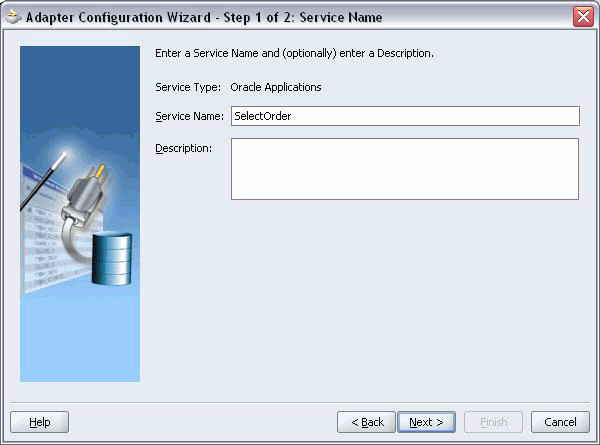
Click Next. The Service Name dialog box appears.
Enter the following information:
In the Service Name field, enter a service name.
In the Description field, enter a description for the service. This is an optional field.
Specifying the Service Name
Click Next. The Service Connection dialog box appears.
You can perform either one of the following options for your database connection:
Note: You need to connect to the database where Oracle E-Business Suite is running.
You can create a new database connection by clicking the New icon.
Detailed instructions on how to create a new database connection, see Creating a New Database Connection.
You can select an existing database connection that you have configured earlier from the Connection drop-down list.
The selected database connection information appears in the Service Connection dialog box. The JNDI (Java Naming and Directory Interface) name corresponding to the selected database connection also appears automatically in the Database Server JNDI Name field. Alternatively, you can specify a JNDI name.
Note: When you specify a JNDI name, the deployment descriptor of the Adapter for Oracle Applications must associate this JNDI name with configuration properties required by the adapter to access the database.
The JNDI name acts as a placeholder for the connection used when your service is deployed to the BPEL server. This enables you to use different databases for development and later for production.
Note: For more information about JNDI concepts, refer to Oracle Application Server Adapter Concepts.
Once you have created a new connection or selected an existing connection, you can add an interface table available in Oracle E-Business Suite.
Click Next.
For Oracle E-Business Suite Release 12:
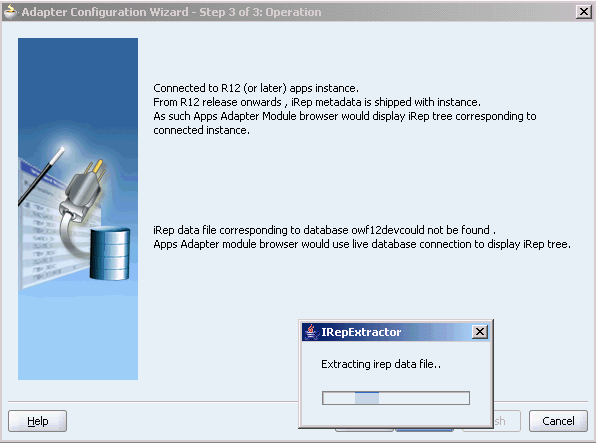
If you are connecting to Oracle E-Business Suite Release 12, then the IREP File not present dialog box appears indicating that OracleAS Adapter for Oracle Applications could not find the Oracle Integration Repository data file corresponding to the database you are connecting in your workspace. Absence of the data file would make browsing or searching of Integration Repository tree considerably slow. You can choose to extract the data file and create a local copy of the Integration Repository data file. Once it is created successfully, OracleAS Adapter for Oracle Applications will pick it up automatically next time and retrieve data from your local Integration Repository.
You can select one of the following options:
Click Yes to extract the Integration Repository data file.
Extracting Integration Repository Data File
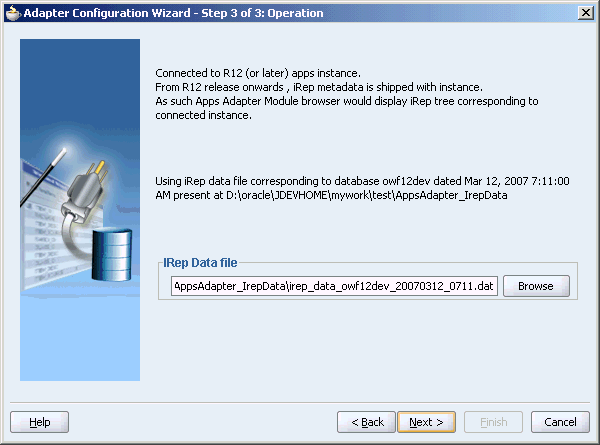
After the system successfully creates a local copy of the Integration Repository data file, next time when you connect to the database, you will find the IRep Data File field appears in the Operation dialog box indicating where your local copy exists with the creation date and time as part of the file name.
Using the Local Integration Repository Data File
Click No to query the Integration Repository data file from the live database you are connecting to display the Integration Repository tree.
Note: It is highly recommended that you create a local copy of the Integration Repository data file so that OracleAS Adapter for Oracle Applications will query the data next time from the local copy in your workspace to enhance the performance.
For Oracle E-Business Suite pre-Release 11.5.10:
If you are connecting to a pre-11.5.10 Oracle E-Business Suite instance, you must select the interface type in the Adapter Configuration Wizard. Select Tables/Views/APIs/Concurrent Programs to proceed.
Click Add to open the Oracle Applications Module Browser.
The Oracle Applications Module Browser combines interface data from Integration Repository with information about the additional interfaces supported by Adapter for Oracle Applications, organized in a tree hierarchy.
Adding a Table from the Oracle Applications Module Browser
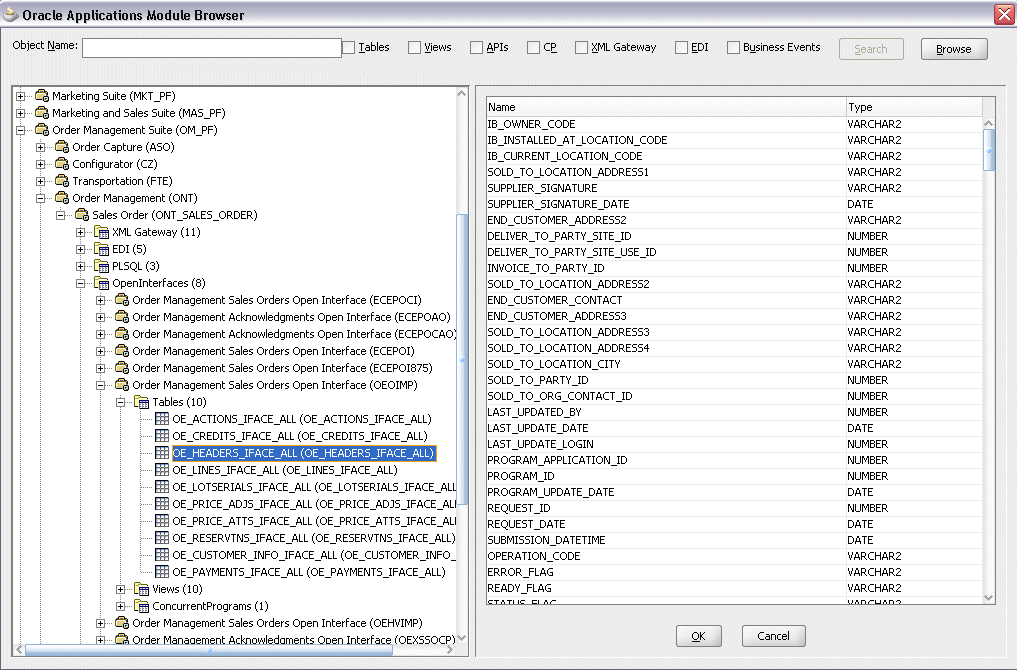
Note: Oracle Applications Module Browser includes the various product families that are available in Oracle Applications. For example, Applications Technology or Order Management Suite are product families in Oracle Applications. The product families contain the individual products. For example, Order Management Suite contains the Order Management product. The product contains the business entities associated with the product. For example, the Order Management product contains the Sales Order business entity. Business entities contain the various application modules that are exposed for integration. These modules are grouped according to the interface they provide. Tables can be found under the OpenInterfaces category.
Navigate to Order Management Suite (OM_PF) > Order Management (ONT) > Sales Order (ONT_SALES_ORDER) > OpenInterfaces >Order Management Sales Orders Open Interface (OEOIMP) > Tables to select OE_HEADERS_IFACE_ALL.
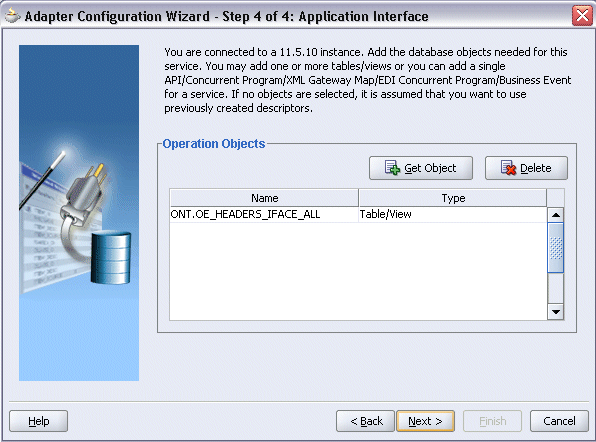
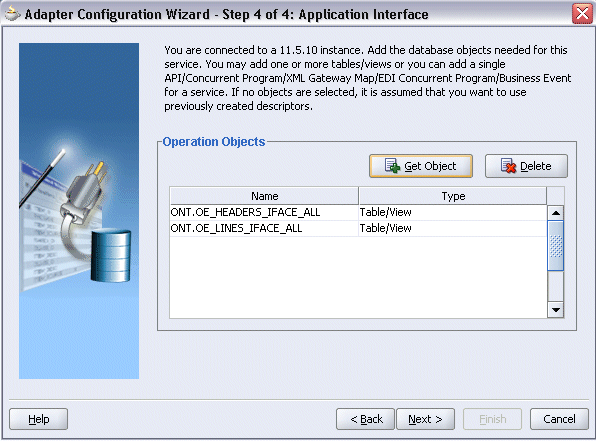
Click OK. The Application Interface dialog appears with the selected open table.
Application Interface Dialog
Click Get Object to open the Oracle Applications Module Browser again to select another open interface table OE_LINES_IFACE_ALL using the same navigation path Order Management Suite (OM_PF) > Order Management (ONT) > Sales Order (ONT_SALES_ORDER) > OpenInterfaces >Order Management Sales Orders Open Interface (OEOIMP) > Tables.
Click OK. The Application Interface dialog appears with the two selected tables.
Application Interface Dialog
Click Next.
In the Operation Type dialog, select Perform an Operation on a Table, and then select the Insert check box.
Selecting the Type of Operation
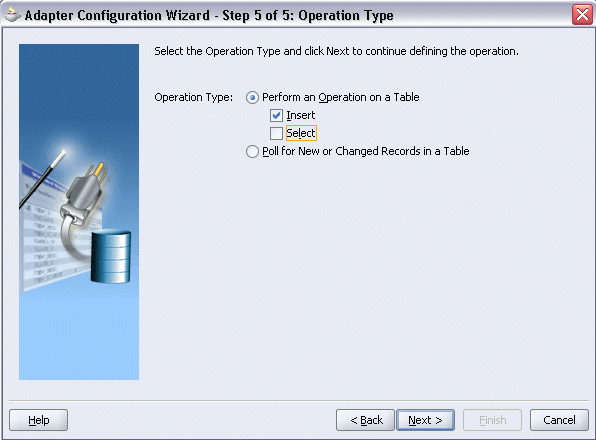
Note: You can only insert data into the interface tables even though the select option is enabled.
Click Next. The Select Table dialog box appears.
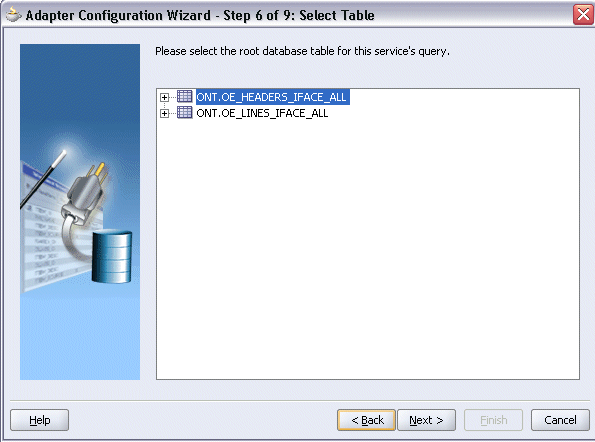
Select OE_HEADERS_IFACE_ALL as the root database table in the Select Table dialog box, which displays the tables that have been previously imported in this JDeveloper project (including tables that were imported for other partner links). This enables you to reuse configured table definitions in multiple partner links.
Selecting a Root Table
Click Next. The Define Primary Keys dialog box appears.
Select the following primary keys for the OE_HEADERS_IFACE_ALL table:
ORDER_SOURCE_ID
ORIG_SYS_DOCUMENT_REF
Defining Primary Keys Page for OE_HEADERS_IFACE_ALL

Click Next.
Select the same primary keys for the OE_LINES_IFACE_ALL table.
Click Next. The Relationships dialog box appears.
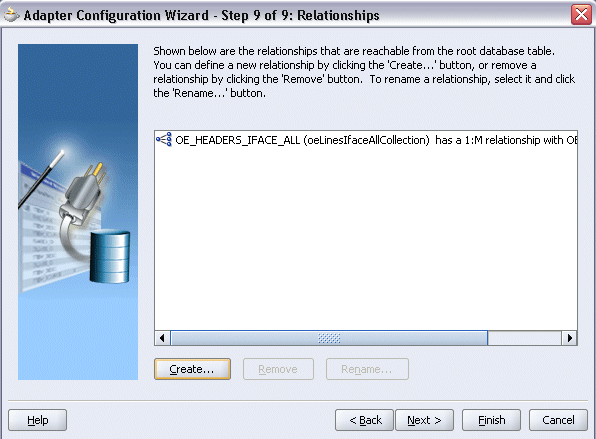
Click Create to define a new relationship. The Create Relationship dialog box appears.
Defining Relationships

Enter the following information to define the relationship between the header and the detail table:
Select the OE_HEADERS_IFACE_ALL as the parent table and OE_LINES_IFACE_ALL as the child table.
Select the mapping type: OE_HEADERS_IFACE_ALL has a 1:M Relationship with OE_LINES_IFACE_ALL
Note: If foreign key constraints between tables already exist in the database, then two relationships are created automatically while importing tables. One of the relationships is 1:M relationship from the source table, which is the table containing the foreign key constraints, to the target table. The other relationship is a 1:1 back pointer from the target table to the source table.
Select the Private Owned check box.
Associate the foreign key fields with the primary key fields:
OE_HEADERS_IFACE_ALL.ORDER_SOURCE_ID: ORDER_SOURCE_ID
OE_HEADERS_IFACE_ALL.ORIG_SYS_DOCUMENT_REF: ORIG_SYS_DOCUMENT_REF
The Relationship Name field is populated automatically by default. You can optionally specify a new name for the relationship you are creating.
Click OK. The newly created relationship information appears in the Relationships dialog.
Relationships Dialog
Click Next and then click Finish to complete the process.
The wizard generates the WSDL file corresponding to the selected interface. This WSDL file is now available for the partner link.
Click Apply and then OK. The partner link is created with the required WSDL settings.
To configure the Invoke activity
In JDeveloper BPEL Designer, drag and drop the Invoke activity from the Component palette into the process diagram between the Receive and Callback activities.
Adding an Invoke Activity
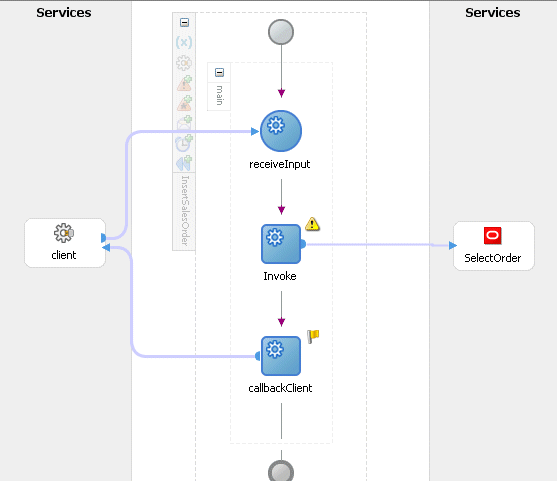
Link the Invoke activity to the SelectOrder service. The Edit Invoke dialog appears.
Configuring the Invoke Activity
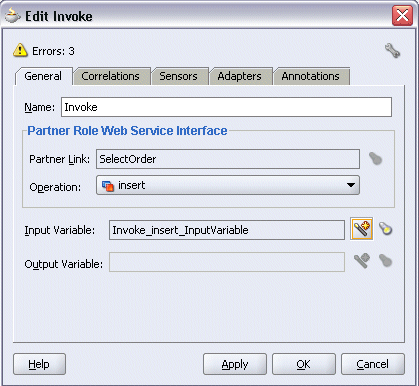
Click the Create icon next to the Input Variable field. Enter a descriptive name for the variable. You can also accept the default name. Select Global Variable and click OK.
In the Invoke dialog box, click Apply and then OK to complete the configuration of the Invoke activity.
The next task is to add an Assign activity to provide values to the input variables.
To configure the Assign activity
Drag and drop the Assign activity to the process map. The Assign activity must be dropped between the Receive and Invoke activities.
Adding an Assign Activity

Double-click the Assign activity in the process map. The Assign dialog box appears.
Click Create and select Copy Operation... to open the Create Copy Operation dialog box.
In the From navigation tree, select type Variable. Navigate to Variable > Process > Variables > inputVariable and select Payload.
In the To navigation tree, select type Variable. Navigate to Variable > Process > Variables > Invoke_insert_InputVariable and select OeHeadersIfaceAllCollection.
Assigning Values to Input Variables

After assigning values to the input variables, click OK.
Click Apply and OK to complete the Assign activity.
After designing the BPEL process, the next step is to deploy, run, and monitor it.
You need to deploy the BPEL process to a BPEL server before you can run it. The BPEL process is first compiled, and then deployed to the BPEL server.
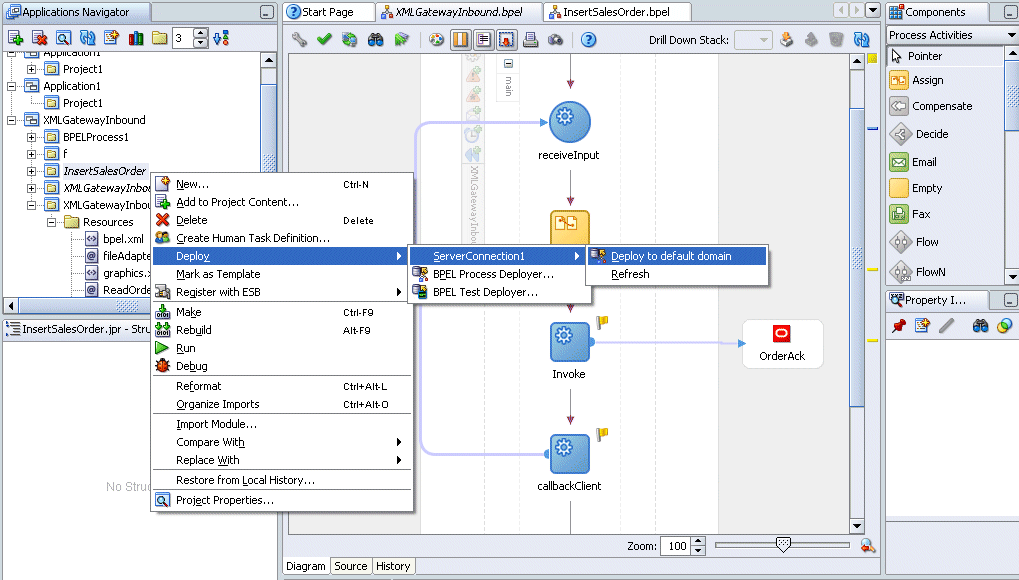
To deploy the BPEL process
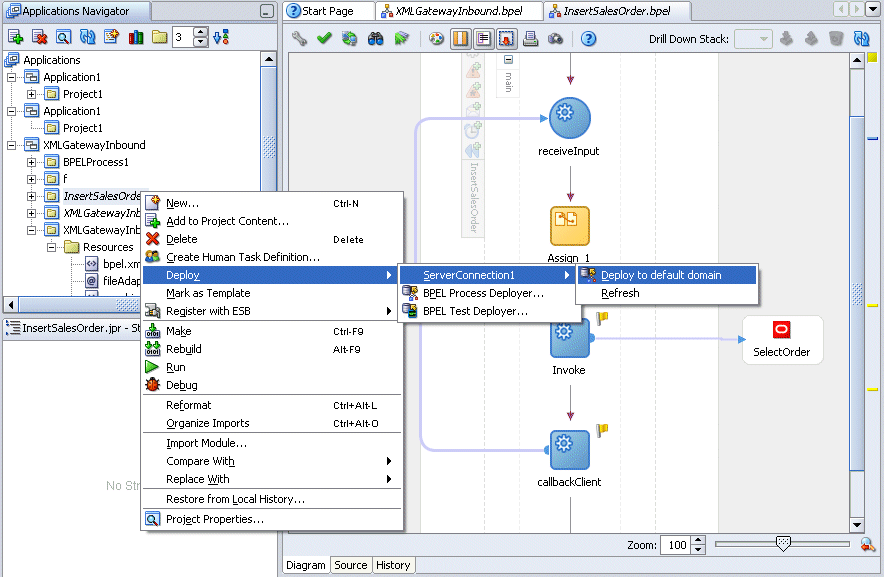
Select the BPEL project in the Applications window.
Right-click the project name. Select Deploy > [Server Connection] > Deploy to Default Domain from the menu that appears.
Deploying the BPEL Process
The BPEL process is compiled and deployed. You can check the progress in the Messages window.
Once the BPEL process is deployed, it can be seen in the BPEL console. You can manage and monitor the process from the BPEL console. You can also test the process and the integration interface by manually initiating the process.
To manually initiate and monitor the BPEL process
Navigate to Oracle Application Server 10g BPEL Console (http://<soaSuiteServerHostName>:<port>/BPELConsole).
The BPEL Console login page appears.
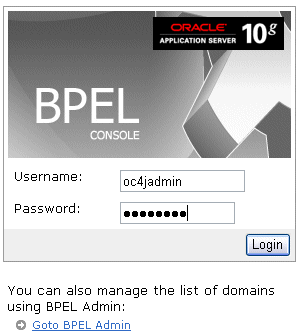
Enter the username and password and click Login.
The Oracle Enterprise Manager 10g BPEL Control appears. The list of deployed processes is shown under Deployed BPEL Processes.
Click the BPEL process that you want to initiate. The Initiate page appears. Enter the input values required by the process.
Click Post XML Message to initiate the process.
The BPEL process is now initiated. You can check the process flow by clicking the Visual Flow icon.
BPEL Console Initiate Page

The audit trail provides information about the steps that have been executed. You can check the audit trail by clicking the Audit Instance icon.
Note: To confirm that the records have been written into the open interface tables, you can write the SQL SELECT statements and fetch the results showing the latest records inserted into the open interface tables. Alternatively, open the forms of the module for which the record has been inserted and then check for changes in the form.
This section describes the steps to configure OracleAS Adapter for Oracle Applications using the Adapter Configuration Wizard in Oracle JDeveloper.
Prerequisites to Configure Interface Views
You need to define a uniqueness criteria, which could be a single key or composite keys.
Following is a list of the procedures required to accomplish the design-time tasks.
To create a new BPEL project
Open JDeveloper BPEL Designer.
From the File menu, select New. The New Gallery dialog box appears.
Select All Items from the Filter By list. This displays a list of available categories.
Expand the General node, and then select Projects.
Select BPEL Process Project from the Items list.
Creating a New BPEL Process Project
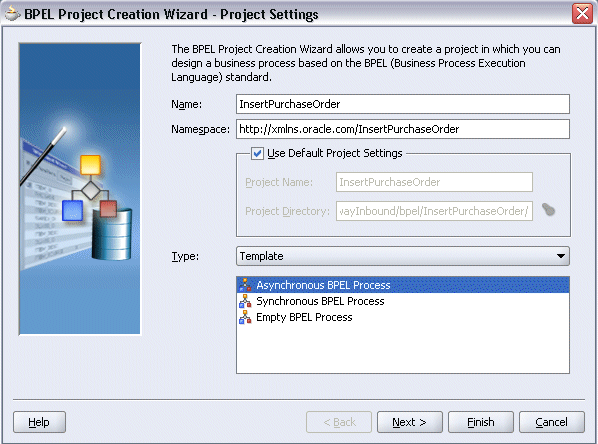
Click OK. The BPEL Project Creation Wizard - Project Settings dialog box appears.
In the Name field, enter a descriptive name. For example, enter SelectCustomer.
Keep the default selection Use Default Project Settings unchanged.
Keep the default selection Template as the Type field. Select Asynchronous BPEL Process as the BPEL process type.
Specifying a Name for the New BPEL Process Project
Click OK.
A new asynchronous BPEL process is created with the receiveInput and callbackClient activities.
The required source files including bpel.xml, InsertPurchaseOrder.xml, and InsertPurchaseOrder.wsdl are created.
New BPEL Process
This section describes how to add a partner link to the BPEL process. A BPEL partner link defines the link name, type, and the role of the BPEL process that interacts with the partner service.
To add a partner link
In JDeveloper BPEL Designer, click Services in the Component palette.
Drag and drop Oracle Applications icon into the border area of the process diagram.
The Adapter Configuration Wizard appears.
Click Next. The Service Name dialog box appears.
Enter the following information:
In the Service Name field, enter a service name, such as OrderAck.
In the Description field, enter a description for the service. This is an optional field.
Click Next. The Service Connection dialog box appears.
You can perform either one of the following options for your database connection:
Note: You need to connect to the database where Oracle E-Business Suite is running.
You can create a new database connection by clicking the New icon.
Detailed instructions on how to create a new database connection, see Creating a New Database Connection.
You can select an existing database connection that you have configured earlier from the Connection drop-down list.
The selected database connection information appears in the Service Connection dialog box. The JNDI (Java Naming and Directory Interface) name corresponding to the selected database connection also appears automatically in the Database Server JNDI Name field. Alternatively, you can specify a JNDI name.
Note: When you specify a JNDI name, the deployment descriptor of the Adapter for Oracle Applications must associate this JNDI name with configuration properties required by the adapter to access the database.
The JNDI name acts as a placeholder for the connection used when your service is deployed to the BPEL server. This enables you to use different databases for development and later for production.
Note: Oracle Application Server Adapter Concepts for understanding JNDI concepts.
Once you have created a new connection or selected an existing connection, you can add an interface view available in Oracle E-Business Suite.
Click Next in the Service Connection dialog box.
For Oracle E-Business Suite Release 12:
If you are connecting to Oracle E-Business Suite Release 12, then the IREP File not present dialog box appears indicating that OracleAS Adapter for Oracle Applications could not find Oracle the Integration Repository data file corresponding to the database you are connecting in your workspace. Absence of the data file would make browsing or searching of Integration Repository tree considerably slow. You can choose to extract the data file and create a local copy of the Integration Repository data file. Once it is created successfully, OracleAS Adapter for Oracle Applications will pick it up automatically next time and retrieve data from your local Integration Repository.
You can select one of the following options:
Click Yes to extract the Integration Repository data file.
Extracting Integration Repository Data File
After the system successfully creates a local copy of the Integration Repository data file, next time when you connect to the database, you will find the IRep Data File field appears in the Operation dialog box indicating where your local copy exists with the creation date and time as part of the file name.
Using the Local Integration Repository Data File
Click No to query the Integration Repository data file from the live database you are connecting to display the Integration Repository tree.
Note: It is highly recommended that you create a local copy of the Integration Repository data file so that OracleAS Adapter for Oracle Applications will query the data next time from the local copy in your workspace to enhance the performance.
For Oracle E-Business Suite pre-Release 11.5.10:
If you are connecting to a pre-11.5.10 Oracle E-Business Suite instance, you must select the interface type in the Adapter Configuration Wizard. Select Tables/Views/APIs/Concurrent Programs to proceed.
Click Add to open the Oracle Applications Module Browser.
The Oracle Applications Module Browser combines interface data from Integration Repository with information about the additional interfaces supported by Adapter for Oracle Applications, organized in a tree hierarchy.
Selecting a View from the Oracle Applications Module Browser
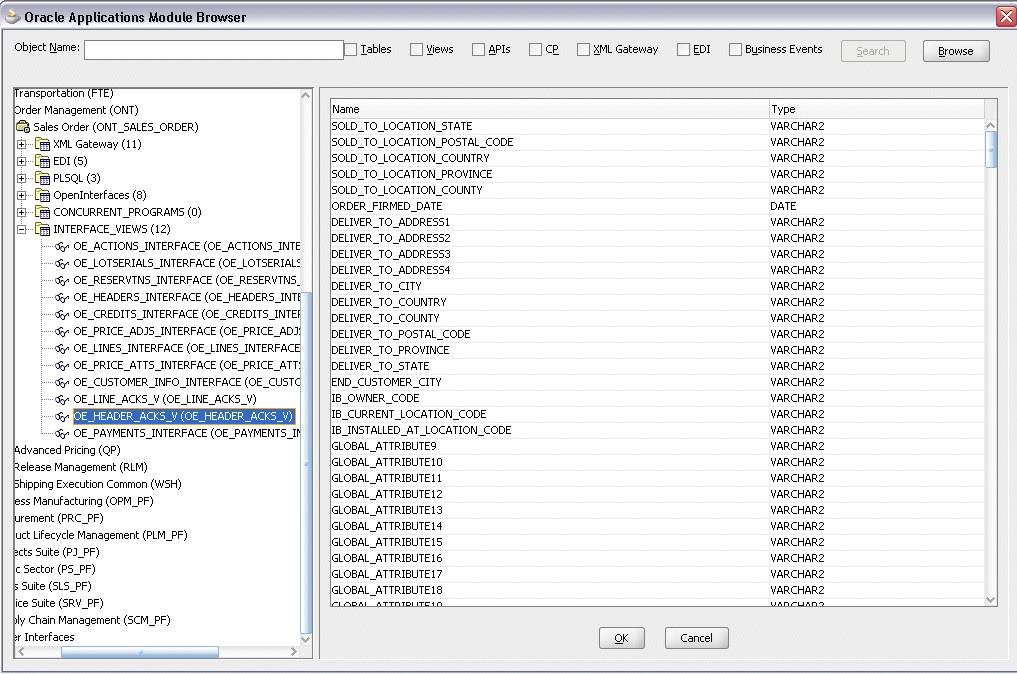
Navigate to Order Management Suite (OM_PF) > Order Management (ONT) > Sales Order (ONT_SALES_ORDER) > Interface_Views to select OE_HEADER_ACKS_V.
Click OK.
Note: You can also search for a view by entering the name of the program in the Object Name field. Select the Views check box, and then click Search.
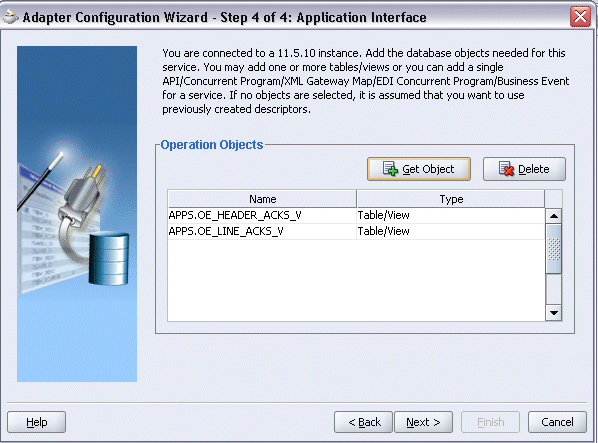
The Application Interface dialog appears with the selected interface view.
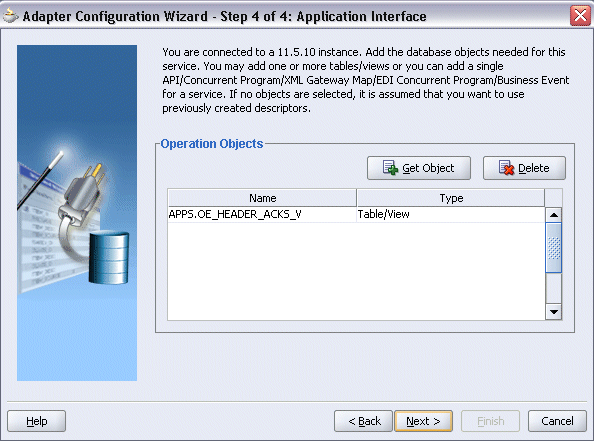
Click Get Object to open the Oracle Applications Module Browser again to select another open interface table OE_LINES_ACKS_V using the same navigation path.
Click OK. The Application Interface dialog appears with the two selected views.
Application Interface Dialog
Click Next in the Operation dialog box. The Operation Type dialog box appears.
Select Perform an Operation on a Table, then select Select.
Selecting the Type of Operation
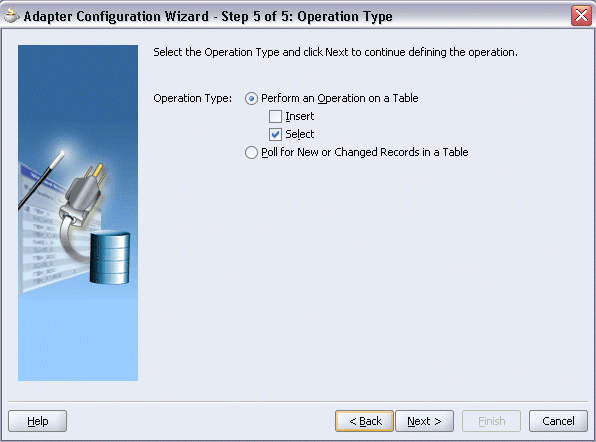
Note: You can perform only the Select operation on views.
Click Next. The Select Table dialog box appears.
Select APPS.OE_HEADERS_ACKS_V as the root database table in the Select Table dialog box, which displays the tables that have been previously imported in this JDeveloper project (including tables that were imported for other partner links). This enables you to reuse configured table definitions in multiple partner links.
Selecting a Root Table
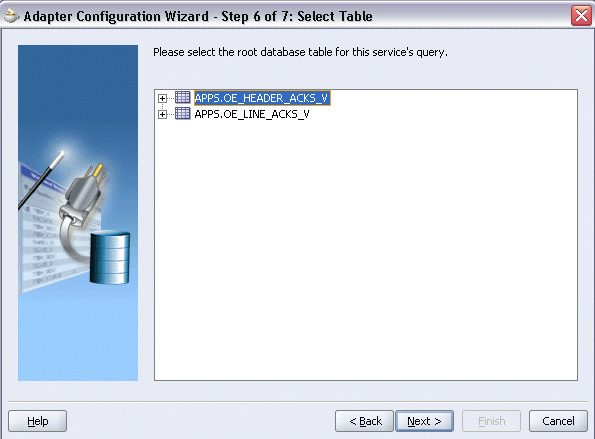
Select the required database table, and then click Next. The Define Primary Keys dialog box appears.
Select the following primary keys for the APPS.OE_HEADERS_ACKS_V view:
ORDER_SOURCE_ID
ORIG_SYS_DOCUMENT_REF
Defining Primary Keys Page for APPS.OE_HEADERS_ACKS_V
Click Next.
Select the same primary keys for the APPS.OE_LINES_ACKS_V view.
Click Next. The Relationships dialog box appears.
Click Create to define a new relationship. The Create Relationship dialog box appears.
Defining Relationships

Enter the following information to define the relationship between the header and the detail table:
Select the APPS.OE_HEADERS_ACKS_V as the parent table and APPS.OE_LINES_ACKS_V as the child table.
Select the mapping type: APPS.OE_HEADERS_ACKS_V has a 1:M Relationship with APPS.OE_LINES_ACKS_V
Note: If foreign key constraints between tables already exist in the database, then two relationships are created automatically while importing tables. One of the relationships is 1:M relationship from the source table, which is the table containing the foreign key constraints, to the target table. The other relationship is a 1:1 back pointer from the target table to the source table.
Select the Private Owned check box.
Associate the foreign key fields with the primary key fields:
OE_HEADERS_ACKS_V.ORDER_SOURCE_ID: OE_LINES_ACKS_V.ORDER_SOURCE_ID
OE_HEADERS_ACKS_V.ORIG_SYS_DOCUMENT_REF: OE_LINES_ACKS_V.ORIG_SYS_DOCUMENT_REF
The Relationship Name field is populated automatically by default. You can optionally specify a new name for the relationship you are creating.
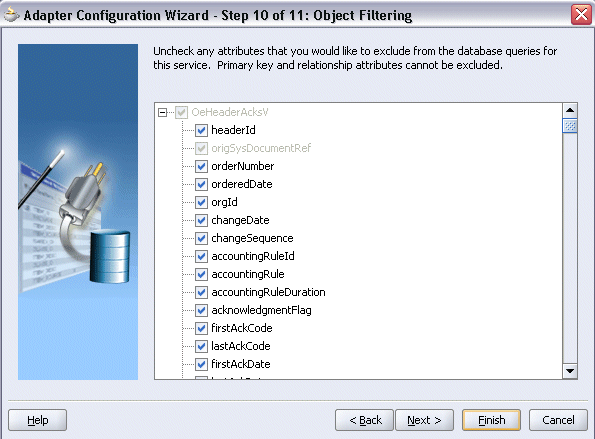
Click Next. The Object Filtering dialog box appears.
Object Filtering
Click Next to open the Define Selection Criteria dialog box.
Define Selection Criteria Dialog
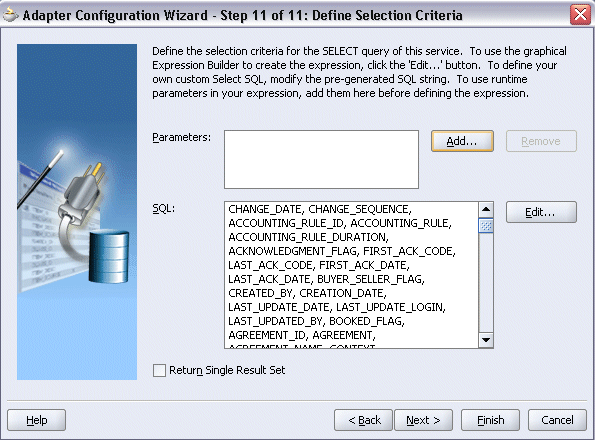
The Define WHERE Clause dialog box appears. If your service contains a SELECT query, then you can customize the WHERE clause of the SELECT statement.
You can click Add to add a new parameter.
Click Next. The Finish dialog box appears.
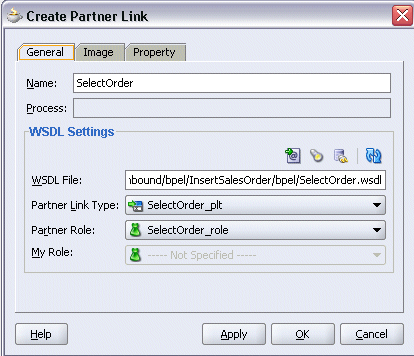
Click Finish. The Create Partner Link dialog box appears.
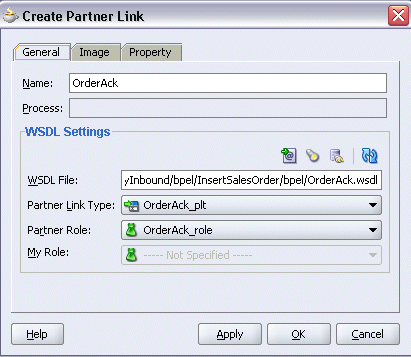
Click Apply and OK. The partner link is created with the required WSDL settings.
To configure the Invoke activity
In JDeveloper BPEL Designer, drag and drop the Invoke activity from the Component Palette into the process diagram between the receiveInput and callbackClient activities.
Link the Invoke activity to the OrderAck service. The Edit Invoke dialog box appears.
Click the Create icon next to the Input Variable field. The Create Variable dialog box appears.
Select Global Variable and enter a name for the variable. You can also accept the default name. Click OK.
Click the Create icon next to the Output Variable field. The Create Variable dialog box appears.
Select Global Variable and enter a name for the variable. You can also accept the default name. Click OK.
Creating a Variable
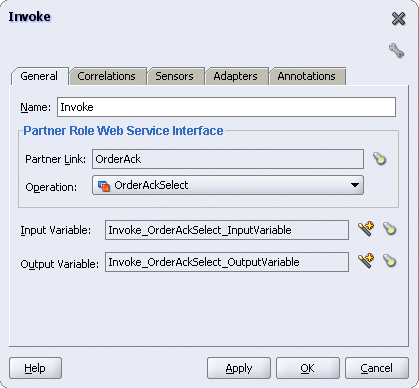
In the Invoke dialog box, click Apply and then OK. The BPEL process is configured with the Invoke activity.
The next task is to add an Assign activity to the process map. This is used to provide values to the input variables.
To configure the Assign activity
Drag and drop the Assign activity to the process map. The Assign activity must be added between the Receive and Invoke activities.
Double-click the Assign activity in the process map. The Assign dialog box appears.
Click Create and select Copy Operation... to open the Create Copy Operation dialog box.
In the From navigation tree, select type Variable. Navigate to Variable > Process > Variables > inputVariable and select Payload.
In the To navigation tree, select type Variable. Navigate to Variable > Process > Variables > Invoke_OrderAckSelect_InputVariable and select OrderAckSelect_inputparameters.
Assigning Values to the Input Variables
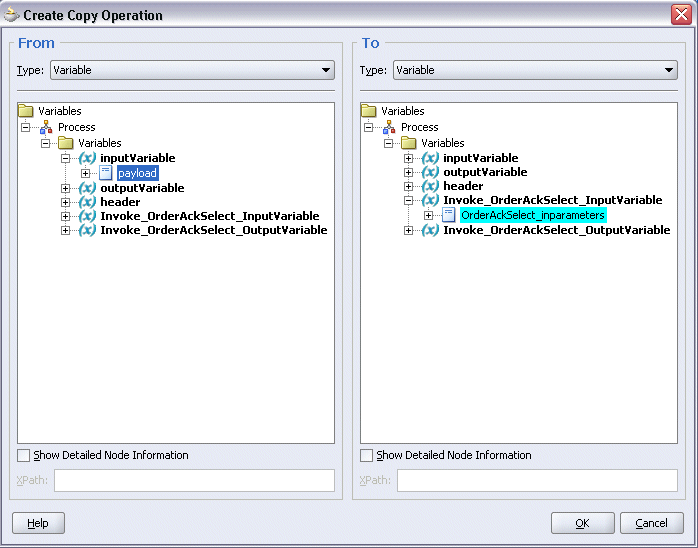
Click OK.
After assigning values to the input variables, click Apply and OK to complete the Assign activity.
After designing the BPEL process, the next steps are to deploy, run and monitor it.
You need to deploy the BPEL process before you can run it. The BPEL process is first compiled, and then deployed to the BPEL server. The following steps discuss deploying the BPEL process to a BPEL server:
To deploy the BPEL process
Select the BPEL project in the Applications window.
Right-click the project name. Select Deploy > [Server Connection] > Deploy to Default Domain from the menu that appears.
Deploying the BPEL Process
The BPEL process is compiled and deployed. You can check the progress of the compilation in the Messages window.
Once the BPEL process is deployed, you can manage and monitor the process from the BPEL Console. You can also test the process and the integration interface by manually initiating the process. The following steps discuss manually initiating and monitoring the BPEL process:
To manually initiate and monitor the BPEL process
Navigate to Oracle Application Server 10g BPEL Console (http://<soaSuiteServerHostName>:<port>/BPELConsole).
The BPEL Console login page appears.
Enter the username and password and click Login.
The Oracle Enterprise Manager 10g BPEL Control appears. The list of deployed processes is shown under Deployed BPEL Processes.
Deployed BPEL Processes
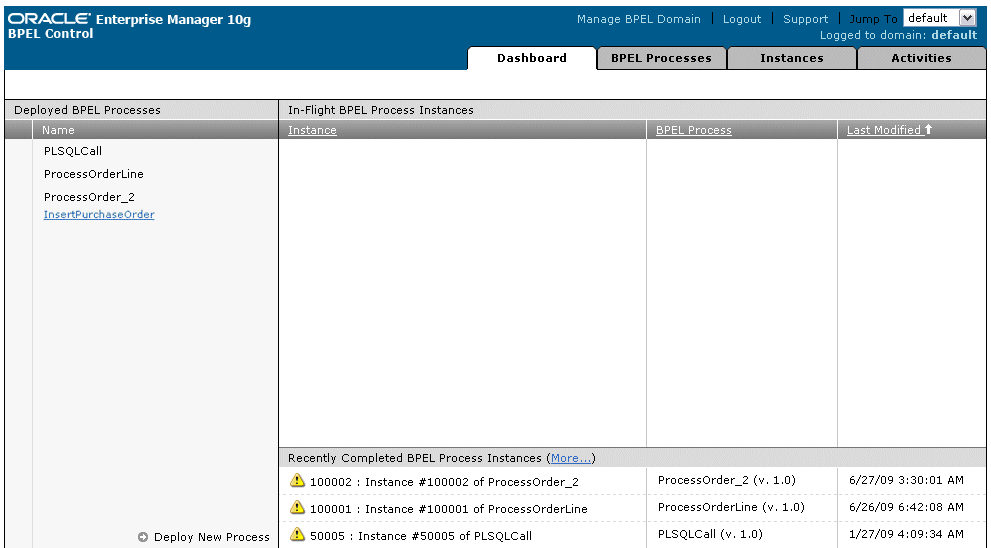
Click the BPEL process that you want to initiate. The Initiate page appears. Enter the input values required by the process.
Click Post XML Message to initiate the process.
The BPEL process is now initiated. You can check the process flow by clicking the Visual Flow icon on the BPEL Console Initiate page.
BPEL Console Initiate Page

The audit trail provides information about the steps that have been executed. You can check the audit trail by clicking the Audit Instance icon.
![]()
Copyright © 2005, 2009, Oracle and/or its affiliates. All rights reserved.