| Oracle® WebCenter Wiki and Blog Server Installation, Configuration, and User's Guide 10g Release 3 (10.1.3.4.0) E14106-01 |
|
 Previous |
 Next |
| Oracle® WebCenter Wiki and Blog Server Installation, Configuration, and User's Guide 10g Release 3 (10.1.3.4.0) E14106-01 |
|
 Previous |
 Next |
This chapter explains how to configure database connectivity and deploy Oracle WebCenter Wiki and Blog Server on Oracle WebLogic Server.
The chapter includes the following sections:
Section 3.1, "About Deploying Oracle WebCenter Wiki and Blog Server"
Section 3.6, "Deploying Oracle WebCenter Wiki and Blog Server"
Section 3.8, "Upgrading from an Existing 10.1.3.2 Deployment"
Before you deploy Oracle WebCenter Wiki and Blog Server on Oracle WebLogic Server, you must perform certain tasks. These tasks include:
Getting the owc_wiki.war file
Setting up your database by creating a schema and required tables for the wiki and blog server
Creating a JDBC data source to configure database connectivity
Updating the Admin server to use the TopLink patch
After completing these tasks, you can deploy your wiki and blog server. If you plan to use Web Services, then after deploying your server you must generate the passphrase that will be used for calling Web Services methods.
To deploy Oracle WebCenter Wiki and Blog Server, you require its WAR file, owc_wiki.war.
To obtain the owc_wiki.war file:
Create a wiki and blog server deployment directory named owc_wiki.
|
Note: The wiki and blog server deployment directory must be namedowc_wiki. |
Download owc_wiki.zip from the Oracle WebCenter Additional Services 10g Release 3 (10.1.3.4.0) page on the Oracle Technology Network (http://webcenter.oracle.com).
Unzip owc_wiki.zip, and copy owc_wiki.war to the owc_wiki deployment directory.
Extract owc_wiki.war in the owc_wiki deployment directory.
You must set up a database for your Oracle WebCenter Wiki and Blog Server. This involves creating the wiki schema and then running the oracle.sql script to create the tables required for Oracle WebCenter Wiki and Blog Server.
To set up the database:
Connect to the database you wish to use for your wiki and blog server.
Create a schema, for example owc_wiki, for your wiki and blog server.
Navigate to the owc_wiki directory where you extracted the owc_wiki.war file. Then from the owc_wiki/WEB-INF/classes directory, run the oracle.sql script.
The oracle.sql script creates the tables required for Oracle WebCenter Wiki and Blog Server.
After you have set up the database for Oracle WebCenter Wiki and Blog Server, you must create a JDBC data source to configure database connectivity.
To create a JDBC data source:
Start the Admin server for the Oracle WebLogic Server domain in which you want to deploy Oracle WebCenter Wiki and Blog Server.
On Windows:
From Start, select All Programs. Navigate to your Oracle WebLogic home where you installed Oracle WebLogic Server and then select User Projects. Next, select your domain and then select Start Admin Server for WebLogic Server Domain. (Figure 3-1)
|
Tip: On Windows, you can also start the Admin server by navigating to$ORACLE_HOME/user_projects/domains/owc_wiki/bin on the file system and double-clicking startWebLogic.cmd. Here, $ORACLE_HOME refers to the directory where Oracle WebLogic Server is installed and owc_wiki refers to the domain where you wish to deploy Oracle WebCenter Wiki and Blog Server. |
On Linux:
Navigate to $ORACLE_HOME/user_projects/domains/owc_wiki/bin. Here, $ORACLE_HOME refers to the directory where Oracle WebLogic Server is installed and owc_wiki refers to your wiki domain.
Run ./startWebLogic.sh.
Start the Oracle WebLogic Server Administration Console by using the following URL format in your browser:
http://host:port/console
Where host:port refer to the host name and port on which Oracle WebLogic Server is installed. For example, the URL may be http://localhost:7001/console.
|
Tip: On Windows, you can start the Oracle WebLogic Administration Server Console by using the Start menu. From Start, select All Programs. Then, navigate to your Oracle WebLogic home and select User Projects. Next, select your domain and then click Admin Server Console. |
Specify the user name and password to log on as the domain administrator. The WebLogic Server Administration Console displays.
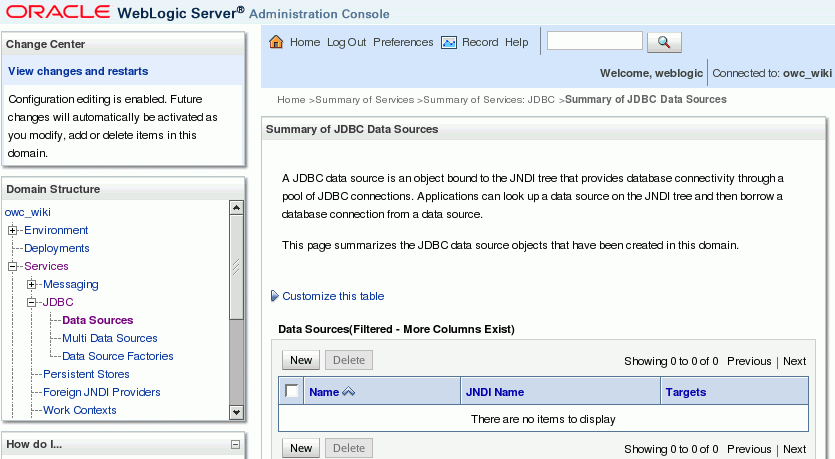
Under Domain Structure, expand Services, JDBC, and then select Data Sources, as shown in Figure 3-2.
Figure 3-2 Accessing the Data Source Settings
Click New.
|
Note: If you are using Production Mode, then click the Lock and Edit button on the left side to activate the New button. |
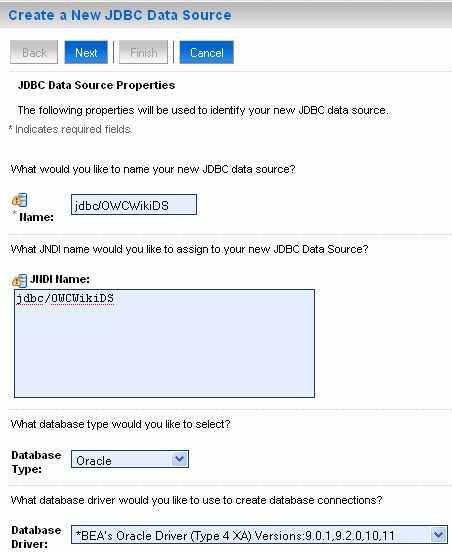
On the JDBC Data Source Properties page, in the Name field, enter a name for the JDBC data source, as shown in Figure 3-3.
In the JNDI Name field, enter the JNDI name for your new JDBC data source.
|
Note: The value that you enter in the Name and JNDI Name fields must be the same. |
From the Database Type dropdown list, select the database type.
From the Database Driver dropdown list, select the database driver that you wish to use for database connections.
Click Next.
Figure 3-3 Specifying JDBC Data Source Details
On the Transaction Options page, click Next.
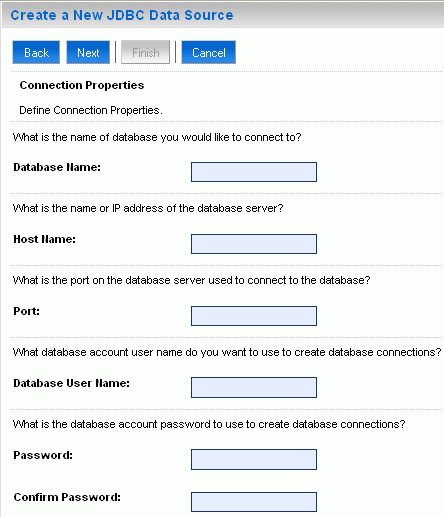
On the Connection Properties page, specify the properties for connecting to the database in which you created the wiki schema by running the oracle.sql script. The properties include the database name, host name, port number, database user name, and password. (Figure 3-4)
Figure 3-4 Specifying Connection Properties
Click Next.
On the Test Database Connection page, click Test Configuration. If the connection is successful, a success message displays.
Click Next.
On the Select Targets page, select the server on which you wish to deploy your JDBC data source, as shown in Figure 3-5. This should be the same server on which you plan to deploy your wiki and blog server.
Click Finish.
A summary of the newly created JDBC data source displays, as shown in Figure 3-6.
|
Note: If you are using Production Mode, then you must select the newly created data source and click Activate changes. |
You must update the Admin Server to use the correct TopLink jars.
To update the Admin Server:
Navigate to the $ORACLE_HOME/user_projects/domains/owc_wiki/bin folder.
Open the startWebLogic file in a text editor.
On Linux, open startWebLogic.sh.
On Windows, open startWeblogic.cmd.
Add the following string in the file:
Dtoplink.xml.platform=oracle.toplink.platform.xml.jaxp.JAXPPlatform
Example 3-1 shows the sample code.
Example 3-1 Updating startWebLogic
if "%WLS_REDIRECT_LOG%"=="" (
  echo Starting WLS with line:
  echo %JAVA_HOME%\bin\java %JAVA_VM% %MEM_ARGS% %JAVA_OPTIONS%
     -Dweblogic.Name=%SERVER_NAME%
     -Djava.security.policy=%WL_HOME%\server\lib\weblogic.policy
     %PROXY_SETTINGS% %SERVER_CLASS% %JAVA_HOME%\bin\java %JAVA_VM%
     %MEM_ARGS% %JAVA_OPTIONS%
     -Dweblogic.Name=%SERVER_NAME%
     -Djava.security.policy=%WL_HOME%\server\lib\weblogic.policy
     -Dtoplink.xml.platform=oracle.toplink.platform.xml.jaxp.JAXPPlatform
     %PROXY_SETTINGS% %SERVER_CLASS%
) else (
  echo Redirecting output from WLS window to %WLS_REDIRECT_LOG%
    %JAVA_HOME%\bin\java %JAVA_VM% %MEM_ARGS% %JAVA_OPTIONS%
    -Dweblogic.Name=%SERVER_NAME%
    -Djava.security.policy=%WL_HOME%\server\lib\weblogic.policy
    %PROXY_SETTINGS% %SERVER_CLASS% >"%WLS_REDIRECT_LOG%" 2>&1
)
Save and close the startWebLogic file.
Restart the Admin Server.
Stop the Admin Server:
On Linux, navigate to $ORACLE_HOME/user_projects/domains/owc_wiki/bin and then run ./stopWebLogic.sh.
On Windows, from Start, select All Programs. Then navigate to the Oracle WebLogic home and then select User Projects. Next, select your domain and then select Stop Admin Server.
Start the Admin Server:
On Linux, navigate to $ORACLE_HOME/user_projects/domains/owc_wiki/bin and run ./startWebLogic.sh.
On Windows, from Start, select All Programs. Select the Oracle WebLogic home directory and then select User Projects. Next, select your domain and then click Start Admin Server for WebLogic Server Domain.
To deploy Oracle WebCenter Wiki and Blog on Oracle WebLogic Server:
Ensure that the Admin server is running for the domain in which you wish to deploy Oracle WebCenter Wiki and Blog Server. (For information, see step 1 in Section 3.4, "Creating a JDBC Data Source")
Start the Oracle WebLogic Server Administration Console by using the following URL format and then log on as the domain administrator:
http://host:port/console
|
Tip: On Windows, from Start, you can also select All Programs, select the Oracle WebLogic home directory, and then User Projects. Next, select your domain and then click Admin Server Console. |
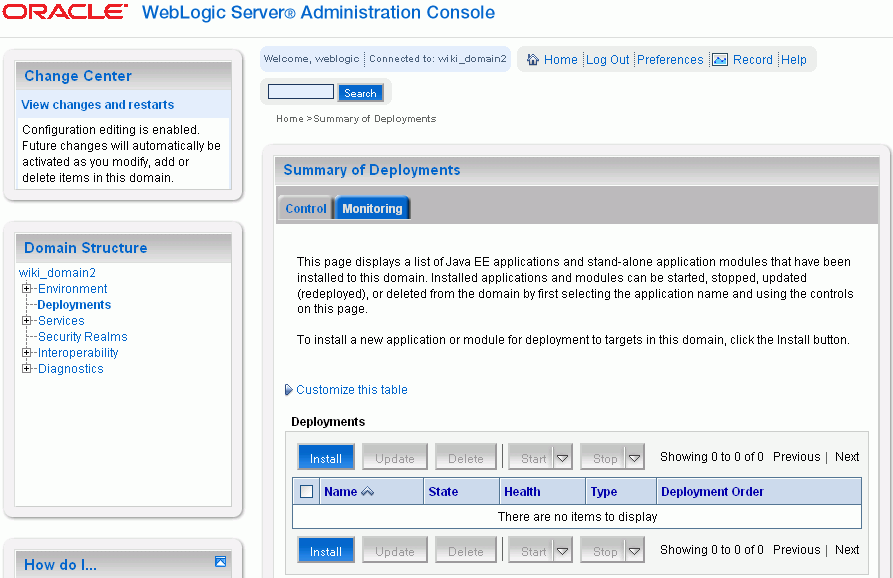
In the left navigation panel, under Domain Structure, click the Deployments link, as shown in Figure 3-7.
If there are any applications already deployed in the domain, a list of those applications displays on the right.
Figure 3-7 Oracle WebLogic Server Administration Console
Click Install.
|
Note: If you are using Production Mode, the Install button appears disabled. Click the Lock and Edit button on the left to enable it. |
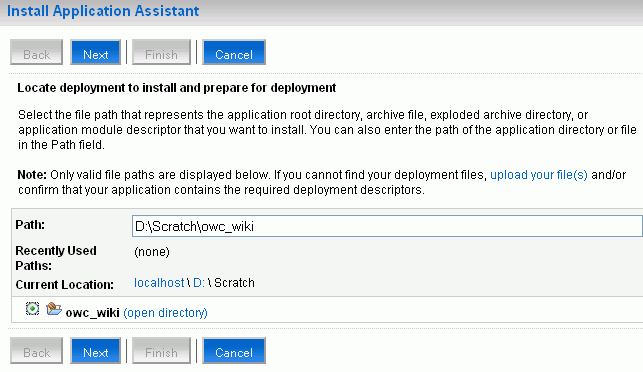
Navigate to the owc_wiki deployment directory where you extracted the owc_wiki.war file. Alternatively, you can specify the directory path in the Path field.
Figure 3-8 shows owc_wiki (open directory) as selected.
Figure 3-8 Specifying the Location of the WAR File
Click Next.
Note that if the WAR file is local, then it may take several minutes to upload it to the server.
Select the targeting style for deploying the wiki and blog server. You can deploy it either as an application or as a library. (Figure 3-9)
Click Next.
Select the server on which you wish to deploy the wiki and blog server. (Figure 3-10)
If you are not running a managed server as deployment target, then your wiki and blog server is deployed on the Admin server.
Figure 3-10 Deployment Target for the Wiki and Blog Server

Click Next.
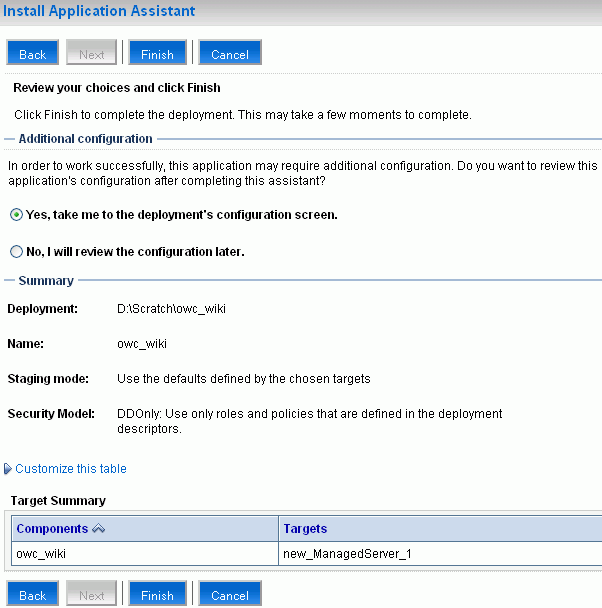
Specify the optional deployment settings. Enter the application name in the Name field. By default, the application name is same as the directory name where you extracted the owc_wiki.war.file, which is owc_wiki.
Select the security model for the application. The default is to use roles and policies defined in the deployment descriptor. (Figure 3-11)
Specify how you want the deployment source files to be accessible to the target server. The default setting is to use the defaults defined by deployment's targets. (Figure 3-11)
Click Next.
Verify the deployment settings and specify whether you plan to review the application configuration immediately after deployment. (Figure 3-12)
Figure 3-12 Reviewing Deployment Information
Click Finish.
Review the settings and click Save.
After Oracle WebCenter Wiki and Blog Server is deployed successfully, a confirmation message is displayed. If the deployment is not successful, review the log and ensure that the deployment settings are correct.
|
Note: Oracle WebCenter Wiki and Blog Server includes an HSQL database that runs on a specific default port (1475). If that port is not available, then after deployment you can modify the port in both thebeans.xml file and the application_config.script file. These files are located in owc_wiki/WEB-INF/classes, where owc_wiki is the directory where you extracted the owc_wiki.war file. |
Click Deployments.
For your newly deployed Oracle WebCenter Wiki and Blog Server, verify that the State is shown as Active and Health is shown as OK. (Figure 3-13)
Figure 3-13 Deployed Wiki and Blog Server

|
Note: If you are using Production Mode, then after deployment, you must select the deployed application and then click Activate changes. After changes are activated, start the server on which you deployed the wiki and blog server, select the deployed application, and then click Start - Servicing all request. |
Start the server on which you deployed the wiki and blog server.
If you deployed your wiki and blog server on the Admin server, see step 1 in Section 3.4, "Creating a JDBC Data Source".
If you deployed your wiki and blog server on a managed server:
To start the managed server on Linux:
Navigate to $ORACLE_HOME/user_projects/domains/owc_wiki/bin.
Run ./startManagedWeblogic.sh wiki_server http://host:port.
Where wiki_server refers to the managed server and host:port refers to the host name and port number of the Admin server.
For example, if your managed server named wikiserver is deployed on the default port on your local machine, then you can run the following command to start the managed server:
./startManagedWeblogic.sh wikiserver http://localhost:7001
Enter the user name and password of the domain administrator to start the managed server.
To start the managed server on Windows:
Navigate to $ORACLE_HOME/user_projects/domains/owc_wiki/bin.
Run startManagedWeblogic.cmd wiki_server http://host:port.
Enter the user name and password of the domain administrator to start the managed server.
To access the newly deployed wiki and blog server, use the following URL format:
http://host:port/owc_wiki
Where host and port are the host and the port number of the server where you deployed Oracle WebCenter Wiki and Blog Server, and owc_wiki refers to your deployed application. For example, if your managed server is running on port 8001, you may specify the path as http://localhost:8001/owc_wiki.
|
Note: The supported browsers for Oracle WebCenter Wiki and Blog Server are Internet Explorer 7.0 or later and Mozilla Firefox 2.0 or later. |
Enter the domain administrator user name and password to log on to Oracle WebCenter Wiki and Blog Server as an administrator.
After deploying the wiki and blog server, you must update the passphrase to be used when calling methods in the Oracle WebCenter Wiki Web Services, as described in Section 6.3, "Oracle Wiki Server Web Services Interface". This passphrase must be shared with trusted application developers wishing to use Oracle WebCenter Wiki Web Services.
|
Note: You may skip this section if you do not plan to use the Oracle WebCenter Wiki Web Services. |
To generate the passphrase or the parameter key:
Log in to Enterprise Manager.
Under the instance where you installed Oracle WebCenter Wiki and Blog Server, locate the deployed wiki application. The application root must be similar to owc_wiki.
Click the wiki application.
Click the owc_wiki module.
Click the Administration tab.
On the Administration page, click Environment Entry Mappings.
Locate the task named Environment Entry Mappings.
Update the value for /oracle/webCenter/owcWiki/webServiceSecurityPassphrase. Update this value with a new passphrase, which is an arbitrary value that you create.
Click OK.
When you update the deployed value, deploying the application again will not overwrite the value you have set.
Oracle WebCenter Wiki and Blog Server 10.1.3.4 enables you to use either a file system-based repository or a database repository. However, Oracle WebCenter Wiki 10.1.3.2 supports storage of data only in a file system-based repository. In a file system-based repository, a domain is represented by a directory and wiki pages within the domain are represented by files within that directory.
To upgrade a wiki and blog server 10.1.3.2 deployment to wiki and blog server 10.1.3.4:
On the wiki and blog server 10.1.3.2 navigate to the $SOURCE_WIKI_HOME/pages directory, where $SOURCE_WIKI_HOME refers to the directory where you deployed the wiki and blog server 10.1.3.2.
Copy these files to the $WIKI_HOME/pages directory on the wiki and blog server 10.1.3.4, where $WIKI_HOME refers to the directory where you deployed the wiki and blog server 10.1.3.4.
For example, the following is a sample path for copying domain files on the wiki and blog server 10.1.3.4:
D:/Oracle/Middleware/user_projects/domains/owc_wiki/servers/wikiserver/stage/owc_wiki/owc_wiki/pages
Where, owc_wiki is the wiki domain and wikiserver is the managed server on which the wiki and blog server is deployed.
If you are using the file system-based storage on the wiki and blog server 10.1.3.4, then it recognizes the newly copied directories and files within as new domains.
|
Note: Attachments associated with wiki pages are stored in a separate directory namedattachments. You can import attachments only when upgrading to a database-based repository. You must copy the source attachments directory to the $WIKI_HOME/attachments directory on your wiki and blog server 10.1.3.4. |
If you are using a database repository in wiki and blog server 10.1.3.4, then you must import the domains. Log on to the wiki and blog server 10.1.3.4 by using the administrator credentials you specified while installing Oracle WebLogic Server.
|
Note: To perform initial configuration of your wiki and blog server, you must log on using the default administrator credentials. |
Click the Administration link on the top-right corner to access the Administration mode. (Figure 3-14)
For information about the Administration mode, see Section 5.1.2, "About the Administration Mode".
Figure 3-14 Administration Link on Oracle WebCenter Wiki and Blog Server 10.1.3.4

Under Domain Related, click Import Domain to import the domain directory into the database.
|
Note: You can import only one domain at a time. |
On the Import Domain page, specify the following details: domain name, description, start page name, and the location where your domain files of the wiki and blog server 10.1.3.2 are stored. (Figure 3-15)
Click Import Domain.
Repeat step 5 and 6 to import other domains.
Restart the server on which you deployed your wiki and blog server 10.1.3.4.