| Oracle® WebCenter Wiki and Blog Server Installation, Configuration, and User's Guide 10g Release 3 (10.1.3.4.0) E14106-01 |
|
 Previous |
 Next |
| Oracle® WebCenter Wiki and Blog Server Installation, Configuration, and User's Guide 10g Release 3 (10.1.3.4.0) E14106-01 |
|
 Previous |
 Next |
You can configure Oracle Access Manager-based single sign-on security for Oracle WebCenter Wiki and Blog Server. This chapter explains how to configure Oracle Access Manager for single sign-on for Oracle WebCenter Wiki and Blog Server.
This chapter includes the following sections:
Section 4.1, "Overview of Oracle Access Manager Authentication"
Section 4.3, "Installing Oracle HTTP Server for Oracle WebCenter Wiki and Blog Server"
Section 4.8, "Configuring a Custom Login Page for Oracle Access Manager"
Section 4.9, "Installing the Security Provider for WebLogic SSPI"
Oracle Access Manager authentication for Oracle WebCenter Wiki and Blog Server requires following components:
Each Oracle HTTP Server configured for integration with Oracle Access Manager must have an Access Gate installed
Oracle Access Manager Identity Server 10.1.4.0.1
Oracle Access Manager WebPass 10.1.4.0.1
Oracle Access Manager 10.1.4.2.0
Oracle Internet Directory 10.1.4.0.1 (Oracle Virtual Internet Directory 10.1.4.0.1 is optional)
These components should be installed one time for the central server.
To configure Oracle Access Manager for single sign-on, you must perform the following steps:
Install Oracle Access Manager
Install Oracle HTTP Server
Install an Access Server
Install an Access Gate (WebGate)
Configure Oracle Access Manager
Configure authentication
Configure a custom login page for Oracle Access Manager
Install the security provider for WebLogic SSPI
Oracle Access Manager Release 10g (10.1.4.2.0) is a patch set. After installing 10g (10.1.4.0.1), you can apply Release 10.1.4 patch set 1 (10.1.4.2.0) to installed components. You cannot install 10g (10.1.4.2.0) directly.
This document explains how to also add base patch 5957301 and the latest bundle patch 7408035.
For detailed information about Oracle Access Manager, see the Oracle Access Manager documentation posted at:
Each Oracle HTTP Server configured for integration with Oracle Access Manager must have an Access Gate installed.
Install Oracle HTTP Server 10.1.3.3 for Apache 2.0. This can be downloaded from the Oracle10g Release 3 Companion CD (10.1.3.x) at:
http://www.oracle.com/technology/software/products/ias/htdocs/101310.html
After installing Oracle HTTP Server, install the Apache HTTP Server plug-in (mod_wl_20). This can be downloaded from:
http://download.oracle.com/otn/bea/weblogic/server103/WLSWebServerPlugins1.0.1150354-Apache.zip
Detailed installation instructions are posted at:
http://e-docs.bea.com/wls/docs103/plugins/apache.html#wp131399
Follow these steps to configure mod_weblogic (mod_wl.conf):
Install mod_wl into Oracle HTTP Server 10.1.3.3.
Without this step, you get the following error when you start Oracle HTTP Server:
--------
09/02/12 01:35:25 Start process
--------
/scratch/ohsoam/install/ohs/ohs/bin/apachectl startssl: execing httpd
Syntax error on line 247 of
/scratch/ohsoam/install/ohs/ohs/conf/httpd.conf:
Cannot load /scratch/ohsoam/install/ohs/ohs/modules/mod_wl_20.so into
server: /scratch/ohsoam/install/ohs/ohs/modules/mod_wl_20.so: cannot open
shared object file: No such file or directory
Confirm that you have the following entries at the end of httpd.conf (after the automatic updates to httpd.conf through Webgate Installer).
For Linux:
# Include the SSL definitions and Virtual Host container
include "/scratch/ohsoam/install/ohs/ohs/conf/ssl.conf"
LoadFile "/scratch/ohsoam/install/webgate/access/oblix/lib/libgcc_s.so.1"
LoadFile "/scratch/ohsoam/install/webgate/access/oblix/lib/libstdc++.so.5"

LoadModule obWebgateModule "/scratch/ohsoam/install/webgate/access/oblix/apps/webgate/bin/webgate.so"
WebGateInstalldir "/scratch/ohsoam/install/webgate/access"

LoadModule weblogic_module modules/mod_wl_20.so

<IfModule mod_weblogic.c>
MatchExpression /owc_wiki WebLogicHost=<host>|WebLogicPort=<port>

</IfModule>

WebGateMode PEER

<Location /access/oblix/apps/webgate/bin/webgate.cgi>
SetHandler obwebgateerr
</Location>

<Location "/oberr.cgi">
SetHandler obwebgateerr
</Location>

<LocationMatch "/*">
AuthType Oblix
require valid-user
</LocationMatch>
For Windows:
#*** BEGIN WebGate Specific ****

LoadModule obWebgateModule "C:\OHSOAM\webgate\access/oblix/apps/webgate/bin/webgate.dll"
WebGateInstalldir "C:\OHSOAM\webgate\access"

LoadModule weblogic_module modules/mod_wl_20.so

<IfModule mod_weblogic.c>
MatchExpression /owc_wiki WebLogicHost=<host>|WebLogicPort=<port>
</IfModule>
WebGateMode PEER

<Location /access/oblix/apps/webgate/bin/webgate.cgi>
SetHandler obwebgateerr
</Location>

<Location "/oberr.cgi">
SetHandler obwebgateerr
</Location>

<LocationMatch "/*">
AuthType Oblix
require valid-user
</LocationMatch>

#*** END WebGate Specific ****
Configure the module mod_wl in Oracle HTTP Server so that it forwards requests to Oracle HTTP Server. To configure Oracle HTTP Server to work with multiple non-clustered servers, use the following example in httpd.conf:
LoadModule weblogic_module modules/mod_wl_20.so

<IfModule mod_weblogic.c>
     MatchExpression /owc_wiki WebLogicHost=wiki.example.com|WebLogicPort=8888
</IfModule>
|
Note: The WebLogic port refers to the wiki server port where the Oracle WebCenter Wiki and Blog Server is deployed. |
An Access Server must be installed for Oracle WebCenter Wiki and Blog Server.
For detailed information about installing an Access Server, see the Oracle® Access Manager Installation Guide 10g (10.1.4.2.0) "Chapter 8, Installing the Access Server". This is posted at:
http://download.oracle.com/docs/cd/E10761_01/doc/oam.1014/b32412/toc.htm
You will be asked to create an Access Server instance in the Access System Console. Leave all defaults as they are, except the following specific entries:
Set Name to wls-wiki-access-server
Set Hostname to the host on which Oracle HTTP Server resides
Set Port to 6021 or to any other available port
Set Access Management Service to On
The saved values should look something like the following:
Name    wls-wiki-access-server
Hostname host.domain.com
Port      6021
Debug     Off
Debug File Name
Transport Security      Open
Maximum Client Session Time (hours)   24
Number of Threads      60
Access Management Service      On

Audit to Database (on/off)     Off

Audit to File (on/off)     Off
Audit File Name
Audit File Size (bytes)      0
Buffer Size (bytes)      512000
File Rotation Interval (seconds)      0
Engine Configuration Refresh Period   14400 (seconds)
URL Prefix Reload Period (seconds)    7200
Password Policy Reload Period (seconds)7200

Maximum Elements in User Cache      100000
User Cache Timeout (seconds)        1800

Maximum Elements in Policy Cache    10000
Policy Cache Timeout (seconds)      7200

SNMP State        Off
SNMP Agent Registration Port

Session Token Cache      Enabled
Maximum Elements in Session Token Cache     10000
After creating this instance in the Access System Console, install the actual Access Server, using the Oracle Access Manager command appropriate to your platform.
For more information, see the installation guide posted at:
http://download.oracle.com/docs/cd/E10761_01/doc/oam.1014/b32412/toc.htm
Again, you will be asked to create an Access Gate instance in the Access System Console. When creating the instance, provide the following properties:
Set Name to wls-wiki-access-gate or to any other name
Set Hostname to the host on which the Oracle HTTP Server is installed (This should be in the host:port format, with the port set to the Oracle HTTP Server port.)
Set Preferred HTTP Host to the Oracle HTTP Server host name.
Set ASDK Client, Access Management Service to On
Set Primary HTTP Cookie Domain to an appropriate value depending on your installation. Typically, this would be a domain-based cookie; for example, ".yourcompany.com".
Set Port to the Oracle HTTP Server port.
Click Save to retain this setup.
For Oracle WebCenter Wiki and Blog Server to be protected with Oracle Access Manager single sign-on, first install Oracle HTTP Server 10.1.3.3 for Apache 2.0. Next, install the Access Gate module on the same machine where Oracle HTTP Server is installed. This is the Oracle HTTP Server and Access Gate installation that will be used to protect the Oracle WebCenter Wiki and Blog Server URL.
Install WebGate 10.1.4.0.1 for OHS2 (Oracle_Access_Manager10_1_4_0_1_linux_OHS2_WebGate). This installer is included with the Oracle Access Manager CD. After successfully installing WebGate 10.1.4.0.1, you must apply the base patch 5957301 (Oracle_Access_Manager10_1_4_2_0_Patch_linux_OHS2_WebGate.zip), which can be downloaded from My Oracle Support (formerly MetaLink):
On Linux only: After applying base patch 5957301, you must apply bundle patch 7408035 (Oracle_Access_Manager10_1_4_2_0_BP06_Patch_linux_OHS2_WebGate.zip), which can downloaded from My Oracle Support (formerly MetaLink):
Make sure that you install the WebGate for your platform and that it is for Oracle HTTP Server with Apache 2.0.
For more information about installing an Access Gate for this Oracle HTTP Server instance, see Oracle Access Manager Installation Guide 10g (10.1.4.2.0) "Chapter 9, Installing the WebGate." This is posted at:
http://download.oracle.com/docs/cd/E10761_01/doc/oam.1014/b32412/webgate.htm#CHDBHAAG
|
Note: WebGate and Access Gate are synonymous. |
On Oracle HTTP Server, confirm that opmn.xml is configured for Oracle Access Manager. The opmn.xml entries should include the following:
<ias-component id="HTTP_Server">
        <process-type id="HTTP_Server" module-id="OHS2">
          <environment>
               <variable id="TMP" value="/tmp"/>
               <variable id="LD_ASSUME_KERNEL" value="2.4.19"/>
          </environment>
          <module-data>
            <category id="start-parameters">
              <data id="start-mode" value="ssl-enabled"/>
            </category>
          </module-data>
          <process-set id="HTTP_Server" numprocs="1"/>
        </process-type>
      </ias-component>
  </ias-instance>…
For detailed information about setting up Oracle Access Manager, see the 10.1.4.2.0 Oracle Access Manager documentation.
The remainder of the information in this section provides samples of the configuration specifically for wiki integration.
Ensure that the following configuration is done in Oracle Access Manager:
Configure the Access Gate
wls-wiki-access-gate (Figure 4-1)
Configure the Access Server (Figure 4-2)
For more information, see Oracle Access Manager Installation Guide 10g (10.1.4.2.0) "Chapter 9, Installing the WebGate." This is posted at:
http://download.oracle.com/docs/cd/E10761_01/doc/oam.1014/b32412/webgate.htm#CHDBHAAG
The Oracle Access Manager Access System Console lets you configure the authentication mechanism. To enable the authentication scheme, you must go through each tab in the form-based authentication scheme. Form-based authentication requires that you give the challenge redirect to the Oracle HTTP Server where Oracle WebCenter Wiki and Blog Server is deployed.
Form-based Authentication Scheme (Figure 4-3)
Figure 4-3 Form-Based Authentication Scheme
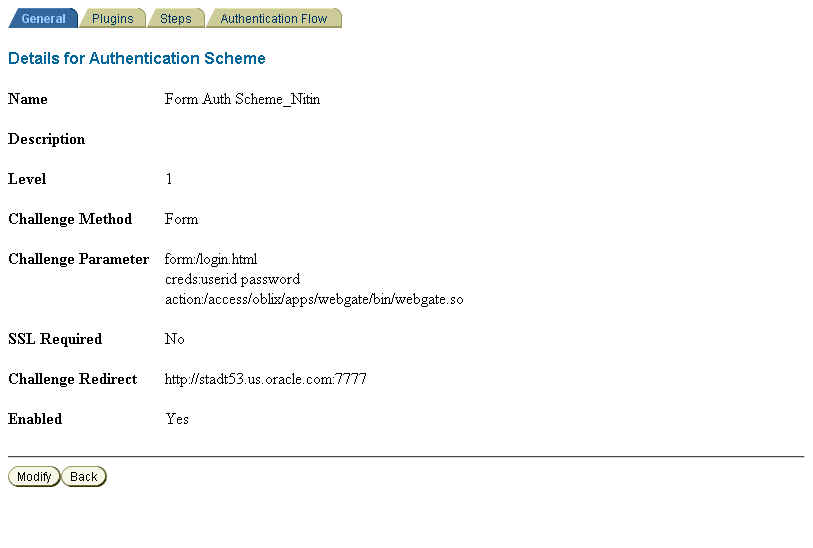
Table 4-1 Plugins
| Plugin Name | Plugin Parameter |
|---|---|
|
|
|
|
|
|
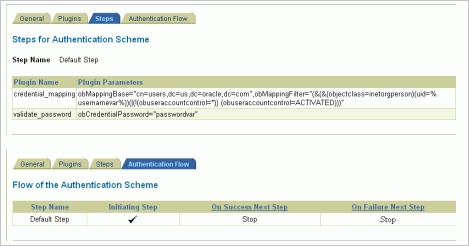
Make sure that the user name field in login.html (which is created in Section 4.8, "Configuring a Custom Login Page for Oracle Access Manager") matches what you enter for uid in the credential_mapping plugin. In this example, it is assumed that login.html would define the username field as userid and the password field as password.
Figure 4-4 Steps for Authentication Scheme
Policy Overview
For more information, see chapter 4 of Oracle Access Manager Access Administration Guide at
http://download.oracle.com/docs/cd/E10761_01/doc/oam.1014/b32420/v2policy.htm#CJAIGHAG
To enable single sign-on using Oracle Access Manager, create a new policy domain in Oracle Access Manager. An example domain is provided here.
To get to the Policy Manager go to http://host:port/access/oblix/apps, and click Policy Manager.
wiki-domain: This defines the policy for the wiki application resources. Most wiki pages are public. However, access to the /admin path is secured, and the /login!withRedirect.jspa is used to trigger authentication and is used by the login link in the application.
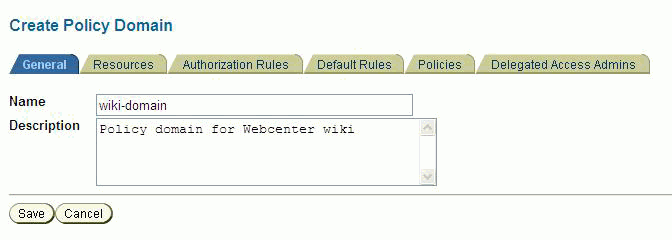
Create a new domain for wiki and blog server 10.1.3.4. Give a unique name for the domain. (Figure 4-6)
Figure 4-6 Create Policy Domain - General
Configure the host identifiers. The host identifier should be the one you registered for your Oracle HTTP Server.
Protect the wiki login and admin URLs. The following URLs need to be protected:
/owc_wiki/acl
/owc_wiki/admin
/owc_wiki/attachments
/owc_wiki/default
/owc_wiki/domain
/owc_wiki/export
/owc_wiki/index_dir
/owc_wiki/install
/owc_wiki/js
/owc_wiki/layouts
/owc_wiki/macro
/owc_wiki/page
/owc_wiki/pages
/owc_wiki/remote
/owc_wiki/tags
/owc_wiki/templates
/owc_wiki/user
/owc_wiki/vhost
/owc_wiki/wp
Define a new authorization rule and enable it. (Figure 4-7)
Figure 4-7 Create Policy Domain - Authorization Rules

On the Allow Access tab of Authorization Rules, specify the role Any one. (Figure 4-8)
Figure 4-8 Create Policy Domain - Authorization Rules - Allow Access

On the Authentication Rule tab of Default Rules, select the Form Authorization scheme defined earlier. (Figure 4-9)
Figure 4-9 Create Policy Domain - Default Rules - Authentication Rules

On the Authorization Expression tab of Default Rules, select the authorization rule defined earlier on the Authorization Rule tab. (Figure 4-10)
Figure 4-10 Create Policy Domain - Default Rules - Authorization Expression

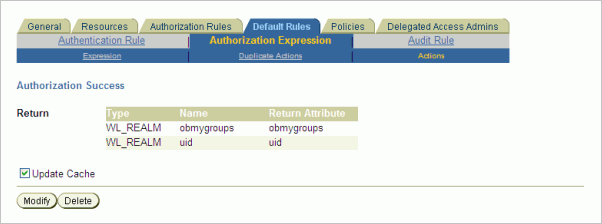
On the Actions tab of Default Rules, define return actions for authorization success for the uid and obmygroups attributes, as shown in Figure 4-11.
Figure 4-11 Create Policy Domain - Default Rules - Authorization Expression - Actions
After creating the policy domain, make sure to enable the policy domain by modifying the existing domain.
Form-based authentication requires a custom login page to be created on the Oracle HTTP Server. This custom login page will be displayed when the user has to be challenged for credentials. The name of the page should match the name specified in the authentication scheme on the Oracle Access Server authentication scheme configuration. In this example, it is specified as login.html. This file must be in the document root ($OHS_HOME/ohs/htdocs) on the Oracle HTTP Server.
Here is the sample login.html file:
<html>
<head>
<title>Test Login Form</title>
<script language="JavaScript">
function submitForm() {
document.forms[0].submit();
}
</script>
</head>
<body bgcolor="#ffffff" onLoad="self.focus();document.loginform.login.focus()">
<center>
<h2>Test Login Form</h2>
<form name="loginform" action="/access/oblix/apps/webgate/bin/webgate.so"method="post">
<table cellspacing="0" cellpadding="0" border="0">
<tr><td valign="center" align="left"><b>Username</b></td>
<td> </td><td valign="center" align="left">
<input type="username" name="userid" size="20" value=""></td>
</tr>
<tr>
<td valign="center" align="left"><b>Password</b></td>
<td> </td><td valign="center" align="left">
<input type="password" name="password" size="20" value=""></td>
</tr>
</table>
<input type=submit id=submit name=submit value=submit />
</form>
</body>
</html>
To assert the identity of logged in users, you must install the Security Provider for WebLogic SSPI (Security Service Provider Interface) on the WebLogic machine. The Security Provider ensures that only appropriate users and groups can access Oracle Access Manager-protected WebLogic resources to perform specific operations. The Security Provider also enables you to configure single sign-on between Oracle Access Manager and WebLogic resources.
The Security Provider for WebLogic SSPI is available at:
http://download.oracle.com/otn/linux/ias/101401/oam_int_linux_v7_cd3.zip
CD7 of the Oracle Access Manager 3rd party integration package contains WebLogic SSPI Provider installer, Oracle_Access_Manager10_1_4_2_2_linux_BEA_WL_SSPI.zip.
For detailed instructions, see Oracle Access Manager Integration Guide "Chapter 10, Integrating the Security Provider for WebLogic SSPI." This is posted at:
http://download.oracle.com/docs/cd/E10761_01/doc/oam.1014/e10356/weblogic.htm#WeblogicSSPI
In addition to following these instructions, you must remove xerces.jar from the CLASSPATH. Specifically, edit startWebLogic.sh on Linux or startWebLogic.cmd on Windows to change the following from:
CLASSPATH="${CLASSPATH}${CLASSPATHSEP}${MEDREC_WEBLOGIC
_CLASSPATH}:/scratch/ohsoam/install/SSPI
_wiki/NetPointSecuProvForWeblogic/oblix/lib/wlNetPoint.jar:/scratch/ohsoam/install
/SSPI_
wiki/NetPointSecuProvForWeblogic/oblix/lib/bcprov-jdk14-125.jar:/scratch/ohsoam/in
stall/SSPI
_wiki/NetPointSecuProvForWeblogic/oblix/lib/xerces.jar:/scratch/ohsoam/install/
SSPI_wiki/NetPointSecuProvForWeblogic/oblix/lib/jobaccess.jar"
to
CLASSPATH="${CLASSPATH}${CLASSPATHSEP}${MEDREC_WEBLOGIC
_CLASSPATH}:/scratch/ohsoam/install/SSPI
_wiki/NetPointSecuProvForWeblogic/oblix/lib/wlNetPoint.jar:/scratch/ohsoam/install
/SSPI_
wiki/NetPointSecuProvForWeblogic/oblix/lib/bcprov-jdk14-125.jar:/scratch/ohsoam/in
stall/SSPI_wiki/NetPointSecuProvForWeblogic/oblix/lib/jobaccess.jar"
Required Tasks
The following tasks need to be completed:
Install the Security Provider (typical installation)
Set up the WebLogic policy in Oracle Access Manager
Run the NetPoint Policy Deployer
Prepare the WebLogic environment
For more information, see http://download.oracle.com/docs/cd/E10761_01/doc/oam.1014/e10356/weblogic.htm.
After completing these tasks, configure the Oracle Access Manager Identity Asserter in the WebLogic console.
To begin, log in to WebLogic Server Administration Console.
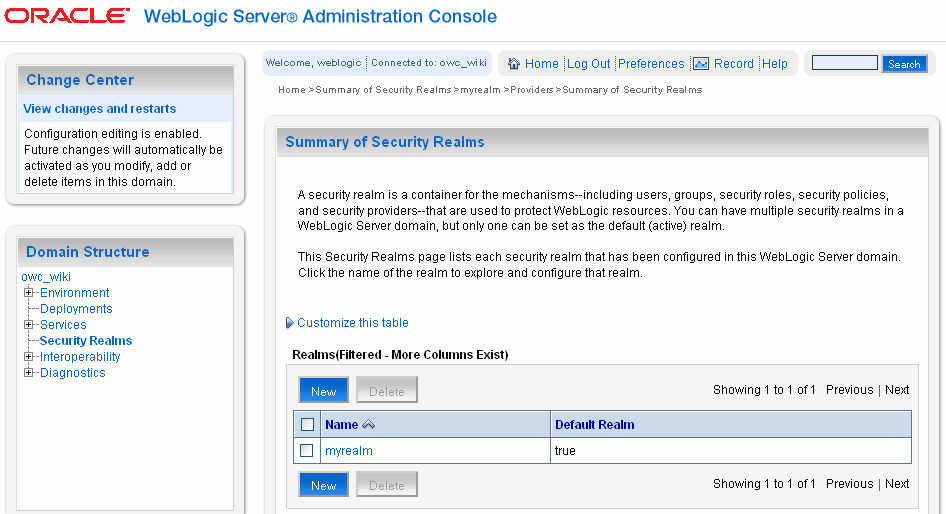
Click Security Realms in the Domain Structure panel. (Figure 4-12)
Click the myrealm link in the list of realms on the right panel.
Figure 4-12 WebLogic Console - Domain Structure - Security Realms
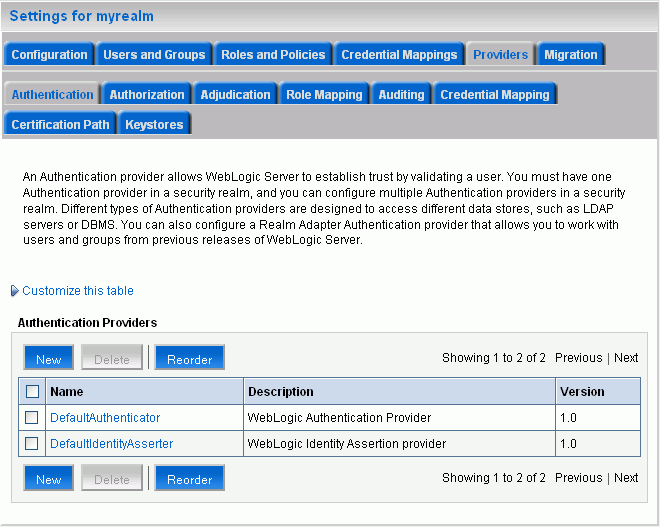
Under Settings for myrealm, click the Providers tab. (Figure 4-13)
Create a new Authentication Provider by clicking New.
Figure 4-13 Settings for myrealm - Providers
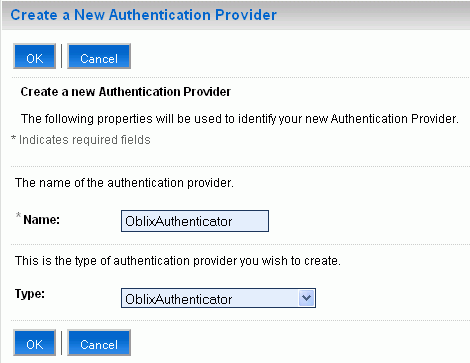
Enter a unique name for the authenticator, and select OblixAuthenticator as the Type. (Figure 4-14)
Click OK.
Figure 4-14 Create a New Authentication Provider
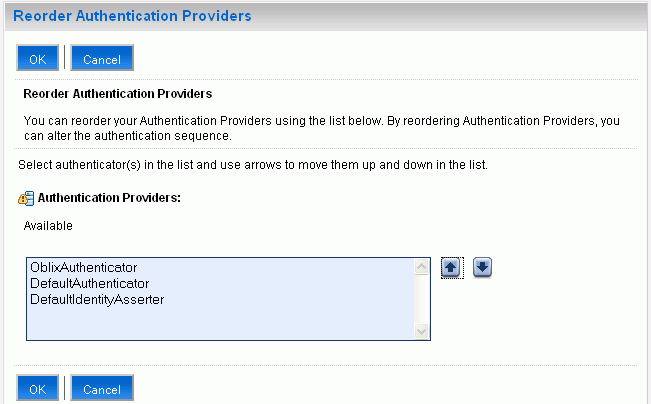
Click Reorder to alter the authentication sequence. (Figure 4-15)
Reorder the sequence of the newly created authenticator by moving oblixAuthenticator to the top of the list by using the arrow button on the right. (Figure 4-16)
Click OK.
Figure 4-16 Reorder Authentication Providers
Under the Name column, click the hyperlink of the newly created oblixAuthenticator to display its properties.
From the Control Flag dropdown list, select SUFFICIENT.
Click Save.
|
Note: After creating the OblixAuthenticator authentication provider, ensure that theOB_UserSearchAttr property of the provider is set to cn in the NetPointProvdersConfig.properties file. |
Click New to create an identity asserter.
Enter a unique name for the identity asserter, and select Type as OblixIdentityAsserter. (Figure 4-18)
Click OK to create the identity asserter.
Reorder the newly created identity asserter to the second position.
Set the Control Flag for the identity asserter to SUFFICIENT.
Restart the Admin Server and all managed servers to uptake the configuration changes.
After SSPI configuration, Oracle WebCenter Wiki and Blog Server can be accessed at the following URL: http://host:port/owc_wiki/index.jspa, where host and port are the host and port of the Oracle HTTP Server.