8 Managing Contacts
This chapter contains the following topics:
8.1 Understanding Contact Information
Contacts are the people who are associated with the organization's customers and partners. You use the CRM Contact program (P90CA070) to enter contacts and to view and modify existing contact information.
The CRM Contact program is also an entry point for the Email Merge and Mail Merge features. These features enable you to create customized email messages and letters for a selected group of contacts. Before you can use either of these features, you must create at least one contact.
|
Note (Release 9.1 Update): The Mail Merge feature has been deprecated as part of bug 28911500. |
Contact information includes:
-
Basic contact information.
You can enter the contact's name, position, address and phone information. You can also associate the contact with other related people.
-
Activity information.
You can create activities for a contact, or attach existing activities to the contact. Activities enable the organization to complete tasks in a timely manner.
-
Sales information.
You can review the sales pipeline, sales opportunities, sales quotes, and sales orders that are associated with the contact.
-
Service information.
You can review the cases that are associated with the contact.
-
Attachments.
You can view, modify, or enter attachments for the contact.
-
Profiles.
Because each organization's business needs differ, it is impossible to anticipate every piece of data that you must track for the contacts. To enable you to track contact information that is specific to the organization, the JD Edwards EnterpriseOne Customer Relationship Management Foundation system provides you with configurable, user-defined contact profiling. You can access up to 30 user-defined fields using the Profiles link on the Contact - Manage {Contact Name} form. You can configure these fields to track information that is specific to the business and is not otherwise captured in the JD Edwards EnterpriseOne system.
8.2 Entering Contact Information
This section provides an overview of contact information, and discusses how to:
-
Enter contacts.
-
Set processing options for the CRM Contact program (P90CA070).
8.2.1 Forms Used to Enter Contact Information
| Form Name | FormID | Navigation | Usage |
|---|---|---|---|
| Search for Contacts | W90CA070C | CRM Foundation Daily Processing (G90C01), Contact | Select an existing contact, or access forms to add new contacts. |
| Add Contact | W90CA070A | Click Add on Search for Contacts. | Enter contact information. |
8.2.2 Entering Contacts
Access the Add Contact form.
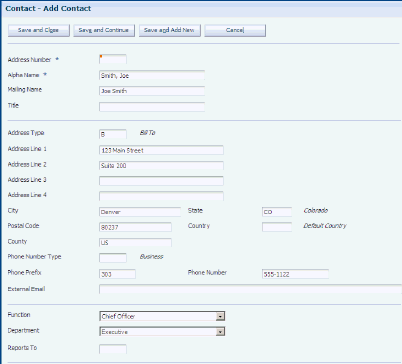
- Alpha Name
-
Enter up to 40 alphabetic characters for the contact name. You can enter dashes, commas, and other special characters, but the system does not use them when you search for a name.
- Mailing Name
-
Enter a mailing name which represents the company or person to whom billing or correspondence is addressed.
- Title
-
Enter the professional title of the contact as it appears in the Who's Who table.
- Address Type
-
Enter the user-defined code (system 01, type AT) that identifies the type of address, such as a home address or an office address.
- Phone Number Type
-
Enter the user-defined code (system 01, type PH) that indicates either the telephone's location or use, such as a business phone or home phone.
- Function
-
Enter the user-defined code (system 01, type FC) that indicates the function that the contact serves in the company, such as consultant, manager, or staff.
- Department
-
Enter the department in which the contact works.
- Reports To
-
Enter the name of the person to whom the contact reports. This field is informational only and not used in any reports.
- Category Code 001-020
-
Enter user-defined information in any of the category code fields. You can also use these fields to represent associated names in the Who's Who list. You can use these codes to identify names for special mailing lists, phone directories, and so on.
8.2.3 Setting Processing Options for the Manage Contacts Application (P90CA070)
Although processing options are set up during JD Edwards EnterpriseOne implementation, you can change processing options each time you run a program.
8.2.3.1 Versions
- 1. Contact Detail Processing (P90CA074) Version
-
Specify the version of Contact Detail Processing (P90CA074) to use. If this processing option is blank, the system uses version ZJDE0001.
- 2. Sales Order Entry (P42101) Version
-
Specify the version of Sales Order Entry (P42101) to use. If this processing option is blank, the system uses version ZJDE0001.
- 3. Quote Order Entry (P42101) Version
-
Specify the version of Quote Order Entry (P42101) to use. If this processing option is blank, the system uses version ZJDE0001.
- 4. Opportunities (P90CB020) Version
-
Specify the version of Opportunities (P90CA020) to use. If this processing option is blank, the system uses version ZJDE0001.
- 5. Activities Extension (P90CAEXT) Version
-
Specify the version of Activities Extension (P90CAEXT) to use. If this processing option is blank, the system uses version XJDE0001.
8.2.3.2 Mobile Client
If you plan to use the disconnected mobile client, you must enter options on the Mobile Client tab that affect that functionality.
- 1. Contact Action Security (Add, Change, and Delete), 2. Alternate Address Action Security (Add, Change, and Delete), 3. Phone and Fax Action Security (Add, Change, and Delete), 4. Electronic Address Action Security (Add, Change, and Delete), 5. Related People Action Security (Add, Change, and Delete), and 6. Related People Phone and Fax Action Security (Add, Change, and Delete)
-
Specify whether a user has the authority to add, change, or delete contact information, alternate addresses, contact phone and fax numbers, electronic addresses, related people, or phone and fax numbers for related people while running on a mobile client.
8.3 Managing Contact Information
This section provides an overview of contact management and discusses how to:
-
Modify contact address information.
-
Modify contact phone and electronic address information.
-
Enter related people for a contact.
-
Create contact profiles.
8.3.1 Understanding Contact Management
After you enter contacts into the system, you must maintain the records to ensure that the information in the system is current. You can modify address, phone, and email information for each contact. You can also associate contacts with related people such as employees, partner contacts, or customer contacts.
You can create contact profiles for each contact to store additional information that is not already maintained in the JD Edwards EnterpriseOne system. Profiles enable you to track the information that is critical to the organization's business needs by providing up to 30 configurable fields to store user-defined data.
8.3.2 Forms Used to Manage Contact Information
| Form Name | FormID | Navigation | Usage |
|---|---|---|---|
| Contact - Search For Contacts | W90CA070C | Daily Sales Force Automation Processing (G90CA01), Contact.
CRM Foundation Daily Processing (G90C01), Contact. Daily Support Processing (G90CE01), Contact. |
Find and select the contact whose information you want to view. |
| Contact - Manage {Contact Name} | W90CA070B | On Search for Contacts, select a contact. | View contact information. |
| Contact - Add Related Person | W90CA073B | On the Contact - Manage {Contact Name} form, select the Contact tab, click Related People and then click Add. | Add a related person to the contact. |
8.3.3 Modifying Contact Address Information
Access the Contact - Manage {Contact Name} form.
-
On the Contact tab, click the Address and Phone link.
-
To modify an existing address record, select the record in the Alternate Addresses grid and then make changes in the grid fields.
-
To delete an address record, select the record in the Alternate Addresses grid and then click Delete.
-
To add address information, select a blank line in the grid and enter address information in the grid fields.
-
If there is more than one address for the contact, select an address and click Set Main Address to specify the main address.
The address that you select is indicated in the Main Address Flag field.
-
To change the main address status, select a different address and click Set Main Address.
The system clears the previous main address and selects the new main address. To clear the main address setting without specifying a main address, click the Clear Main Address button.
Figure 8-2 Contact - Manage {{Contact Name} form: Contact tab: Address and Phone link
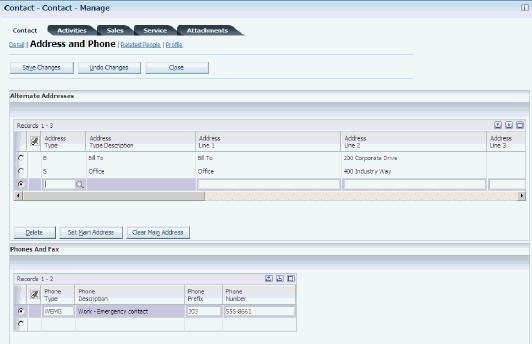
Description of ''Figure 8-2 Contact - Manage {{Contact Name} form: Contact tab: Address and Phone link''
8.3.4 Modifying Contact Phone and Electronic Address Information
Access the Contact - Manage {Contact Name} form and click the Address and Phone link.
-
To modify an existing telephone or fax record, select the record in the Phones and Fax grid and then make changes in the grid fields.
-
To delete a telephone or fax entry, select the record in the Phones and Fax grid and then click Delete.
-
To enter a new enter telephone or fax record, select a blank row in the grid and then enter the phone or fax information in the grid fields.
-
To modify an existing electronic address record, select the record in the Electronic Addresses grid and then make changes in the grid fields.
-
To delete an electronic address record, select the record in the Electronic Addresses grid and then click Delete.
-
To enter a new electronic address record, select a blank row in the grid and then enter the electronic address information in the grid fields.
-
If you have previously created an email message for the contact, you can click Send Email to send the email to electronic addresses that you just added.
8.3.5 Enter Related People for a Contact
Access the Contact - Manage {Contact Name} form's Contact tab, and then click the Related People link.
Figure 8-3 Contact - Manage {Contact Name} form: Contact tab: Related People link
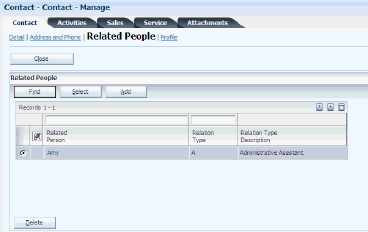
Description of ''Figure 8-3 Contact - Manage {Contact Name} form: Contact tab: Related People link''
-
To modify an existing related person record, select the record in the Related People grid and then make changes in the grid fields.
Alternatively, you can click a record's link to modify information, but if you are using the Mobile Client feature, you cannot modify server synchronization information.
-
To delete a related person record, select the record in the Related People grid and then click Delete.
-
To modify phone information for the related person, click the record and make changes on the Contact - Manage Related Person form.
-
To add a related person, click Add and then enter related person information on the Contact - Add Related Person form.
8.3.6 Creating Contact Profiles
Access the Contact - Manage {Contact Name} form. Select the Detail tab and click the Profile link.
Figure 8-4 Contact - Manage {Contact Name} form: Detail tab: Profile link
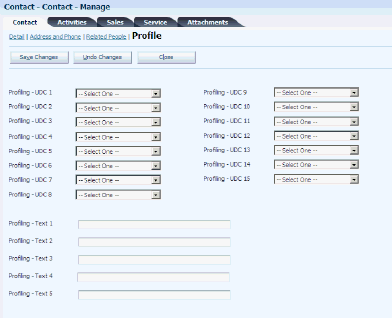
Description of ''Figure 8-4 Contact - Manage {Contact Name} form: Detail tab: Profile link''
|
Note: You can configure each field on this form to store the data that the organization must track for each contact. Before you enter data on this form, you should define the needs of the organization, and configure the fields accordingly. Typically, the system administrator is responsible for configuring user-defined fields. |
See JD Edwards EnterpriseOne Tools System Administration Guide.
8.4 Managing Contact Activities
This section provides an overview of contact activities and discusses how to:
-
View or modify contact activities.
-
Add a new activity for the contact.
-
Link the activity to an action plan.
-
View or modify contact email.
8.4.1 Understanding Contact Activities
The fields, grids, and links on the Activity tab enable you to view or modify activities that relate to the contact. You can also add a new activity by accessing the Activities application.
Similarly, you can access the email application to view or modify email messages that were created as activities for the contact. (Only the email messages that were created as an activity for the contact are displayed on the Activities tab).
The Activities tab also enables you to link a selected activity with an action plan.
8.4.2 Forms Used to View and Modify Activity Information
| Form Name | FormID | Navigation | Usage |
|---|---|---|---|
| Contact - Search For Contacts | W90CA070C | Daily Sales Force Automation Processing (G90CA01), Contact.
CRM Foundation Daily Processing (G90C01), Contact. Daily Support Processing (G90CE01), Contact. |
Find and select the contact whose information you want to view. |
| Contact - Manage {Contact Name} | W90CA070B | On Search for Contacts, select a contact. | View contact information. |
| Activity - Edit | W01301B | Select an activity record on Contact - Manage {Contact Name} form, Activities tab, Activity link. | View or modify activity information. |
| Add Activity | W01301B | On the Contact - Manage {Contact Name} form's Activities tab, click Add. | Add a new activity for the contact. |
| Contact - Manage {Contact Name} Activities tab (Email link) | W90CA07EA | Click Email on the Activities tab. | View email information related to the contact. |
| Action Plan Search and Select | W01401A | On the Contact - Manage {Contact Name} form's Activities tab, click Link Action Plan. | Find and select the action plan to which you want to link the activity. |
8.4.3 Viewing or Modifying Contact Activities
Access the Contact - Manage {Contact Name} form (Activities tab).
-
If necessary, use the fields in the Search area of the form to limit search results.
At a minimum you might specify the activity type before searching.
-
When you locate the activity record whose information you want to view or modify, select the record and click Select. (Alternatively, you can click the record's link under the Activity Type column heading.)
-
On Activity - Edit, view or modify the activity.
At this point you are in the Activities application.
-
Click Save and Close or Cancel to return to the Contact - Contact - Manage {Contact Name} form.
Figure 8-5 Contact - Manage {Contact Name} form: Activities tab: Activities link

Description of ''Figure 8-5 Contact - Manage {Contact Name} form: Activities tab: Activities link''
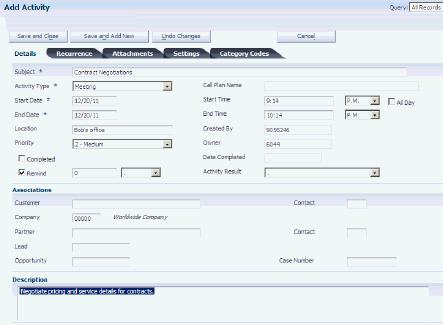
8.4.4 Adding a New Activity for the Contact
To add a new activity for a contact, access the Add Activity form. This form is part of the Activities application, but after you create the activity, the system associates it with the contact.
8.4.5 Linking the Activity to an Action Plan
Access the Contact - Manage {Contact Name} form and click the Activities tab.
-
In the grid, find and select the activity that you want to link to an action plan, and then click Link Action Plan.
-
On the Action Plan Search and Select form, find and select the action plans to which you want to link the activity, and then click Select.
Figure 8-7 Action Plan Search & Select form
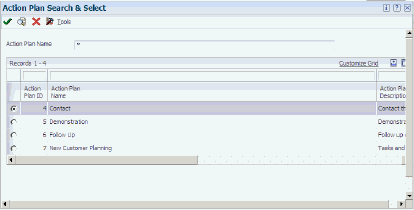
Description of ''Figure 8-7 Action Plan Search & Select form''
8.4.6 Viewing or Modifying Contact Email
Access the Contact - Manage {Contact Name} form's Activities tab, and then click the Email link.
-
To select the email message you want to view or modify, click that specific email link under the Subject column.
-
On Email - Manage {Email Name}, view or modify the email as needed.
-
When you are finished viewing or modifying, save or undo any changes and then send the email or close.