7 Managing Farming Activities
This chapter contains the following topics:
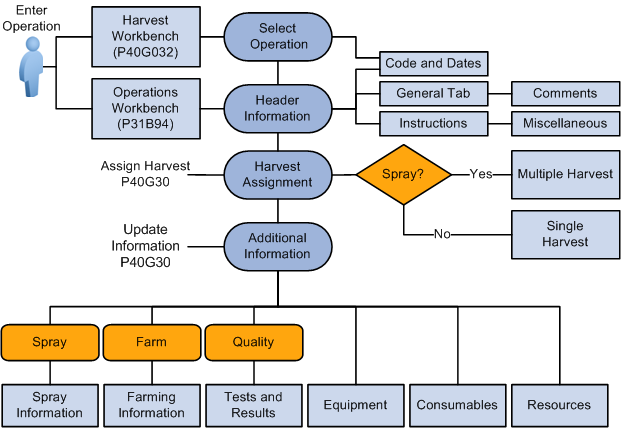
7.1 Understanding Managing Farming Activities
During the harvest growing period up until the actual harvesting of the crop, several activities, operations, and data collection occurs. The purpose of the activities is to enable instruction of work and provide a way to update operational information, such as information about additives, styles, costs, equipment, and resources, to the harvest record. Common growing activities include:
-
Managing farming operations, such as tilling, planting, pruning, spraying, and irrigating.
-
Conducting quality inspections or product classification assessment.
-
Tracking growing statistics.
This diagram shows the flow for managing farming activities:
7.1.1 Spray Operations
Tracking spray operations is common practice to help protect growers from the risk of agrochemical residue that exceeds the maximum residue limits for export or domestic markets. The maintenance of spray operations is a quality issue and a legislative safety requirement.
Due to holding times from the last spray, planning must consider the lead time between the spray operations and the estimated harvest date. For example, if a block is due to be harvested, planners must ensure that the block is not sprayed for approximately 30 days before harvest.
If a spray operation is submitted and shows that a particular agrochemical was used for the wrong purpose or the timing is incorrect, the harvest from the block or the block itself may be quarantined for a period.
7.1.2 Farming Operations
You use farming operations to record when activities such as planting, irrigating, and pruning occur. Typical information to be captured includes the planting method, pruning method, and associated comments.
The business must understand the irrigation method and volume, the pruning techniques, the dates on which the operations are complete, and the stages of crop growth. Comparisons between all these harvest activities are required to ensure that the crop growth and maturity are managed. Growers might to measure the irrigation volume by plant or volume per area.
7.1.3 Weigh Tag Operations
Weigh tag operations and farming operations share the same Grower Harvest and Weigh Tag Receipt Operation program (P40G30). Weigh tag operations require additional functionality that is called by the Processing Options for Grower Weigh Tags program (P40G0700).
You create weigh tag operations using the same base operations and configured operations that are defined in this chapter.
7.1.4 Deleting Operations
You can delete operations that are in Draft status only. Operations can be deleted using these programs:
-
Farming Activities Workbench (P31B94).
-
Weigh Tag Workbench (P31B94).
-
Work Order Workbench (P31B95).
7.1.5 Harvest Unit of Measure Versus Operation Unit of Measure
You can use two programs to set up default units of measure. You use the Grower Cost Center Defaults program (P40G002) to define default units of measure (00/UM) for harvest records. You use the Winery Constants program (P31B13) to define default units of measure (31B/UM) for operations. If the area unit of measure differs between the programs, you must add a standard unit of measure conversion in the Unit of Measure Conversion program (P41003).
For example, you measure the area of your harvests in hectares. You apply a pesticide using a spray operation by the acre. Therefore, you must add a conversion to convert one hectare to 2.471053815 acres.
The system requires special handling codes when converting the units of measure. For example:
| Type of Measure | Example | Special Handling Code |
|---|---|---|
| Area | Acre, hectare, square mile | A |
| Distance | Meter, mile, kilometer, yard | D |
| Volume | Bottles, cubic feet, liters, gallons | V |
| Temperature | Celsius, Fahrenheit, Kelvin | T |
| Weight | Kilograms, pounds, tons | W |
7.2 Understanding Operation Withholding Dates
Harvest operations can have interdependencies that should be managed to ensure optimum crop production of a harvest and worker safety. These interdependencies are managed using withholding dates to control the validation between harvest operations. The system displays a warning message when an operation is planned inside of the withholding period of another operation.
This table defines the withholding type codes, provides descriptions, explains when to use each code, and gives examples of when to use each code:
| Withholding type code | Description | Use | Example |
|---|---|---|---|
| P | Prior activity | Use when an operation should not have any activity for a period before starting this operation. | Two days before a pruning operation, no spraying, cutting, or irrigating operations should be performed in that area. |
| R | Reentry to block | Use when the operation is complete and no one should reenter the block for a given number of days. | Workers should not enter the area for one day after a pesticide spray operation is performed. |
| H | Harvest activity | Use when the harvest cannot occur until a specific number of days after this operation. | A chemical spray is applied to the harvest and government regulations require a waiting period before harvesting can begin. |
| S | Subsequent activity | Use when subsequent operations cannot be scheduled until a specific number of days after this operation is complete. | An irrigation activity is performed and additional operations should not be scheduled for the next two days. |
7.2.1 Validating
When entering the first operation for a harvest, the system does not perform a validation. When the first operation for a harvest is in the system, any additional operations that are entered or modified are validated against all other operations for that harvest.
This table describes the fields used to activate the validation process, describes the field, and defines the program where the field is located:
| Field | Description | Where to Set Up |
|---|---|---|
| Validate check box | Use this check box for a withholding code to specify that this operation is validated against other operations, within the same harvest, that have withholding days for the same code. The system validates that the operation's start and end dates do not conflict with the withholding period that is defined for that withholding type code. For instance, by checking the validation check box for the prior activity check box, the system validates all operations that have withholding days defined for the prior activity type. | Select this check box on the configured operation. |
| Withholding Days | Specify the number of days to calculate the withholding period. The unit of measure (UOM) for withholding days represents a 24-hour period and corresponds to a calendar day. | Enter the withholding days on the farm and spray operations. |
| Withholding Period | The system calculates this field by adding the operation period to the withholding days. The withholding period starts at midnight (time is 00:00:00) and ends one second before midnight (time 23:59:59) of the last day of the withholding period. For example, if both the operation days and the withholding days equal two, the withholding from date begins at midnight the day that the operation starts and ends at midnight two days after the operation ends. To calculate the prior-activity withholding period, the system back schedules the withholding period from the operation start date. | Enter the withholding days on the farm and spray operations. |
7.2.2 Two-Way Validation
When a new operation is added to an existing harvest, the system performs a two-way validation. The first validation compares the new operation to existing operations. The system verifies, for each withholding type that has a check in the validation check box on the new operation, that the operation dates do not overlap with the withholding periods for the existing operations.
The second validation compares existing operations to the new operation. The system verifies, for each withholding type that has a check in the validation check box for the existing operation, that the operation dates do not overlap with the holding periods for the new operations.
This diagram shows three existing operations, and the validation that occurs based on the validation check box being selected and the withholding days being defined in a new operation:
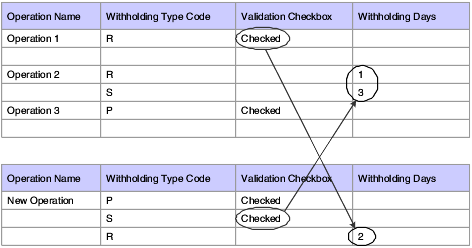
In the above example, a new operation is added that has the validation check box selected for prior and subsequent activities. The system validates against the existing operation, Operation 2, because it has withholding days entered for subsequent activities. The system also validates against existing operations that have prior withholding days entered. In this example, none of the operations have prior withholding days.
Next, the system validates the existing operations that have any validation check boxes selected. For Operation 1, the reentry validation check box is selected. The system validates against the new operation because the reentry withholding days is set to two.
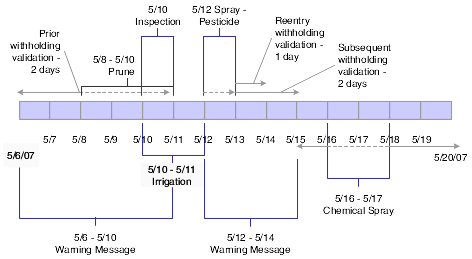
7.2.3 Example 1
This table and the subsequent timeline demonstrate the interdependencies of several operations that use withholding codes:
| Operation Name | Oper Duration/ Days | Oper Start Date | Oper End Date | W/H Type Code | Validation Check Box | W/H Days | W/H Period Start Date | W/H Period End Date |
|---|---|---|---|---|---|---|---|---|
| Prune | 3 | May 8 | May 10 | P | 2 | May 6 | May 10 |
| Operation Name | Oper Duration/ Days | Oper Start Date | Oper End Date | W/H Type Code | Validation Check Box | W/H Days | W/H Period Start Date | W/H Period End Date |
|---|---|---|---|---|---|---|---|---|
| Spray - Pesticide | 1 | May 12 | May 12 | R | Checked | 1 | May 12 | May 13 |
| S | 2 | May 12 | May 14 |
| Operation Name | Oper Duration/ Days | Oper Start Date | Oper End Date | W/H Type Code | Validation Check Box | W/H Days | W/H Period Start Date | W/H Period End Date |
|---|---|---|---|---|---|---|---|---|
| Irrigation | 2 | May 10 | May 11 |
| Operation Name | Oper Duration/ Days | Oper Start Date | Oper End Date | W/H Type Code | Validation Check Box | W/H Days | W/H Period Start Date | W/H Period End Date |
|---|---|---|---|---|---|---|---|---|
| Inspection | 1 | May 10 | May 10 | R | Checked |
This diagram is a graphical representation of the four operations in the table. The dotted lines represent the operation start and end dates for the prune and pesticide operations. The solid lines, for these two operations, represent the withholding periods.
Figure 7-3 Operation interdependency timeline 1

Description of "Figure 7-3 Operation interdependency timeline 1"
7.2.4 Example 2
In this example, a new operation is added to the system. The chemical spray operation validates against existing harvest operations that have withholding days for both subsequent activities and prior activities. For each validation check box that is checked on existing operations, the system also validates against the current withholding days for the corresponding operations.
This table and subsequent timeline demonstrate how the system validates a new harvest operation using the two-way validation:
| Operation Name | Oper Duration / Days | Oper Start Date | Oper End Date | W/H Type Code | Validation Check Box | W/H Days | W/H Period Start Date | W/H Period End Date |
|---|---|---|---|---|---|---|---|---|
| Chemical Spray | 2 | S | ||||||
| P | Checked | 1 | May 15 | May 17 | ||||
| R | Checked | 2 | May 16 | May 19 |
| Operation Name | Oper Duration / Days | Oper Start Date | Oper End Date | W/H Type Code | Validation Check Box | W/H Days | W/H Period Start Date | W/H Period End Date |
|---|---|---|---|---|---|---|---|---|
| Prune | 3 | May 8 | May 10 | P | 2 | May 6 | May 10 | |
| Inspection | 1 | May 10 | May 10 | R | Checked |
| Operation Name | Oper Duration / Days | Oper Start Date | Oper End Date | W/H Type Code | Validation Check Box | W/H Days | W/H Period Start Date | W/H Period End Date |
|---|---|---|---|---|---|---|---|---|
| Spray - Pesticide | 1 | May 12 | May 12 | R | Checked | 1 | May 12 | May 13 |
| S | 2 | May 12 | May 14 |
| Operation Name | Oper Duration / Days | Oper Start Date | Oper End Date | W/H Type Code | Validation Check Box | W/H Days | W/H Period Start Date | W/H Period End Date |
|---|---|---|---|---|---|---|---|---|
| Irrigation | 2 | May 10 | May 11 | P | Checked |
| Operation Name | Oper Duration / Days | Oper Start Date | Oper End Date | W/H Type Code | Validation Check Box | W/H Days | W/H Period Start Date | W/H Period End Date |
|---|---|---|---|---|---|---|---|---|
| Inspection | 1 | May 10 | May 10 | R | Checked |
This diagram is a graphical representation of the five operations in the table. The dotted lines represent the operation start and end dates for the prune, pesticide, and chemical spray operations. The solid lines, for these three operations, represent the withholding periods.
Figure 7-4 Operation interdependency timeline 2
Description of "Figure 7-4 Operation interdependency timeline 2"
The first validation checks against existing operations:
-
Prune: A warning message appears if the new operation is scheduled to start from May 6 through May 10.
-
Spray-Pesticide: A warning message appears if the new operation is scheduled to start from May 12 through May 14.
The system validates existing operations against the new operation's withholding period and displays a warning message if an existing operation is scheduled:
-
The day before the start date for the new operation.
-
During the reentry-withholding period for the new operation.
Adding the new operation using a start date of May 16 with an end date of May 17 prevents any warning messages.
7.2.5 Start and End Dates
The system does not validate the withholding days for an operation's harvests unless both the start and end dates for either the instructed or actual dates are entered in the operation header. If a date is missing, when the user clicks Save and Close, the system issues an error message stating that the operation start and end dates are required.
7.3 Reviewing Base Operations
This section provides an overview of base operations for JD Edwards EnterpriseOne Grower Management and discusses how to view base operations.
7.3.1 Understanding Base Operations
Base operations serve as predefined templates that are delivered with the JD Edwards EnterpriseOne Grower Management and Blend Management systems. Base operations determine which components are available for a configured operation. You can view base operations, but you cannot modify them.
7.3.2 Forms Used to View Base Operations
7.3.3 Viewing Base Operations
Access the Edit Base Operation Configuration form.
- Base Operation Code
-
Displays a short code that describes the base operations. These operations are considered in-place operations. Grower values are:
FARM: Farm operation.
FARMQA: Grower QA operation.
SPRAY: Spray operation
HARVEST: Scheduled harvest operation.
WT: Weigh tag.
- Base Operation Description
-
Displays a description that further defines the base operation. For example, the base operation code WT is for grower weigh tag operations.
7.3.3.1 Vessel Details
Select the Vessel Details tab.
Figure 7-5 Edit Base Operation Configuration form
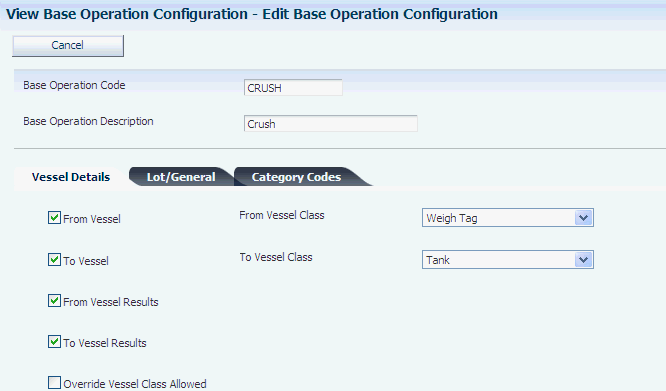
Description of "Figure 7-5 Edit Base Operation Configuration form"
- From Vessel
-
Controls whether from vessel information is displayed for the operation.
- From Vessel Class
-
Displays the type of from vessel to use in the operation. For Grower Management, vessel classes are:
Harvest
Weigh Tag
7.3.3.2 Lot/General
Select the Lot/General tab.
Figure 7-6 Edit Base Operation Configuration form: Lot/General tab
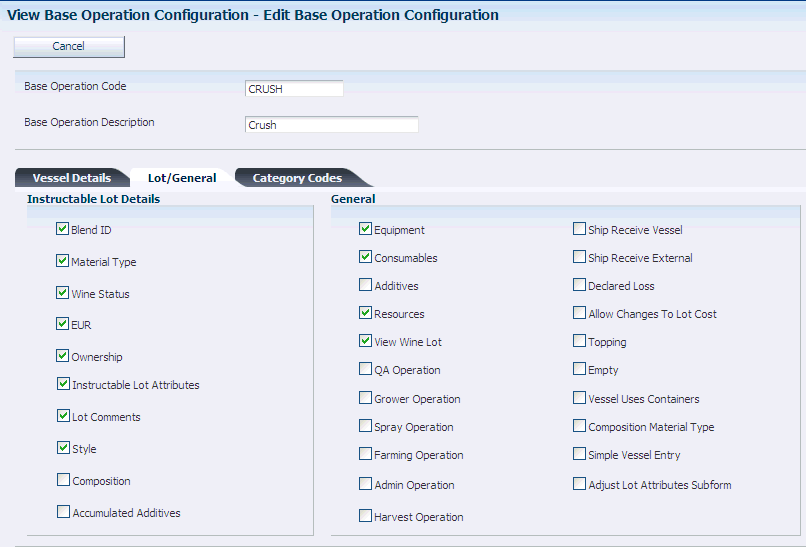
Description of "Figure 7-6 Edit Base Operation Configuration form: Lot/General tab"
- Blend ID
-
Displays the blend ID instructables for the operation.
- Material Type
-
Displays the material type instructables for the operation.
- Wine Status
-
Displays the wine status instructables for the operation.
- EUR (end-use reservation)
-
Displays the EUR instructables for the operation. Select this check box for Blend Management and weigh tag operations only. The system does not process EURs at the lot level for farm, farmqa, and spray operations.
- Ownership
-
Displays the ownership instructables for the operation. Select this check box for Blend Management and weigh tag operations only. The system does not process ownership at the lot level for farm, farmqa, and spray operations.
- Instructable Lot Attributes
-
Displays the instructable lot attributes for the operation if this option is selected.
- Lot Comments
-
Displays the instructable lot comments for the operation if this option is selected.
- Style
-
Displays the style instructables for the operation if this option is selected.
- Accumulated Additives
-
Displays accumulated additive instructables for the operation if this option is selected.
- Equipment
-
Displays equipment details for the operation if this option is selected. Equipment is defined as all physical items, other than vessels, at a production facility.
- Consumables
-
Displays consumable details (that are required by equipment) for the operation if this operation is selected. Consumables are dry goods that are used by equipment but do not affect wine attributes.
- Additives
-
Displays additive details for the operation if this option is selected. You can enter an additive operation separately from other operations to retain a clear history and traceability of the additive throughout the wine-making process using Operational Trace/Track.
- Resources
-
Displays resource details for the operation if this option is selected. Instruct specific people or work groups to perform an operation in accordance with their skill sets, schedules, resource management, and so forth.
- View Wine Lot
-
Displays blend lot details for the operation.
- QA Operation (quality assurance operation)
-
Designates that this operation is a QA operation if this option is selected.
- Grower Operation
-
Designates this operation as a grower operation if this option is selected. Examples of grower operation include farming and spraying. Operations, such as QA and weigh tag can also be used in grower applications if this option is selected.
- Spray Operation
-
Designates this operation as a spray operation. Spray operations are used in grower applications. The Grower option must also be selected in the Base Operation definition to activate the farming operation.
- Farming Operation
-
Designates this operation as a farming operation. Farming operations are used in grower applications. The Grower option must also be selected in the Base Operation definition to activate the Farming operation.
- Allow Changes to the Lot Cost
-
Select to allow lot cost changes at the operation.
- Harvest
-
Designates a scheduled harvest operation that is different from other farming operations. The harvest operation is an in-place operation that is performed on a harvest. Using this base operation enables you to tie the considerable expense that might be incurred because of harvesting a crop to a specific activity in the growing cycle.
The harvest operation enables you to plan harvesting activities with information such as quantity or area to harvest, cut instructions, date and time of the harvest, and delivery instructions. You can also assign resources, equipment, and consumables to track the associated cost. Lot attributes, lot comments, and styles are the instructables for this base operation. The From vessel class is Harvest. The harvest operation is classified as a cut operation using the Base Operation Category Code 1 UDC table.
Planning and recording a harvest operation is optional.
- Composition Material Type
-
Select to designate that the operation updates the composition material type. Select this check box for Blend Management and weigh tag operations only. The system does not process composition material type at the lot level for farm, farmqa, and spray operations.
7.3.3.3 Category Codes
Select the Category Codes tab.
Figure 7-7 Edit Base Operation Configuration form: Category Codes tab
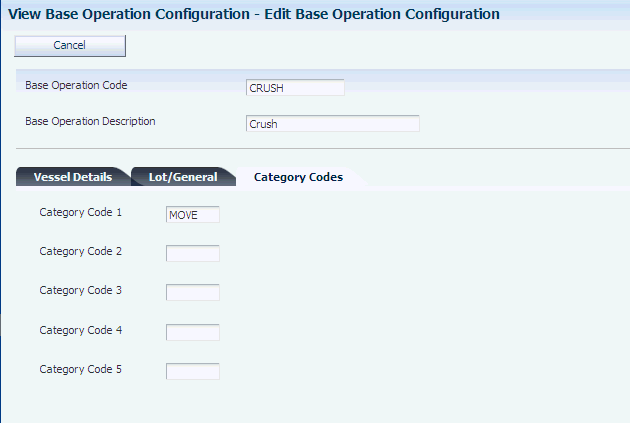
Description of "Figure 7-7 Edit Base Operation Configuration form: Category Codes tab"
- Category Codes 1–5
-
Displays base operation category codes (B31/B1–B5) that specify the type of base operations.
7.4 Setting Up Configured Operations
This section discusses how to set up configured operations.
7.4.1 Forms Used to Set Up Configured Operations
7.4.2 Setting Up Configured Operations
Access the Edit Operation Configuration form.
- Operation Code
-
Enter a unique, user-defined name to identify the configured operation. This is a required field. The user must specify this code to instantiate an operation.
- Base Operation Code
-
Enter a base operation code for the basis of the operation. Use the search button to review all available base operation codes and descriptions.
- Operation Description
-
Enter a user-defined description for the configured operation.
7.4.2.1 Defaults
Select the Defaults tab.
Figure 7-8 Edit Operation Configuration form: Defaults tab

Description of "Figure 7-8 Edit Operation Configuration form: Defaults tab"
- Harvest Operations
-
Select to indicate that the operation is a harvest operation. This field is used only for searching and identifying configured operations.
- From Vessel Class
-
Displays one of these vessel classes from which the operation directs material. In JD Edwards EnterpriseOne Grower Management, the values are:
Harvest: Used for farm, spray, and farmqa operations.
Weigh Tag: Used for weigh tag operations.
- From Material Type UOM (from material type unit of measure)
-
Select the UOM for the From (source) material type. Use a UOM for volume or weight. This value is critical for the system to correctly perform UOM conversions within an operation. Values are:
Area
For farm, farmqa, spray and harvest operations, the material type UOM must be area. For all other operations, the material type UOM cannot be area.
Volume
Weight
- Operation Form Title
-
Enter a customized title for forms that you use when entering operations.
- Permission List Type
-
Select a UDC (H95/PT) to identify who is permitted to perform the operation.
7.4.2.2 Results
Select the Results tab.
Figure 7-9 Edit Operation Configuration form: Results tab
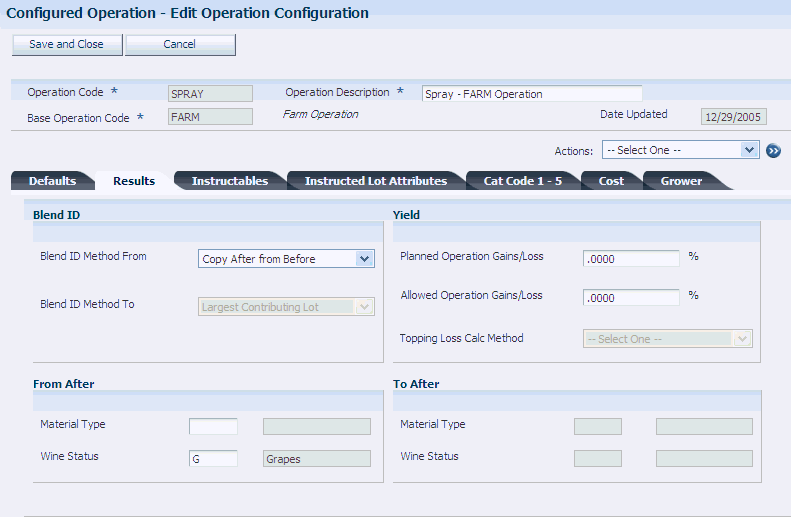
Description of "Figure 7-9 Edit Operation Configuration form: Results tab"
- Blend ID Method From
-
Enter the method that calculates the blend ID for the after from lot. Values are:
Copy after from before.
Do not default after Blend ID.
Generate new Blend ID.
- After From Material Type
-
Enter a specific material type for the After From Lot field. If this field is blank, the system uses lot blending rules to determine the After From Material Type. Material type is used for accounting purposes. This is the hierarchy for populating the material type at the operation level:
-
Use the user-specified material type on the lot.
-
Copy the material type from the Before Lot, if it exists.
-
Use the value from the After From Material Type field on the configured operation.
-
Use the default from the Material Type field on the harvest record.
-
- After From Wine Status
-
Enter a specific wine status for the After From Lot. If this field is blank, the system uses lot blending rules to determine the After From wine status.
- After To Wine Status
-
Enter a specific wine status for the After To Lot. If this field is blank, the system uses lot blending rules to determine the After To wine status.
7.4.2.3 Instructables
Select the Instructables tab.
Figure 7-10 Edit Operation Configuration form: Instructables tab
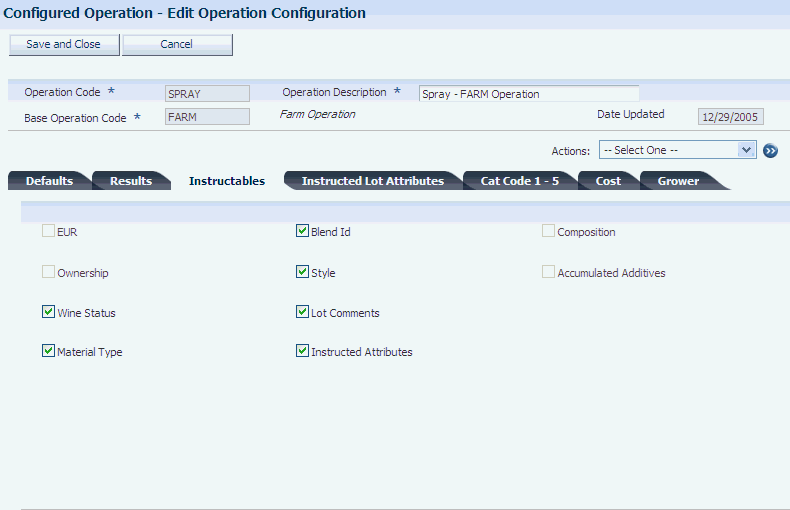
Description of "Figure 7-10 Edit Operation Configuration form: Instructables tab"
- Instructables
-
Select the check box to specify whether the user can manually override these lot attributes after the system has blended the lots:
-
EUR
-
Ownership
-
Wine status
-
Material type
-
Blend ID
-
Style
-
Lot comments
-
Instructed attributes
-
Accumulated Additives (error correction only)
-
Composition (error correction only)
-
7.4.2.4 Instructed Lot Attributes
Select the Instructed Lot Attributes tab.
Figure 7-11 Edit Operation Configuration form: Instructed Lot Attributes tab

Description of "Figure 7-11 Edit Operation Configuration form: Instructed Lot Attributes tab"
- After From Instructed Attributes (1–12)
-
Enter specific values for the instructed attributes of the after from lot instructed attributes.
- After To Instructed Attributes (1–12)
-
Enter specific values for the instructed attributes of the after to lot. If you leave this field blank, the system uses blending rules to determine the After From instructed attribute.
7.4.2.5 Cat Code 1 - 5
Select the Cat Code 1–5 tab.
Figure 7-12 Edit Operation Configuration form: Cat Code 1- 5 tab

Description of "Figure 7-12 Edit Operation Configuration form: Cat Code 1- 5 tab"
- Cat Code 1–5
-
Enter a UDC (31B/B1–B5) to define various categories for configured operations. The system supplies the default base operation in the first category code field. Therefore, you cannot modify the first category code field.
7.4.2.6 Cost
Select the Cost tab.
Figure 7-13 Edit Operation Configuration form: Cost tab
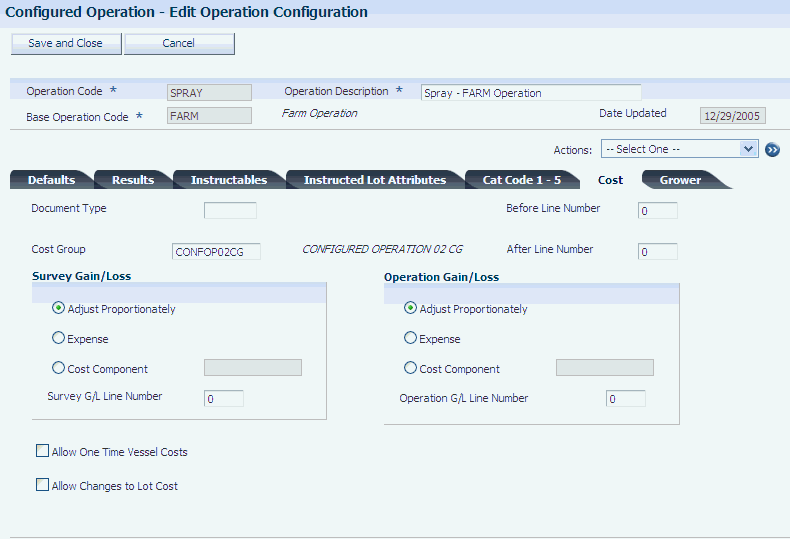
Description of "Figure 7-13 Edit Operation Configuration form: Cost tab"
- Document Type
-
Enter a document type to support the accounting functionality.
- Before Line Number
-
Enter the legal report line number corresponding to the before lot.
Line numbers 101–199 are grouped in Section 1 of the Legal Report.
Line numbers 201–299 are grouped in Section 2 of the Legal Report.
Line numbers 301–399 are grouped in Section 3 of the Legal Report.
Line numbers 100, 200, and 300 are balance line numbers.
- After Line Number
-
Enter the legal report line number corresponding to the after lot.
Line numbers 101–199 are grouped in Section 1 of the Legal Report.
Line numbers 201–299 are grouped in Section 2 of the Legal Report.
Line numbers 301–399 are grouped in Section 3 of the Legal Report.
Line numbers 100, 200, and 300 are balance line numbers.
- Apply Periodic To Vessel Cost
-
Select to indicate that periodic costs apply to the use of a vessel.
- Allow Changes to Lot Cost
-
Select to indicate that you allow changes to lot costs.
7.4.2.7 Grower
Select the Grower tab.
Figure 7-14 Edit Operation Configuration form: Grower tab
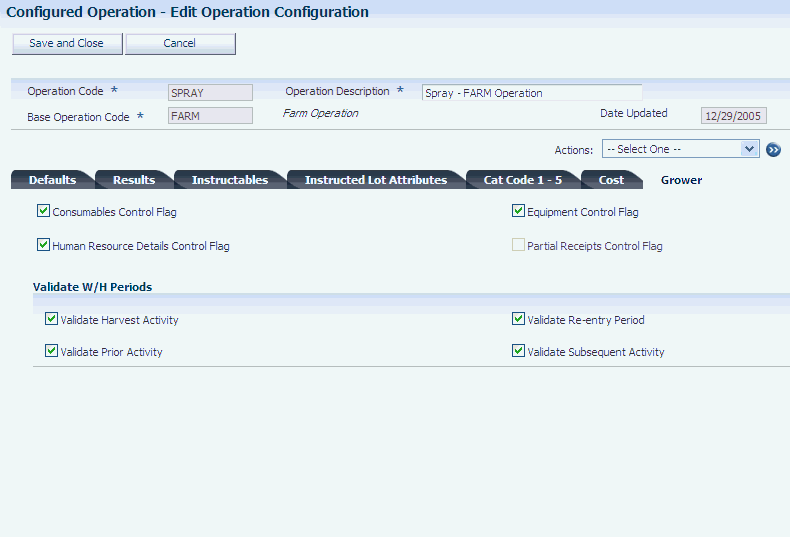
Description of "Figure 7-14 Edit Operation Configuration form: Grower tab"
- Consumables Control Flag
-
Select to indicate that a requirement exists to add consumable details for equipment that is used in the operation. Consumables are dry goods that are used by equipment but do not affect crop attributes. Select the check box to display the consumable details for the operation. The status of this check box is supplied by the system from the base operation and can be overridden at the configured operation level.
- Human Resource Details Control Flag
-
Select to indicate whether specific people or a work group should perform an operation. Select the check box to display the human resource details for the operation. The status of this check box is supplied by the system from the base operation and can be overridden at the configured operation level.
- Equipment Control Flag
-
Select to indicate whether the system displays equipment details. Select the check box to display the equipment details for the operation. The status of this check box is supplied by the system from the base operation and can be overridden at the configured operation level.
- Partial Receipts Control Flag
-
The Partial Receipts Control Flag determines when the quantity that is received on a Weigh Tag is updated to inventory. It also determines the point at which a receipt line is added or updated for the received quantity.
Deselect the option to update inventory and receipts when the operation status is Closed.
Select the option to update inventory and receipts when the operation status is greater than Draft.
- Validate Harvest Activity
-
Select to indicate that the system validates all operations that have withholding days defined for the harvest activity type.
- Validate Prior Activity
-
Select to indicate that the system validates all operations that have withholding days defined for the prior activity type.
- Validate Re-Entry Period
-
Select to indicate that the system validates all operations that have withholding days defined for the reentry activity type.
- Validate Subsequent Activity
-
Select to indicate that the system validates all operations that have withholding days defined for the subsequent activity type.
7.4.2.8 Edit Farming Operation Categories
Access the Edit Farming Operation Categories form.
Figure 7-15 Edit Farming Operation Categories form
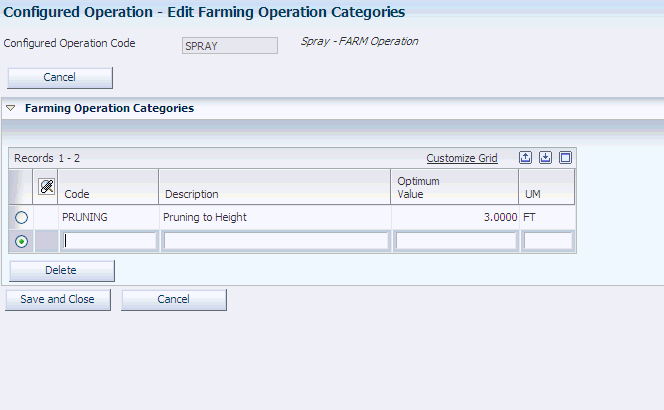
Description of "Figure 7-15 Edit Farming Operation Categories form"
- Code
-
Enter a farming application code for the farming operation.
- Description
-
Enter a description for the farming code.
- Optimum Value
-
Enter the optimum result value for the farming operation.
7.5 Entering Grower Operations
This section provides overviews of grower operations, lists prerequisites, and discusses how to:
-
Set processing options for Farming Operations (P40G30).
-
Enter farm operations.
-
Enter spray operations.
-
Enter harvest operations.
-
Enter farm operations using Create From List - Farming Operations.
7.5.1 Understanding Grower Operations
Companies growing crops use several operations that are specific to the grower environment. To accommodate these requirements, you can use the base operations provided by the system to set up the following configured operations:
-
Farming operations.
-
Spray operations.
-
Harvest operations.
7.5.1.1 Farming Operations
Growers require various operations to be performed on a block throughout the growing season. Operation activities might include tilling, planting, pruning, spraying, irrigating, and harvesting. The purpose of the activities is to enable instruction of work, and provide a mechanism to update operational costs to the harvest record.
The type of operation that is required depends on the type of crop that is being harvested. For example, tuber crops do not require pruning. This table describes two different types of farm operations, their use, and typical information that is maintained:
| Configured Operations | Base Operation | Use | Information Tracked |
|---|---|---|---|
| Stem Water
Evapotranspiration Frost Protection Apply Water |
Farm | Use irrigation operations to record that a watering activity occurred. | Information includes the method of irrigation (sprinkler), the total volume of water (100,000 gallons), the time of application (6:00 a.m., early morning), or the volume per area over time (one gallon per square foot per hour) |
| Planting | Farm | Use planting operations to record that a planting activity occurred. | Information includes method of planting, seed or stock type, or any associated comments. |
7.5.1.2 Spray Operations
The business must understand what agrochemicals have been sprayed on which dates and at what stages of crop growth. The maintenance of spray operations is both a quality and a legislative safety requirement. Due to holding times from the last spray, planning must consider the lead time between spray and the estimated harvest date. For example, if a block is due to be harvested, planners must ensure that the block is not sprayed for approximately 30 days before harvest.
This tables describes a spray operation, its use, and typical information:
| Configured Operations | Base Operation | Use | Information Tracked |
|---|---|---|---|
| Fertilizer
Pesticide Herbicide Fungicide |
Spray | Use spray operations to confirm that approved agrochemicals were applied within their withholding periods, along with the method and rate of application. They also enable users to trace agrochemical use from the end product. | Information includes validating withholding periods, defining a normal rate of application, and defining the targeted pest and disease. |
7.5.1.3 Harvest Operations
Scheduled harvest operations provide a mechanism for planning a farming activity that potentially incurs considerable costs. By entering harvest operations, you can create a plan that includes information, such as quantity or area to harvest, cut instructions, date and time to harvest, and delivery instructions. In addition, as with other operations, you can assign equipment, resources, and consumables. This information enables you to track associated cost.
To enter harvest operations, you use a configured operation that is defined based on the HARVEST base operation. The vessel class for the harvest operations is always Harvest. The category codes for the base operation designate the harvest operation as a CUT operation. You can associate only one harvest with a harvest operation. However, for every harvest, you can enter multiple scheduled harvest operations. You can select a harvest by accessing the Search and Select Harvests form.
You can enter a scheduled harvest quantity that exceeds the current estimate. In this case, the system issues a warning. However, you do not receive the warning if you change the estimate manually in the harvest.
You can enter a harvest operation for acreage or for a quantity. If you enter an acreage, you can calculate the resulting quantity using the following equation: Harvest Quantity = (Current Estimate/Planted Area) x Harvest Area. If you have entered a scheduled quantity, but decide to recalculate the quantity based on the acreage, you must clear the quantity from the Scheduled Quantity field and then recalculate it based on the acreage.
If you use continuous estimates, the Current Estimate field remains blank and you must enter both the quantity and the area for the operation.
When you enter or revise a harvest operation, the system supports planning by displaying the scheduled, completed, received and remaining harvest quantities. The Schedule Quantity field displays the total of all scheduled harvest quantities that are at a status beyond Draft. The system updates the quantity in the Grower Harvest table (F40G03) only for harvest operations at a status beyond Draft. The completed quantity represents the total of all scheduled quantities on harvest operations for a specific harvest with a status of Closed. You can review scheduled harvest quantities using the Harvest Workbench program (P40G032).
When you close the first harvest operation for a harvest, the system automatically creates a purchase order for the harvest, if you have not entered a purchase order. If the harvest is associated with a contract, the system checks contract details before creating the purchase order. The purchase order updates the On Receipt and the On PO fields in the Summary Availability program (P41202). In addition, the system updates the cut date in the Grower Harvest table with operation end date and the Completed Harvest Quantity field with the quantity of the operation. If you schedule the harvest by area, the system performs the conversion from acreage to quantity and uses the calculation result for the update.
You can delete a scheduled harvest if it is at a Draft or Planned status. If you cancel a scheduled harvest operation, the system deducts the scheduled quantity from the total scheduled quantity in the Grower Harvest table. The same thing occurs when you reverse a closed harvest operation. You can change the status and other information using the Speed Actuals program (P31B67), but you cannot set the operation to a Closed status. You can also use the Speed Operation Update program (P31B96) to update harvest operations, including closing them.
From the Harvest Workbench program, you can access the Scheduled Harvest Details program (R40G60) to print a report with harvest operation information, such as planned, and actual dates, harvest quantities, and areas, deliver date, receipt branch and so on.
7.5.2 Prerequisites
Before you complete the tasks in this section:
-
Set up configured operations.
-
Set up facility master records.
-
Set up equipment master records within the winery.
-
Add operation consumables as item branch records.
-
Set up work order templates.
See Entering Item Information, Entering Item Master Information.
7.5.3 Forms Used to Enter Farming Operations
7.5.4 Setting Processing Options for Farming Operations (P40G30)
Use these processing options to control system processing and define default versions.
7.5.4.1 General
These processing options control whether the actual dates are displayed and whether the Work Order Status batch process is run automatically. These processing options are specific to weigh tag operations.
- 1. Enter Actuals
-
Specify whether the system enables you to enter actual dates. Values are:
Blank: Do not allow users to enter actual dates.
1: Allow users to enter actual dates.
For future use.
- 2. Run Calculate Work Order Status (R31B19)
-
Specify whether the Work Order Status batch process is run immediately following the addition of a work order. The Work Order Status batch process uses the operation statuses to determine the work order status. Values are:
Blank: Do not automatically run the Work Order Status batch process.
1: Run the Work Order Status batch process automatically.
7.5.4.2 Process
This processing option controls whether the purchase order and receipts information appear. This processing option is specific to weigh tag operations.
- Purchase Order and Receipts
-
Specify whether the application displays the purchase order and receipts information. Values are:
Blank: Display the purchase order and receipts information.
1: Do not display the purchase order and receipts information.
7.5.4.3 Versions
These processing options control the versions that are called by the program.
- 1. Calculate Work Order Status (R31B19)
-
Specify the version of the Calculate Work Order Status batch program (R31B19) the work order application uses when automatically updating the work order status. If you leave this processing option blank, the system uses XJDE0001.
- 2. Grower Weigh Tag Process (P40G0700)
-
Specify the version of the Grower Weigh Tag Process program (P40G0700) that the system uses. If you leave this processing option blank, the system uses ZJDE0001.
- 3. Matrix Order Entry (P41902)
-
Specify the version of the Matrix Order Entry program (P41902) that is available from the Sales Order application. If you leave this processing option blank, the system uses ZJDE0001.
- 4. Weigh Tag Master Details (P31B77)
-
Specify the version of the Weigh Tag Master Details program (P31B77) that the system uses. If you leave this processing option blank, the system uses ZJDE0001.
7.5.5 Entering Farm Operations
Access the Edit Grower Operation form.

- Operation Number
-
Displays a unique numeric identifier for the operation number.
- Work Order Number
-
Displays a numeric work order number.
- Configured Operation
-
Displays the configured operation that is entered on the Configured Operation Code Selection form.
- Branch
-
Displays the default grower cost center. Grower branch plants must be set up in the Winery Constants program (P31B13).
- Creator
-
Supplies the user's system sign-on. You should enter each user sign-on in the address book master.
- Operation Status
-
Select the operation status. Inventory transactions and costing occurs when you change an operation status to closed. In addition, the system:
-
Supplies a default status of draft when initially adding an operation.
-
Assigns operation numbers when the operation is at an Active, Actual, or Closed status.
-
Requires an assigned harvest when an operation is at an Active or Actual status.
-
Does not validate withholding dates when an operation is at a Cancelled status.
The grower operation statuses are:
-
Active
-
Actual
-
Cancelled
-
Closed
-
Draft
-
7.5.5.1 General
Select the General tab.
Figure 7-17 Edit Grower Operation form: General tab

Description of "Figure 7-17 Edit Grower Operation form: General tab"
- Instructed Start Date
-
Supplies the system date and time by default when the operation is created. You can override the start date. The system uses the system time as a default that you cannot override.
- Instructed End Date
-
Enter the expected end date for the operation.
- Instructed Duration
-
Enter the expected instructed duration for the operation. If this field is left blank, the system calculates the duration using the start and end dates.
- Duration UOM
-
Select the duration UOM. Values are:
Blank
Days
Hours
Minutes
Seconds
- Actual Start Date and Actual End Date
-
Enter the actual start and end dates for the operation.
- Actual Duration
-
Enter the actual duration for the operation.
- Creation Date
-
Displays the date that the operation was entered into the system.
7.5.5.2 Instructions
Select the Instructions tab. Enter free-form text to provide detailed instructions for performing the operation.
7.5.5.3 Comments
Select the Comments tab. Enter free-form text containing additional comments regarding the operation.
7.5.5.4 Misc.
Select the Misc. tab.
Figure 7-18 Edit Grower Operation form: Misc. tab
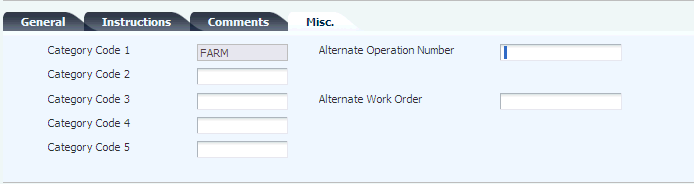
Description of "Figure 7-18 Edit Grower Operation form: Misc. tab"
- Category Code 1 - 5
-
Enter UDCs (31B/B2–B5) to further define the operation. Category Code 1 displays the base operation.
- Alternate Operation Number
-
Enter an additional operation number to identify an outside processor's reference number or to track information after the fact. The system does not validate this number.
- Composition Material Type
-
Enter a code for the material type. This field is specific to weigh tags.
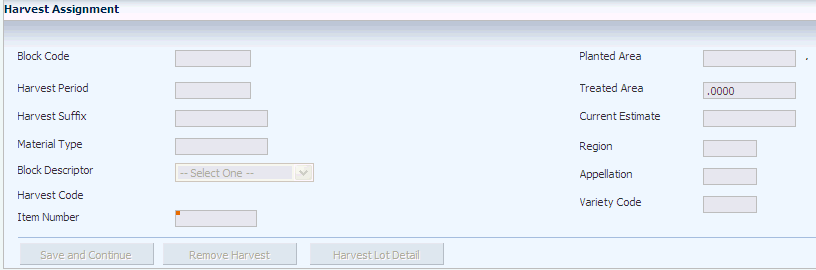
7.5.5.5 Harvest Assignment
Click Save and Continue on the General tab to enable additional fields.
Select the Harvest Assignment tab.
Figure 7-19 Edit Grower Operation form: Harvest Assignment tab
Description of "Figure 7-19 Edit Grower Operation form: Harvest Assignment tab"
- Block Code
-
Enter the assigned block code for the operation.
- Harvest Period, Harvest Suffix
-
Enter the assigned harvest period and suffix for the operation.
- Save and Continue
-
Select to save the harvest assignment for the operation and continue updating the operation information.
- Harvest Lot Detail
-
Select to view harvest lot details.
- Remove Harvest
-
Select to remove the displayed harvest from the operation.
- Treated Area
-
Enter the total area on which the activity was performed during the farming or spray operation. If this field is left blank, this user-entered value is supplied by default from the total harvest planted area.
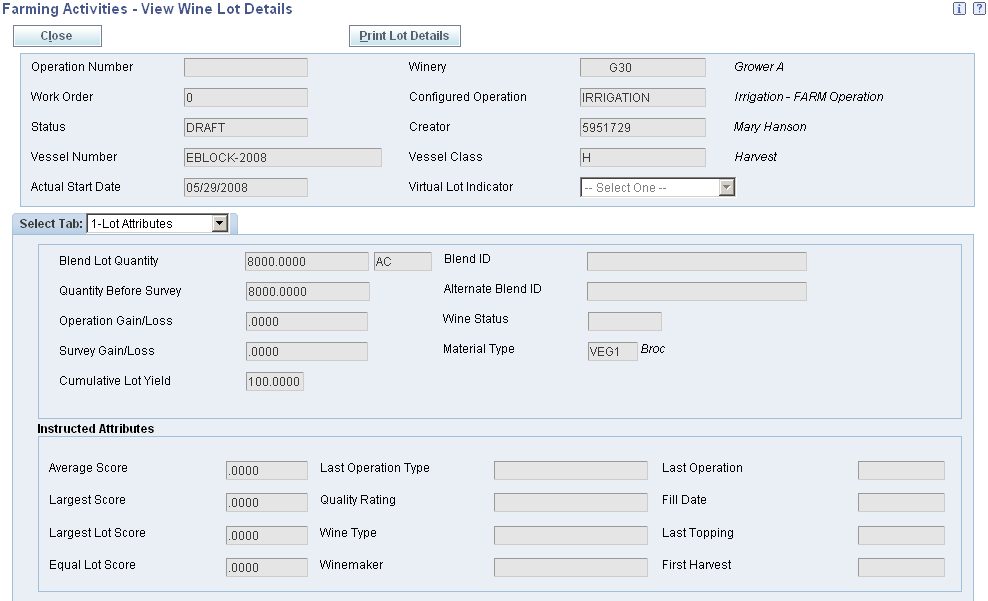
7.5.5.6 Harvest Lot Detail
Click the Harvest Lot Detail link. The cost center on the harvest record and the branch on the operation must be the same to track lot details.
7.5.5.7 Farming Info
Select the Farming Info tab.
Figure 7-21 Edit Grower Operation form: Farming Info tab
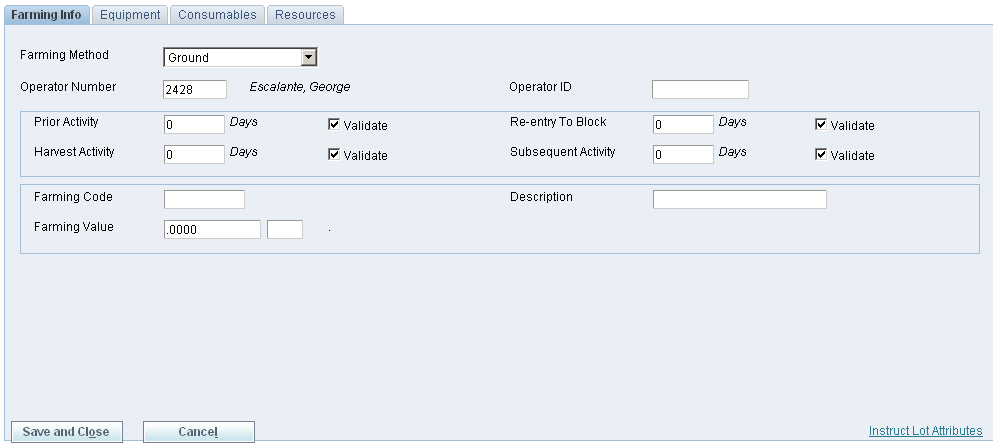
Description of "Figure 7-21 Edit Grower Operation form: Farming Info tab"
- Farming Method
-
Select a UDC (40G/SM) to identify the method of farming operation.
- Operator Number
-
Enter the address book number for the person performing the operation.
- Operator ID
-
Enter the operator ID for the person operating the grower operation (use when the base operation is Farm or Spray). If this is an internal block, the system supplies by default the operator ID that is defined on the block. If this is an external block or if the operation has multiple harvests, the user must manually enter the operator information.
- Prior Activity
-
Displays a value from the configured operation that signifies the number of days that must elapse since the last activity on this harvest record. You can override this value.
- Validate Prior WH (validate prior withholding)
-
Select to indicate that the system validates all operations that have withholding days defined for the prior activity type.
- Harvest Activity
-
Displays a value from the configured operation that signifies the number of days that must elapse before the next harvest activity can take place on the harvest record. You can override this value.
- Validate Harvest WH (validate harvest withholding)
-
Select to indicate that the system validates all operations that have withholding days defined for the harvest activity type.
- Re-entry To Block
-
Displays a value from the configured operation that signifies the number of days that must elapse before you reenter the harvest block. You can override this value.
- Validate Reentry WH (validate reentry withholding)
-
Select to indicate that the system validates all operations that have withholding days defined for the reentry activity type.
- Subsequent Activity
-
Displays a value from the configured operation that signifies the number of days that must elapse before he next harvest activity can take place on the harvest record. You can override this value.
- Validate Subsequent WH (validate subsequent withholding)
-
Select to indicate that the system validates all operations that have withholding days defined for the subsequent activity type.
- Farming Code
-
Enter a unique identifier representing a farming activity. Values are set up in the Farming Activities Additional Configuration program (P40G75), which is accessed from the Configured Operation Setup program (P31B75P). Values can include:
Prune
Pick
Irrigate
- Farming Value
-
Displays the optimum value that is set up on the farming code.
- Description
-
Displays the farming code description.
7.5.5.8 Equipment
Select the Equipment tab.
Figure 7-22 Edit Grower Operation form: Equipment tab
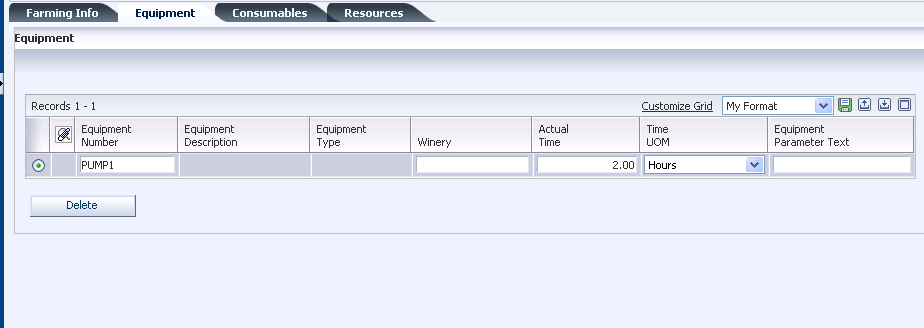
Description of "Figure 7-22 Edit Grower Operation form: Equipment tab"
- Equipment Number
-
Enter an identifier for a piece of equipment that performs this operation. The system uses this information to schedule the equipment on the block when required and to manage cost control. Values are set up in the Equipment Attributes program (P31B05).
- Winery
-
Enter the business unit that owns the equipment. Costs are pulled from the business unit and equipment number record.
- Equipment Parameter Text
-
Enter free-form text detailing information for the piece of equipment that is used in this operation.
- Actual Time
-
Enter the actual time a work group or staff member spent on an operation or the actual time a piece of equipment was used on an operation.
- Time UOM (time unit of measure)
-
Select the code for the time duration.
7.5.5.9 Consumables
Select the Consumables tab.
Figure 7-23 Edit Grower Operation form: Consumables tab
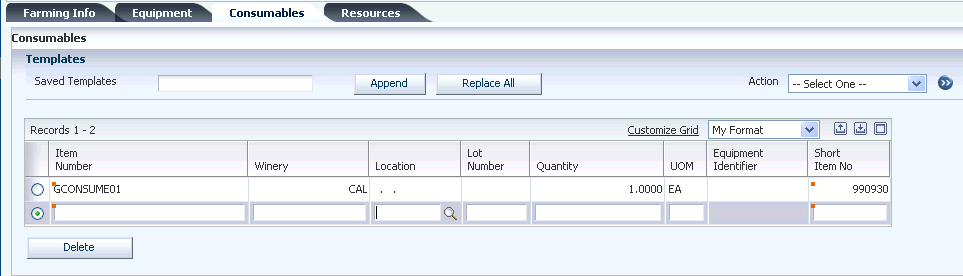
Description of "Figure 7-23 Edit Grower Operation form: Consumables tab"
- Saved Templates
-
Specify the consumable template to attach to the operation. If you have set up consumable templates, you can select the appropriate template on the Search & Select Consumable Template form. You can set up consumable templates to simplify data entry.
You have the option to append a consumable template or to replace any consumables that you entered with the list of consumables from the template.
You can also manually enter consumables and then save them as a template.
- Item Number
-
Enter an item number for anything that is consumed by the operation.
7.5.5.10 Resources
Select the Resources tab.
- Work Group Code
-
Specify the work group code for the operation. Values are set up in the Work Groups program (P31B11).
- Staff Number
-
Specify a staff number for the operation. The system enables you to enter either a staff number or a work group code. Values are set up in the Staff Information program (P31B02).
- Actual Time
-
Enter the actual time that a work group or staff member spent on an operation.
- Time UOM (time unit of measure)
-
Select the code for the time duration.
7.5.5.11 Instruct Lot Attributes
Click the Instruct Lot Attributes link. The system does not support EUR, Composition, and Ownership Lot Attributes for operations using FARM, FARMQA, and SPRAY as the base operation. Most grower operations use an area unit of measure and the system cannot calculate a lot quantity for an area.
The system displays a negative 1 for active ingredients for spray operations.
7.5.6 Entering Spray Operations
Access the Farming Activities - [spray operation name] form.
Entering spray operations is similar to entering farming operations. You enter the instructed start date, end date, and duration. You can also add instructions, comments, and category codes.
7.5.6.1 Harvest Assignments
Select the Harvest Assignments tab.
Figure 7-24 Edit Grower Operation form: Harvest Assignments tab
Description of "Figure 7-24 Edit Grower Operation form: Harvest Assignments tab"
- Block Code
-
Enter the assigned block code for the operation.
- Harvest Period and Harvest Suffix
-
Enter the assigned harvest period and suffix for the operation.
- Planted Area
-
Displays the treated area from the harvest.
- Treated Area
-
Enter the total treated area that is affected by the spray operation. This is a user-entered value, or it is supplied by default from the total harvest planted area if this field is left blank. This value is for informational purposes only and does not drive any functionality.
- Area UOM (area unit of measure)
-
Displays the default area unit of measure that is entered in the Winery Constants program (P31B13).
- Harvest Code
-
Displays a concatenated number using the block code, harvest period, and harvest suffix.
7.5.6.2 Spray Info
Select the Spray Info tab.
Figure 7-25 Edit Grower Operation form: Spray Info tab

Description of "Figure 7-25 Edit Grower Operation form: Spray Info tab"
- Item Number
-
Enter the item number for the spray master.
- Item Cost Center
-
Displays the cost center from the operation branch that is associated with the spray item. You can override the cost center and use a spray item from another business unit.
- Spray Method
-
Enter a UDC (40G/SM) to identify the method of spray operation. Values might include:
01: Aerial
02: Ground
- Additive Quantity
-
Enter a quantity for an additive on a spray operation. This value represents a fixed quantity. This value is supplied by default from the item spray master.
- Additive Total Quantity
-
Enter the total quantity of an additive for an operation to override the system-calculated additive quantity. Select the check box to the right of this field to enable input.
After you enter a value, select the Calculate Rate From Total check box and click the Refresh button. The system recalculates the Additive Quantity value and disables that field.
- Prior Activity W/H (prior activity withholding)
-
Enter a value that signifies the number of days that must have elapsed since the last activity took place on this harvest record. This value is supplied by default from the item spray master and can be overridden.
- Harvest W/H (harvest withholding)
-
Enter a value that signifies the number of days that must elapse before the next harvest activity can take place on the harvest record. This value is supplied by default from the item spray master and can be overridden.
- Re-entry Period W/H (reentry period withholding)
-
Enter a value that signifies the number of days that must elapse before you reenter the harvest block. This value is supplied by default from the item spray master and can be overridden.
- Subsequent Activity
-
Enter a value that signifies the number of days that must elapse before any other activity can take place on the harvest. This value defaults from the item spray master and can be overridden.
- Internally Supplier
-
Select to denote that the spray item being used in the operation is supplied internally by the grower and issued from inventory when the operation is closed.
- Location
-
Enter the inventory location that the system uses when issuing the spray item from inventory.
- Lot/SN (lot/serial number)
-
Enter the lot number of the spray item being used.
- Production Type
-
Select a UDC (40G/PT) to denote whether the spray is production or nonproduction.
1: Production
2: Nonproduction
- Operator ID
-
Enter the operator ID for the person operating the grower operation (Base Ops Farm and Spray). If this is an internal block, the system operator ID that is defined on the block as the default value. If this is an external block or if the operation has multiple harvests, the user must manually enter the operator information.
- Operator Number
-
Enter the address book number for the person performing the operation.
- Chemical Code
-
Enter a code to specify the chemical that is used in the operation. The system copies this code from the item spray information at the time the operation is created.
- Validate
-
Select to indicate that the system validates all operations that have withholding days for the corresponding withholding activity.
- Non-Production Site
-
Enter a UDC (40G/SI) to be used with nonproduction sprays that identifies the type of site being sprayed.
- License Number
-
Enter the spray operator license number as assigned by the government.
7.5.7 Entering Harvest Operations
Access the Edit Grower Operation form.
Complete the operation header information and click Save and Continue.
- Search For Harvest
-
Click to access the Search and Select Harvests form to select the desired harvest.
You can also manually enter the block code and harvest period on the Harvest Assignment tab. The system retrieves additional harvest information, for example the current estimates, and displays it on the Harvest Assignment tab.
- Save and Continue
-
Click to activate the Scheduled Harvest tab. If you enter the harvest operation at a status beyond Draft, the system reserves the harvest record at this point.
7.5.7.1 Scheduled Harvest
Select the Scheduled Harvest tab.
Figure 7-26 Edit Grower Operation form: Scheduled Harvest tab
Description of "Figure 7-26 Edit Grower Operation form: Scheduled Harvest tab"
- Scheduled Quantity
-
Enter the quantity to be harvested. The system supplies the unit of measure from the harvest.
If you enter a quantity that is larger than the current estimate, the system issues a warning. However, if you manually change the harvest estimate, the system does not issue a warning if, because of this change, the scheduled quantity exceeds the current estimate.
If you use continuous estimates, the Current Estimate field remains blank. In this case, you must enter both the scheduled quantity and the area.
- Scheduled Area
-
Enter the area to be harvested if you prefer to define the harvest in terms of acreage. The system supplies the default unit of measure from the harvest.
If you use continuous estimates, the Current Estimate field remains blank. In this case, you must enter both the scheduled quantity and the area. If the system cannot calculate the quantity when the operation is moved to a status beyond Draft, the system issues an error.
- Calculate Quantity
-
Click to calculate the scheduled harvest quantity. The system uses the following equation for this calculation: Harvest Quantity = (Current Estimate/Planted Area) x Harvest Area.
If the Scheduled Quantity field contains a positive number, the system does not override the value because of this calculation. You must manually clear the field and then perform the calculation.
If you use continuous estimates, the Current Estimate field remains blank. In this case, you must enter both the scheduled quantity and the area.
- Receiving Branch
-
Enter the code for the recipient of the harvested crop. The system displays the address book number of the receiving branch in the Deliver To field.
- External Ownership
-
If a purchase order exists for the harvest, this option appears checked. If you have not yet created a purchase order, this field is enabled.
- Scheduled Quantity, Completed Quantity, Received Quantity, and Remaining Quantity
-
As you create or update a harvest operation, the system updates the harvest quantities in the Grower Harvest table (F40G03) and displays them in these fields.
The scheduled quantity represents the total of all scheduled quantities on harvest operations at a status beyond Draft for a specific harvest.
The completed quantity is the sum of all scheduled quantities on closed harvest operations for a specific harvest.
The received quantity is the total received quantity from all closed weigh tag operations for a harvest.
The Remaining Quantity field stores the difference between the scheduled and the received quantity.
- P.O. Number
-
When you close the harvest operation, the system generates a purchase order and populates this field with the purchase order number.
- Harvest Lot Detail
-
Click to access lot detail about the harvest. When you enter a harvest information, the system generates a new lot number, but retains all lot attributes. The new lot number applies to the entire harvest, not just the actual quantity of harvested crops.
The system uses the scheduled quantity and area that you enter or calculate to update only the Grower Harvest table, but do not change the lot quantity.
- Remove Harvest
-
Select to remove the harvest assignment. Consequently, the system clears the values on the Scheduled Harvest tab and disables it.
7.5.8 Entering Farm Operations Using Create From List - Farming Operations
Access the Operation/WO Template Selection form.
Figure 7-27 Operation/WO Template Selection form
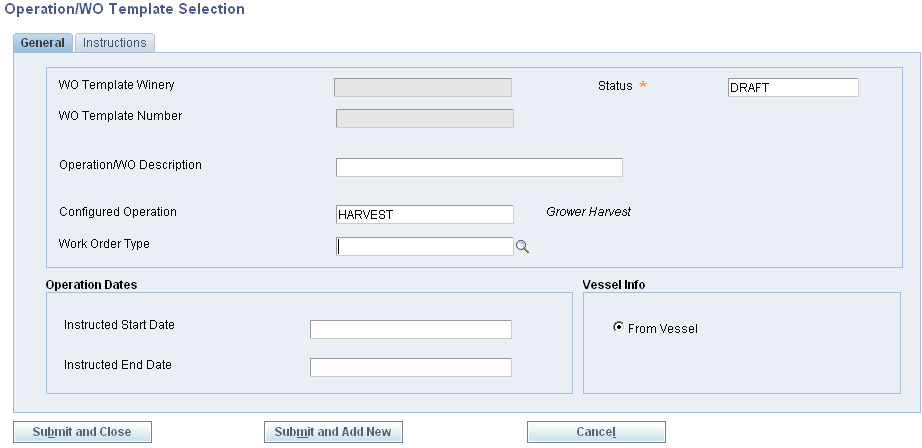
Description of "Figure 7-27 Operation/WO Template Selection form"
7.5.8.1 General
- WO Template Winery
-
Enter the facility that the work order template was created for.
- WO Template Number
-
Enter the number of the work order template to associate with the selected vessel or vessels.
- Operation/WO Description
-
Enter a description for the operation.
- Configured Operation
-
Enter the configured operation code to create an operation for the selected vessels. If you enter a configured operation code to create an operation, the system does not enable you to enter work order template information.
- Work Order Type
-
Enter a UDC (31B/TW) that identifies the type of work order that is being created. You can use this code to identify a group of operations that are performed . For example:
PPP: Plant, pick, prune
PIS: Plant, irrigate, spray
- Status
-
Initially displays a status of Draft when you add an operation.
- Instructed Start Date
-
Enter the anticipated start date for the operation.
- Instructed End Date
-
Enter the anticipated end date for the operation.
7.5.8.2 Instructions
Select the Instructions tab. Enter free-form text to provide detailed instructions for performing the operation.
7.6 Setting Up Spray Masters
This section provides an overview of spray master records, lists prerequisites, and discusses how to set up spray masters.
7.6.1 Understanding Spray Masters
Spray master records are set up as enterprise requirements planning (ERP) items. You must create an item and item branch record for each spray master. You can use any stocking type when creating the item record. The spray master must exist before you can apply it to a harvest.
7.6.1.1 Restricted EURs and Styles
When you create a spray master, you can assign one or more end-use reservation (EUR) codes that are restricted for the spray master. For example, you have an organic EUR that you do not want to spray with chemicals. Diazinon is a chemical that is used in the pesticide spray. When you create the spray item for pesticide, you enter the organic EUR code. The same logic applies to styles.
The system issues a warning message when you attach a harvest to a spray operation and the spray operation has one or more restricted EURs and the harvest has the same EURs.
7.6.2 Prerequisites
Before you complete the tasks in this section:
-
Create a spray master using the Item Master program (P4101).
-
Create a branch-specific spray master using the Item Branch/Plant program (P41026).
-
Set up EUR records.
-
Set up block styles.
7.6.3 Forms Used to Set Up Spray Masters
7.6.4 Setting Up Spray Masters
Access the Edit Spray Item form.
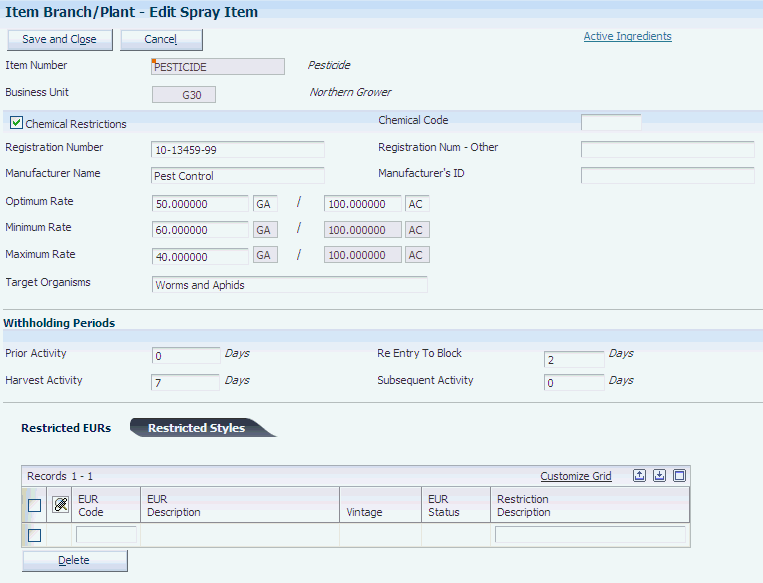
- Chemical Restrictions
-
Select to indicate that the spray item has chemical restrictions imposed on it.
- Registration Number
-
Enter a registration number for the pesticide that is assigned by the government. This number is specific to the branch/plant.
- Manufacturer Name
-
Enter the name of the chemical manufacturer.
- Optimum Rate and Unit of Measure
-
Enter the optimum application quantity and unit of measure for the spray operation. Changing the divisor quantity or unit of measure changes the divisor quantity or unit of measure for the minimum and maximum rates.
- Minimum Rate
-
Enter the minimum application quantity for the spray operation for a given area.
- Maximum Rate
-
Enter the maximum application quantity for the spray operation for a given area.
- Target Organism
-
Enter the target organisms for the spray operation.
- Chemical Code
-
Enter a code to identify the chemical. When creating an operation, the system copies the chemical code for use in data selection.
- Registration Num - Other (registration number - other)
-
Enter the secondary pesticide registration number that is used for spray items.
- Manufacturer's ID
-
Enter the identification number of the manufacturer.
- Active Ingredients
-
Click to access the Enter Bill of Material Information form. On this form, you define ingredients as active ingredients, enter quantities, and define effective dates.
7.6.4.1 Withholding Periods
- Prior Activity
-
Enter a value that signifies the number of days that must have elapsed since the last activity took place on this harvest record.
- Harvest Activity
-
Enter a value that signifies the number of days that must elapse before the next harvest activity can take place on the harvest record.
- Re Entry To Block
-
Enter a value that signifies the number of days that must elapse before reentering the harvest block.
- Subsequent Activity
-
Enter a value that signifies the number of days that must elapse before any other activity can take place on the harvest record.
7.7 Updating Operations
This section provides an overview of updating farming operations and discusses how to:
-
Update operations using speed operation update.
-
Set processing options for Speed Actuals Update (P31B67)
-
Update operations using speed actuals update.
-
Review withholding warning details.
7.7.1 Understanding Updating Farming Operations
If you want to update operations, you search for and retrieve them on the Search For Operations form using the available filters. After the system retrieves the operations, you can update them by adding further details to one or more operations. You use the Speed Operation Update program (P31B96) to provide detailed information for operations. You can define planned start and end dates, and the system calculates the duration for each operation. In addition, you can assign staff and equipment to the selected operations. For example, you can group operations of a similar nature by assigning them a job number. You assign qualified resources to a job number for a particular type of operation. For example, you assign quality assurance personnel to quality assurance operations. These operations can belong to multiple work orders.
7.7.1.1 Operations Workflow
This flowchart shows the operation statuses:
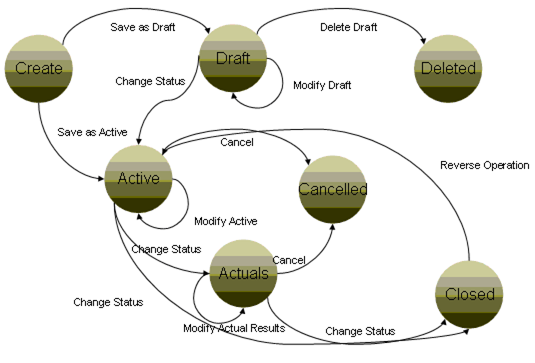
The flowchart shows the operation status and the paths that are valid for updating statues. For example
-
When you create an operation, you can save it with an active or draft status. You cannot create a new operation with a closed status.
-
When the operation is in an active status, you can maintain the operation and keep it at an active status or update the status to Actuals, Cancelled, or Closed.
-
Once an operation is at a Closed status, the only status you can move it to is back to active (as part of reversing an operation).
Once all farming activities are complete, you update the harvest status to closed to indicate all activities for this harvest record have been completed. You can set up user-defined statuses, using the Operation Workflow Status program (P31B74), however each of the user-defined statuses must correspond to a status in the flowchart.
7.7.1.2 Record Reservation
To avoid simultaneous processing of the same operation, the system reserves (locks) records for processing by any other program. When you access and edit an operation record, the system reserves the record for that program. Additionally, the system reserves all harvests that are attached to the operation, and its downstream operations.
When another user attempts to access a reserved operation, the system issues an error indicating that the operation is reserved. Users must wait until the system releases the records; however, any user can view the records.
If you reschedule operations by changing the planned date of an operation, you change the dependency chain. That means that revising an upstream operation may now affect different downstream operations and vessels. If a vessel in a downstream operation is reserved from a different application, the system cannot process the record reservation and returns an error.
7.7.1.3 Speed Operation Update
This diagram shows the information that you can update using the Speed Update program (P31B96)
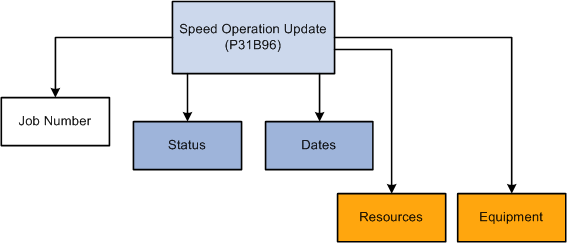
You use the Speed Operation Update program (P31B96) to change the operation status to active, actual, or closed. You can also assign a job number to the operation.
The system recalculates the elapsed time when you change either the instructed start time or the instructed end time. However, if you change the elapsed time, the system does not recalculate the instructed end date.
You can edit equipment and resources also. You cannot edit spray and farm information using this program.
7.7.1.4 Speed Actuals
Occasionally, you might to add or change the actual values on several operations. You can use the Speed Actuals Update program (P31B67) to add and change the actual values on multiple operations using one form. The system displays the appropriate tabs, based on the type of operation that you choose. For example, when you choose a farm operation, you cannot access the spray tab. When you enter actuals for harvest operations, the system displays the Scheduled Harvest tab.
When you select operations, the system reserves those operations. If the operation is currently reserved, an error message appears on the Speed Actuals Update form.
As you enter or change actual values using the Speed Actuals Update form, the system enters a check mark in the Process Y/N field in the row of the operation with which you are working. The system accepts changes only to operations with a check mark. To discard changes, remove the check mark and the system does not accept changes to the operation.
You can change only the Instructed Start, Instructed End, Actual Start, Actual End, and Status fields for the operation header record. You can change the status of an operation to active or actual, not closed. You can remove the actual end date and enter the actual elapsed time and the system recalculates the actual end date. The system calculates the new actual end date using the unit of measure entered during operation entry.
You can edit equipment and resources also.
|
Note: If you change the operational dependency by changing the dates, the system does not update correct amounts in the planned quantities until you click Save and Close. |
7.7.1.5 Withholding Warnings in Speed Actuals
When you make changes to farming or spray operations, these changes may cause withholding date violations. When you save the changes, the system validates withholding dates for the selected operations that have a check mark in the Update column. The system performs the validation for each withholding type that is selected for an operation. The validation checks whether the operation dates overlap with the withholding dates of other operations. If an operation in the Speed Actuals Update program overlaps with multiple existing operation, the system only finds the first existing operation for each validation rule and validates the next harvest or operation.
When you change the actual start or end date of the operation and then attempt to save the changes, the system performs a two-way validation. The system issues a warning if:
-
The operation that you selected in the Speed Actuals Update program is planned or performed within the withholding period of another operation.
-
One or more operations have been planned or performed within the withholding period of the operation that you selected in the Speed Actuals Update program.
If either of these conditions is met, the system displays a warning. If you set the withholding date processing options for any of the four types of withholding dates for the Speed Actuals Update program, the system automatically displays the Withholding Warning Detail form. The form lists the operation number and all harvest records that are associated with an operation.
|
Note: Some harvest records may not cause a withholding date warning. |
7.7.2 Prerequisite
To enable the Speed Actuals Update program to validate withholding dates, ensure that the appropriate validation check boxes for farm and spray operations are selected.
7.7.3 Forms Used to Update Operations
7.7.4 Updating Operations Using Speed Operation Update
Access the Speed Operation Update form.
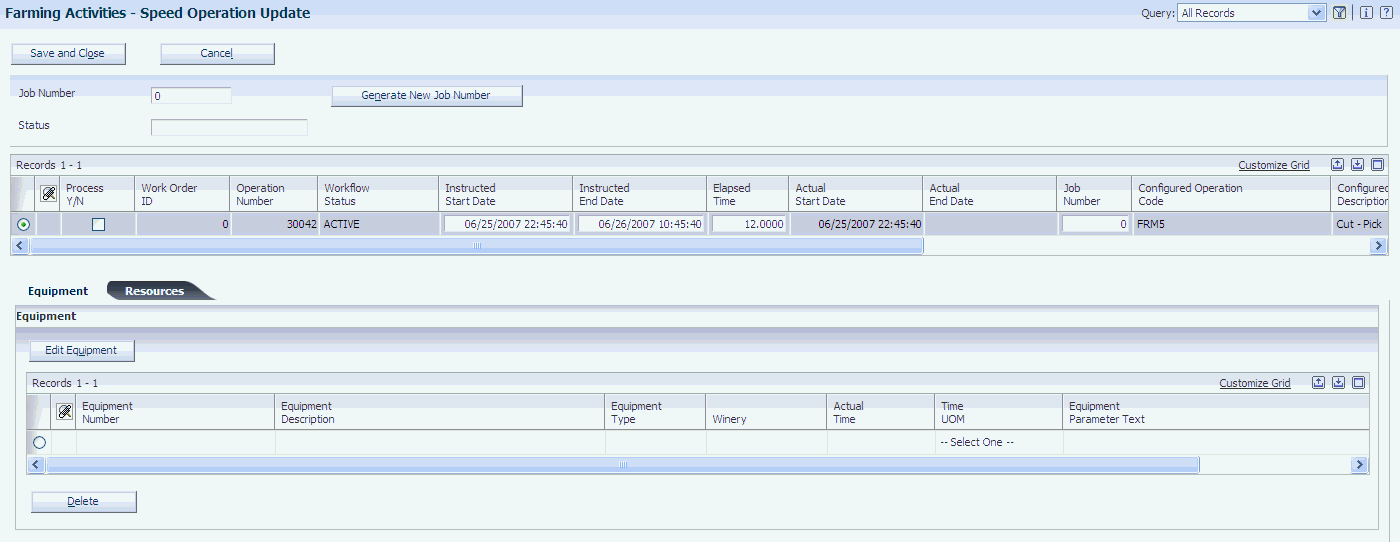
- Job Number
-
Select Generate New Job Number to generate an operation job number. This number is used for grouping and planning purposes. You can also manually enter a job number.
- Status
-
Enter the new workflow status of the operation.
- Process Y/N
-
The system selects this check box when you change the operation status.
- Inst Start (instructed start)
-
Enter the instructed start time of the operation. Changing the start date or end date triggers the withholding validation process and issues a warning if any overlap exists.
- Inst End (instructed end)
-
Enter the instructed end time of the operation. Changing the start date or end date triggers the withholding validation process and issues a warning if any overlap exists.
- Elapsed Time
-
Enter the elapsed time for the operation.
7.7.4.1 Resources
Select the Resources tab.
- Work Group Code
-
Enter the work group that performed the operation. This value is created in the Setup Work Group Master program (P31B11).
- Staff Number
-
Enter the staff number of the individual who performed the operation. This value is created in the Staff Setup program (P31B02).
- Actual Time
-
Enter the actual time that a work group or staff member spent on an operation.
- Time UOM (time unit of measure)
-
Select the unit of measure representing the actual time that is spent for each work group and staff member.
7.7.4.2 Equipment
Select the Equipment tab.
- Equipment Number
-
Enter the equipment number that is used to perform the operation. This value is created in the Create Equipment Attributes program (P31B05). The equipment and operation must have the same branch.
- Winery
-
The system defaults the winery providing the equipment.
- Equipment Parameter Text
-
Enter free-form text that is specific to the equipment.
7.7.5 Setting Processing Options for Speed Actuals Update (P31B67)
Use these processing options to control default processing for the Speed Actuals Update program.
7.7.5.1 Status
This processing option enables you to specify a default workflow status.
- Default Workflow Status
-
Enter the name of a workflow status. The system uses this status as the default when updating the status of the operations. For example, a configured workflow status might be Issued, Instructed, or Pending. If you leave this processing option blank, the system does not update the status of the operation.
7.7.5.2 Versions
This processing option controls the versions that the system uses when it calls additional programs.
- 1. Grower Speed Weigh Tag (P40G301)
-
Specify the version the system uses to call the Grower Speed Weigh Tag program. If you leave this processing option blank, the system uses the default version ZJDE0001.
7.7.5.3 Withholding
These processing options control the display of withholding warnings.
- Prior Withholding Warning
-
Indicate whether the Withholding Warning Detail form should automatically be displayed when a prior withholding warning occurs. Values are:
1: Automatically display the warning screen.
Blank: Do not automatically display the warning screen.
When you display the warning screen, the system automatically highlights the Existing Prior Withholding Period and Existing Prior Activity columns.
- Reentry Withholding Warning
-
Indicate whether the Withholding Warning Detail form should automatically be displayed when a reentry withholding warning occurs. Values are:
1: Automatically display the warning screen.
Blank: Do not automatically display the warning screen.
When you display the warning screen, the system automatically highlights the Existing Reentry Withholding Period and Existing Reentry Activity columns.
- Subsequent Withholding Warning
-
Indicate whether the Withholding Warning Detail form should automatically be displayed when a subsequent withholding warning occurs. Values are:
1: Automatically display the warning screen.
Blank: Do not automatically display the warning screen.
When you display the warning screen, the system automatically highlights the Existing Subsequent Withholding Period and Existing Subsequent Activity columns.
- Harvest Withholding Warning
-
Indicate whether the Withholding Warning Detail form should automatically be displayed when a harvest withholding warning occurs. Values are:
1: Automatically display the warning screen.
Blank: Do not automatically display the warning screen.
When you display the warning screen, the system automatically highlights the Existing Harvest Withholding Period and Existing Harvest Activity columns.
7.7.6 Updating Operations Using Speed Actuals Update
Access the Speed Actuals Update form.
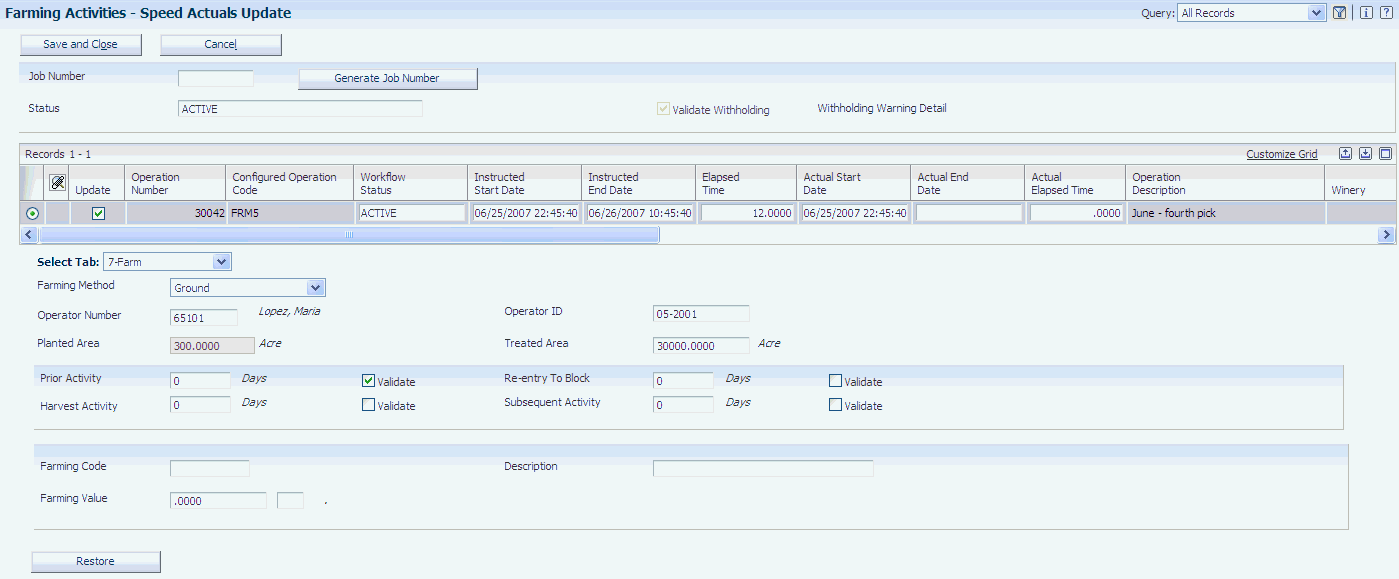
- Validate Withholding
-
Click to validate withholding dates.
When you first access the Speed Actuals Update form to work with grower operations, this check box is always selected and disabled. When you click Save and Close after making changes, the system always validates the withholding dates. After the first validation, the check box remains selected, but you can deselect it.
If you want the system to continue performing validations, keep the check box selected. However, if you do not want the system to continue validating withholding dates after the first time, you must deselect the check box.
Note:
This check box is displayed only for grower operations. - Withholding Warning Detail
-
Click to access the Withholding Warning Detail form.
You can use this link if you did not set the processing options for the Speed Actuals Update program to display the warning detail form automatically when you click Save and Close and the validation identifies overlapping withholding dates.
If you access the Withholding Warning Detail form manually, the system does not highlight any columns.
7.7.7 Reviewing Withholding Warning Details
Access the Withholding Warning Detail form.
Figure 7-33 Withholding Warning Detail form
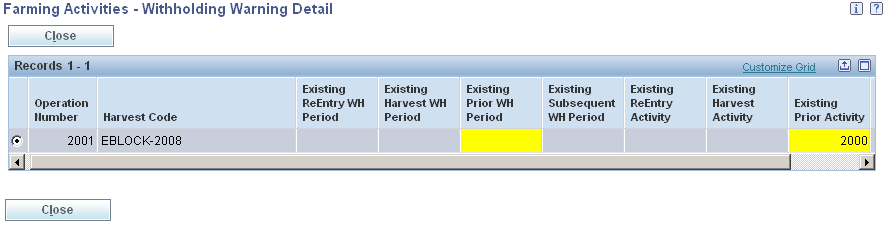
Description of "Figure 7-33 Withholding Warning Detail form"
7.8 Reversing Operations
This section provides an overview of reversing operations and discusses how to reverse operations.
7.8.1 Understanding Reversing Operations
After an operation is closed, you might reverse the operation, for example, if the user makes a data entry error or if the work was entered in the system but never performed. This might occur when the supervisor tells the user to create an irrigation operation for 600 blocks, and just after closing the operations, it rains; the operation is not complete. Another example would be when the user enters an operation for the wrong block. The user must reverse the operation and then record the information for the correct block.
You can also reverse weigh tag operations. An example would be when the farmer delivers the crop to the wrong crush site. The person at the weigh bridge may accept delivery, but when the grower representative runs the weigh tag summary report and sees the delivery to the wrong site, he or she may ask that the material be shipped to the correct crush site. Sending premium merlot grapes to a box wine crush site is an example of a mistake that must be reversed.
|
Note: The system issues an error if the selected operation includes a partial receipt type weigh tag that has been paid. |
7.8.2 Forms Used to Reverse Operations
7.8.3 Reversing Operations
Access the Reverse Operations form.
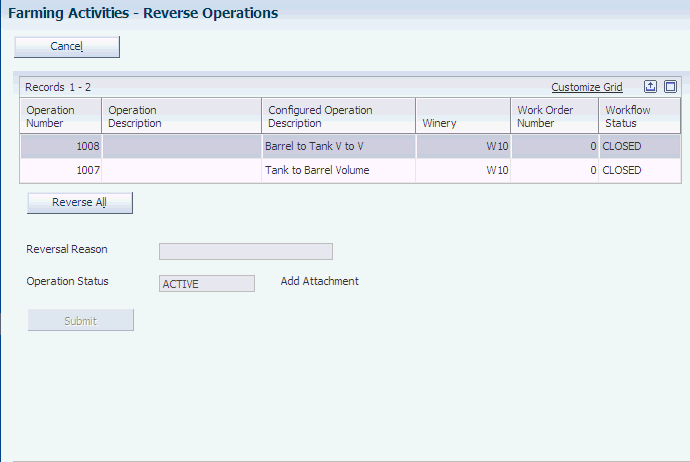
- Reversal Reason
-
Enter the reason for the reversal. This is a required field.
- Operation Status
-
Select the name of the workflow status. For example, a configured workflow status can be draft, actual, or active. This workflow status should be unique to the status type. For each workflow type, the workflow name should be unique.
7.9 Reviewing Operation History
This section provides an overview of operation history and discusses how to review operation history.
7.9.1 Understanding Operation History
After operations are attached to a grower harvest, you can view all the operations using the Operation History program (P40G70).
7.9.2 Forms Used to Review Operation History
7.9.3 Reviewing Operation History
Access the View Operations History form.
7.9.3.1 Operations
- Planned Dates and Actual Dates
-
Select whether the system uses the planned dates or actual dates when searching for operations that are assigned to the identified grower harvest.
- Start Date From
-
Specify the from start date to narrow your search for operations.
- Start Date Thru
-
Specify a through start date when searching based on a range of start dates.
- End Date From
-
Specify the from end date to narrow your search for operations.
- End Date Thru
-
Specify a through start date when searching based on a range of operation end dates.
- Operation Status
-
Select an operation status.
7.10 Reviewing Grower Hierarchy
This section provides an overview of grower hierarchy and discusses how to set up processing options for the Grower Hierarchy program (P40G0400)
7.10.1 Understanding Grower Hierarchy
The grower hierarchy is a term that refers to the hierarchal structure of a farm. The hierarchal structure consists of four levels:
-
Farm. This is the highest level of the hierarchy (level 1).
-
Block. This is the second level of the hierarchy.
-
Harvest. This is the third level of the hierarchy.
-
Harvest Suffix. This is the lowest level of the hierarchy (level 4).
You can use the Grower Hierarchy program (P40G0400) to view the grower hierarchy. The Grower Hierarchy program provides links for easy access to the Grower Farm (P40G01), Grower Block (P40G02), Grower Harvests (P40G03), and Item Master (P4101) programs. The Grower Hierarchy program also enables you to save and edit queries
7.10.2 Form Used to Review Grower Hierarchy
| Form Name | Form ID | Navigation | Usage |
|---|---|---|---|
| Grower Hierarchy | W40G0400A | Daily Processing (G40G111), Grower Hierarchy | Review grower hierarchy |
7.10.3 Setting Processing Options for the Grower Hierarchy Program (P40G0400)
Use these processing options to set default values.
7.10.3.1 Defaults
These processing options enable you to enter default information for the Grower Hierarchy program.
- Farm Code
-
Specify the default farm code the system uses for this version of the Grower Hierarchy program.
- Block Code
-
Specify the default block code the system uses for this version of the Grower Hierarchy program.
- Harvest Period
-
Specify the default harvest period the system uses for this version of the Grower Hierarchy program.
- Harvest Suffix
-
Specify the default harvest suffix the system uses for this version of the Grower Hierarchy program.
- Farm Type
-
Specify the default farm type the system uses for this version of the Grower Hierarchy program.
- Cost Center
-
Specify the default cost center the system uses for this version of the Grower Hierarchy program.
- Farm Status Code
-
Specify the default farm status code the system uses for this version of the Grower Hierarchy program.
- Block Status Code
-
Specify the default block status code the system uses for this version of the Grower Hierarchy program.
- Harvest Status Code
-
Specify the default harvest status code the system uses for this version of the Grower Hierarchy program.
7.10.3.2 Versions
- Grower Farm Maintenance (P40G01)
-
Specify which version of Grower Farm Maintenance program (P40G01) you want the system to use. If left blank, the system uses version ZJDE0001.
- Grower Block Maintenance (P40G02)
-
Specify which version of Grower Block Maintenance program (P40G02) you want the system to use. If left blank, the system uses version ZJDE0001.
- Grower Harvest Maintenance (P40G03)
-
Specify which version of Grower Harvest Maintenance program (P40G03) you want the system to use. If left blank, the system uses version ZJDE0001.
- Item Master (P4101)
-
Specify which version of Item Master program (P4101) you want the system to use. If left blank, the system uses version ZJDE0001.

7.11 Running Operation Reports
This section discusses how to:
-
Run the Pesticide Usage report.
-
Set processing options for Pesticide Usage Report (R40G300).
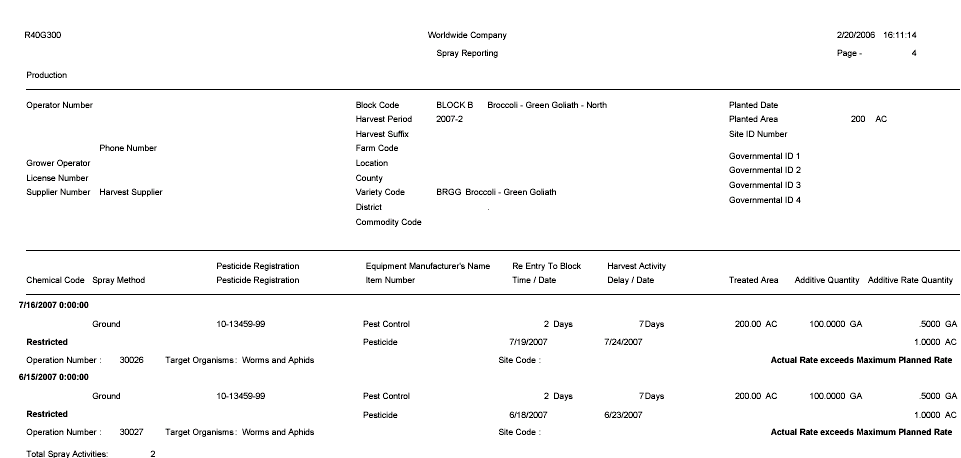
7.11.2 Setting Processing Options for Pesticide Usage Report (R40G300)
Use these processing options to specify contact types and select dates when running the report.
7.11.2.1 Contact Types
- 1. Contact Address Type, 2. Contact Address Type, and 3. Contact Address Type
-
Specify up to three contact types to be printed on the Spray report. If multiple contacts exists in the Grower Contacts table (F40G102), the first one prints.
7.11.2.2 Dates
- Reporting Date Type
-
Specify whether you want to run the report by the actual start date or the Instructed start date in the Operation Header table (F31B65). Values are:
Blank or 0: Run the report based on the actual start date.
1: Run the report based on the instructed start date.
- Spray Reporting Start Date
-
Specify the start date for the spray report. Spray operations with start dates that are later than or equal to this date and before or equal to the specified ending date are included on the report. If this processing option is left blank, the start date is not used in the selection criteria.
- Spray Reporting End Date
-
Specify the end date for the spray report. The report includes spray operations with end dates that are before or equal to this date and later than or equal to the specified starting date. If this processing option is left blank, the system does not use the end date in the selection criteria.