4 Setting Up and Managing Homebuilder Management Foundation Information
This chapter contains the following topics:
-
Section 4.1, "Understanding Homebuilder Foundation Information"
-
Section 4.11, "Analyzing Profitability with the Community Pro Forma Program"
4.1 Understanding Homebuilder Foundation Information
This table describes the components that you must set up before using JD Edwards EnterpriseOne Homebuilder Management:
| Component | Description |
|---|---|
| National Purchasing Areas | A collection of communities at a higher level than the area level. |
| Areas | A collection of communities. |
| National Purchasing Communities | A collection of lots that are designated within a national purchasing area. |
| Communities | A collection of lots, also referred to as subdivisions or projects. |
| National Purchasing Phases | Sections, or subsets, of lots within a community that are designated within a national purchasing community. |
| Phases | Sections, or subsets, of lots within a community. (Optional)
If a community is not set up as phase-enabled, the system uses the default phase record 000 for all setup, costing, construction, and sales activities. |
| Lots | An individual site within a community or phase. |
| Plans and Elevation | Basic features and architectural elements of a house. |
| Options | Features that buyers can choose to purchase to further customize their houses. |
An area is typically associated with a single purchasing department or geographic territory. Within an area, you can create communities that can be further divided into construction phases. Communities and phases are logical groupings of lots within an area. After communities and phases are identified, you can associate them with lots and plans. The use of an area as a high-level organizational structure enables multiple communities to be included in inquiries and searches.
Setting up the basic homebuilder information in the JD Edwards EnterpriseOne Homebuilder Management system enables you to:
-
Create a flexible organizational structure, which enables you to customize the product offerings at various levels of detail.
-
Streamline the setup process and minimize redundant data entry with the use of copying features.
-
Simplify the maintenance and management of product lines.
-
Analyze the performance of the product lines in several ways, including breakdowns by plan, option, and community.
The structure of the system allows for this analysis on either a pro forma or an actual basis.
-
Separate the construction elements of a house from the sales elements, when appropriate.
4.1.1 Understanding Tracking the HA Ledger for Communities and Lots
Use the Update Projected Final Ledger Type by Subledger/Subledger Type check box in the Community Master program (P44H101) and the Lot Master (P44H201) programs.to control the tracking of projected final amounts/units at the job level.
The check box is available in the P44H101 program when you initially set up the community.
See Setting Up Communities (Release 9.1 Update).
The check box is available in the P44H201 program after you run the Lot Start Process and the Business Unit Field in Lot Master is populated with the new job number that is created for this lot. The system initially copies the value of the check box from the associated community to a new job. You can access the check box on the Additional Information tab of the Lot Master Revisions form.
See Setting Up Lots.
The system stores check box value in the Extended Job Master table (F5108).
4.2 Understanding Wildcards
Wildcards can increase the efficiency of data setup and processing. You can use wildcards to set up and maintain option master, supplier assignment, bid detail, and takeoff information. The wildcard character (+) identifies items that apply to all levels of configuration or costing.
For example, when you set up options, you can use wildcards to make a specific option available for multiple plans and elevations. If you want to make an option available for selection regardless of the plan or elevation of the house that a buyer has chosen, enter + in the Plan and Elevation fields on the Option Revisions form.
When you select options on the Select Option Package Components form, the system displays all option master records that are specific to the plan and elevation that the buyer chose. The system also displays all options for which you entered a unique plan in the Plan field and + in the Elevation field, all options for which you entered + in both the Plan and Elevation fields, and so on.
|
Note: The JD Edwards World Homebuilder Management system uses the wildcard character *, and not +. In the JD Edwards EnterpriseOne Homebuilder Management system, * has other meanings, so you cannot use it as a wildcard. |
4.2.1 Fields and Records in Which Wildcards Are Allowed
This table shows the field and type of record in which you can enter the wildcard character:
| Field | Community Master | Supplier Assignment | Bid Detail | Takeoff |
|---|---|---|---|---|
| Community | x | x | x | x |
| Phase | x | x | x | x |
| Plan | x | blank | x | x |
| Elevation | x | blank | x | x |
| Swing | blank | blank | blank | x |
| Lot | blank | x | blank | blank |
| Option Number | blank | x | blank | blank |
4.2.2 Examples of Option Master Records with Wildcards
This table lists examples of option master records that are set up with wildcards:
| Option Number | Area | Community | Phase | Plan | Elevation | Explanation |
|---|---|---|---|---|---|---|
| MPL100 | 100 | 10010000 | 000 | 1850 | + | This option is available for houses that meet these criteria:
|
| APL200 | 100 | 10010000 | 000 | + | + | This option is available for houses that meet these criteria:
|
| SLU210 | 100 | + | + | + | + | This option is available for houses within area 100 that meet these criteria:
|
| YLE601 | 100 | + | + | 1850 | A | This option is available for houses within area 100 that meet these criteria:
|
| CAR552 | 100 | + | + | 1850 | + | This option is available for houses within area 100 that meet these criteria:
|
4.3 Prerequisites
Before you complete the tasks in this chapter, you must:
-
Set up the branch/plant constants.
-
Add a new job master record for the area.
-
Enter cost codes for the new job.
4.4 Setting Up Areas
This section provides an overview of areas and lists the forms that are used to set up areas.
4.4.1 Understanding Areas
An area is a grouping that home builders use to specify a group of communities that share a commonality, such as a geographic territory. Large home builders might have many areas within their organizational structure. Smaller, regional builders might operate their entire organization using a single area.
To further cost savings, you can use national purchasing to set up a national / commodity based approach to procurement. National purchasing provides a separate hierarchical structure from the standard area, community, phase setup. The national purchasing functionality is applicable to both bids and takeoffs. When you use national purchasing, you have more leverage with suppliers to negotiate contracts on a global basis to get the best pricing possible, while still allowing for overrides at the community level.
To set up areas and national purchasing areas, access the User Defined Codes program (P0004A) to add values to user-defined code (UDC) table 00/05.
4.4.2 Forms Used to Set Up Areas
| Form Name | FormID | Navigation | Usage |
|---|---|---|---|
| Work With User Defined Codes | W0004AA | Foundation Management (G44H21), Area Setup | Review areas. |
| User Defined Codes | W0004AI | On the Work With User Defined Codes form, click Add. | Set up areas. |
4.5 Setting Up Communities (Release 9.1 Update)
This section provides an overview of communities, lists prerequisites, and discusses how to:
-
Set processing options for Community Master (P44H101).
-
Set up communities.
4.5.1 Understanding Communities
A community is a distinct grouping of lots that share any number of conditions, such as product offering or geography. You set up a community in the Community Master program (P44H101) before you enter any remaining components, such as plans, lots, and options. You can copy community master information from an existing community to a new community that has similar characteristics. If you specify an area as a national purchasing area, you must also select a national purchasing community.
Each community master record that you create has a corresponding job master record. Many fields in the community master record directly correspond to fields in the job master record, including Job Type, Company Number, Update Projected Final Ledger Type by Subledger/Subledger Type, and Category Codes 1–10.
You can enter job master information on the Community Revisions form. If the job master record exists at the time that you create the community master record, you can either accept the common values from the job master record and apply them to the community master record, or choose to overwrite the values in the job master record with those that you enter in the community master record.
See "Setting Up Jobs" in the JD Edwards EnterpriseOne Applications Job Cost Implementation Guide
4.5.2 Prerequisites
Before you complete the tasks in this section, you must:
-
Enter income statement and warranty business units or jobs in the JD Edwards EnterpriseOne General Accounting system.
-
Verify that the activity rules and associated construction and sales rule types are set up in UDC 44H0/RT.
-
Enter tax areas, entities, rates, and reason codes for any applicable taxes that apply to the community location.
4.5.3 Forms Used to Set Up Communities
| Form Name | Form ID | Navigation | Usage |
|---|---|---|---|
| Work with Community Master | W44H101B | Foundation Management (G44H21), Maintain Communities | Review communities. |
| Community Revisions | W44H101C | On the Work with Community Master form, click Add. | Set up communities. |
4.5.4 Setting Processing Options for Community Master (P44H101)
Processing options enable you to specify the default processing for programs and reports.
4.5.4.1 Defaults
- 1. Posting Edit - Business Unit
-
Specify a code from UDC 00/PF for the posting edit code for the job master record. Values are:
Blank: Post transactions.
K: Lock the original budget.
N: Cannot post transactions.
P: Purge.
- 2. Level of Detail - Business Unit
-
Specify a code from UDC H00/LD that determines the level of detail to display for business units. Nine levels of detail are available. Level 1 is the least detailed, and level 9 is the most detailed. The default level is 9.
- 3. Homebuilder Area
-
Specify a code from UDC 00/05 that determines the area. An area comprises one or multiple communities.
4.5.4.2 Versions
If you leave any of the following processing options blank, the system uses the ZJDE0001 version.
- 1. Extended Homebuilder Data (P44H092) Version
-
Specify the version of the P44H092 program to use.
- 2. Lot Master (P44H201) Version
-
Specify the version of the P44H201 program to use.
- 3. Plan Master (P44H301) Version
-
Specify the version of the P44H301 program to use.
- 4. Option Master (P44H401) Version
-
Specify the version of the P44H401 program to use.
- 5. Option Selections (P44H501) Version
-
Specify the version of the P44H501 program to use.
- 6. Community Master Outbound Notification (P44H9901) Version
-
Specify the version of the P44H9901 program to use when scheduling is enabled.
4.5.5 Set Up Communities
Access the Community Revisions form.
- Area
-
Enter a value that represents one or more communities.
- Community
-
Enter a 8-digit value that represents a community. A community is a distinct grouping of lots which can be grouped together through user-defined specifications, for example, product offering, geography, and so on. A subset of the builder's plans and options are typically included within a community.
Note:
When you enter a community, the last four numbers should be zeros. During the Lot Start process, the system concatenates the community number with the lot to form a lot job number. The value in the Community field should end with 0000.
4.5.5.1 General
- Type Business Unit
-
Enter a code from UDC 00/MC that specifies the classification of the business unit.
- Phase Enabling Flag
-
Select this check box if phases are used in this community.
If this check box is selected, you can access the Phase Maintenance form from the Form menu.
- Update Projected Final Ledger Type by Subledger/Subledger Type
-
Note:
For more information on tracking a job by subledger/subledger type, see "Extended Job Information" in the JD Edwards EnterpriseOne Applications Job Cost Implementation GuideIf you select this check box for a specific job, the system records the subledger/subledger types by job to the Projected Final ledger types (HA/HU).
If you do not select this check box for a specific job, the system does not record the subledger/subledger types by job to Projected Final ledger types (HA/HU).
Note:
You may not want to select this check box in the case of model homes or for common area work that is being managed in a job. - Number of Lots
-
Enter the total number of lots that are planned for the community. This field is informational only.
- Number of Phases
-
Enter the number of phases within a community. This field is informational only.
This field appears if the Phase Enabling Flag check box is selected for the community. If the Phase Enabling Flag check box is not selected, the Number of Phases field is assumed to be zero and all other phase-related setup and maintenance features are disabled for that community.
- Product Type
-
Enter a code from UDC 44H3/PT to classify plans by product type. Values include:
CON: Condominium
SFA: Single family attached.
SFD: Single family detached
TOW: Townhouse
- Construction Sequence
-
Displays the last sequence number that was used with this phase of lots. This value will be automatically updated incrementally at the start of new lots.
- Construction Rule Type and Sales Rule Type
-
Enter a code from UDC 44H0/RT that specifies the rule type associated with the construction or sales activity for homes in the community.
4.5.5.2 Tax Info
- Tax Entity
-
Enter the address number of the tax authority to which property taxes are paid.
- Tax Rate/Area
-
Enter a code that identifies an area that has common tax rates and tax authorities. The system validates this code against the Tax Areas table (F4008).
- Tax Expl Code (tax explanation code)
-
Enter a hard-coded value from UDC 00/EX that specifies the algorithm to use to calculate tax and GL distribution amounts.
The system uses the tax explanation code in conjunction with the tax rate area and tax rules to determine how the tax is calculated.
4.5.5.3 Cat Codes
- Income Statement Business Unit
-
Enter a code that specifies the business unit for the income statement in the closing worksheet.
- Warranty Business Unit
-
Enter a code that specifies the business unit for the warranty used in the closing worksheet.
- Closing Worksheet Template
-
Specify a standard template for booking the closing entries of a sale. At escrow closing, the system compiles a closing worksheet based on the specifications of the template that you specify in this field and the lot information.
4.5.5.4 Dates
- User Dates 1–10
-
Enter a date for construction or community-related information, for example, the date that the building permit is accepted.
4.5.5.5 Addresses
- Addresses 1–20
-
Enter an address book number for construction or community-related information.
4.5.5.6 Attachments
Enter text or attach information that you want to associate with the community.
4.6 Setting Up Phases
This section provides an overview of phases, lists a prerequisite, and discusses how to set up phases.
4.6.1 Understanding Phases
A phase, which is an optional component, is a subset of lots within a community. You set up phases in the Community Master program (P44H101). Within the same community, phases can have distinct product offerings and pricing. Suppliers and subcontractors might bid phases independently.
In a phase-enabled community, you define plans, bids, takeoffs, and option pricing at the phase level. Phases enable you to:
-
Replicate actual construction activities by building lots in separate phases within a community.
-
Provide separate pricing and product offerings for each phase.
-
Provide separate material and labor costs by phase for bids, takeoffs, item pricing, and supplier assignments.
-
Restrict the selection and construction of options by phase within a community.
4.6.2 Prerequisite
Before you complete the task in this section, you must verify that the Phase Enabling Flag check box on the Community Revisions form is selected for communities that require phase construction.
4.6.3 Forms Used to Set Up Phases
| Form Name | Form ID | Navigation | Usage |
|---|---|---|---|
| Work with Community Master | W44H101B | Foundation Management (G44H21), Maintain Communities | Review communities. |
| Phase Maintenance | W44H101A | On the Work with Community Master form, select a community and select Phase Maint from the Form menu. | Set up phases.
Note: If the Phase Maint selection is disabled, the Phase Enabling Flag check box for the community is not selected on the Community Revisions form. |
4.6.4 Setting Up Phases
Access the Phase Maintenance form.
Many of the fields that appear on the Phase Maintenance form are the same as those fields that appear on the General tab of the Community Revisions form.
See Set Up Communities.
- Phase and Phase Description
-
Enter a number and description to identify a phase within a community.
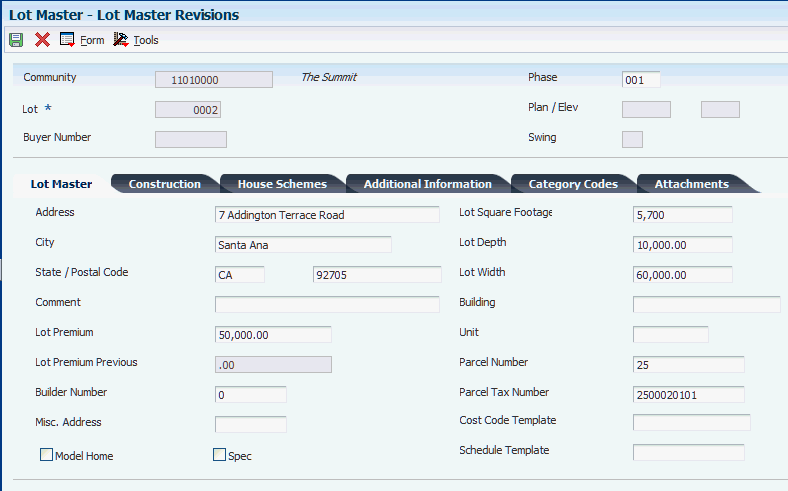
4.7 Setting Up Lots
This section provides an overview of lot setup, lists a prerequisite, and discusses how to:
-
Set processing options for Lot Master (P44H201).
-
Set up lots.
-
Assign multiple lots to a community.
-
Release lots for sale.
4.7.1 Understanding Lot Setup
Use the Lot Master program (P44H201) to set up the lots within a community and manage the progress of the lots through the various stages of construction. The P44H201 program can track:
-
Lot construction information, including start date, completion date, and current construction activity.
-
Lot number, street address, and legal description of the lot, including the assessor's parcel number, legal lot, tract, and block designation.
-
Lot premiums.
-
Unique lot characteristics.
-
Lot history information, such as changes to the lot status code, plan, and elevation and advancement through the construction activity rules.
During the initial setup, enter only basic information about a lot. As the lot progresses through the configuration and construction process, the system automatically updates additional fields on the Lot Master Revisions form.
You must release a lot for sale before it can be configured with a plan and elevation or sold to a buyer. Lots that the builder controls or unprepared lots, which are lots that have not been committed for sale, can be established in the P44H201 program without making them available for house configuration or sale. When you release a lot for sale, the system updates the lot status in the lot master record and the lot is available to the Sales Workbench program (P44H500). After you release a lot, you cannot change the lot back to unreleased.
4.7.2 Prerequisite
Before you complete the tasks in this section, you must set up any necessary lot-related user-defined codes.
4.7.3 Forms Used to Set Up Lots
| Form Name | Form ID | Navigation | Usage |
|---|---|---|---|
| Work with Lot Master | W44H201A | Foundation Management (G44H21), Lot Master | Review lots by community and phase.
Release lots for sale. |
| Lot Master Revisions | W44H201B | On the Work with Lot Master form, click Add. | Set up lots. |
| Lot Master Maintenance | W44H201C | On the Work with Lot Master form, select a record and select Lot Maintenance from the Row menu. | Assign multiple lots to a community. |
4.7.4 Setting Processing Options for Lot Master (P44H201)
Processing options enable you to specify the default processing for programs and reports.
4.7.4.1 Defaults
- 1. Construction Status Code Last - at lot creation
-
Specify a construction activity rule from UDC 44H0/RL that identifies the lot creation.
- 2. Lot Status Code - at lot creation
-
Specify a code from UDC 44H2/LS that identifies the status of a lot, such as Sold / Not Started. This value is determined by the current construction activity rule.
- 3. Construction Status Code Last - at release for construction
-
Specify a construction activity rule from UDC 44H0/RL that identifies the release for construction.
- 4. Sales Activity Code - at Sales creation
-
Specify a sales activity code from UDC 44H0/RL that identifies the last sale completed in the sales process.
- 5. Sales Contract Status - at release for sale
-
Specify a default contract status code from UDC 44H5/ST that identifies released for sale.
- 6. Lot Status
-
Specify a code from UDC 44H2/LS that identifies the status of a lot. This value is determined by the current construction and sales activity rule.
You can make changes to the Construction Sequence field on the Lot Master Revisions form if the lot status has not yet reached this status.
- 7. Construction Status Code Last
-
Specify a code from UDC 44H0/RL that identifies the construction activity rule.
You can make changes to the Phase and Commitment Start Date fields on the Lot Master Revisions form if the construction status has not yet reached this status.
- 8. Hide phase column when phase is not enabled for a community.
-
Specify whether to hide the phase column if phase is not enabled for a community. Values are:
Blank: Do not hide.
1: Hide.
4.7.4.2 Versions
If you leave any of the following processing options blank, the system uses the ZJDE0001 version.
- 1. Extended Homebuilder Data (P44H092) Version
-
Select the version of the P44H092 program to use.
- 2. Sales Management (P44H500) Version
-
Select the version of the P44H500 program to use.
- 3. Job Status Inquiry (P512100) Version
-
Select the version of the P512100 program to use.
- 4. Homebuilder Activity Rules (P44H002) Version
-
Select the version of the P44H002 program to use.
- 5. Lot Master Outbound Notification (P44H9903) Version
-
Select the version of the P44H9903 program to use.
4.7.5 Setting Up Lots (Release 9.1 Update)
Access the Lot Master Revisions form.
- Lot
-
Enter a four-digit number that specifies the lot.
If you select a community, the system will supply a lot number.
- Phase
-
Enter a value that specifies a phase within a community.
If a community is not phase-enabled, the system supplies the default phase value 000 in this field.
- Buyer Number, Plan/Elev, (plan/elevation) and Swing
-
Displays values that are generated by the Sales Workbench program (P44H500).
4.7.5.1 Lot Master
Select the Lot Master tab.
- Lot Premium
-
Enter the monetary amount adjustment that is based on the prime location of the lot.
The system uses this field to calculate the total house price. The system stores this value in the Lot Master (F44H201) and the Sales Master (F44H500) tables.
- Builder Number
-
Enter a number that identifies the builder. The value in this field is typically the address book number of the superintendent and is used for construction information. The system stores this value in the Lot Master (F44H201) and the Sales Master (F44H500) tables.
- Model Home and Spec (speculation)
-
Select one of these check boxes to specify whether the home is a model or spec.
- Building
-
Enter the building location of the house.
- Unit
-
Identify the unit of the building. Unit is a field used in location reporting. The unit is used in conjunction with the lot and block to describe a parcel of land, usually within a subdivision.
- Parcel Number
-
Enter an alphanumeric code to use as an alternate identification number for a service address. The parcel number must be unique. If you leave this field blank, the system does not assign a number when you add a service address.
- Parcel Tax Number
-
Enter a value for the parcel tax number. This field is used for informational purposes.
- Cost Code Template
-
Enter a code that indicates the job or business unit from which the account master records for a lot are copied.
- Schedule Template
-
Enter a code that specifies the template for use by a third-party scheduling system.
|
Note: If you enter values in the Cost Code Template and Schedule Template fields on the Lot Master Revisions form, the values override the values that you entered on the Plan Master Revisions form. If you leave the Cost Code Template and Schedule Template fields blank, the system supplies the values that you entered on the Plan Master Revisions form. |
4.7.5.2 Construction
Select the Construction tab.
- Release Status Date
-
Enter the date that a lot is released for construction.
- Commitment Start Date
-
Enter the start date for bid and takeoff pricing. If you do not enter a value in this field, you must enter a value in the Commitment Effective Date processing option of the Lot Start Workfile Generation program (R44H700).
- Plot Approval Date
-
Enter the date on which the plot was approved for building.
- Construction Start Date
-
Enter the date on which construction for a house begins.
- Construction Complete Date
-
Enter the date on which the construction for a house is complete.
- Actual Finish Date
-
Enter the date on which an item or a line of work was completed.
- Legal Lot / Block / Tract
-
Enter the number that is used to describe a parcel of land within a community. This information is typically used for tax and sales purposes.
- PQ Hold Date (prequalify hold date)
-
Enter the date on which a walk-through will take place.
- Permit Number
-
Enter the permit number. This field is informational only.
- Construction Sequence
-
Enter a value that specifies the construction sequence of a started lot. This field is input capable only if the lot has not reached the lot status specified in a processing option.
Optionally, you can use this field to represent the contract change order number.
- Posting Stage
-
Enter a value to use to record the through posting stage in the Option Selections table (F44H511).
4.7.5.3 House Schemes
Select the House Schemes tab.
The fields on this tab are user-defined and can be used to specify color package, type of roof tile, and so on.
4.7.5.4 Additional Information
Select the Additional Information tab.
- Amount 1–6
-
Enter an amount that specifies various construction or community-related information. For example, you could use this field to identify the amount of the initial deposit on a property.
- User Reason Code 01–06
-
Enter a user-defined value that indicates why a line has been approved or rejected. You set up and maintain these field names through vocabulary overrides. Leave these fields blank if they are not applicable.
- Update Projected Final Ledger Type by Subledger/Subledger Type
-
Note:
This check box is only available after you run the Lot Start Workfile Generation (R44H700) for the lot. Once you run this process, the Business Unit Field in Lot Master is populated with the new job number that is created for this lot.If you select this check box for a specific job, the system records the subledger/subledger types by job to the Projected Final ledger types (HA/HU).
If you do not select this check box for a specific job, the system does not record the subledger/subledger types by job to Projected Final ledger types (HA/HU).
Note:
You may not want to select this check box in the case of model homes or for common area work that is being managed in a job.
4.7.5.5 Category Codes
Select the Category Codes tab.
- Categories 1–10
-
Specify a lot category code from UDC 44H2/01–10.
4.7.6 Assigning Multiple Lots to a Community
Access the Lot Master Maintenance form.
Use this form to set up multiple lots at the same time. The Lot Master Maintenance form has the same fields as the Lot Master Revisions form.
4.7.7 Releasing Lots for Sale
Access the Work with Lot Master form.
To release lots for sale:
-
Enter the number of a specific community in the Community field.
-
Select a lot, and then select Release for Sale from the Row menu.
-
At the warning message, click Yes to continue.
The system updates the release dates on each lot with today's date. The lot is now available in the P44H500 program, where a plan and elevation can be configured or the lot can be sold to a buyer.
4.8 Setting Up Cost Code Templates
A cost code template is a predefined list of the cost code and budget structure that applies to a plan. The system uses cost code templates during the Lot Start process to copy cost codes and budgets to lots. The system creates accounts for the lot in the form of cost codes, cost types, and other account category code information, such as trade codes and construction stage codes.
You can set up as many cost code templates as necessary. For example, you might set up different cost code templates and assign them to each plan or lot in a community. Alternatively, you might set up one cost code template and assign it to all communities that use the same cost code structure.
|
Note: A cost code template is called a chart type in JD Edwards EnterpriseOne Job Cost system. |
4.8.1 Conversion from JD Edwards World Homebuilder Management
If you converted from Oracle's JD Edwards World Homebuilder Management, be aware of the following:
-
The cost code template replaces the plan jobs, also known as P jobs.
-
The Plan Master Conversion program (R44H9301) populates the Cost Code Template field with the P job number.
-
The JD Edwards EnterpriseOne Homebuilder Management system does not require that you embed the community or plan number in a cost code template.
A cost code template can now span all communities and companies that use the same cost code structure.
-
You can create as many cost code templates as your business requires.
4.8.2 Forms Used to Set Up Cost Code Templates
| Form Name | FormID | Navigation | Usage |
|---|---|---|---|
| Work with Job Master | W51006R | Foundation Management (G44H21), Job Cost Master | Review jobs. |
| Work with Cost Code Structures | W51091G | On Work with Job Master form, select Chart Types on the Form menu. | Review cost code structures. |
| Chart Type Setup | W51091I | On the Work with Cost Code Structures form, select a chart type and select Chart Type Setup from the Row menu. | Set up cost codes for a cost code template (chart type). |
4.9 Setting Up Plans for Communities
This section provides an overview of plans for communities, lists prerequisites, and discusses how to:
-
Set processing options for Plan Master (P44H301).
-
Assign plans to communities.
-
Revise plans.
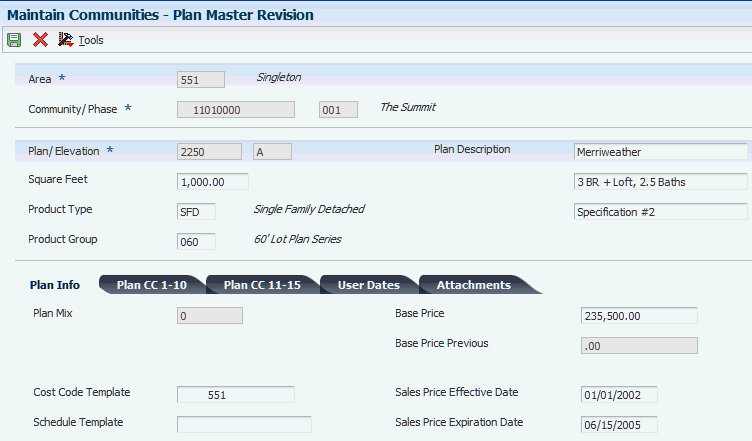
4.9.1 Understanding Plans for Communities
A plan represents an architectural design based on an arrangement, a location, and the size of the rooms in a house. A plan typically has a varied façade or exterior look, which is called its elevation.
For reporting and analysis, you can assign specific attributes, such as square feet and the type of product and group, to a plan in the Plan Master program (P44H301). Additionally, you can assign the cost code template and schedule template at the plan level.
4.9.1.1 Copying Plans
You can use existing plans to copy information to a new community or phase. You can copy plans:
-
From an existing community to a new community.
-
From an existing community to a new phase within another community.
-
From an existing phase within a community to a new phase within an existing or new community.
-
From an existing phase within a community to a new community that does not have phases.
|
Note: You can copy plans only within the same area. You cannot copy plans from a community or phase in one area to a community or phase in another area. You must copy a plan to a phase that already exists. |
4.9.2 Prerequisites
Before you complete the tasks in this section, you must:
-
Set up areas and communities.
-
Set up cost code templates.
4.9.3 Forms Used to Set Up Plans for Communities
| Form Name | FormID | Navigation | Usage |
|---|---|---|---|
| Work with Community Master | W44H101B | Foundation Management (G44H21), Maintain Communities | Review communities. |
| Community Plan Maintenance | W44H301D | For communities without phases, select a record and select Community Plans from the Row menu on the Work with Community Master form.
For communities with phases, select a record and select Phase Maint from the Row menu on the Work with Community Master form. On the Phase Maintenance form, select a record and select Community Plans from Row menu. |
Assign plans to communities. |
| Plan Master Revision | W44H301A | On the Community Plan Maintenance form, select a plan and select Revision from the Row menu. | Revise plans. |
4.9.4 Setting Processing Options for Plan Master (P44H301)
Processing options enable you to specify the default processing for programs and reports.
4.9.4.1 Versions
If you leave either of these processing options blank, the system uses the ZJDE0001 version.
- 1. Extended Homebuilder Data
-
Specify the version of the P44H092 program to use.
- 2. Community Master
-
Specify the version of the P44H101 program to use.
4.9.5 Assigning Plans to Communities
Access the Community Plan Maintenance form.
Figure 4-2 Community Plan Maintenance form
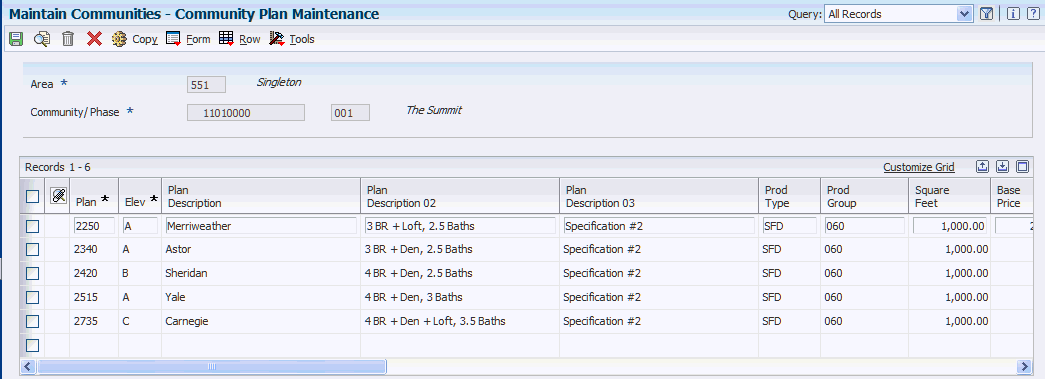
Description of ''Figure 4-2 Community Plan Maintenance form''
- Plan and Elev (elevation)
-
Enter values that specify the plan and elevation combinations in a community.
- Product Group
-
Enter a code from UDC 44H3/PG to classify plans by group. For example, you could classify plans according to lot sizes or according to the number of stories in the plan, such as a single-story or two-story plan.
- Square Feet
-
Enter a value that represents the square footage of the plan.
This measurement can be used in the lot (job) to allow for calculations of costs and revenue per square feet in the JD Edwards EnterpriseOne Job Cost system.
- Base Price
-
Enter the base price of a house. The system stores the base price in the Plan Master table (F44H301).
- Sales Price Effective Date and Expiration Date
-
Enter the dates that specify when the sales price becomes effective and when it expires. The system compares these dates to the date on which a plan is configured on a lot to determine the sales price.
4.10 Setting Up Options
This section provides an overview of options, list prerequisites, and discusses how to:
-
Set processing options for Option Master Maintenance (P44H401).
-
Review options.
-
Set up options.
-
Set up option packages.
-
Update option cost detail.
-
Copy options by community.
4.10.1 Understanding Options
Options are features that buyers can add to a base house specification to customize their homes. The successful management of options increases both builder profits and buyer satisfaction.
You can use the Option Master Maintenance program (P44H401) to either set up each option as a single item or group options together to form an option package. An option package is often purchased at a discount and might contain an option that is not otherwise available. An option that is available only as part of an option package is called a package component. The system tracks the revenue and cost variances between the option package and the sum of individual options if they have been selected individually. You will add options to a house during lot configuration.
In addition to setting up individual options and options packages, you can:
-
Use wildcards to offer options at multiple levels, including area, community, phase, plan, and elevation.
-
Assign prices and cost information for each option and option package at every available level.
-
Set up custom options.
-
Add unlimited text and attachments, such as photographs of the option or a link to a manufacturer's product catalogue, at every available level.
-
Copy selected options, pricing information, and extended data from an existing community or phase to a new community.
Additionally, you can specify effective and expiration dates for prices to save time if the same options are offered at many or all of your communities.
4.10.1.1 Option Type Setup
Because each lot corresponds to a job in the JD Edwards EnterpriseOne Job Cost system, you can review the profitability of the options for each job. Before you set up options, set up the values in the Special Handling field for the option types in UDC table 44H4/OT to correspond to the values that are set up for automatic accounting instruction (AAI) IS. You can enter any value from 1 through 9 in the Special Handling field. For example, the option type that you set up as 3 will correspond to the AAI that you set up as IS3. If you do not set up the AAI IS with the corresponding code, the system will use the default AAI IS.
In the JD Edwards EnterpriseOne Job Cost system, the Create Journal Entries program (R51444) uses the Account Master table (F0902) to determine which accounts that have subledgers and retrieves the option type from the Option Master program (P44H40). The value in the Special Handling field in the option type UDC table (44H4/OT) indicates which AAI IS is used to access the correct cost of the sales account.
See "Recognizing Profit" in the JD Edwards EnterpriseOne Applications Job Cost Implementation Guide.
4.10.2 Prerequisites
Before you complete the tasks in this section, you must:
-
Set up area, community, phase, plan, and elevation information for the options.
-
Set up the values in the Special Handling Code field for the option types in UDC table 44H4/OT to correspond to the values set up for AAI IS.
This setup enables the Create Journal Entries program (R51444) in the JD Edwards EnterpriseOne Job Cost system to determine which cost of sales account, represented as subledgers, to use for each of the options.
4.10.3 Forms Used to Set Up Options
| Form Name | FormID | Navigation | Usage |
|---|---|---|---|
| Work with Options | W44H401D | Foundation Management (G44H21), Option Master | Review options. |
| Option Revisions | W44H401B | On the Work with Options form, click Add. | Set up options. |
| Option Master Maintenance | W44H401A | On the Work with Options form, select Mass Maintenance from the Form menu. | Maintain option master information. |
| Option Package Maintenance | W44H402C | Select an option package on the Work with Options form, and select Option Packages from the Row menu. | Maintain option package components. |
| Select Option Package Components | W44H402A | On the Option Package Maintenance form, select Select Options from the Form menu. | Set up option packages. |
| Option Cost Detail | W44H401C | Select an option on the Work with Options form, and select Option Cost Detail from the Row menu. | Update option cost detail. |
| Copy Community Options | W44H401CA | Foundation Management (G44H21), Copy Options by Community | Copy options by community. |
| Options Copy Preview | W44H401CB | On the Copy Community Options form, select the options to copy, and then click Next. | Review options before you copy them to a community. |
4.10.4 Setting Processing Options for Option Master Maintenance (P44H401)
Processing options enable you to specify the default processing for programs and reports.
4.10.4.1 Defaults
- 1. Enter default area
-
Specify the default area from UDC 00/05 that the system displays on the Work with Options form.
- 2. Enter default swing for option cost detail form
-
Specify a code from 42H2/SW that identifies the default swing that the system displays on the Option Cost Detail form.
- 3. Allow gross profit percent to be overridden on option cost detail form
-
Specify whether the system allows you to override the gross profit percent on the Option Cost Detail form. Values are:
Blank: Do not allow override.
1: Allow override.
- 4. Allow the suggested sales price to be overridden on the option cost detail form
-
Specify whether the system allows you to override the calculated suggested sales price on the Option Cost Detail form. Values are:
Blank: Do not allow override.
1: Allow override.
- 5. Suggested sales price rounding preference for option cost detail form
-
Specify the rounding preference for the calculated suggested sales price. Values are:
Blank: Do not round. For example, use the original value of 1236.56 USD.
1: Round to the nearest whole number. For example, round 1236.56 USD to 1237.00 USD.
2: Round to the nearest tenth. For example, round 1236.56 USD to 1240.00 USD.
4.10.4.2 Versions
- 1. Extended Homebuilder Data Version
-
Specify which version of the P44H092 program to use. If you leave this processing option blank, the system uses the ZJDE0001 version.
4.10.5 Reviewing Options
Access the Work with Options form.
The Work with Options form includes wildcard check boxes for community, phase, plan, and elevation. These check boxes work in conjunction with the Community, Phase, Plan, and Elevation fields in the header area of the form. For example, if you specify a community and do not select the Wildcard Community check box, the system displays only those option records that are available in that specific community. However, if you select the Wildcard Community check box, the system displays all options that are specific to the community, as well as all area-level options.
4.10.6 Setting Up Options
Access the Option Revisions form.
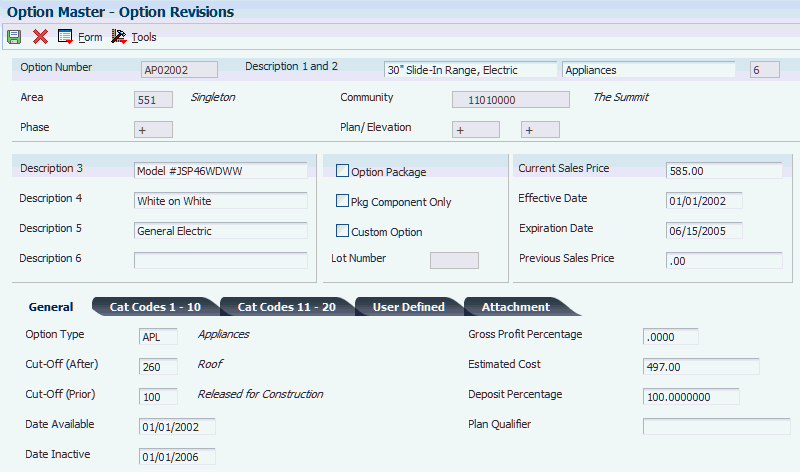
- Option Package
-
Select this check box if the option is classified as a package option.
- Pkg Component Only (package component only)
-
Select this check box if the option is only a package component. A package component only option cannot be sold separately.
- Custom Option
-
Select this check box if the option is a one-time custom option and is not available for general selection. If you select this check box, you must enter a value in the Lot Number field.
- Lot Number
-
Enter the specific lot on which the house will be constructed.
- Current Sales Price
-
Enter the current sales price of the option. The amount is based on the effective date on the Option Cost Detail form.
- Previous Sales Price
-
Enter the previous sales price for the option. You must enter a value in this field if you change the amount in the Current Sales Price field.
4.10.6.1 General
Select the General tab.
- Option Type
-
Enter a code from UDC 44H/OT that is used to categorize options. The system uses this value to map option revenue from the Closing Worksheet Data Mapping table (F44H599) into one of nine Option Revenue fields (OPRV1-9) on the Work with Sales Master History form.
- Cut-Off (After) and Cut-Off (Prior)
-
Enter codes from UDC 44H0/RL that specify the before and after construction stage in which to prevent option selection.
- Date Available
-
Enter the date on which an option is available.
- Date Inactive
-
Enter the date on which an option is inactive.
- Gross Profit Percentage
-
Enter a value to use to calculate a suggested sales price. The gross profit percentage is based on this formula:
Sales Price = Cost / (1 − Gross Profit Percentage)
Enter gross profit percents in decimal form; for example, enter 25 percent gross profit percent as .25, and enter 100 percent as 1.0000.
- Estimated Cost
-
Enter the estimated amount for bids or takeoffs. This amount can be used in the calculation of the sales price.
- Deposit Percentage
-
Enter the percent of the total amount that equals the deposit amount. This percentage is used to calculate the amount of the deposit that is taken from the buyer.
- Plan Qualifier
-
Enter alphanumeric text to qualify the plan. This text is stored in the Option Master table (F44H401) and is informational only.
4.10.7 Setting Up Option Packages
Access the Select Option Package Components form.
To set up an option package:
-
Select each option that is part of the package, and then click Select.
-
On Option Package Maintenance, click Find to review the newly selected options for the package.
- Link Number
-
Display a sequence number that is maintained by the system.
- Quantity per Package
-
Enter the unposted quantity of an option record.
- Link Eff Date (link effective date) and Link Exp Date (link expiration date)
-
Enter the effective and expiration dates for the link.
4.10.8 Updating Option Cost Detail
Access the Option Cost Detail form.
- Effective Date
-
Enter the effective date for the option.
- Estimated Cost
-
Enter the estimated amount that is budgeted for the option.
- Sales Price Effective Date and Sales Price Expiration Date
-
Enter the dates through which the sales price is effective. These dates are used to determine whether the system uses the current sales price or the previous sales price of the option.
If you leave the Sales Price Effective Date field blank, the sales price goes into effect immediately.
- Preview Price Change
-
After you enter values in the header area, select to display the new suggested sales price. The current sales price appears in the Previous Sales Price field. The system updates the new Current Sales Price field from the Suggested Sales Price field.
4.10.9 Copying Options by Community
Access the Copy Community Options form.
To copy community options:
-
Enter values in the fields that appear in the Copy From, Copy To, and Dates group boxes.
The fields are described below under the headings Copy From and Copy To, and Dates.
-
Click Find to display the options that meet the criteria in the Copy From fields.
-
If applicable, select only the options in the detail area that you want to copy and select the Selected Options check box.
-
Select the Pricing Information and Extended Data check boxes, if applicable.
-
Click Next to access the Options Copy Preview form to review the options that the system will copy.
-
Click Finish to continue with the copy process, or click Cancel to return to the Copy Community Options form.
4.10.9.1 Copy From and Copy To
- Community, Phase, and Plan ID
-
Enter the community, phase, and plan in which to copy from and to.
For the Phase field, the wildcard + is available.
For the Plan ID field, the wildcards + and * are available.
If you enter * in the Copy From Plan ID field, the system supplies * in the Copy To Plan ID field.
4.10.9.2 Dates
- Price Effective and Price Expiration
-
Enter the dates on which the prices for the options become effective and when they expire.
4.10.9.3 Include
- Selected Options
-
Select this check box to copy only the options that you select in the detail area. A check mark appears in the left column of the detail area when you select an option. Select this check box only in combination with options selected in the detail area.
- Pricing Information
-
Select this check box to include the pricing information from the original option.
- Extended Data
-
Select this check box to copy extended data from the original option.
4.11 Analyzing Profitability with the Community Pro Forma Program
This section provides an overview of the Community Pro Forma program (P44H102), lists prerequisites, and discusses how to set up community proforma information.
4.11.1 Understanding the Community Pro Forma Program (P44H102)
The costs and risks involved in developing a new community can be significant, given the high cost of land and construction materials. To justify and secure the required capital, you should have an initial projection of profitability. Whether you are building massive retail shells, which might contain several unique retailer outlets, or a community of 1,000 homes, use the Community ProForma program (P44H102) to forecast projected profits and manipulate key profit-related parameters.
The P44H102 program:
-
Tracks a significant number of revenue and cost variables.
-
Performs extensive what if analysis.
The program derives the base revenue from each plan master that is assigned to the community. You can manipulate plan mix, lot cost assumptions, additional costs, and additional revenue. Based on the revenue and cost assumptions, you can forecast community profitability.
-
Overrides costs by a set percentage of the total revenue.
You can use lot override percentages to associate a cost percentage that is applied with the extended base revenue for all plan line items. The system allows for 10 discrete average cost percentages, and it tracks each separately when it calculates totals. When you enter a lot override percentage, the system updates the associated average other cost on the Community ProForma form.
For example, if you can build five houses on Plan B for 100,000 USD per house, and these houses include an estimated 10,000 USD in total options, the resulting revenue would be 510,000 USD. If you enter 10.00 in the Average Cost Percentage 1 field, the system applies 51,000 USD (10 percent of 510,000 USD) as a cost in the Average Other Cost 1 field for each Plan B.
The P44H102 program enables you to specify revenue and cost parameters for a specific community or phase. Revenue parameters include base house revenue, lot premiums, options, and company-specific revenue categories. Cost parameters include land costs, direct costs, allocated overhead, indirect costs, and company-specific cost categories.
You can apply the revenue and cost parameters equally to all lots in the community or apply them at a plan and mix level. For example, if the average sales and marketing costs are 500 USD per house, you might add 500 USD to the cost of every house in the community. Alternatively, you might decide that because more expensive floor plans require greater average sales and marketing burden, you will allocate these costs to specific plans so that more expensive plans receive a larger allocation.
The P44H102 program creates a pro forma contribution analysis for a community or phase. If the initial assumptions of revenue and cost do not result in an acceptable income statement, you can modify key profit-related parameters, including:
-
Land and direct costs.
-
Overhead and other indirect costs.
-
Plan mix.
-
Revenue per plan (including lot premiums).
-
Option revenue and cost.
-
Numerous user-defined cost and revenue variables.
4.11.1.1 Field Calculations
This table lists the calculations that the system uses to update fields in the detail area of the Community ProForma form:
| Field | Calculation |
|---|---|
| Mix Base Price | Base Price à Plan Mix |
| Total Option Profit | Total Option Revenue − Total Option Cost − Option Incentive |
| Total Revenue | Base House Revenue + Lot Premium + Options + Other Revenue − Discounts and Incentives |
| Estimated Plan Profit | Total Revenue − Total Cost |
| ProForma Margin | (Total Revenue − Total Cost) / Total Revenue à 100 |
| Mix Lot Premium | Average Lot Premium à Plan Mix |
| Mix Other Revenue 2 | Other Revenue 2 Ã Plan Mix |
| Mix Other Revenue 3 | Other Revenue 3 Ã Plan Mix |
| Mix Other Revenue 4 | Other Revenue 4 Ã Plan Mix |
| Total Base Revenue | Mix Base Price + Mix Lot Premium + Mix Other Revenue 2 - 4 |
| Total Option Revenue | Estimated Option Revenue 1 - 5 − Option Incentive |
| Mix Lot Cost | Land Per Lot Cost à Plan Mix |
| Option Cost 1 - 5 | Option Revenue − (Option Revenue à Option Margin) |
| Total Option Cost | Total of Option Cost 1 - 5 |
| Mix Cost - Indirect | Indirect Per Lot Cost à Plan Mix |
| Mix Cost - Selling | Sales and Marketing Per Lot Cost à Plan Mix |
| Mix Other Cost 4 | Other Per Lot Cost à Plan Mix |
| Extended Other Cost 1 - 10 | Override Percentage from the Override Percentage tab à Total Plan Mix Revenue |
| Total Other Cost | Total of Extended Other Costs and Average Other Costs |
| Estimated Plan Profit | Not applicable |
| Estimated Margin | Not applicable |
4.11.2 Prerequisites
Before you complete the tasks in this section, you must:
-
Set up communities.
-
Set up plans and, optionally, phases.
-
To project the most accurate cost and revenue estimates, verify that this information is available:
-
Allocated cost estimates, including land and other off-site costs.
-
Direct cost estimates, including base house and option.
-
Overhead cost estimates and the method of allocation.
-
Sales and marketing cost estimates and the method of allocation.
-
Initial plot map.
-
Projections about plan mix.
-
Revenue projections, including base house revenue, lot incentives, and options.
-
Other miscellaneous costs and revenues for which you must account.
-
4.11.3 Forms Used to Analyze Profitability with the Community Pro Forma Program
| Form Name | FormID | Navigation | Usage |
|---|---|---|---|
| Work with Community Master | W44H101B | Foundation Management (G44H21), Maintain Communities | Review communities. |
| Community ProForma | W44H102B | For communities that are phase-enabled, select a community on the Work with Community Master form and select Phase Maint from the Row menu. On the Phase Maintenance form, select a phase and then select Pro Forma from the Row menu.
For communities that are not phase-enabled, select a community on the Work with Community Master form and select Pro Forma from the Row menu. |
Set up community pro forma information. |
4.11.4 Setting Up Community Pro Forma Information
Access the Community ProForma form.
|
Note: You can define four per-lot revenue and per-lot cost categories to satisfy specific company requirements. For example, you could change Sales Marketing to represent a different cost category, if appropriate. |
4.11.4.1 Per Lot Amounts
Select the Per Lot Amounts tab.
- Avg Lot Premium (average lot premium)
- Avg. Other Revenue 2
- Avg. Other Revenue 3
- Avg. Other Revenue 4
-
Enter values to use to calculate part of the community pro forma total base cost. These four components of lot cost are identified at the community level and are multiplied by the number of lots indicated in the community plan mix. The total of these four components represent the extended lot cost at the plan level and the base cost at the community pro forma level.
4.11.4.2 Lot Override Percentages
Select the Lot Override Percentages tab.
- Avg. Cost Pct 1–10 (average cost percent 1–10)
-
Specify the average cost percentage for a community and phase. The system uses this amount to calculate the value in the corresponding Average Other Cost 1 field in the detail area of the form.
For example: (Average Cost Percent 1 x Total Revenue) = Average Other Cost 1.
4.11.4.3 ProForma Totals
Select the ProForma Totals tab.
Review the amounts that the system calculates in the header area of the form. Enter values in the detail area fields, as necessary.
4.11.4.4 Detail Area
- Plan Mix
-
Enter the number of individual units for a plan that are projected to be built within a community.
- Estimated Option Revenue 1
-
Enter the estimated revenue from the first category of option sales.
- Est. Option Incentive (estimated option incentive)
-
Enter the estimated option incentive that is given to the buyer. This value is stored in the Lot Sales History table (F44H501H) and is used to calculate the net option price.
- Estimated Disc / Incentive1 (estimated discount/incentive 1)
-
Enter the estimated average discount or incentive for each sale.
- Estimated Cost
-
Enter the estimated construction cost. This value is typically exclusive of all land and other allocated costs.
- Option Margin 1
-
Enter the percentage of revenue assumed to be profit. The system uses this value to calculate profitability from options.
- Avg. Other Cost 1–10 (average other cost 1–10)
-
Enter an average cost. If you entered a value in the corresponding Average Cost Percent field on the Lot Overrides Percentages tab, the system updates this field based on the values in the Total Revenue (Other Cost) and Plan Mix fields.
You cannot manually enter a value in both the Average Other Cost and Average Cost Percent fields.