10 eRecruit Applications Setup
This chapter contains the following topics:
10.1 Understanding eRecruit Setup
The eRecruit Setup program (P08460) allows you to set preferences for many of the recruiter activities, such as display options for the Manage Job Postings program (P08470), display options for job postings, and information about how the applicants will apply for job postings.
The eRecruit Setup program includes one power form that you can use to perform all of the setup steps that you need to set up the eRecruit system. From this form, you can update all tables related to the setup for eRecruit. Each section of the form represents a separate table.
|
Important: Because each section of the power form represents a separate table, you must be sure to save the information that you add in each section before you proceed to the next section. For this reason, a Save button appears in each section. The system prompts you to save your work if you attempt to access another tab without first saving your work. |
10.2 Defining Posting Categories
This section provides an overview of posting categories and discusses how to enter the definitions.
10.2.1 Understanding Posting Category Definitions
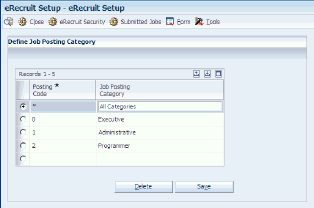
You create posting categories to classify the types of job postings that your company uses. Typically, you group the job postings according to your organization's business practices. Commonly used posting categories might include: Executive, Administrative, Financial, and Technical. When you group your job postings within these categories, applicants can easily search for the postings that best match their qualifications.
Grouping postings by category also allows you to define settings for each posting category, as discussed in a later setup step.
You can delete a posting category if you have not attached a job posting to it. When you delete the posting category, you also delete all of the settings for that posting category.
10.2.2 Form Used to Define Posting Categories
| Form Name | FormID | Navigation | Usage |
|---|---|---|---|
| eRecruit Setup | W08460A | Recruitment Management Setup (G08BRM4), eRecruit Setup.
Click Save. |
Complete appropriate information. |
10.2.3 Posting Category Information
Access the eRecruit Setup form.
|
Caution: All additions, edits, and deletions to the Job Posting Category should be done on this form. If not, information that is connected to the posting category can become corrupted. |
- Posting Code
-
Enter a list of valid codes for a specific user defined code list.
- Job Posting Category
-
Enter a user defined name or remark.
10.3 Defining Settings by Posting Category
This section provides an overview of settings by posting category and discusses how to enter the values.
10.3.1 Understanding Settings by Posting Category
You define settings for each posting category in the eRecruit Setup program (P08460). This table describes the settings that you define on each tab in the Define Settings By Posting Category section:
| Tab Name | Settings |
|---|---|
| Field Preferences | You define field preferences to specify the fields that appear in the Manage Job Postings program (P08470) when the recruiter creates a job posting. Posting Tab selections are included in UDC (08R/WS). You can also specify whether the system hides or shows competencies for each posting category. |
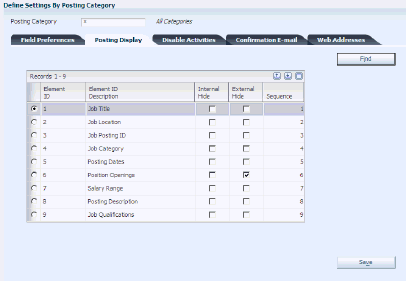
| Posting Display | You define posting display settings to select portions of the posting that are visible to the applicant, as well as the order of appearance. You can select to define the settings differently for each posting category. Thus, an EXEC posting type might display different elements in a different order than an ADMIN posting type. Posting display elements are included in UDC (08R/EI). |
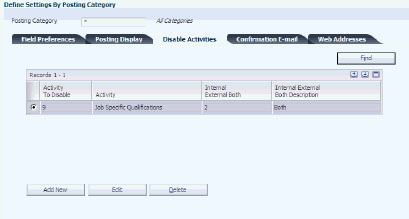
| Disable Activities | You can disable the applicant activities in UDC (08R/AA). If you include an activity here, the applicant can not perform the activity when browsing job postings or applying for a job posting. You can disable the activity for internal applicants, external applicants, or both. |
| Confirmation Email | You can define by posting category the email that the system sends to applicants when they apply for jobs. |
| Web Addresses | You can define settings for system level email and Website addresses for all eRecruit correspondence. You can set up the addresses by posting category and language. Emails that the system sends to the recruiter or applicant contain the email address that you specify here. The Website URL is included in emails the system sends to the applicant. |
10.3.2 Forms Used to Define Settings by Posting Category
| Form Name | FormID | Navigation | Usage |
|---|---|---|---|
| Define Settings By Posting Category | W08460A, Sub-form | Recruitment Management Setup (G08BRM4), eRecruit Setup | Use the form, with multiple tabs, to find existing values and enter new information. |
10.3.3 Settings by Posting Category
Access the Define Settings By Posting Category form.
Figure 10-2 Define Settings By Posting Category form
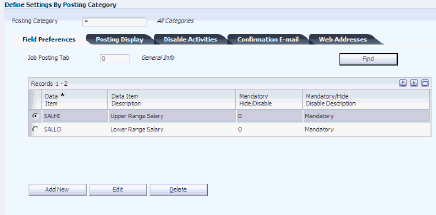
Description of ''Figure 10-2 Define Settings By Posting Category form''
To define settings by posting category:
In the Define Settings by Posting Category section, complete the Posting Category field to specify the category for which you will define settings.
10.3.3.1 Field Preferences
Access the Field Preferences tab.
-
On the Field Preferences Tab enter 0 in the Job Posting Tab field to define field preferences for the General Info tab in the Manage Job Postings program (P08470), and then click Find.
-
Click Add New, and then complete these fields as needed to specify the fields that will appear in the Manage Job Postings program (P08470) when the recruiter creates a job posting:
-
Data Item
-
Mandatory Hide/Disable
-
-
To edit field preferences, select the record that you want to edit, click Edit, and then change the Mandatory Hide/Disable field, as needed.
-
Enter 1 in the Job Posting Tab field to define field preferences for the Job Title tab in the Manage Job Postings program (P08470), and then click Find.
-
Repeat steps 3 and 4, as needed.
-
Enter a 2 in the Job Posting Tab field to define field preferences for the Competencies tab in the Manage Job Postings program (P08470), and then click Find.
-
To hide the Competencies tab for a posting category, click the Hide Competencies Tab field to add a check mark. Click the Hide Competencies Tab field again to remove the check mark to display the Competencies tab for a posting category.
- Posting Category
-
Enter a user defined code (08R/PC) that assigns a job posting to a specific group.
- Mandatory Hide/Disable
-
Enter a user defined code (08R/MH) that is used within the Manage Job Postings program (P08470) to specify the display options for a field.
- Hide Competencies
-
Enter a value that specifies whether you want to hide or display an item. Values are:
0: Do not hide.
1: Hide.
10.3.3.2 Posting Display
Access the Posting Display tab form.
-
Select the Posting Display tab.
-
Complete these fields to define how the job postings appear to the applicant:
-
Element ID
-
External Hide
-
Internal Hide
-
Sequence
Note:
You define posting display settings according to the posting category. For example, the elements that you display for an executive posting category and the order in which you display them might differ from the elements and order that you would display for an administrative posting category.The detail area displays all of the available posting elements. You can hide the element or select the order in which it appears, but you cannot delete the element.
-
- Element ID
-
Enter a user defined code (08R/EI) that identifies an element of a job posting. You specify the elements the system displays to the applicant in the eRecruit Setup program (P08460). Examples of element ID's include Job Title, Job Location, and Job Category.
- External Hide
-
Enter a value that specifies whether you want to hide or display an item. Values are:
0: Do not hide.
1: Hide.
- Internal Hide
-
Enter an option that specifies whether a posting element is hidden internally. Values are:
0: Do not hide.
1: Hide.
- Sequence
-
Enter a value that is assigned to a posting element (UDC 08R/EI) to specify the sequence in which that element appears in the job posting display.
10.3.3.3 Disable Activities
Access the Disable Activities tab form.
-
Select the Disable Activities tab.
-
Complete these fields to define the applicant activities that you want to disable for a particular posting type, and to indicate whether you want to disable the activity for internal applicants, external applicants, or both:
-
Activity To Disable
-
Internal External Both
Note:
You must add the activity to the detail area in order to disable it. All activities listed in the Disable Applicant Activities UDC table (08R/AA) are enabled unless you add them to the detail area.
-
- Activity To Disable
-
Enter a user defined code (08R/AA) that is assigned to an activity which is used by an applicant. You can set up each activity to be disabled on the Disable Activities tab of the eRecruit Setup application (P08460).
- Internal External Both
-
Enter a user defined code (08R/IE) assigned to an applicant activity that denotes whether the activity is disabled internally, externally, or both.
10.3.3.4 Confirmation Email
Access the Confirmation Email tab.
-
Select the Confirmation Email tab and enter the text of the email that you want to send to applicants when they apply for a job.
You can create confirmation email text in multiple languages.
Important:
You must use HTML tags to attach formatting to the text. Commonly used HTML formatting tags include:{BR} (line break)
{P} (paragraph)
{B} (bold)
{/B} (end bold)
{U} (underline)
{/U} (end underline)
Tags are not case-sensitive.
-
To review the confirmation email as the applicant will see it, click the Preview button.
10.3.3.5 Web Addresses tab
Access the Web Addresses tab.
-
Select the Web Addresses tab.
-
Complete these required fields to specify the general system-level email address and Web site that the system uses in email to applicants and recruiters:
The email address is the From address used in email sent by the system. Applicants receive email when they register to use the eRecruit system, forget their password and when they apply for a job posting. Recruiters receive system email when an applicant applies for a job posting and when an applicant changes their personal information.
-
Language Code
-
Electronic Address
-
Website URL
-
- Electronic Address
-
Enter the email address or Uniform Resource Locator (URL) for either an individual or an entity.
- Website URL
-
Enter the email address or Uniform Resource Locator (URL) for either an individual or an entity.
10.4 Defining Standard Phrase Categories
This section provides an overview of standard phrase categories and discusses how to enter the values.
10.4.1 Understanding Standard Phrase Categories
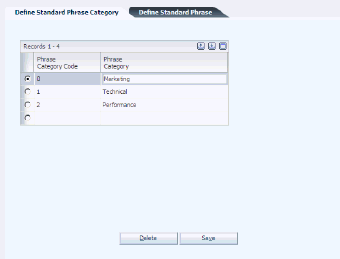
You define categories for standard phrases to classify the types of standard phrases that your company uses. Typically, you group the standard phrases according to your organization's business practices. Commonly used standard phrase categories might include Marketing and Technical.
When you delete the standard phrase category, you delete all of the standard phrases for that category, as well.
10.4.2 Form Used to Define Standard Phrase Categories
| Form Name | FormID | Navigation | Usage |
|---|---|---|---|
| eRecruit Setup | W08460A | Recruitment Management Setup (G08BRM4), select eRecruit Setup
Click Save. |
Complete the required fields. |
10.5 Defining Standard Phrases
This section provides an overview of standard phrases and discusses how to enter the values.
10.5.1 Understanding Standard Phrases
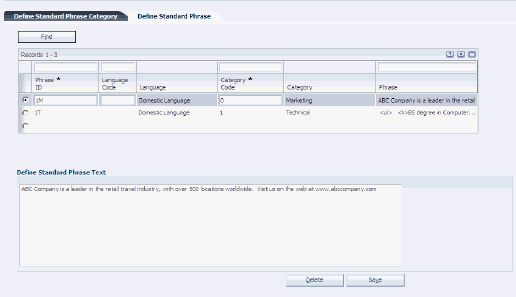
Companies typically use basic phrases repeatedly when creating job postings. You can save time by creating standard phrases that you use frequently and storing them by category to use over and over again. The user who creates the job postings can choose to add a selected standard phrase to the posting.
This table illustrates examples of commonly used standard phrases:
| Standard Phrase Category | Standard Phrase |
|---|---|
| Legal | We are an Equal Opportunity Employer. |
| Marketing | XYZ Travel is a leader in the retail travel industry, with over 500 locations worldwide. Visit us on the Web at http://www.xyztravel.com. |
| Benefits | We provide excellent benefits and compensation packages including medical, dental, vision, 401(k), employee stock purchase plan, health club, and quarterly bonus program. |
| Salary | Salary commensurate with experience. |
| Skills |
|
| Technical |
|
|
Important: You must use HTML tags to attach formatting to the text. Commonly used HTML formatting tags include:{BR} (line break) {P} (paragraph) {B} (bold) {/B} (end bold) {U} (underline) {/U} (end underline) Tags are not case-sensitive. |
10.5.2 Form Used to Define Standard Phrases
| Form Name | FormID | Navigation | Usage |
|---|---|---|---|
| eRecruit Setup | W08460A | Recruitment Management Setup (G08BRM4), eRecruit Setup | Define Standard Phrase tab:
Enter new values for standard phrases. When you leave the Language field blank, the system uses the Domestic Language that you specified in UDC (01/LP). |
10.5.3 Standard Phrases
Access the eRecruit Setup form.
To define standard phrases:
-
On eRecruit Setup, complete these required fields in the Define Standard Phrase section:
-
Phrase ID
-
Phrase Category
-
-
Complete the Language Code field, as needed:
-
Enter the desired text for your standard phrase in the Define Standard Phrase Text box, and then click Save. To add or edit the text for a standard phrase, you must first select the phrase in the detail area.
-
Phrase ID
Enter a unique identification value that is assigned to a standard phrase.
-
Phrase Category
Enter a user defined code (08R/PH) that assigns a standard phrase to a specific group.
-
