7 Setting Up Self-Service Time Entry
This chapter contains the following topics:
7.1 Understanding Self-Service Time Entry Setup
Before employees can enter timecard information using the self-service time entry applications, you must create the text that appears on the time entry forms, set up user interfaces, assign manager delegates for managers who review and approve timecards, and specify the available pay types that can be used for each employee group.
First, you must set up the director form. The director form is the first form that the system displays when you access the self-service time entry system. You can enter text that will appear on this form. This text is called director text. You use director text to provide user instructions for employees or to provide pay-period or labor distribution period specific information that might be needed for employees to enter timecards correctly.
In addition to director text, the Time Entry Self Service Director form also contains links to the actual time entry interfaces. You can activate the links to the Employee Summary Time Entry program (P051128), the Employee Daily Time Entry program (P051127), or to both programs. Though the system displays all of the links on the Time Entry Self Service Director form, the active links are determined by the processing option settings for the Time Entry Self Service Director program (P051125).
After you set up the director, you must set up user interfaces for the time entry applications. You can create multiple interfaces to accommodate the business requirements of different companies or business units within your organization. To set up a user interface for self-service time entry, you select the fields that you want to appear on the time entry forms. These fields are set as default fields that the system automatically displays on Employee Daily Time Entry and Employee Summary Time Entry:
-
Pay Type
-
Hours
-
Work Date
-
Subledger
-
Subledger Type
-
Charge To
-
Shift Code
-
Equipment Worked
-
Equipment Hours
The system also provides you with over 50 additional predefined fields to choose from. These fields enable you to quickly and easily configure your user interfaces to meet the business needs of your organization.
You can specify which pay types are available to employees within different employee groups. For example, employees in business unit 100 might need to use different pay types than employees in business unit 200, or employees with Job Type A-200 might use different pay types than employees with Job Type B-55. You can use the Classification/Pay Cross Reference program (P05932) to specify the available pay types for each employee group. When you set up this information, employees can enter timecards for only the pay types that are assigned to their employee group. If you do not set up this information, employees will receive a hard error message on this field and will not be able to complete time entry.
You can define employee groups according to this criteria:
-
Job type only.
-
Job type and job step only.
-
Business unit only.
-
Union code only.
-
Shift code only.
-
Job type, job step, business unit, union code, and shift code.
You can select the fields that you use to define employee groups for pay type assignment in the processing options for the Time Entry Self Service Director program.
To set up delegates who can assist managers with timecard approvals, you can use the Manager Delegates Setup program (P051126) to designate one or more subordinate employees as delegates for each manager. You also assign an authority level for each delegate. Manager delegates are employees who are given permission to perform duties on behalf of a manager. For example, if a manager is not available to review and approve timecards before the timecard approval deadline, a manager delegate could review and approve the timecards for that manager.
7.1.1 Mobile Enterprise Applications for Field Progress Entry (Release 9.1 Update)
The following mobile applications are available, and can be used to manage field progress entry on a mobile device:
-
Mobile Field Progress Entry (Tablet)
-
Mobile Field Progress Labor Entry (Smartphone)
-
Mobile Field Progress Equipment Entry (Smartphone)
-
Mobile Account Progress Entry (Smartphone)
These applications require system administrator configuration before they are available to individual users. Contact your system administrator to determine whether these applications are available for use.
Additionally, see the following topic in the JD Edwards EnterpriseOne Applications Mobile Enterprise Applications Implementation Guide:
7.2 Setting Up the Time Entry Director Form
This section provides an overview of the Time Entry Director form and discusses how to:
-
Set processing options for Time Entry Self Service Director (P051125).
-
Set up director text.
7.2.1 Understanding the Time Entry Director Form
The Time Entry Self Service Director program displays the first form that employees see when they access self-service time entry. You define the text that appears on this form. This text is called director text. You use director text to provide user instructions for employees or to provide pay-period specific or labor distribution period specific information that employees might need to enter timecards correctly. The Time Entry Self Service Director form displays labor distribution period specific information for the labor distribution period employees. For the other employees, the Time Entry Self Service Director form displays the default pay period end date based on the processing option. If you choose to include pay-period specific information in director text, you must revise the text for each pay period.
The Historical Correction Periods option on the Time Entry Self Service Director form displays for labor distribution employees and is hidden for pay period employees. If you select the Historical Correction Periods option, the system enables the Timecard Corrections link. You can access historical corrections through this link. You can set a processing option to display or hide the Timecard Corrections link.
These examples illustrate the types of information that you might want to include in director text.
7.2.1.1 Example 1
July 1–15 time entry reports are due by noon July 16: 80 total hours.
Overtime reminder: All employees who are eligible for overtime are responsible for coding all overtime hours that are worked to pay code 300. If you have any questions about overtime eligibility, please speak with your manager or a human resources representative.
7.2.1.2 Example 2
To enter timecards using this self-service form, verify that the date in the Pay Period Ending Date field is correct, and then click the Summary Time Entry link to access the time entry screen. On the time entry screen, complete all of the fields, and then click Save. Your manager will review your timecards and you will receive an email response regarding the approval status of your timecards. If you have questions regarding the time entry process or the review and approval process, please speak with your manager or a human resources representative.
In addition to director text, the director form also contains these links to employee or manager programs (interfaces):
-
Daily Time Entry
-
Summary Time Entry
-
Manager Review and Approval
You use the processing options for the Time Entry Self Service Director program to specify which of these links are active.
The director form also automatically displays the last day of the pay period, based on information that you enter in the processing options.
7.2.2 Forms Used to Set Up the Time Entry Director Form
| Form Name | FormID | Navigation | Usage |
|---|---|---|---|
| Work With Director Text | W051124A | Time Entry Self service Setup (G05BESS41), Director Text Setup
Click Add. |
Set up director text. |
| Define Director Text | W051124B | Click OK. | In the text pane, enter text for the self-service time entry form. |
7.2.3 Setting Processing Options for Time Entry Self Service Director (P051125)
Processing options enable you to specify the default processing for programs and reports.
7.2.3.1 Date/Pay Cycle Code
Use these processing options to specify the pay-period ending dates that are displayed on the Time Entry Self Service Director form. The system displays the date that is linked to the employee pay cycle code. To ensure that the correct date is displayed on time entry forms, you must update these processing options each pay period.
- 1. Pay Period Ending Date - Weekly
-
Specify the last day of the workweek for weekly processing periods.
- Weekly Pay Cycle Code
-
Specify the master pay cycle that the system uses to determine pay period dates.
- 2. Pay Period Ending Date - Biweekly
-
Specify the last day of biweekly processing periods.
- Biweekly Pay Cycle Code
-
Specify the master pay cycle that the system uses to determine pay period dates.
- 3. Pay Period Ending Date - Semi-Monthly
-
Specify the last day of semimonthly processing periods.
- Semi-Monthly Pay Cycle Code
-
Specify the master pay cycle that the system uses to determine pay period dates.
- 4. Pay Period Ending Date - Monthly
-
Specify the last day of monthly processing periods.
- Monthly Pay Cycle Code
-
Specify the master pay cycle that the system uses to determine pay period dates.
7.2.3.2 Pay Type
Use these processing options to specify the pay types that the system uses to create timecards for lump sum entries in the Quick Entry section of the summary time-entry forms.
- 1. Pay Type - Regular
-
Specify the pay type that the system assigns to timecard information that is entered for regular pay in the self-service time entry program.
- 2. Pay Type - Sick Leave
-
Specify the pay type that the system assigns to timecard information that is entered for sick pay in the self-service time entry programs.
- 3. Pay Type - Vacation
-
Specify the pay type that the system assigns to timecard information that is entered for vacation pay in the self-service time entry programs.
- 4. Pay Type - Holiday
-
Specify the pay type that the system assigns to timecard information that is entered for holiday pay in the self-service time entry programs.
- 5. Pay Type - Overtime
-
Specify the pay type that the system assigns to timecard information that is entered for overtime pay in the self-service time entry programs.
- 6. Cross Reference Search
-
Specify the criteria that are used to set up a pay type cross-reference table for employee self-service time entry. You use the pay type cross-reference table to define pay types that various employee groups can use for time entry.
For example, if you want to assign pay types to employees by job type and job step, enter 2. If you enter 2, you should define pay types for all employee groups that use job type and job step.
To assign pay types to employee groups by business unit, enter 3.
To assign pay type cross-references that use different criteria for each employee group, enter 0. When you enter 0, you enable pay types to be assigned to specific employee groups. You also enable a default set of pay types to be set up by leaving all of the options blank. This also allows any or none of the options to be used to define pay type cross-references. Values are:
1: Job type.
2: Job type and job step.
3: Business unit.
4: Union code.
5: Shift code.
0 or Blank (default): Any or all cross reference options.
7.2.3.3 Leave Entry
Use these processing options to specify how the system processes information for global leave administration.
- 1. Leave Verification Set
-
Specify a code that identifies a group of leave verification rules that are grouped together for processing on any given application that will validate entry of leave time. You set up this code in the Leave Verification rules program (P07602).
- 2. Leave History Source
-
Specify the table from which the system retrieves history information. Values are:
0 or Blank: Calendar Month DBA Summary History table (F06145) or Employee Transaction History Summary table (F06146).
1: Fiscal and Anniversary Year History table (F06147).
- 3. Enable/Disable Quick Entry Fields for the Summary Time Entry
-
Specify whether to enable or disable quick entry for Sick, Vacation, and Holiday fields for the Summary Time Entry program (P051128). Values are:
0 or Blank: enable Sick, Vacation, and Holiday fields.
1: disable Sick, Vacation, and Holiday fields. (default value)
- 4. Sick Leave Type
-
Specify a user-defined code (07/LV) that describes the leave time that an employee takes or requests. This information can be used to report leave trends. Values might include:
C: Comp time
S: Sick time
M: Maternity leave time
- 5. Vacation Leave Type
-
Specify a user-defined code (07/LV) that describes the leave time that an employee takes or requests. This information can be used to report leave trends.
- 6. Holiday Leave Type
-
Specify a user-defined code (07/LV) that describes the leave time that an employee takes or requests. This information can be used to report leave trends.
7.2.3.4 Account Number
Use these processing options to specify how the system validates account numbers that are included on employee timecards.
- 1. Validate # sign
-
Specify whether the system allows employees to enter a pound sign (#) in place of a valid account number. If this is not allowed, the system verifies the validity of the account numbers that are associated with each timecard. Values are:
0: Allow a pound sign entry.
1: Do not allow a pound sign entry.
- 2. Posting Account Only
-
Specify whether the system verifies that the account number that is entered for timecards can be posted. Values are:
0: The system does not verify that the account number can be posted.
1: The system verifies that the account number can be posted.
- 3. Dynamic Account Creation
-
Specify whether the system uses dynamic account creation when an account number that does not exist in the Account Master table (F0901) is entered on a timecard. You should set this option to 0 if dynamic account creation is not included in your accounting process. Values are:
0: Do not create accounts dynamically.
1: Create accounts dynamically.
- 4. Validate Account
-
Specify whether the system automatically verifies and retrieves the correct account number from the Employee Master Information table (F060116). When this processing option is set to 1, the system first compares the account number that is entered on the timecard to existing account information in the Employee Master Information table. If the employee enters no account number, then the system uses data that is linked to the account number, such as the job location, cost code, pay type, and union, to retrieve the correct account number. Values are:
0: The system does not verify and retrieve the account number.
1: The system verifies and retrieves the account number.
2: The system verifies non-blank account numbers.
7.2.3.5 Multicurrency
Use these processing options to enable the multicurrency feature for employee self-service time entry and to specify the currency that the system uses. This feature must also be enabled in the Enable Multi-Currency Functionality processing option on the Recharge tab of the Time Entry MBF Processing Options program (P050002A). Also on the Recharge tab, you should enter appropriate values for the remaining processing options.
- 1. Multicurrency
-
Specify whether to enable multicurrency time accounting. When multicurrency time accounting is enabled and a timecard is saved, the system retrieves the currency code and then saves it in the Employee Transactions - Batch File table (F06116Z1). Values are:
1: Enable multicurrency time accounting.
0: Do not enable multicurrency time accounting.
- 2. Currency Mode
-
Specify the currency that the system uses for the transaction. Values are:
D: Domestic Currency
F: Foreign Currency
7.2.3.6 Manager
Use this processing option to specify whether the missing timecard feature can be used.
- 1. Timecard Select Option
-
Specify whether managers can view records for employees who have not entered timecards for the specified period. Values are:
0: Enable the missing timecard option.
1: Disable the missing timecard option.
- 2. Time Entry Review
-
Specify the program to use to review Employee Timecards from the Manager Workbench program (P051129). Values are:
0: The Summary Time Entry program.
1: The Daily Time Entry program.
- 3. Require Approval through Detail View
-
Specify whether manager approval of timecards can only be done through the Self Service Manager Review and Approval detail timecard view. The approve, reject, and paid not approved actions will be disabled in the Self Service Manager Review and Approval program. Values are:
0: Allow manager approval in summary and detail view.
1: Allow manager approval only in details view.
7.2.3.7 Administrator
Use these processing options to specify whether the system displays each of the available time entry links on the self-service time entry forms. You can also specify the text that the system displays for each link.
- 1. Show Daily Time Entry Link
-
Specify whether the system displays a link to the Employee Daily Time Entry program (P051127). If you do not display the Daily Time Entry link, the employee cannot access the program. Values are:
0: The system displays the link.
1: The system does not display the link.
- Daily Time Entry Override Name
-
Override the text for the link to the Daily Time Entry program. If you enter text in this processing option, you must set the Show Daily Time Entry Link processing option to display the link.
- 2. Show Summary Time Entry Link
-
Specify whether the system displays a link to the Summary Time Entry program. If you do not display the Summary Time Entry link, the employee cannot access the program. Values are:
0: Display the link.
1: Do not display the link.
- Summary Time Entry Override Name
-
Override the text for the link to the Summary Time Entry program. You must display the Summary Time Entry link for the system to display the text that you enter in this processing option.
- 3. Show Manager Approval Time Entry Link
-
Enable employee self-service time entry users to approve timecards using the Manager Approval program. If you do not display the Manager Approval link, employees cannot access Manager Approval. Values are:
0: Display Manager Approval Link.
1: Do not display Manager Approval Link.
- Manager Approval Time Entry Override Name
-
Override the text for the Manager Approval link. To display the text that you enter in this processing option, you must also set the processing option for the Show Management Approval Time Entry Link to display.
- 4. Show Request Pay In Advance Time Entry Link
-
Specify whether the system displays a link to Request Pay In Advance in self-service time entry applications. If you do not show the Request Pay In Advance link, employees cannot see the link and cannot access this option. Values are:
0: Show the Request Pay In Advance link.
1: Do not show the Request Pay In Advance link.
- Request Pay In Advance Time Entry Override Name
-
Override the text for the Request Pay In Advance link. To display the text that you enter in this processing option, you must choose to display the Request Pay In Advance link.
- 5. Show Time Entry Corrections Link
-
Specify whether to display or hide the Timecard Corrections link. Values are:
0: Show the Time Entry Corrections link.
1:Do not show the Time Entry Corrections link.
- Time Entry Corrections Override Names
-
Override the text for the Time Entry Corrections link. To display the text that you enter in this processing option, you must choose to display the Time Entry Corrections link.
- 6. Submit Button Override Text
-
Specify the text that overrides the default text on the Submit button during the submission of timecards to managers.
7.2.3.8 Resource Assignment
Use this processing option to specify whether the system displays estimated hours from the Resource Assignment.
- 1. Default estimated hours from the Resource Assignment
-
Specify whether to display estimated hours from the Resource assignment work order. Values are:
Blank: Do not display default hours.
1: Display default hours.
7.2.3.9 Future Entry
Use this processing option to specify whether the system allows future entry of timecards.
- 1. Restrict future entry of timecards by pay type
-
Specify whether to allow or restrict future entry of timecards based on pay type. Values are:
0: Allow future entry of timecards.
1: Restrict future entry of timecards.
7.2.3.10 Timecard Changes
Use this processing option to specify whether a change reason code is required for timecard changes.
- 1. Timecard Changes Require Change Reason Code
-
Specify whether a change reason is required for the timecard changes. Values are:
0: Do not require a timecard change reason.
1: Require a timecard change reason.
7.2.3.11 Daily Time Entry
Use this processing option to specify the pay type category.
- 1. Regular Pay Type Category
-
Specify a user–defined code (06/PC) that specifies the summarized hours for regular pay types in the Daily Time Entry program (P051127).
- 2. Sick Pay Type Category
-
Specify a user–defined code (06/PC) that specifies the summarized hours for sick pay types in the Daily Time Entry program (P051127).
- 3. Vacation Pay Type Category
-
Specify a user–defined code (06/PC) that specifies the summarized hours for vacation pay types in the Daily Time Entry program (P051127).
- 4. Holiday Pay Type Category
-
Specify a user–defined code (06/PC) that specifies the summarized hours for holiday pay types in the Daily Time Entry program (P051127).
7.2.4 Setting Up Director Text
Access the Work With Director Text form.
To set up director text for self-service time entry:
-
Click Add.
-
On Define Director Text, complete these fields:
-
Company
-
Business Unit
-
-
In the text pane, enter the text that you want to appear on the form.
Note:
You can enter only text in the text pane. Do not enter OLE objects or images into the text pane. Also, when you enter text into the text pane, you must enter the HTML code{BR}when you want a line break. Using the Enter key will not simulate a line break when the text appears on the director form. -
Click OK.
-
To enter different director text for different groups within your organization, complete steps 1 through 4 for each company and business unit combination for which you want to create director text.
-
To use the same director text for all employees in your organization, complete these steps once and enter 0 in the Company field and leave the Business Unit field blank.
7.3 Creating the Time Entry Interface for Employee Self-Service
This section provides an overview of the time entry interface for employee self-service and discusses how to set up the time entry interface for employee self-service.
7.3.1 Understanding the Time Entry Interface for Employee Self-Service
Before employees can enter timecard information into the system, you must define the information that appears on the interface that employees use. These fields are set up to appear by default on all self-service time entry forms; however, you can choose to display additional fields:
-
Pay Type
-
Hours
-
Work Date
-
Subledger
-
Subledger Type
-
Charge To
-
Shift Code
-
Equipment Worked
-
Equipment Hours
You can use the ESS Time Entry Setup program (P051123) to select from over 50 additional predefined fields to appear on the employee time entry interface. These fields enable you to quickly and easily create time entry forms that meet the requirements of your organization. Depending on your business needs, you can create different time entry interfaces for each home company and home business unit combination within your organization. One of the predefined fields is used for government contracting.
For example, if you want employees in Company A to enter simple time entry records that do not require a large amount of data entry, you can choose to display only the default fields for Company A employees.
Conversely, you might want employees in Company B to enter detailed time entry information. In this case, you might select a large number of additional fields to appear on the employee time entry interface for Company B. Examples of additional fields that you might want to display are:
-
Company - Home
-
Object Account
-
Subsidiary
-
Item Number
-
Unites - Pieces
-
Amount - Sales
-
Union Code
-
Work State
-
Billing Rate
All time entry applications support the global leave administration module and include this information:
-
Leave begin date
-
Leave end date
-
Leave comments
-
Leave type
-
Leave hours per day
The system saves all forms of leave entries in the Leave Transactions table (F07620). The system gathers leave information that is entered in any of the time entry applications and saves it in the F07620 table. Employees can use the leave begin date and leave end date for ease of entry of multiple dates within a date range. The system creates leave transaction and timecards for each date in the date range.
The system saves leave comments in the Leave Messaging and Audit table (F07630). These records are connected to the leave by leave number. The system can store many instances of leave comments separately in the table based on the person who enters the comments and the time entry program. The Form menu enables users to quickly access Time Entry (P051131) and Speed Time Entry (P051121). The Row menu enables quick access to the Paid Time Off Inquiry program (P053020). You can click a link on the time entry forms to gain access to the Leave Status and Messaging Summary program (P07630) that displays existing comments for the current leave request.
7.3.2 Forms Used to Create the Time Entry Interface for Employee Self-Service
| Form Name | FormID | Navigation | Usage |
|---|---|---|---|
| Work With ESS Time Entry Setup | W051123A | Time Entry Self service Setup (G05BESS41), Self Service Screen Setup.
Click Add. |
Use the search and select form to access Work With ESS Time Entry Setup. |
| ESS Time Entry Setup Revisions | W051123B | Click OK. | Click each tab and enter appropriate values. |
7.3.3 Setting Up the Time Entry Interface for Employee Self-Service
Access the Work With ESS Time Entry Setup form.
To set up the time entry interface for employee self-service:
-
Click Add.
-
On ESS Time Entry Setup Revisions, complete these fields:
-
Company
-
Business Unit
-
-
To specify which time entry programs you want employees to use, click one of these options:
-
Summary Time Entry
-
Daily Time Entry
-
Both
-
-
On the Fields 1–21 tab, click the options for the fields that you want to appear:
-
Account Number
-
Job Type
-
Job Step
-
LS Amnt
-
Opt Sequence
-
Equip Worked On
-
Union
-
Batch
-
Uprate Amount
-
Shift Differential
-
Amount or Percent
-
Billing Rate
-
Home Company
-
Cost Code
-
-
Click the Fields 22–40 tab, and then click any of these options that you want to appear on the time entry interface:
-
Home Business Unit
-
Tax Area
-
Item
-
Piece Rate
-
Pieces
-
Phase
-
Record Type
-
WCI Code (Workers Compensation Insurance)
-
SC/WC (Sub-Class/Workers Compensation)
-
Check Route
-
Cat 001 (Category)
-
Cat 002
-
Cat 003
-
Cat 004
-
Bill RtCd (Rate Code)
-
Equipment Object
-
Equipment Blrt (Bill Rate)
-
-
Click the Fields 41–63 tab, and then click any of these options that you want to appear on the time entry interface:
-
Cost Type 1
-
Cost Object 1
-
Cost Type 2
-
Cost Object 2
-
Cost Type 3
-
Cost Object 3
-
Cost Type 4
-
Cost Object 4
-
Activity Code
-
Task Number
-
Currency From
-
Currency To
-
Leave Type
-
Leave ID Number
-
Leave Begin Date
-
Leave End Date
-
Leave Hours Per Day
-
Leave Comments
-
Pay In Advance
-
Timecard From and Timecard Thru
-
Hours Per Day
-
Contract Labor Category
-
Change Reason
-
Change Comments
-
Business Unit Description
-
-
Click OK.
-
Complete steps 2–7 for each company and business unit combination for which you want to create a separate user interface.
If you want to use the same user interface for all of the employees in your organization, you can create one interface by entering 0 in the Company field and leaving the Business Unit field blank.
-
Summary Time Entry
Click to specify which type of time entry (summary or detail) uses the currently selected fields.
-
Daily Time Entry
Enter the option that specifies which type of time entry (summary or detail) uses the currently selected fields.
-
Both
Enter the option that specifies which type of time entry (summary or detail) uses the currently selected fields.
-
Account Number
Specify whether the system displays the Account Number - Input field on employee self-service time entry forms. This code identifies the general ledger account that is associated with the time entry record. Values are:
1: Display this field.
Blank: Do not display this field. This is the default value.
-
Job Type
Enter a code that specifies whether the system displays the Job Type (Craft) field on employee self-service time entry forms. This user-define code (07/G) defines the job in which the employee works. Values are:
1: Display this field.
Blank: Do not display this field. This is the default value.
-
Job Step
Enter a code that specifies whether the system displays the Job Step field on employee self-service time entry forms. This user-defined code (07/GS) represents a subcategory of a job type. Values are:
1: Display this field.
Blank: Do not display this field. This is the default value.
-
LS Amnt
Enter a code that specifies whether the system displays the Amount Entered Gross Pay field on employee self-service time entry forms. This value represents the amount of pay that an employee receives before taxes and deductions. Values are:
1: Display this field.
Blank: Do not display this field. This is the default value.
-
Opt Sequence
Enter a code that specifies whether the system displays the Sequence Number field on employee self-service time entry forms. This code is used to indicate an order of succession. Values are:
1: Display this field.
Blank: Do not display this field. This is the default value.
-
Equip Worked On
Enter a code that specifies whether the system displays the Equipment Worked On field on employee self-service time entry forms. This code is the identification number for the equipment that an employee maintained, repaired, or worked on. Values are:
1: Display this field.
Blank: Do not display this field. This is the default value.
-
Batch
Enter a code that specifies whether the system displays the Batch Number field on employee self-service time entry forms. This code is used to identify a group of time entry records that the system processes and balances as a unit. Values are:
1: Display this field.
Blank: Do not display this field. This is the default value.
-
Uprate Amount
Enter a code that specifies whether the system displays the Amount Uprate field on employee self-service time entry forms. This value is added to the employee's base hourly rate. Values are:
1: Display this field.
Blank: Do not display this field. This is the default value.
-
Amount or Percent
Enter a code that specifies whether the system displays the Amount or Percent field on employee self-service time entry forms. This value is used to determine whether a shift differential is a percentage or a flat amount. Values are:
1: Display this field.
Blank: Do not display this field. This is the default value.
-
Billing Rate
Enter a code that specifies whether the system displays the Rate Distribution (Billing) field on employee self-service time entry forms. This value is the rate that is used for billing or recharge purposes. Values are:
1: Display this field.
Blank: Do not display this field. This is the default value.
-
Cost Code
Enter a code that specifies whether the system displays the Subsidiary field on employee self-service time entry forms. The subsidiary represents a subdivision of an object account. Values are:
1: Display this field.
Blank: Do not display this field. This is the default value.
-
Home Business Unit
Enter a code that specifies whether the system displays the Home Business Unit field on employee self-service time entry forms. This value identifies the business unit where the employee generally works. Values are:
1: Display this field.
Blank: Do not display this field. This is default value.
-
Tax Area
Enter a code that specifies whether the system displays the Tax Area field on employee self-service time entry forms. This code is the Vertex GeoCode that identifies the employee's geographical location for taxation purposes. Values are:
1: Display this field.
Blank: Do not display this field. This is the default value.
-
Item
Enter a code that specifies whether the system displays the Item Number - Short field on employee self-service time entry forms. This code is used as an inventory code to identify items. Values are:
1: Display this field.
Blank: Do not display this field. This is the default value.
-
Piece Rate
Enter a code that specifies whether the system displays the Rate - Piecework field on employee self-service time entry forms. This rate represents the amount of pay that an employee receives for each item or piece that is produced. Values are:
1: Display this field.
Blank: Do not display this field. This is the default value.
-
Pieces
Enter a code that specifies whether the system displays the Units - Pieces field on employee self-service time entry forms. This value represents the number of pieces or items that were completed for piecework employees. Values are:
1: Display this field.
Blank: Do not display this field. This is the default value.
-
Phase
Enter a code that specifies whether the system displays the Categories Work Order 1 field on employee self-service time entry forms. This code is used to indicate the current stage or phase of a work order. Values are:
1: Display this field.
Blank: Do not display this field. This is the default value.
-
Record Type
Enter a code that specifies whether the system displays the Record Type field on employee self-service time entry forms. Record Type is a code that identifies whether the employee is a payroll employee, a recharge employee, or both. Values are:
1: Display this field.
Blank: Do not display this field. This is default value.
-
WCI Code (Workers Compensation Insurance)
Enter a code that specifies whether the system displays the Worker's Compensation field on employee self-service time entry forms. This code represents the Worker's Compensation Insurance code under which the employee is insured. Values are:
1: Display this field.
Blank: Do not display this field. This is the default value.
-
SC/WC Sub-Class/Workers Compensation)
Enter a code that specifies whether the system displays the Sub Class - Worker's Comp field on employee self-service time entry forms. This code is used to define any special circumstances that would result in multiple rates for a single Worker's Compensation Insurance code. Values are:
1: Display this field.
Blank: Do not display this field. This is the default value.
-
Check Route
Enter a code that specifies whether the system displays the Routing Code - Check field on employee self-service time entry forms. This code is used to specify the check routing or mail stop code that is associated with an employee's payment, and it is used in sorting payments to facilitate their handling and delivery. Values are:
1: Display this field.
Blank: Do not display this field. This is the default value.
-
Cat 001 (Category)
Enter a code that specifies whether the system displays the Category Code - Payroll 1 field on employee self-service time entry forms. You can use this code to track information that is specific to your organization. Values are:
1: Display this field.
Blank: Do not display this field. This is the default value.
-
Bill RtCd (Rate Code)
Enter a code that specifies whether the system displays the Equipment Rate Code field on employee self-service time entry forms. This user-defined code (00/RC) is used to identify the billing method that is used for a piece of equipment. For example, code DY refers to daily billing and MO refers to monthly billing. Values are:
1: Display this field.
Blank: Do not display this field. This is the default value.
-
Equipment Object
Enter a code that specifies whether the system displays the Equipment Object Account field on employee self-service time entry forms. This code represents the account to which amounts that are associated with equipment utilization are charged. Values are:
1: Display this field.
Blank: Do not display this field. This is the default value.
-
Equipment Blrt (Billing Rate)
Enter a code that specifies whether the system displays the Billing Rate - Equipment field on employee self-service time entry forms. This value represents the monetary amount that is billed for the use of equipment. Values are:
1: Display this field.
Blank: Do not display this field. This is the default value.
-
Cost Type 1
Enter a code that specifies whether the system displays the Managerial Analysis Type field on employee self-service time entry forms. This field should be displayed if the Managerial Analysis Code field is displayed. Values are:
1: Display this field.
Blank: Do not display this field. This is the default value.
-
Cost Object 1
Enter a code that specifies whether the system displays the Managerial Analysis Code field on employee self-service time entry forms. The Managerial Analysis code works the same as the subledger code; however, the system does not post this code to the Account Balances table (F0902). Values are:
1: Display this field.
Blank: Do not display this field. This is the default value.
-
Activity Code
Enter a code that specifies whether the system displays the Activity Based Costing Code field on employee self-service time entry forms. Values are:
1: Display this field.
Blank: Do not display this field. This is the default value.
-
Task Number
Enter a code that specifies whether the system displays the Task Unique Key field on employee self-service time entry forms. This code is used to identify a task or assignment for resource scheduling purposes. Values are:
1: Display this field.
0: or Blank: Do not display this field. This is the default value.
-
Currency From
A code that specifies whether the system displays the Currency Code field on employee self-service time entry forms. This code identifies the currency of a customer's or a supplier's transactions. Values are:
1: Display this field.
0: or Blank: Do not display this field. This is the default value.
-
Currency To
A code that specifies whether the system displays the Currency Code To field on employee self-service time entry forms. This code is used to identify the currency for which the system must retrieve the exchange rate. Values are:
1: Display this field.
0: or Blank: Do not display this field. This is the default value.
-
Leave Type
Enter a code that specifies whether the system displays the Leave Type field on employee self-service time entry forms. This code is used to identify the type of time that an employee codes to a leave pay type. Values are:
I: Display this field.
Blank: Do not display this field. This is the default value.
-
Leave ID Number
Enter a code that specifies whether the system displays the Leave Request Number field on employee self-service time entry forms. This code is the unique identification number of the leave request that is associated with a time entry record. Values are:
1: Display this field.
Blank: Do not display this field. This is the default value.
-
Leave Begin Date
A code that specifies whether the system displays the Leave Begin Date field on employee self-service time entry forms. This date field is used to enter the start date for a single occurrence of leave. Values are:
1: Display this field.
0: or Blank: Do not display this field. This is the default value.
-
Leave End Date
Enter a code that specifies whether the system displays the Leave End Date field on employee self-service time entry forms. This date field is used to enter the start date for a single occurrence of leave. Values are:
1: Display this field.
0: or Blank: Do not display this field. This is the default value.
-
Leave Hours Per Day
Enter a code that specifies whether the system displays the Hours Per Day field on employee self-service time entry forms. This field is used for employees to specify the number of hours per day when a leave begin and end date are entered. Values are:
1: Display this field.
0: or Blank: Do not display this field. This is the default value.
-
Leave Comments
Enter a code that specifies whether the system displays the Leave Comments field on employee self-service time entry forms. This field is used for employees to enter details about the leave they've entered. Values are:
1: Display this field.
0: or Blank: Do not display this field. This is the default value.
-
Pay In Advance
Enter a code that specifies whether the system displays the Pay In Advance field on employee self-service time entry forms. This field is used for employees to specify the pay in advance timecard. Values are:
0 or blank: Do not display this field (default).
1: Display this field.
-
Change Reason
Enter a code that specifies whether the system displays the Change Reason field on employee self-service time entry forms. This field is used for employees to specify the Change Reason. Values are:
Blank: Do not display the Change Reason field.
1: display the Change Reason field.
-
Change Comments
Enter a code that specifies whether the system displays the Change Comments field on employee self-service time entry forms. This field is used for employees to enter comments regarding the timecard change. Values are:
Blank: Do not display the Change Comments field.
1: display the Change Comments field.
-
7.4 Assigning Pay Types to Employee Groups
This section provides an overview of pay types assignment and discusses how to set up pay type assignment for employee groups.
7.4.1 Understanding Pay Types Assignment
To simplify the time entry process and to ensure that employees enter timecards using the correct pay types, you can use the Classification/Pay Cross Reference program (P05932) to specify the available pay types for specified employee groups within your organization. Linking pay types with employee groups is also necessary for the self-service time entry programs to function properly. You can define groups based on job types, job steps, business units, shift codes, union codes, or any combination of these fields. You can use the processing options for the Time Entry Self Service Director program (P051125) to specify which of these fields you want to use to create employee groups for pay type classification purposes.
When you assign pay types to specific employee groups, employees can use only the pay types that have search criteria that match the information in the Employee Master Information table (F060116). For example, if you assign a pay type to business unit 100 and job type A-50, only employees who are listed in the Employee Master Information table with business unit 100 and job type A-50 can enter timecards using that pay type. Additionally, only the pay types that are associated with an employee group are displayed with the search function for the pay type field during the time entry process.
You can also set up a set of default pay types for employees who are listed in the Employee Master Information table with business unit and job type values that do not meet specified search criteria. You might want to do this to identify employee groups for which you have not set up pay type information. For example, if you set up pay type information for each employee group within your organization, you can set up default information and include only one pay type in the default set. If an employee does not meet the search criteria for any of the other employee groups, that employee can enter time using only the pay type that you have set up in the default set. You can then review time entry records to find employees who have entered timecards using that pay type. By identifying those employees, you can identify employee groups for which you need to set up pay type information.
You might also want to use a default set of pay types if you have a large number of employees in different employee groups who can use the same pay types. For example, if only three of the business units within your organization require unique pay types, you might set up pay types for each of the three business units. However, if the rest of the employees within your organization use the same pay types, you can set up a default set of pay types for those employees rather than setting up the same pay type information for each business unit.
|
Note: Assigning pay types to employee groups is required in order for self-service time entry programs to function properly. You must set up pay type information so that employees in your organization can use the pay types that you set up. If no pay types are set up, then employees will receive a hard error message on the pay type field and will not be able to enter a self-service timecard. |
7.4.2 Forms Used to Assign Pay Types to Employee Groups
| Form Name | FormID | Navigation | Usage |
|---|---|---|---|
| Work with Classification Pay/Cross Reference | W05932A | Rate Derivation Setup (G05BRD4), Classification Pay/X-Ref
Click Add. |
Access the Classification/Pay Cross Reference Revisions form |
| Classification/Pay Cross Reference Revisions | W05932C | Click OK. | Enter appropriate values to assign pay types to existing employee groups. |
7.4.3 Setting Up Pay Type Assignment for Employee Groups
Access the Classification/Pay Cross Reference Revisions form.
To assign pay types to business units:
-
Click Add.
-
On Classification/Pay Cross Reference Revisions, complete any of these fields to define the employee group to which you want to assign pay types:
-
Job Type
-
Job Step
-
Union Code
-
Business Unit
-
Shift Code
Note:
To create a default set of pay types, leave all of these fields blank.
-
-
In the detail area of the form, enter the beginning pay type code in a range of pay types in the From Trans field.
-
Enter the ending pay type code in a range of pay types in the Thru Trans field.
Note:
When you are entering a range of pay types to assign to an employee group, both the pay type in the From Trans field and the pay type in the Thru Trans field are included in the range and assigned to the specified group. If you do not want to enter a pay type range, you can enter the same pay type code in the From Trans and Thru Trans fields. -
Select a blank row in the detail area and repeat steps 3 and 4 until you have assigned all of the pay types for the specified business unit.
-
Click OK.
-
Shift Code
Enter a user-defined code (00/SH) that identifies daily work shifts.
In payroll systems, you can use a shift code to add a percentage or amount to the hourly rate on a timecard.
For payroll and time entry, if an employee always works a shift for which a shift rate differential is applicable, enter that shift code on the employee's master record. When you enter the shift code on the employee's master record, you do not need to enter the code on the timecard when you enter time. If an employee occasionally works a different shift, you enter the shift code on each applicable timecard to override the default value.
-
From Transaction (Trans)
Enter the number and description of the PDBA that you want the system to use to calculate the corresponding PDBA. This number is the beginning number in the range that is the basis of the calculation.
-
Thru Transaction (Trans)
Enter the number and description of the PDBA that you want the system to use to calculate the corresponding PDBA. This number is the ending number in the range that is the basis of the calculation.
-
7.5 Working with Labor Distribution Periods
This section provides an overview of labor distribution periods and discusses how to:
-
Add a labor distribution period for an employee.
-
Override standard hours with labor distribution period.
7.5.1 Understanding Labor Distribution Periods
You use the Labor Distribution Periods program (P059062) to add or update a labor distribution period for a date range. You must use the Override Employee Labor Period Standard Hours program (P059063) to change the standard hours for an employee for whom a labor distribution period with a different number of standard hours has been assigned. The standard hours defined in the P059063 program are used instead of the standard hours defined in the labor distribution period for the employee.
7.5.2 Forms Used to Work with Labor Distribution Periods
| Form Name | FormID | Navigation | Usage |
|---|---|---|---|
| Work with Labor Distribution Periods | W059062F | HRM Setup (G05B4), Labor Distribution Periods | Review and revise existing labor distribution periods or access the Flat File Cross-Reference form. |
| Revise Labor Distribution Periods | W059062G | Click Add on the Work with Labor Distribution Periods form. | Add a new labor distribution period. |
| Override Employee Labor Period Standard Hours | W059063A | Select Employee Hours from the Form menu on the Revise Labor Distribution Periods form. | Enter employees and labor period hours to override the standard hours of the labor distribution period ID for that employee. |
7.5.3 Adding Labor Distribution Period for an Employee
Access the Revise Labor Distribution Periods form.
Figure 7-1 Revise Labor Distribution Periods form
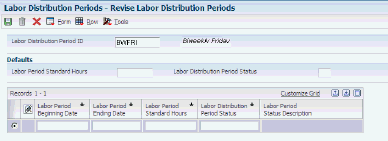
Description of ''Figure 7-1 Revise Labor Distribution Periods form''
- Labor Distribution Period ID
-
Enter a value from UDC table 05T/LD that identifies the labor distribution period.
- Labor Period Standard Hours
-
Enter the standard number of work hours for employees assigned to the labor distribution period.
- Labor Distribution Period Status
-
Enter a value from UDC table 05T/LS that indicates the status of the labor distribution period ID. Values are:
-
C: This indicates that the status is closed.
-
F: This indicates that the status is open for future entry.
-
O: This indicates that the status is open.
-
X: This indicates that the status is open only for historical correction.
-
- Labor Period Beginning Date
-
Enter the beginning date for the labor distribution period ID.
- Labor Period Ending Date
-
Enter the ending date for the labor distribution period ID.
7.5.4 Overriding Standard Hours with Labor Distribution Period
Access the Override Employee Labor Period Standard Hours form.
Figure 7-2 Overriding Employee Labor Period Standard Hours form
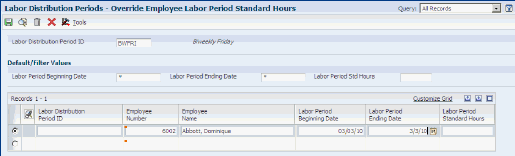
Description of ''Figure 7-2 Overriding Employee Labor Period Standard Hours form''
- Employee Number
-
Enter the number of the employee for whom you are changing the standard number of hours for a labor period.
- Employee Name
-
The address book name of the employee corresponding to the employee number.