36 Field Progress Entry Mobile Applications
This chapter discusses these topics:
-
Section 36.1, "Field Progress Entry Mobile Applications Overview"
-
Section 36.2, "Setting Processing Options for the Field Progress Entry Mobile Applications"
-
Section 36.3, "Setting Up Time Entry Information for the Mobile Field Progress Entry Applications"
-
Section 36.5, "Using the Field Progress Entry Mobile Tablet Application"
-
Section 36.6, "Using the Mobile Field Progress Labor Entry Smartphone Application"
-
Section 36.7, "Using the Mobile Field Progress Equipment Entry Smartphone Application"
-
Section 36.8, "Using the Mobile Field Account Progress Entry Smartphone Application"
|
Important Note: Before using the Field Progress Entry mobile applications, Oracle strongly recommends that users have a complete understanding of how to use the associated processes and applications in the JD Edwards EnterpriseOne base software.For additional information about the processes and applications associated with the mobile application discussed in this chapter, see:
|
36.1 Field Progress Entry Mobile Applications Overview
The Field Progress Entry mobile applications provide project managers and others the ability to enter labor and equipment time entry, and to review account progress details for a selected job and cost code.
The Field Progress Entry mobile tablet application (M51050) enables you to perform all of these field progress entry review and update functions. Three mobile smartphone applications have been created to provide users with the ability to update field progress data:
-
Mobile Field Progress Labor Entry - Phone application (M51051)
-
Mobile Field Progress Equipment Entry - Phone application (M51052)
-
Mobile Field Account Progress Entry - Phone application (M51053)
Using these applications, you can:
-
Enter timecards for a selected crew, for your direct report employees, or for employees for whom you have delegate rights.
-
Enter equipment time entry.
-
Review budgeted units vs. actual units. (tablet only)
-
Review and update account progress, which includes actual units, percent complete, and force +/- units.
This table lists the applications that are available to enter or update the field progress information:
| Type of Application | Additional Information |
|---|---|
| Base EnterpriseOne Application | Use these applications in the JD Edwards EnterpriseOne system to review and update field progress details:
|
| Tablet Application | Mobile Field Progress Entry - Tablet (M51050)
To download the application to your tablet, search on the following text in the application store:
|
| Smartphone Applications | Mobile Field Progress Labor Entry - Phone (M51051)
To download the application to your smartphone device, search on the following text in the application store:
Mobile Field Progress Equipment Entry - Phone (M51052) To download the application to your smartphone device, search on the following text in the application store:
Mobile Field Account Progress Entry - Phone (M51053) To download the application to your smartphone device, search on the following text in the application store:
|
Before using the Field Progress Entry mobile applications, you must set up processing options to specify the versions of several JD Edwards EnterpriseOne applications that are used during mobile field progress entry data processing.
Barcode Scanning (Release 9.1 Update)
The Field Progress Entry mobile tablet application (M51050) and the Field Progress Equipment Entry mobile smartphone application (M51052) are designed to scan data from a barcode and populate the equipment number in the Equipment field. To scan barcode data, you can use the native camera on your device or a third-party handheld Bluetooth-enabled scanning device. To use this functionality, you must create barcodes that represent a single field in the JD Edwards EnterpriseOne system. This application does not accept barcodes that consist of data for multiple fields.
You can generate barcodes using services such as those offered by Barcodes Inc.
|
Note: Oracle is not affiliated with Barcodes, Inc. and does not require or recommend that you use this service to create your barcodes. |
36.2 Setting Processing Options for the Field Progress Entry Mobile Applications
The Field Progress Entry mobile applications all include sets of processing options that you must review and update before using the applications. These processing options determine which versions of base EnterpriseOne programs are used when processing field progress data, and how data is displayed in the mobile applications.
36.2.1 Setting Processing Options for the Mobile Field Progress Entry Tablet Application (M51050)
You use processing options to specify default processing information for a program.
36.2.1.1 Process
- 1. Budget Hours Code
-
Use this processing option to specify the code for Budget Hours to display on the Budget/Actual tab. Values for this processing option are defined in the Define Inquiry Columns (P51921) program. For example, if you want to display the Original Budget Hours, enter the code that represents the Original Budget Hours (for example, OBU). The application then displays the hours and description associated with the OBU code.
Use the visual assist to select a valid value for this processing option.
- 2. Actual Hours Code
-
Use this processing option to specify the code for Actual Hours to display on the Budget/Actual tab. Values for this processing option are defined in the Define Inquiry Columns (P51921) program. For example, if you want to display the Actual Hours, enter the code that represents the Actual Hours (for example, AU). The application then displays the hours and description associated with the AU code.
Use the visual assist to select a valid value for this processing option.
- 3. Crew ID Required
-
Use this processing option to specify whether Crew ID on the Labor tab is a required field. Values are:
1: Crew ID required.
Blank: Crew ID is not required.
36.2.1.2 Display
- 1. Display Labor Tab
-
Use this processing option to specify whether to display the Labor tab in the application. For example, if your organization does not use JD Edwards EnterpriseOne Time and Labor, you might hide this tab. Values include:
1: Hide the Labor tab.
Blank: Display the Labor tab.
- 2. Display Equipment Tab
-
Use this processing option to specify whether to display the Equipment tab in the application. For example, if your organization does not enter equipment time, you might hide this tab. Values include:
1: Hide the Equipment tab.
Blank: Display the Equipment tab.
- 3. Display Account Progress Tab
-
Use this processing option to specify whether to display the Account Progress tab in the application. For example, if you do not want employees to update account information using the mobile application you might hide this tab. Values include:
1: Hide the Account Progress tab.
Blank: Display the Account Progress tab.
36.2.1.3 Versions
Use these processing options to specify the version of the specified program that the mobile application uses to process field progress data. If you leave any of these options blank, the system uses version ZJDE0001.
-
1. Cost Code Schedule (P51901) Version
-
2. Job Status Inquiry (P512000) Version
-
3. User Defined Codes (P0004A) Version
-
4. Resource Master (P48310) Version
-
5. Equipment Time Entry (P12110) Version
-
6. Account Progress Entry (P510211) Version
-
7. Equipment Search and Select (P17012S) Version
-
8. Time Entry Self Service Director (P051125) Version
-
9. Employee Profile (P060116) Version
-
10. Employee Basic Compensation (P0801CMP) Version
-
11. Employee Organizational Assignments (P0801ORG) Version
-
12. Manager Delegates Setup (P051126) Version
-
13. Job Progress Entry (P510212) Version
36.2.2 Setting Processing Options for the Mobile Field Progress Labor Entry Phone Application (M51051)
You use processing options to specify default processing information for a program.
36.2.2.1 Process
- 3. Crew ID Required
-
Use this processing option to specify whether Crew ID is a required field. Values are:
1: Crew ID required.
Blank: Crew ID is not required.
36.2.2.2 Versions
Use these processing options to specify the version of the specified program that the mobile application uses to process field progress data. If you leave any of these options blank, the system uses version ZJDE0001.
-
1. Cost Code Schedule (P51901) Version
-
2. Resource Master (P48310) Version
-
3. Employee Profile (P060116) Version
-
4. Employee Basic Compensation (P0801CMP) Version
-
5. Employee Organizational Assignments (P0801ORG) Version
-
6. Time Entry Self Service Director (P051125) Version
-
7. Manager Delegates Setup (P051126) Version
-
8. User Defined Codes (P0004A) Version
36.2.3 Setting Processing Options for the Mobile Field Progress Equipment Entry Phone Application (M51052)
You use processing options to specify default processing information for a program.
36.2.3.1 Versions
Use these processing options to specify the version of the specified program that the mobile application uses to process field progress data. If you leave any of these options blank, the system uses version ZJDE0001.
-
1. Cost Code Schedule (P51901) Version
-
2. Equipment Time Entry (P12110) Version
-
3. User Defined Codes (P0004A) Version
36.2.4 Setting Processing Options for the Mobile Field Account Progress Entry Phone Application (M51053)
You use processing options to specify default processing information for a program.
36.2.4.1 Versions
Use these processing options to specify the version of the specified program that the mobile application uses to process field progress data. If you leave any of these options blank, the system uses version ZJDE0001.
-
1. Cost Code Schedule (P51901) Version
-
2. Account Progress Entry (P510211) Version
-
3. Job Progress Entry (P510212) Version
36.3 Setting Up Time Entry Information for the Mobile Field Progress Entry Applications
If you are using these mobile applications to enter timecards for employees, you must first verify that your system is set up to allow entry of timecards using the HCM Self-Service system. You also use the self-service setup to specify which pay types are available to employees when creating self-service timecards.
For additional information and instructions about setting up and using self service time entry, see Setting Up Self-Service Time Entry.
Additionally, if your users are entering time for employees other than those employees who directly report to them, you must verify that delegate records have been set up, and that those records are set up with an Authorization Type of 1, which enables users to enter, change, delete, approve, and reject timecards for the specified employees. You must also verify that the delegate records are set up to include the appropriate date range.
For additional information about setting up time entry delegate information, see Understanding Manager Delegates Setup for Time Entry.
If your users are using a crew ID to retrieve employees, they should verify that the system has the employees assigned to the crew in the Resource Master table (F48310). You use the Resource Master program (P48310) to assign employees to a crew.
For additional information about assigning resources to crews, see Understanding Resource Master Records.
Lastly, be aware that after you create timecards using these mobile applications, those timecards are stored in the F06116Z1 table, and must be transferred to the F06116 before they can be processed through a payroll cycle. For additional information about this process, see Setting Up Time Entry Batch Processing.
36.4 Setting Up the Bluetooth Option in the Mobile Device to Scan Barcodes (Release 9.1 Update)
The Field Progress Entry mobile tablet application (M51050) and the Field Progress Equipment Entry mobile smartphone application (M51052) include the Equipment field in one location in the application. When you enter new equipment time entry information, the Equipment field displays as you select the Equipment tab in the Field Progress Entry screen for tablet application. For the smartphone application, the Equipment field appears in the Equipment screen that displays when you enter new equipment time entry information. When you enter new equipment time entry information using the Field Progress Entry tablet and smartphone applications, you must enter the equipment number in the Equipment field.
You can populate the Equipment field in the equipment time entry information screen using the following options:
-
Use the keyboard on your mobile device to manually enter the data.
-
Use the camera application on your mobile device to scan the data. To use this option, you must disable the Bluetooth option in your device settings.
-
Use a Bluetooth-enabled scanning device to scan the data. To use this option, you must:
-
Enable the Bluetooth option in your device settings.
-
Configure the third-party scanning device to connect to your mobile device.
Note:
When you enable the Bluetooth option on your device, the system may disable the device's keyboard. -
36.5 Using the Field Progress Entry Mobile Tablet Application
Use the Field Progress Entry tablet application to review project information, enter timecards for employees, enter billing information for equipment, and to work with account progress entries.
Before you can use the application, you must download and install the application from the application store on your device.
36.5.1 Updating Field Progress Entries Using the Field Progress Entry Mobile Tablet Application
To update field progress entry:
-
Open the application by tapping the Field Prog icon on your device, and then log in.
See Section 3, "Logging Into Mobile Enterprise Applications"
-
From the Field Progress Entry home screen, enter the job number in the Enter Job Number field and then tap the Search button.
The system displays the list of records based on your search criteria, and displays the details of the first record in the right pane of the screen.
-
If you do not know the job number, or if you want to enter additional search criteria to narrow your search results, tap the filter button.
-
In the Filters pane, the values for Cost Code, Cost Type, and Level of Detail are populated based on the default information that is set up in the versions of the programs specified in the processing options of the tablet application. You can leave these values as they are, override them, or clear them to meet your search needs. Tap the Apply button. When you tap the Apply button, the system:
-
Takes you to the list of cost codes that are displayed based on your filter values.
-
Saves the filter values that you entered. The system displays the saved filter values the next time you open the filter screen.
To discontinue the use of filter values in your search, tap the Cancel button. When you tap the Cancel button, the system:
-
Takes you to the list of cost codes associated with the last saved filter values, if applicable.
-
Ignores the filter values that you entered, and restores the last saved filter values to the filter fields.
To delete all filter values you specified, and to enter new filter values, tap the Clear button.
-
-
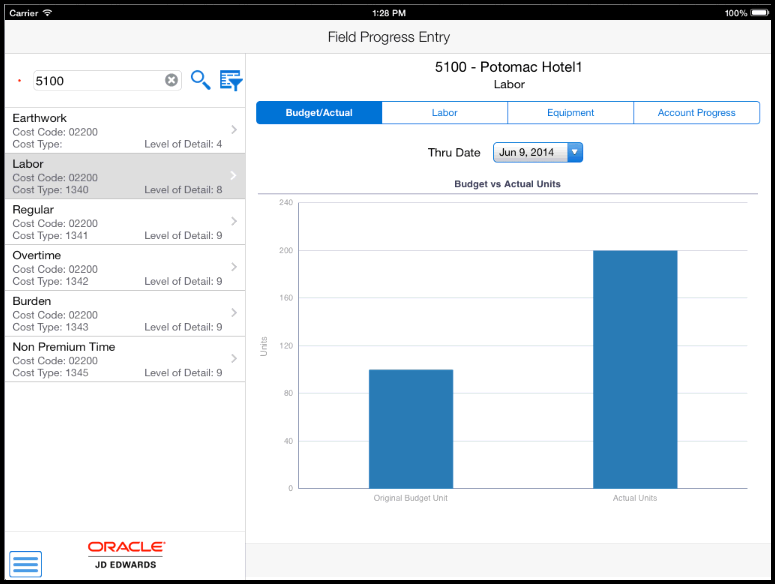
The system returns you to the Field Progress Entry form with a list of records that meet your search criteria. The first record is automatically selected, and details associated with that record are displayed on the right side of the screen.
Tap any record in the list to review the details for that record.
-
The device displays the Budget vs. Actual Units graph on the right side of the screen, with the system date in the Thru Date field. You can change this date.
-
To enter labor details, tap the Labor tab.
Figure 36-2 Field Progress Entry: Labor Tab
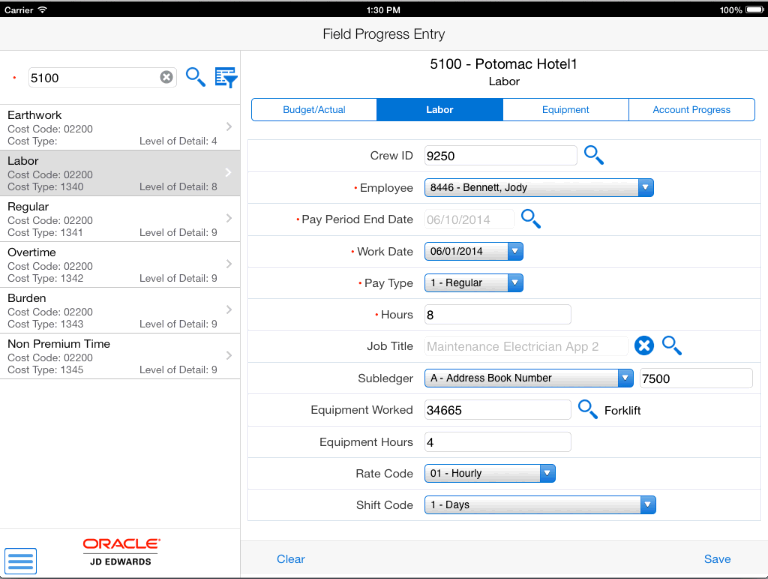
Description of ''Figure 36-2 Field Progress Entry: Labor Tab''
- Crew ID and Employee Fields
-
Select an employee from the Employee drop down list. If you entered a value in the Crew ID field, the system populates the Employee list with only those employees who belong to the specified crew. If you leave the Crew ID field blank, the system populates the Employee list with all direct reports of the logged on user.
The system displays an error if you do not have the authority to enter timecards for the selected employee.
Whether the Crew ID field is required or optional is controlled by the application's processing options.
- Pay Period End Date and Work Date
-
Use the visual assist to retrieve a valid pay period end date. The system provides only valid pay period end dates based on the selected employee's pay cycle code.
After selecting a pay period end date, select a work date. The system allows you to select from dates within the pay period associated with the specified pay period end date.
- Pay Type and Hours
-
Select a pay type from the Pay Type drop down list. The system provides only those pay types that the employee has been authorized to use. Enter the number of hours for the timecard. These fields are required.
Additionally, complete any of the remaining optional fields on the Labor tab, and then tap the Save button at the bottom right.
The system displays the Record Created message.
-
To enter equipment time entry that can be separate from the time entered for labor and equipment, tap the Equipment tab.
Figure 36-3 Field Progress Entry: Equipment Tab
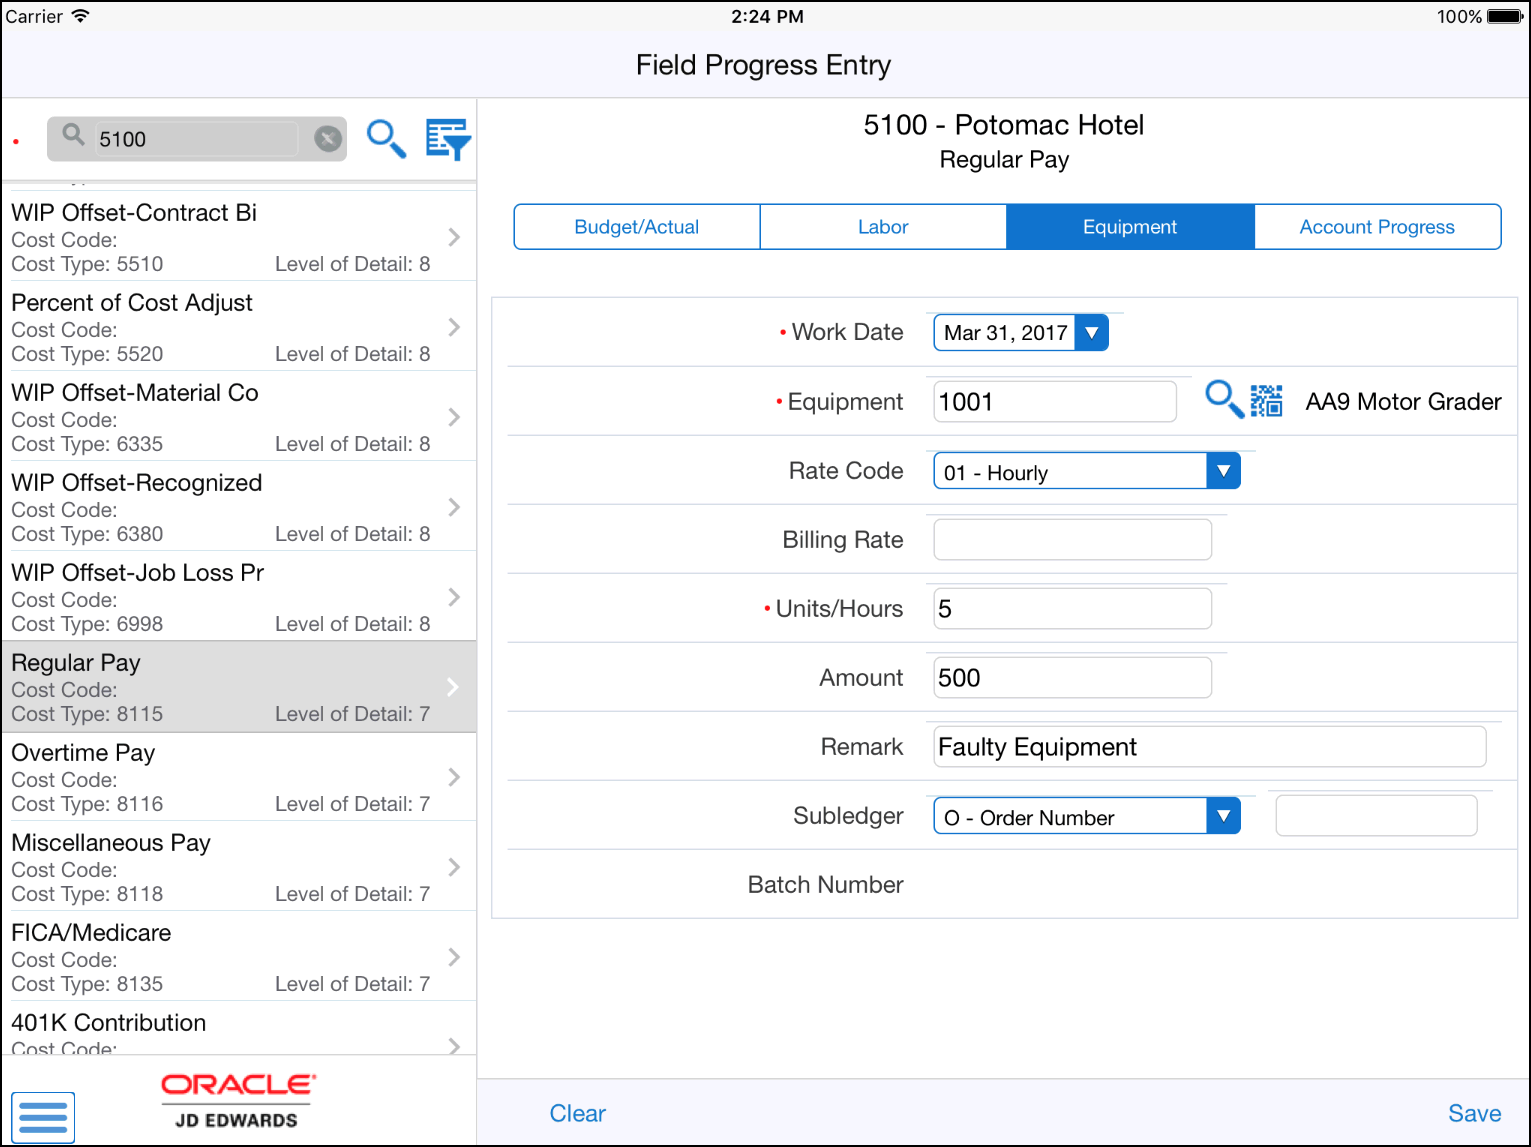
Description of ''Figure 36-3 Field Progress Entry: Equipment Tab''
Select a work date. The default date is the system date, but you can change the date if needed.
- Equipment (Release 9.1 Update)
-
Equipment is a required field. To enter data in the Equipment field use one of the following options:
-
Use the keyboard on your mobile device to manually enter the data. Alternately, you can tap the search and select button to search and select a piece of equipment.
-
Use the camera application on your mobile device to scan the data.
To use this option, tap the QR Code button next to the Equipment field. The system launches the device camera and you can scan the barcode of the equipment.
-
Use a Bluetooth-enabled scanning device to scan the data.
To use this option, tap the Equipment field to activate the scanning device. Then, scan the barcode of the equipment using the scanning device.
Note:
The Equipment field is designed to accept the asset that you identify with an identification symbol in the Fixed Assets Constants program (P001012).See Setting Up Fixed Asset Constants in the JD Edwards EnterpriseOne Applications Fixed Assets Implementation Guide.
For example, if the symbol to identify the serial number is "/" and the serial number is "4CE0460D0G"; then you need to enter "/4CE0460D0G" in the Equipment field to search and select a piece of equipment.
-
- Rates, Hours, and Amount
-
When you enter equipment time, you can specify a rate code, and enter a billing rate. You can also enter the units or hours. For example, if you enter a billing rate of 20, and you enter 10 hours, the system calculates the amount to be 200. However, if you enter a value in the Amount field, that value overrides what you enter in the Billing Rate and Units/Hours fields. You must enter a value in either the Units/Hours field or the Amount field. Both of these fields cannot be blank.
- Subledger Type and Subledger
-
Select a Subledger Type and then enter a valid subledger value in the Subledger field (next to the Subledger Type drop down list).
- Batch Number
-
After you save the record, the system assigns and displays a batch number. If you enter another record with the same date, the system retains the batch number. If you enter another record with a different date, the system removes the batch number, and creates a new batch number when you save the record.
Tap the Save button at the bottom right of the screen.
-
To review and modify account progress information, tap the Account Progress tab.
Figure 36-4 Field Progress Entry: Account Progress Tab
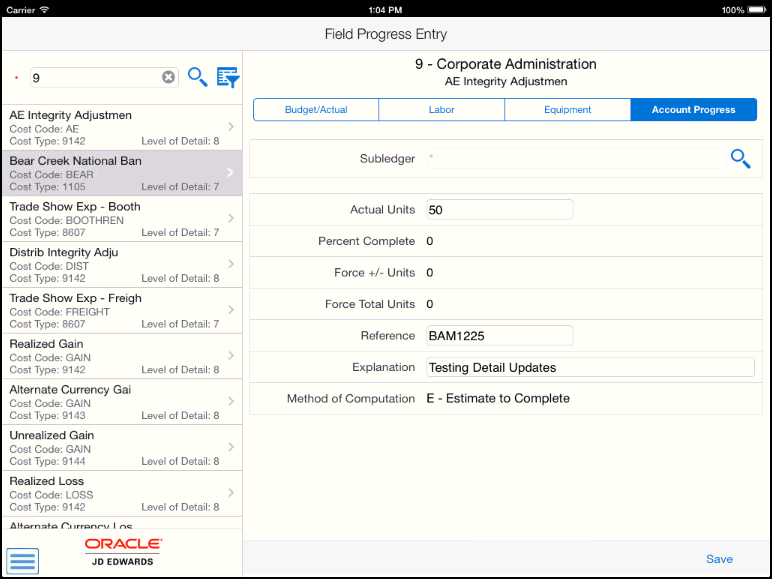
Description of ''Figure 36-4 Field Progress Entry: Account Progress Tab''
To enter a subledger, tap the Visual Assist button, select a Subledger type and enter a subledger value, then tap Apply. Entering a subledger is optional.
Specify values in the Actual Units, Percent Complete, Force +/- Units, and Force Total Units fields. These fields are optional. Note that the fields that are editable is determined by the value in the Method of Computation field.
The values in the Explanation and Reference fields are retrieved from program versions specified in the processing options. If no value is found for the Explanation field, the system populates the field with Field Progress Entry. You can override this value.
Tap the Save button at the bottom right of the screen.
-
To log out of the application, tap the Menu button at the bottom left of the screen, and then tap Logout.
36.6 Using the Mobile Field Progress Labor Entry Smartphone Application
Use the Field Progress Labor Entry smartphone application to enter the timecard information for employees by job and cost type.
Before you can use the application, you must download and install the application from the application store on your device.
36.6.1 Entering Timecards Using the Field Progress Labor Entry Mobile Smartphone Application
To enter timecards for field progress:
-
Open the application by tapping the Labor Entry icon on your device, and then log in.
See Section 3, "Logging Into Mobile Enterprise Applications"
-
From the Field Progress Labor Entry home screen, enter the job number in the Enter Job Number field and then tap the Search button.
The system displays the list of records based on your search criteria.
-
If you do not know the job number, or if you want to enter additional search criteria to narrow your search results, tap the filter button.
-
In the Filters pane, the values for Cost Code, Cost Type, and Level of Detail are populated based on the default information that is set up in the versions of the programs specified in the processing options. You can leave these values as they are, override them, or clear them to meet your search needs. Tap the Apply button. When you tap the Apply button, the system:
-
Takes you to the list of cost codes that are displayed based on your filter values.
-
Saves the filter values that you entered. The system displays the saved filter values the next time you open the filter screen.
To discontinue the use of filter values in your search, tap the Cancel button. When you tap the Cancel button, the system:
-
Takes you to the cost code list associated with the last saved filter values, if applicable.
-
Ignores the filter values that you entered, and restores the last saved filter values to the filter fields.
To delete all filter values you specified, and to enter new filter values, tap the Clear button.
-
-
The system returns you to the Field Progress Labor Entry screen with a list of records that meet your search criteria.
Tap any record in the list to review to create timecards for that record.
-
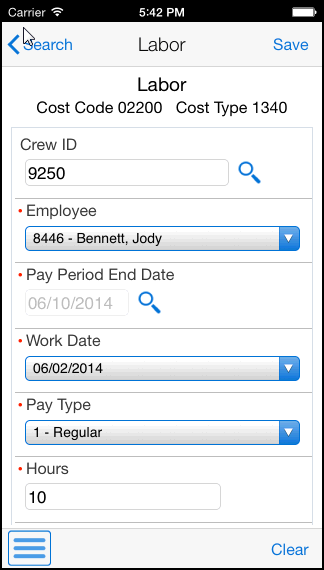
On the Labor screen, enter the timecard details.
- Crew ID and Employee Fields
-
Select an employee from the Employee drop down list. If you entered a value in the Crew ID field, the system populates the Employee list with only those employees who belong to the specified crew. If you leave the Crew ID field blank, the system populates the Employee list with all direct reports of the logged on user.
The system displays an error if you do not have the authority to enter timecards for the selected employee.
Whether the Crew ID field is required or optional is controlled by the application's processing options.
- Pay Period End Date and Work Date
-
Use the visual assist to retrieve a valid pay period end date. The system provides only valid pay period end dates based on the selected employee's pay cycle code.
After selecting a pay period end date, select a work date. The system allows you to select from dates within the pay period associated with the specified pay period end date.
- Pay Type and Hours
-
Select a pay type from the Pay Type drop down list. The system provides only those pay types that the employee has been authorized to use. Enter the number of hours for the timecard. These fields are required.
Complete any of the remaining optional fields on the Labor screen.
-
Tap the Save button at the top right of the screen.
-
To log out of the application, tap the Menu button at the bottom left of the screen, and then tap Logout.
36.7 Using the Mobile Field Progress Equipment Entry Smartphone Application
Use the Mobile Field Progress Equipment Entry smartphone application to enter equipment time entry information by job and cost code.
Before you can use the application, you must download and install the application from the application store on your device.
36.7.1 Entering Equipment Time Entry Using the Field Progress Equipment Entry Mobile Smartphone Application
To enter field progress equipment information:
-
Open the application by tapping the Eq Time Entry icon on your device, and then log in.
See Section 3, "Logging Into Mobile Enterprise Applications"
-
From the Field Progress Equipment Entry home screen, enter the job number in the Enter Job Number field and then tap the Search button.
The system displays the list of records based on your search criteria.
-
If you do not know the job number, or if you want to enter additional search criteria to narrow your search results, tap the filter button.
-
In the Filters pane, the values for Cost Code, Cost Type, and Level of Detail are populated based on the default information that is set up in the versions of the programs specified in the processing options. You can leave these values as they are, override them, or clear them to meet your search needs. Tap the Apply button. When you tap the Apply button, the system:
-
Takes you to the list of cost codes that are displayed based on your filter values.
-
Saves the filter values that you entered. The system displays the saved filter values the next time you open the filter screen.
To discontinue the use of filter values in your search, tap the Cancel button. When you tap the Cancel button, the system:
-
Takes you to the cost code list associated with the last saved filter values, if applicable.
-
Ignores the filter values that you entered, and restores the last saved filter values to the filter fields.
To delete all filter values you specified, and to enter new filter values, tap the Clear button.
-
-
The system returns you to the Field Progress Equipment Entry screen with a list of records that meet your search criteria.
-
Tap any record to enter equipment time for that record. The system brings you to the Equipment screen.
-
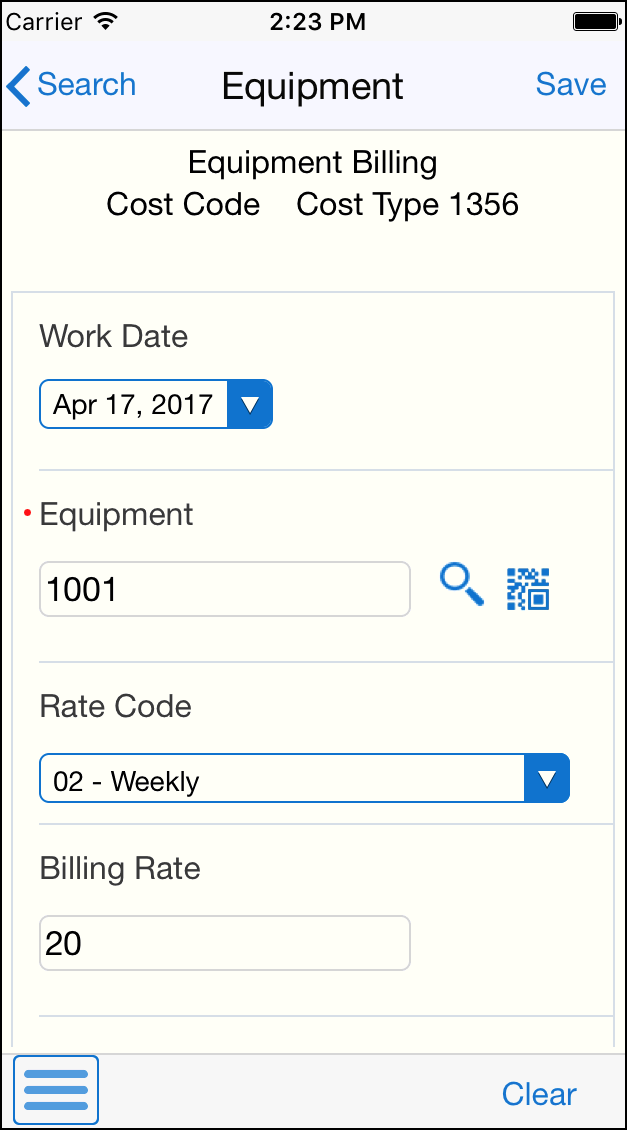
Select a work date. The default date is the system date, but you can change the date if needed.
-
Enter an equipment number.
- Equipment (Release 9.1 Update)
-
Equipment is a required field. To enter data in the Equipment field use one of the following options:
-
Use the keyboard on your mobile device to manually enter the data. Alternately, you can tap the search and select button to search and select a piece of equipment.
-
Use the camera application on your mobile device to scan the data.
To use this option, tap the QR Code button next to the Equipment field. The system launches the device camera and you can scan the barcode of the equipment.
-
Use a Bluetooth-enabled scanning device to scan the data.
To use this option, tap the Equipment field to activate the scanning device. Then, scan the barcode of the equipment using the scanning device.
-
Note:
The Equipment field is designed to accept the asset that you identify with an identification symbol in the Fixed Assets Constants program (P001012).See Setting Up Fixed Asset Constants in the JD Edwards EnterpriseOne Applications Fixed Assets Implementation Guide.
For example, if the symbol to identify the serial number is "/" and the serial number is "4CE0460D0G"; then you need to enter "/4CE0460D0G" in the Equipment field to search and select a piece of equipment.
-
Enter the remaining timecard information.
- Rates, Hours, and Amount
-
When you enter equipment time, you can specify a rate code, and enter a billing rate. You can also enter the units or hours. For example, if you enter a billing rate of 20, and you enter 10 hours, the system calculates the amount to be 200. However, if you enter a value in the Amount field, that value overrides what you enter in the Billing Rate and Units/Hours fields. You must enter a value in either the Units/Hours field or the Amount field. Both of these fields cannot be blank.
- Subledger Type and Subledger
-
Select a Subledger Type and then enter a valid Subledger value.
- Batch Number
-
After you save the record, the system assigns and displays a batch number. If you enter another record with the same date, the system retains the batch number. If you enter another record with a different date, the system removes the batch number, and creates a new batch number when you save the record.
-
Tap the Save button at the top right of the screen.
-
To log out of the application, tap the Menu button at the bottom left of the screen, and then tap Logout.
36.8 Using the Mobile Field Account Progress Entry Smartphone Application
Use the Mobile Field Account Progress Entry smartphone application to work with account progress entries. This application enables you to update information by job and cost code.
Before you can use this application, you must download and install the application from the application store on your device.
36.8.1 Updating Account Progress Using the Mobile Field Account Progress Entry Smartphone Application
To update account progress entry for an account:
-
Open the application by tapping the Acct Progress icon on your device, and then log in.
See Section 3, "Logging Into Mobile Enterprise Applications"
-
From the Field Account Progress home screen, enter the job number in the Enter Job Number field and then tap the Search button.
The system displays the list of records based on your search criteria.
-
If you do not know the job number, or if you want to enter additional search criteria to narrow your search results, tap the filter button.
-
In the Filters pane, the values for Cost Code, Cost Type, and Level of Detail are populated based on the default information that is set up in the processing options in the version of the Cost Code Schedule (P51901) program. You can leave these values as they are, override them, or clear them to meet your search needs. You can also enter the job number in the Filters pane or search for the job number by description. Tap the Apply button. When you tap the Apply button, the system:
-
Takes you to the list of cost codes that are displayed based on your filter values.
-
Saves the filter values that you entered. The system displays the saved filter values the next time you open the filter screen.
To discontinue the use of filter values in your search, tap the Cancel button. When you tap the Cancel button, the system:
-
Takes you to the cost code list associated with the last saved filter values, if applicable.
-
Ignores the filter values that you entered, and restores the last saved filter values to the filter fields.
To delete all filter values you specified, and to enter new filter values, tap the Clear button.
-
-
The system returns you to the Field Account Progress screen with a list of records that meet your search criteria.
Tap any record in the list to review the details for that record.
-
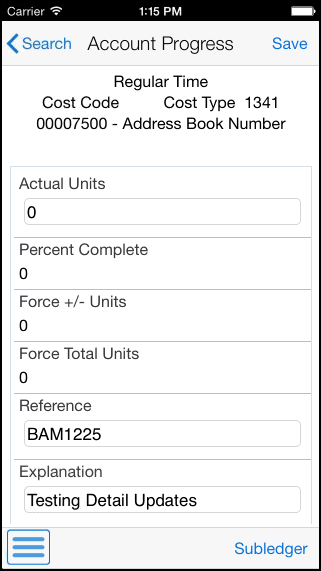
The system takes you to another Account Progress screen, with the job and cost code details displayed in the header. If the selected record includes a subledger, that information is also displayed in the header.
To enter a subledger, tap the Subledger button at the bottom right of the screen, select a Subledger type and enter a subledger value, then tap Apply. Note that the subledger is added to the header. Entering a subledger is optional.
-
In the Account Progress screen, you can perform these steps to update cost code details:
-
Update the Actual Units field.
-
Update the Percent Complete field.
-
Update the Force Units by entering an incremental value in the Force +/- Units field. When you enter a value in this field, the system updates the Force Total Units value automatically by adding the force units to the previous force total units.
-
Update the Force Total Units field. When you enter a value in this field, the system updates the Force +/- Units value automatically with the incremental difference between the previous force total units and the new force total units.
-
Update the Reference field. The default value is based on the processing option settings from the selected version of the P510212.
-
Update the Explanation field. The default value is based on the processing option settings from the selected version of the P510212. If the processing option is blank, the default value is Field Progress Entry.
-
-
Tap the Save button at the top right of the screen.
-
To log out of the application, tap the Menu button at the bottom left of the screen, and then tap Logout.
