28 Employee Self Service
This chapter contains the following topics:
-
Section 28.2, "Requesting a Verification-of-Employment Letter"
-
Section 28.3, "Reviewing Personal Information Using Self Service"
-
Section 28.4, "Reviewing Pay Stubs Using Employee Self Service"
-
Section 28.6, "Entering Competency Information Using Self Service"
-
Section 28.8, "(Release 9.1 Update) Disclosing Disability Status"
-
Section 28.9, "(Release 9.1 Update) Disclosing Protected Veteran Status"
-
Section 28.10, "Managing Self-Service Timecards Using Summary Time Entry"
28.1 Understanding Employee Self Service
Self service enables employees to review and enter information using a company intranet portal. One of the most common self-service functions that companies offer is open enrollment for benefits. Another common self-service offering is access to employee personal information.
28.2 Requesting a Verification-of-Employment Letter
This section provides an overview of verification-of-employment letters and discusses how to:
-
Set processing options for Review Requests for Verification of Employment (P05003).
-
Request a verification-of-employment letter.
28.2.1 Understanding Verification-of-Employment Letters
The Review Requests for Verification of Employment program (P05003) enables employees to submit requests online to verify salary and employment information. Concurrently, they can review the salary and employment information that is associated with their employee records.
Using processing options, the employer controls the user level. An employee can review information at the employee user level and make changes that are allowed for employees. An HR person can review information at the HR user level and perform functions that are allowed only at an administrative level.
After an employee has submitted a request for employment verification, a workflow process is started. The workflow process forwards the request to a designated HR administrator. The HR administrator then reviews the employment and salary information that the system has generated, makes any necessary revisions, and forwards the information directly to the party previously specified by the employee.
Employees can use self service to request that a verification-of-employment letter be sent to a creditor or loan officer. After requesting the letter, employees can review the progress of the request. The HR administrator can print or send the completed letter by email.
28.2.2 Forms Used to Request a Verification-of-Employment Letter
| Form Name | FormID | Navigation | Usage |
|---|---|---|---|
| Work With Verification Of Employment Requests | W05003A | Employee Self Service (G05BESS1), Verification of Employment
On Work With Verification Of Employment Requests, click Select. |
Request a Verification-of-Employment letter. |
| Verification of Employment Data | W05003B | On Verification Of Employment Data, select the Request Information tab. | Enter required data. |
| Verification of Employment Data | W05003B | Employment Data tab
Click OK. |
Update employment information, if required.
The Work With Verification Of Employment Requests form appears. Your letter is pending review. |
28.2.3 Setting Processing Options for Review Requests for Verification of Employment (P05003)
Processing options enable you to specify the default processing for programs and reports.
28.2.3.1 User Level
- 1. User Level:
-
Values are:
Blank: Employee
1: Employee.
2: HR clerk.
3: HR Administrator (This option does not send a request through Workflow.)
Note:
If this program is used by an employee or an HR clerk, the approval process will be routed through workflow, where the Workflow Setup tab must be set up.
28.2.3.2 Workflow Setup
Use this processing option to specify which address number the system uses.
- 1. Address Number of VOE request processor (HRM):
-
Specify the address number of the HR person (Human Resources) or who processes VOE (Verification of Employment) requests. This entity can also be a distribution list.
28.2.4 Requesting a Verification-of-Employment Letter
Access the Verification Of Employment Data form.
Figure 28-1 Verification Of Employment Data form

Description of ''Figure 28-1 Verification Of Employment Data form''
To request a verification-of-employment letter:
-
On Work With Verification Of Employment Requests, complete the Employee No field and click Add.
-
On Verification Of Employment Data, complete the Contact Name field on the Request Information tab.
-
Complete any of these optional fields:
-
Company
-
Title
-
Phone Area / Number
-
Comment
-
-
Select one or more of these contact method options:
-
Email
-
Facsimile
-
Mail
-
-
Complete any of these fields that apply to the contact method option that you have chosen:
-
E-Mail Address
Enter a value that indicates whether the verification-of-employment letter can be sent by email. Values are:
1: Yes, the letter can be sent by email.
0: No, the letter cannot be sent by email. This is the default value.
-
Email
Enter a valid email address.
-
Fax Prefix / Phone No.
Enter the prefix for telephone number 2. The default format for the Phone Prefix data dictionary item is set to the United States prefix (area code). This format is three characters enclosed in parentheses, for example, (303). If you require an alternate format to accommodate a non-United States prefix, you must change the data display rules in the data dictionary.
-
Address Line 1
Enter the first line of a mailing address for an employee, customer, or supplier in the JD Edwards EnterpriseOne Address Book system. The U.S. Internal Revenue Service (IRS) restricts the size of the address that prints on an employee's year-end tax return. To comply with IRS regulations, the system has these restrictions:
-
On W-2 returns, the system prints only the last three non-blank address lines plus the city, state, and postal code.
-
On 1099 returns, the system prints only the last non-blank address line plus the city, state, and postal code.
-
On other U.S. federal magnetic media, the system prints only the last non-blank address line plus the city, state, and postal code.
-
-
Address Line 2
Enter the second line of the mailing address for an employee, customer, or supplier in the JD Edwards EnterpriseOne Address Book system.
Payroll users: The IRS restricts the size of the address that prints on employee year-end forms. To comply with IRS regulations, the system has these restrictions:
-
On W-2 returns, the system prints only the last three non-blank address lines plus the city, state, and postal code.
-
On 1099 returns, the system prints only the last non-blank address line plus the city, state, and postal code.
-
On other U.S. federal magnetic media, the system prints only the last non-blank address line plus the city, state, and postal code.
-
-
City
Enter a name that indicates the city that is associated with the address.
-
State
Enter a user-defined code (00/S) that specifies the state or province. This code is usually a postal service abbreviation.
-
Postal Code
Enter the United States ZIP code or the postal code that specifies where a letter is to be routed. Attach this code to the address for delivery in other countries. This code is used as the low end value when you are doing Postal Code Transaction range processing.
-
Country
Enter a user-defined code (00/CN) that identifies a country. The country code has no effect on currency conversion.
The JD Edwards EnterpriseOne Address Book system uses the country code for data selection and address formatting.
-
-
Click the Employment Data tab.
-
Review these pay information fields:
-
Date Started
Enter the date on which the employee actually reported to work for the most recent period of hire. When an employee initially begins working, the default value is the original hire date. If no original hire date exists, the system uses the current date. This field can be updated multiple times if, for example, an employee is a seasonal worker.
For the calculation tables in the Payroll system and the eligibility tables and date codes in the Human Resources system, the system also uses this date as a start date when it calculates deductions, benefits, and accruals.
-
Job Type/Step Description
Enter the description that is associated with the job type and job step. This description is stored in the Job Information table.
-
Continued Employment
Enter a value that indicates the employee's potential for continuing employment with the organization. Values are stored in the user-defined code table email.
-
Date Of Last Raise
Enter the date of the employee's last raise. For the email HR system, this is the date when you update salary and wages. If you also have the Payroll system, this date is automatically updated when a payroll is run. You define pay-effective dates using the Pay Rate Information form.
-
Amount Of Increase
Enter an amount. Amount of increase is the difference between two values. A negative value indicates a decrease.
A monetary increase as a result of a raise occurring on the date of last raise.
-
Date of Next Raise
Enter the date that the hourly or annual pay rate for the employee increases. The new rate goes into effect after a payroll cycle finishes with a pay period end date on or after the date of the next raise.
-
Pay Period Salary
Enter a valid amount. Pay Period Salary is calculated by dividing the annual salary by the number of pay periods.
-
-
Review these pay information fields for the current year, one year prior, and two years prior:
-
Base
Enter an amount paid from all pay types that are considered to be base salary for the current year.
-
Overtime
Enter an amount that is paid from all pay types that are considered to be overtime pay for the current year.
-
Commission
Enter an amount that is paid from all pay types that are considered to be commission pay for the current year.
-
Bonus
Enter the amount of bonus pay that the employee earned, year-to-date in the current year. The system calculates this amount by searching the employee's timecards for pay types that represent bonus pay. It then calculates the amount of the employee's earnings during the year that were attributed to the bonus pay types.
Note:
When you set up a pay type, you use the Pay Type Category field (PACT) to identify it as part of a related group of pay types, such as regular pay, bonus pay, commissions, and so on. You define pay type categories in user-defined code list (UDC) PC. -
Other
Enter an amount that is paid from all pay types that are considered to be other pay for the current year. Other pay is anything other than base salary, overtime, commission, and bonus.
-
-
Click OK.
-
To review the status of your request, click Find.
-
Review this field for the request:
-
Revd Flag (revised flag)
Enter a UDC (05/V2) that indicates the progress of your verification of employment letter. Values are:
0: Pending.
The administrator has not yet reviewed your request. You can change your request information if you need to.
1: Reviewed.
The administrator has reviewed your request. Changing your request information is not advisable.
2: Processed.
The administrator has processed your verification of employment letter.
-
28.3 Reviewing Personal Information Using Self Service
This section provides an overview of employee personal information, lists a prerequisite, and discusses how to:
-
Set processing options for Employee Profile (P060116).
-
Review personal information.
28.3.1 Understanding Employee Personal Information
You can use employee self service for review. As personal circumstances change, use this approach to review the current status of personal information, obtain documentation regarding employment, or review paid time off. To use employee self service, each employee must have password-protected access to your software.
Use the Employee Profile program (P060116) to review information that currently exists in your company's records. The information that you can review is in these categories:
-
Personal
-
Company (self service)
-
Job (self service)
The information in this location is for review only; you cannot change any of the fields.
With proper administrative authority, you can also select an employee record and then select one of these menu options:
-
EE Profile (Employee)
When you select the EE Profile option, the system displays Employee Profile and Job Information (P060116).
-
Address Book
When you select the Address Book option, the system displays Address Book Revision (P01012) and provides an opportunity to enter changes.
-
Benefits Enrollment
When you select the Benefits Enrollment option, the system displays Enrollment Overrides (P08330). You can also set a processing option to select Enrollment With Eligibility (P08334).
-
Employee DBA (Deduction, Benefit, Accrual) Instructions
When you select Employee DBA Instructions, the system displays Employee DBA Instructions (P050181).
Managers can review this information from the Manager's Workbench (P08712). The HR administrator can review this information by accessing Employee Profile from the Employee Management menu (G05BE1), selecting an employee record, and then selecting EE Profile from the Row menu. On Employee Profile and Job Information, your personal information is always displayed. You can click tabs for Company or Job information. Managers and HR representatives can also expedite their review of information by selecting multiple employee records on the Work With Employees form and then selecting Next on Employee Profile and Job Information to step through the employee records. The task in this section represents forms as they are viewed by an employee.
28.3.2 Prerequisites
Before you complete the tasks in this section:
-
Set the Address Number processing option for the Employee Profile program (P060116) to the HR administrator's address number. The Enrollment tab of the processing options is not functional for this application. Do not enter or change the value for this tab.
-
(Release 91. Update) To access the Voluntary Self-Identification of Disability Status form from the Employee Profile program (P060116), leave the Disclose Disability Status Button processing option blank.
-
(Release 91. Update) To access the Voluntary Self-Identification of Protected Veteran Status form from the Employee Profile program, leave the Disclose Veteran Status Button processing option blank.
-
(Release 91. Update) To disclose disability and veteran status information, you must run the Personal Employee Information Workfile Build (R054101) report.
28.3.3 Form Used to Review Personal Information Using Self-Service
| Form Name | FormID | Navigation | Usage |
|---|---|---|---|
| Employee Profile and Job Information | W060116C | Employee Self Service (G05BESS1), Employee Personal Profile | Review personal information on each of the form tabs.
If necessary, an employee can use the text area of the form to communicate detailed information that you want to provide to HR and then click OK. |
28.3.4 Setting Processing Options for Employee Profile (P060116)
Processing options enable you to specify the default processing for programs and reports.
28.3.4.1 Enrollment
Use this processing option to specify the program that the system opens when the user chooses the benefits enrollment menu option.
- Benefits Enrollment
-
Specify whether to enroll an employee with eligibility for benefits or with overrides. Values are:
0: Enroll with overrides. This is the default value.
E: Enroll with eligibility.
28.3.4.2 Human Resource
Use these processing options to specify the default address number, which the system uses to send an email message to the appropriate human capital management representative, and whether to display the Disclose Disability Status button.
- 1. Address Number
-
Specify the address book number that the system uses to retrieve the email address from the Remark field on the Who's Who Address Book form.
- (Release 9.1 Update) 2. Disclose Disability Status Button
-
Specify whether to display the Disclose Disability Status button on the Employee Profile and Job Information form. Values are:
Blank: Show button
1: Hide button
- (Release 9.1 Update) 3. Disclose Veteran Status Button
-
Specify whether to display the Disclose Veteran Status button on the Employee Profile and Job Information form. Values are:
Blank: Show button
1: Hide button
- (Release 9.1 Update) 4. Veteran, Disabled Veteran Fields
-
Specify whether to display the Veteran and Disabled Veteran fields on the Employee Profile and Job Information form. Values are:
Blank: Show
1: Hide
28.3.4.3 Versions
Use these processing options to specify the program version that the system uses for each program.
- 1. Address Book Version
-
Specify the Address Book version. If you leave this processing option blank, the system uses ZJDE0001.
- 2. Enrollment with Eligibility Version
-
Specify the Enrollment with Eligibility version. If you leave this processing option blank, the system uses ZJDE0001.
- 3. Enrollment with Overrides Version
-
Specify the Enrollment with Overrides version. If you leave this processing option blank, the system uses ZJDE0001.
- 4. Employee DBA Instructions Version
-
Specify the Employee DBA Instructions version. If you leave this processing option blank, the system uses ZJDE0001.
28.3.5 Reviewing Personal Information
Access the Employee Profile and Job Information form.
To review employee personal profile information:
-
On Employee Profile and Job Information, review the data in the Personal section.
-
Click Disclose Disability Status to access the Voluntary Self-Identification of Disability Status form to review or enter disability status information.
-
Click Disclose Veteran Status to access the Voluntary Self-Identification of Protected Veteran Status form to review or enter veteran status information.
-
Review the information on the Company and Job tabs.
-
If you find information that requires correction or you desire to have new information added, click Contact HR.
-
On Send Internal Work Item, complete these fields:
-
Subject
Enter a short description or subject of the message.
-
Phone Number
Enter the phone number of the individual who is sending the message.
The system provides the default address number of the HR administrator in the Send To field, as specified by the processing option. The system provides your name as the default in the Call From field, which is not available for change.
-
-
Use the text area of the form to communicate detailed information that you want to provide to HR. When finished, click OK.
Workflow sends your message to the HR administrator for action on your request.
28.4 Reviewing Pay Stubs Using Employee Self Service
This section provides an overview of pay stubs review and discusses how to review pay stub information.
28.4.1 Understanding Pay Stubs Review
Employees can use employee self service to review the accuracy of their pay stubs and ensure that they are complete. If the portal component for the Stub Information History program (P07186) exists on your organization intranet portal, employees can click the link to review their personal pay stub history. An HR administrator can access the same program from a menu and enter an employee identification number to review pay stub history for various employees.
28.4.2 Forms Used to Review Pay Stubs
| Form Name | FormID | Navigation | Usage |
|---|---|---|---|
| Work With Pay Stub History | W07186C | HR access: U.S. History Inquiries (G07BUSP14), Pay Stub History
On Work With Pay Stub History, click Select. |
Enter identification information and click Find.
When you access this program from an organization portal, the system reads the employee sign-in identification, disables this field, and displays pay stub records for the current user. Select a pay stub record. |
| Pay Stub History Information | W07186A | Select Piecework Stub from the Row menu | Review information. |
| Work With Employee Piece Work Stub Detail | W071861A | Click Cancel. | Review piecework detail. |
28.4.3 Reviewing Pay Stub Information
Access the Pay Stub History Information form.
Figure 28-2 Pay Stub History Information form
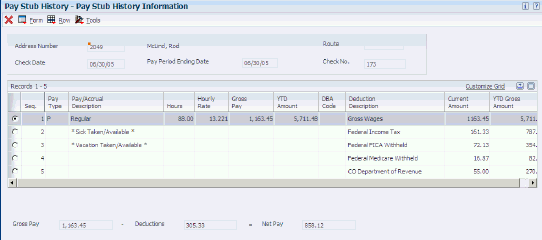
Description of ''Figure 28-2 Pay Stub History Information form''
To review pay stubs using employee self service:
-
On Work With Pay Stub History, to display entries for previous pay periods, complete these fields and then click Find:
-
Employee Identification
-
From Check Date
-
Through Check Date
-
-
Select a pay stub record, and click Select.
-
On Work With Pay Stub History, review the copy of the pay stub.
-
To print the information, select Print from the Form menu.
28.5 Entering Automatic Deposit Information
This section provides an overview of automatic deposit information and discusses how to enter automatic deposit information.
28.5.1 Understanding Automatic Deposit Information
Employees use the Auto Deposit Instructions program (P055011) to enter automatic deposit information when they want all or part of their payment each pay period to be deposited directly into their bank account. Employees can choose to receive part of their payment in check form and the rest in automatic deposit form. They also can divide their payment among multiple accounts. Typically, the automatic deposit information that employees enter is reviewed and approved by a payroll representative before the information takes effect. An employee receives a message from the payroll representative that indicates whether the information that he or she entered has been approved.
Employees can also revise any existing automatic deposit information that they or a payroll representative entered previously.
When employees use self service to enter or update automatic deposit information, the new deposit information is processed in the next payroll cycle, and the prenote test is eliminated.
28.5.2 Form Used to Enter Automatic Deposit Information
| Form Name | FormID | Navigation | Usage |
|---|---|---|---|
| Revise Automatic Deposit Instructions | W055011A | Employee Self Service (G05BESS1), Auto Deposit Instructions
On Revise Automatic Deposit Instructions, click OK. |
Review existing data and enter new information as necessary.
The system displays a message that indicates that the information that employees entered has been submitted to a payroll representative for approval. |
28.5.3 Entering Automatic Deposit Information
Access the Revise Automatic Deposit Instructions form.
Figure 28-3 Revise Automatic Deposit Instructions form
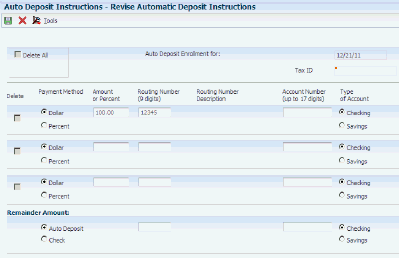
Description of ''Figure 28-3 Revise Automatic Deposit Instructions form''
To enter automatic deposit information:
-
On Revise Automatic Deposit Instructions, select one of these options:
-
Dollar1
Enter a value that specifies the type of processing for an event.
-
Percent1
Enter a value that specifies the type of processing for an event.
-
-
Complete these fields:
-
Amount or Percent
Enter the actual gross pay amount for an employee. This amount is different than the distributed gross pay amount that is used for labor distribution. See data item DPAY.
When you are using Work Order Time Entry, this field is used to record miscellaneous pay for an employee, (for example, piece rate bonus).
-
Bank Trnst No. (bank transit number)
Enter the bank transit number for the employee's financial institution. Banks might refer to this number as the ABA (American Bank Association) or payment routing number. This number can be obtained from the employee's check or deposit slip. It is located between the colons (:) at the bottom of the check.
For U.S. banks, this number contains nine digits. If this number does not contain nine digits, you must contact the employee's financial institution to obtain the correct number.
For Canadian banks, this number contains eight digits. Therefore, Canadian clients must enter the bank transit number with a leading zero.
If you change this number for an employee, the system creates a prenote for the employee's next auto deposit.
-
Bank Account
Enter the employee's unique account number at the financial institution. The number is obtained from the bottom line of a voided check or a deposit slip from the employee's account. You must include dash cue symbols in the field.
Account numbers can also be obtained from other sources, such as passbooks or debit cards. When transcribing information, left justify and enter only numbers (0 through 9), alphabetic characters (A through Z), and hyphens (-). If fewer than 17 characters are required, leave the unused spaces blank. Spaces that are left within the depositor's account number will be ignored when the paperless entry is prepared. For example, 0123 4 56789 will appear as 0123456789 in the entry record, and 0123-4 56789 will appear as 0123-456789.
If you change this number, the system automatically prenotes the employee's auto deposit record again.
Note:
The Financial Organization Account Number (FOA#) is used as the company's unique bank account number rather than the employee's unique bank account number in these files:F06560 - Bank Reconciliation - Issue Table
F06561 - Bank Reconciliation - Paid Table
-
-
To indicate the type of account, select one of these options:
-
Checking1
No entry required. This is a generic field that is used for video constants display.
-
Savings1
No entry required. This is a generic field that is used for video constants display.
-
-
Repeat steps 1–3 for as many accounts as you want to have a portion of your payment deposited.
-
If, after completing steps 1–4, any additional portion of your payment is unallocated, select one option:
-
Remainder Auto Deposit
Enter a value that specifies the type of processing for an event.
-
Remainder Check
Enter a value that specifies the type of processing for an event.
-
-
Complete the Routing Number and Account Number fields.
-
Select one of these options in the Remainder Amount group box:
-
RemChecking (remainder checking)
Enter a value that specifies the type of processing for an event.
-
RemSavings (remainder savings)
Enter a value that specifies the type of processing for an event.
-
-
Click OK.
28.6 Entering Competency Information Using Self Service
This section provides an overview of self-service competency information and discusses how to:
-
Set processing options for Competency Self Service (P05130).
-
Enter a training competency.
-
Enter a skills competency.
-
Enter an accomplishment competency.
-
Enter a certification competency.
-
Enter an education competency.
-
Enter a language competency.
-
Revise competency information.
28.6.1 Understanding Self-Service Competency Information
Competency management is a method of categorizing and tracking the qualifications that employees have that make them competent to perform their job duties. These qualifications, such as C programming skills, professional license, or fluency in French, are called competencies.
An organization uses competency management to track the competencies that their employees possess and to compare these competencies with those that are required for their job. Tracking competencies helps managers and human resources representatives determine the competencies that employees need in order to satisfy the requirements of their current job, as well as a job they might hope to obtain in the future. Competency management also helps employees and managers create clear career goals and performance objectives.
To simplify the process of maintaining competency information for employees, employees can use self service to enter and revise their own competency information.
Because employees typically know their own professional background more thoroughly than that of anyone else in your organization, they can enter their own competency information, and the system submits it to someone else, such as their manager or a member of the human resources department, for approval. For example, others might not be aware that an employee is working on an advanced degree or a professional certification that is not directly related to their current job. Self service enables the employee to update his or her competency information as each competency is acquired. Employees can also revise their existing competency information.
After the employee enters competency information, the appropriate person receives a Workflow message that indicates that competency information is waiting for approval. That person must then review the information and enter a level of proficiency for each competency.
After employees enter competency information, they can review it to verify that it is correct. If they find an error or omission, they can revise the information to correct it. After they revise competency information, the appropriate person, such as their manager or a member of the human resources department, receives a Workflow message that indicates that the information is waiting for approval.
The process that employees use to revise competency information is similar to the process that they use to enter this information, except that they must first search for the competency that they need to revise.
28.6.2 Prerequisite
Set these common settings to Yes in the Common Settings for HR Employee Self Service Programs (P05004) to allow employees to enter user-defined training or educational degrees:
-
Can EE Enter Course Provider?
-
Can Others See Course Provider?
-
Can EE Enter Institution?
-
Can Others See Institution?
28.6.3 Forms Used to Enter Competency Information Using Self Service
| Form Name | FormID | Navigation | Usage |
|---|---|---|---|
| Competency Self Service | W05130A | Employee Self Service (G05BESS1), Employee Competency Self Service | Use this form to access a competency type form. |
| Skills | W05132B | On Competency Self Service, click Add. | Add a skills competency. |
| Accomplishments | W05133B | On Competency Self Service, click Add. | Add an accomplishment competency. |
| Certifications | W05134B | On Competency Self Service, click Add. | Add a certifications competency. |
| Education | W05135B | On Competency Self Service, click Add. | Add an education competency. |
| Language | W05136B | On Competency Self Service, click Add. | Add a language competency. |
| Work with Training/Development | W05130A | Employee Self Service (G05BESS1), Employee Competency Self Service
On Competency Self Service, select one or more options and then click View. |
Use search and select to locate the desired record. Select the record and update the competency information. |
28.6.4 Setting Processing Options for Competency Self Service (P05130)
Processing options enable you to specify the default processing for programs and reports.
28.6.4.1 Display
- Display Manager Information
-
Specify whether the system displays the status, verification information, and competency level on the forms. Values are:
Blank: Do not display the information.
1: Display the information.
28.6.5 Entering a Training Competency
Access the Training/Development form.
If a specific training course or provider does not exist in the predefined list when an employee enters a training competency, the employee must add a code for the course or provider. After an employee adds a new code, the administrator can change, approve, or reject the code.
To enter a training competency:
-
On Training/Development, complete these fields:
-
Competency Code
-
Course Code
-
Provider
-
Training Reason
-
-
To add a new course or provider if one does not exist, click the Add New Course button.
Note:
For this button to appear, the Can EE Enter Course Provider setting must be Yes in the Common Settings for HR Employee Self Service Programs (P05004). -
Complete any of these optional fields, and click OK:
-
Start Date
-
End Date
-
Grade
-
Deliver Type
-
Units
-
Location / Room
-
-
Repeat steps 2 and 3 for each training competency that you want to enter.
-
Training/Development
Enter a code that identifies a competency table or category for which you can track employee competencies. Values are:
01: Training
02: Skill
03: Accomplishment
04: Certification
05: Degree
06: Language
This is a UDC (05/CY), but the values are hard-coded and cannot be changed. Therefore, each of the competencies that you track must pertain to one of these competency types. Adding additional values to this list requires system configurations.
-
Competency Code
Enter a code that specifies a competency within a competency type. For example, a competency for the competency type Skill might be C programming or Driving a forklift.
-
Course Code
Enter a code that represents a training course.
If the Can Others See Course Provider setting is Yes in the Common Settings for HR Employee SelfService Program (P05004), the Search for Course Visual Assist form will display unconfirmed courses.
-
Add New Course
For this button to appear, the Can EE Enter Course Provider setting in the Common Settings for HR Employee Self Service Programs (P05004) must be Yes.
If a training course does not exist, click the Add New Course button. Enter a course description and the system will add a record for the new course with a course code, to the Course Master table (F05101). This record is flagged until approved by an HR administrator. A record will also be added to the Unconfirmed Training Additional Information table (F05108) with information about the person who added the record and when.
-
Provider
Enter a UDC (05/PR) that identifies a person or institution who provides training.
If a provider does not exist, click the Add New Course button to add a new course and provider.
See Add New Course.
-
Training Reason
Enter a UDC (05/TN) that indicates the reason for the training.
-
Start Date
Enter the date on which the training course started.
-
End Date
Enter the date on which the training course ended.
-
Grade
Enter the grade that the employee received for the course.
-
Deliver Type
Enter a code that specifies the way in which a course is delivered or presented.
Examples of delivery type include classroom training and computer-based training.
-
Units
Enter a unit of measure for calculating student credits for training courses.
-
Location / Room
Enter the classroom or location where the training course is held.
-
28.6.6 Entering a Skills Competency
Access the Skills form.
To enter a skill competency:
-
On Skills, complete the Competency Code field.
-
Complete any of these optional fields, and click OK:
-
Skill Description
-
Date Acquired
-
Status
-
-
Repeat steps 2 and 3 for each skill competency that you want to enter.
-
Skills
Enter a code that identifies a competency table or category for which you can track employee competencies. Values are:
01: Training
02: Skill
03: Accomplishment
04: Certification
05: Degree
06: Language
This is a UDC (05/CY), but the values are hard-coded and cannot be changed. Therefore, each of the competencies that you track must pertain to one of these competency types. Adding additional values to this list requires system configurations.
-
Competency Code
Enter a code that specifies a competency within a competency type. For example, a competency for the competency type Skill might be C programming or Driving a forklift.
-
Skill Description
Enter a user-defined name or remark.
-
Date Acquired
Enter the date on which the employee acquired the skill.
-
Status
Enter a UDC (05/CR) that indicates the progress that the employee has made toward a level of proficiency in a particular competency. For example, for certification competencies, you might define a status, Pending, to indicate that the employee has completed a certification test but has not yet received his or her test scores.
-
28.6.7 Entering an Accomplishment Competency
Access the Accomplishments form.
To enter an accomplishment competency:
-
On Accomplishments, complete these required fields:
-
Competency Code
-
Accomplishment Type
-
-
Complete any of these optional fields, and click OK:
-
Date Achieved
-
Awarding Organization
-
Date Awarded
-
Status
-
-
Repeat steps 2 and 3 for each accomplishment competency that you want to enter.
-
Accomplishments
Enter a code that identifies a competency table or category for which you can track employee competencies. Values are:
01: Training
02: Skill
03: Accomplishment
04: Certification
05: Degree
06: Language
This is a UDC (05/CY), but the values are hard-coded and cannot be changed. Therefore, each of the competencies that you track must pertain to one of these competency types. Adding additional values to this list requires system configurations.
-
Accomplishment Type
Enter a code that indicates an accomplishment. For example, you could define an accomplishment for Network Administration Certification. The system saves this information in UDC 05/AT.
-
Date Achieved
Enter the date on which the employee achieved the accomplishment.
-
Awarding Organization
Enter the name of the organization that awards the certification or other documentation for the competency.
-
Date Awarded
Enter the date on which an accomplishment was formally recognized by the awarding organization.
-
28.6.8 Entering a Certification Competency
Access the Certifications form.
To enter a certification competency:
-
On Certifications, complete these required fields:
-
Competency Code
-
Licensing Body
-
Renewal Code
-
Expiration Date
-
-
Complete any of these optional fields, and click OK:
-
Licensing Number
-
Score Rating
-
Status
-
Issue Date
-
-
Repeat step 2 and 3 for each certification competency that you want to enter.
-
Certification
Enter a code that identifies a competency table or category for which you can track employee competencies. Values are:
01: Training
02: Skill
03: Accomplishment
04: Certification
05: Degree
06: Language
This is a UDC (05/CY), but the values are hard-coded and cannot be changed. Therefore, each of the competencies that you track must pertain to one of these competency types. Adding additional values to this list requires system configurations.
-
Licensing Body
Enter a UDC (05/LB) that represents the name of the organization that grants the professional license or certification.
-
Renewal Code
Enter a UDC (05/RC) that indicates the requirements that the employee must complete to renew the license.
-
Expiration Date
Enter the date on which the employee's professional license expires.
-
Licensing Number
Enter the identification number of the employee's professional license.
-
Score Rating
Enter the score that the employee receives when attaining a professional license or certification.
-
Issue Date
Enter the date on which the professional license was issued to the employee.
-
28.6.9 Entering an Education Competency
If a specific educational institution does not exist in the predefined list when an employee enters an education competency, the employee must add a code for the institution. After an employee adds a new code, the administrator can change, approve, or reject the code.
To enter an education competency:
-
On Education, complete these required fields:
-
Competency Code
-
Institution Code
-
-
To add an institution if one does not exist in the predefined list, click the Add New Institution button
Note:
For this button to appear, the Can EE Enter Institution setting must be Yes in the Common Settings for HR Employee Self Service Programs (P05004). -
Complete any of these optional fields, and click OK:
-
Location
-
Degree Date
-
GPA Rating (Grade Point Average)
-
GradeBase
-
Honorary
-
-
Repeat steps 2 and 3 for each education competency that you want to enter.
-
Education
Enter a code that identifies a competency table or category for which you can track employee competencies. Values are:
01: Training
02: Skill
03: Accomplishment
04: Certification
05: Degree
06: Language
This is a UDC (05/CY), but the values are hard-coded and cannot be changed. Therefore, each of the competencies that you track must pertain to one of these competency types. Adding additional values to this list requires system configurations.
-
Institution Code
Enter a UDC (05/IC) that represents the educational institution from which you obtained your degree.
If the Can Others See Institution setting is Yes in the Common Settings for HR Employee SelfService Program (P05004), the Search for Institution Visual Assist form will display unconfirmed institutions.
-
Add New Institution
For this button to appear, the setting Can EE Enter Institution must be Yes in the Common Settings for HR Employee Self Service Programs (P05004).
See Setting Up Common Settings for Self-Service.
If an educational institution code does not exist, click the Add New Institution button. Enter an institution description and the system will add a record for the new institution with an institution code to UDC (05/IC), with a special handling code of 1. A record will also be added to the Unconfirmed External Training Additional Information table (F05108) with additional information about who added the record and when.
Note:
If a UDC record for an institution contains a special handling code of 1, an employee entered the institution and should not be deleted. -
Location
Enter the city or region where the educational institution is located.
-
Degree Date
Enter the date on which the employee graduated and earned a degree.
-
GPA Rating
Enter the overall grade or scale on which a student's grade point average is based.
-
GradeBase
Enter the mathematical average of all of the grades that a student earns in a class.
-
Honorary
Enter a value that indicates whether the student graduated with honors.
-
28.6.10 Entering a Language Competency
To enter a language competency:
-
On Language, complete the Competency Code required field.
-
Complete any of these optional fields, and click OK:
-
Status Date
-
Status
-
-
Repeat steps 2 and 3 for each language competency that you want to enter.
-
Language
A code that identifies a competency table or category for which you can track employee competencies. Values are:
01: Training
02: Skill
03: Accomplishment
04: Certification
05: Degree
06: Language
This is a UDC (05/CY), but the values are hard-coded and cannot be changed. Therefore, each of the competencies that you track must pertain to one of these competency types. Adding additional values to this list requires system configurations.
-
Status Date
Enter the effective date of the status.
-
28.6.11 Revising Competency Information
Access the Competency Self Service form.
To revise competency information:
-
On Competency Self Service, select one or more of these options that correspond to the type of competency that you need to revise, and then click View:
-
Training/Development
-
Skills
-
Accomplishments
-
Certification
-
Education
-
Language
-
-
On Work With Training/Development, Work With Skills, Work With Accomplishments, Work With Certifications, Work With Education, or Work With Language, complete the Competency Code field.
-
To narrow your search, complete any of the other fields, and then click Find.
-
Select a record in the detail area, and then click Select.
-
On Training/Development, Skills, Accomplishments, Certifications, Education, or Language, make the necessary changes, and then click OK.
28.7 Entering Timecards Using Self Service
This section provides an overview of self-service time entry, lists a prerequisite, and discusses how to:
-
Enter timecards using self service.
-
Delete or modify self-service timecards.
28.7.1 Understanding Self-Service Time Entry
You can streamline and simplify the process of entering and reviewing employee timecard information by using self-service features. You can use the self-service approach for time entry to eliminate, or greatly reduce, the need for paper time sheets. You can also increase the accuracy and efficiency of your data entry by eliminating the need for a time entry administrator to manually transfer data from paper timecards into the system.
Self-service time entry applications enable you to configure the user interfaces that employees use to enter timecards. You can create multiple interfaces to accommodate the different business requirements of employee groups within your organization.
When employees use self-service time entry, the system displays a welcome form called a director. You can configure this form to include user instructions for the time entry process, or to include information that employees need in order to complete their timecards for the specified pay period. The director form also includes links to the Employee Daily Time Entry (P051127) and Employee Summary Time Entry (P051128) programs, and a link to the Manager Review and Approval program (P051129) that managers or delegates can use to review and approve employee timecards.
When employees click the appropriate link from the director form, the system displays a time entry form where they can enter their timecard information. You can configure this form to include only the fields that you want employees to complete. Using the ESS Time Entry Setup program (P051123), you can select from over 50 predefined fields to appear on the employee time entry form. This program enables you to quickly and easily create custom time entry forms to meet your business requirements. You can also define the pay types that each employee can use to enter timecards, which helps to ensure the accuracy of the timecard data.
|
Note: Employees can enter timecards only for themselves using self-service time entry programs. Similarly, employees who are not managers are able to review only their own timecards. Managers can review their own timecards and those of their employees. If an employee needs to enter timecards for another employee, these timecards must be entered using standard time entry programs. |
After an employee enters timecards into the system, those timecards can be reviewed and then approved, changed, deleted, or rejected by the employee's manager. You can also set up manager delegates to perform the review and approval process in the event that an employee's manager is unavailable. Manager delegates are employees that are assigned permission to review and approve timecards on behalf of a manager. In addition, you can generate email messages directly from the Manager Review and Approval program, which enables managers to automatically notify employees about the status of their timecards during the approval process.
When employees enter timecards using self-service applications, the system stores the timecards in the Employee Transactions - Batch File table (F06116Z1), which is a temporary workfile. After the timecards have been reviewed and approved, you can run the Time Entry Batch Processor program (R05116Z1I) to transfer the timecards from the workfile into the Employee Transaction Detail File table (F06116). When the timecards are in the Employee Transaction Detail File table, they can be included in payroll cycle processing.
|
Note: Because the system stores self-service timecard information in the Employee Transactions - Batch File table (F06116Z1), you can enter timecards while the system is processing a payroll cycle without affecting that payroll cycle. Only timecards that are saved in the Employee Transaction Detail File table (F06116) are included in the payroll cycle. |
The Time Entry Self Service Director program (P051125) serves as the entry point for employees and managers to access self-service time entry applications. You can adapt the text that appears on this form and enter time entry in two formats. It can be based on pay period dates or labor period dates. If you enter the time entry based on pay period dates, the system will automatically populate the pay period end date. However, for the time entries based on labor period dates, the labor distribution period tables will control the valid labor period date selections.
Employees access the time entry applications by clicking links that appear on the Time Entry Self Service Director. Employees can click the Summary Time Entry link or the Daily Time Entry link. In addition to the time entry application links, a link to the timecard review and approval application is provided for managers who must review and approve timecards.
|
Note: The Summary Time Entry, Daily Time Entry, and Manager Review/Approval links always appear on Time Entry Self Service Director. The Summary Time Entry and Daily Time Entry links are always active for all employees; however, the Manager Review and Approval link is active only for managers and their active delegates who can review employee timecards. |
When you click the Daily Time Entry link from the Time Entry Self Service Director, the system displays Employee Daily Time Entry (P051127) with all timecards for the specified pay period or labor distribution period. The user will be able to modify only those timecards that have a status other than 'Approved' or 'Waiting for Approval'. The fields that employees must complete are determined during the setup process. The format of the form is determined by the pay frequency of the employee who accesses the program. For example, when an employee who is paid weekly or has a weekly labor distribution period entry accesses Employee Daily Time Entry, the system displays summarized information for the seven days for which the employee can enter timecards. Similarly, when an employee who is paid biweekly or has a biweekly labor distribution period frequency accesses the form, the system displays summarized information for the 14 days for which the employee can enter timecards.
To enter timecard information, you use a time entry grid that contains a column for each day in the pay period. You can enter all timecards for the same pay type on one line in the grid for the entire pay period. A separate line in the grid must be used for each pay type that is used during the pay period. For example, if you work eight hours of regular time each day and also work two hours of overtime each day, enter two lines of time entry to track the time for the pay period. You should enter one line and designate the pay type as regular pay. You then enter normal hours that you worked for each day of the pay period on the same line. You should also enter a second line and designate the pay type as overtime pay. You then enter overtime hours that you worked for each day of the pay period on the same line.
|
Note: Only employees who are paid weekly, biweekly, or semimonthly can enter self-service timecards using Employee Daily Time Entry. Employees who are paid monthly must use Employee Summary Time Entry to enter self-service timecards. |
When processing options for the Time Entry MBF Processing Options program are set appropriately, administrators can designate timecards as public or private. When public timecards exist for employees, the system displays them for review. Employees can click a link on the director form that displays the public timecard. Employees cannot modify a public timecard, but can enter an additional timecard for the same work date.
Self-service time entry works together with global leave administration so that employees can view available leave balances when they are entering timecards. To access leave balances, employees can select the Leave Balances Review option. After reviewing balances, they can continue entering their time.
Administrators can set up a time entry option to pay for certain types of leave in advance of actually taking the time off. When this option is enabled, the Time Entry Self Service Director program displays a Request Pay In Advance link. Employees can select this link and can then enter time in advance. For example, an employee who is planning to take vacation time could enter the time in advance. In a payroll prior to the scheduled vacation, the employee would receive payment for the vacation time.
When the organization sets up rules for taking sick leave that include certification of sick events, the timecard applications display this requirement, including a field where you can specify that you have submitted a certification.
When an employee enters or updates timecards and clicks Submit, the system displays a Submit Confirmation window. If the employee clicks the OK button, the system stores the timecards in a temporary workfile called the Employee Transactions - Batch File table (F06116Z1). The system automatically assigns a status of 0 - Waiting for Approval to these timecard records. This enables managers to easily identify timecards that must be reviewed and approved. The employee cannot modify these timecards:
-
Timecards that have a status 0 and are waiting for manager's approval.
-
Timecards that have been approved by the manager.
However, when an employee enters or updates timecards and clicks Save, the system assigns a status of 5 to the timecard. The user can still modify these timecards.
After the timecards are approved, the Time Entry Batch Processor program (R05116Z1I) is used to move timecards from the Employee Transactions - Batch File table into the Employee Transaction Detail File table (F06116). After timecards from the workfile are stored in the Employee Transaction Detail File table, they can be processed in a payroll cycle.
28.7.2 Prerequisite
Set up the self-service time entry features.
28.7.3 Forms Used to Enter Timecards Using Self Service
| Form Name | FormID | Navigation | Usage |
|---|---|---|---|
| Time Entry Self Service Director | W051125C | Client portal: Time Entry Self Service Director
On Time Entry Self Service Director, click the Daily Time Entry link. |
Use the search and select form to access the time entry form. |
| Employee Daily Time Entry | W051127A | On Employee Daily Time Entry, click Save. | Complete time entry information.
The fields that the system displays in the detail area are determined during self-service time entry setup. |
| Time Entry Self Service Director | W051125C | Client portal: Time Entry Self Service Director | Use the search and select form to access the time entry form. |
| Employee Daily Time Entry | W051127A | On Employee Daily Time Entry, click Save. | Click the Select option next to the records that you want to delete.
To modify records, change any of the fields in the detail area of the form. When a manager approves a timecard, you can no longer delete or modify the information. |
28.7.4 Entering Timecards Using Self Service
Access the Employee Daily Time Entry form.
If you have selected the Project and Gov Contract Accounting Used check box in the Service Billing Constants program (P48091), the system displays the Contract Labor Category field on the Employee Daily Time Entry form.
To enter self-service timecards using daily time entry:
-
On Employee Daily Time Entry, click a blank line in the time entry area at the bottom of the form.
If you need to review leave balance amounts before entering time, click Leave Balance Review.
-
Enter a value in the Pay Type field.
-
Enter the number of hours that are associated with the pay type that you entered in step 3 for each day of the pay period.
-
Complete any additional fields in the detail area.
-
Click Save to save the record and to display a new line in the time entry area.
When you click Save, the system updates the totals in the review sections of the form.
-
Complete steps 2 through 6 until you have entered all timecard information. You must enter a separate line for each pay type.
-
Click Back to return to Time Entry Self Service Director.
-
Pay Period Ending Date
Enter the pay period end date that you entered in the Time Entry Self Service Director program. Alternately, the system can retrieve it from the processing option.
The system saves this value to the F06116Z1 table.
-
Pay Type
Enter a code that defines the type of pay, deduction, benefit, or accrual.
Pay types are numbered from 1 to 999. Deductions and benefits are numbered from 1000 to 9999.
-
Change Reason
Enter a code from UDC table 05T/CR to define the reason for the change in the timecard record.
-
Change Comments
Enter the comments associated with a timecard change.
-
28.7.5 Delete or Modify Self-Service Timecards
Access the Employee Daily Time Entry form.
To delete or modify self-service timecards using daily time entry:
-
On Employee Daily Time Entry, to delete timecards, click the Select option next to the records that you want to delete, and then click Delete.
-
To modify timecards, change any of the fields in the detail area of the form, and then click Save.
-
Click Back to return to the Time Entry Self Service Director.
28.8 (Release 9.1 Update) Disclosing Disability Status
This section provides an overview of disability status disclosure, and discusses how to disclose disability status.
28.8.1 Understanding Disability Status Disclosure
Under U.S. law, employees are required to disclose their disability status on the Voluntary Self-Identification of Disability Form CC-305 that is published by the U.S. Department of Labor's Office of Federal Contract Compliance Programs (OFCCP). Employees can use the Disability Status Disclose Form program (P085591) to enter information about any disabilities that they may have.
When employees enter data in the P085591 program, the system updates the data directly to the self-service workfiles. After you run the Update Employee Personal Information to Live Tables report (R054104), the system updates the data to the Disability and Veteran Status History table (F085590).
|
Note: When employees enter their disability status using the P085591 program and click Submit, the form is self-approved by the employee and the system does not trigger the workflow process.If you want to include the workflow approval process to approve disability status responses submitted by an employee, use the self-service programs to enable employees to provide their disability status. If you use the self-service applications, you must create a process flow script by using the Self-Service Process Flow Setup program (P05400). See Creating a Self-Service Process Flow Script for OFCCP Forms. |
28.8.2 Prerequisite
Before you complete the tasks in this section, you must run the Personal Employee Information Workfile Build (R054101) report.
28.8.3 Form Used to Disclose Disability Status
| Form Name | Form ID | Navigation | Usage |
|---|---|---|---|
| Voluntary Self-Identification of Disability Status | W085591A | Employee Self Service (G05BESS1), Disability Status Disclosure | Disclose disability status. |
28.8.4 Disclosing Disability Status
Access the Voluntary Self-Identification of Disability Status form.
To disclose disability status:
-
On Voluntary Self-Identification of Disability Status, select one of these options:
-
YES, I HAVE A DISABILITY (or previously had a disability)
-
NO, I DON'T HAVE A DISABILITY
-
I DON'T WISH TO ANSWER
-
-
Click Submit.
28.9 (Release 9.1 Update) Disclosing Protected Veteran Status
This section provides an overview of protected veteran status disclosure, and discusses how to disclose the protected veteran status information.
28.9.1 Understanding Protected Veteran Status Disclosure
Under U.S. regulations, employees are required to self-identify themselves as protected veterans on the veteran self-identification form that is published by the U.S. Department of Labor's Office of Federal Contract Compliance Programs. Employees can use the Veteran Status Disclose Form program (P085610) to enter information about their protected veteran status.
When employees enter data in the P085610 program, the system updates the data directly to the self-service workfiles. After you run the Update Employee Personal Information to Live Tables report (R054104), the system updates the data to the Disability and Veteran Status History table (F085590).
|
Note: When employees enter their protected veteran status using the P085610 program and click Submit, the form is self-approved by the employee and the system does not trigger the workflow process.If you want to include the workflow approval process to approve veteran status responses submitted by an employee, use the self-service programs to enable employees to provide their protected veteran status. If you use the self-service applications, you must create a process flow script by using the Self-Service Process Flow Setup program (P05400). See Creating a Self-Service Process Flow Script for OFCCP Forms. |
28.9.2 Prerequisite
Before you complete the tasks in this section, you must run the Personal Employee Information Workfile Build (R054101) report.
28.9.3 Form Used to Disclose Veteran Status
| Form Name | Form ID | Navigation | Usage |
|---|---|---|---|
| Voluntary Self-Identification of Protected Veteran Status | W085610A | Employee Self Service (G05BESS1), Veteran Status Disclosure | Disclose protected veteran status. |
28.9.4 Disclosing Protected Veteran Status
Access the Voluntary Self-Identification of Protected Veteran Status form.
To disclose protected veteran status:
-
In the Self Identification section, select one of these options:
-
I BELONG TO THE FOLLOWING CLASSIFICATIONS OF PROTECTED VETERANS (CHOOSE ALL THAT APPLY):
-
DISABLED VETERAN
-
RECENTLY SEPARATED VETERAN
-
ACTIVE WARTIME OR CAMPAIGN BADGE VETERAN
-
ARMED FORCES SERVICE MEDAL VETERAN
-
Military Discharge Date (MM/DD/YY)
Enter the date on which the employee was discharged from military duties.
Note:
When an employee enters a date in the Military Discharge Date field, the system does not update this information in the Supplemental Data table (F00092).
-
-
I am a protected veteran, but I choose not to self-identify the classifications to which I belong.
-
I am NOT a protected veteran.
-
-
Click Submit.
28.10 Managing Self-Service Timecards Using Summary Time Entry
This section provides an overview of managing self-service timecards using summary time entry, and discusses how to:
-
Manage self-service timecards.
-
Delete or modify self-service timecards.
28.10.1 Understanding Self-Service Timecards Using Summary Time Entry
When you click the Summary Time Entry link on the Time Entry Self Service Director, the system displays two sections on Employee Summary Time Entry where employees can enter timecard information. In the Quick Entry section of the form, employees can enter lump sum amounts for regular, sick, vacation, and holiday hours that they worked during the pay period.
For example, if an employee uses 40 hours of vacation time during the pay period, he or she can enter the total vacation time in the Quick Entry section of the form. The pay types that are included in the Quick Entry section are specified in a processing option for the Time Entry Self Service Director program.
Additionally, employees can enter timecard records in the time entry grid at the bottom of the form. The fields that appear in the time entry grid are determined during the self-service time entry setup process.
|
Note: Employees whose pay frequency is monthly must use Employee Summary Time Entry to enter self-service timecards. Only employees whose pay frequency is weekly, biweekly, or semimonthly can enter self-service timecards using either Employee Daily Time Entry or Employee Summary Time Entry. |
When an employee enters or updates timecards and clicks Submit, the system stores them in a temporary workfile called the Employee Transaction - Batch File table (F06116Z1). These timecard records are assigned a status of 0 - Waiting for Approval, which enables managers to easily identify timecards that must be reviewed and approved. Users can enter or update their own timecard records using this form. However, if a manager has already approved a timecard or if the timecard has the status 'Waiting for Approval', the user cannot update the timecard.
After the timecards are approved, the Time Entry Batch Processor program (R05116Z1I) is used to move the timecards into the Employee Transaction Detail File table (F06116). After the system moves the timecards from the workfile into the Employee Transaction Detail File table, they can be processed in a payroll cycle.
When processing options for the Time Entry MBF Processing Options program are set appropriately, administrators can designate timecards as public or private. When public timecards exist for employees, the system displays them for review. Employees can click a link on the director form that displays the public timecard. Employees cannot modify a public timecard, but can enter an additional timecard for the same work date.
28.10.2 Forms Used to Manage Self-Service Timecards Using Summary Time Entry
| Form Name | FormID | Navigation | Usage |
|---|---|---|---|
| Time Entry Self Service Director | W051125C | Client portal: Time Entry Self Service Director
On the Time Entry Self Service form, click the Summary Time Entry link. |
Use the search and select form to reach the summary time entry form. |
| Summary Time Entry | W051128A | Click Save. | Enter time entry information. |
| Time Entry Self Service Director | W051125C | Client portal: Time Entry Self Service Director | Use the search and select form to reach the summary time entry form. |
| Employee Summary Time Entry | W051128A | On Time Entry Self Service Director, click the Employee Summary Time Entry link. | Enter changes as required. |
28.10.3 Managing Self-Service Timecards
Access the Summary Time Entry form.
If you have selected the Project and Gov Contract Accounting Used check box in the Service Billing Constants program (P48091), the system displays the Contract Labor Category field on the Employee Daily Time Entry form.
To enter self-service timecards using summary time entry:
-
On Summary Time Entry, complete these fields in the Quick Entry (Totals Only) section of the form to enter lump sum amounts:
-
Reg.
Enter the number of hours that are associated with each transaction.
-
Vac
Enter the number of hours that are associated with each transaction.
-
Sick
Enter the number of hours that are associated with each transaction.
-
Holiday
Enter the number of hours that are associated with each transaction.
-
-
To enter timecards in the detail area of the form, click a grid line and enter a pay type in the Pay Type field.
The fields that appear in the detail area are determined during self-service time entry setup.
If you click Close without first saving the timecard, the system displays a Save Any Unsaved Records? dialog box so you that can choose to save any unsaved changes or cancel the Close request.
If you need to review leave balance amounts before entering time, click Leave Balance Review.
-
Complete any additional fields in the detail area.
-
Click Save to save the record and display a new line in the time entry area.
-
Complete steps 2 through 5 until you have entered all timecard information.
-
Click Back to return to the Time Entry Self Service Director.
28.10.4 Delete or Modify Self-Service Timecards
Access the Employee Summary Time Entry form.
To delete or modify self-service timecards using summary time entry:
-
On Employee Summary Time Entry, to delete timecards, click the Select button next to the records that you want to delete, and then click Delete.
-
To modify timecards, change any of the fields in the detail area of the form, and then click Save.
You cannot delete or modify a timecard if a manager has already approved it.
To select or remove a selected status for all of the timecard records that are displayed, you can use the Select All or Clear All options.
The system displays a confirmation dialog box that you must use to confirm the delete action. The dialog indicates the number of records that are selected and provides Yes and No options so that you can proceed with the delete action or stop the delete action and return to Employee Summary Time Entry.
-
Click Back to return to the Time Entry Self Service Director.