29 Manager Self Service
This chapter contains the following topics:
-
Section 29.3, "Setting Processing Options for Managers Workbench (P08712)"
-
Section 29.7, "Reviewing Upcoming Employee Reviews by Supervisor"
-
Section 29.8, "Entering Data for Verification-of-Employment Letters"
-
Section 29.14, "(Release 9.1 Update) Approving Disability Status Information"
-
Section 29.15, "(Release 9.1 Update) Approving Protected Veteran Status Information"
29.1 Understanding Manager Self Service
Managers can accomplish many tasks with less effort and time by using self-service procedures. These procedures might be available through a company intranet site or from your software menus for employees and managers. This approach reduces document handling between employees and the human resources department by enabling employees to access information, forms, and services using desktop computers.
Managers can use self-service and Managers Workbench (P08712) programs to perform a wide range of tasks for which they are responsible. These tasks include:
-
Requesting employee status changes.
-
Running managerial reports.
-
Assigning delegates.
-
Generating a graphic organizational chart and reviewing the hierarchical structure of the jobs within an organization.
-
Reviewing jobs and job competencies in an organization.
-
Performing a gap analysis of employee and job competencies.
-
Entering employee competency information.
-
Reviewing employee profiles.
-
Reviewing employee information, such as name and address, time entry, emergency contacts, paid time off balances, and skill competencies.
Additional self-service programs are available for managers to use that are not included in the Managers Workbench. These programs, accessible from the Employee and Manager self service menus, are:
-
Upcoming Reviews by Supervisor (P052200).
-
Employee Setup Workbench (P08710).
-
Auto Deposit Instructions (P055011).
-
Competency Self Service (P05130).
The type of information that is available on your self-service website is defined by your company. For example, your company might allow employees to make address changes but not benefits changes. Only selected applications can be enabled on an intranet site.
Many of the manager self-service programs employ Workflow. Workflow is an email based system that automates tasks by using email to reduce the processing time that it normally takes to complete a task. For example, managers can initiate an employee's promotion using Status Change from Managers Workbench. When the process is initiated, a series of messages within Workflow are sent to each manager who must be informed about the change and who must approve the change.
29.1.1 Compensation Management Self-Service Considerations
Your organization might have set up the Compensation Management system as a self-service application that enables you to manage the salary reviews of the employees who report to you. If you access the Compensation Management system from a self-service program, such as the Manager's Workbench (P08712), you can make salary recommendations within your own management hierarchy only. The supervisor field is disabled.
29.2 Using the Managers Workbench Program
This section provides an overview of using the Managers Workbench program, lists the forms used with the Managers Workbench program, and discusses how to set processing options for Managers Workbench (P08712).
29.2.1 Understanding Managers Workbench
You can perform many common supervisory tasks from a centralized location using Managers Workbench (P08712). From this location, your employee information is easily accessible, enabling you to analyze job and employee information, initiate changes, and save time when you need reports that can be processed as a list or on an individual basis. Your own personal employee information is also available from within this application.
Using the Managers Workbench, you have quick, easy access to information that you can review and use for budgeting, planning, decision making, and approving. This application uses workflow to save time when you are communicating changes and obtaining required authorizations.
|
Note: The Managers Workbench separates access to your personal information from access to your employees' information by the use of form and row menus. For example, when you select options from a form menu, you can access your own personal information and make a variety of changes. When you select options from a row menu, the system displays your employees' information. A manager can view an employee's information, but generally cannot make changes directly to an employee's record. |
These options are available in the Managers Workbench:
| Manager Function | Options |
|---|---|
| Self Service | You can select My Self Service Ap from the Form menu, and then perform these tasks:
When you first select one of your employees and then select Self Service Apps. from the Row menu, you can perform these tasks:
You can also review employee data, analyze employee skills, and prepare for employee coaching sessions with these self-service options. |
| Status Change | Status Change includes options for performing these tasks:
This centralized approach to managing employee changes enables you to initiate, review, and approve changes for your employees. The User Defined status change category enables your Human Capital Management department to set up an additional employee change category. For example, you might want to create a new category for compensation review. |
| Reports | These reports are available from the Managers Workbench (P08712):
Managers Reports (P08740) is a preset list of reports, defined by your human capital management department, that you can use to meet frequent reporting requirements. Your human capital management administrator can create one or more versions that include reports that you commonly use. Use these reports to help meet your needs for organizational reporting, planning, review, and management of your employees. You can generate reports for the employee group below your job level, or you can select a subordinate management level and generate reports with that level at the top of the hierarchy. You can use the Submitted Reports option on the Form menu to review the status of reports that you have previously submitted. |
| Supplemental Data | Depending on what kinds of supplemental data you maintain, your human capital management administrator can set up databases for each system. You can use supplemental data to track information that is not included in the standard master tables. For example, you might want to track information such as products purchased, sales information, delivery methods, internal ratings, or work history. Supplemental-database code information is stored in the Supplemental Database Setup table (F00090). |
| Gap Analysis | Use Gap Analysis to help you compare the skill competencies that are required for a job and the current competencies of an employee. Often used in conjunction with Job Competencies In An Organization, these functions are useful for organizational planning and in preparation for employee performance reviews. |
| Performance | Use Employee Performance to create new appraisals, review and change current appraisals, and review historical appraisal information. You can review your personal performance appraisal by choosing Performance from the Form menu.
When you are using the performance options, you can also access supplemental data from the Performance menu to record additional information that you want to track. |
| Employee Profile | Use Employee Profile to review employee data that is obtained from the Employee Master Information table (F060116). You can also use this function to contact your Human Capital Management department about updates to an employee record. |
| Attachments | Attachments can be added as part of the setup function to provide information for all managers who use any of the Managers Workbench applications. These can include instructions, reminders, or miscellaneous information.
You can also add attachments while using Managers Workbench applications. For example, you might want to remind yourself about information that will help you plan for reviews or record action steps that you want to remember regarding specific employees. You can also attach graphic files. The attached files are linked to your address number and an employee address number so that if either position changes, another manager cannot view the notes that you attach. |
| Jobs In An Organization | Use Jobs In An Organization to review how each job fits into the hierarchical levels of the organizational structure. You can use this information to plan for new jobs and to determine the competencies that are associated with each job. When you access this program from Managers Workbench, you can review information, but you cannot change it. |
| Compensation Review | Use this program to review compensation data for any of your employees. The program provides you with a workbench that provides access to programs for:
|
| Employee Letters | When you need to send written information to employees, you can use the mail merge features of your software to efficiently produce letters that you mail to all of your employees. For example, you can quickly generate a letter to a group of your employees who are included in a new marketing campaign. Or you can generate a mass mailing to all of your employees to explain a new benefit option. This option runs the Web Mail Merge application, which enables you to work with the letters that you have generated. |
| Job Competencies In An Organization | Use Job Competencies In An Organization to see how job competencies are assigned to the hierarchical levels of the organizational structure. You can use this information to determine the competencies that apply to you and the employees who report to you. |
| Approvals | Use Approvals to expedite the workflow process for your employees. Use this form menu option to review all Status Change approval requests, add comments, and take appropriate action. |
| Delegates | Use My Delegates, on the Form menu, to set up subordinates who are authorized to use Managers Workbench in your absence or to enable others to perform managerial functions. After the initial setup, the delegates that you select can access Managers Workbench at your organizational level and then perform functions at an authority level that you specify to help you review, change, and approve employee information. |
| Attachments | Attachments can be added as part of the setup function to provide information for all managers who use any of the Managers Workbench applications. These can include instructions, reminders, or miscellaneous information.
You can also add attachments while using Managers Workbench applications. For example, you might want to remind yourself about information that will help you plan for reviews or record action steps that you want to remember regarding specific employees. You can also attach graphic files. The attached files are linked to your address number and an employee address number so that if either position changes, another manager cannot view the notes that you attach. |
29.2.2 Form Used for Using the Managers Workbench Program
| Form Name | FormID | Navigation | Usage |
|---|---|---|---|
| Work With Managers Employees | W08712A | Manager Self-Service menu (G05BMSS1), Managers Workbench | Review the information displayed and then select an option. When a processing option is set appropriately, the system reads the address book number of the manager who is signed in to the system, automatically displays that information, and then displays the list of employees who report to this manager.
You can access your personal information and follow up on previous tasks that you initiate by selecting an option from the Form menu. You can initiate and follow up on employee tasks by selecting options from the Row menu. |
29.3 Setting Processing Options for Managers Workbench (P08712)
Processing options enable you to specify the default processing for programs and reports.
29.3.1 User Level
- 1. User Level
-
Specify whether management, employees, or HR personnel will use the application. Values are:
Blank: Management
1: Employees and management
2: HR personnel
29.3.2 Version
The instructions for processing options 1–10 are identical.
- Managers Workbench Programs (P08810, P08720, P087201, P08006, P08007, P08008, P08740, P08750, P05100, P087711)
-
Specify a program version. If you leave this processing option blank, the system uses the default version (ZJDE0001).
- 11. Current Performance Appraisals (P087712)
-
Specify a program version. If you leave this processing option blank, the system uses a default version:
-
If user level is set to 1, the system uses version ZJDE0004.
-
If user level is set to 2, the system uses version ZJDE0006.
-
- 12. Historical Performance Appraisals (P087712)
-
Specify a program version. If you leave this processing option blank, the system uses a default version:
-
If user level is set to 1, the system uses version ZJDE0005.
-
If user level is set to 2, the system uses version ZJDE0006.
-
- 13. Paid Time Off Inq (P053020)
-
Specify the version for Paid Time Off Inquiry. If left Blank, the default version ZJDE0001 will be used.
- 14. Name/Address (P05101)
-
Specify the version for Name/Address. If left Blank, the default version ZJDE0001 will be used.
- 15. Review Time Entry (P051125)
-
Specify the version for Review Time Entry. If left Blank, the default version ZJDE0001 will be used.
- 16. Supplemental Data (P00092)
-
Specify the version for Supplemental Data. If left Blank, the default version ZJDE0001 will be used.
- 17. Submitted Reports (P986116)
-
Specify the version for Submitted Reports. If left Blank the default version ZJDE0001 will be used.
- 18. HTML Org Chart (P08713W)
-
Specify the version for HTML Organizational Charts. If left Blank the default version ZJDE0001 will be used.
29.4 Changing an Employee Status
This section provides an overview of employee status change and discusses how to set processing options for Employee Status Change (P08720).
29.4.1 Understanding Employee Status Change
Changing an Employee's Status, one of the applications within Manager's Workbench (P08712), provides a centralized approach to implementing common changes for employees who report to you or to one of your subordinate managers. Using this approach, you can manage some of the most common types of employee changes with a minimum of time and effort.
Using this approach, when you select the type of change desired for a specified employee and implement a change, the system automatically notifies your HR department and any other managers who must approve the change. You will also be able to review the status of the approvals to stay current with the changes that you have initiated.
You can perform any of these preset tasks:
-
Promote an employee.
-
Change an employee's job status.
-
Relocate an employee.
-
Change an employee department or supervisor.
-
Review a leave of absence.
In addition to the five preset tasks listed previously, two additional options exist that you can define in user-defined code (UDC) 08/S4 to meet your specific requirements. For example, you might define this option to change an employee's salary. Working with your HR administrator, you can set up similar tasks or change any of the existing, preset tasks to use any combination of the data in the Employee Master Information table (F060116).
To initiate an employee change, you can use the Employee Status Change program (P08720). You normally access this program through the Manager's Workbench program (P08712). The system automatically displays tabs and fields on the change request form that are required to complete the change that you request.
29.4.2 Forms Used to Change an Employee Status
| Form Name | FormID | Navigation | Usage |
|---|---|---|---|
| Work With Managers Employees | W08712A | Manager Self-Service (G05BMSS1), Managers Workbench
On the Managers Workbench, click Find. |
Display employee records. |
| Select Employee Status Change Request | W08720A | On Work With Managers Employees, select Status Change Req. and then Status Change from the Row menu.
On Select Employee Status Change Request, click Add. |
Select a change type. To display notes about the change type, click the button next to the change type. |
| Create Employee Status Change Request | W08720B | On Select Employee Status Change Request, select a status change and then click Add.
On the Instructions tab, review the information. Review all other tabs. |
To save, but not submit the request, click OK. To save and submit a request for approval, click Submit. |
29.4.3 Setting Processing Options for Employee Status Change (P08720)
Processing options enable you to specify the default processing for programs and reports.
29.4.3.1 Process
- 1. Mail Box Designator
-
Specify the name of the mail box in the Employee Work Center where your workflow notifications and approval messages are sent. If you leave this processing option blank, the system uses 01, personal in-basket.
To create a new mail box, add a new record to the 02/MB UDC.
- 2. Final Status
-
Specify the final status for the Employee Status Change records (F08720) when the process has been successfully completed. The final status should be a numeric status code. Status Change status codes are found in the 08/S5 UDC table.
- 3. Allow Delegates
-
Specify whether you want to allow the use of delegates. If a manager defines a delegate, this employee can perform certain tasks on behalf of the manager. Values are:
0: No
1: Yes
- 4. Perform Employee Master Field Edits
-
Specify whether you want the system to perform the same validation on the data as is done with the employee master applications. Values are:
0: No
1:Yes
29.4.3.2 User Level
- 1. User Level
-
Specify whether the application is used by a manager or by HR personnel. HR personnel can add a status change for any employee, not just subordinates. Values are:
Blank: Manager
1: Manager or manager's delegate
2: HR personnel.
29.4.3.3 Defaults
- Status Change Type 1–5
-
Specify a status change type that the system uses as one of five default settings. The system displays the five default status-change types on the Select Employee Status Change Request form.
- 6. Job Information Change
-
Specify whether the system automatically displays job information from the employee record when you change a job type for an existing employee. The system automatically includes pay frequency, union code, pay class, pay grade, overtime exempt, pay grade step, and benefit group. Values are:
0: Do not use default data.
1: Use default data.
- 7. Business Unit/Job ID Information Change
-
Specify whether the system automatically includes business unit and job cross-reference information from the employee record when you change a job type for an existing employee. The system automatically uses the union code, workers compensation, and benefit group from the Business Unit/Job ID. X-Ref table (F08005). Values are:
0: Do not use default data.
1: Use default data.
29.4.4 Requesting an Employee Status Change
Access the Create Employee Status Change Request form
Figure 29-1 Create Employee Status Change Request form
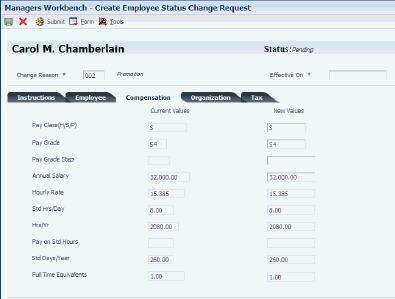
Description of ''Figure 29-1 Create Employee Status Change Request form''
To request an employee status change:
-
On Work With Managers Employees, click one of these buttons and click Find to display your subordinates.
-
Active Employees
-
All Employees
-
-
Select the subordinate's record that you want from the detail area.
-
From the Row menu, select Status Change Req and then Status Change.
-
On Select Employee Status Change Request, select an option.
Review change type notes and initiate an employee status change.
Values can be defined for the change type fields to meet the needs of the organization.
-
Change1
-
Change2
-
Change3
-
Change4
-
Change5
-
User Defined
-
-
To display notes or instructions about the change process, click the button next to the option.
-
Click Add.
-
On Create Employee Status Change Request, complete these fields:
-
Change Reason
-
Effective On
-
-
Read the comments on the Instructions tab, and then select the next tab to enter appropriate changes to the active fields.
Fields that are not applicable to the type of change that is selected are not available for changes.
-
Select each of the remaining tabs and enter changes as appropriate.
Because a limited number of fields can be placed on a form at one time, the eligibility code, user-defined dates, and category code fields are on a different form. When you select the Category Codes/User Dates tab, this form is automatically displayed.
-
After you review information for all tabs and complete the changes, perform one of these actions:
-
Click OK to save, but not submit, the request.
This option enables you to review the request at a later date and then submit it for approval.
-
Click Submit to save and submit the request for approval.
After you submit a request, you cannot revise it except to enter a new change reason or to change the effective on date.
-
The system automatically generates workflow messages in the Employee Work Center for the appropriate managers. The system updates the Employee Master Information table (F060116) when the required approvals are complete.
If you need to change a request after you have submitted it, but before it has been approved, cancel the request and create a new one.
29.5 Reviewing an Employee Status Change
This section provides an overview of an employee status change review and discusses how to:
-
Set processing options for Status Change Review (P087201).
-
Review an employee status change request.
29.5.1 Understanding an Employee Status Change Review
You can use the Status Change Review program (P087201) to examine a request that you have previously submitted, review notes that relate to a request, or follow up on a request that has not been approved within a reasonable amount of time.
If a request has not been approved, you can use the escalation monitor to determine possible reasons for the delay and restart the process. Use one of these options, depending on the apparent cause of the delay:
-
Escalation monitor. Provides a report of all halted workflow processes and moves the requests to the next stage.
-
Restart. Restarts a specific status change process, terminating any active process instances.
If you need to make additional changes to a request after you have submitted it, but before it has been approved, cancel the request and create a new one.
The system automatically generates workflow messages in the Employee Work Center (P012501) for the appropriate managers. The system updates the Employee Master Information table (F060116) when the required approvals are complete.
29.5.2 Forms Used to Review an Employee Status Change
| Form Name | FormID | Navigation | Usage |
|---|---|---|---|
| Work With Managers Employees | W08712A | Manager Self-Service menu (G05BMSS1), Managers Workbench | Review existing data. |
| Work With Status Change | W087201A | On Work With Managers Employees, select Status Change Request from the Row menu and then select Status Change Review. | Select an employee record and review an employee status change request. |
| Modify Employee Status Change Request | W08720B | On Work With Status Change, select an employee record and then click Select. | Review the status change information.
To generate a report of all instances of all halted processes, select Escalation Monitor from the Form menu. To restart a change process and delete pending workflow messages that are linked to the process, select a record, and then select Restart from the Row menu. |
29.5.3 Setting Processing Options for Status Change Review (P087201)
Processing options enable you to specify the default processing for programs and reports.
29.5.3.1 Processing
Use these processing options to activate potential application activities that provide managers with a broader range of control over workflow and management options.
- 1. Allow Delegates
-
Specify whether you want to allow the use of delegates. If a manager has defined a delegate, this employee can perform certain tasks on his or her behalf. Values are:
0: No
1: Yes
- 2. Allow Escalating Halted Activities
-
Specify whether to allow the user to escalate halted workflow activities. The Status Change workflow stops the process during a payroll lockout or to wait for a specified effective date. If the process is waiting for an effective date, escalating causes the changes to be committed to the database immediately instead of waiting for the effective date. Escalating a payroll lockout reverifies the lockout status before allowing the process to continue. Values are:
0: No
1: Yes
- 3. Allow Restarting Active Processes
-
Specify whether to allow the user to restart an active Status Change process. The Status Change workflow process might stop for any of these reasons:
-
Payroll lockout
-
Effective date
-
Delay of management approval
When the workflow has stopped for any of these reasons, performing a restart completes the active workflow activity and deletes the records in the Approval History table. The status of the Status Change record changes to pending. The workflow process is completed but not deleted. Values are:
0: No
1: Yes
-
- 4. Allow Aborting Active Processes
-
Specify whether to allow the user to terminate an active Status Change process. When the Status Change workflow process stops for a payroll lockout, an effective date, or a management approval, terminating will update the status of the Status Change record to 07 (canceled by user) and complete the active workflow. Values are:
0: No
1: Yes
- 5. Employee Status Change Version (P08720)
-
Specify which version of the Employee Status Change application (P08720) you want to use. The version controls the workflow process, retrieving the correct processing options for mail box and the final status.
If no value is entered, the system uses version ZJDE0001.
29.5.3.2 User Level
Use this processing option to specify the type of user who will be accessing the application.
- 1. User Level
-
Specify whether the application will be used by management, employees, or HR personnel. Values are:
Blank: Management
1: Employees and management
2: HR personnel
29.6 Assigning a Delegate
This section provides an overview of delegate assignment, lists a prerequisite, and discusses how to:
-
Set processing options for Managers Delegates (P08750).
-
Assign a delegate.
29.6.1 Understanding Delegate Assignment
You can use the Managers Delegates program (P08750) to designate other employees as delegates. You can also define the level of authority that is assigned to each delegate so that the delegate can assist you with tasks and projects when you are away from your office or when you just need additional assistance. When work that you assign to others requires system access with an authority level comparable to a management level, you can assign delegate status to them up to your own level. When you designate an employee as a delegate for you, that employee can assist with routine tasks or projects from a predefined set of applications that will enable the use of delegates. For example, you might want a delegate to run a list of weekly reports or conduct a job analysis project. You can also delegate an employee to perform your supervisory functions for periods of time that you will be absent from work.
Assigning delegates permits you to designate another employee to access your software with system authorization at a level that you assign. You can assign an authority level up to, and including, your own. For example, you can designate an employee to perform many of the same functions that you would ordinarily perform by assigning appropriate authorization types. The system includes five preset authorization types and enables you to add configured authorization types.
29.6.2 Prerequisite
Set up additional authorization types, if needed, in UDC 08/AY.
29.6.3 Forms Used to Assign Delegates
| Form Name | FormID | Navigation | Usage |
|---|---|---|---|
| Work With Managers Employees | W08712A | Manager Self-Service menu (G05BMSS1), Managers Workbench
My Delegates, Form menu. |
Select an employee record. |
| Work With Delegates | W08750A | Click OK. | Enter delegate information. You can enter information for the same employee as many times as needed, assigning an additional authorization type for each entry. |
29.6.4 Setting Processing Options for Managers Delegates (P08750)
Processing options enable you to specify the default processing for programs and reports.
29.6.4.1 Defaults
Use this processing option to specify whether the Manager field is accessible and the address book value can be changed. When the value is set to the default value of1 or blank, the system automatically detects the address book number of the manager who is currently signed onto the system, disables the field, and displays only delegates who are subordinate to the displayed manager. When the value is set to 2, the system activates the Manager field, does not automatically detect an address book number, and displays the subordinate delegates for any manager whose address book number is entered.
- 1. User Level
-
Specify whether to display delegates for different managers or to display the delegates for only one manager. Values are:
1:Manager field is disabled. This is the default value.
2:Manager field is enabled.
29.6.5 Assigning a Delegate
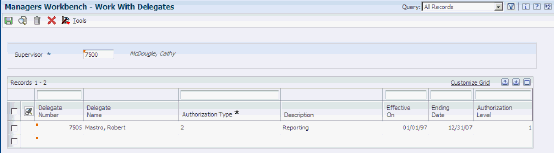
Access the Work With Delegates form.
To assign a delegate:
-
On Work With Managers Employees, click Find to display your organizational hierarchy and your employees' records.
-
Select My Delegates from the Form menu.
-
On Work With Delegates, complete these fields:
-
Delegate Number
Enter a number that identifies an entry in the JD Edwards EnterpriseOne Address Book system, such as employee, applicant, participant, customer, supplier, tenant, or location.
-
Authorization Type
Enter a code that specifies the type of authorization that is given to a delegate.
-
Effective On
Enter a future date when all changes will take effect or the date when the changes went into effect. If you do not enter a date in this field, the system uses the current date as the effective date.
-
Ending Date
Enter a future date on which the authorization expires.
-
Authorization Level
Enter the number of levels in the organizational structure below the delegate's manager that the delegate can review and make changes to employee records. For example, a value of 0 allows the delegate to access only employees that report directly to the delegate's manager. A value of 1 allows the delegate to access the records of employees that report to the manager's immediate subordinates.
-
-
Repeat step 3 for the same employee as many times as needed, assigning an additional authorization type for each entry.
-
When you are finished assigning delegates, click OK.
29.7 Reviewing Upcoming Employee Reviews by Supervisor
This section provides an overview of upcoming employee reviews, lists a prerequisite, and discusses how to review upcoming employee review information.
29.7.1 Understanding Upcoming Employee Reviews
Managers can sign in to the self-service intranet site to search for all upcoming employee reviews. This process can occur in one of these ways:
-
You can sign in to the self-service intranet site and search for upcoming employee reviews using the Upcoming Reviews by Supervisor program (P052200).
You can search for employees based on these fields: Business Unit, Pay Class, Type of Review, and all review dates and payroll status fields. The system automatically displays employees that report directly to you by your supervisor number.
-
You can sign in to the self-service intranet site and access the Upcoming Reviews By Supervisor program after receiving an electronic message about your upcoming employee reviews.
Instead of having to search for specific employees, the system automatically completes the grid with the employees that you are responsible for reviewing soon.
The electronic notification process occurs after the system administrator runs the Upcoming Reviews program (R052202). If the processing options for Upcoming Reviews are set up correctly, the program initiates Enterprise Workflow Management, which notifies all supervisors about their upcoming reviews by email. The system administrator can run the program automatically on a certain date by setting a processing option appropriately and setting up the program to run in the Scheduler Workbench.
Different versions of the report can be run to report overdue reviews and reviews for all employees. In these cases, you would not receive email messages. However, the system would still supply the Work With Upcoming Reviews by Supervisor form that displays the employees that you are responsible for reviewing.
After the system displays your employees with upcoming reviews, you can select an employee record and select an option from the Row menu to review profile, supplemental, employment, or organizational data for the employee. You can access this information if your JD Edwards EnterpriseOne security system is set up to provide this access.
29.7.2 Prerequisite
If the Upcoming Reviews program (R052202) has been run, you need to review only the information on the report that appears when you sign in to your self-service site.
29.7.3 Form Used to Review Upcoming Employee Reviews by Supervisor
| Form Name | FormID | Navigation | Usage |
|---|---|---|---|
| Work With Upcoming Reviews By Supervisor | W052200A | Manager Self-Service (G05BMSS1), Upcoming Reviews by Supervisor | Review upcoming employee review information. |
29.7.4 Reviewing Upcoming Employee Review Information
Access the Work With Upcoming Reviews By Supervisor form.
Figure 29-3 Work With Upcoming Reviews By Supervisor form
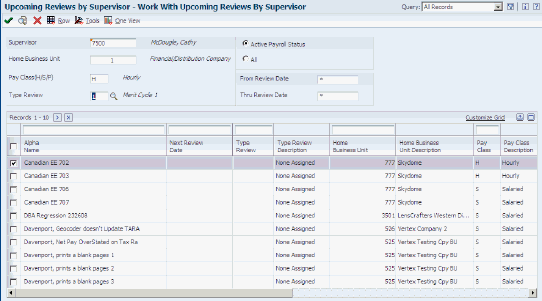
Description of ''Figure 29-3 Work With Upcoming Reviews By Supervisor form''
To review upcoming employee reviews by supervisor:
-
On Work With Upcoming Reviews By Supervisor, complete any of these fields:
-
Home Business Unit
-
Pay Class (H/S/P)
-
Type Review
-
Type Review
Enter a UDC (06/RV) that specifies the type of performance review to be completed for the next review period.
-
-
-
Complete these fields if you want to review employees who have upcoming reviews during a specific period of time:
-
From Review Date
Enter the date on which the employee is scheduled for the next performance or salary review. This field is for information only. It is not used by any programs or processes in the system.
-
Thru Review Date
Enter the date on which the employee is scheduled for the next performance or salary review. This field is for information only. It is not used by any programs or processes in the system.
If you complete the From Review Date field, but leave the Thru Review Date field blank, the system displays all employees with reviews on or after the from review date. If you complete only the Thru Review Date field, the system displays employees with no specific next review date and employees with a next review date that is equal to or prior to the through review date.
-
-
Select one of these options, and then click Find to display your subordinates.
-
Active Payroll Status
Enter an option that specifies the type of processing for an event.
-
All
Enter an option that specifies the type of processing for an event.
The Active Payroll Status option displays only employees with an active payroll status, including employees who are on a leave of absence.
The All option displays all employees, including those with a terminated status and employees on a leave of absence.
-
-
Review the displayed information.
29.8 Entering Data for Verification-of-Employment Letters
This section provides an overview of data for verification-of-employment letters, lists a prerequisite, and discusses how to:
-
Set processing options for Review Requests for Verification of Employment (P05003).
-
Enter data for verification-of-employment letters.
29.8.1 Understanding Data for Verification-of-Employment Letters
The Review Requests for Verification of Employment program (P05003) allows only human resource administrators or system administrators to enter employment data for verification-of-employment letters.
Entering the employment data is the second part of a two-step process for processing a verification-of-employment letter. The employee must first request a letter by entering personal information on the Request Information tab of the Verification of Employment Data form. When an employee enters a request, the system copies the employee's job and compensation information from the Job Information table (F08001) to the Employment Data tab.
If Enterprise Workflow Management is enabled through your processing options, after receiving an email that a verification-of-employment request is pending, you can inquire on the request, change the employee's employment data if necessary, and process the letter. You can also email the completed letter to the contact person whom the employee has requested.
29.8.2 Prerequisite
Have your human capital management system administrator set the processing option for Verification of Employment to 3. This processing option enables you to change the job information fields on the Verification of Employment Data form, if necessary.
29.8.3 Forms Used to Enter Data for Verification-of-Employment Letters
| Form Name | FormID | Navigation | Usage |
|---|---|---|---|
| Work With Verification Of Employment Requests | W05003A | Employee Self Service (G05BESS1), Verification of Employment
On Work With Verification Of Employment Requests, click Select. |
Locate an employee record. |
| Verification Of Employment Data | W05003B | On Verification Of Employment Data, select the Employment Data tab.
Click OK. |
Review and change information as required.
If you clicked the Save Document button, the system saves the letter to the C:\TEMP\ directory. You can print the Verification of Employment letter that automatically appears. You can also email the letter. |
29.8.4 Setting Processing Options for Review Requests for Verification of Employment (P05003)
Processing options enable you to specify the default processing for programs and reports.
29.8.4.1 User Level
Use this processing option to specify the organizational level of the user who will perform verification of employment functions.
This list describes consequences and additional setup issues that you should be aware of when you select one of the three processing options:
| Typical User | Setup Issues |
|---|---|
| 1: Employee | Entering 1 instructs Workflow to notify the recipient of the pending request after the employe enters the request information. The recipient completes the verification-of-employment letter and can print the letter or send it by email to the requested contact person. This value starts the process with the employee and finishes it with the Workflow recipient. If you enter this value, you must set up your recipient in the processing option on the Workflow Setup tab. |
| 2: HRM clerk | Entering 2 instructs Workflow to notify the recipient of the completed letter after the human resource management clerk enters the request information. The recipient approves the letter and can print the letter or send it by email directly to the contact person that the employee requested. This value assumes that the process has already started with the employee. The HR clerk does not receive a Workflow message but sends the completed letter through Workflow to a recipient for approval. If you select this value, you must set up your recipient in the processing option on the Workflow Setup tab. |
| 3: HRM administrator | Entering 3 deactivates Workflow in the Verification of Employment program. Because the human resources administrator starts and completes all requests, no need for Workflow exists. The HR administrator can delete a request and also print the letter or send it by email directly to the contact person that the employee requested. |
- 1. User Level:
-
Specify whether this program will be used by an employee, an HR clerk, or an HR administrator. Values are:
Blank: Employee
1: Employee.
2: HR clerk.
3: HR Administrator (This option will not send a request through Workflow.)
Note:
If this program is used by an employee or an HR clerk, the approval process is routed through workflow, where the Workflow Setup tab must be set up.
29.8.4.2 Workflow Setup
Use this processing option to specify the user or users who will process verification of employment requests.
- 1. Address Number of VOE request processor (HRM):
-
Specify the address number of the HR person (or a distribution list) who processes requests for verification of employment.
29.8.5 Entering Data for Verification-of-Employment Letters
Access the Work With Verification Of Employment Data form.
Figure 29-4 Work With Verification Of Employment Data form

Description of ''Figure 29-4 Work With Verification Of Employment Data form''
To enter employment data for verification-of-employment letters:
-
On Work With Verification Of Employment Requests, complete these fields and click Find to locate an employee's request:
-
Employee ID
-
Request Date
Enter the date that an item is scheduled to arrive or that an action is scheduled for completion. If you are adding a request for a verification of employment letter, enter today's date. If you are reviewing a request, enter the date when you initially added the request.
-
-
If you need to delete a record, select the record and click Delete.
-
Select the employee's record and click Select.
-
On Verification Of Employment Data, select the Employment Data tab.
-
If your processing option is set to 3, select one or more of these options, depending on the contact method that the employee has selected.
-
Print VOE Letter
Select an option to print the verification of employment letter.
The system prints the verification of employment letter when you click OK.
-
Delete Document
Select an option that specifies whether you want the system to save the letter when you print it. If you select this option, the letter is deleted when the you click OK.
-
E-Mail VOE Letter
Select an option that specifies whether the system sends the verification of employment letter to the requested email address.
The system sends the verification-of-employment letter when you click OK.
This option is enabled only when you activate the Print Verification-of-Employment Letter option also. You must also have the E-Mail box on the Requisition Information tab checked and a value in the E-Mail Address field.
-
-
Review and change these fields if necessary:
-
Date Started
Enter the date on which the employee actually reported to work for the most recent period of hire. When an employee initially begins working, the default value is the original hire date. If no original hire date exists, the system uses the current date. This field can be updated multiple times if, for example, an employee is a seasonal worker.
For the calculation tables in the Payroll system and the eligibility tables and date codes in the Human Resources system, the system also uses this date as a start date when it calculates deductions, benefits, and accruals.
-
Job Type/Step Description
Enter the description that is associated with the job type and job step. This description is stored in the Job Information table (F08001).
-
Continued Employment
Enter a value that indicates the employee's potential for continuing employment with the organization. Values are stored in UDC 05/V3.
-
Date Of Last Raise
Enter the date of the employee's last raise. For the standalone HR system, this is the date when you update salary and wages. If you also have the Payroll system, this date is automatically updated when a payroll is run. You define pay effective dates using the Pay Rate Information form.
-
Amount Of Increase
Enter an amount of increase that is the difference between two values. A negative value indicates a decrease.
A monetary increase a result of a raise occurring on the date of last raise.
-
Date of Next Raise
Enter the date that the hourly or annual pay rate for the employee increases. The new rate goes into effect after a payroll cycle finishes with a pay period end date on or after the date of the next raise.
-
Pay Period Salary
Enter a value that represents the pay period salary. Pay period salary is calculated by dividing the annual salary by the number of pay periods.
-
Comment
Enter a comment, description, or remark. This entry can be up to 40 characters in length.
-
Pay Frequency
-
Pay Class (H/S/P)
-
-
Review and change these compensation fields for the Current Year, One Year Prior, and Two Years Prior fields if necessary:
-
Base
Enter an amount that is paid from all pay types considered to be base salary for the current year.
-
Overtime
Enter an amount that is paid from all pay types considered to be overtime pay for the current year.
-
Commission
Enter an amount that is paid from all pay types considered to be commission pay for the current year.
-
Bonus
Enter an amount of bonus pay that the employee earned, year-to-date in the current year. The system calculates this amount by searching the employee's timecards for pay types that represent bonus pay. It then calculates the amount of the employee's earnings during the year that were attributed to the bonus pay types.
Note:
When you set up a pay type, you use the Pay Type Category field (PTCT) to identify it as part of a related group of pay types, such as regular pay, bonus pay, commissions, and so on. You define pay type categories in UDC 06/PC. -
Other
Enter an amount to be paid from all pay types that are considered to be other pay for the current year. Other pay is anything other than base salary, overtime, commission, and bonus.
-
-
Click OK.
-
Select Print from the Form menu.
-
If you have selected the option to send the letter, select Send or Cancel on the prompt on the E-Mail Confirmation form asking whether you want to send the request by email.
-
If you have selected the option to email the letter, click Send or Cancel on the prompt on the E-Mail Confirmation form asking whether you want to send the request by email.
29.9 Using Managers Reports
This section provides an overview of managers reports and discusses how to run predetermined reports.
29.9.1 Understanding Managers Reports
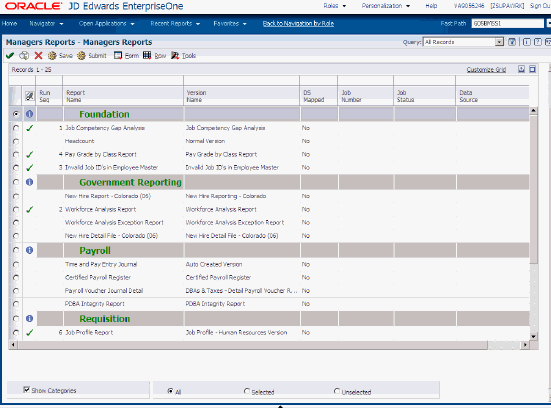
Managers and their delegates can use the Managers Reports program (P08740), to automate required reporting procedures and save time. Managers can select reports from a preset list to meet frequent reporting requirements. Two reporting approaches are available:
-
Reports by category
-
Individual reports
The Category option includes a configured list of reports that can save time. For example, if a manager needs to review a group of payroll reports at the end of each payroll cycle, the Payroll report category can be selected and the system prints all reports in the Payroll category. The reports that are included in each category are defined in the Managers Reports Setup program (P08741). Managers can also select reports within a list and specify the order in which they print to meet specific requirements. You can add to the list of categories by modifying UDC 08/RP. You can also use the Managers Reports Setup program to create Manager Reports versions that include preset lists of reports.
Managers can select and print any of the individual reports, such as Headcount or Phone List, by selecting the report name, reviewing the print destination on the Printer Selection form, and then clicking OK.
The Generate Graphic Org Chart program (P08713W) prints a picture of the organization, starting at the requesting manager's level.
The supplemental data report produces information from the Supplemental Data table (F00092), linked to the Employee Master Information table (F060116). For example, you might want to print a report on skills or competencies for an employee. You can review the supplemental information that is available for this report in the Employee Master program (P0801).
Some reports are designed to run for a specific employee and enable you to pass the address book number of the employee to the report through the report data structure. When a report meets this criteria and the report data structure mapping has been set up in the Managers Reports Setup application, the DS Mapped column will contain a Yes. When you run a report that has the data structure mapped, the report will be run for the address book number in the Employee field. If the Employee field is blank, the report will be run for the address book number in the Manager field.
You can also create and name your own custom list of report that contains a selection or reports from multiple categories. You can then recall this list and submit the entire list or individual reports on the list.
29.9.2 Forms Used to Run Managers Reports
| Form Name | FormID | Navigation | Usage |
|---|---|---|---|
| Managers Reports | W08740B | Manager Self-Service Menu (G05BMSS1), Managers Reports
On Managers Reports, click Submit. |
To run reports without modification, select desired reports. |
| Manager Reports Sequence | W08740A | On Managers Reports, select Set Run Sequence from the Form menu. | Select a report record.
Run reports in a particular sequence. |
29.9.3 Using Managers Reports
Access the Managers Reports form.
To run manager reports:
-
On Managers Reports, complete the Category field and then click Find.
To list reports in all categories leave this field blank and click Find.
-
List Name
Enter the name of a report list. You can create multiple report lists, each with a unique name. To copy an existing list, display the list to copy, change the name in the List Name field, and click Save.
-
Category
Enter the name of a report category. Each report is associated with a category to make creating and maintaining lists of reports easier and to enable you to view or submit just the reports that belong to a particular category.
-
-
To run the list of reports without modification, click Submit.
-
To run the list of reports in a particular order, select Set Run Sequence from the Form menu.
-
On Manager Reports Sequence, select each row in the order in which you want the reports to run.
-
If you need to restart the sequence numbering, click Find and then select each row in the order in which you want the reports to run.
-
Click OK.
-
To run the reports in the new sequence, on Managers Reports, click
-
To run an individual report from the list, select the report and click the Select button.
-
To select multiple reports or to add reports to your custom list, double-click the button in the first column (or the row header) for the desired report, and then click Submit. This will run all reports with a check mark in the row header column.
-
To run a report for one employee, complete the Employee field:
-
Click Submit.
-
To apply a name to your list of reports, enter a value in the List Name field, and then select Save from the Form menu.
29.10 Setting Up Information for New Employees
This section provides an overview of new employee setup, lists prerequisites, and discusses how to:
-
Set processing options for Employee Setup Workbench (P08710).
-
Add an employee record using employee setup.
-
Initiate employee setup
-
Approve a setup process or task.
-
Review and revise the setup status
29.10.1 Understanding New Employee Setup
When you hire an individual, many administrative tasks must be completed before the employee starts working. The process of setting up a new employee can involve many different people, paper forms, and approvals, and equipment must be set up for the new employee. Delays in the paperwork or approvals sometimes impede preparation for the employee and contribute to lost productivity.
You can use Managers Employee Setup to automate most communication that is associated with preparation for a new employee's arrival. Using this automated approach enables you to set up and distribute tasks and route approvals efficiently. You can track each process to spot potential problems and avoid delays. Workflow enhances the setup processes. Workflow routes approval and notification messages to required people about tasks that they need to complete by a specific date. This process tracks critical dates and notifies the originator when delays occur.
Using Workflow to help complete the setup process for new employees reduces the risk of misplacing paper forms, informs appropriate personnel of tasks that should be completed by a certain date, and decreases time spent preparing for a new employee.
You can avoid lost productivity by reviewing each setup process to resolve possible delays and ensure that all preparation will be completed on time. When you need to reduce the setup interval, you don't have to wait until all the hiring processes are complete to start preparing for the new employee. As soon as the address book number has been entered into the system, you can create setup tasks to ensure that the new employee can start work on the first day of employment.
When you initiate the process, Workflow sends a series of approvals according to the setup tasks that you entered. Each setup task can do one or more of these activities: run a report, send an email message, create a work order, or start a Workflow process.
29.10.1.1 Add an Employee Record Using Employee Setup
You must add an employee record to the database before you can initiate the employee setup process. If you have already added an employee record, proceed to the step to initiate employee setup.
When you add an employee record using the Employee Quick Hire program (P060116Q), the system automatically adds an employee record to the Address Book Master table (F0101) and an employee setup record to the Employee Setup Master table (F08710). If you are adding an employee record using any of these programs, see the referenced information for adding an employee record, and then proceed to the step to initiate employee setup.
-
Employee Master (P0801).
-
Applicant Entry (P08401).
-
Personic or any third-party software that updates the Unedited Quick Hire Transaction File table (F060116Z).
Note:
When you use one of these programs, the system does not automatically add an employee setup record to the Employee Setup Master table. An F08710 record is added only if the employee is added through Quick Hire. To add a setup record after you add an employee record, you must access the Employee Setup Workbench program and initiate the process for employee setup.
29.10.1.2 Initiate the Employee Setup Process
After you add an employee record, you can assign setup tasks to the employee's setup record and then initiate the setup process.
Depending on how one of the processing options has been set, the entire employee setup process might require approval. Workflow will deliver an approval form for the process and wait for confirmation before it starts individual tasks that you have assigned to the employee record.
Most setup tasks are specific to the location where the employee will be working. You can select tasks from a default task list that displays setup tasks for every employee by job type and job step. You can also select tasks from a setup task list that includes all defined tasks. You can change tasks to configure the employee's setup. However, this could reinstate the process approval depending on the task specifications.
Each setup task can do one or more of these activities, depending on how the tasks have been set up:
-
Run a report.
-
Send an email message.
-
Create a work order.
-
Start a Workflow process.
Information that you enter in the tabbed area of the Employee Setup Entry form updates the Employee Setup Master table (F08710). Information that you enter in the detail area of the form updates the Employee Setup Tasks table (F08711).
29.10.1.3 Approve a Setup Process or Task
After you initiate employee setup, Workflow completes one or both of these procedures depending on how the processing options are set:
-
Obtains a process approval.
-
Obtains a task approval for each employee setup task that includes an approval requirement.
If the system requires a process approval, Workflow begins for each employee setup task, but waits until it obtains the process approval before continuing.
Workflow can complete any or all of these processes for each setup task:
-
Create a work order.
-
Create a report.
-
Send an email.
-
Start an additional Workflow process.
When specified in the processing option, the system requires a process approval for the entire setup process. When the system requires a process approval, it sets the task status to Pending (as defined in Setup Task Status list 08/S1) until the designated manager approves the process. When the designated manager approves the setup process, the system resets the process status to Approved (this is the status in the F08710 record) and restarts each task within the process. If a task has a future start date, the task workflow process halts and waits for the schedule activation date. The Escalation Monitor restarts halted tasks with a future start date on the appropriate date.
Individual tasks and changes to tasks might also require approval. For example, if the task for installing an employee telephone does not require an approval, Workflow does not send an email approval form. However, you can set up this task to require an approval if a manager changes the task to install a phone with multiple features.
When a task requires approval, Workflow first verifies that the manager who entered the employee setup record also entered data in the required fields that identify the location of the new employee's work space. If values are missing, Workflow delays the process and sends an email message to the manager. When the manager enters the required data, the workflow process is restarted and sends an email approval form to the approver who has been specified for the task. The system then sets the task status to WA or Waiting for Approval (defined in Setup Task Status list 08/S2) until it is approved. When the designated manager approves the task, the system sets the task status to Approved and starts processing the task.
When the task is approved, the activation date is reached, and the required location information is entered, workflow resumes and activates the task. This action changes the status of the task record (F08711) to A or Activated and carries out the predefined task activities:
-
Sends an email message.
-
Runs a configured report.
-
Creates a work order.
-
Starts an additional Workflow process.
An email message can contain the employee's name and location information, the description of the task, a requested completion date, and the manager's comments about the task. When a report is one of the task activities, an email is sent to the task recipient that contains an active link that, when selected, submits the report. You can also link a work order to the setup task.
A task remains in the Activated status until the task recipient finishes working on the task, returns to the Managers Employee Setup application, and selects Completed from the Row menu.
29.10.1.4 Review and Revise the Setup Process
You can review and revise the task status for the entire setup process and for individual tasks. You can delete a task if it is in the Pending status. You can cancel a task if it is in the Waiting, Approved, or Active status. If you do not activate the employee setup process when you add an employee setup record, you can activate the process after your review.
Managers who are responsible for approving the process for new employee setup or the individual tasks within the process should complete these procedures.
29.10.2 Prerequisites
Before you complete the tasks in this section:
-
Set the processing options for Employee Setup Workbench (P08710).
-
Complete the setup tasks for the employee setup process.
-
Set the processing options for Employee Quick Hire (P060116Q) to activate the new hire process, which includes Employee Setup Workbench.
You must also set these processing options to specify whether the system automatically updates the Employee Master Information table (F060116) or the Unedited Quick Hire Transaction File table (F060116Z) when you add a record.
-
Review the status codes from UDCs 08/S1 and 08/S2.
|
See Also: |
29.10.3 Forms Used to Set Up Information for New Employees
| Form Name | FormID | Navigation | Usage |
|---|---|---|---|
| Work With Employee Setup | W08710C | Manager Self-Service (G05BMSS1), Managers Employee Setup
Employee Management (G05BE1), HRM Employee Setup On Work with Employee Setup, click Add. |
If you added an employee record using a program other than the Employee Setup Workbench program, use the first navigation.
Locate and select an employee record for the setup tasks are required. |
| Employee Setup Entry | W08710G | On Employee Setup Entry, select Add Default Tasks from the Form menu. | Review default tasks. |
| Employee Setup Entry | W08710G | On Work With Employee Setup, select an employee record and then click Select. | Select an employee record. |
| Employee Setup Search and Select | W08710E | On Employee Setup Entry, select an employee, click Select, and then select Copy Employee from the Form menu.
Click OK. |
The system supplies the detail area with tasks from the specified employee. You can copy tasks only from employees who have the same Setup Action value as the employee that you are setting up. |
| Activation Confirmation | W08710K | On Activation Confirmation, click Yes. | The Activation Confirmation form appears asking whether you want to activate the employee setup process. |
| Work With Employee Setup | W08710C | On Work With Employee Setup, click OK. | Review pending status. |
| Work Center | W012503F | Workflow Management (G02), Employee Work Center | View all queues to view all employee setup messages. |
| Media Object Viewer | W012503G | On Media Object Viewer, click Drag. | Check the box for a pending approval message, click Drag, and then view the message in the right-hand pane. |
| To Approve, or Reject a Request | Not Applicable | Click the button in the left-hand queue. | To approve or reject a request, select an option and then quit the Work Center program. |
| Work With Employee Setup | W08710C | Manager Self-Service (G05BMSS1), Managers Employee Setup
Employment Management, (G05BE1), HRM Employee Setup |
Select a pending process record. To activate the process, select Process Tasks from the Row menu. Or, to review the status, click Select.
Tasks with a Y in the Pending Tasks column are pending. Although you previously submitted tasks with an N, you can also review them to track their progress. |
| Employee Setup Entry | W08710G | Click Abort Task from the Row menu.
Click OK. |
Review the task status. |
29.10.4 Setting Processing Options for Employee Setup Workbench (P08710)
Processing options enable you to specify the default processing for programs and reports.
29.10.4.1 Processing
Use these processing options to specify the default values that the system uses to determine approval requirements and distribute workflow messages when managers or HR personnel perform employee setup functions.
- 1. Require Process Approval
-
Specify whether to require a manager's approval for the employee setup process before the system processes any of the setup tasks.
This approval is for the entire setup process. To create additional security, you can set up a requirement for the system to send an approval message for each setup task. Values are:
0: No
1: Yes
- 2. Allow Changing Process Approver
-
Specify whether to authorize a manager to change the individual who can approve the employee setup process. The default setting is the manager's supervisor. For cases in which the manager has no supervisor, and the first processing option is set to require process approval, the manager has the approval authority. Values are:
0: No
1: Yes
- 3. Work Center Mail Box
-
Specify the mailbox number in the Employee Work Center of the individual to whom you want to send your notifications and approval messages. Values are:
Blank: 01 (Personal In Basket)
To create a new mailbox number, you must add a record to UDC table 02/MB.
29.10.4.2 User Level
Use this processing option to specify the organizational level of the user who will perform employee setup functions.
- 1. User Level
-
Specify whether the application will be used by a manager (including a manager's delegate) or HR personnel. Values are:
Blank: Manager
1: Manager or manager's delegate
2: HR Personnel
29.10.4.3 Defaults
Use this processing option to specify the end status of the employee setup process when you successfully complete it.
- 1. Ending Setup Status
-
Specify the status to which you want the employee setup process changed when the process finishes successfully. The status codes are listed in UDC table 08/S1. Values are:
1: Completed
7: Archive
8: Purge
29.10.4.4 Work Orders
Use these processing options to specify the statuses that the system uses to identify pending, active, and canceled work orders, the record type to use for writing instructions for a work order, and whether the system automatically supplies the description of the employee setup task when you create a new work order.
- 1. Pending W.O. Status Code (Required)
-
Specify the status that the system will use to identify pending work orders. The system places a work order in pending status when the setup task has been initiated but is waiting for the user to enter an effective date or location information.
- 2. Active W.O. Status Code (Required)
-
Specify the status that the system will use to identify active work orders. The system places a work order in active status when the setup task has been initiated, the effective date has been reached, and the user has entered the location information.
- 3. Cancelled W.O. Status (Required)
-
Specify the status that the system will use to identify canceled work orders. The system places a work order in canceled status when the user ends the setup task.
- 4. Record Type used when creating Work Order instructions
-
Specify the record type that you want to use when you are writing instructions for a work order. The default value is A.
- 5. Copy Task Description to Work Order
-
Specify whether the system will copy the description of the employee setup task that is contained in the F087102 table into the description field of the work order when you create a new work order. Values are:
1: Copy the description from the setup task record.
0: Use the description from the work order template.
29.10.5 Initiate Employee Setup
Access the Employee Setup Entry form.

To initiate employee setup:
If you just added an employee record using the Employee Setup Workbench program (P08710), continue with the task.
-
On Work With Employee Setup, if you used a program other than Quick Hire to add the employee master record (F06116), click the Add button and go to step 4; otherwise, perform step 2.
-
Complete any of these fields and click Find:
-
Supervisor
Enter the address book number of the supervisor.
-
Employee Number
Enter the address book number of the employee who is being hired or set up.
-
Process Status
Enter a code that represents the status of the entire setup process.
-
-
Select the employee setup record and click Select.
-
If you added an employee record with a program other than Employee Setup Workbench, on Employee Setup Entry, complete the Address Number and Setup Action fields on the Employee tab:
-
Setup Action
Enter a code that represents the setup action to perform.
-
-
To add default tasks, select Add Default Tasks from the Form menu.
If default tasks are set up for the new employee's job type and step, the system supplies the default tasks on the Employee Setup Entry form.
If a value is in the Lock Code field, you can change the subclass only to a level that is equal to or less than the value in the Ranking field.
Your new employee record appears on Work With Employee Setup and shows Pending in the Process Status field in the detail area.
-
To add or change the subclass for a task, review these fields:
-
Ranking
Enter a code that specifies the rank of tasks within a task type. You rank tasks to restrict users from changing the subclass of a task to a subclass with a higher rank.
-
Lock Code
Enter a code that specifies whether the hiring manager can change the selected default setup task.
-
-
Complete the Sub Class field.
If the task is locked, the subclass that you select must have a ranking that is equal to or less than the value in the Ranking field.
-
Complete the UM optional field.
-
If the task is an equipment-setup task and you need more than one unit, complete the Units field.
-
Review the system-supplied information in the Order Number field and in these fields:
-
Task Recipient
Enter the address book number of the person who is assigned to the current employee setup task.
-
Approved By
Enter the address book number of the person who approves any given work. The system verifies this number against the Address Book Master table (F0101).
-
Req. Flds (Required Fields)
Enter a value that represents the number of location category codes you need to know to accomplish the current setup task.
For example, to install a telephone, you might need to know the first four location codes (state, city, building, and office number). To set up a computer account, you might need to know only the first two location codes (state and city).
-
-
Select the Location tab and review the value for Required Fields to determine the number of location code fields that you need to complete for this task.
-
Complete as many of these Location Code fields as are required.
For example, if four fields are required, then complete Location Code 001 through 004.
-
Location Code 001
Enter a user-defined category code that defines the location of an employee. You set up this code to meet the needs of your organization. For example, you can set up a category code to represent country, city, state, campus, building, office, or other location.
The Human Resources system provides this code to enable you to define a custom setup process for new employees based on the location where the employee will work.
-
-
Complete the Office Number optional field.
-
Office Number
Enter a field that uniquely identifies the physical location where an employee works. The system does not verify this information. You can enter any alphanumeric string.
-
-
To assign an additional task, complete the Task Type field and repeat steps 6–13.
-
To copy tasks from another employee, select Copy Employee from the Form menu. On the Employee Setup Search and Select form, inquire on the setup process for the desired employee to copy from and click the Select button.
-
When you finish entering all tasks for the employee's setup, click OK.
-
On Activation Confirmation, click Yes to begin the process.
If you click No, the system leaves the status of the process as pending. You will need to activate the process from the Work With Employee Setup form by selecting the Process Tasks from the Row menu.
29.10.6 Approve a Setup Process or Task
Access the Work Center form.

To approve the process or task for employee setup:
-
On Work Center, verify that the information in these fields is correct and then click Find:
-
Address Number / User / Role
Select a value that filters which queues and users appear in the Work Center. Values are:
Address Number: All queues and users who are associated with the address number will appear. Address Number is the default value.
User: All queues for the user's associated address number will appear.
Role: All queues for the role's associated address number will appear.
All the Work Center's logic will run off of the associated address number. Therefore, all users and roles must have an associated address number.
-
Associated Address Number
Enter a number that identifies an entry in the JD Edwards EnterpriseOne Address Book system, such as employee, applicant, participant, customer, supplier, tenant, or location.
-
Tickler Date
Enter the date on which an activity was performed or, for promise activities, the reminder date.
-
-
To view all queues, select the All Queues option.
-
All Queues
Select this check box to specify that all of the mailboxes that exist on the system will display whether mail is in them for the address number that is entered. If this check box is not selected, only those mailboxes that have mail in them for the address number that is entered will appear.
-
-
Review your messages in the left-hand pane.
-
Click the (+) button adjacent to the queue that receives employee setup messages.
-
To view a message, select the check box that is adjacent to a pending approval entry, and then click Drag.
-
On Media Object Viewer, if the message allows you to approve a task, click the button in the left-hand pane.
A Workflow message might provide only change notification or change notification and approval. On Media Object Viewer, if an approval is requested, a button exists in the left-hand pane that you can click. The system then displays a form that you can use to approve or reject the request.
-
Click the button in the left-hand queue.
-
On To Approve or Reject a Request, select one of these options in the Actions area, and click OK.
-
Approve
Enter a value that specifies the type of processing for an event.
-
Reject
Enter a value that specifies the type of processing for an event.
-
-
On Work Center, click Close.
29.10.7 Review and Revise the Status
Access the Employee Setup Entry form.
To review and revise the status:
-
On Work With Employee Setup, complete these fields and click Find:
-
Supervisor
-
Employee Number
-
Process Status
-
-
If you want to cancel a process, select a pending process record, and then select Cancel Process from the Row menu.
-
To delete the process, click Delete.
You can delete only a process that is in Pending status. After any of the tasks have been processed, you will no longer be able to delete an entire setup process.
-
To activate the process, select Process Tasks from the Row menu.
-
Click Select to review the status for individual setup tasks.
-
On Employee Setup Entry, review the Task Status field for each task in the detail area.
The Task Status field displays the status for an individual setup task. You can delete the task if the status is Pending. A task is pending only if you have not submitted it for processing. You can abort the task if the status is Waiting, Approved, or Active.
To cancel a task, select a task, Abort Task, Row menu, OK.
When you cancel a task, the system sets the task status to Cancelled by User. When you cancel a process, the task record remains in the system.
When you delete a process, the task record is removed from the system.
When you complete a task, the system sets the task status to the value that you specified in the final Task Status field on the Work With Setup Task Details form.
-
To cancel a task, on Work With Employee Setup, select Recipient Tasks from the Row menu. On Work With Recipient tasks, select the task to cancel, and then select Cancel from the Row menu.
-
To complete a task in the system after the task recipient finishes the work, on Work With Employee Setup, select Recipient Tasks from the Row menu. On Work With Recipient tasks, select the task to complete, and select Complete from the Row menu.
29.11 Approving Automatic Deposit Information
This section provides an overview of automatic deposit information approval and discusses how to enter automatic deposit approvals.
29.11.1 Understanding Automatic Deposit Information Approval
Employees can use self-service to enter and update some of their personal information, such as name and address, emergency contact, and so on. Some types of information that employees enter, such as automatic deposit and competency, must be reviewed and approved by someone else before the database is updated.
If you are a representative of your organization's payroll department, you might be responsible for approving the automatic deposit information that employees add or change. In some cases, the routing number for an employee's bank might not exist in the user-defined code list for routing numbers (06/BC). You can use self service to approve automatic deposit information and the addition of new routing numbers.
If you are a representative of the payroll department, you might be responsible for approving the automatic deposit information that employees enter through self service. If Enterprise Workflow Management is enabled, you receive a message in the Employee Work Center when automatic deposit information is awaiting your approval. You must verify that the employee correctly completed all of the necessary information, and then approve or disapprove the request. If necessary, you can enter a response to the employee. Workflow includes your response in the email message that notifies the employee of the status of the request.
29.11.2 Forms Used to Approve Automatic Deposit Information
| Form Name | FormID | Navigation | Usage |
|---|---|---|---|
| Work Center | W012503F | Workflow Management(G02), Employee Work Center | On Work Center, locate an automatic deposit message. |
| Review/Validate Automatic Deposit Instructions | W055011B | On Review/Validate Automatic Deposit Instructions, click the Review/Validate Automatic Deposit Instructions.jde link.
Click OK. |
Review and then approve or disapprove.
If the employee entered the incorrect routing number for the bank, you can enter a correction. |
29.11.3 Entering Automatic Deposit Approvals
Access the Work Center form.
To approve automatic deposit information:
-
On Work Item Manager, open a message queue that displays a message awaiting your review.
-
To review the message, select the check box next to the message that you want to review, and then click Drag.
-
Review the message in the adjacent pane and, if you want to submit an approval, click the magnifying glass button.
-
Click Review/Validate Automatic Deposit Instructions.jde.
-
Click the Review/Validate Automatic Deposit Instructions.jde link.
-
On Review/Validate Automatic Deposit Instructions, review all changes.
-
To approve or disapprove, click one of these buttons, and then click OK.
-
Approve
-
Disapprove
-
29.12 Approving Bank Transit Information
This section provides an overview of bank transit information approval and discusses how to approve bank transit information.
29.12.1 Understanding Bank Transit Information Approval
Occasionally, when an employee enters automatic deposit information using self service, the employee might discover that the routing number for the bank where the account resides is not one of the valid values in the Routing Number field. In this case, the employee can submit a request to have the bank's routing number added to the list of values. If you are a representative of the payroll department, you might be responsible for approving the employee's request before the system adds the new bank number to UDC 06/BC.
If Enterprise Workflow Management is enabled, you receive a message in the Employee Message Center when bank information is awaiting your approval. You must verify that the employee correctly completed all of the necessary information, and then approve or disapprove the request. If necessary, you can enter a response to the employee. Workflow includes your response in the email message that notifies the employee of the status of the request.
When you approve the employee's request, the system updates UDC 06/BC.
29.12.2 Form Used to Approve Bank Information for Automatic Deposits
| Form Name | FormID | Navigation | Usage |
|---|---|---|---|
| Work Center | W012503F | Workflow Management menu (G02), Employee Work Center
On Work Center, click OK. |
Approve bank transit information. |
29.12.3 Approving Bank Transit Information
Access the Work Center form.
To approve bank information for automatic deposits:
-
On Work Item Manager, select the message that you need to view.
-
Click the light bulb button in the exit bar in the middle of the form.
-
Click the light bulb button that appears on the right side of the form.
-
On Add Bank Transit Number, review the information in these fields and correct it, if necessary:
-
Bank Name
Enter a user-defined name or remark.
-
Bank Routing Number
Enter the bank transit number for the employee's financial institution. Banks might refer to this number as the ABA or payment routing number. This number can be obtained from the employee's check or deposit slip. It is located between the MICR colons (:) at the bottom of the check.
For U.S. banks, this number contains nine digits. If this number does not contain nine digits, you must contact the employee's financial institution to obtain the correct number.
For Canadian banks, this number contains eight digits. Therefore, Canadian clients must enter the bank transit number with a leading zero.
If you change this number for an employee, the system creates a prenote for the employee's next auto deposit.
-
-
Add optional information to the Payroll Clerk's Response text area.
-
Select one of these options, and click OK:
-
Bank Added
Enter a value that specifies the type of processing for an event.
-
Bank Not Added
Enter a value that specifies the type of processing for an event.
-
29.13 Approving Competency Information
This section provides an overview of competency information approval and discusses how to approve self-service competency entries.
29.13.1 Understanding Competency Information Approval
Competency management is a method of categorizing and tracking the qualifications that employees have that make them competent to perform their job duties. These qualifications, such as knowledge, skills, and training, are called competencies.
As a manager, you can use self service to review competency information for your subordinates. You can also enter the level of proficiency that each employee demonstrates in these competencies.
Your organization uses competency management to track the competencies that each employee possesses and to compare these competencies with those that are required for the employee's job. Tracking employee competencies helps you create clear career goals and performance objectives for the employees who work for you.
To simplify the process of maintaining competency information, employees can use self service to enter and revise their own competency information. You might be responsible for approving the information that employees enter and entering the employee's level of proficiency in certain competencies. In this case, you receive a message in the Employee Message Center after an employee enters competency information. You must then review the information and enter a level of proficiency for each competency.
|
Note: The self service employee cannot add competencies. This functionality is not open to the self service employees. You can maintain your own competency information which includes courses taken and the course provider but does not include the competencies themselves. The courses and providers must be maintained within an existing competency. |
29.13.2 Forms Used to Approve Competency Information
| Form Name | FormID | Navigation | Usage |
|---|---|---|---|
| Work Center | W012503F | Workflow Management menu (G02), Employee Work Center | On Work Center, select a message and review the information. |
29.13.3 Approving Self-Service Competency Entries
Access the Work Center form
To approve competency information:
-
On Work Center, select the message that you need to view.
-
Click the light bulb button in the exit bar in the middle of the form.
-
Click the light bulb button that appears on the right side of the form.
-
On Training/Development, Skills, Accomplishments, Certifications, Education, or Language, complete all of these fields that apply, and then click OK:
-
Competency Level
Enter a code that refers to the level of proficiency that a person or asset has demonstrated for a specific competency type and competency code.
-
Verified By
Enter the name or address book number of the person who verified that the employee is certified in the competency.
-
Verification Method
Enter a UDC (05/VM) that defines the methods that you use to verify employee competency levels.
-
29.14 (Release 9.1 Update) Approving Disability Status Information
This section provides an overview of disability information approval, and discusses how to approve disability information.
29.14.1 Understanding Disability Information Approval
Employees can use JD Edwards EnterpriseOne self-service applications to enter and update their disability status. When employees enter or update their disability status, it may be required that an authorized approver reviews and approves the updated information.
You can use JD Edwards EnterpriseOne Workflow Management to facilitate the process of obtaining approval for the disability status response submitted by an employee. After an employee submits the Voluntary Self-Identification of Disability Form CC-305, the system updates the F085590W work table with the data and triggers the workflow process. As part of the workflow process, the following events occur after the employee submits the employee self-service form:
-
The system notifies the HR administrator, who is authorized to approve the disability status response submitted by the employee, that the response is pending approval.
-
After the HR administrator approves or rejects the disability status response, the system updates the F085590W work table.
29.14.2 Forms Used to Approve Disability Information
| Form Name | Form ID | Navigation | Usage |
|---|---|---|---|
| Work Center | W012503F | Workflow Management (G02), Employee Work Center | Review disability status response messages. |
| Disability Status Disclosure Approval | W085595AB | On Work Center, select a disability status response message and click the Disability Status Disclosure Approval.jde link. | Review an employee's disability status and then approve or reject the approval request. |
29.14.3 Approving Disability Information
Access the Disability Status Disclosure Approval form.
To approve disability information:
-
In the Action area, select one of these options:
-
Approve
-
Reject
-
-
In the Comments area, enter text to add a brief note. Additionally, you can click the media object button to attach a media object.
-
Click OK.
29.15 (Release 9.1 Update) Approving Protected Veteran Status Information
This section provides an overview of protected veteran status information approval, and discusses how to approve protected veteran status information.
29.15.1 Understanding Protected Veteran Status Information Approval
Employees can use JD Edwards EnterpriseOne self-service applications to enter and update their protected veteran status. When employees enter or update their protected veteran status, it may be required that an authorized approver reviews and approves the updated information.
You can use JD Edwards EnterpriseOne Workflow Management to facilitate the process of obtaining approval for the protected veteran status response submitted by an employee. After an employee submits the protected veteran status self-identification form, the system updates the F085605W work table with the data and triggers the workflow process. As part of the workflow process, the following events occur after the employee submits the employee self-service form:
-
The system notifies the HR administrator, who is authorized to approve the veteran status response submitted by the employee, that the response is pending approval.
-
After the HR administrator approves or rejects the disability status response, the system updates the F085605W work table.
29.15.2 Forms Used to Approve Protected Veteran Status Information
| Form Name | Form ID | Navigation | Usage |
|---|---|---|---|
| Work Center | W012503F | Workflow Management (G02), Employee Work Center | Review protected veteran status response messages. |
| Veteran Status Disclosure Approval | W085605WA | On Work Center, select a protected veteran status response message and click the Veteran Status Disclosure Approval.jde link. | Review an employee's protected veteran status information and then approve or reject the approval request. |
29.15.3 Approving Protected Veteran Status Information
Access the Veteran Status Disclosure Approval form.
To approve protected veteran status information:
-
In the Action area, select one of these options:
-
Approve
-
Reject
-
-
In the Comments area, enter text to add a brief note. Additionally, you can click the media object button to attach a media object.
-
Click OK.
29.16 Creating Organizational Charts for the Web
This section provides an overview of organizational charts and discusses how to:
-
Set processing options for Generate Graphic Organization Chart (P08713).
-
Create organizational charts for the web.
29.16.1 Understanding Organizational Charts for the Web
You can use the Generate Graphic Organization Chart program (P08713W) to create graphical organization charts that illustrate and document your organizational structure.
When you use the Generate Graphic Organization Chart program (P08713W) in a web-enabled environment, you can select an employee, and then click a single option to generate a chart that displays up to three levels of your organization.
In the web-enabled version, you can also select options from the Form menu to display employee profile information and to specify custom setup options for your charts. On the Organization Chart Display Options form, you can select employee information that you want to display, colors for the nodes that represent each of the organization levels, and a range of layout options.
29.16.2 Forms Used to Create Organizational Charts for the Web
| Form Name | FormID | Navigation | Usage |
|---|---|---|---|
| Organization Chart | W08713WB | Manager Self-Service (G05BMSS1), Generate Graphic Organization Chart | On Organization Chart, click Display Chart or Printable View. |
| Organization Chart Display Options | W08713WC | On Organization Chart, select Display Options from the Form menu. | Enter appropriate values and generate an organizational chart. |
29.16.3 Creating Organizational Charts for the Web
Access the Organization Chart form.
To create organizational charts for the web:
-
On Organization Chart, complete the Address Number field, and then click Display Chart.
-
To change the top level of the chart to one level higher in the organization, click the left arrow.
-
To display the chart in a page layout format so that you can print the chart on multiple pages, select the Page Layout option, and then click Display Chart.
-
To print the chart, click the Printable View button.
29.17 Approving Self-Service Timecards
This section provides an overview of self-service timecard review and approval and discusses how to approve timecards.
29.17.1 Understanding Self-Service Timecard Review and Approval
After employees enter self-service timecards into the system, managers must review those timecards. Using the Manager Review and Approval program (P051129), managers can review, change, reject, and approve employee timecards. Along with reviewing and approving timecards, managers can use this program to view a list of employees who are missing timecards for the specified period. You can also set up the review and approval process to be completed by manager delegates.
Managers or their delegates can review the timecards for a group of employees and approve or reject all of the timecards at once, or timecards can be approved, changed, or rejected individually. Managers can also select multiple timecards or employees to approve or reject at one time.
In addition to approving and rejecting timecards, managers also can assign the Paid - Not Approved status to timecards. This status is used for informational purposes, and the timecards that are assigned this status are processed in the same way that approved timecards are processed. Managers might use this status if a timecard is incorrect, but the approval deadline does not allow for the timecard to be changed and re-entered by the employee. Assigning the Paid - Not Approved status allows the system to pay the employee for the timecard. The manager would then need to follow up with the employee to ensure that the timecard information is corrected during a future pay period.
Managers also can enter comments and send email messages to employees in the review process. To add comments, a manager enters text into the Comments field. The system saves comments in the Leave Messaging and Audit table (F07630). You can review the comments by clicking a link in the Leave Comments Review field. A manager can use the Send E-Mail to Employee link on Self Service Manager Review and Approval to send a message to an employee. Managers might use this function to notify employees of the reason that a timecard was changed or rejected, or to remind employees who have not entered timecards for the period to enter their timecards before the deadline.
The system stores timecards that employees enter into the system in a temporary workfile called the Employee Transactions - Batch File table (F06116Z1). After the timecards are reviewed and approved or rejected, the Time Entry Batch Processor program (R05116Z1I) moves all of the timecards with an Approved or Paid Not Approved status into the Employee Transaction Detail File table (F06116). When timecards are in the Employee Transaction Detail File table, they can be processed in a payroll cycle.
|
Note: To use the missing timecards option during the review and approval process, you must set the processing options for the Time Entry Self Service Director program (P051125) to enable that feature. To display a list of employees who have not entered timecards for the pay period, the system must search through the entire employee database to find all of the employees that report to the specified manager; therefore, this process might take a significant amount of processing time.When processing options for the Time Entry MBF Processing Options program are set appropriately, administrators can designate timecards as public or private. When public timecards exist for employees, the system displays them for review. Managers and employees can click a link on the director form that displays the public timecard. Neither managers nor employees can modify a public timecard. Because the system supports multiple timecards for a work date, employees can enter an additional timecard for the same work date. |
29.17.2 Forms Used to Approve Self-Service Timecards
| Form Name | FormID | Navigation | Usage |
|---|---|---|---|
| Time Entry Self Service Director | W051125C | Client portal, Time Entry Self Service Director
On Time Entry Self Service Director, click the Manager Review/Approval link. |
Verify the pay period ending date. |
| Self Service Manager Review and Approval | W051129A | On Self Service Manager Review and Approval, click an appropriate response option. | Review and approve self-service timecards. Then assign an appropriate status. |
29.17.3 Approving Timecards
If you have selected the Project and Gov Contract Accounting Used check box in the Service Billing Constants program (P48091), the system displays the Contract Labor Category field on the Self Service Manager Review and Approval form.
Access the Self Service Manager Review and Approval form.
To review and approve self-service timecards:
-
On Time Entry Self Service Director, verify that the date in the Pay Period Ending Date or Labor Distribution End Date field is correct, and then click the Manager Review/Approval link.
If the employee entered timecards using daily time entry, the system displays Employee Daily Time Entry when you review timecard detail. Similarly, if the employee used summary time entry, the system displays Employee Summary Time Entry. If the employee entered timecards using both applications during the same pay period, the system displays all of the employee's timecards on Employee Summary Time Entry.
-
On Self Service Manager Review and Approval, verify the values in these fields:
-
Manager
If you are a delegate who is reviewing and approving timecards for a manager, enter the address book number of the approving manager, and then click Refresh to display subordinate employees.
-
Pay Period Ending Date or Labor Distribution End Date.
-
-
To specify which timecards to review, click one of these buttons, and then click Find Timecards.
The values that you can enter are the same for each selection:
-
Waiting Approval, Saved, Approved, Rejected, Paid Not Approved, Missing Timecard
Enter a code that indicates the current status of time entry records. Values are:
0: Waiting for approval.
1: Approved.
2: Rejected.
3: Not approved but paid.
5: Saved, but not submitted for approval.
Note:
You can click the Show All button to review all timecards. -
-
To review missing timecards, specify dates in the Begin Date and End Date fields and click Find Employee With Missing Timecards. The system displays all employees with missing timecards for the specified period.
-
To approve all of the timecards for multiple employees, click the Select button next to each employee for whom you want to approve timecards, and then click Approve.
-
To reject all of the timecards for multiple employees, click the Select button next to each employee for whom you want to reject timecards, and then click Reject.
-
To reject all of the timecards for multiple employees, but enable them to be processed in a payroll cycle, click the Select button next to each employee for whom you want to assign the Paid - Not Approved status, and then click Paid Not Approved.
-
To review the timecard detail for an individual employee, click the Select button next to the employee's record in the detail area of the form, and then click Detail.
-
To approve selected timecards for the employee, click the Select button next to each timecard that you want to approve, and then click Approve.
-
To reject selected timecards for the employee, click the Select button next to each timecard that you want to reject, and then click Reject.
-
To assign the Paid - Not Approved status to selected timecards for the employee, click the Select option next to each timecard for which you want to assign this status, and then click Paid Not Approved.
-
When you have finished reviewing all of the employee's timecards, click OK to return to Self Service Manager Review and Approval.
-
To send an email message to an employee, click the Select option next to the employee, and then click the Send E-Mail to Employee link.
-
On Self-Service E-Mail Message, complete the Subject field.
-
Type your message in the text box, and then click Send.
-
On Manager Self-Service Review and Approval, click Previous to return to Time Entry Self Service Director.