4 Processing Payroll Information for Canada
This chapter contains the following topics:
4.1 Setting Up the Payroll Workbench
This section provides an overview of the payroll workbench, and discusses how to set up the payroll workbench for Canada.
4.1.1 Understanding the Payroll Workbench
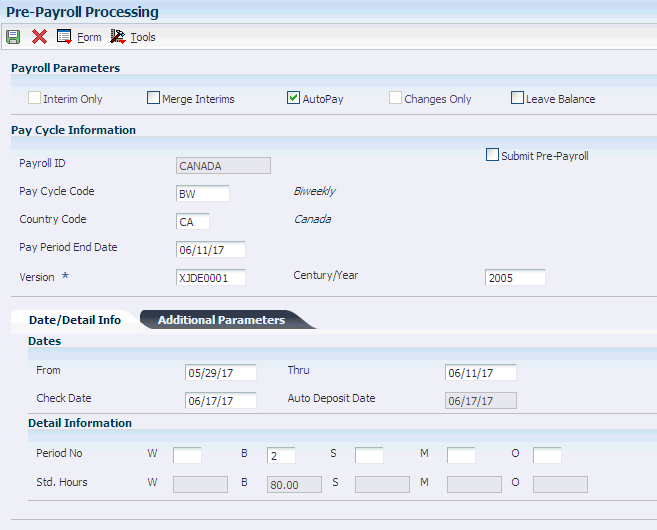
You process both Canadian and U.S. payroll from the Pay Cycle Workbench. To process a Canadian payroll, you must enter the country code for Canada and select Canadian employees for the payroll.
4.1.1.1 Country Code
To process a Canadian payroll, enter CA in the Country Code field on the Pre-Payroll Processing form.
4.1.1.2 Data Selection
You cannot include employees from multiple countries in the same payroll. To select only Canadian employees for a payroll, include the country code for Canada in the data selection for the pre-payroll program version. If all of the employees are Canadian, you do not need to include the country code in the data selection.
4.1.2 Forms Used to Set Up the Payroll Workbench
| Form Name | FormID | Navigation | Usage |
|---|---|---|---|
| Work With Pay Cycle Workbench | W07210A | Payroll Workbench (G07BUSP11), Pay Cycle Workbench | Select a Payroll ID. |
| Pre-Payroll Processing | W07200A | On the Work the With Pay Cycle Workbench form, select a Payroll ID and then click Select. | Set up the Payroll Workbench for Canada |
4.1.3 Setting Up the Payroll Workbench for Canada
4.2 Using Canadian Payment Types
This section provides an overview of Canadian payment types, and discusses how to:
-
Set processing options for the Print Cheques - Canadian program (R77231).
-
Set processing options for the Print Auto Deposit Advices Can program (R77233).
-
Set processing options for the Create Auto Deposit Tape File program (R77235).
4.2.1 Understanding Canadian Payment Types
JD Edwards EnterpriseOne supplies these Canada-specific payment programs:
-
The Print Cheques - Canadian program (R77231).
-
The Print Auto Deposit Advices Can program (R77233).
-
The Create Auto Deposit Tape File program (R77235).
To use these payment programs, enter them on the Print Payment Setup form, which is accessible from the Payroll Cycle Workbench (P07210).
4.2.2 Setting Processing Options for the Print Cheques - Canadian Program (R77231)
Processing options enable you to specify the default processing for programs and reports.
4.2.2.1 Print Options
These processing options determine how certain information appears on checks as well as the translation that is used to convert the number amounts to words.
- 1. Translation Code
-
Specify whether to translate the amounts on the checks from numbers to words. Values are:
X00500: Translate U.S. dollar amounts.
X00500CH: Translate Chinese RMB amounts.
X00500FR: Translate French franc amounts.
X00500S1: Translate Spanish peso amounts (female).
X00500S2: Translate Spanish peso amounts (male).
- 2. Company Name and Address
-
Specify whether the company name and address appear on payroll checks. Values are:
Blank or 1: Do not print company name and address.
2: Print company name only.
3: Print company name and address.
- 3. Company Number
-
Specify the company number of the company whose name and address appears on the payroll checks. This processing option applies only if you indicate in the company name and number processing option that prints this information on the checks. If you leave this processing option blank, each check displays the name and address of the employee's home company.
- 4. Employee Identification Number
-
Specify the type of employee identification number that appears on the checks. Values are:
2: Tax ID number
3: Third employee number
Blank: Address book number
4.2.3 Setting Processing Options for the Print Auto Deposit Advices Can Program (R77233)
Processing options enable you to specify the default processing for programs and reports.
4.2.3.1 Print Options
Use these processing options to specify how certain information appears on auto deposit advice slips.
- 1. Company Name and Address
-
Specify whether the company name and address appear on automatic deposit advice slips. Values are:
Blank or 1: Do not print company name and address.
2: Print company name only.
3: Print company name and address.
- 2. Company Number
-
Specify the company number of the company whose name and address you want to appear on the automatic deposit advice slips.
This processing option applies only if you indicate in the Company Name and Number processing option that you want to print that information on the automatic deposit advice slips. If you leave this processing option blank, each automatic deposit advice slip displays the name and address of the employee's home company.
- 3. Employee Identification Number
-
Specify the type of employee identification number that appears on the automatic deposit advice slips. Values are:
2: Tax ID number
3: Third employee number
Blank: Address book number
4.2.4 Setting Processing Options for the Create Auto Deposit Tape File (R77235)
Processing options enable you to specify the default processing for programs and reports.
4.2.4.1 Company Options
These processing options identify the company and banking information to the bank data center.
- 1. Payroll ID
-
Specify the payroll ID for this group of automatic deposit transactions. This processing option is for information only.
- 2. Bank Data Centre Number
-
Specify the transit number of the bank data center that is processing these transactions. This processing option can contain as many as five characters.
- 3. Company Bank Number
-
Specify the bank number of the bank from which the amounts are debited. This processing option can contain as many as three characters.
- 4. Company Branch Number
-
Specify the branch transit number of the bank from which the amounts are debited. This processing option can contain as many as five characters.
- 5. Company Customer Number
-
Specify the company's customer number for the bank data center. This processing option must contain 10 characters. If the customer number contains fewer than 10 characters, you must add leading zeros. For example, enter the number 123456 as 0000123456.
- 6. Company Bank Account Number
-
Specify the company's bank account number from which the amounts are debited. This processing option must contain 12 characters. If the bank account number is less than 12 characters, you must add leading zeros. For example, enter the number 123456789 as 000123456789.
4.2.4.2 Versions
The Canadian Create Auto Deposit Tape File program (R77235) creates both an auto deposit tape file and a direct deposit register. This processing option determines the version of R77235 that the system uses to print a direct deposit register. You run one version of R77235 to create the auto deposit tape file. This version runs the version that you specify in this processing option to create the direct deposit register. You might create a different version of R77235 for the direct deposit register to use different data sequencing from the one you used for the auto deposit tape file.
- 7. Direct Deposit Register Version Number
-
Specify the version that the system uses to print the direct deposit register. If you leave this processing option blank, the program uses the XJDE0001 version.
4.3 Reviewing Payroll Cycle Reports
This section provides an overview of payroll cycle reports for Canada and lists a prerequisite.
4.3.1 Understanding Payroll Cycle Reports for Canada
During the payroll cycle, you can print reports that enable you to verify employee tax, earnings, and timecard information. When you set up reports, you can indicate the step in the payroll cycle at which you want the system to print each report. For example, you might print the Federal Tax Distribution Summary report (R073170) during pre-payroll processing. You can also create custom reports and set them up to print during the steps of a payroll cycle.
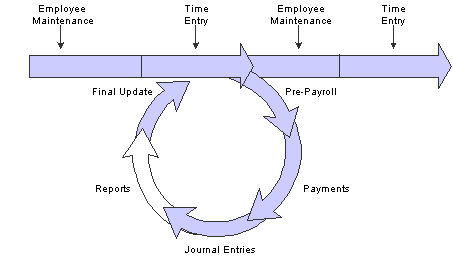
After you set up reports, they automatically print during the step of the payroll cycle that you indicate. After you process each step in the payroll cycle, you typically need to review the reports and make any necessary corrections before you continue to the next step in the cycle. Many reports are most valuable after you have processed pro forma journal entries. For this reason, the payroll cycle includes a reporting step, during which you can print any of the payroll cycle reports that are not set up to print during another step of the cycle.
The graphic illustrates the location of the reporting step in the payroll cycle:
4.3.2 Prerequisite
Set up the payroll-cycle reports that you want to print.

