2 Setting Up the JD Edwards EnterpriseOne Real Estate Management System
This chapter contains the following topics:
2.1 Setting Up Constants
Constants are default settings that the JD Edwards EnterpriseOne Real Estate Management (REM) system uses to process requests, generate billings, and perform other tasks. You must define certain constants before you enter information for tenants, facilities, and leases.
You can set up constants by building and company. If you do not define constants for the building, the system uses the company constants. If you do not define constants for the company, the system uses the information that is set up for company 00000, which is the default company. All companies and building can use the information that you set up for company 00000.
When you set up constants for company 00000, you also establish system constants. The options that define the system constants, such as versions, area types, and area validations, appear on the Real Estate Management Constants Revisions form only when you are setting up company 00000. When you use a company number other than the default company 00000, the system displays an abbreviated version of the Real Estate Management Constants Revisions form.
The system stores system constant information in the Property Management Constants table (F1510B).
|
Important: You must log out and log back into the system for constant changes to take effect. In general, do not change system constants after you set up the system. If you do make changes, you must be thoroughly familiar with the information that is involved because it is central to the system processes. You should also ensure that only authorized personnel can access and maintain the constants. |
|
Note: Because you generate invoices and vouchers from the JD Edwards EnterpriseOne Real Estate Management system, you must also set up the Accounts Receivable (AR) and Accounts Payable (AP) constants. |
|
See Also:
|
Setting Up Straight-Line Rent Constants (Release 9.1 Update)
You can set up default straight-line rent processing information using the Real Estate Management Constants program. You use straight-line rent constants to define the default values for the following fields:
-
Lease Term Date Selection
The system uses this value to determine which dates to use when calculating the lease term for straight-line rent processing.
-
Lease Version Date Selection
The system uses this value to determine whether to use the lease version that is effective on the system date, or the lease version with the latest effective date, when calculating straight-line amounts.
-
Append on Regeneration
The system uses this option to determine whether the system uses the Append method when regenerating straight-line rent information after a lease has changed.
When the option is selected, the system retains the existing records in the Straight-line Rent Lease Control table (F1513B) that were created from the previous run of the Straight-line Rent Generation program (R15130), and the results from the current run are appended to the results of the previous run. The system updates all records to use the new batch number from the second run of the R15130.
When the option is not selected, the system deletes the F1513B records from the previous run of the R15130 when you rerun the R15130. Only the results of the current run are displayed.
When appending results from two runs of the R15130, the lease term of the previous run must not overlap with the lease term of the new run. If the lease terms overlap, then you must deselect this option so that the system deletes the F1513B records from the previous run while generating amounts for the new lease term.
When running the R15130 to append results of a lease term that ends mid-month and a lease term that starts mid-month, the Prorate Partial Month Rents processing option should be set to 1 (Prorate Partial Month Rents). If you set the Prorate Partial Month Rents processing option to 2 (Prorate on 30 Day Month) or 3 (Prorate on 31 Day Month), the results might be incorrect depending on the partial month being processed.
As with other constants, you set up straight-line rent constant information at the building, company, or default (company 00000) level.
After you set up constants, the default values are automatically added to leases that are created. If the processing option settings in the P1501 and P1502 are set to allow straight-line rent setup overrides, you can update the values on the lease or recurring billing records, and then click OK to save your changes.
See Section 4.2.4, "Understanding Straight-line Rent Processing for Leases (Release 9.1 Update)" and Section 7.3.1, "Understanding Recurring Billing Information" for more information.
|
Important Note: When you set up straight-line rent information in the Real Estate Management Constants, the system does not automatically update existing leases. To update existing leases, you must access the Lease Straight-line Rent Setup form, by selecting the Setup Straight-line Form menu option from the Lease Master Revisions form.When you access this form the first time after the straight-line rent constants have been defined, the system automatically creates a record in the Lease Straight-line Rent Setup table (F15131), and populates it with the default values from the constants. |
Setting Constants for Balance Sheet Lessee Accounting (Release 9.1 Update)
Several new fields have been added to the Real Estate Management constants that enable users to set default values for balance sheet lessee accounting. The fields include:
-
Lease Classification
Use this option to specify the default value classification of the lease for accounting purposes. The lease can be a finance lease, operating lease, or not on the balance sheet.
This field only appears on the constants if the company is Company 00000, and the Building field does not have a value. Users can override this value on the lease.
-
Reasonably Certain to Exercise Option
Select this option to indicate that the lessee is reasonably certain to exercise the purchase option. The purchase option can be to purchase the asset, renew the lease, or terminate the lease.
This option only appears on the constants if the company is Company 00000, and the Building field does not have a value. Users can override this value on the lease.
-
Generate Unit Asset
Select this option if you want the system to automatically generate an asset record when you create a unit record. This option can be set for Company 00000 and also on company or company/building constants.
-
Activate Balance Sheet Accounting
Use this option to indicate whether lessee accounting is recognizing leased assets and liabilities on the balance sheet. If you do not select this option, payments for leased assets are expensed using the RM AAI account. If you select this option, the system tracks lease liability on the balance sheet, and payments for leased assets use the lessee accounting AAIs for the specific lease type instead. Once you have activated balance sheet accounting, you should not deactivate it.
-
Populate Subledger
Use this option to indicate whether or not the system creates journal entries for the Lessee Balance Sheet Accounting AAIs by subledger. If you select this option, the system uses the asset number as the subledger and E as the subledger type.
2.1.1 Forms Used to Set Up Constants
| Form Name | FormID | Navigation | Usage |
|---|---|---|---|
| Work with Real Estate Management Constants | W1510D | RE System Setup (G15412), RE System Constants | Locate and review system constant records by company and building. |
| Real Estate Management Constants Revisions | W1510C
The system calls the W1510A form only when updating company 00000. |
On the Work with Real Estate Management Constants form, click Add. | Set up constants.
Set up straight-line rent information (Release 9.1 Update) |
2.1.2 Setting Up Constants
Access the Real Estate Management Constants Revisions form.
- Company or Building
-
Enter a value in either of these fields.
- Revenue Business Unit Flag
-
Enter the code that specifies the method that the system uses to retrieve the business unit, which determines the revenue account. Values are:
0: The system uses the building number as the revenue business unit, regardless of any business unit that is defined in the AAIs.
1: The system uses the business unit that is defined in the PMxxxx AAIs. If no business unit is defined in these AAIs, the system uses the building number. To direct revenues to business units other than the building, you must enter a value of 1.
Note:
The Expense Account AAIs (RMxxxx) are used in the same way during Accounts Payable processing as the Revenue Account AAIs (PMxxxx) are used during Accounts Receivable processing. - Lease Year Beginning Month
-
Enter the value that corresponds to the beginning month of a standard lease year. Although various leases may start on different dates throughout the year, they can share the same annual schedule that the property manager establishes. If you do not know the beginning month, enter 01 for January.
- Report Year Begin Month
-
Enter the month that defines the beginning of the year for tenant sales analysis purposes. This value is used in sales analysis processing to determine which months are to be included in quarter-to-date (QTD) and year-to-date (YTD) numbers. If you do not know the beginning month, enter 01 for January.
- Tax Suppress
-
If you select this check box, the system bypasses tax processing and does not display tax processing fields. If you do not select this check box, the system processes taxes. Individual forms and reports may have processing options that override the value that is entered here.
Note:
You can only enter a value in this field when you are setting up constants for company 00000. - Activate Versioning
-
If you select this check box, the edits and options for lease versioning are active. If you do not select this check box, versioning is not active.
Note:
You can only use this field when you are setting up constants for company 00000. - Hard Versioning Error
-
If you select this check box, the system only allows you to make changes to the latest version of the lease. The system displays a message that indicates that the version is locked when you access any other versions of the lease. If you do not select this check box, the system allows you to make changes to all versions of a lease.
You can only select this check box if you select the Activate Versioning check box.
Note:
You can only use this field when you are setting up constants for company 00000. - Rentable Area Type
-
Enter a user-defined code (UDC) from UDC table 15/AR that defines the rentable area.
Note:
You can only use this field when you are setting up constants for company 00000. - Validate Rentable Area
-
If you select this check box, the system validates the rentable area when you are entering building, floor, and unit information. If you do not select this check box, the system does not validate the information.
When the system validates the rentable area, the total square footage of the floors cannot exceed the total square footage of the building.
Note:
You can only use this field when you are setting up constants for company 00000. - Usable Area Type
-
Enter a user-defined code from UDC table 15/AR that defines the usable area.
Note:
You can only use this field when you are setting up constants for company 00000. - Validate Usable Area
-
The system validates the usable area when you enter building, floor, and unit information. This field is only valid for company 00000.
Note:
The total square footage of the floors cannot exceed the total square footage of the building. - Alt. Area Type 1 (alternate area type 1), Alt. Area Type 2 (alternate area type 2), and Alt. Area Type 3 (alternate area type 2)
-
Enter a user-defined code from UDC table 15/AR that specifies an area type other than the rentable or usable area types.
Note:
You can only use this field when you are setting up constants for company 00000. - Validate Alt. Area 1 (validate alternate area 1), Validate Alt. Area 2 (alternate area type 2), and Validate Alt. Area 3 (validate alternate area 3)
-
If you select this check box, the system validate alternate area 1, alternate area 2, and alternate area 3 when you enter building, floor, and unit information.
Note:
For validation purposes, the total square footage of the floors cannot exceed the total square footage of the building.You can only enter a value in this field when you are setting up constants for company 00000.
- Lease Term Dates Selection (Release 9.1 Update)
-
A value that specifies the dates that the system uses to determine the straight-line rent term when generating straight-line amounts. Values are:
Blank: Use the begin date and end date on the lease.
1: Use the move-in date and plan-out date for the unit on the lease.
2: Use the commitment begin date and plan-out date for the unit on the lease.
9: Use user-defined lease term dates.
Note that option 9 is available only when using the Lease Straight-line Rent Setup (P15131) program.
- Lease Version Date Selection (Release 9.1 Update)
-
A value that specifies the dates that the system uses to determine the lease version when generating straight-line rent amounts. Values are:
Blank: System Date
1: Latest Version Effective Date
9: User Defined Lease Version Date
Note that option 9 is available only when using the Lease Straight-line Setup (P15131) program.
- Append on Regeneration (Release 9.1 Update)
-
Use this option to determine whether the system uses the Append method when regenerating straight-line rent information after a lease has changed.
When the option is selected, the system retains the existing records in the Straight-line Rent Lease Control table (F1513B) that were created from the previous run of the Straight-line Rent Generation program (R15130), and the results from the current run are appended to the results of the previous run. The system updates all records to use the new batch number from the second run of the R15130.
When the option is not selected, the system deletes the F1513B records from the previous run of the R15130 when you rerun the R15130. Only the results of the current run are displayed.
When appending results from two runs of the R15130, the lease term of the previous run must not overlap with the lease term of the new run. If the lease terms overlap, then you must deselect this option so that the system deletes the F1513B records from the previous run while generating amounts for the new lease term.
When running the R15130 to append results of a lease term that ends mid-month and a lease term that starts mid-month, the Prorate Partial Month Rents processing option should be set to 1 (Prorate Partial Month Rents). If you set the Prorate Partial Month Rents processing option to 2 (Prorate on a 30 Day Month) or 3 (prorate on a 31 Day Month), the results might be incorrect depending on the partial month being processed.
- Lease Classification (Release 9.1 Update)
-
Use this option to specify the default classification of the lease for accounting purposes. The lease can be a finance lease, operating lease, or not on the balance sheet.
This field only appears on the constants if the company is Company 00000, and the Building field does not include a value. Users can override this value on the lease. Values are:
Blank: Not on the balance sheet
1: Operating lease
2: Finance lease
- Reasonably Certain to Exercise Option (Release 9.1 Update)
-
Select this option to indicate that the lessee is reasonably certain to exercise the purchase option. This option is informational only and indicates whether the lessee has the intent to purchase the asset, renew the lease, or terminate the lease.
This option only appears on the constants if the company is Company 00000, and the Building field does not include a value. Users can override this value on the lease. Values are:
0 (Not Selected): Not expected to exercise option.
1 (Selected): Reasonably certain to exercise option.
- Generate Unit Asset (Release 9.1 Update)
-
Select this option to specify that the system automatically creates an asset when adding a unit. Values are:
0 (Not Selected): Do not automatically create an asset.
1 (Selected): Automatically create an asset.
- Activate Balance Sheet Accounting (Release 9.1 Update)
-
Use this option to indicate whether lessee accounting is recognizing leased assets and liabilities on the balance sheet. If you do not select this option, payments for leased assets are expensed using the RM AAI account. If you select this option, the system tracks lease liability on the balance sheet, and payments for leased assets use the lessee accounting AAIs for the specific lease type instead. Once you have activated balance sheet accounting, you should not deactivate it.
- Populate Subledger (Release 9.1 Update)
-
Use this option to indicate whether or not the system creates journal entries for the Lessee Balance Sheet Accounting AAIs by subledger. If you select this option, the system uses the asset number as the subledger and E as the subledger type.
2.2 Setting Up User-Defined Codes
UDC values are required in many fields in the JD Edwards EnterpriseOne Real Estate Management system. In these fields, the system only accept codes that are defined in a UDC table. Some UDCs are hard-coded, and others you can define to meet the needs of the organization. Some UDCs contain a special handling code, which directs the system to perform a specific function. Set up UDC values to define codes that are appropriate for the business needs, such as business unit types, tenant lease types, lease status codes, and log classes.
This table describes the UDCs that are used by the JD Edwards EnterpriseOne Real Estate Management system:
| UDC | Description |
|---|---|
| Business Unit Type (00/MC) | Defines the types of business units with which you work, such as office building or warehouse. In general, you use this code to differentiate the properties and buildings that you manage. In addition, you can use this code to separate the Real Estate Management business unit types from other types of business units. |
| Unit Type (15/UT) | Defines the types of units that consist of rentable areas for which leases exist, such as office, condo, apartment, or retail store. |
| Unit Usage (15/UU) | Defines how a unit is used, such as storage or parking. |
| Unit Status (15/US) | Defines the status of a unit, such as occupied or vacant. |
| Lease Type (15/LT) | Defines the types of leases for billing and reporting purposes, such as operating agreement or sublease.
Special handling codes are: O: Enter this value in the first position of the Description 2 field to indicate that the lease type is open-ended. S: Enter this value in the first position of the Description 2 field to indicate that the lease type is a sublease. NA: Enter this value in the first two positions of the Description 2 field to indicate that the lease as speculative. |
| Lease Status (15/LS) | Defines the status of a lease for billing and reporting purposes, such as expired, holdover, or terminated.
Special handling codes are: O: Enter this value in the first position of the Description 2 field to indicate that the lease type is open-ended. X: Enter this value in the first position of the Description 2 field to indicate that the lease status is inactive. |
| Log Class (15/LG) | Defines the types of information that a log line can contain. This can further describe a lease or facility.
For leases, the log class can define terms and conditions such as insurance. For facilities, the log class can define building permits, features and amenities, and fire protection systems. You can enter any combination of these special handling codes to specify the log class when multiple values are applicable: B: Enter this value in the first position of the Description 2 field to indicate that the log class is a building. F: Enter this value in the first position of the Description 2 field to indicate that the log class is a floor. L: Enter this value in the first position of the Description 2 field to indicate that the log class is a lease. O: Enter this value in the first position of the Description 2 field to indicate that the log class is an option. U: Enter this value in the first position of the Description 2 field to indicate that the log class is a unit. Blank: Leave the Description 2 field blank to indicate that the log class applies to all. |
| Log Amenity ID (15/AM) | Defines the facility amenities that are identified in a log line, such as the number of rentable units and elevator banks, and seating capacity. |
| Tenant Sales Product Code (15/PC) | Defines another level of detail for goods that are sold by tenants, such as jewelry or office furnishings for a retail store. |
| Tenant Sales Report Type (15/RT) | Defines the types of sales reports that are provided by tenants, such as estimated, actual, or verbal. |
| Tenant Sales Adjustment Type (15/AT) | Defines the adjustment reasons or causes for changes in originally reported sales, such as a correction or a miscellaneous adjustment. |
| Revenue Fee Type (15/FE) | Defines the types of fees that the system uses to calculate revenue, such as lease commissions or management fees.
Special handling codes are: LS: Enter this value in the first two positions of the Description 2 field to indicate that the revenue fee type is lease-based. CCAR: Enter this value in the first four positions of the Description 2 field to indicate that the revenue fee type is based on a business unit from the Accounts Receivable system. CCGL: Enter this value in the first four positions of the Description 2 field to indicate that the revenue fee type is based on a business unit from the General Accounting system. |
| Fee & Interest Type (15/FY) | Defines the types of fees and interest that the system uses to generate charges against invoices, such as delinquency fees and security deposit interest. |
| Area Type (15/AR) | Defines the types of area that the system uses to calculate rent, such as rentable area or usable area. |
| Space Detail Hierarchy (15/HI) | Defines the hierarchy level for space detail options, such as first, second, or final. |
| Option Status (15/OS) | Defines the status of an option type, such as approved, declined, or expired. |
| Option Amount Type (15/TA) | Defines the amount type for the option, such as, dollars, percentage, or number of spaces. |
| Offer Status (15/OF) | Defines the status of the option offer, such as accepted or declined. |
| Standard Option Level (15/SL) | Defines whether the option is a lease or tenant level standard. The values of T (tenant level) and L (lease level), which are the only values for the UDC, are hard-coded and should not be changed. |
| Recurring Option (15/RO) | Defines whether the option standard is a recurring option throughout the term of the lease. |
| Clause Key Level (15/CK) | Defines whether the clause is lease-level or tenant-level. The values of T (tenant level) and L (lease level), which are the only values for the UDC, are hard-coded and should not be changed. |
| Escrow Deposit Type (15/ED) | Defines the types of escrow deposits, such as utility, security, or key deposit. |
| Straight-line Rent Lease Term Dates (15/FD) (Release 9.1 Update) | Defines which dates the system uses to define the lease term dates. |
| Lease Version Selection (15/LV) (Release 9.1 Update) | Defines which date is used to determine the lease version that is currently active. |
| Lease Header Category Code 01-05 (15/D1 - 15/D5) (Release 9.1 Update) | Defines additional information about the lease header that is not stored in other fields. Category code fields can be configured to meet your business needs. |
| Lease Detail Category Code 11-15 (15/B1 - 15/B5) (Release 9.1 Update) | Defines additional information about the lease detail that is not stored in other fields. Category code fields can be configured to meet your business needs. |
| Lease Classification (15/LL) (Release 9.1 Update) | Defines the type of lease for balance sheet accounting. |
| Effect on Lease Liability (15/LA) (Release 9.1 Update) | Defines how the specified asset impacts the lease liability calculation for balance sheet accounting. |
| Effect on ROU Asset (15/LB) (Release 9.1 Update) | Defines how the specified asset impacts the right of use asset calculation for balance sheet accounting. |
| Amortization Schedule Type (15/AS) (Release 9.1 Update) | Defines whether the type of amortization schedule is a lease liability or ROU asset schedule. |
| Payment Method (15/PA) (Release 9.1 Update) | Defines whether the payment is in advance or in arrears. |
| Lease Liability Status (15/LD) (Release 9.1 Update) | Defines the status of the lease line for balance sheet accounting processes. |
2.3 Setting Up Automatic Accounting Instructions
You can create automatic accounting instructions (AAIs) for each unique combination of company and either billing code, adjustment reason code, or general ledger (GL) offset code. AAIs define which accounts the system uses to post entries to the General Ledger. Billing and GL offset codes are one to four characters and adjustment reason codes are only two characters.
You can also set up AAIs for default company 00000, if a specific AAI is not defined. Each AAI is associated with a GL account that consists of a business unit, object, and optionally, a subsidiary.
This table lists the AAI items in the JD Edwards EnterpriseOne Real Estate Management system, the code type that is used with each AAI item, and a description of the associated account:
| AAI | Code Type | Description of AAI |
|---|---|---|
| PM | Billing code | The revenue account for an invoice, which the system credits. You must set up this AAI for each bill code that you use. For example, PMRO identifies the revenue account for regular office rent, as specified by the billing code (RO). |
| PM | Tax code | The tax account for an invoice that is generated with taxes using tax explanation code AR. You must enter a GL offset in the tax rate area, and then set up the AAI using the GL offset that is specified. For example, if the tax rate area CO is set up with the GL offset TXTX, the system generates a journal entry for the tax amount and uses the account that is set up for AAI PMTXTX. |
| RC | GL offset | The receivables trade account, which the system debits. For example, RCRO identifies the receivables trade account for regular office rent, as specified by the GL offset code (RO). |
| RC | Tax offset | The offset for the tax amount if the tax explanation code is AR. You must set up the AAI using the GL offset that is entered for the tax explanation code. |
| RM | Billing code | The expense account for a voucher, which the system debits. You must set up this AAI for each bill code that you use. For example, RMRENT identifies the expense account for the rent payment that is related to a payable lease, as specified by the billing code (RENT). |
| RM | Tax code | The tax account for a voucher that is generated with taxes using tax explanation code AR. You must enter a GL offset for the tax rate area, and then set up the AAI using the GL offset that is specified. For example, if the tax rate area CO is set up with the GL offset TXTX, the system generates a journal entry for the tax amount and uses the account that is set up for AAI RMTXTX. |
| PC | GL offset | The payables trade account, which the system credits. For example, PCRENT identifies to the payables trade account for the rent payment that is related to a payable lease, as specified by the GL offset code (RENT). |
| PC | Tax offset | The offset for the tax amount if the tax explanation code is AR. You must set up the AAI using the GL offset that is entered for the tax explanation code. |
| RA | Adjustment code | The adjustment account for a receipt transaction, which the system either debits or credits, depending on how it is used.
For example, the system uses the RASI to identify the account to credit for interest that is earned on a security deposit; and RABD to identify the write-off account to debit for bad debt. |
Balance Sheet Lessee Accounting AAIs (Release 9.1 Update)
You use balance sheet lessee accounting to define the account numbers used for lessee accounting journal entries. Balance sheet lessee accounting AAIs follow the structure L*xxxx, where xxxx is a searchable heirarchy that can include:
-
Major equipment class
-
Major accounting class
-
Lease classification (F for finance, or O for operating)
-
Generic
The major equipment class and major accounting class fields are defined in the Asset Master for the leased asset. The lease classification is defined in the Lease Master for the leased asset. The system searches the AAIs for the asset in the order listed above, stopping when it finds a match.
For example, you might set up your LR AAIs as follows:

If you have an asset with no major equipment class, a major accounting class of 30, and a lease classification of finance, the system would perform a hierarchical search, starting with major equipment class, and stopping when it finds a match. In this example, the system would use AAI LR30, where 30 is the major accounting class. The lease classification is not considered, as a higher-level match was found.
Using the same AAIs, if an asset did not have either a major equipment class or major accounting class defined, and had a lease classification of operating, the system would have continued searching until it reached AAI LRO.
(Release 9.1 Update) This table lists the AAIs that support balance sheet lessee accounting:
| AAI | Name and Account Type | Description |
|---|---|---|
| LC | Accumulated Amortization
Non-current asset |
The contra asset account that allows a company's balance sheet to easily report both the amount of an asset's cost that has been amortized as of the date of the balance sheet, and the asset's cost. This AAI is used for balance sheet accounting. |
| LL | Lease Liability
Long term liability |
The account for lease liability reported on the balance sheet. This AAI is used for balance sheet lessee accounting. |
| LR | ROU Asset
Non-current asset |
The account for right of use asset reported on the balance sheet. This AAI is used for balance sheet lessee accounting. |
| LV | ROUA Remeasurement Profit/Loss | (Release 9.1 Update) The account for remeasurement profit/loss adjustments. This AAI is used for balance sheet lessee accounting. |
| LG | Lease Liability Gain/Loss | (Release 9.1 Update) The account for liability gain/loss adjustments. This AAI is used for balance sheet lessee accounting. |
| LU | ROUA Revaluation Offset | (Release 9.1 Update) The account for right of use asset revaluation. This AAI is used for balance sheet lessee accounting. |
| L0 | Prepaid Rent - Lessee
Current asset |
The account for prepaid rent. This account is debited when paying rent and credited when processing the lease liability. This AAI is used for balance sheet lessee accounting. |
| L1 | Lease Expense
General expense |
The account for lease expense reported on the income statement. This AAI is used for balance sheet lessee accounting. |
| L2 | Interest Expense
Other expense |
The account for interest expense reported on the income statement. This AAI is used for balance sheet lessee accounting. |
| L3 | Amortization Expense
Amortization Expense |
The account for amortization expense reported on the income statement. This AAI is used for balance sheet lessee accounting. |
| L4 | LL Rounding Adjustment | The account for remaining balance adjustments on lease liability schedules from the R15180. This AAI is used for balance sheet lessee accounting. |
| L5 | ROUA Rounding Adjustment | The account for remaining balance adjustments on ROU asset schedules from the R15180. This AAI is used for balance sheet lessee accounting. |
| L6 | Sublease Expense Offset
Amortization expense |
The account for sublease expense reported on the income statement. This AAI is used for balance sheet lessee accounting. |
| L7 | LL Termination Adjustment Offset | This is the GL offset account used when posting to the Lease Liability account (derived from the LL AAI) when terminating a leased asset early. This AAI is used for balance sheet lessee accounting. |
| L8 | ROUA Termination Adjustment Offset | This is the GL offset account used when posting to the Accumulated Amortization account (derived from the LC AAI) when terminating a leased asset early. This AAI is used for balance sheet lessee accounting. |
| L9 | As-Of Balance Adjustment | The account for as-of balance adjustments on ROU asset schedules from the R15170. This AAI is used for balance sheet lessee accounting. |
(Release 9.1 Update) You can automatically populate your AAI table (F0012) with these balance sheet lessee accounting AAIs by running the Insert Lessee Accounting AAIs program (R150012). This program creates a record in the F0012 for each of the balance sheet lessee Accounting AAIs if a record for that AAI does not already exist. The program prints a report listing which AAIs were added to the table.
In the Automatic Accounting table (F0012), the AAIs that are related to the JD Edwards EnterpriseOne Real Estate Management system have sequence numbers from 15.000 through 15.999.
This table describes some AAIs that are defined in the JD Edwards EnterpriseOne Real Estate Management system:
| Field | Description | Sample Items |
|---|---|---|
| 15.010 | Regular rent - office | PMRO, RCRO |
| 15.020 | Regular rent - retail | PMRRTL, RCRRTL |
| 15.040 | Rent expense - payable | PCRENT, RMRENT |
| 15.050 | Expense participation | PMEXPA, RCEXPA |
| 15.060 | Sales overage (AR) | PMSLSO, RCSLSO |
| 15.065 | Sales overage (AP) | PCSALE, RMSALE |
| 15.070 | Escalation | PMESCA, RCESCA |
| 15.080 | Management fees | PMMGMT, RCMGMT |
| 15.090 | Miscellaneous receivables
Straight-line Rent - accruals Straight-line Rent - adjustments Straight-line Rent - catch-up adjustments Straight-line Rent - deferrals |
PMMISC, RCMISC
PMACCR, RCACCR PMAJST, RCAJST PMCACH, RCCACH PMDEFR, PCDEFR |
| 15.100 | Security deposit | PMSECD, RCSECD |
| 15.110 | Non-sufficient funds | PMNSF, RCNSF |
| 15.200 | Lessee accounting | LC, LL, LR, LV, LG, LU, and L0 through L9 |
| 15.700 | Late fees | PMLATE, RCLATE |
| 15.800 | Sales tax - payable | PMCTXTX, RMTXTX |
| 15.900 | Security deposit refunds - offset account
Security deposit clearing account |
PCREFD
RARF |
|
See Also:
|
2.4 Setting Up Bill Codes and Adjustment Reason Codes
Use the Bill Codes / Adjustments Reasons program (P1512) to set up bill codes and adjustment reason codes that the system uses to identify the AAIs that the system uses to post transactions. You must define the adjustment reason codes both as adjustment reason codes in the Billing Code Entry table (F1512) and as adjustment classifications in UDC table 15/AD.
|
Important: The JD Edwards EnterpriseOne Real Estate Management system and the JD Edwards EnterpriseOne Accounts Receivable system each use specific adjustment reason codes. Do not use the JD Edwards EnterpriseOne Accounts Receivable system adjustment reason codes unless they have also been set up in the JD Edwards EnterpriseOne Real Estate Management system. To prevent errors, you should set up identical codes for both systems. |
You can define a bill code or adjustment reason code for a specific property or building. Otherwise, all information is applicable for all properties.
Because of the relationship among AAIs, bill codes, and adjustment reason codes, you must set up AAIs before you set up bill codes and adjustment reason codes. For existing bill codes or adjustment reasons, you can revise information on the Bill Codes/Adjustment Reasons Revisions form; however, you cannot revise the Bill Code or Building fields. To revise either of those values, you must delete the bill code and add a new bill code.
Straight-line Rent Setup for Bill Codes (Release 9.1 Update)
You can use the Bill Codes / Adjustments Reasons program (P1512) to specify the default value for whether bill codes are included in straight-line rent processing. You can create records for the bill code alone, or for both the bill code and building.
When you enter recurring billing information for a lease (P1502), the system attempts to retrieve the default Straight-line Rent Generation flag for the bill codes you enter. The system first attempts to find the default by searching for the bill code and building. If no match is found, the system searches for the bill code alone.
When you run the Generate Straight-line Rent Information program (R15130), the system uses the processing option settings for that program to determine whether to look for the Straight-line Rent Generation flag in the recurring billing records, or to use the bill codes defined in the processing options.
When you add this bill code to a recurring billing record, the processing options on the version of the Lease Information program (P1501) that is specified in the processing options of the Recurring Billing program (P1502) determine whether you can override the Straight-line Rent Generation designation that is defined here.
See Understanding the Straight-line Rent Billing Process for additional information.
Lessee Accounting Setup for Bill Codes (Release 9.1 Update)
You can use the Bill Codes/Adjustments Reasons program (P1512) to specify the default values for these lessee accounting-related fields:
-
Effect on Lease Liability (UDC 15/LA)
This field is used when setting up recurring billing information, and specifies how the system calculates the lease liability information for recurring payments using this bill code.
Values for this field include:
-
Guaranteed Residual Value: Payments using bill codes with this value represent the amount expected to be paid against the contracted guaranteed residual value (GRV) of the asset when the lease is complete. You must enter these payments in recurring billing to ensure that the maximum potential liability associated with the asset is reported. GRV amounts are used in calculating the lease liability amortization schedules.
-
No: Payments using this bill code have no impact on lease liability.
-
Yes: Payments using this bill code have an impact on lease liability.
-
-
Effect on Right of Use Asset (UDC 15/LB)
This field is used when setting up manual billing information, and specifies the types of payments that are typically made before lease commencement.
Values for this field include:
-
No: Payments using this bill code have no impact on the ROU asset calculation.
-
Lease Incentive: Payments made with this bill code represent incentives the lessor provides to the lessee on or before lease commencement. These amounts should be entered as negative amounts.
-
Initial Direct Cost: Payments using this bill code represent payments associated with the costs to secure the lease made prior to lease commencement.
-
Lease Payment: Payments made with this bill code represent lease payments made before lease commencement.
-
These fields are used to calculate amounts on the amortization schedules and when creating journal entries for leased assets. You can create records for the bill code alone, or for both the bill code and building.
Depending on the value in one of these fields, only certain values can be used in the other field. Use these guidelines when setting lessee accounting values:
-
Effect on Lease Liability and Effect on ROU Asset can be set to No.
-
If Effect on Lease Liability is set to Yes or Guaranteed Residual Value, Effect on ROU Asset must be set to No or Lease Payment.
-
If Effect on ROU Asset is set to Lease Incentive or Initial Direct Cost, Effect on Lease Liability must be set to No.
When you enter manual and recurring billing information for a lease, the system attempts to retrieve the default lessee accounting values for the bill codes you enter. The system first attempts to find the default by searching for the bill code and building. If no match is found, the system looks for the bill code alone.
2.4.1 Prerequisite
Before you complete the tasks in this section, you must set up the real estate AAIs.
2.4.2 Forms Used to Set Up Bill Codes and Adjustment Reasons
| Form Name | FormID | Navigation | Usage |
|---|---|---|---|
| Work With Bill Codes/Adj Reasons | W1512A | RE System Setup (G15412), Bill Codes / Adjustment Reasons | Review bill codes and adjustment reasons. |
| Bill Codes / Adjustment Reasons Revisions | W1512B | On the Work With Bill Codes/Adj Reasons form, click Add. | Set up bill codes and adjustment reasons codes. |
2.4.3 Setting Processing Options for Bill Codes / Adjustment Reasons (P1512)
Processing options enable you to specify the default processing for programs and reports.
2.4.3.1 Versions
- 1. Automatic Accounting Instructions (P0012)
-
Specify the version of the P0012 program to use when you access the program from the Form menu. If you leave this processing option blank, the system uses version ZJDE0015.
2.4.4 Setting Up Bill Codes and Adjustment Reason Codes
-
From the RE System Setup menu (G15412), select Bill Codes / Adjustment Reasons.
-
On the Work With Bill Codes/Adj Reasons form, click Add to access the Bill Codes/Adjustment Reasons Revisions form and complete the following required fields:
-
Bill Code
Enter code that determines the trade account that the system uses as the offset when you post invoices or vouchers. The system concatenates the value that you enter to the AAI item RC (for Accounts Receivable) or PC (for Accounts Payable) to locate the trade account. For example, if you enter TRAD, the system searches for the AAI item RCTRAD (for receivables) or PCTRAD (for payables).
-
-
Specify whether the record is a bill code or an adjustment by completing the Bill Code or Adj field.
If you are creating an Adjustment code, you must complete the Adj. Classifications field.
-
Specify the Priority Application.
Enter the two-character numeric code that indicates the order in which the system applies the receipt to the invoice pay item based on the bill code. The system applies the payment to invoice pay items with bill codes that are assigned a lower number (higher priority) first. For example, if one invoice has three bill codes with priorities 1, 2, and 3, the system applies the receipt to the pay item that has a bill code with a priority 1 first.
Note:
The priority application code is applicable only when you load invoices for receipt entry and when you select the Priority Code Application field.These priority codes are hard-coded for special processing:
00: Enter this value for bill codes that you use on credit memos (negative invoices) when you want to use the feature to automatically apply receipts to specific credit memos only. This is based on a processing option for the RE Receipts Entry program (P15103). The system displays only those credit memos with a priority code that equals 00.
99: Enter this value for bill codes that you use on invoices that the system bypasses when you use the feature to automatically apply receipts to invoices. This is based on a processing option for the RE Receipts Entry program (P15103). The system does not automatically apply receipts to invoices, regardless of the setting of the corresponding processing option, if the priority application code assigned to the bill code is 99.
-
If you are creating a bill code that is used to identify security deposits, complete the Security Group field.
-
Use the Subject to Late Fees field to specify whether the bill code is subject to fee and interest calculations.
-
To further classify adjustment codes for reporting purposes, complete the Adj Classification field.
This field is required if you entered a value of A in the Bill COde or Adj field.
-
Complete any of these optional fields, and then click OK:
-
Special Processing Code
Enter a value that specifies whether to use the bill code as the default value for unapplied receipts if the Unapplied Bill Code field is blank. If you set up multiple default bill codes, the system uses the bill code that it locates first in alphabetical order. If you do not set up a default bill code, the system uses the bill code UC.
-
Spread Code
Enter a value that specifies whether to allow the invoices that are generated with the bill code to be paid. For example, you might have to prevent invoices for security deposits from being paid. Values are:
Y: Allow.
N: Do not allow. The system does not display invoices with this bill code on the Receipts Entry form, regardless of whether they were selected for payment using the Load feature and the Select features.
W: Allow invoices that generated with this bill code to be paid, but issue a warning message.
-
Comment Required
Enter a value that specifies whether invoices for the bill code require a value in the Remark field in the Receipts Entry form. The system assigns the description of the bill code by default.
-
-
Straight-line Rent Generation (Release 9.1 Update)
Use this field to specify whether the bill code you are creating should be included in straight-line rent processing.
-
Lessee Accounting Setup (Release 9.1 Update)
Use the Effect on Lease Liability and Effect on Right of Use Asset fields to specify how lessee accounting values are calculated. These fields are used when generating amortization schedules and journal entries for leased assets.
2.5 Setting Up Billing Frequency Information
This section provides an overview of billing frequency information, lists a prerequisite, and discusses how to:
-
Set up periodic billing cycles.
-
Set up weekly billing cycles.
2.5.1 Understanding Billing Frequency Information
Set up billing frequency information, or cycles, for recurring and irregular billings such as rent, expense participation, escalations, and sales overage in the Billing Frequency Information program (P15019). The billing cycle determines how often and when an account is billed. You can set up weekly billing cycles or periodic billing cycles for monthly, quarterly, semiannual, annual, and irregular billing cycles.
Regardless of the type of billing cycle, you must assign it a fiscal date pattern code so that the system can correlate the period with a calendar. For example, if you specify that annual billing should occur in period 12, you must indicate whether period 12 is December or May. The fiscal date pattern code defines the beginning and ending of the fiscal year, as well as the number and length of each period for that year.
|
Note: You can use a regular fiscal pattern for all billings. Each billing process posts transactions to the correct period in the general ledger based on the fiscal pattern that is associated with the company on the lease. Billing frequencies that are attached to sales overage information must always be assigned a calendar fiscal pattern as sales are processed by calendar year. |
Use the following guidelines when setting up a fiscal date pattern code:
-
For periodic billings, assign a fiscal date pattern code that is set up in the F0008 table.
You can add or revise fiscal date pattern codes by accessing the Date Patterns form from the Form menu in the Company Names & Numbers program (P0010).
-
For weekly billings, assign a fiscal date pattern code that is set up in the F0008B table.
Verify whether the 52-period date pattern exists by selecting the corresponding option when you set up the weekly billing frequency. If a date pattern does not exist, set up the 52-period date pattern in the Set 52 Period Dates program (P0008B).
If you enter a fiscal date pattern code that is not set up in the correct table, the system displays an error message when you post billings.
The system stores billing frequency information in the Billing Frequency Master table (F15019).
2.5.2 Prerequisite
Before you complete the tasks in this section, you must set up the fiscal date patterns.
|
See Also:
|
2.5.3 Forms Used to Set Up Billing Frequency Information
| Form Name | FormID | Navigation | Usage |
|---|---|---|---|
| Work with Billing Frequency Codes | W15019A | RE System Setup (G15412), Billing Frequency Information | Select and review billing frequency records. |
| Billing Frequency Code Revisions | W15019B | On Work with Billing Frequency Codes, click Add. | Set up periodic billing cycles.
Note: The Set 52 Period Pattern option appears when you select the Weekly option when adding a new billing frequency code. |
| Work With 52 Periods | W15019D | On Billing Frequency Code Revisions, select 52 Period Patterns from the Form menu. | Verify whether a date pattern code exists for the weekly billing frequency. |
| Set Up 52 Periods | W0008BF | On the Work with 52 Periods form, click Add. | Set up weekly billing cycles. |
2.5.4 Setting Up Periodic Billing Cycles
Access the Billing Frequency Code Revisions form.
- Billing Frequency Code
-
Enter a user-defined value, a number or letter, that identifies how often the system generates billing records.
- Fiscal Date Pattern
-
Enter a user-defined code from UDC table H00/DP that identifies a fiscal date pattern. You must set up special codes (letters A through N) for 4-4-5, 13-period accounting, or any other date pattern that is unique to the environment. The default value is R, that identifies a regular calendar pattern.
- Periodic
-
Select this button to set up periodic billing cycles.
- Per 1 through Per 14 (period 1 through period 14)
-
Select the period options that apply to the frequency code.
Periods 1–12 correspond to a calendar billing period which is typically associated with a month. For example, period 4 corresponds to April. Period 13 and period 14 are primarily used to extend the periodic billing cycle for weekly billings.
2.5.5 Setting Up Weekly Billing Cycles
Access the Set Up 52 Periods form.
On the Billing Frequency Code Revisions form, you must complete the Bill Frequency Code and Fiscal Date Pattern fields and select the Weekly button and Set 52 Period Pattern check box to set up weekly billing cycles.
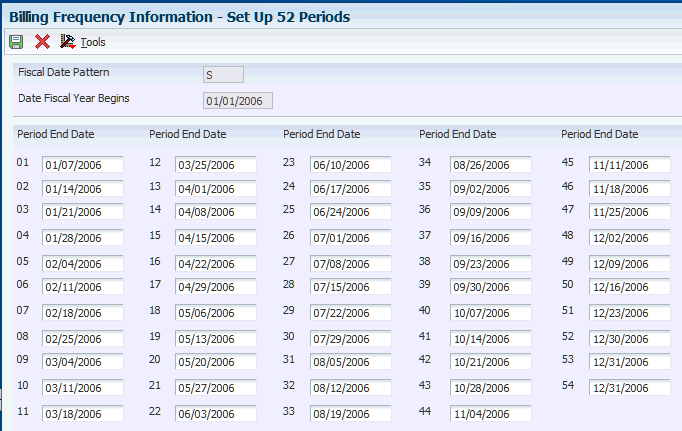
- Date Fiscal Year Begins
-
Enter the first day of the fiscal year.
- Period End Date 01throughPeriod End Date 54
-
Enter the month end date in 12-period (monthly) accounting. The period end date in 13-period, or 4-4-5 period, or 52-period accounting.
Based on the ending date of period one, the system calculates ending dates for each of the 52 periods, in seven-day increments. The system assigns the same ending day for periods 52, 53, and 54.
2.6 Setting Up Tax Rate Area Information
This section provides an overview of tax rate area information, lists prerequisites, discusses how to set up tax rate areas.
2.6.1 Understanding Tax Rate Area Information
Use the Tax Rate/Area Information program (P1508) to set up and work with the areas, rates, and effective dates for current and future taxes. Each tax area can have its taxes assessed by different tax authorities for different purposes and rates. The system uses this information and a tax explanation code to calculate the tax amounts for billings when tax processing is in effect. As tax rates change, you can update the tax rate and area information. The system stores tax rate and area information in the Tax Areas table (F4008).
The system does not check for duplicate tax rate and area information. Consequently, you can set up different tax rates and effective date ranges for the same tax rate and area. The system checks for overlapping effective date ranges. When an overlap exists, the system generates an error.
When you process taxes, note the following:
-
The Tax Suppress field in the Property Management Constants table (F1510B) controls whether tax processing is in effect and whether the tax-related fields are displayed.
Processing options for specific billing programs also control tax processing.
-
When tax processing is in effect, you can assign the necessary tax information for a billing in the Tax Ex Code (tax explanation code), Tax Rate Area, and Serv/Tax Date (service/tax date) fields on the Manual Billing Revisions form.
The service and tax date must occur within the effective date range that is defined for the tax rate and area.
-
The system automatically supplies the tax rate area for a tenant from either the Customer Master by Line of Business table (F03012) or Supplier Master table (F0401).
You can also manually assign a different tax rate area for a particular billing.
In addition to the tax explanation codes that are used in the JD Edwards EnterpriseOne Accounts Payable and JD Edwards EnterpriseOne Accounts Receivable systems, the Real Estate Management system uses the tax explanation code AR. The system calculates taxes for tax explanation code AR in the same manner that it does for S, with these differences:
-
The system creates a separate pay item for each tax rate that is specified.
-
The system uses the GL offset from the tax rate area and either PM/RC AAIs (for invoices) or RM/PC AAIs (for vouchers) to locate the tax account and tax offset account to use.
For example, you want to charge a county tax of 2 percent and a city tax of 3 percent on an invoice with a taxable amount of 1,000. Using the code AR and the appropriate tax rate area, the system automatically creates two pay items for the tax information.
The resulting invoice has these pay items:
-
1,000 for the invoice.
-
20 for the county tax.
-
30 for the city tax.
If you use the tax explanation code S, the resulting invoice has only one pay item for 1,000 with a tax amount of 50.
|
Important: Any tax explanation codes other than AR that you use in the JD Edwards EnterpriseOne Real Estate Management system are subject to the standard financial tax processing and setup. |
See "Understanding Tax Explanation Codes" in the JD Edwards EnterpriseOne Applications Tax Processing Implementation Guide.
2.6.2 Prerequisites
Before you complete the tasks in this section, you must:
-
Set up tax authorities.
-
Set up the appropriate tax AAIs.
|
See Also:
|
2.6.3 Forms Used to Set Up Tax Rate Area Information
| Form Name | FormID | Navigation | Usage |
|---|---|---|---|
| Work With Tax Rate/Areas | W1508A | RE System Setup (G15412), Tax Rate / Area Information | Review and select tax rate area records. |
| Tax Rate/Area Revisions | W1508B | On the Work With Tax Rate/Areas form, click Add. | Set up tax rate areas. |
2.6.4 Setting Up Tax Rate Areas
Access the Tax Rate/Area Revisions form.
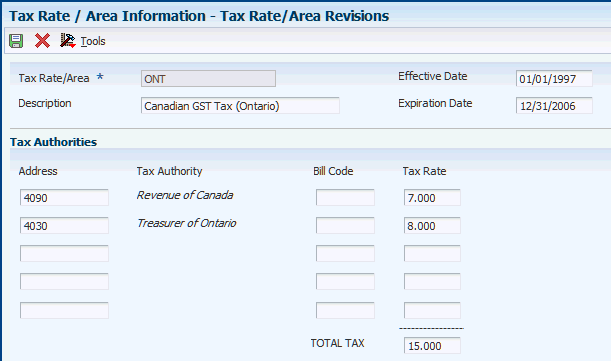
- Tax Rate/Area
-
Enter the code that identifies a tax or geographic area that has common tax rates and tax authorities. The system validates the code that you enter against the Tax Areas table (F4008). The system uses the tax rate area, the tax explanation code, and tax rules to calculate tax and GL distribution amounts when you create an invoice or voucher.
- Effective Date and Expiration Date
-
Enter the dates when a transaction, contract, obligation, preference, or policy rule becomes effective or ceases to be in effect.
- Address
-
Enter the address book number of the tax authority.
- Bill Code
-
Enter a code that indicates how to locate the tax account for general ledger entries. This field corresponds to AAIs that, in turn, correspond to the tax account. Examples are:
PTyyyy for AP (VAT only).
RTyyyy for AR (VAT only).
GTyyyy for GL (VAT only).
4320 for sales orders
4400 and 4410 for purchase orders.
When setting up VAT and Canadian GST, PTyyyy, RTyyyy, and GTyyyy are the only values. For the AP system, a second GL offset (PTxxxx) is required when the tax setup involves VAT plus use taxes (tax explanation code B). Use the AAI PTxxxx to designate the use tax portion of the setup.
For sales taxes, the Accounts Payable and Accounts Receivable systems do not use the values in this field. However, the Sales Order Management and Procurement systems require values in this field.
You must complete this field for tax rate areas that are used with tax explanation code AR.
- Tax Rate
-
Enter the percentage of tax that is assessed or paid to the corresponding tax authority, based on the tax area.
Enter the percentage as a whole number and not as the decimal equivalent. For example, to specify 7 percent, enter 7, not.07.
If the tax rate area is used with tax explanation codes B (VAT plus use) or C (VAT plus sales), you must enter the VAT tax authority and tax rate on the first line of the tax rate area.
2.7 Setting Up Logs and Legal Clauses
This section provides overviews of logs and legal clauses, log standards, and lease option type standards, lists a prerequisite, and discusses how to:
-
Select log standards.
-
Set up log standards.
-
Set up lease option types.
2.7.1 Understanding Logs and Legal Clauses
The system provides two methods for tracking information, and you can use either or both methods, depending on the type of information you are tracking:
-
Logs, which enable you to track information by lease, building, floor, or unit.
Set up templates for logs by using log standards.
-
Legal clauses, which enable you to track information by lease or tenant.
Set up templates for legal clauses by using lease option types.
Although you can use logs to track lease information, the legal clauses provide a more robust means of tracking because you can associate the clause directly with a unit, and you can group all the clauses by tenant instead of by lease only.
This table describes some differences between legal clauses and logs by providing information about features that are specific to each tracking method:
| Feature | Legal Clause | Log |
|---|---|---|
| Clause Amounts | You can track each lease option by an amount. You can define the amount type. Amount types include monetary, number, miles, and percentage. | No field exists for tracking. You must use an attachment. |
| Standard Option versus Required Log | You can specify whether the option is standard for the lease or tenant.
The system copies any standard lease options automatically based on the setting of a processing option. |
You can set up log standards that are required. If one log standard is required, the system copies all standards automatically based on the setting of a processing option. |
| Dates | You can track legal-clause dates that include:
|
You can track log-class dates that include:
|
| Amenity ID | This feature is not used, because you can set up multiple detail types per option type. | You use the amenity ID to create subcategories for a log class. Each log class is one detail line. |
| E.P. Code | Expense participation does not use area information from the legal clauses. | You can set up areas to use for expense participation calculations instead of using the areas that are set up on the lease. |
| Space Details | You can set up square footage or unit information for each detail line for each lease option. For example, if the unit is a parking structure, you can set up space details for each floor of the parking garage that has audit information that is separate from the audit. | You can tack additional space information on separate log lines for the lease. |
2.7.2 Understanding Log Standards
Log information describes a lease or facility. For leases, the log information defines the terms and conditions of the lease, such as critical dates, lease options, and text descriptions. For facilities, log information might define the areas that you use for expense participation, critical dates, the number of units within a building or on a floor, tenant improvements, or inspection of the sprinkler system.
When you use logs, each type of information that you track is a log class. You can set up log classes by building, floor, unit, or lease.
|
Note: (Release 9.1 Update) The system provides additional attributes functionality that allows you to track, search and report on the features of buildings, floors, and units. |
This table lists each log standard and it's corresponding log standard type and log classes:
| Log Standard | Log Standard Type | Log Classes |
|---|---|---|
| Building or Properties | Business Unit Type (00/MC) | For the building, you can track:
|
| Floor | Area Grouping Code (15/GC) | For the floor, you can track:
|
| Unit | Unit Type (15/UT) | For the unit, you can track:
|
| Lease | Lease type (15/LT) | For the lease, you can track:
(Release 9.1 Update) Additional asset-related fields have been added to the Lease Log to enable you to track information by unit (property asset) or asset (non-property asset) on lessee leases. |
If you use the same logs to track similar information on the lease or facility, you can use the Log Standards Information program (P1523) to create log standards. Log standards are templates or models that you use to track the same information for the same types of leases, buildings, floors, and units. Log standards simplify the setup process for individual leases and facilities and help reduce the possibility of errors.
When you set up log standards, you must set up the log standard level to identify whether the log pertains to the building, floor, unit, or lease.
When you set up log lines, you can specify whether they are required. For example, you might make the log line for insurance information required so that a critical date is entered to indicate when insurance information must be received.
You can update log information when necessary by revising. deleting, or adding log lines, deleting lines within logs. When you revise the log standard, you change the current information for that log standard from that point forward. Logs that are already attached to leases or facilities do not change.
Additionally, you can attach a media object (for example, a lease abstract) to a log standard. Every time that you copy the log standard, the system includes the attached media object.
The system provides processing options that enable you to copy log standards automatically when you add a new lease, building, floor, or unit. If you do not set the processing option, you can copy log standards manually. To copy log standards manually, you must access the program that corresponds to the log level:
-
The Property/Building Information program (P15062) for the building.
-
The Floor Information program (P1506) for the floor.
-
The Unit Information program (P15217) for the unit.
-
The Lease Information program (P1501) for the lease.
In each of these programs, you can select Log Details on the Form menu to access the Log Detail form. From the Log Detail form, you can select Copy Logs on the Form menu.
2.7.3 Understanding Lease Option Type Standards
If you use legal clauses to track information, you can use the Lease Option Type Information (P157011) program to create lease options to use as a template. You can set up options for each lease type that you use, or for specific tenants, but not for both. For example, you might offer an option for parking on commercial leases that you do not offer on leases for restaurants. Option types include lease details such as mortgage information, options to renew, lease terms, right of first refusal, and insurance information. You can define these options as standard for a tenant or a lease type.
The system stores lease option type information in the Lease Option Type Header (F157011) and Lease Option Type Detail (F157012) tables.
2.7.4 Prerequisite
Before you complete the tasks in this section, you must verify that the following UDCs are set up:
-
Tenant Lease Type (15/LT)
-
Business Unit Types (00/MC)
-
Grouping Code (15/GC)
-
Unit Type (15/UT)
-
Log Class (15/LG)
-
Amenity Identification (15/AM)
2.7.5 Forms Used to Set Up Log Standards and Lease Options
| Form Name | FormID | Navigation | Usage |
|---|---|---|---|
| Log Standard Level Selection | W1523A | RE System Setup (G15412), Log Standards Information | Select log standards. |
| Log Standards Revisions | W1523B | On the Log Standard Level Selection form, select an option, complete the corresponding field, and then select Revisions from the Form menu. | Set up log standards.
You set up log standards for the code that is entered in one of these fields:
|
| Work With Option Types | W157011A | RE System Setup (G15412), Lease Option Type Information | Review and select lease option types. |
| Option Type Revisions | W157011B | On the Work With Option Types form, click Add. | Set up lease option types. |
2.7.6 Selecting Log Standards
Access the Log Standard Level Selection form.
- Business Unit Log Standards and Type Business Unit
-
If you select the business unit log standard, you must enter a user-defined code from UDC table 00/MC that identifies the classification of the business unit.
- Floor Log Standards and Area Grouping Code
-
If you select the floor log standard, you must enter a user-defined code from UDC table 15/GC that the system uses to reconcile the total area of the group to the total area of the floor.
If you leave this field blank, the system automatically uses FLOR. A processing option in this program controls the kind of floor that the form displays, based on the grouping code.
- Unit Type Log Standards and Unit Type
-
If you select the unit type log standard, you must enter a user-defined code from UDC table 15/UT that identifies the type of unit for billing and reporting purposes. Examples include:
OFFCE: Office space
RSALE: Retail space
RESTR: Restaurant
CONDO: Condominium
- Lease Type Log Standards and Lease Type
-
If you select the lease type log standard, you must enter a user-defined code from UDC table 15/LT that identifies the type of lease for billing and reporting purposes. Examples include
AP: Apartment.
CO: Commercial office.
RT: Retail store.
SB: Sublease.
2.7.7 Setting Up Log Standards
Access the Log Standard Revisions form.
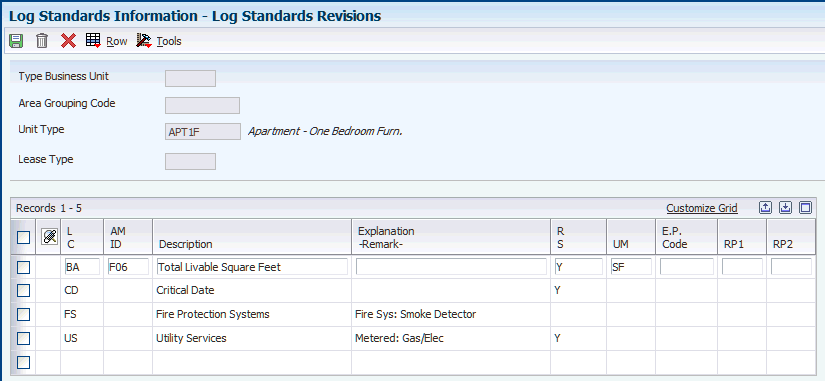
- L C (log class)
-
Enter a user-defined code from UDC table 15/LG that identifies the type of information that the log contains. Examples include:
OP: First renewal option.
IN: Insurance.
PK: Parking spaces.
TI: Tenant improvements.
- AM ID (amenity ID)
-
Enter the four-character user-defined code from UDC table 15/AM that is used to provide additional information about the class to which the log belongs. For example, if the log class represents building features, you can use the amenity ID to further define a feature, such as atrium. Examples include:
F01: Number of rentable units
F02: Seating capacity
INS: Insurance renewal
SEWR: Sewer hookups
- Explanation -Remark
-
Enter a name or remark that describes the purpose for using an account or that conveys any other information about the transaction.
- R S (required standards)
-
Enter a value that specifies whether the log line is a required standard for the lease. Values are:
Blank or N: The log line is not a required standard.
Y: The log line is a required standard and cannot be deleted from the model. If you select this value, the system disables the LC (log class), AM ID (amenity ID), and UM (unit of measure) fields for revisions.
- E.P. Code (expense participation code)
-
Enter a user-defined code from UDC table 15/EP that identifies a log line used for the control square footage of a property or building. The system uses this control square footage to calculate expense participation.
- RP1 (reporting code pm log 01)
-
Enter a user-defined code UDC table 15/L1–L10 that specifies a group for reporting purposes. You can set up the field names in vocabulary overrides.
2.7.8 Setting Up Lease Option Types
Access the Option Type Revisions form.
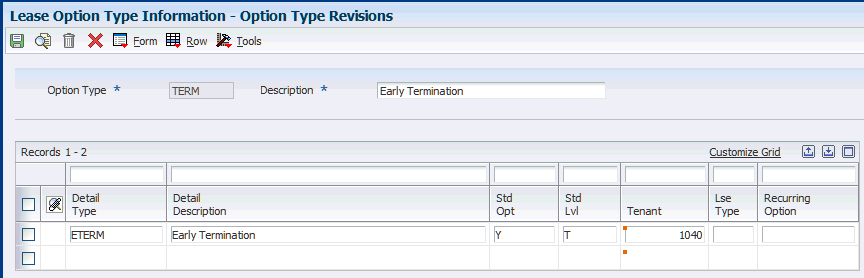
- Option Type
-
Enter a value that specifies the type of option that is offered on a legal clause.
- Description
-
Enter a description of the option type.
- Detail Type
-
Enter a value that identifies individual items within an option type.
- Detail Description
-
Enter a description that specifies details about an option type, such as the number of parking spaces.
- Std Opt (standard option)
-
Enter a value that specifies whether an option is standard. The system automatically copies options that are standard when a new lease is added based on the setting of the processing option. Values are:
Blank: Not standard.
Y: Standard.
- Std Lvl (standard option level)
-
Enter a user-defined code from UDC table 15/SL that indicates whether an option is defined as standard for the lease or the tenant. If the option is a standard for leases, the lease type must also be defined. If the option is a tenant standard, the tenant number must also be defined. Values are:
L: Lease. You must also specify the lease type if you select this option.
T: Tenant. You must also specify the tenant's address book number if you select this option.
- Lse Type (lease type)
-
Enter a user-defined code from UDC table 15/LT that identifies the type of lease for billing and reporting purposes. Examples include:
AP: Apartment.
CO: Commercial office.
RT: Retail store.
SB: Sublease.
- Recurring Option
-
Enter a user-defined code from UDC table 15/RO that is used for informational purposes.
2.8 Setting Up Statement Messages
This section provides an overview of statement messages and discusses how to set processing options for Generic Message/Rates Records (P00191).
2.8.1 Understanding Statement Messages
You can set up the system to print user-defined messages on statements that you send to customers. The Generic Message/Rates Records program (P00191) uses user-defined codes from UDC table 15/MS as identifiers for the associated statement messages. You can set up an unlimited number of statement messages.
The P00191 program limits the number of messages that are printed in these statement locations:
-
The header portion of the statement.
-
The portion to the left of the total following the statement detail.
-
The aging portion of the statement if you specify to print aging information.
You can specify a different message to print according to the aging category. For example, you might include a message on statements with invoices in the fifth aging category that is more strongly worded than the message on statements with invoices in the first aging category. If one statement has invoices in multiple aging categories, the system prints the message that is associated with the oldest aging category.
|
Caution: Although you can specify a different UDC table, the Print Statements program (R155001) accesses codes from UDC 15/MS only. |
The system stores the statement message codes and associated text in the General Message Detail table (F00192).
2.8.2 Forms Used to Set Up Statement Messages
| Form Name | FormID | Navigation | Usage |
|---|---|---|---|
| Work With Generic Message/Rate Types | W00191A | RE System Setup (G15412), Statement Messages | Access statement message codes. |
| Enter Generic Message/Rates | W00191D | On the Work With Generic Message/Rate Types form, click Add. | Add and delete statement message codes, and access statement messages. |
| General Message | W00191E | On the Enter Generic Message/Rates form, select a code and select General Message from the Row menu. | Add and revise message texts. |
2.8.3 Setting Processing Options for Generic Message/Rates Records (P00191)
Processing options enable you to specify the default processing for programs and reports.
2.8.3.1 Defaults
- 1. System Code
-
Specify a user-defined code from UDC table 98/SY that identifies a system. In this case, enter 15 for the Real Estate Management system.
If you select the P00191 processing options from the G15412 menu, the system enters the default value of 15.
- 2. Record Type
-
Specify the code that identifies the table that contains UDCs. In this case, enter MS.
If you select the P00191 processing options from the G15412 menu, the system enters the default value of MS.
2.8.3.2 Display
- 1. Text Type
-
Specify the type of text that the system displays. Values are:
1: Rate text
2: Message text
- 2. Text Column Display
-
Specify the width, in characters, of the text column that the system displays. Values are:
1: 60-column display.
2: 80-column display.