3 Setting Up Order Processing Information
This chapter contains the following topics:
3.1 Understanding Order Processing Information
Before you can process order information, you must define the methods and data that the system uses to process orders. Order information that you should set up before you begin processing data includes:
-
Commission information
Using commission constants, you can specify the rates, basis, and criteria that the system uses to calculate commission amounts on different order types. You can set up commission information to conform to the needs of an organization.
Additionally, you can set up a sales group to distribute commission amounts to a group of salespeople who contribute to a customer's sale. You can define commission information for each member of the group.
-
Branch sales markups
You use branch sales markups to set up the additional costs that are associated with transfer orders and interbranch sales orders. For example, if the company sells from one location but fills and ships orders from another location, such as a central supply warehouse, you can ship the order from the central supply warehouse directly to the customer.
-
Flexible account numbers
Flexible account numbers enable you to configure each segment of the account number according to the needs of the organization. For example, you can use a format that includes information such as salesperson, branch, sales territory, and other address book category codes. Or you can set up the structure of the flexible account number based on how you track the performance of items and customers through sales detail and the general ledger.
-
Order templates
You create and assign order templates to speed up the order entry process. A template contains information about frequently ordered items. You can create standard templates, that the system can use for all customers, or you can create customer-specific templates. You can create order templates based on sales history, or you can update existing templates based on sales trends.
-
Order hold information
You can define the conditions that the system uses to place orders on hold and attach those conditions to a hold code. For example, you can define minimum and maximum order values. If the total order amount is not within this range, the system assigns the hold code to the order to place the order on hold and stop further processing. You can also define sales margin and credit holds. Based on this information, the system places an order on hold if the order or order line does not meet the sales margin or exceeds the customer's credit limit.
-
Self-service information
You set up information to enable the customers and suppliers to review and update information on their own. You can set up customer and supplier profiles to limit access to only those programs customers and suppliers are able to use.
You can also set up product hierarchies, which enable customers to view products by group and hierarchy. By assigning items to product groups and hierarchies, you relieve the customers from having to scroll through a complete list of inventory items.
3.2 Understanding Record Reservations
If the business receives many sales orders every day and you work with various programs to efficiently manage the sales orders, you can limit user access to the programs after the sales orders have been entered to preserve data integrity. Having multiple users who update data at the same time can result in inaccuracies.
JD Edwards EnterpriseOne provides you with record reservation capability which, when activated, enables only one user at a time to update individual records that are contained in the Sales Order Detail File table (F4211). After one user finishes updating a detail line, another user can access the line to continue updating information. Record reservation helps ensure the integrity of the data.
By accessing the user-defined code (UDC) table 00/RR for record reservations, you can activate record reservation for a particular program by entering 1 in the Special Handling field.
You can activate record reservations for these JD Edwards EnterpriseOne Sales Order Management programs:
-
Sales Order Entry (P4210 and P42101).
-
Shipment Confirmation (P4205).
-
Backorder Release (P42117).
-
Backorder Release and Report (R42118).
-
Print Pick Slips (R42520).
-
Inventory Commitment (R42997).
-
Packaged Pick Slip (R42521).
-
Control Pick Slips (R42522).
-
Batch Credit Hold (R42542). Release 9.1 Update
-
Batch Release Credit Holds (R42550). Release 9.1 Update
-
Order and Basket Level Pricing (R42750). Release 9.1 Update
-
Sales Order Batch Price/Cost Update (R42950). Release 9.1 Update
3.3 Setting Up Commission Information
This section provides overviews of commission constants, commission information, and commission assignments, lists prerequisites, and discusses how to:
-
Set up commission constants.
-
Set up sales groups.
3.3.1 Understanding Commission Information
You set up commission information in the JD Edwards EnterpriseOne Sales Order Management system to reflect the company's sales environment.
You can assign one or more salespeople or sales groups to each customer. The salesperson can receive a commission based on whether the customer number is in the Sold To field, the Ship To field, or both fields on the order entry form. After you enter an order and update customer sales, the system applies a calculated commission amount to the salesperson's address book number or the address book number of each salesperson in the sales group. After sales update, you can review commission information in the Sales Commission File table (F42005), and summaries of COGS and sales by item in the Sales Summary History File table (F4229) to ensure that the salespeople receive the correct amount.
When you enter a sales order, the system processes the commission information based on whether you use preferences. If you do not use preferences, then the system retrieves commission information from the Sales Order Detail Commission table (F42160), which uses the information from the Sales Order Header Commission Information (F42150) and Customer Master Commission Information (F42140) tables, respectively. You can also enter commission information into the sales order header.
If you use basic preferences, the system retrieves commission information from the F42160 table, which displays the information from the Preference Profile - Sales Commission table (F40344). If no commission information is in the F40344 table, the system retrieves default commission information from the F42150 table. You can also use advanced preferences to retrieve commission information.
You can set up a sales group to distribute commissions to a group of two or more salespeople who contribute to a customer's sale. For example, if the sales group consists of a sales manager, account representative, and sales assistant, you assign a group code that represents the three salespeople. Sales groups are useful for identifying salespeople who are responsible for a customer's orders and maintaining multiple commission percentages.
3.3.2 Understanding Commission Assignments
To define commission information in the JD Edwards EnterpriseOne Sales Order Management system, you must associate one or more salespersons or sales groups a commission percentage, a customer, and an order type.
You set up commission percentages according to the company's commission payment policies. You can distribute commissions by entering a fixed commission percentage or variable commission percentages.
When you set a fixed commission percentage, the system applies the same percentage for any order type that generates a commission. If you assign one or more sales groups to a customer, you can distribute commissions on a fixed commission percentage. You can set a fixed percentage that distributes the same commission percentage to each salesperson within a group. However, when you assign a fixed commission percentage in the customer billing instructions for a group, the system distributes the commission amount to the group number. You can use this option if you distribute commissions to an entity, such as a branch office. The system does not automatically divide the fixed commission percentage between the salespeople within the group.
You can also set a fixed commission percentage for the group or variable commission percentages for salespeople within the sales group. If commission percentages differ within a group, you can set up different commission percentages for each salesperson. For example, a manager can have a higher rate of commission than a sales assistant.
When you assign a fixed commission percentage on the customer master record, the system calculates the commission amount based on the order total. You cannot assign commission percentages for a salesperson on the customer master record to calculate variable commission percentages or set up additional commission information. To distribute the same commission percentage to the salespeople within a group, you must specify the commission percentage for each salesperson.
When you set variable commission percentages for an individual salesperson, the system includes variables, such as effective dates, order types, fixed costs, and minimum amounts, before calculating commissions. For example, you can have a different commission percentage for sales orders than you have for blanket orders. Or you might deduct fixed costs from an order before you calculate commissions.
3.3.3 Understanding Commission Constants
You use commission constants to define the information that the system uses, in addition to employee-specific commission information, to calculate commission amounts. You can include additional information before calculating the commission amount for a salesperson, a sales group, or salespeople within a group. The system compares the additional commission information such as order type, fixed costs, and effective dates against the order information before calculating the commission percentage. You can designate different commission percentages for order types. For example, you can designate that a salesperson earn five percent commission on a standard sales order, two percent on a direct ship order, and seven percent on a blanket order.
You can also designate commission percentages for a limited period with variables that apply during the effective dates. For example, you can specify that a sales trainee earns a seven percent commission on sales order totals during the training period. During that time, the order must meet a minimum gross margin amount or the system does not calculate commissions. If the order qualifies for a commission, then you must deduct fixed costs before calculating the commission percentage. After the training period, the salesperson earns a five percent commission on the gross margin of all orders after the system deducts the fixed costs. You can enter multiple commission percentages when you anticipate changes in the future.
As an alternative to entering a commission percentage, you can enter a commission amount for an invoice, cost, or gross amount.
You can assign additional information to a sales group or salespeople within a group. To specify additional commission information for the group, you must assign the additional information to the group code. For example, you can specify that the group must meet the assigned minimum gross margin before the system calculates the commission. To calculate additional commission information for salespeople within the group, you can assign additional information to each salesperson's number.
After you have set up a commission constant, you cannot delete it. However, you can change the expiration date.
You must use the Sales Order Constants program (P42460) to set up the Sold To Ship To Default. This determines whether the salesperson receives a commission based on whether the customer number is in the Sold To field, the Ship To field, or both fields on the order entry form.
|
Note: If you set the Sales Order Constants to base the commission on the customer in both the Sold To and Ship To fields and enter the same customer number in the Sold To and Ship To fields, the salesperson receives a double commission. |
3.3.4 Prerequisites
Before you complete the tasks in this section:
-
Verify that you set up a code for the salesperson group in UDC table 42/RS.
-
Verify that the commission rate codes are blank for each customer in the Customer Master by Line of Business table (F03012).
-
Set up UDC 42B/CD to determine whether the system bases commissions on the customer number in the Sold To field, the Ship To field, or both fields when entering the order.
-
Set up the Sold To Ship To Default field in the Sales Order Constants program (P42460).
Enter P42460 in the Fast Path field to access the Sales Order Constants program.
-
Verify that address book numbers exist for all salespeople.
-
Verify that you have set the processing options for the Sales Update program (R42800) to update the commission information.
3.3.5 Forms Used to Set Up Commission Information
| Form Name | Form ID | Navigation | Usage |
|---|---|---|---|
| Work With Commission Constants | W42110E | Commission/Royalty Management (G4223), Commission/Royalty Constants | Review and select commission constant records. |
| Commission Constant Revisions | W42110D | Click Add on Work With Commission Constants. | Set up commission constants.
Add and revise commission constant records. |
| Work with Related Salesperson | W42100F | Commission/Royalty Management (G4223), Commission/Royalty Related Salesperson | Review and select related salesperson records. |
| Related Salesperson Revisions | W42100E | Click Add on Work with Related Salesperson. | Set up sales groups.
Add and revise related salesperson records. |
3.3.6 Setting Up Commission Constants
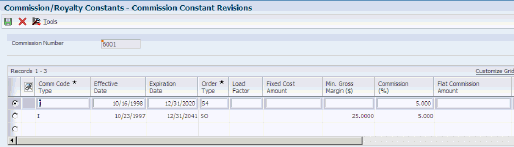
Access the Commission Constant Revisions form.
Figure 3-1 Commission Constant Revisions form
Description of ''Figure 3-1 Commission Constant Revisions form''
- Commission Number
-
Enter the address book number of the person for whom you are setting up the commission constant.
- Comm Code Type (commission code type)
-
Enter a code to designate whether the system calculates commission using the invoice amount or gross margin. No matter which item the system uses, you should consider an amount as the starting point in the commission calculation and apply loading factors, fixed costs, minimum margins, and so on.
- Load Factor
-
Enter the factor that the system uses as a multiplier of product cost.
- Fixed Cost Amount
-
Enter the monetary amount of processing overhead per order.
- Min. Gross Margin ($) (minimum gross margin (USD))
-
Enter the order-based minimum gross margin. If the gross margin is not equal to at least this amount, then the order does not qualify for a commission.
- Commission (%) (commission (percent))
-
Enter the percentage of an order sales amount that is payable to the salesperson.
- Flat Commission Amount
-
Enter a value to specify a commission amount. Enter a flat commission amount instead of a commission percentage. You must enter the per-unit amount to calculate commission amounts against the invoice, gross margin, or cost.
- Per Unit Amount
-
Enter the monetary amount per unit of the item.
- Currency Code
-
Enter a code that identifies the currency for the salesperson's flat commission.
- Category Code
-
Enter one of 30 reporting codes that you can assign to an address in the JD Edwards EnterpriseOne Address Book. Use these codes to group address book records for reports, mailings, and so on. Category codes are user-defined (system 01, types 01 through 30). Examples include:
-
Category code 01
-
Location or Branch
-
Category code 02
-
Salesperson
-
Category code 03
-
Product
-
Category code 04
-
Credit officer
-
- Geographic Region
-
Enter one of 30 reporting codes that you can assign to an address in the JD Edwards EnterpriseOne Address Book. Use these codes to identify addresses for reports, mailings, and so on. Category codes are user-defined (system 01, types 01 through 30). Examples include:
-
Category code 01 - Location or Branch.
-
Category code 02 - Salesperson.
-
Category code 03 - New tenant.
-
Category code 04 - Credit officer.
-
- Freight Handling Code
-
Enter a code from UDC 42/FR designating the method by which supplier shipments are delivered. For example, the supplier could deliver to the company's dock, or you could pick up the shipment at the supplier's dock.
You can also this codes to indicate who has responsibility for freight charges. For example, you can have a code indicating that the customer legally takes possession of goods as soon as they leave the supplier warehouse and that the customer is responsible for transportation charges to the destination.
- Password
-
Enter a series of characters that you must enter before the system updates a table.
In JD Edwards EnterpriseOne Distribution from Oracle, the password secures commissions setup and the release of held orders. Only users with access to the password can release an order. The system does not display the password on the form. You should not enter blanks anywhere in the password.
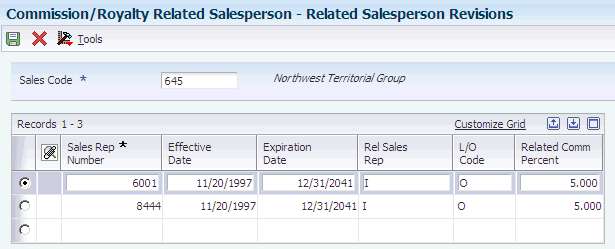
3.3.7 Setting Up Sales Groups
Access the Related Salesperson Revisions form.
Figure 3-2 Related Salesperson Revisions form
Description of ''Figure 3-2 Related Salesperson Revisions form''
- Sales Code
-
Enter a code that you use for the salesperson number when more than two salespersons are responsible for an order.
- Sales Rep Number (sales representative number)
-
Enter an address book number for the sales representative.
To create a commission liability for more than two salespersons, you can relate individuals or entities (for royalties) to a single order line. To do so, set up a sales code that represents not one but many salespersons in the related salesperson file. The system inserts this code in the billing instructions record for any customer or during sales order entry to create multiple commission records at the appropriate point in the order processing cycle (one record for each related salesperson). The system enables multiple percentages to a single salesperson.
- Rel Sales Rep (related sales representative)
-
Enter a code to designate whether the system calculates commissions using invoice amount or gross margin.
- L/O Code (line/order code)
-
Enter O to base commissions on order totals or L to base commissions on line amounts.
- Related Comm Percent (related commission percent)
-
Enter the percent of the sale for which a related salesperson is responsible. A related salesperson is any salesperson in a designated (related) sales group.
For a given group, the percent of the sale does not have to equal 100 percent.
3.4 Setting Up Branch Sales Markups
This section provides an overview of branch sales markups and discusses how to set up branch sales markups.
3.4.1 Understanding Branch Sales Markups
You use branch sales markups to set up the additional costs that are associated with a transfer or interbranch sales order. You enter an interbranch sales order to fill a sales order from a branch/plant that is different from where you placed the order. For example, if the company sells from one location but fills and ships orders from another location, such as a central supply warehouse, you can ship the order from the central supply warehouse directly to the customer.
Companies can apply additional costs to transfer and interbranch sales. The additional costs that you set in the Branch Transfer Markup program (P3403) are the amounts that the branch/plant charges in addition to the base price.
You can use the P3403 program to set the markup amount for any transfer or interbranch sales order. You can also define the relationship between the selling branch/plant and the supplying branch/plant. For example, if you are setting up the branch sales markup table from the perspective of a central supply warehouse, you can define the amount that you charge every location that places an order.
You can also set markup amounts that are specific to either an item or an item group. For example, any time you fill an order that contains an item with an additional markup amount, the system adds the markup amount for that item to the order total. Or any time that you fill an order that contains an item from a specific group, the system adds the markup amount for the group. You cannot set a markup for both an item and a markup for a group that includes the item.
3.4.2 Forms Used to Set Up Branch Sales Markups
| Form Name | Form ID | Navigation | Usage |
|---|---|---|---|
| Work With Branch Transfer Markup | W3403C | Sales Order Management Setup (G4241), Branch Sales Markups | Review and select branch transfer markup records. |
| Branch Transfer Markup Revision | W3403A | Select a branch to revise, and click Select on the Work With Branch Transfer Markup form. | Set up branch sales markups.
Add and revise branch transfer markup records. |
3.4.3 Setting Up Branch Sales Markups
Access the Branch Transfer Markup Revision form.
Figure 3-3 Branch Transfer Markup Revision form
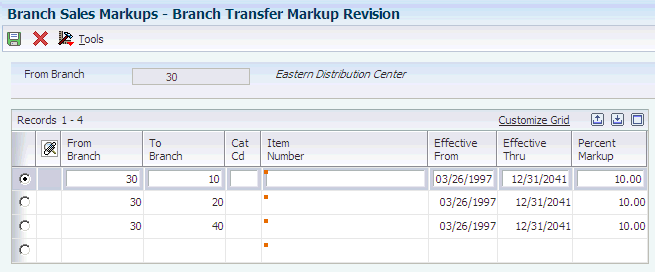
Description of ''Figure 3-3 Branch Transfer Markup Revision form''
- From Branch
-
Enter an alphanumeric code that identifies a separate entity within a business for which you want to track costs. For example, a business unit might be a warehouse location, job, project, work center, branch, or plant.
You can assign a business unit to a document, entity, or person for purposes of responsibility reporting. For example, the system provides reports of open accounts payable and accounts receivable by business unit to track equipment by responsible department.
Business unit security might prevent you from viewing information about business units for which you have no authority.
- To Branch
-
Enter an accounting entity, such as a profit center, department, warehouse location, job, project, or work center, that is required for management reporting.
- Cat Cd (category code)
-
Enter a value from UDC 41/S1 which represents the logically-related items. Using the category code enables you to set the markup price for a group of items instead of setting up each individual item.
- Percent Markup
-
Enter the percentage that the cost is to be marked up when the item is transferred from one branch to another.
3.5 Defining Flexible Account Numbers
This section provides an overview of flexible account numbers, lists prerequisites, and discusses how to define flexible account numbers.
3.5.1 Understanding Flexible Account Numbers
You use flexible sales accounting to create a flexible format for account numbers in the chart of accounts. Flexible account numbers use the standard JD Edwards EnterpriseOne format, which has three segments:
-
Business unit
-
Object
-
Subsidiary
The account number is displayed as Business Unit.Object.Subsidiary.The flexible format lets you configure each segment of the account number.
For example, you can use a format that includes more information, such as salesperson, branch, sales territory, and other address book category codes. Or you can set up the structure of the flexible account number based on how you track the performance of items and customers through sales detail and the general ledger.
The standard account structure is formatted with these segments:
-
Business unit
-
Object account
-
Subsidiary account
-
Subledger
Flexible format accounts have the same segments. The length of all segments cannot exceed 34 characters. Each segment of the flexible format account has a character limit:
-
Business unit: 12 characters.
-
Object account: 6 characters.
-
Subsidiary account: 8 characters.
-
Subledger: 8 characters.
To create a flexible account number, you define one or more of these segments. Each of these fields is hard-coded in UDC table 40/DI. You can view valid fields in the Flexible Sales Accounting program (P40296). You associate one or more pieces of information with each segment. Each piece of information is associated with a field and is stored in a table. The tables are different for each application.
To associate information with a segment, you must know the data item name, or alias, that is associated with the corresponding field in the table.
|
Note: To use a field that is not included in these tables, you must develop custom programming.You cannot define an object segment. You must define the object account through automatic accounting instructions (AAIs). The subledger account is not visible online, but is stored in the Account Ledger table (F0911). You activate flexible sales accounting through the processing options for the Sales Update program (R42800). |
Before you create a flexible account number, consider these points:
-
Use a consistent account structure.
You must use the same account structure for all companies and all business units in the organization. This is necessary for multicompany consolidations and automated intercompany settlements.
If you use flexible accounting in JD Edwards EnterpriseOne Financial Management from Oracle, the business unit and subsidiary account that you define through distribution flexible sales accounting must have the same number of characters as the business unit and subsidiary account that you define through financial flexible accounting.
-
Define one subledger per account.
You can define only one subledger type for each account. You should review the account structure before you set up flexible accounts to determine how you use subledgers.
3.5.1.1 Example: Flexible Account Number
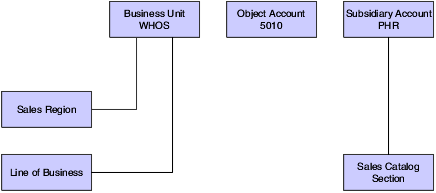
A pharmaceutical company sells its products nationwide to hospitals and pharmacies. It also sells nonprescription products to retail outlets.
The company tracks sales by region of the country, hospital versus retail pharmacies, and pharmacy (prescription) versus over-the-counter (nonprescription) sales. The company can direct the sales, cost of goods sold, and inventory charges to accounts that are made up of different combinations of these three categories to track their sales information.
The company could define the flexible account number as:
-
Business unit, in two segments:
-
Address book category code, such as sales region (for example, W for West).
-
Address book category code, such as line of business (for example, HOS for hospital or RET for retail).
-
-
General ledger object account from the AAI, such as 5010.
-
(Optional) Subsidiary account, in one segment.
Use the item master reporting code, such as sales catalog section (for example, PHR for pharmacy or OTC for over the counter).
This diagram illustrates that the revenue when a hospital buys a prescription drug for its pharmacy goes to the WHOS.5010.PHR account:
3.5.1.2 Base Sales Order Management AAIs
You can define a flexible account number only for these base sales order management AAI tables:
-
4220: Cost of Goods Sold.
-
4230: Sales.
-
4240: Inventory.
-
4250: Sales Tax Payable.
When the system searches for an account for these AAIs, it searches the Sales Flex Accounting table (F4096) in this order:
-
The system checks for a flexible account number that has been defined for a specific AAI and a specific company.
-
If no account has been defined for a specific AAI and a specific company, the system checks for an account that has been defined for a specific AAI and company 00000.
3.5.1.3 Advanced Pricing AAIs
You can define a flexible account number for only these advanced pricing AAI tables:
-
4270: Adjustments
-
4280: Accruals
When the system searches for an account for these AAIs, it searches the F4096 table in this order:
-
The system checks for a flexible account number that has been defined for a specific AAI, a specific company, and an adjustment name.
-
If no account has been defined for a specific AAI, a specific company, and an adjustment name, the system checks for a flexible account number that has been defined for a specific AAI and a specific company.
-
If no account has been defined for a specific AAI and a specific company, the system checks for a flexible account number that has been defined for a specific AAI, company 00000, and an adjustment name.
-
If no account has been defined for a specific AAI, company 00000, and an adjustment name, the system checks for a flexible account number that has been defined for a specific AAI and company 00000.
3.5.1.4 Locating Account Information from the AAI
When you process a transaction that requires the system to record information to the general ledger, it searches for each part of the flexible account number. This table describes the search hierarchies:
If you have set up the appropriate processing options in the R42800 program, the system searches for flexible account information.
3.5.2 Prerequisites
Before you complete the tasks in this section:
-
Determine the information to associate with each segment of the account number.
-
Define AAIs with object account information only.
3.5.3 Forms Used to Define Flexible Account Numbers
| Form Name | Form ID | Navigation | Usage |
|---|---|---|---|
| Work With Flexible Sales Accounts | W40296A | Sales Order Management Setup (G4241), Flexible Sales Accounting | Review and select flexible account number records. |
| Flexible Sales Account Revisions | W40296C | Click Add on the Work With Flexible Sales Accounts form. | Define flexible account numbers.
Add and revise flexible account number records. |
3.5.4 Defining Flexible Account Numbers
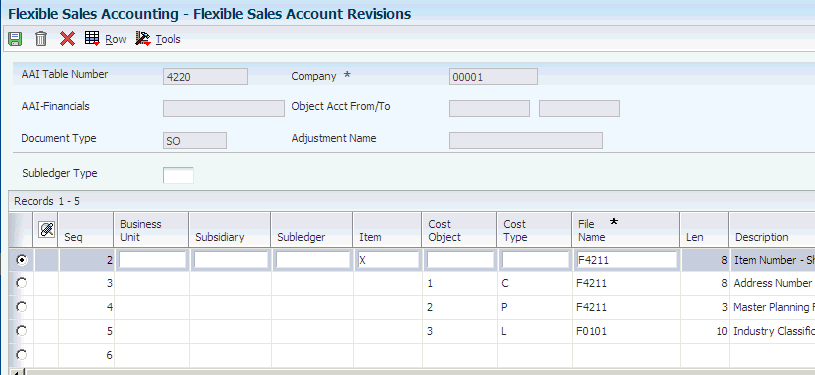
Access the Flexible Sales Account Revisions form.
Figure 3-5 Flexible Sales Account Revisions form
Description of ''Figure 3-5 Flexible Sales Account Revisions form''
- AAI Table Number
-
Enter a number used to specify sequence and retrieve accounting information.
- AAI-Financials
-
Review the hard-coded field that defines an account or range of accounts used for a particular function. For example, item GLG4 defines the retained earnings account that the system uses for annual close purposes. During processing, programs use the item number and company number to find the correct account to debit or credit. Along with company, the item (or range) is the key to the AAI table.
- Object Acct From/To (object account from/to)
-
Enter the beginning and ending object accounts to represent a range of accounts. The system allocates only amounts posted to accounts in this range.
- Adjustment Name
-
Enter a value from UDC 40/TY that identifies an adjustment definition. You define adjustments in the Price Adjustment Definition program (P4071).
For JD Edwards EnterpriseOne Agreement penalty schedules, add a definition for each of the four types of penalties:
-
Minimum quantity
-
Maximum quantity
-
Under commitment
-
Over commitment
-
- Subledger Type
-
Enter a value from UDC 00/ST that the system uses with the Subledger field to identify the subledger type and how the system performs subledger editing.
On the User Defined Codes form, the second line of the description controls how the system performs editing. This is either hard-coded or user defined. Valid values include:
-
A: Alphanumeric field, do not edit.
-
N: Numeric field, right justify and zero fill.
-
C: Alphanumeric field, right justify and blank fill.
-
- Business Unit
-
Enter an X to indicate that this segment of each general ledger account number is stored as part of the Business Unit field in the database. For flex account numbers, you can define up to six segments and use a total of 12 characters for the Business Unit field.
If you define multiple segments for the business unit, the system concatenates them left to right in ascending order according to their assigned sequence numbers. The resulting number is right-justified in the database field.
- Subsidiary
-
Enter an X to indicate that this segment of each general ledger account number is stored as part of the Subsidiary Account field in the database. For flex account numbers, you can define up to four segments and use a total of eight characters for the Subsidiary Account field.
If you define multiple segments for the subsidiary account, the system concatenates them left to right in ascending order according to their assigned sequence numbers. The resulting number is left-justified in the database field.
- Subledger
-
Enter an X to indicate that this segment is stored as part of the Subledger field in the database.
If you define multiple segments for the subledger, the system concatenates them left to right in ascending order according to their assigned sequence numbers. The resulting number is left-justified in the database field.
- Item
-
Enter an X in the item column to associate a flex rule with the item number.
- Cost Object
-
Enter a value that indicates which cost object is populated with a particular segment. Values are 1, 2, 3, and 4.
- Cost Type
-
Enter a code that specifies the type of cost object and the type of editing. The system stores valid types in the Cost Object Types table (F1620). You can add or modify the cost types using the Cost Object Types program (P1620).
- File Name
-
Enter the number of a specific table. For example, the Account Master table name is F0901.
- Data Item
-
Enter a code of a specific data item from the table specified in the File Name field. For example, if you enter F0901 in the File Name field, you can enter any field within the table, such as R001, in the Data Item field.
- Data Type
-
Enter a code that identifies the address that the system uses in flexible sales accounting. Valid values are:
-
1: Bill To
-
2: Ship To
-
3: Parent
The system uses this code with the Data Item field.
If the value in the Data Item field is from the Address Book Master table (F0101), then the Data Type field is required.
-
3.6 Creating Order Templates
This section provides an overview of order templates, lists prerequisites, and discusses how to:
-
Set processing options for the Customer Template Revisions program (P4015).
-
Create a standard template.
-
Set processing options for the Customer History Template Rebuild program (R42815).
-
Create a system-generated template.
3.6.1 Understanding Order Templates
You create and assign order templates to speed up the order entry process. A template contains information about frequently ordered items.
A standard template applies to all customers. For example, you can create an Office template that lists the most frequently ordered office supplies. Or you could identify a standard template that lists all of the most frequently ordered items, regardless of their classification.
You should regularly update existing order templates to ensure that the order entry process remains accurate and efficient. For example, you can change the quantities or sequences on an existing template.
After a customer has an established ordering history, you can automatically create order templates. The Customer History Template Rebuild program (R42815) is a standard JD Edwards EnterpriseOne batch program. After you have entered orders for a customer and run the Sales Update program, the system creates a record of the customer's ordering history in the Sales Order History file (F42119). You can identify the appropriate data selection criteria and run the Customer History Template Rebuild program to:
-
Create a standard template based on sales history.
-
Update a template based on current sales patterns.
3.6.1.1 Standard Templates
You create a template for frequently ordered items to speed the order entry process. You can create a standard template that applies to all customers and assign it to appear every time you enter an order. You can create as many standard templates as you need. If you enter a template name in the processing options for the Sales Order Entry programs (P4210 and P42101), the system displays the template that is specified in the processing options each time you enter an order.
You assign one standard template to a customer through the Customer Master program (P03013). This template appears each time you enter an order for the customer. A customer-specific template contains the customer's address book number and includes only that customer's most frequently ordered items and quantities. You can create multiple templates for a customer, or you can use the same template for multiple customers.
You can access any templates during sales order entry and select one that is appropriate to the customer's needs.
3.6.2 Prerequisites
Before you complete the tasks in this section:
-
Create a code in UDC 40/OT for the template names.
-
Verify that orders exist for the customer in the F42119 table.
3.6.3 Forms Used to Create Order Templates
| Form Name | Form ID | Navigation | Usage |
|---|---|---|---|
| Work With Available Order Templates | W4015A | Sales Order Advanced & Technical Ops (G4231), Customer Template Revisions | Review and select order templates. |
| Order Template Revisions | W4015B | Click Add on the Work With Available Order Templates form. | Create a standard template.
Add and revise order templates. |
| Work With Sales Order History | W40215E | Select Order History from the Form menu on the Order Template Revisions form. | Copy the details from a sales order to use on the template by selecting the sales order.
Note: The Order Format processing option must be set to 1 (Sold To) or 2 (Ship To) or the system displays the Work With Purchase Order History form. |
3.6.4 Setting Processing Options for the Customer Template Revisions Program (P4015)
Use these processing options to display default values and specify versions.
3.6.4.1 Display
These processing options specify the default order template and the customer self-service mode.
- 1. Enter the desired format
-
Specify whether the system displays the address book field for the sold to, ship to, supplier, or user in the header. Values are:
1: Sold To
2: Ship To
3: Supplier
4: User
- 2. Customer Self-Service Mode
-
Specify whether the system uses the standard processing or the customer self-service mode. Values are:
Blank: Standard processing.
1: Customer self-service mode for Java/HTML.
2: Customer self-service mode for Windows.
3.6.4.2 Versions
These processing options control which version the system uses when you call the programs from the P4015 program.
- 1. Customer Service Inquiry (P4210)
-
Specify the version for the Customer Service Inquiry program (P4210).
If you leave this processing option blank, the system uses version ZJDE0001.
- 2. Open Purchase Orders (P4310)
-
Specify the version for the Open Purchase Orders program (P4310).
If you leave this processing option blank, the system uses version ZJDE0001.
3.6.5 Creating a Standard Template
Access the Order Template Revisions form.
Figure 3-6 Order Template Revisions form

Description of ''Figure 3-6 Order Template Revisions form''
- Order Template
-
Enter a value from UDC 40/OT that identifies the list of items that you frequently order. The items are often grouped based on the product type, such as fuels, lubricants, and packaged goods.
- Usual Quantity
-
Enter the quantity that is usually ordered.
- Seq No. (sequence number)
-
Enter the sequence by which individual lines are displayed on the template.
3.6.6 Setting Processing Options for the Customer History Template Rebuild Program (R42815)
Use these processing options to define how the system creates customer templates from history.
3.6.6.1 Process 1
These processing options specify the order template, sequencing, number of lines, and effectivity dates that the system uses when you run the Customer Template Rebuild program.
- 1. Enter Order Template to be created
-
Specify a code from UDC 40/OT that identifies a list of items that you frequently order. The item groups are often based on the product type, such as fuels, lubricants, and packaged goods.
- 2. Enter template sequence selection
-
Enter 1 for version sequence or 2 for most frequently ordered.
- 3. Enter maximum number of lines
-
Specify a maximum number of lines to include.
If you leave this processing option blank, the system includes all lines.
- 4. Enter minimum number of lines
-
Specify the minimum number of lines to include.
If you leave this processing option blank, the system includes all lines.
- 5. Effective From Date
-
(Optional) Specify the date from which the template is active or effective.
If you leave this processing option blank, the system uses the system date.
- 6. Effective Thru Date
-
(Optional) Specify the date through which the template is active, or effective.
If you leave this processing option blank, the system populates the field with the last defined date.
3.6.6.2 Process 2
These processing options specify whether the system uses the Sold To or Ship To address number on the order template.
- 1. Order Template Address Selection
-
Enter 1 for Sold To or 2 for Ship To.
- 2. Average Quantity in Usual Quantity
-
Enter 1 to use the value that is in the average quantity in the Usual Quantity field on the Order Template Revision form.
3.6.7 Creating a System-Generated Template
Select Sales Order Advanced & Technical Ops menu (G4231), Customer Template Rebuild.
You use the Customer History Template Rebuild program (R42815) to automate the process of creating templates. The R42815 program is a batch program that creates a template from a customer's established ordering history.
3.7 Setting Up Order Hold Information
This section provides overviews of order hold information, the assignment of hold codes to orders, and the assignment of hold codes to the customer billing instructions and discusses how to set up order hold codes.
3.7.1 Understanding Order Hold Information
You can put an order on hold to prevent the order from being processed. You might put an order on hold because the order:
-
Does not meet the minimum order amount.
-
Exceeds the customer's credit limit.
-
Does not meet or exceeds the sales margin.
-
Is for an inactive customer.
You define the conditions that the system uses to place orders on hold and attach those conditions to a hold code. For example, you can define minimum and maximum order values. If the total order amount is not within this range, the system assigns the hold code to the sales order which places the order on hold and stops further processing.
You can also define sales margin and credit holds. Based on this information, the system places an order on hold if the order or order line does not meet the sales margin. The system also places an order on hold if the order exceeds the customer's credit limit.
3.7.1.1 Order Hold Codes
You can set up order hold information that the system uses to place orders on hold. The system applies this information if you set the appropriate processing options for the Sales Order Entry programs.
Additionally, you can use hold codes with the Product Allocation preference. This way, you can restrict the amount of an item or item group that a customer or customer group can purchase.
You must set up the Product Allocation preference in the Preference Master program (P40070), and activate the preference through the Preference Processing Options program (R40400). In the Order Hold Constants program (P42090), you set up the hold code in UDC 42/HC and define the hold information. In the processing options for the Sales Order Entry programs, you must enter the product allocation hold code to activate order hold processing at the line level and then activate preference profile processing.
3.7.1.2 Order Hold Codes for Minimum and Maximum Order Amounts
You can set minimum and maximum order amounts that the customer must order before the system advances the order through the processing cycle. For example, you can offer the customer a trade discount if the customer orders a minimum amount.
You define a range between the minimum and maximum order amounts on the Billing Information form of the Customer Master program (P03013) or you can define a minimum or maximum line amount. Then, you set up hold codes for the system to compare the order or line amount against the values that you defined on the customer master record.
To set up order checking for a range of amounts, enter the hold code in the Order Minimum Value Check and Order Maximum Value Check processing options, on the Order Holds tab of the Sales Order Entry program. The system compares this amount to the total sales order amount. If the order amount is not within the range defined, the system displays an error message and does not process the order.
3.7.1.3 Order Hold Codes for Credit Checking
You set up a credit hold code to automatically compare the credit limit that you set up on the customer master record against the order and any outstanding balances in accounts receivable. For example, you can set a customer's credit limit to 1,000 USD. If the customer has an accounts receivable balance of 100 USD, the order must be 900 USD or less or the system places the order on hold.
You can also specify a hold based on the percentage of the outstanding balance in accounts receivables. You must specify aging periods, such as 0 to 30 days or 31 to 60 days, to verify balance information. If you specify 31 to 60 days, the system does not include balance information from the first period in its comparison.
For example, a customer has a total accounts receivable balance of 6,000 USD; 5,000 USD in the 0- to 30-day period and 1,000 USD in the 31- to 60-day period. You set up a hold based on the percentage of the outstanding balance to be 20 percent of the total accounts receivable balance. You specify the 31- to 60-day aging period for the system to compare against the allowable percentage. Based on this information, the maximum allowable outstanding balance for the 31- to 60-day period is 1,200 USD. With an outstanding balance of 1,000 USD in the 31- to 60-day aging period, this customer passes the credit check.
You set up the order code for credit checking by entering the hold code in the Customer Credit Check processing option, located on the Order Holds tab, for the Sales Order Entry program.
3.7.1.4 Order Hold Codes for Inactive Customers
You can set up a hold code for inactive customers. Inactive customers include customers to whom you no longer sell, who have file bankruptcy, or to whom you sell infrequently. You set up an inactive hold code to automatically prevent the order from being processed for inactive customers. You can also set up an inactive hold code to display an error message for orders for infrequent customers.
|
Note: This type of order hold applies to the entire order. The system does not place order detail lines on hold, but rather places the entire order on hold. |
After you set up the hold code in UDC 42/HC for inactive customers, you must set the Search Type field to a user-defined inactive customer type on the Address Book tab in the Address Book Revisions program (P01012). Additionally, you must set the Inactive Customer Hold processing option and enter the search type in the Inactive Customer Search Type processing option on the Order Holds tab in the Sales Orders Entry program.
If you select the option Use Customer Set in the System Constants form and you enter an inactive customer on an order, the system displays a warning but does not place the order on hold.
After you set up the hold codes (42/HC and 00/CM) for infrequent customers, you must enter these values in the Inactive Customer processing options on the Order Holds tab in the Sales Orders Entry program. When you enter an order for an infrequent customer and the system places the order on hold, you can process the order with the appropriate approvals.
3.7.1.5 Order Hold Codes for Margin Checking
You set up a hold code to verify that all sales orders or sales order detail lines meet any margin criteria that you specify.
The system uses this equation to calculate margin:
(Price – Cost) ÷ Price = Margin
For example, if you purchase an item for 42 cents and sell it for 1.00 USD, the calculation is:
(1 - 0.42) ÷ 1 = 0.58 or 58 percent
You can set up a hold code that verifies the sales margin percentage of a detail line or an entire order. If you set up a order hold code that compares the sales margin to detail lines in the sales order, the system verifies that each detail line is between the minimum and maximum margins that you specify. For example, if the sales margin is between 25 percent and 30 percent, but the margin for one item is 35 percent, the system places the order on hold.
When you set up hold code information that verifies the sales margin of the order total, the system verifies that the order total meets the minimum and maximum margins that you specify. For example, if the sales margin is between 25 percent and 27 percent, and the margin for one item is 28 percent, but the margin for the order total is 25 percent, the system does not place the order on hold.
You set up the order code for margin checking by entering the hold code in the Order Margin Check or Order Line Margin Check processing option, located on the Order Holds tab in the Sales Order Entry program.
3.7.1.6 Order Hold Codes for Partial Order Holds
A partial order hold is a hold in which there is not enough quantity to fill an order detail line, but the customer does allow partial orders. A partial order hold is not a backorder, you can release a partial order hold at any time, whereas you can only release a backorder when quantity for an order detail line is available.
You set up a hold code so that if the quantity is not available to complete an order detail line, the system places the entire order on hold until the quantity is available. Use this order hold when backorders and partial shipments are allowed.
If the system does not have the quantity available to fill an order detail line, the system backorders or cancels available quantities based on backorder information in the Customer Master program (P03013). If the customer does not allow backorders, the system cancels the order detail line. With a partial order hold, the system holds the order detail line until quantity is available. If the customer does not allow backorders, but does allow partial orders or line shipments, you can set up a partial order hold so that the system does not cancel the order detail line.
You set up the order code for partial order hold by entering the hold code in the Partial Order Hold processing option, located on the Order Holds tab in the Sales Order Entry program. You must also set the Activate Availability Checking processing option, located on the Commitment tab in the Sales Order Entry program.
3.7.1.7 Order Hold Codes for Prepayments
You set up order hold information that the system uses to place orders on hold when processing prepayments. Hold codes enable you to verify that each step in the prepayment process is completed correctly.
You should define these hold codes for prepayment transactions:
-
Settlement holds, identified by hold code CS.
-
Authorization holds, identified by hold code CA.
The system applies the order hold information if you set the appropriate processing options for the Sales Order Entry program.
3.7.2 Understanding the Assignment of Hold Codes to Orders
You must specify hold codes in the processing options of the Sales Order Entry programs to activate hold codes. The system automatically compares the information in the order, such as accounts receivable information, order and line margin percentages, and partial orders, against every order. To exempt specific customers from credit checking, you must activate the Exempt from Credit Hold option in the Customer Billing Instructions program. If the system places an order on hold, you must release all orders in the Held Order Release program (P43070).
Additionally, you can manually enter a hold code in the order heading information. A value in the Hold Code field prevents the system from processing that specific order.
If the JDESOENTRY workflow process is active, the system processes the order through order hold checking. After you click OK to accept the order, the system checks the processing options for hold codes and compares the order against the order hold information.
If the system puts the order on hold, an action message is sent to the address book number that is defined in the hold code as the person responsible. This message indicates that the order is on hold. The person responsible for releasing the orders can review messages that were sent during the workflow process and access orders-to-release by way of the work center.
3.7.3 Understanding the Assignment of Hold Codes to the Customer Billing Instructions
You can specify a hold code on the Billing Information form of the Customer Master program (P03013). When you enter a hold code for a customer, the system places all orders for that customer on hold. The system does not process the customer's orders until the person responsible for reviewing that customer's orders releases the order into the processing cycle.
You can use the Batch Order Holds program (R42642) to update a customer's existing order with the hold code that was entered in the Billing Information form. For example, if you entered an order before you reconciled administrative issues with a customer, you can withdraw the order from the processing cycle by placing the order on hold.
After you set up the hold code in the Billing Information form, you can run the R42642 program to update a customer's open sales orders. You can run this batch program on an individual customer or all customers with hold code fields that are not blank.
3.7.4 Forms Used to Set Up Order Hold Information
| Form Name | Form ID | Navigation | Usage |
|---|---|---|---|
| Work With Hold Order Constants | W42090A | Sales Order Management Setup (G4241), Order Hold Information | Review and select hold order codes. |
| Order Hold Information | W42090B | Click Add on the Work With Hold Order Constants form. | Set up order hold codes.
Add and revise hold order codes. |
| Customer Billing Instructions - Work With Customer Master | W03013A | Sales Order Management Setup (G4241), Customer Billing Instructions | Select and review customers. |
| Customer Billing Instructions - Customer Master Revision | W03013B | Click Add on the Customer Billing Instructions - Work With Customer Master form.
Enter a value in the Temporary Credit Message field on the Credit tab of the Customer Billing Instructions - Customer Master Revision form, and click OK. |
Add and revise customer information. |
3.7.5 Setting Up Order Hold Codes
Access the Order Hold Information form.
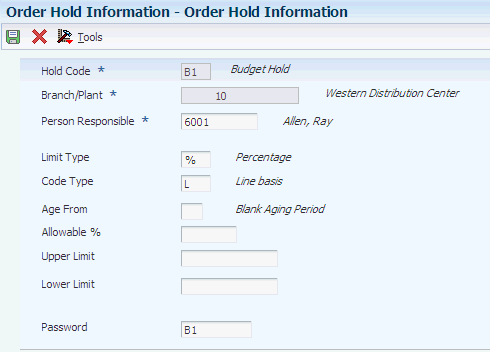
- Hold Code
-
Enter a value from UDC 42/HC that identifies why an order is on hold.
- Person Responsible
-
Specify the address book number of the person who is responsible for reviewing and releasing orders that are placed on hold.
- Limit Type
-
Specify whether the limit type is based on an amount or a percentage. Limit type typically applies only on order or line gross margin limits. Values are:
A: Limit is based on an amount.
%: Limit is based on a percentage for the order.
- Code Type
-
Specify a code to hold an individual line within an order or to hold the entire order. For credit holds, the hold code applies to the whole order. For margin holds, you can apply the hold code to a line or the whole order.
L: Apply a hold to an individual line within an order.
O: Apply a hold to the order as a whole.
- Age From
-
Specify a number that designates the aging period that the system should use when you specify a credit check based on the aging of the customer's accounts receivable. This is based on the accounts receivable payment setup.
- Allowable Percent (allowable percent)
-
Specify a number to indicate what percentage of total receivables to accept in the column specified in the Age From field. You must enter a value in this field when you use aging credit checking.
For example, the customer has a total AR balance of 10,000 and 2,500 of that is in the 31- to 60-day column. The Age From value is 3 (31 to 60 days) and the Acceptable Percent value is 10 (10 percent). Therefore, this customer could have as much as 1,000 (10,000 × 10 percent) in columns 3 through 6 and still pass this credit check.
- Upper Limit
-
Specify a number that indicates the upper limit of acceptable margin percentages or amounts. Use this code to establish a maximum gross margin percentage or amount for an order or an individual order line.
- Lower Limit
-
Specify a number that indicates the lower limit of acceptable margin percentages or amounts. You can establish a minimum gross margin percentage or amount for an order or for an individual order line.
- Password
-
Enter a series of characters that you must enter before the system updates a table.
In the JD Edwards EnterpriseOne Distribution systems, the password secures commissions setup and the release of held orders. Only users with access to the password can release an order. The system does not display the password on the form. You should not enter blanks anywhere in the password.
3.8 Setting Up Self-Service Information for Sales Order Management
This section provides overviews of self-service setup for customers, security issues, processing options for customer self-service, and product hierarchy setup for self-service order entry, lists prerequisites, and discusses how to:
-
Set processing options for the Item Hierarchy program (P4101H).
-
Set up product hierarchies.
3.8.1 Understanding Self-Service Setup for Customers
Before customers can use self-service to access information, you must provide a method for them to:
-
Access item information.
-
Review account information.
-
Review existing orders and shipments.
-
Access product and warranty information.
-
Review information about existing calls.
-
Review service orders.
When you set up user profiles for customers, you can limit their access to only the self-service menus, based on their user IDs. Customers cannot use self-service to add or modify address book or customer master information.
3.8.2 Understanding Security Issues
After you set up address book and master records for customers, you must set up user profiles to limit customers' access to the system. Customers must have profiles before they can sign in to any self-service applications.
In the user profile, enter this information for a customer or supplier:
-
User ID.
-
Password.
-
Preferences, such as language and localization information.
You must also specify the menu the customer can access. Customers can access only the programs that are on the menu that you specify in the user profiles.
When a customer enters information using self-service programs, the system stores product selections and other information in a memory cache file. The customer can move between programs and the cache file retains the current contents of the order or quote.
3.8.3 Understanding Processing Options for Customer Self-Service
To enable customers to use self-service to enter and review orders and account information, you must activate the customer self-service processing options for these programs:
-
Sales Order Entry (P4210).
-
Customer Ledger Inquiry (P03B2002).
-
Item Availability (P41202).
If you use JD Edwards EnterpriseOne Transportation Management, activate the customer self-service processing options for these programs:
-
Shipment Tracking (P4947).
-
Work with Shipments (P4915).
-
Work With Loads (P4960).
The system displays only those fields that are useful to customers and hides fields that are confidential.
3.8.4 Understanding Product Hierarchy Setup for Self-Service Order Entry
When customers access the system using self-service, you can enable them to view products by group and hierarchy. By assigning items to product groups and hierarchies, you relieve the customers from having to scroll through a complete list of the inventory items.
You define a product group by selecting a category code from either the F4101 table or the F4102 table. Items that have the same assigned category codes belong to a group. For example, a bicycle manufacturer can create a group called Bikes that contains subgroups for mountain bikes, road bikes, and so on. The system assigns hierarchies based on the sequence number and the parent directory that you specify. For example, the group Bikes would have a higher sequence number than the group Mountain Bikes. The resulting tree-like structure can have any number of levels.
If you have defined item restrictions for a customer in the Customer Master program, that customer is not able to view the restricted items, although the items remain part of the product groups and hierarchies that you assign.
3.8.5 Prerequisites
Before you complete the tasks in this section:
-
Verify that you have set up customers in the address book.
-
Verify that you have set up customer master records for customers.
-
Assign a branch/plant and default location to each customer.
When customers inquire on products, pricing, and availability, the system retrieves the information based on the branch/plant that you assign to the customer's user ID.
-
If you are using JD Edwards EnterpriseOne Transportation Management, set up routing entries to include self-service routing options.
See JD Edwards EnterpriseOne Applications Transportation Management Implementation Guide.
3.8.6 Forms Used to Set Up Self-Service Information for Sales Order Management
| Form Name | Form ID | Navigation | Usage |
|---|---|---|---|
| Product Hierarchy Maintenance | W4101HD | Sales Order Management Setup (G4241), Item Hierarchy Manager | Review and select product hierarchy groups. |
| Product Hierarchy Revisions | W4101HE | Click Add on the Product Hierarchy Maintenance form. | Set up product hierarchies.
Add and revise product hierarchies. |
| Directory Search | W4101HF | Select Parent Directory from the Form menu on the Product Hierarchy Revisions form. | Locate and select a parent hierarchy. |
3.8.7 Setting Processing Options for the Item Hierarchy Program (P4101H)
Use these processing options to set default values and define how the system processes data.
3.8.7.1 Defaults
These processing options specify the default value that the system uses for the structure type and the version of the Sales Order Entry program that the system uses from P4101H.
- Structure Type
-
Enter a code from UDC 01/TS that identifies a type of organizational structure that has its own hierarchy in the JD Edwards EnterpriseOne Address Book system (for example, email).
When you create a parent/child relationship for JD Edwards EnterpriseOne Accounts Receivable, this field must be blank.
- SO Entry Version (P4210) (sales order entry version (P4210))
-
Enter a version of the Sales Order Entry program (P4210) that the system uses to determine how to process orders.
3.8.7.2 Process
These processing options control whether the system performs item restriction checking and availability checking and which table to use when referencing category codes.
- 1. Item Restrictions (1/0)
-
Specify whether the system performs item restriction checking to determine whether an item can be sold to the customer. Values are:
Blank: Do not perform item restriction checking.
1: Check for item restrictions.
- 2. Check Availability (1/0)
-
Specify whether the system performs availability checking for each item on the order.
Blank: Do not perform availability checking.
1: Perform availability checking.
- 3. Item File
-
Specify whether the system uses the item master or item branch table when referencing category codes. Values are:
Blank: Use the F4101 table.
1: Use the F4102 table.
3.8.8 Setting Up Product Hierarchies
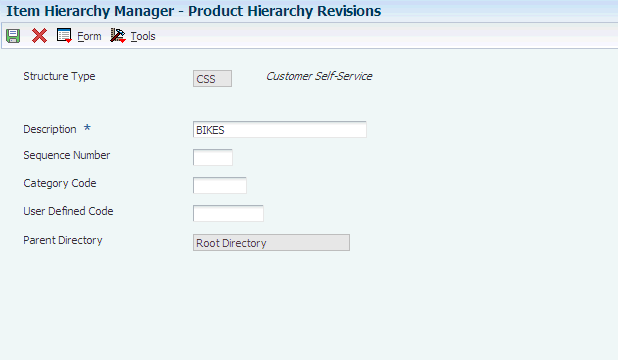
Access the Product Hierarchy Revisions form.
Figure 3-8 Product Hierarchy Revisions form
Description of ''Figure 3-8 Product Hierarchy Revisions form''
- Structure Type
-
Specify a value from UDC 01/TS that identifies the type of organizational structure that the system uses when creating the product hierarchy. This structure type has its own hierarchy in the JD Edwards EnterpriseOne Address Book system.
- Description
-
Enter a name for the item hierarchy.
- Sequence Number
-
Specify a sequence number to identify the sequential order within a group.
- Category Code
-
Specify a field from either the F4101 or the F4102 table from which the system retrieves values and creates groups. This is the lowest level in the product hierarchy that contains actual items. For example, you can point to the fourth sales category code field on the item master by entering SRP4 in this field.
- User Defined Code
-
Specify a value in the UDC table that is referenced in the category code field. For example, if you enter category code SRP4, the system retrieves values from UDC 41/S4.
- Parent Directory
-
Select a value using the Form menu to access the Directory Search form.