2 Configuring the Sales Order Management System
This chapter contains the following topics:
-
Section 2.1, "Understanding System Configuration for Sales Order Management"
-
Section 2.7, "Setting Up Sales Order Automation (RTE) Filtering"
-
Section 2.8, "Setting Up Revenue Recognition for Sales Order Invoices"
2.1 Understanding System Configuration for Sales Order Management
Before you use JD Edwards EnterpriseOne Sales Order Management, you must define certain information that the system uses during processing. You use this information to configure the system to meet the company's business needs.
This table describes the information that you must set up for this system:
| Setup Information | Description |
|---|---|
| UDCs | You can set up UDCs to configure the system for order processing. |
| Constants | You set up constants to provide the system with these types of default information:
|
| Order line types | You can define codes that determine how the system processes a detail line in an order. |
| Order activity rules | You can establish the sequence of steps to process an order. |
| AAIs | You set up AAIs to provide JD Edwards EnterpriseOne Sales Order Management with accounting information and general ledger relationships that are necessary to interact with JD Edwards EnterpriseOne General Accounting. |
2.2 Setting Up UDCs
This section provides an overview of each UDC that you should set up for JD Edwards EnterpriseOne Sales Order Management.
UDCs enable you to configure the way the system operates. You must add these code types in the UDC tables.
2.2.1 Auto TP Rollback Level - (00/AT)
Enter a value of 1 in the Special Handling field of this UDC to temporarily place data in the Transaction Workfile table (F41021WF). The system updates the data into the Item Location File table (F41021) and deletes data from the Transaction Workfile table after the inventory commitment is successful.
2.2.2 Status Codes for Prepayments (00/SP)
You use status codes to determine the status of a prepayment. The system contains predefined statuses, which are hard-coded:
-
Blank: Pre-authorization
-
01: Sent for Authorization
-
02: Authorized
-
03: Ready to Settle
-
04: Sent for Settlement
-
05: Settled
-
06: Authorization Declined/Error
-
07: Settlement Declined/Error
You should not change the hard-coded statuses.
2.2.3 Payment Instruments (00/PY)
To identify transactions for prepayment processing, you must use payment instruments that are assigned special handling codes. These payment types are listed according to whether they are hard-coded.
Hard-coded payment instruments include:
-
X: Use electronic data interchange (EDI) Remote Draft (AR & AP).
-
Y: Use EDI Remote Wire (AR & AP).
-
Z: Use EDI Remote Check (AR & AP).
-
?: Use credit card payment.
You should not change the hard-coded payment instruments codes.
Soft-coded payment instruments include:
-
C: Check - 8 3/4 (AR & AP).
-
D: Draft by invoice (AR & AP).
-
N: Print Check - Brazil.
-
T: Electronic funds transfer (EFT) (AR & AP).
-
W: Check - 8 1/2 (AR & AP).
2.2.4 Prepayment Special Handling Codes for 00/PY
Prepayment processing is driven by values in the special handling code column for the Payment Instruments UDC (00/PY). That is, if you set up a handling code for a payment type, the system processes the transaction through the authorization and settlement cycle. JD Edwards EnterpriseOne has predefined payment types with these special handling codes:
-
11: Cash payment
-
12: Check payment
-
13: Credit card payment
2.2.5 Blanket/Quote Order Types (40/BT)
You use this UDC table to specify which order types the system uses to designate blanket orders and quote orders.
2.2.6 On Hand Quantity Relief (40/IU)
You use this UDC table to specify whether the system relieves on-hand inventory for an order type during shipment confirmation. If you do not set up a order type in this table, the system relieves on-hand inventory when you run the Sales Update program (R42800).
2.2.7 Order Templates (40/OT)
Before you can create an order template, you must add the template name to this UDC table. If you do not add the template to this table, you cannot set up the template using the Customer Template Revisions program (P4015).
2.2.8 Cross Reference Type Code (41/DT)
You use this UDC table to specify different cross-reference types, such as substitutes, complimentary items, and replacement items. The system also uses these codes to reference customer or supplier part numbers. To leverage these codes, you must enter cross-reference information for items using the Item Cross Reference program (P4104).
2.2.9 Hold Codes (42/HC)
JD Edwards EnterpriseOne provides you with a default code AH (Approval Hold), which is set up in this UDC, to use for approval processing. You can add other approval hold codes if you specify a special handling code of 1.
2.3 Setting Up Constants
This section provides an overview of constants for JD Edwards EnterpriseOne Sales Order Management, lists prerequisites, and discusses how to:
-
Set up branch/plant constants.
-
Set up item availability.
-
Set up system constants.
-
Set up batch control constants.
-
Set up location formats.
-
Set up locations in branch/plants.
2.3.1 Understanding Constants for Sales Order Management
A constant is a piece of information that you set up to define how the system processes information. The system uses constants as default information in many JD Edwards EnterpriseOne systems. After you determine the information to use throughout the system, you can enter the appropriate values or change any predefined values.
Branch/plant constants enable you to configure the processing of daily transactions for each branch/plant in the distribution and manufacturing systems.
|
Note: If you use Oracle's JD Edwards EnterpriseOne Warehouse Management, you must define the warehouse information on the Branch Location Definition form of the Branch/Plant Constants program (P41001). Otherwise, you should at least define location length information. |
2.3.1.1 Item Availability
You must define how to calculate item availability for each branch/plant. Item availability affects how the system calculates back orders, cancellations, and customer delivery times.
|
Note: If you use Oracle's JD Edwards EnterpriseOne Configurator, you must set the Check Availability field in the Configurator Constants program (P3209) to check availability during sales order entry. If the system finds the exact item and string match, a window displays all locations containing the specific configuration. |
2.3.1.2 System Constants
You define system constants to determine which functions the system performs. For example, assume that you have several branch/plants and you use different units of measure for the items in each branch/plant. You can set a system constant to automatically convert units of measure by branch.
System constants apply to all branch/plants. You cannot configure the settings for individual branch/plants.
2.3.1.3 Batch Control Constants
You define batch control constants to prevent the system from applying changes that unauthorized personnel make to the general ledger. Also, you can define a constant that requires you to enter batch control information before the system runs a batch-processing job. You can enter batch control information to compare the anticipated size of the job to the result.
You must define management approval and batch control separately for each distribution and manufacturing system.
2.3.1.4 Location Control
Location control is a JD Edwards EnterpriseOne feature that you activate through the branch/plant constants. You can designate location information that is specific to each branch/plant. In each branch/plant, you can set up unique information about specific item locations.
JD Edwards EnterpriseOne Warehouse Management requires location control, it is optional for all other JD Edwards EnterpriseOne distribution systems.
2.3.1.5 Location Format
Defining the location format enables you to determine how to set up item locations. You can define elements that contain more specific information about the actual location. For example, an element can represent an aisle, bin, shelf, or any other location that you use in a branch/plant.
You can define a location format using up to 10 different elements, such as aisle, shelf, and bin. For each element, you can define:
-
Length
The total length of all elements, including separators, cannot exceed 20 characters. The system does not store separators in the tables, but uses separators to edit a location on a form or report. If you do not want to use separators, leave the separator field blank. The system displays the location as one string of characters.
-
Justification
-
Separator character
If you are using JD Edwards EnterpriseOne Warehouse Management, you must also define default units of measure for volumes, dimensions, and weights.
2.3.1.6 Locations in Branch/Plants
After you have defined the format for the locations, you must define all of the locations in a warehouse. To locate items more easily, you can create a hierarchy of locations within the warehouse and enter information about zones.
You can define a primary location to store basic information about items in a warehouse. A primary location is not an actual physical location. For example, you could designate a primary location as Location A and then assign every item in the warehouse to a location that begins with A.
You can also define a blank location as the primary location for inventory items. How the system displays the primary location depends on the location format specifications that you define for the branch/plant.
2.3.2 Understanding System Setup for Taxed Prices
Before you can use the taxed prices on sales orders, you must set up the system for taxed prices. Complete these setup steps in sequential order:
-
Specify whether the system is set up to use taxed prices for sales orders.
To do so, access the Branch/Plant Constants program (P41001) and select the Enable Sales Taxed Prices check box on the System Constants form. If you select this constant, then you must also select either the By Sold To or the By Ship To constant. Therefore, when you enter values in the Sold To and Ship To fields on a sales order, the system checks the setting on the System Constants form to determine whether the system is set to use the Sold To or Ship To customer.
See Taxed Prices
Note:
If you change the value of the Sales Taxed Prices constant, the system may produce unexpected results during sales order processing. -
Specify whether the customer is set up to use taxed prices for sales orders.
To do so, access the Customer Master program (P03013) and select the Use Taxed Prices check box on the Billing Information form. The system displays the Use Taxed Prices check box on the Billing Information form only when you enable taxed prices for sales orders in the system.
See Taxed Prices
2.3.3 Prerequisites
Before you complete the tasks in this section:
-
Create an address book record for the branch/plant.
-
Set up a branch/plant named ALL.
-
Set up the branch/plant as a business unit.
|
See Also: |
2.3.4 Forms Used to Set Up Constants
| Form Name | Form ID | Navigation | Usage |
|---|---|---|---|
| Work With Branch/Plant Constants | W41001B | Sales Order Management Setup (G4241), Branch/Plant Constants | Review and select branch/plant constant records. |
| Branch/Plant Constants | W41001H | Click Add on the Work With Branch/Plant Constants form. | Set up branch/plant constants.
Add and revise branch/plant constant records. |
| Item Availability Definition | W41001G | Select the branch/plant constant record, and then select Availability from the Row menu on the Work With Branch/Plant Constants form. | Set up item availability.
Add and revise item availability definitions. |
| System Constants | W41001F | Select Sys. Constants (system constants) from the Form menu on the Work With Branch/Plant Constants form. | Set up system constants.
Add and revise system constants. |
| Application Constants | W41001E | Select App. Constants (application constants) from the Form menu on the Work With Branch/Plant Constants form. | Set up batch control constants.
Add and revise batch control constants. |
| Branch Location Definition | W41001A | Select the branch/plant constant record, and then select Location Def. (location definition) from the Row menu on the Work With Branch/Plant Constants form. | Set up location formats.
Add and revise location definitions. |
| Enter Location Information | W4100B | Select the branch/plant constant record, and then select Locations from the Row menu on the Work With Branch/Plant Constants form. | Set up locations in branch/plants.
Add and revise location information for branch/plant. |
2.3.5 Setting Up Branch/Plant Constants
Access the Branch/Plant Constants form.
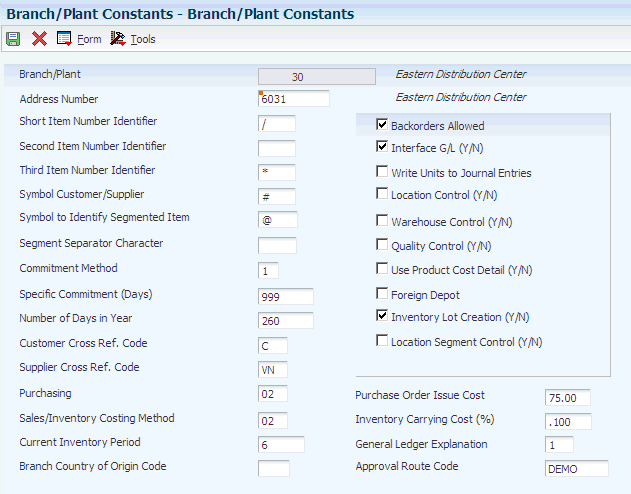
- Short Item Number Identifier
-
Enter a symbol to identify the eight-character short item number when you do not want to use it as the primary number.
Leave this field blank to use this item number as the primary number. That is, you use it most often to enter or review information.
If this is not the primary number, you must enter a special symbol to identify it. Use a symbol that is not significant for any other purposes of entry, such as /, *, or &. Do not use a period or a comma as a symbol. When you enter this item number on any other form, you must include this symbol as the first character.
Note:
Only one field for item number symbols (SYM1, SYM2, SYM3, or SYM6) can be blank to identify it as the primary number. All others must include a unique symbol. - Second Item Number Identifier
-
Enter a symbol to identify the 25-character second item number when you do not want to use it as the primary number.
Leave this field blank to use this item number as the primary number. That is, you use it most often to enter or review information.
If this is not the primary number, you must enter a special symbol to identify it. Use a symbol that is not significant for any other purposes of entry, such as /, *, or &. Do not use a period or a comma as a symbol. When you enter this item number on any other form, you must include this symbol as the first character.
Note:
Only one field for item number symbols (SYM1, SYM2, SYM3, or SYM6) can be blank to identify it as the primary number. All others must include a unique symbol. - Third Item Number Identifier
-
Enter a symbol to identify the 25-character third item number when you do not want to use it as the primary number.
Leave this field blank to use this item number as the primary number. That is, you use it most often to enter or review information.
If this is not the primary number, you must enter a special symbol to identify it. Use a symbol that is not significant for any other purposes of entry, such as /, *, or &. Do not use a period or a comma as a symbol. When you enter this item number on any other form, you must include this symbol as the first character.
Note:
Only one field for item number symbols (SYM1, SYM2, SYM3, or SYM6) can be blank to identify it as the primary number. All others must include a unique symbol. - Symbol Customer/Supplier
-
Enter a character that identifies the customer's or supplier's number in the system. When you enter a number preceded by this character, the system recognizes the number as the customer's or supplier's number. The system then uses the cross-reference table to match the number to the item number. You must complete this field if you want the system to perform cross-referencing.
- Symbol to Identify Segmented Item
-
Enter a character that identifies the segmented item in the system.
- Segment Separator Character
-
Enter a separator character for segmented items in the system.
- Commitment Method
-
Specify the method that the system uses to commit lot items from inventory. Values are:
1: Normal commit method. The system commits inventory from the primary location and then from secondary locations.
2: Commit method by lot number. The system commits inventory by lot number, starting with the lowest lot number and committing orders to available lots.
3: Commit method by lot expiration date. The system commits inventory from the locations with the earliest expiration date first. The system considers only locations with expiration dates that are greater than or equal to the sales order or parts list requested date.
- Specific Commitment (Days)
-
Enter a number that the system uses to determine when to commit inventory to an order in sales order processing. This value in days is added to current date and compared with the promised ship date for the order line. If the promised date is greater than the calculated date, then the order line is future committed in the Item Location table (F41021).
Enter 999 to eliminate future commits.
- Number of Days in Year
-
Enter the number of days in a year that the company is open for business. This field is required. You must specify a number from 252 to 365.
The JD Edwards EnterpriseOne Procurement system uses this number to calculate the Economic Order Quantity (EOQ).
- Customer Cross Ref. Code (customer cross-reference code)
-
Enter a code from UDC 41/DT that indicates the type of cross-reference setup for customers.
- Supplier Cross Ref. Code (supplier cross-reference code)
-
Enter a code from UDC 41/DT that indicates the type of cross-reference setup for suppliers.
- Purchasing
-
Enter a value from UDC 40/CM that indicates the cost method that the system uses to determine the cost of the item for purchase orders. Cost methods 01–19 are reserved.
- Sales/Inventory Costing Method
-
Enter a value from UDC 40/CM that indicates the cost method that the system uses to calculate the cost of goods sold for the item. Cost methods 01–19 are reserved.
- Current Inventory Period
-
Enter 1 to 14 to identify the current accounting period. The system uses this number to generate error messages, such as PBCO (posted before cut off) and PACO (posted after cut off).
- Branch Country of Origin Code
-
Enter the 2-digit country code that indicates whether parts are made outside of the United States. Example values are:
-
CA: Canada
-
MX: Mexico
Enter the 3-digit code that indicates whether parts are made within the United States. The format for the values is U followed by the 2-digit state postal code. For example, UOH represents Made in Ohio, USA.
-
- Backorders Allowed
-
Select this option to specify whether to allow backorders for this branch/plant.
You can allow backorders by item using the Item Master (P4101) or Item Branch/Plant (P41026) programs, by customer using the Customer Billing Instructions program (P03013), or by branch/plant using the Branch/Plant Constants program (P41001).
You must select the Backorders Allowed option in all programs for the system to backorder an item on a sales order.
- Interface G/L (Y/N) (interface general ledger (yes/no))
-
Select to indicate that inventory transactions that are processed through this branch/plant create general ledger entries.
- Write Units to Journal Entries (Y/N) (write units to journal entries (yes/no))
-
Specify whether the system moves units to the general ledger after the system records a journal entry from these programs:
-
P31111 (Work Order Inventory Issues)
-
P31112 (Work Order Completions)
-
P31802 (Work Order Journal Entries)
-
P4112 (Inventory Issues)
-
P4113 (Inventory Transfers)
-
P4114 (Inventory Adjustments)
-
P4116 (Item Re-Classification)
-
P41413 (Cycle Count Update)
-
P41610 (Tag Update)
-
R42800 (Sales Update)
-
P4312 (Receipts)
-
P4314 (Voucher Match)
-
P415021 (Update Operational Reconciliation)
-
P415101 (General Stock Movements)
-
P41514 (Bulk Manufacturing Gains/Losses)
-
R49700 (Cycle Billing)
-
P49510 (Bulk Load Confirmation - XT49799)
-
P49515 (Bulk Load Confirm Batch - XT49799)
-
P49530 (Package Load Confirm - XT49799)
-
P49572 (Upload Gantry Data - XT49799)
-
P49710 (Bulk Delivery Confirm - XT49799)
-
P49711 (Bulk Delivery Confirm Milk Run - XT49799)
-
P49715 (Bulk Disposition - XT49799)
-
P49720 (Package Delivery Confirm - XT49799)
-
P49731 (Mass Confirm Batch - XT49799)
-
- Location Control (Y/N) (location control (yes/no))
-
Select to indicate that the system uses only locations in the Location Master table (F4100). You use location control to use only locations that are in the F4100 table. When the Warehouse Control option is selected, the Location Control option must also be selected. Clear the option and the system does not restrict locations to those in the F4100 table. The system uses all locations that conform to the location format that are defined on the Branch Location Definition form.
- Warehouse Control (Y/N) (warehouse control (yes/no))
-
Specify whether the system creates warehouse transactions for the branch/plant.
- Quality Control (Y/N) (quality control (yes/no))
-
Specify whether to activate the JD Edwards EnterpriseOne Quality Management system from Oracle (system 37) for the branch/plant.
- Use Product Cost Detail (Y/N) (use product cost detail (yes/no))
-
Specify whether distribution programs use total cost or detailed product costs.
- Foreign Depot
-
Specify whether another company owns the branch/plant. The Bulk and Packed Load Confirmation programs use this code to determine whether the depot from which product is being loaded is a foreign depot. If it is a foreign depot, you must enter a valid borrow agreement during load confirmation.
- Inventory Lot Creation (Y/N) (inventory lot creation (yes/no))
-
Specify whether the inventory transaction programs can create new lot or serial numbers in the system. If you leave this option cleared, the system does not allow the inventory transaction programs to create new lot numbers in the system. If you select this option, the system allows the inventory transaction programs to create new lot numbers in the system.
- Location Segment Control (Y/N) (location segment control (yes/no))
-
Specify whether the system enables the Location Segment Specifications in the Location Definition program (P41001). The segment specifications determine how the system segments locations within a branch using UDC table (41/ER). You must select this check box to define segments for locations.
- Purchase Order Issue Cost
-
Enter the amount that JD Edwards EnterpriseOne Procurement uses to calculate the EOQ. This cost should be the estimate of the cost of materials, labor, and overhead that you incur when you issue a single purchase order. The default value is 00.
This example illustrates how the system calculates EOQ using the Purchase Order Issue Cost method:
S: Purchase Order Issue Cost = 15.0
I: Inventory Carrying Cost = nine percent (.09).
Y: Annual Sales in Units = 3,000
C: Unit cost of Item = 10.0
EOQ = the square root of ((2S/I) × (Y/C))
The square root of [(2)(15) ÷ 0.09] × 3,000 ÷ 10.0 = 316.23
- Inventory Carrying Cost (%) (inventory carrying cost (percent))
-
Enter the percentage of inventory investment that JD Edwards EnterpriseOne Procurement uses to calculate EOQ. The default value is zero. Enter the percentage as a decimal value.
This example illustrates how the system calculates EOQ using the Inventory Carrying Cost Percentage:
S: Purchase Order Issue Cost = 15.0
I: Inventory Carrying Cost = nine percent (.09).
Y: Annual Sales in Units = 3,000
C: Unit Cost of Item = 10.0
EOQ = Square root of ((2S/I) × (Y/C)) = the square root of (2(15) ÷ nine percent (.09)) × (3000 ÷ 10) = 316.23
Note:
Access field help for the Economic Order Quantity field for more information about the EOQ formula. - General Ledger Explanation
-
Enter a code that the JD Edwards EnterpriseOne Inventory Management system uses to select the default description that appears on the second line of a journal entry in the general ledger. Values are:
1: Item master description (default value).
2: Primary item number.
- Approval Route Code
-
Enter a code that determines to whom an order is routed for approval.
2.3.6 Setting Up Item Availability
Access the Item Availability Definition form.
To specify items to exclude from the item availability calculation, click any of the options under the Subtract heading. To specify items to include in the item availability calculation, click any of the options under the Add heading.
- Quantity Soft Committed to SO WO (quantity soft committed to sales orders and work orders)
-
Select to include the number of units that are soft-committed to sales orders or work orders in the item availability calculation.
- Quantity Hard Committed to SO (quantity hard-committed to sales orders)
-
Select to include the number of units that are hard-committed to a specific location and the lot for sales orders in the item availability calculation.
- Quantity Future Committed to SO (quantity future committed to sales orders)
-
Select to include the quantity on any sales order in which the requested shipment date is beyond the specific commitment days.
- Quantity Hard Committed to WO (quantity hard-committed to work orders)
-
Select to include the number of units that are hard-committed to a specific location and the lot for work orders in the item availability calculation.
- Other Quantity 1 SO (other quantity 1 sales orders)
-
Select to include the quantity specified as an additional reduction in the item availability calculation.
- Other Quantity 2 SO (other quantity 2 sales orders)
-
Select to include the quantity specified as an additional reduction in the item availability calculation.
- Quantity on Hold
-
Select to include the number of units on hold in the item availability calculation.
- Safety Stock
-
Select to include the number of units that are reserved as safety stock in the item availability calculation.
- Quantity on Purchase Order Receipts
-
Select to include the number of units on purchase orders in the item availability calculation.
- Quantity on PO - Other 1 (quantity on purchase order - other 1)
-
Select to include the number of units on other purchase orders in the item availability calculation.
- Quantity on Work Order Receipts
-
Select to include the number of units on work orders in the item availability calculation.
- Quantity in Transit
-
Select to include the number of units in transit in the item availability calculation.
- Quantity in Inspection
-
Select to include the number of units in inspection in the item availability calculation.
- Quantity in Operation 1
-
Select to include the number of units in one operation of the receipt routing process in the item availability calculation. You define which operation from receipt routing corresponds to this field.
- Quantity in Operation 2
-
Select to include the number of units in one operation of the receipt routing process in the item availability calculation. You define which operation from receipt routing corresponds to this field.
2.3.7 Setting Up System Constants
Access the System Constants form.

- Unit of Measure Conversion by Branch
-
Select to display the item-specific conversion table when you add an item to a specific branch/plant.
Clear this option and the system displays the item-specific conversion table for all branch/plants from the Item Master table (F4101).
- Update Average Cost On-Line
-
Select to calculate a new average cost immediately after any transaction occurs that affects the average cost of an item.
Clear this option to indicate that all processes that affect average cost create transactions in the Average Cost Work File table (F41051). The system calculates a new average cost when you run the Average Cost Update program (R41811).
- ECS Control (energy and chemical system control)
-
Select to use the JD Edwards EnterpriseOne Bulk Stock Inventory system.
- Internet Enable PPAT Messages (internet enable people places and things messages)
-
Select to send any E-mail messages that the system generates using distribution programs.
- Scientific Rounding
-
Select to perform scientific rounding.
Currently, this feature is enabled only for the JD Edwards EnterpriseOne Quality Management systems Test Results Revisions program (P3711).
- Use Customer Set
-
Select to specify whether the system uses the customer set feature.
- Ship Ascending Date Rule
-
Select to apply the ship ascending date rule by customer and by item during the sales order entry, pick slip print, commitment, and ship confirmation processes. When the system applies the Ship Ascending Date Rule, the system sorts shipping customers' lots in ascending order by expiration date, sell by date, or best before date.
- Enable Sales Taxed Prices
-
Select this check box to specify that the system uses taxed prices for sales orders.
- By Sold To and By Ship To
-
To If you select the Enable Sales Taxed Prices check box, you must also specify a customer. The system uses this value to determine whether the customer on the sales order is set up to use taxed prices. Values are:
By Sold To: If you select this check box, the system uses the value in the Sold To field on the sales order to determine whether to use taxed prices.
By Ship To: If you select this check box, the system uses the value in the Ship To field on the sales order to determine whether to use taxed prices.
- Allow Duplicate Lots
-
Enter a value to determine whether the system assigns the same lot to multiple items. Values are:
1: The system does not allow duplicate lots. The lot is restricted to one item and one branch/plant.
2: The system allows duplicate lots. You can create a lot that contains multiple items and branch/plants.
3: The system does not allow duplicate lots. The lot is restricted to one item, but can contain quantities in multiple branch/plants.
- Sales Price Retrieval UOM (sales price retrieval unit of measure)
-
Enter a code that specifies the unit of measure for retrieving base prices and price adjustments for sales order processing, service and warranty management, and ship and debit processing. The system enables users to define base prices in the Item Base Price File table (F4106) and price adjustments in the Price Adjustment Detail table (F4072) in various units of measure.
If the base price or price adjustments are not found in the specified unit of measure, the system uses the primary unit of measure for the item.
- Purchase Price Retrieval UOM (purchase price retrieval unit of measure)
-
Enter a code that represents the unit of measure for the purchase base price during purchase order processing.
If you specify the unit of measure for transaction or pricing and the system does not find a record in that unit of measure, the system repeats the process using the primary unit of measure of the item.
- Sales Price Based On Date
-
Enter a code that determines how the system updates the price effective date in the Sales Order Header File table (F4201) and Sales Order Detail File table (F4211). In JD Edwards EnterpriseOne Sales Order Management, the system uses the price effective date to retrieve the base price from the F4106 table and price adjustments from the F4072 table.
- Purchase Rebate Category Code
-
Enter a number that determines which category code the system uses in the criteria for inclusion comparison.
- Preference Schedule
-
Enter a value from UDC 40/AS that identifies the advanced preference schedule that the system uses when resolving preferences. The advanced preference schedule determines which preferences the system resolves when using the advanced preference functionality. You cannot maintain preference schedules directly through UDCs, but you can maintain preference schedules by using the Price Adjustment Schedule program (P4070).
- Pref Retrieval UOM (preference retrieval unit of measure)
-
Enter a code that specifies the unit of measure that the system uses for retrieving advanced preference adjustments during sales order processing. The system enables you to define the advanced preference adjustments in the F4072 table in various units of measure.
If you specify the unit of measure for transaction or pricing and the system does not locate a record in that unit of measure, the system repeats the process using the primary unit of measure of the item.
- Accelerated Pricing Resolution Engine
-
Enter a value to indicate whether the system uses the accelerated pricing resolution engine to caches records to specific pricing tables. Values are:
-
Blank or 0: Do not allow use.
-
1: Allow use.
-
2: Auto load.
Auto load automatically loads the cache when any user processes a transaction using a cached table.
You should thoroughly read and understand the details of how the accelerated pricing resolution engine works, the limitations, and how to manage it before you enable this option.
-
2.3.8 Setting Up Batch Control Constants
Access the Application Constants form.
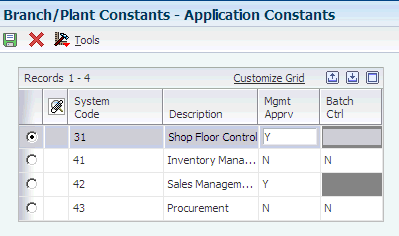
- System Code
-
Enter a value from UDC 98/SY that identifies a system. Values are:
01: JD Edwards EnterpriseOne Address Book
03B: JD Edwards EnterpriseOne Accounts Receivable
04: JD Edwards EnterpriseOne Accounts Payable
09: JD Edwards EnterpriseOne General Accounting
11: JD Edwards EnterpriseOne Multicurrency from Oracle
- Mgmt Apprv (management approval)
-
Enter a code that indicates whether you require approval of batches before they can be posted to the general ledger. Values are:
Y: Yes, assign a status of Pending to each batch that you create within the listed systems.
N: No, assign a status of Approved to each batch.
- Batch Ctrl (batch control)
-
Enter a code that indicates whether the system requires entry of batch control information.
For each batch, the system displays a batch control form on which you must enter information about the number of documents and the total amount of the transactions that you expect in the batch. The system uses these totals to edit and display differences from the actual transactions that you enter.
This field applies only to JD Edwards EnterpriseOne Inventory Management and JD Edwards EnterpriseOne Procurement. In JD Edwards EnterpriseOne Inventory Management, Y indicates that the system displays a batch control form before you issue, adjust, or transfer inventory. In JD Edwards EnterpriseOne Procurement, Y indicates that the system displays a batch control form before you enter receipts. Values are:
Y: Yes, require entry of batch control information.
N: No, do not require entry of batch control information.
2.3.9 Setting Up Location Formats
Access the Branch Location Definition form.
Figure 2-4 Branch Location Definition form
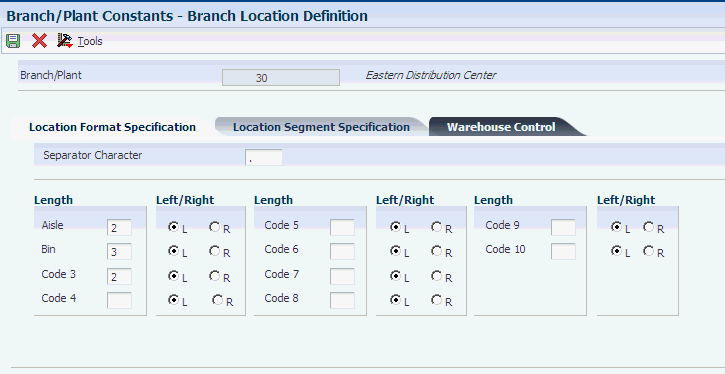
Description of ''Figure 2-4 Branch Location Definition form''
2.3.9.1 Location Format Specification
Select the Location Format Specification tab.
- Separator Character
-
Enter a character that divides the elements of the location when the system displays them on forms or reports. For example, you can use a / as a separator character to divide elements such as aisle, bin, and shelf in a location code.
The location code can contain up to 20 characters, including separators.
The system does not store separators in the tables, but uses them to edit a location on a form or report. If you do not want to use separators, leave this field blank.
However, you must enter characters and spaces to equal the correct length of each element in the location code. The system then displays the location as one string of characters.
The system uses the character that you enter in this field to separate the combination of tank and owner and aisle and bin as it appears on forms or reports.
Companies commonly use a "." (period) as the separator character.
- Aisle
-
Enter a number that identifies the number of characters to represent the tank (or aisle for packaged stock). Values are numbers 1 through 8.
- Bin
-
Enter a number that identifies the number of characters to represent the owner for commingled bulk stock (or bin for packaged stock). Values are numbers 1 through 8.
- Code 3 through Code 10
-
Enter the number of characters to represent codes 3 through 10, respectively, in the location format specification.
- Left/Right
-
Select either the L or R option to determine the justification or alignment (left or right) for each element that you use to define the location format.
2.3.9.2 Warehouse Control
Select the Warehouse Control tab.
If you do not use JD Edwards EnterpriseOne Warehouse Management, do not complete the fields on the Warehouse Control tab.
- Request Inclusion Version
-
Enter a code from UDC 40/RV that identifies an inclusion rule to use for this branch/plant. JD Edwards EnterpriseOne Manufacturing systems from Oracle and JD Edwards EnterpriseOne Warehouse Management use inclusion rules in this way:
-
For JD Edwards EnterpriseOne Manufacturing systems, enable multiple versions of resource rules for running Material Requirements Planning (MRP), Master Production Schedule (MPS), or Distribution Requirements Planning (DRP).
-
For JD Edwards EnterpriseOne Warehouse Management, enable multiple versions of inclusion rules for running putaway and picking. The system processes only those order lines that match the inclusion rule for a specified branch/plant.
-
- Dimension Unit of Measure
-
Enter a code from UDC 00/UM that identifies the unit of measure to display dimensions for the warehouse. The system enables you to establish inches, centimeters, meters, and so forth as a measuring standard.
- Volume Display UOM (volume display unit of measure)
-
Enter a code from UDC 00/UM that identifies the unit of measure that the system uses to display volume for this branch/plant. The system inputs a value in this field from the Branch/Plant Constants program (P410012). You can override this default value.
- Weight Display UOM (weight display unit of measure)
-
Enter a code from UDC 00/UM that identifies the unit of measure that the system uses to indicate weight for this item. You can specify ounces, grams, kilograms, and so on, as weight standards. The system uses this unit of measure for the item or overrides it for an individual item or container.
- Receiving Location
-
Enter the area in the warehouse where you receive inventory. The format of the location is user-defined and you enter the location format for each branch/plant.
- Shipping Location
-
Enter the location that the system uses as the default value when you pick inventory and move the inventory for shipping. The format of the location is user-defined in the Branch/Plant Constants form.
2.3.10 Setting Up Locations in Branch/Plants
Access the Enter Location Information form.
You can set up locations for branch/plants after you have defined the location format for the branch/plant.
- Location
-
Enter the area in the warehouse where you receive inventory. The format of the location is user-defined and you enter the location format for each branch/plant.
A location format comprises elements and, optionally, a separator character.
Elements represent more specific locations in a branch/plant. If the tank contains commingled stock, include the separator character that is defined on the Branch Location Definition form and identify the owner.
The total length of all elements in this field, including separators, cannot exceed 20 characters. The location for a single tank can contain up to the number of characters identified in the fields in which you specify the aisle information on the Branch Location Definition form.
The owner ID can contain up to the number of characters identified in the fields in which you specify the bin information on the Branch Location Definition form.
If you leave this field blank and do not use a separator character, the system displays the location as an asterisk. If you use a separator character, the system displays the location with the correct number of spaces for each element, followed by the separator character.
- Put Zone (putaway zone)
-
Enter a code from UDC 46/ZN that identifies areas in the warehouse where goods are put away or stored.
- Pick Zone
-
Enter a code from UDC 46/ZN that identifies an area from which items are picked for shipment.
- Replen Zone (replenishment zone)
-
Enter a code from UDC 46/ZN that identifies replenishment zones, which are areas in the warehouse from which items are retrieved to replenish or refill picking locations. You assign zones to locations using the Location Master program (P4100).
- LOD (level of detail)
-
Enter a code that summarizes or classifies locations and provides a hierarchy of locations for review purposes. For example, you can assign aisles to level 2, and individual bins within the aisle to level 3.
Use the LOD field to specify the beginning level of detail the system displays for the location.
- Aisle
-
Enter a code that identifies a location in a warehouse. The system uses this code with a bin and lot identifier to indicate a specific, tangible storage area within a warehouse or yard.
- Bin
-
Enter a specific storage location within a warehouse or store. The system uses the bin with an aisle location to identify a storage area for which width, depth, and height can be readily measured.
- Loc 03 (location 03) through Loc 10 (location 10)
-
Enter a code that the system uses for one of two purposes:
-
To identify a specific location within a branch/plant as part of the location identifier.
-
To use as a general reporting code for location information.
-
- Mix Item/Lot
-
Enter a code that specifies whether to prohibit or allow the system to combine different items into one location or to combine different lot or serial numbers of the same item into one location. Valid values are:
-
Blank: No restrictions.
-
1: One item per location.
-
2: One item or lot per location.
-
3: One item, lot, or status per location.
-
- Staging Loc (staging location)
-
Enter a code that indicates whether the location is a staging location, where you hold items temporarily before moving them somewhere else. Staging locations (such as the receiving and shipping docks) do not require a group definition for dimensions, volume, or weight, because they have unlimited capacity. Valid codes are:
-
Y: Yes, this location is a staging location.
-
N: No, this location is not a staging location.
-
2.4 Setting Up AAIs for Sales Order Management
This section provides an overview of AAIs for Sales Order Management and discusses how to set up AAIs for Sales Order Management.
2.4.1 Understanding AAIs for Sales Order Management
AAIs are the links between the day-to-day functions, chart of accounts, and financial reports. The system uses AAIs to determine how to distribute amounts that are associated with general ledger entries that the system generates. For example, in JD Edwards EnterpriseOne Sales Order Management, AAIs specify how to record the journal entries that are associated with transactions such as selling a stock item to a customer.
For JD Edwards EnterpriseOne distribution systems, you must create AAIs for each unique combination of company, transaction, document type, and general ledger class that you anticipate using. You associate each AAI with a specific general ledger account that consists of a business unit, an object, and optionally, a subsidiary.
If you collect taxes on customer invoices, you must distribute the tax amounts to the correct general ledger accounts. When you set up AAIs for a specific type of tax, such as value added tax (VAT) or use tax, you designate which accounts you want to debit and credit for an invoice tax amount.
The system stores AAIs in the Distribution/Manufacturing - AAI Values table (F4095).
2.4.1.1 Search Sequence for AAIs
You set up AAI tables so that the system can assign account numbers to sales order transactions and account for the amounts that are associated with those transactions in the general ledger. Most organizations set up separate account numbers for each company within their organization. However, some organizations use the same account numbers for each company. If you do not want to set up separate accounts for each company, you can set up account information for the default company, company 00000. The system searches for account numbers in this order:
-
The system first searches for a match on order company, order type, and general ledger category code.
-
If no match is found, the system searches for a match on order company, order type, and general ledger category code of **** (wildcard).
-
If no match is found, the system searches for a match on company 00000, order type, and general ledger category code.
-
If no match is found, the system searches for a match on company 00000, order type, and general ledger category code of **** (wildcard).
-
If no match is found, the system produces an error notifying the user that the AAI is not set up.
If an organization uses product detailed costing in addition to the fields Order Company, Order Type, and the G/L Category Code, then the system also includes Cost Type in the search for an account. This applies to the sales AAIs 4220 and 4240.
In addition, the Flexible Sales Accounting Setup menu (G4241) enables further flexibility in defining the Business Unit, Subsidiary, and Subledger fields based on other driver fields in the Sales Order Detail table (F4211).
2.4.1.2 AAIs for Sales Order Management
This table describes the AAIs to set up for JD Edwards EnterpriseOne Sales Order Management:
| AAI | Description |
|---|---|
| Cost of Goods (COGS) Sold (4220) | Provides the expense or cost amount to the cost of goods sold account. |
| Deferred Cost of Goods Sold (4221) | Provides the expense or cost amount to a deferred cost of goods sold account when you use cycle billing or periodic invoicing. |
| Cost of Goods Sold - Accommodations (4222) | Provides the expense or cost amount to a cost of goods sold account when loan agreements are in effect for bulk items on the transaction and you do not use cycle billing. |
| Deferred Cost of Goods Sold - Accommodations (4223) | Provides the expense or cost amount to a deferred cost of goods sold account when loan agreements are in effect for bulk items on the transaction and you use cycle billing or periodic invoicing. |
| Revenue (4230) | Provides the actual sales price of inventory in the sales revenue account. |
| Deferred Revenue (4231) | Provides the actual sales price of inventory in a deferred sales revenue account when you use cycle billing or periodic invoicing. |
| Unbilled A/R Credit (4232) | Credits the accounts receivable account with the unbilled amount from the transaction when you use cycle billing or periodic invoicing. |
| Allocated Revenue (4233) | Writes additional allocated revenue entries when the Freight Allocations by Item is set up from the JD Edwards EnterpriseOne Transportation Management system (determined at the time of transportation freight update) and some or all of the total freight charge for a shipment is distributed to the existing sales order line items. |
| Inventory (4240) | Credits the cost amount to an inventory account. |
| Inventory In Transit (4241) | Credits the cost amount to an inventory account for load confirmed lines when using the JD Edwards EnterpriseOne Transportation Management system. The system uses this AAI for AAI 4240. |
| Accommodations (4242) | The system uses AAI 4242 for bulk item transactions that have borrow agreements set up for accommodations. Select the Foreign Depot and Interface G/L check boxes on the Branch/Plant Constants form. |
| A/R Trade (4245) | Debits the sales amount to an accounts receivable account. The system writes the accounts receivable offset entries to the general ledger only if the Bypass Update to Accounts Receivable processing option on the Sales Update program (R42800) is deactivated. |
| Tax Liability (4250) | Provides journal entries to tax liability accounts that were created during sales update. |
| Price Adjustments (4270) | Provides the journal entries for individual price adjustments that were created during sales update. |
| Rebates Payable (4280) | Provides the offset entries of accrued accounts. |
| Ship and Debit (4234) | Adjusts the profit margins that are affected by ship and debit agreements. |
The Account Revisions form of the Distribution AAIs program (P40950) displays each predefined AAI item and information about the document type, general ledger class, and accounts that are affected by transactions.
2.4.2 Forms Used to Set Up AAIs for Sales Order Management
| Form Name | Form ID | Navigation | Usage |
|---|---|---|---|
| Work With AAIs | W40950B | Sales Order Management Setup (G4241), Automatic Accounting Instructions | Review and select AAI tables. |
| Account Revisions | W40950D | Select an AAI table, and then select Details from the Row menu on the Work With AAIs form. | Set up AAIs for Sales Order Management.
Add and revise account information for the selected AAI table. |
2.4.3 Setting Up AAIs for Sales Order Management
Access the Account Revisions form.
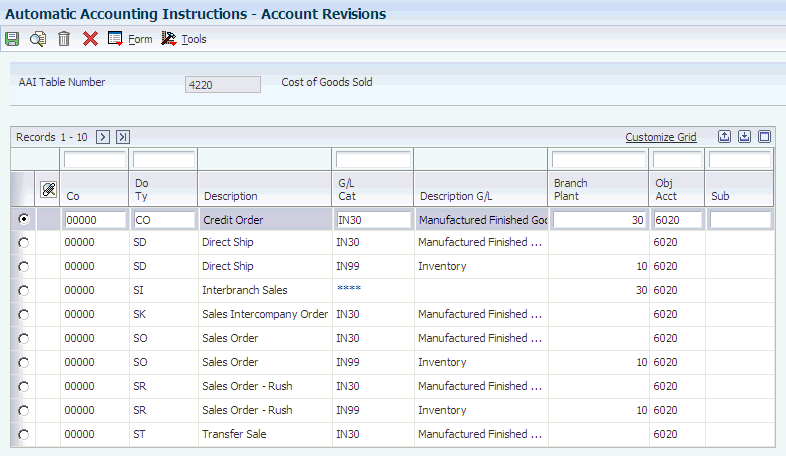
- G/L Cat (general ledger category)
-
Enter a code from UDC 41/9 that identifies the general ledger offset that system uses when it searches for the account to which it posts the transaction. If you do not want to specify a class code, you can enter **** (four asterisks) in this field.
You can use AAIs to predefine classes of automatic offset accounts for the JD Edwards EnterpriseOne Sales Order Management systems. You might assign general ledger class codes as follows:
-
IN20: Direct Ship Orders
-
IN60: Transfer Orders
-
IN80: Stock Sales
The system can generate accounting entries based upon a single transaction. For example, a single sale of a stock item can trigger the generation of accounting entries similar to the following:
-
Sales-Stock (Debit) xxxxx.xx
-
A/R Stock Sales (Credit) xxxxx.xx
-
Posting Category: IN80
-
Stock Inventory (Debit) xxxxx.xx
-
Stock COGS (Credit) xxxxx.xx
The system uses the class code and the document type to find the AAI.
-
- Branch Plant
-
Enter an alphanumeric code that identifies a separate entity within a business for which you want to track costs. For example, a business unit might be a warehouse location, job, project, work center, branch, or plant.
If you leave this field blank, the system uses the branch plant based on the G/L Account Business Unit processing option setting in the Sales Update program (R42800).
- Obj Acct (object account)
-
Enter the portion of a general ledger account that refers to the division of the cost code (for example, labor, materials, and equipment) into subcategories. For example, you can divide the cost code for labor into regular time, premium time, and burden.
Note:
If you use a flexible chart of accounts and the object account is set to six digits, Oracle recommends that you use all six digits. For example, entering 000456 is different than entering 456 because if you enter 456 the system enters three blank spaces to fill a 6-digit object. - Sub (subsidiary)
-
Enter a subset of an object account. Subsidiary accounts include detailed records of the accounting activity for an object account.
2.5 Setting Up Order Line Types
This section provides an overview of order line types and discusses how to set up order line types.
2.5.1 Understanding Order Line Types
When you enter detail information for a sales order, you enter the quantity, price, and cost for each item or service. You can also enter a credit item, a nonstock item, and text information in the same sales order.
Each entry is a line. A line is the information for an item or service that you are ordering as it pertains to the order. The system processes each line based on a line type.
A line type is a code that the system uses to process each detail line that you enter for a specific order type. For example, you can specify line type S for stock items. The system determines whether it should increase or decrease the quantity of the item in inventory. You can specify line type F for freight charges. The system determines from the definition of the line type that this item is not an inventory item.
You can specify how the system uses line types in the general ledger and within JD Edwards EnterpriseOne Inventory Management. For example, when you purchase or sell an inventory item, you can assign a line type for stock items. The system records the transaction according to the information that you specified for the line type. In this case, the system reflects the cost or price of the item in the general ledger. The transaction line also affects item availability in JD Edwards EnterpriseOne Inventory Management.
The line types that you define are applicable throughout distribution systems. For example, the system processes line types in the same way for JD Edwards EnterpriseOne Sales Order Management as it processes line types for JD Edwards EnterpriseOne Procurement.
2.5.1.1 Adding a Message Using a Text Line Type
During order entry, you can enter a message on an order detail line by using a text line type. For example, you can enter an order detail line for a stock item, such as a bike, and then enter an order detail line for text, such as Some Assembly Required. This order detail line functions like a message. Based on the line type definition, the information in an order detail line with a line type that is denoted by the text feature is a memo-only line. The system does not verify the information in the Item Number field, which is the message, against information in the Item Branch File table (F4102) and the transaction does not interact with any other JD Edwards EnterpriseOne systems, such as JD Edwards EnterpriseOne Accounts Receivable and JD Edwards EnterpriseOne Accounts Payable.
2.5.1.2 Assigning a Line Type for Nonstock Items
You can set up the line type for nonstock items so that the system retrieves information from the Item Master table (F4101) but does not commit quantities. The Edit Item Master for Non-Stock Items option controls whether the system validates the item on the sales order line against the F4101 table. The system uses this option only with nonstock inventory interfaces.
During order entry, the system verifies the item number in the F4102 table and the cost and price information in the Item Cost File table (F4105) and Item Base Price File table (F4106). However, the system does not create commitments or perform availability checks.
2.5.2 Forms Used to Set Up Order Line Types
| Form Name | Form ID | Navigation | Usage |
|---|---|---|---|
| Work With Line Types | W40205A | Sales Order Management Setup (G4241), Order Line Types | Review and select order line type records. |
| Line Type Constants Revisions | W40205B | Click Add on the Work With Line Types form. | Set up order line types.
Add and revise order line type records. |
2.5.3 Setting Up Order Line Types
Access the Line Type Constants Revisions form.
- Inv. Interface (inventory interface)
-
Enter a code that specifies how the system interacts with the JD Edwards EnterpriseOne Inventory Management system for order lines with the specified line type. Values are:
-
Y: The monetary or unit value of any activity containing this line type is reflected in inventory. The system also edits the item that you enter to ensure that it is a valid item. This is the default value.
-
A: The system recognizes the number that you enter as a general ledger account number. The system uses this code in purchasing only.
-
B: The system performs edits when using format 4 in purchase order entry.
The system retrieves price data from the inventory tables, but does not update the quantity on the purchase order. This code is valid only when you have set the G/L Interface field to Y (yes). Budget checking is fully functional when you use this interface code.
-
D: The item in this line is an inventory item that does not affect availability or quantities.
-
N: The item is not an inventory item.
To verify whether the item exists in the F4101 table, use Inventory Interface N with the Edit Item Master for Non-Stock Item option.
-
- G/L Offset (general ledger offset)
-
Enter a code from UDC 41/9 that identifies the general ledger offset for the account to which the system posts the transaction. If you do not want to specify a class code, enter **** (four asterisks) in this field.
You can use AAIs to predefine classes of automatic offset accounts for JD Edwards EnterpriseOne Sales Order Management. You can assign general ledger class codes in these ways:
-
IN20 Direct Ship Orders.
-
IN60 Transfer Orders.
-
IN80 Stock Sales.
The system can generate accounting entries based on a single transaction. For example, a single sale of a stock item can trigger the generation of accounting entries similar to this:
-
Sales-Stock (Debit) xxxxx.xx.
-
A/R Stock Sales (Credit) xxxxx.xx.
-
Posting Category: IN80.
-
Stock Inventory (Debit) xxxxx.xx.
-
Stock COGS (Credit) xxxxx.xx.
The system uses the class code and the document type to find the appropriate AAI.
-
- Include in Tax 1
-
Enter a code that indicates whether the monetary value of this order line is subject to applicable taxes and which taxes to apply. Values are:
Y: The line is subject to applicable taxes.
N: The line is not subject to applicable taxes.
3–8: Yes, the line is subject to applicable taxes at the rate indicated by the group number (3–8). The system uses group numbers for value-added tax.
- Sales Journal Col (sales journal column)
-
Enter a value to indicate which of the four columns on this line receives the sales value. Values are:
1: Column 1 receives the sales value (if any).
2: Column 2 receives the sales value (if any).
3: Column 3 receives the sales value (if any).
4: Column 4 receives the sales value (if any).
- G/L Interface (general ledger interface)
-
Select to reflect the monetary amount or unit value of any activity that contains this order line type in the general ledger.
- A/R Interface (accounts receivable interface)
-
Select to reflect the monetary amount or unit value of any activity that contains this order line type in JD Edwards EnterpriseOne Accounts Receivable.
- A/P Interface (accounts payable interface)
-
Select to reflect the monetary amount or unit value of any activity that contains this order line type in JD Edwards EnterpriseOne Accounts Payable.
- S/WM Interface (service and warranty management interface)
-
Select to enable the system to use this order line type in the JD Edwards EnterpriseOne Service Management (S/WM) system.
When you select this option, you set up additional JD Edwards EnterpriseOne S/WM attributes for the line type on the S/WM Line Type Constants Revisions form which can be accessed through the Form menu.
- Text Line
-
Select to indicate that the information with this order line type contains only text information.
- Reverse Sign
-
Select to reverse the sign of the quantity in the line. Use this code to enable easy entry of credit memos.
- Apply Freight
-
Select to perform freight calculations during processing.
If you do not select this option, the system does not perform freight calculations during processing.
- Apply Retainage
-
Select to include the item's values in the calculation of an accounts payable retainage. Use this option only if the interface between JD Edwards EnterpriseOne Procurement and JD Edwards EnterpriseOne Accounts Payable is active.
- Generate Workorder
-
Select to generate an internal work order automatically for this order detail line.
- Include in Cash Discount
-
Select to include the extended monetary amount of the transaction in the cash discount or payment terms discount calculation.
- Include Sales/COGS for Gross Profit (include sales/cost of goods sold for gross profit)
-
Select to include sales and cost of goods sold in gross profit calculations.
- Voucher Match Variance Account
-
Select to indicate that a variance that the system generates during voucher match should be booked to the account. Clear to book any variance to the expense account for the order detail line.
Note:
The system uses this option with the Inv. Interface field set to A or B in JD Edwards EnterpriseOne Procurement only. - Edit Item Master for Non-Stock Item
-
Select to validate the sales order line item against the Item Master table. Use this with the nonstock inventory interface only.
- Protect Price on Sales Order
-
A code that indicates the Unit Price, Extended Price, Foreign Unit Price, and Foreign Extended Price fields on a sales order detail line are protected against revisions after the order is entered.
Selecting this option ensures that the price cannot be changed after the initial entry of the sales order.
- Generate Purchase Order
-
Select to generate a purchase order. Use this with the Inventory Interface field set to D and N.
- Call Materials Issue
-
Select to activate the materials issue function when performing the receipts into stock function.
You use this option only for JD Edwards EnterpriseOne Procurement and when you are using JD Edwards EnterpriseOne Engineer to Order from Oracle.
- Procurement Receipt Required
-
Select to require receipts for purchase orders lines. If you select this option, the purchase order line must be received before the voucher match process. If you clear this option, you can match purchase order lines without requiring a receipt.
2.6 Setting Up Order Activity Rules
This section provides an overview of order activity rules, lists prerequisites, and discusses how to set up order activity rules.
2.6.1 Understanding Order Activity Rules
To advance an order line through the order process, you must create order activity rules. The system uses order activity rules to determine the sequence of steps for processing order information.
The system processes an order line based on the order activity rules that you set up for the order type and line type combination. For example, you could set up the order activity rules for stock line types in sales orders as:
-
Enter order
-
Print pick slip
-
Confirm shipment
You must assign a status code for every step in the order process. A status code is a number that the system uses to identify the current status of an order line. You must also identify next status codes that determine the next step to which the system advances the order. You must arrange status codes in ascending numeric order for the system to establish the sequence of steps.
You can change the progression of steps or include alternate steps in the order activity rules. For example, you can set up order activity rules for nonstock items in sales orders so that the system bypasses the step to print pick slips and advances the order line to shipment confirmation.
You can specify at which point in the order process the system writes records to the Sales Order Detail Ledger File (F42199) and the Procurement Order Detail Ledger File (F43199) history tables.
In order processing, you can use the order activity rules to:
-
Locate the status of an order.
-
Select orders for batch processing.
-
Prepare reports that are based on the current status of an order.
2.6.2 Prerequisites
Before you complete the tasks in this section:
-
Verify that you have set up status codes in UDC table 40/AT.
-
Verify that you have set up order types in UDC table 00/DT.
-
Verify that you have set up order line types.
2.6.3 Forms Used to Set Up Order Activity Rules
| Form Name | Form ID | Navigation | Usage |
|---|---|---|---|
| Work With Order Activity Rules | W40204B | Sales Order Management Setup (G4241), Order Activity Rules | Review and select order activity rule records. |
| Order Activities Rules - Revisions | W40204A | Click Add on the Work With Order Activity Rules form. | Set up order activity rules.
Add and revise order activity rule records. |
2.6.4 Setting Up Order Activity Rules
Access the Order Activity Rules - Revisions form.
Figure 2-6 Order Activity Rules - Revisions form
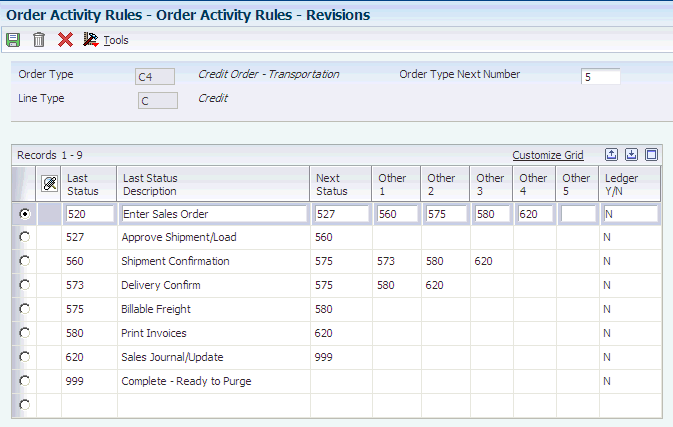
Description of ''Figure 2-6 Order Activity Rules - Revisions form''
- Order Type
-
Enter a code from UDC 00/DT that identifies the type of document. This code also indicates the origin of the transaction. Document type codes are reserved for vouchers, invoices, receipts, and time sheets, which create automatic offset entries during the post program. (These entries are not self-balancing when you originally enter them.)
The system contains predefined document types which should not be changed:
P: Accounts Payable documents.
R: Accounts Receivable documents.
T: Payroll documents.
I: Inventory documents.
O: Purchase Order Processing documents.
J: General Accounting/Joint Interest Billing documents.
S: Sales Order Processing documents.
- Order Type Next Number
-
Enter a code to indicate which next number series the system uses when creating order numbers for this order type. Ten available Next Number series are available.
This field addresses:
-
Purchase requisitions that carry order numbers that are different from bid requests and purchase orders.
-
Blanket sales orders that are numbered in a different number range from standard sales orders.
-
- Other 1, Other 2, Other 3, Other 4, and Other 5
-
(Optional) Enter a number to indicate a status that can be performed as the next step in the order process.
Although this is not the preferred or expected next step, this field is an allowable override. The system does not allow you to initiate an order line step or status that is not defined as either the expected next status or an other allowed status. Other allowed status codes let you bypass processing steps. These codes are often referred to in processing options as override next status codes.
- Ledger Y/N (ledger yes/no)
-
Enter a value to write a record to the S.O Ledger Detail File table (F42199). Values are:
Y: Write a record for selected fields to the history table.
N: Do not write a record to the history table.
2.7 Setting Up Sales Order Automation (RTE) Filtering
This section provides an overview of real-time events and real-time event filtering, and discusses how to set up real-time event filtering.
2.7.1 Understanding Real-Time Events
A real-time event (RTE) is a notification to a third-party system that a business transaction has occurred in the JD Edwards EnterpriseOne system. Third-party systems can subscribe to the JD Edwards EnterpriseOne system to receive notification when a specific transaction occurs. You can use any JD Edwards EnterpriseOne interface, such as HTML, WIN32, and terminal servers to generate RTEs. Real-time events can be used for both synchronous and asynchronous processing.
You use the Event Definition Workbench program (P90701A) to define RTEs in the JD Edwards EnterpriseOne system. Every RTE that you use must have an associated record in the Event Activation Status table (F90705). See JD Edwards EnterpriseOne Applications Real-Time Events Implementation Guide.
2.7.2 Understanding Real-Time Event Filtering
When an RTE is active, the system publishes the RTE when you create a new order and make any subsequent revisions such as sales order update or status change. Depending on the order type, the order might undergo several changes during its life cycle, which could result in the system generating multiple RTEs that are not needed by those systems which are subscribing to real-time events. Unnecessary RTEs impact system performance by placing increased demand on the transaction server that processes the RTEs.
The Work With RTE Filter program (P4230) provides the flexibility to filter RTE generation for the most heavily used events:
-
Sales Order. RTSOOUT, RTSOOUT2, and RTSOOUT3.
-
Shipment Notice Manage Notify. RTSHPNOUT and RTSHPNOUT2.
-
Invoice Manage Notify. RTINVOUT and RTINVOUT2.
For example, without filtering the system generates a version of event RTSOOUT each time you make a change to a sales order. Subscribing systems do not need many of these generated transactions to process through the transaction server. The Work With RTE Filter program enables you to set up the JD Edwards EnterpriseOne system to publish the RTSOOUT, RTSOOUT2, RTSOOUT3, RTSHPNOUT, RTSHPNOUT2, RTINVOUT, and RTINVOUT2 events based upon specific criteria such as:
-
Last status code. Filtering based upon status code provides enormous flexibility and applies only to the JD Edwards EnterpriseOne Sales Order Management system.
-
Order type. You can exclude the order types that you do not want the system to generate RTEs. For example, you might not want the system to generate RTEs for transfer orders between branch plants.
-
Business unit. You can exclude the business units that you do not want the system to generate RTEs. For example, you might have a central location that serves as a distribution center to regional locations. When shipping to regional locations you may find it unnecessary for the system to generate RTEs.
2.7.3 Forms Used to Set Up Real-Time Event Filtering
| Form Name | Form ID | Navigation | Usage |
|---|---|---|---|
| Work With Real Time Event Filter | W4230C | Sales order Management Setup (G4241), RTE Filter Details. | Add, review, and select RTE filter detail records. |
| Real Time Event Filter Revisions | W4230D | On the Work With Real Time Event Filter form, click Add. | Add and revise filtered RTE details. |
2.7.4 Reviewing and Activating RTE Filters
Access the Work With Real Time Event Filter form.
Figure 2-7 Work With Real Time Event Filter form
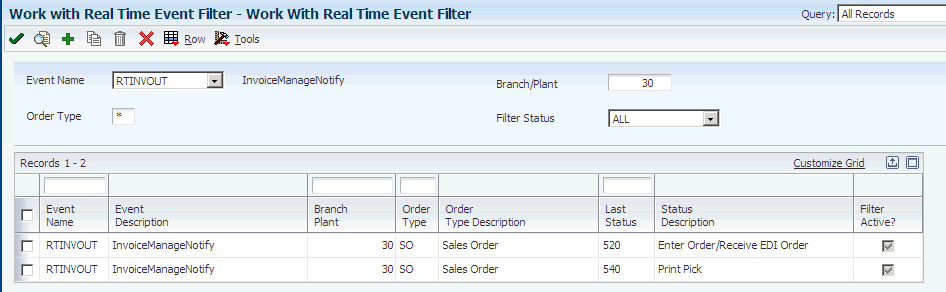
Description of ''Figure 2-7 Work With Real Time Event Filter form''
- Event Name
-
Select an event name from the drop down menu. The event name must be listed in UDC table 42/RF.
- Order Type
-
Specify the order type associated with the real-time event.
- Branch Plant
-
Enter an alphanumeric code that identifies a separate entity within a business for which you want to track costs. For example, a business unit might be a warehouse location, job, project, work center, branch, or plant.
- Filter Status
-
Specify whether the status of each detail line for the real-time event is active or inactive. A check mark in the Filter Active column indicates that the detail line is active. To change the status, select one or more lines and select Change Status from the Row menu.
2.7.5 Setting Up RTE Filter Details
Access the RTE Filter Details Revisions form.
Figure 2-8 Real Time Event Filter Revisions form
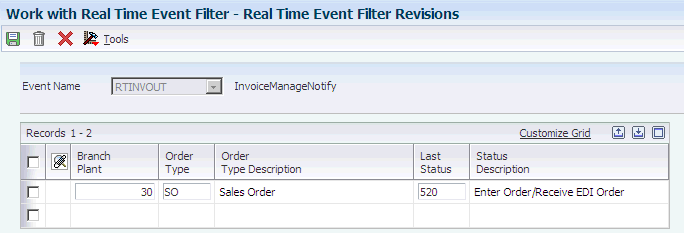
Description of ''Figure 2-8 Real Time Event Filter Revisions form''
- Event Name
-
Select an event name from the drop down menu. The event name must be listed in UDC table 42/RF.
- Branch Plant
-
Enter an alphanumeric code that identifies a separate entity within a business for which you want to track costs. For example, a business unit might be a warehouse location, job, project, work center, branch, or plant.
- Order Type
-
Enter a user defined code (00/DT) that identifies the type of document. This code also indicates the origin of the transaction. J.D. Edwards has reserved document type codes for vouchers, invoices, receipts, and time sheets, which create automatic offset entries during the post program
- Last Status
-
Enter a code (40/AT) that specifies the last step in the processing cycle that this order line has successfully completed.
2.8 Setting Up Revenue Recognition for Sales Order Invoices
You must complete the following setup before the system can send sales order invoices to the revenue recognition process in the JD Edwards EnterpriseOne Accounts Receivable system:
-
Set up the company constant, UDCs, and AAIs for revenue recognition.
-
Set up trigger information (hierarchy, dates, and configuration records)