8 Setting Up Routes
This chapter contains the following topics:
8.1 Understanding Routes
Routing is essential to the JD Edwards EnterpriseOne Transportation Management system. Routing is the process by which the system selects a carrier and a mode of transport and then rates a shipment or load. A routing entry represents the path that the shipment takes. You can define the cost of shipping for the shipment based on a particular route by assigning a rate schedule to the routing entry.
You assign a routing entry and a rate to every shipment and load. You must set up both routing entries and rates during system setup, but you can change them whenever necessary. Routing entries and rates are set up for common carriers or private fleets. You can select a routing entry, or you can let the system automatically select a routing entry.
You create a specific routing entry that defines an origin and destination that is served by a carrier or private fleet. The system uses these search criteria to select a routing entry that meets the needs of the shipment or load:
| Search Criteria | Description |
|---|---|
| Routing hierarchy | The routing hierarchy determines how the system searches for destination information in the Routing Entries table (F4950). You can specify a sequence for the routing hierarchy, but the system generally searches from the most specific destination to the most general destination. |
| Routing restrictions | Routing restrictions are limitations such as weight, volume, and number of pieces that are placed on a routing entry. |
| Options & equipment rules | Options and equipment rules list the options, equipment, or both that are supported by a routing entry, mode of transport, or carrier. |
| Preferences | If a mode of transport or carrier preference is set up, the route must match the mode, carriers, or both that are specified in the preference. |
| Delivery date requirements | A route is then selected based on delivery date. The system calculates shipment dates based on the user-entered dates and factors in the workday calendar to account for nonworking days such as holidays and weekends. |
Each of these search levels eliminates routing entries that might not fit the shipment or load. The system sorts the available routes by the route selection type, which is set up in the customer preference. Customer preferences include least cost, best delivery time, best performance, or a combination of the three.
After the system selects and assigns a routing entry to a shipment, the payable and billable freight charges are calculated based on the rate information from the routing entry.
When you enter a purchase order or credit sales order (customer return), you can route and rate the resulting shipment. Based on the business process, you can set up rates and rate schedules that the system uses specifically for inbound shipments; however, you do not have to set up specific rates with inbound shipments.
As with outbound shipments, when you enter an inbound shipment, the system assigns the carrier or mode of transport that is entered on the order. If you do not enter a route manually, the system uses the customer preferences for preferred carrier and route information. If customer preferences are not defined, the system uses the routing tables to route and rate the inbound shipment. The system rates an inbound shipment only when the freight terms are collect.
8.2 Setting Up Routes
This section provides overviews of route setup, routing hierarchy, routing entry setup, routing restriction setup, carrier zone setup, option and equipment rule setup, intermodal route setup, lists prerequisites, and discusses how to:
-
Set up the routing hierarchy.
-
Set up routing entries.
-
Set up routing restrictions.
-
Set up carrier zones.
-
Set up options and equipment rules.
-
Set up intermodal routes.
8.2.1 Understanding Route Setup
A route is the path that the shipment takes to the customer. When you set up a route, you define origin and destination, available mode of transport, and available carrier for each route. You must also assign a rate schedule.
For inbound shipments, such as a purchase order or credit sales order, a route can be the path that the shipment takes from the supplier. An inbound shipment is defined as a movement of products from a single origin (for a purchase order, the supplier) to a single destination (the purchaser). Because the only difference between an inbound and outbound transaction for a shipment is a different origin and destination, you can use the same method to define routes for inbound and outbound shipments.
A routing entry defines the origin and destination that is served by a common carrier or private fleet. In addition, a routing entry specifies the carrier number and mode of transport that is used for a given combination of origin and destination for a shipment or load. It also specifies the information that the system uses to calculate the freight charges that applies to the routing entry.
8.2.2 Understanding Routing Hierarchy
The routing hierarchy determines how the system searches for destination information in the Routing Entries table (F4950). The system finds routing entries for each shipment or load according to the information that is found on this table.
8.2.3 Understanding Routing Entry Setup
You set up the routing entries for each of the carriers and modes of transport, or a private fleet. The system then uses these routing entries to route and rate shipments or loads. Routing entries are stored in the Routing Entries table (F4950) and must contain this information:
-
Origin
-
Destination
-
Carrier
-
Mode of Transport
-
Rate Schedule
Note:
When you define the origin for routing entries, you can only define origin, origin branch/plant, or origin postal code (and country code). If you define more than one of these in a single routing entry, the system displays an error message. The Business Unit Master table (F0006) must contain the address book number for the origin depot. Otherwise, shipments and any routing entries that are set up by origin or origin postal code are not valid. If you use a country code in the routing entry, to enable selection of the route Ship To addresses of the shipment or load, you must specify country codes in the address book record.
After you define the origin, you can define the destination by destination postal code, destination postal code and country code, route code, city and state, city and country code, county and state, county and country code, or address number. The system generates an error if a previous entry or entry combinations are defined.
The system does not select multiple routing entries for the same combination of carrier and mode. For example, if you have two entries for the same mode, both of which service the origin and destination, the system uses the most specific entry, based on the routing hierarchy. The routing hierarchy determines how the system searches for routing entries, based on their destination information. You use several criteria to define destinations, including address book number, route, carrier zone, city, state, and country.
When the system selects a routing entry, the rate schedule links to the rating tables and retrieves a rate. The system then calculates the billable charges, payable charges, or both.
When defining the rate definition, you can specify a business function to create a user-defined program to calculate a promised delivery date or additional restrictions, to perform user-defined tasks, or to determine whether a specific carrier is eligible for a shipment.
You can copy routing entries to create new entries.
8.2.4 Understanding Routing Restriction Setup
You can define routing restrictions such as maximum size, weight, and volume, maximum number of stops, and maximum number of piece restrictions for a route. You must use these criteria to define restrictions for a route:
-
Mode of transport
-
Carrier
-
Mode of transport and carrier
The system selects a route for a shipment or load only if it meets the restrictions that you specify. For example, if the road to a destination has a bridge with a maximum weight limit, you must define a maximum weight for the vehicle going to that destination so that the system selects a route that does not violate the restriction.
8.2.5 Understanding Carrier Zone Setup
A carrier zone is a defined regional area. This area usually contains multiple postal codes and is grouped for convenience and cost savings. You set up carrier zones using the Carrier Zone Definitions program (P4951) to maintain destination information for the routing entries. You set up the zones by origin. When the system routes a shipment or load, it uses the destination information to select a carrier zone. You set up carrier zones to enable the system to:
-
Integrate with rate tables to calculate a rate.
-
Select routing entries that are based on destination.
-
Reduce the number of routing entries.
When you set up carrier zones, you can significantly reduce the number of routing entries that are required when multiple locations are served by the same routing entry. You can use carrier zones as a lookup value when you rate a shipment.
8.2.6 Understanding Option and Equipment Rule Setup
Options and equipment rules are special requirements for a specific route, carrier, or mode of transport. When the system selects a routing entry for possible use during shipment or load routing, the system searches for inclusion or exclusion rules for each option or piece of equipment that is required for that shipment. The system first attempts to find an inclusion or exclusion rule at the route level. If no rules exist at that level, the system searches for a rule at the carrier level. Again, if no rules exist at that level, the system searches for a rule at the mode of transport level. If the system encounters a rule that excludes the route, the system cannot select the route.
8.2.7 Understanding Intermodal Route Setup
An intermodal route uses multiple modes of transportation or multiple carriers to transport finished goods and raw materials from a single origin to a single destination. You can use the Intermodal Detail Routing Entries Definition program (P49501) for rail shipments or to create an intermodal routing entry for any shipment that uses multiple modes of transportation.
To set up an intermodal route, you must first set up a parent route, which joins all of the intermediate stops or legs. Each intermediate stop is linked to the parent route by origin and destination information. Each leg within the parent route is linked as well.
For example, assume that you have a parent route between city A and city E. Between those cities are three additional cities to which you provide shipping services – city B, city C, and city D. You would set up an intermodal route and specify four legs in this way:
-
Leg one has an origin of city A and a destination of city B.
-
Leg two has an origin of city B and a destination of city C.
-
Leg three has an origin of city C and a destination of city D.
-
Leg four has an origin of city D and a destination of city E.
Each of the intermediate legs can have its own mode of transport, carriers, and so on.
8.2.8 Prerequisites
Before you complete the tasks in this chapter:
-
Set up the Route Rule user-defined codes (49/CL).
See User-Defined Codes.
-
Set up carriers in the Carrier Master table (F4906) and in the Address Book (P01012).
-
Set up parent routes.
8.2.9 Forms Used to Set Up Routes
| Form Name | Form ID | Navigation | Usage |
|---|---|---|---|
| Routing Hierarchy Revisions | W4950D | Route Setup (G49411), Work With Routing Entries
On Work With Routing Entries, select Routing Hierarchy from the Form menu. |
Set up the routing hierarchy. |
| Routing Entries Revisions | W4950B | On Work With Routing Entries, click Add. | Set up routing entries. |
| Routing Restrictions Revisions | W4952A | Route Setup (G49411). Work With Routing Restriction
On Work With Routing Restrictions, click Add. |
Set up routing instructions. |
| Carrier Zone Revisions | W4951B | Route Setup (G49411). Work With Carrier Zones
On Work With Carrier Zones, click Add. |
Set up carrier zones. |
| Option and Equipment Inclusion/Exclusion Revisions | W4956A | Route Setup (G49411). Work With Options and Equipment Rules
On Work With Option and Equipment Inclusion/Exclusion Rules, click Add. |
Set up options and equipment rules. |
| Intermodal Detail Routing Entry Revisions | W49501B | On Work With Routing Entries, locate records that have a parent route. Select a record in the grid, and then select Intermodal Detail from the Row menu.
On Work With Intermodal Detail Routing Entries, click Add. |
Set up intermodal routes. |
8.2.10 Setting Up the Routing Hierarchy
Access the Routing Hierarchy Revisions form.
Figure 8-1 Routing Hierarchy Revisions form
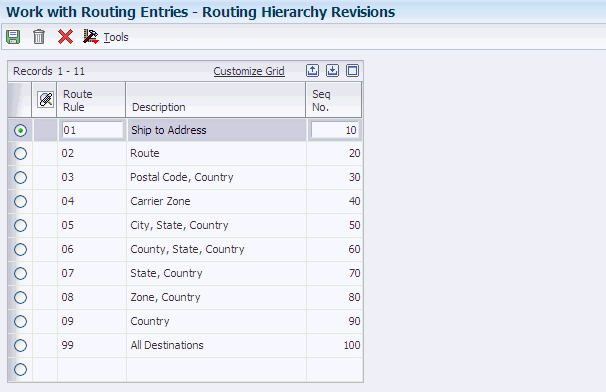
Description of "Figure 8-1 Routing Hierarchy Revisions form"
Ten hard-coded routing hierarchy values are available. The values that the system recognizes include:
-
Ship To Address
-
Route
-
Postal, Country
-
Carrier Zone
-
City, State, Country
-
County, State, Country
-
State, Country
-
Zone, Country
-
Country
-
All Destinations
This is the most general criteria in the routing hierarchy.
|
Note: Each route has only one routing hierarchy value or combination of values. For example, a route cannot have, as part of its criteria, Ship To Address and Route. Although both are valid, the system recognizes only one routing hierarchy value or combination of values such as Zone, Country. |
8.2.11 Setting Up Routing Entries
Access the Routing Entries Revisions form.
Figure 8-2 Routing Entries Revisions form

Description of "Figure 8-2 Routing Entries Revisions form"
-
To enter a destination, complete these fields based on how you set up the routing hierarchy:
-
Destination Postal Code
(If you type an asterisk in this field, the system searches the routing entry for all destinations.)
-
Route Code
-
Carrier Zone
-
Zone
-
Ctry
-
City
-
County
-
ST
-
Destination Address Number
-
Origin
-
Origin Country
If you enter a value for origin country, you must also enter an origin postal code.
-
Origin Postal Code
-
Route Number
-
-
To enter rate schedule information for either an outbound or inbound route, complete these fields:
-
Outbound Rate Schedule
-
Inbound Rate Schedule
-
-
To enter new routes with specific beginning and ending dates, complete these fields:
-
Effective Date
-
Expired Date
These date fields are useful for creating new routing entries for an existing carrier.
-
-
To prevent the system from automatically choosing a route when you create a shipment, complete the Rt Sl field with a zero.
-
To enter rate definition information for rates that are stored within a route, complete these fields:
-
R T
A rate type can only be unit or fixed.
-
Rt Bs
-
Rt UM
-
-
To enter rate information for freight charges for outbound routes and inbound routes, complete these fields:
-
Outbound Freight Charge Rate
-
Inbound Freight Charge Rate
-
-
To determine how the system searches for possible carriers for a route, complete any of these fields:
-
Lead Days
-
Transit Days
-
Pfm Rtg
-
-
To enter tax information or override the tax information that the carrier has specified, complete these fields:
-
Tax Y/N
-
Tax Rate/Area
-
Tax Explanation
-
-
To enter additional information for the route, complete these optional fields:
-
SCAC
-
Cur Cod
-
Distance
-
UM
-
Branch Plant
-
Function Name
-
Shipment Depot
-
Contract Number
-
-
Complete the Parent Route field to set up a parent route for an intermodal route.
Enter 1 in the Parent Route field to specify this route as a valid parent route.
-
Click OK.
-
Destination Postal Code
Enter the United States ZIP code or the postal code that specifies where a shipment is to be routed. Attach this code to the address for delivery in other countries. This code is used as the low end value when you are doing Postal Code Transaction range processing.
-
Route Code
Enter the user-defined code (42/RT) that represents the delivery route on which the customer resides. The freight summary facility uses data in this field as one of several factors to calculate potential freight charges for an order.
For picking, use the route code with the stop and zone codes to group all of the items that are to be loaded onto a delivery vehicle for a specific route.
You set up a default value for each of these fields on the Customer Billing Instruction form.
-
Zone
Specify the user-defined code (40/ZN) that represents the delivery area in which the customer resides. The freight summary facility uses data in this field as one of several factors to calculate potential freight charges for an order.
For picking, you can use the zone code with the route and stop codes to group all items that are to be loaded onto a delivery vehicle for a specific route.
You set up the default value for each of these fields on the Customer Billing Instructions form.
-
Ctry (country)
Enter the user-defined code (00/CN) that identifies a country. The country code has no effect on currency conversion.
The JD Edwards EnterpriseOne Address Book system uses the country code for data selection and address formatting.
-
County
Enter the name of a county, parish, or other political district that is necessary for the address or for tax purposes.
-
ST (state)
Enter the user-defined code (00/S) that identifies the state or province. This code is usually a postal service abbreviation.
-
Destination Address Number
Enter the address number of the location to which you want to ship this order. The address book provides default values for customer address, including street, city, state, zip code, and country.
-
Carrier Zone
Enter the identifier that a carrier uses to specify a specific zone. For example, ZONE-21 might refer to a zone that a parcel carrier uses to determine the freight charge for deliveries to specific zip codes.
-
Outbound Rate Schedule
Enter the schedule of freight and miscellaneous charges that are applied to a shipment.
-
Carrier Number
Specify the carrier that is assigned to complete a shipment or part of a shipment. This could represent a common carrier or a private fleet.
-
8.2.12 Setting Up Routing Restrictions
Access the Routing Restrictions Revisions form.
Figure 8-3 Routing Restrictions Revisions form
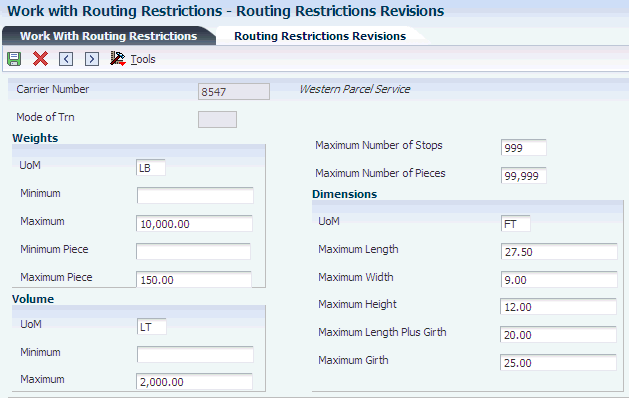
Description of "Figure 8-3 Routing Restrictions Revisions form"
- Weight UoM
-
Specify the unit of measure that indicates the weight of an individual item. Typical weight units of measure are:
GM: Gram
KG: Kilogram
CW: Hundredweight
TN: Ton
OZ: Ounce
LB: Pound
When setting up a user-defined code for a weight unit of measure, you must specify W for the user-defined code's special handling code.
- Minimum Weight
-
Enter the minimum weight for the shipment.
- Maximum Weight
-
Enter the maximum weight for the shipment.
- Minimum Piece Weight
-
Enter the minimum weight for a shipment piece.
- Maximum Piece Weight
-
Enter the maximum weight for a shipment piece.
- Volume UoM
-
Specify the unit of measure that is used for the cubic space that is occupied by an inventory item. Typical volume units of measure are:
ML: Milliliter
CF: Cubic Foot
CY: Cubic Yard
CM: Cubic Meter
PT: Pint
LT: Liter
When setting up a volume unit of measure user-defined code, you must specify a V for the user-defined code's special handling code.
- Minimum Cubes
-
Enter the minimum cubic space for the shipment.
- Maximum Cubes
-
Enter the maximum cubic space for the shipment.
- Maximum Number of Stops
-
Enter the maximum number of stops that can be made on a delivery.
- Maximum Number of Pieces
-
Enter the maximum number of pieces for a shipment.
- Dimensional UoM
-
Specify the width, height, or length unit of measure for a vehicle.
- Maximum Length
-
Enter the maximum length of a shipment.
- Maximum Width
-
Enter the maximum width of a shipment.
- Maximum Height
-
Enter the maximum height of a shipment.
- Maximum Length Plus Girth
-
Enter the maximum girth plus length of a shipment.
- Maximum Girth
-
Enter the maximum girth of a shipment.
8.2.13 Setting Up Carrier Zones
Access the Carrier Zone Revisions form.
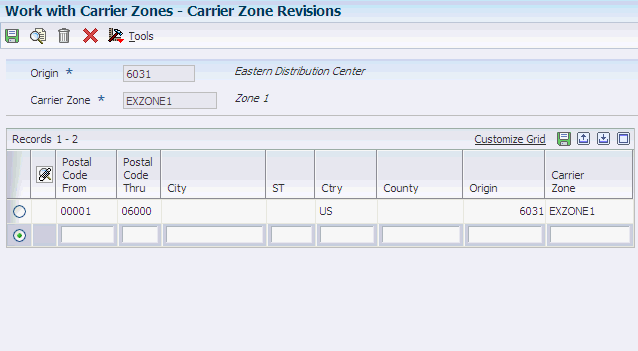
- Carrier Zone
-
Specify the identifier used by a carrier to identify a specific zone. For example, ZONE-21 might refer to a zone used by a parcel carrier to determine the freight charge for deliveries to specific zip codes.
- Postal Code From
-
Enter the beginning postal code in a range of postal codes.
- Postal Code Thru
-
Enter the ending postal code in a range of postal codes.
8.2.14 Setting Up Options and Equipment Rules
Access the Option and Equipment Inclusion/Exclusion Revisions form.
Figure 8-5 Option and Equipment Inclusion/Exclusion Revisions form
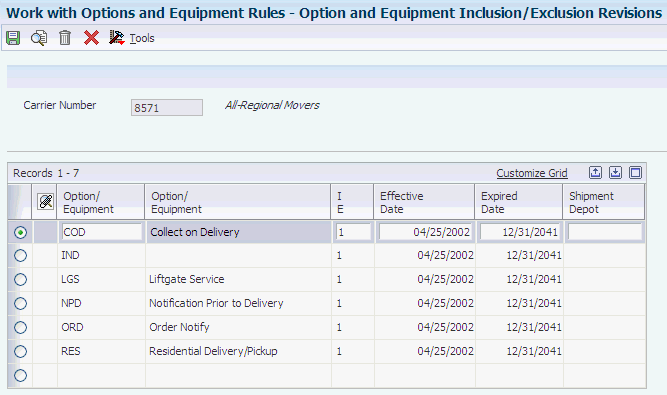
Description of "Figure 8-5 Option and Equipment Inclusion/Exclusion Revisions form"
- Option/ Equipment
-
Enter the user-defined option or piece of equipment that is associated with a shipment or that is required to make a shipment.
- I E
-
Select this option to include or exclude. Values are:
Y or 1: include
N or 0: exclude
- Shipment Depot
-
Identify the origin depot for a shipment or a load.
8.2.15 Setting Up Intermodal Routes
Access the Intermodal Detail Routing Entry Revisions form.
Figure 8-6 Intermodal Detail Routing Entry Revisions form
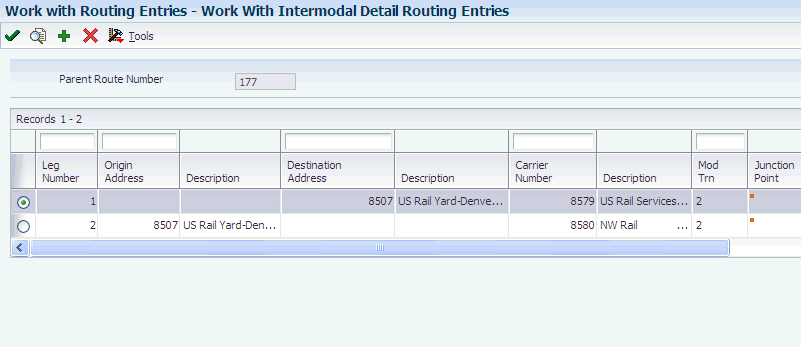
Description of "Figure 8-6 Intermodal Detail Routing Entry Revisions form"
-
Complete these fields to enter an origin and a destination:
-
Leg Number
The system assigns numbers in sequence, starting with 1, unless you enter a specific number.
-
Origin Address
-
Destination Address
The system uses the origin and destination address to split the shipment routing steps into multiple steps, one step for each leg. The destination of a leg becomes the origin of the next leg and so on, for each leg. The first origin and last destination are defined in the parent route.
-
-
To specify whether the system calculates a rate for a particular leg, complete the Rate Schedule field:
This field is optional. Any legs to which rate schedules have been assigned are rated during the routing and rating process.
-
Complete these fields, and click OK:
-
Carrier Number
-
Mod Trn
-
Contract Number
-
Freight Chg Rate
-
Cur Cod
-
R T
-
Rt Bs
-
Rt UM
-
Transit Days
-
UM
-
Effective Date
-
Expired Date
-
Route Number
-
Tax Y/N
-
Tax Rate/Area
-
Tax Explanation
-