3 Setting Up the System
This chapter contains the following topics:
3.1 Understanding Transportation Management
This section provides overviews of:
-
Transportation Management
-
Hub setup
-
User-defined codes
3.1.1 Transportation Management
Before you can use the JD Edwards EnterpriseOne Transportation Management system, you must define certain information that the system uses during processing. This information enables you to configure the system according to business needs.
3.1.2 Hub Setup
Hubs are central locations that carriers use to distribute shipments to a regional area. The system uses hubs (or distribution centers) for pooled shipments. You set up hubs as address book records. The system then uses the associated address book number as the origin for a routing entry.
You can add a search type value for hubs. The system can use the parent address of a hub to identify the hub owner, although this information is for informational purposes only. You can also use category codes for special hub values, but this information is not used directly in the JD Edwards EnterpriseOne Transportation Management system.
3.1.3 User-Defined Codes
Many fields throughout the JD Edwards EnterpriseOne Transportation Management system require user-defined codes (UDCs). You can customize fields in the system by setting up UDCs to meet the needs of the organization.
UDCs enable you to establish and maintain a table that defines valid codes for various types of information. Codes are categorized by system and code type.
The JD Edwards EnterpriseOne Transportation Management system uses these UDCs:
| Code | Description |
|---|---|
| Shipment Status (41/SS) | Defines the different statuses that a shipment goes through as it is processed by the JD Edwards EnterpriseOne Transportation Management system. |
| Freight Handling Code (42/FR) | Defines the different types of freight in a load. |
| Shipping Document/Line Types (49/SD) | Defines the document types from other systems, such as Sales Order Management, that result in the creation of shipments. |
| Freight Classification (49/BE) | Classifies the various types of freight as established by the National Motor Freight Classification (NMFC) book. |
| Freight Commodity Code (49/BF) | Classifies the attributes of an item or commodity as specified in the NMFC commodity codes. |
| Option/Equipment (49/BG) | Defines all of the options and equipment services that carriers may provide for shipments and loads. Examples include weekend delivery, notification before delivery, liftgate service and so on. |
| Shipment Status Codes (49/BH) | Defines the tracking requirements of a shipment. Specifically, this code records the status of a shipment as it is in transit. |
| Shipment Status Reason (49/BJ) | Defines the reason for the status code of a shipment. |
| Freight Rate Schedule (49/BK) | Stores rate definitions and rate schedules. You apply rate schedules to routing entries to link to specific rates. |
| Freight Charge Code (49/BL) | Lists the charge codes that the system uses to determine freight costs for carriers or private fleets. |
| Shipment Tracking Type (49/BS) | Defines the type of tracking that a shipment uses for a specific carrier or private fleet. This code does not affect any fields in the system. It is informational only. |
| Preference Criteria (49/BU) | Defines international shipping information that is specific to imports and exports. This code is informational only. |
| Producer of Goods (49/BV) | Defines international shipping information for non-hazardous goods that are specific to imports and exports. This code is informational only. |
| Domestic/Foreign Commodity (49/BW) | Defines a commodity as either domestic or foreign. |
| Hazard Class or Division (49/BX) | Defines the various hazardous classes that may apply to hazardous items such as corrosives and flammables. |
| Packaging Group (49/BY) | Defines whether the items being packaged are dangerous. |
| Subsidiary Risk (49/BZ) | Defines the risks that are associated with hazardous materials, such as gasoline or corrosives for a shipment or load. |
| Packaging Instructions (49/CB) | Defines the packaging instructions for hazardous liquids or corrosives. |
| Hazard Label (49/CC) | Lists the color labels that you apply to the packaging for hazardous materials. |
| Routing Rule (49/CL) | Defines the routing rules to use for the routing hierarchy. |
In addition, you must define the UDCs (00/DT) for the various document types and the UDCs (00/TD) for the workdays that you set up in the system.
3.2 Activating Transportation Management
This section provides an overview of transportation management activation and discusses how to activate transport management.
3.2.1 Understanding Transportation Management Activation
Before you can use the JD Edwards EnterpriseOne Transportation Management system, you must activate it within JD Edwards EnterpriseOne. When you activate transportation management, the system creates the links between the JD Edwards EnterpriseOne Sales Order Management, Procurement, and Transportation Management systems. Specifically, when you create sales or purchase orders, the system generates shipments.
3.2.2 Forms Used to Activate Transportation Management
| Form Name | Form ID | Navigation | Usage |
|---|---|---|---|
| Work With JD Edwards EnterpriseOne System Control | W99410A | Transportation Setup (G4941), Activate Transportation System | Access forms to activate transportation management. |
| JD Edwards EnterpriseOne System Control - Revisions | W99410B | Select data item SY49 on the Work With JD Edwards EnterpriseOne System Control form, and click the Select button. | Activate Transportation Management. |
3.2.3 Activating Transportation Management
Access the JD Edwards EnterpriseOne System Control - Revisions form.
Select Yes and click OK.
3.3 Setting Up Automatic Accounting Instructions
This section provides an overview and discusses how to set up automatic accounting instructions.
3.3.1 Understanding Automatic Accounting Instructions
Automatic accounting instructions (AAIs) are the links between the day-to-day functions, the chart of accounts, and financial reports. The system uses AAIs to determine how to distribute general ledger entries that the system generates. For example, in the JD Edwards EnterpriseOne Transportation Management system, AAIs indicate how the system records a freight charge after a shipment is confirmed.
For distribution systems, you must create AAIs for each unique combination of company, transaction, document type, and general ledger class that you anticipate using. Each AAI is associated with a specific general ledger account that consists of a business unit, an object account and, optionally, a subsidiary account.
If you are required to collect taxes on customer invoices, you must distribute the tax amounts to the correct general ledger accounts. When you set up AAIs for a specific type of tax, such as value added tax (VAT) or usage tax, you designate the accounts to debit and credit for an invoice tax amount.
The system stores distribution AAIs in the Distribution/Manufacturing - AAI Values table (F4095).
The JD Edwards EnterpriseOne Transportation Management system uses these distribution AAIs for processing:
| AAI | Description |
|---|---|
| Freight Payable (4921) | Provides the general ledger account information for freight costs. |
| Accrued Freight (4920) | Provides the general ledger account information for accrued freight. |
| Freight Variance (4922) | Provides the general ledger account information for manual, tax, or currency variances. |
The Account Revisions form of the Distribution AAIs program (P40950) displays each predefined AAI item and information about the document type, general ledger class, and accounts that are affected by transactions.
3.3.2 Forms Used to Set Up Automatic Accounting Instructions
| Form Name | Form ID | Navigation | Usage |
|---|---|---|---|
| Work With AAIs | W40950B | Transportation Setup (G4941), Transportation AAIs | Access transportation AAIs. |
| Account Revisions | W40950D | Select an AAI table on the Work With AAIs form, and then select Details from the Row menu. | Set up AAI details. |
3.3.3 Setting Up Automatic Accounting Instructions
Access the Account Revisions form.
- Co (company)
-
Specify the specific organization, fund, or other reporting entity. The company code must exist in the Company Constants table (F0010) and must identify a reporting entity that has a complete balance sheet. At this level, you can have intercompany transactions.
Note:
You can use company 00000 for default values such as dates and automatic accounting instructions. You cannot use company 00000 for transaction entries. - Do Ty
-
Specify the origin and purpose of the transaction. The system reserves several prefixes for document types, such as vouchers, invoices, receipts, and time sheets. The reserved document type prefixes for codes are:
P: Accounts payable documents
R: Accounts receivable documents
T: Time and Pay documents
I: Inventory documents
O: Purchase order documents
S: Sales order documents
- G/L Cat
-
Specify the general ledger offset that the system uses when it searches for the account to which it posts the transaction. If you do not want to specify a class code, you can enter **** (four asterisks) in this field.
You can use AAIs to predefine classes of automatic offset accounts for the JD Edwards EnterpriseOne Inventory Management, Procurement, and Sales Order Management systems. You might assign general ledger class codes such as:
IN20: Direct Ship Orders
IN60: Transfer Orders
IN80: Stock Sales
The system can generate accounting entries based upon a single transaction. For example, a single sale of a stock item can trigger the generation of accounting entries similar to these:
-
Sales-Stock (Debit) xxxxx.xx.
-
Accounts Receivable Stock Sales (Credit) xxxxx.xx.
-
Posting Category: IN80.
-
Stock Inventory (Debit) xxxxx.xx.
-
Stock COGS (Credit) xxxxx.xx.
The system uses the class code and the document type to find the AAI.
-
- Branch Plant
-
Specify a separate entity within a business for which you want to track costs. For example, a business unit might be a warehouse location, job, project, work center, branch, or plant.
You can assign a business unit to a document, entity, or person for purposes of responsibility reporting. For example, the system provides reports of open accounts payable and accounts receivable by business unit to track equipment by responsible department.
Business unit security might prevent you from viewing information about business units for which you have no authority.
If you leave this field blank, the system uses the business unit that you entered on the work order, in the Charge to Cost Center field.
- Obj Acct
-
Enter the portion of a general ledger account that refers to the division of the Cost Code (for example, labor, materials, and equipment) into subcategories. For example, you can divide the Cost Code for labor into regular time, premium time, and burden.
Note:
If you use a flexible chart of accounts and the object account is set to six digits, you should use all six digits. For example, entering 000456 is different from entering 456 because if you enter 456, the system enters three blank spaces to fill a six-digit object. - Sub
-
Enter the subset of an object account. Subsidiary accounts include detailed records of the accounting activity for an object account.
Note:
If you are using a flexible chart of accounts and the object account is set to six digits, you must use all six digits. For example, entering 000456 is different from entering 456 because, if you enter 456, the system enters three blank spaces to fill a six-digit object.If you leave this field blank, the system uses the value that you entered on the work order in the Cost Code field.
3.4 Setting Up the Workday Calendars
This section provides an overview of workday calendars and discusses how to:
-
Add workday calendars.
-
Change workday defaults.
-
Copy workday calendars.
-
Set processing options for Workday Calendar (P00071).
3.4.1 Understanding Workday Calendars
You set up and maintain workday calendars by calendar type. You can set up calendars for the depot, branch/plant, route code, carrier, or customers. The system uses these calendars when calculating promised shipment and delivery dates.
To calculate the promised shipment date, the system compares the workday calendars of the route, carrier, and branch/plant to find a common workday. To calculate the promised delivery date, the system compares the workday calendars of the customer, carrier, and branch/plant to find a common workday.
For example, you might set up a calendar specifically for a depot in which you record the days that the depot is closed, such as weekends, holidays, or planned shutdowns. When the dispatcher builds shipments and loads, the system uses the information that you set up in the workday calendar to track valid workdays. If a delivery is scheduled to arrive on a weekend, the system updates the date to the next workday.
3.4.2 Forms Used to Set Up the Workday Calendars
| Form Name | Form ID | Navigation | Usage |
|---|---|---|---|
| Work With Workday Calendar | W00071B | Payment Terms Revisions (G00141), Work Day Calendar
Planning Setup menu (G1346), Work Day Calendar Transportation Setup menu (G4941) Work Day Calendar Shop Floor Management Setup menu (G3141), Shop Floor Calendar Product Data Management Setup menu (G3041), Shop Floor Calendar |
Add or view calendars. |
| Workday Calendar Revisions | W00071A | Set up a calendar on the Work With Workday Calendar form, and click the Add button.
Select a calendar on the Work With Workday Calendar form, and click Select. |
Change defaults for workday calendars. |
3.4.3 Adding Workday Calendars
Access the Work With Workday Calendar form.
Figure 3-2 Work With Workday Calendar form
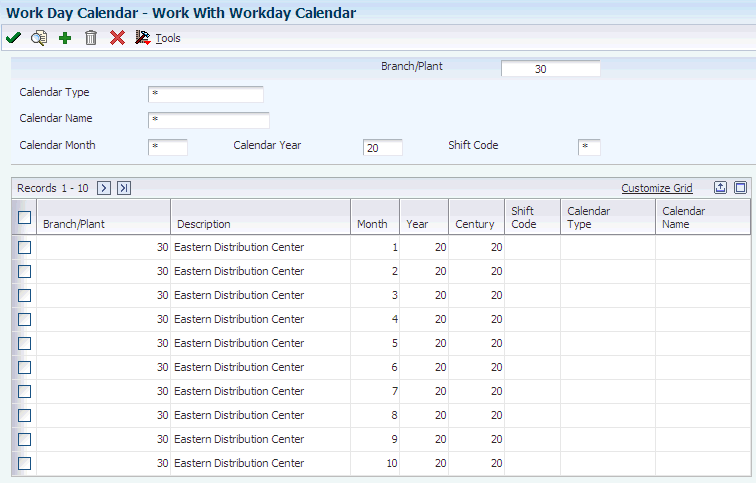
Description of "Figure 3-2 Work With Workday Calendar form"
- Branch/Plant
-
Enter the high-level business unit. Use this code to refer to a branch or plant that might have departments or jobs that represent lower-level business units that are subordinate to it. For example:
-
Branch/Plant (MMCU)
-
Dept A (MCU)
-
Dept B (MCU)
-
Job 123 (MCU)
Business unit security is based on the higher-level business unit.
With the exception of ALL, which is a hard-coded value for this program, the branch/plant that you assign must exist in the Business Unit Master table (F0006).
-
- Calendar Name
-
(Optional) Enter the name of the calendar. If you enter a value in the Calendar Name field, you must enter a shift code.
- Calendar Type
-
(Optional) Specify how the calendar is used. For example, the calendar might be specific to an industry such as banking, or it might be used to schedule delivery persons for a route.
Note:
If you use the default value of *, the system updates the value to blank even though blank is not set up as a valid value in the UDC table. - Calendar Month
-
Enter the number that corresponds to the month in a calendar year.
- Calendar Year
-
Enter the calendar year for this calendar.
- Shift Code
-
(Optional) Specify the daily work shifts.
3.4.4 Changing Workday Defaults
The types of default days that you can specify on Workday Calendar Revisions are in UDC 00/TD. With the exception of W, which is hard-coded as a workday, all other values that are specified are nonworking days. Here are examples of the type of day that you can specify on the calendar:
-
W (workday)
-
E (weekend)
-
H (holiday)
-
S (shut down)
3.4.5 Copying Workday Calendars
Access the Workday Calendar Revisions form.
To copy a workday calendar:
-
On Workday Calendar Revisions, click Copy on the toolbar.
-
Complete the Branch/Plant field to create a calendar.
-
Complete these optional fields to specify unique calendars for the same branch/plant:
-
Calendar Name
-
Calendar Type
-
Shift Code
-
-
Change the default values as necessary for each day of the week and click OK.
3.4.6 Setting Processing Options for Workday Calendar (P00071)
Processing options enable you to specify the default processing for programs and reports.
3.4.6.1 Interop
- 1. Type - Transaction
-
Enter the transaction type for the interoperability transaction. If this processing option is left blank, the system does not perform outbound interoperability processing.
- 2. Before Image Processing
-
Specify whether to use before image processing. Enter 1to write before images for outbound change transactions. If this processing option is left blank, only after images are written.
3.5 Setting Up Transportation Constants
This section provides an overview of transportation constants and discusses how to set up transportation constants.
3.5.1 Understanding Transportation Constants
You use transportation constants to identify branch/plants as depots in the organization and to set up default information throughout the system. You set up default information for the depots in categories ranging from freight classification and shipment status codes to shipment consolidation options and units of measure. These constants provide the information that is necessary to create and process shipments and loads.
3.5.2 Forms Used to Set Up Transportation Constants
| Form Name | Form ID | Navigation | Usage |
|---|---|---|---|
| Work With Transportation Constants | W49002A | Transportation Setup menu (G4941), Work With Transportation Constants | Access forms to set up transportation constants. |
| Transportation Constants Revisions | W49002B | On Work With Transportation Constants, click Add. | Set up transportation constants. |
3.5.3 Setting Up Transportation Constants
Access the Transportation Constants Revisions form.
Figure 3-3 Transportation Constants Revisions form
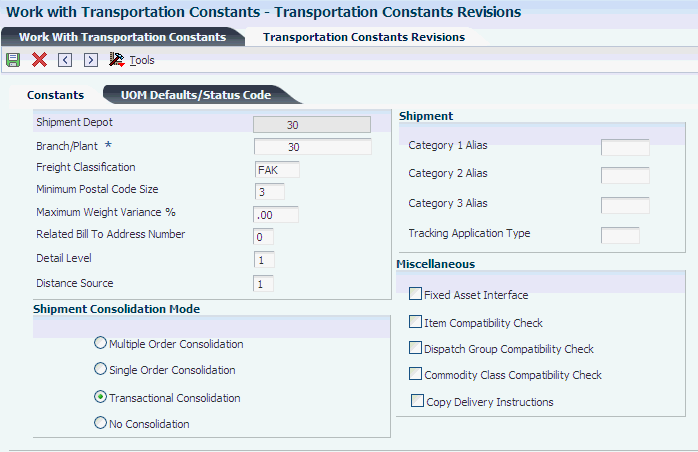
Description of "Figure 3-3 Transportation Constants Revisions form"
- Shipment Depot
-
Enter the code that specifies the shipment depot. If a specific depot is not defined as the default depot, the system retrieves default information for depot ALL.
- Branch/Plant
-
Specify a separate entity within a business for which you want to track items and costs. This entity might be a warehouse location, job, project, work center, or branch/plant. The Branch/Plant field is alphanumeric.
- Freight Classification
-
Enter the National Motor Freight Classification that is assigned according to the freight commodity code.
This is the default information for items that do not have a freight class.
- Minimum Postal Code Size
-
Specify the minimum number of characters that the system requires for a postal code when you create a routing entry.
- Maximum Weight Variance Percent
-
Enter the percent by which the confirmed weight of the shipment can vary from the actual weight that is stored in the shipment when the shipment is confirmed. If the variance is exceeded, the system displays a warning or error message when confirming the shipment.
- Related Bill To Address Number
-
Specify which related address book number contains the bill to address for freight. If the related address book number contains no value, the system uses the address book number for the depot to obtain the billing address.
- Detail Level
-
Specify the shipment detail field that determines a rate when the charge is applied at the shipment detail level.
You can specify one of these fields:
-
Freight Classification Code
-
Dispatch Group
-
Freight Category 1
-
Freight Category 2
-
- Distance Source
-
Enter the source of the distance for a delivery. The source could be a preference or carrier agreement, entered by the user, or retrieved from a mileage system.
- Category 1 Alias
-
Specify the Alias from the Address Book table that is stored in the Shipment Category 1 column.
- Category 2 Alias
-
Specify the Alias from the Address Book table that is stored in the Shipment Category 2 column.
- Category 3 Alias
-
Specify the Alias from the Address Book table that is stored in the Shipment Category 3 column.
- Tracking Application Type
-
Specify the type of text that stores the URL for carriers who provide a shipment tracking function on the internet.
- Consolidation Mode
-
Specify how an order line should be consolidated. Values are:
Blank or 0: Transactional consolidation. Order lines that are entered or modified are placed on the same shipment.
1: Multiple order shipment. Order lines from multiple orders are consolidated onto a shipment.
2: Single order shipment. Order lines are consolidated only onto shipments containing lines from that order.
3: No consolidation. Each order line is placed on its own shipment.
- Fixed Asset Interface
-
Specify whether Fixed Assets interface is active for Load and Delivery Management vehicles or for Bulk Inventory tanks. Values are:
Y or 1: The interface is active
N or 0 or Blank: The interface is not active
- Item Compatibility Check
-
Specify whether the system should perform an item level compatibility check. If so, the system does not place two items that are incompatible on the same shipment.
- Dispatch Group Compatibility Check
-
Specify whether compatibility of items is based on dispatch group. If it is, two items with a different dispatch group are not placed on the same load or shipment.
- Commodity Class Compatibility Check
-
Specify whether compatibility of items is based on commodity class. If it is, two items with a different commodity class are not placed on the same load or shipment.
- Copy Delivery Instructions
-
Specify whether to copy delivery instructions.
3.5.3.1 UOM Defaults/Status Code
Select UOM Defaults/Status Code.
- Weight
-
(Optional) Specify the unit of measure that indicates the weight of an individual item. Typical weight units of measure are:
GM: Gram
KG: Kilogram
CW: Hundredweight
TN: Ton
OZ: Ounce
LB: Pound
When setting up a weight unit of measure UDC, you must enter W for the special handling code of the UDC.
- Cubes
-
(Optional) Specify the unit of measure that the system uses to indicate volume for this item. You can specify cubes, liters, gallons, and so on, as volume standards. The system uses this unit of measure for the item or overrides it for an individual item or container.
- Linear
-
(Optional) Specify the width, height, or length unit of measure for a vehicle.
- Volume
-
(Optional) Specify the unit of measure for the cubic space that is occupied by an inventory item. Typical volume units of measure are:
ML: Milliliter
CF: Cubic Foot
CY: Cubic Yard
CM: Cubic Meter
PT: Pint
LT: Liter
When setting up a volume unit of measure UDC, you must enter V for the special handling code of the UDC.
- Maximum Piece Weight
-
(Optional) Enter the maximum weight of a shipment piece.
- Maximum Piece Volume
-
(Optional) Enter the maximum cubic volume of a shipment piece.
- Pending Shipment Status
-
(Optional) Enter the status of a shipment when the shipment is pending approval.
- Approved Shipment Status
-
(Optional) Enter the status at and beyond which order lines are not automatically added to shipments and shipments are not automatically rerouted.
- Confirmed Shipment Status
-
(Optional) Enter the status at and beyond which a shipment is considered to be confirmed. The system does not adjust a shipment that has been confirmed even if quantities on the underlying order have been changed.
- Hold Shipment Status
-
(Optional) Enter the status of a shipment when the shipment is being held.
- Approved Load Status
-
(Optional) Enter the status of a load which indicates that the load has been approved.
- Confirmed Load Status
-
(Optional) Specify the code that indicates the confirmed status of a load.
3.6 Setting Up Load Constants
This section provides overviews of load constants and load types and discusses how to:
-
Set up load types.
-
Set up load next numbers.
3.6.1 Understanding Load Constants
Load constants define the default information that is used for load types and load next numbers. These constants include various control codes that the system uses to process loads.
The system stores next numbers for loads at the planning depot level. A planning depot can be a centralized planning and scheduling organization or the originating depot of a load.
3.6.2 Understanding Load Types
You set up load types to define the specific characteristics of each type of load that you use in the day-to-day processes. For example, you can define whether a specific load type requires:
-
In-transit inventory tracking.
-
Compartments (for bulk loads).
-
Multiple loading points.
3.6.3 Forms Used to Set Up Load Constants
| Form Name | Form ID | Navigation | Usage |
|---|---|---|---|
| Work With Load Types | W49003A | Transportation Setup (G4941), Work With Load Types | Access forms to set up load types. |
| Load Type Revisions | W49003B | On Work With Load Types, click Add. | Set up load types. |
| Work With Load Next Numbers | W49170A | Transportation Setup (G4941), Work With Load Next Numbers | Access forms to set up load next numbers. |
| Load Next Numbers Revision | W49170B | On Work With Load Next Numbers, click Add. | Set up load next numbers. |
3.6.4 Setting Up Load Types
Access the Load Types Revisions form.
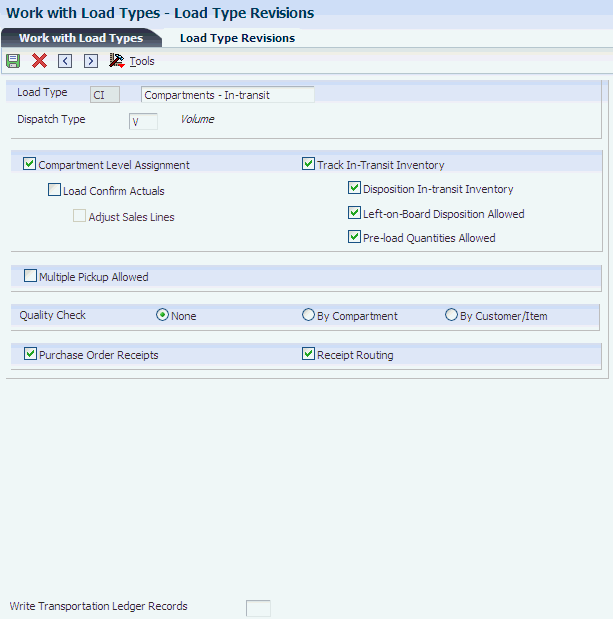
- Load Type
-
Enter the code that controls how a load is handled by the load building and confirmation processes. Load types are defined in the load type table.
- Dispatch Type
-
Specify whether this vehicle uses a weight or a volume device to control and measure the loading of product to its compartments. Values are:
V: Indicates that the measurement method is by volume.
W: Indicates that the measurement method is by weight.
T: Indicates that the measurement method is based on the transaction.
S: Indicates that the measurement method is by volume at standard. Used during Bulk Load and Delivery Confirmation or when bulk load and delivery confirmation are performed in one step.
A bulk vehicle can have a V or W dispatch type. A packed vehicle can only have a W dispatch type.
- Compartment Level Assignment
-
Enter 1 in this field to indicate that compartment level assignment is required for the load. A blank indicates that compartment level assignment is not allowed.
- Load Confirm Actuals
-
Leave this field blank to indicate that the load should be confirmed as scheduled. Enter 1 to indicate that bulk items should be load confirmed using actual quantities regardless of tolerance.
- Adjust Sales Lines
-
Specify whether the system adjusts order lines. This field applies only to bulk items and only if the Load Confirm Actuals field is not blank. Values are:
Blank: The system does not adjust order lines at load confirm time when the load is confirming actuals.
1: The order lines are adjusted at load confirm time when actual load quantity is different than scheduled.
- Track In-Transit Inventory
-
Specify whether in-transit inventory is being tracked in advanced transportation. Values are:
0: Do not track in-transit inventory at load confirmation.
1: Track in-transit inventory at load confirmation.
- Disposition In-transit Inventory
-
Enter 1 to indicate that before a load for a vehicle is confirmed, the prior load for that vehicle must be completely deliver confirmed and any product remaining on board the vehicle must be dispositioned.
Leaving this field blank indicates that a load for a vehicle can be load confirmed regardless of whether in-transit inventory for the last load has been dispositioned.
- Left-on-Board Disposition Allowed
-
Enter 1 to indicate that product remaining on board after deliveries are completed can be dispositioned as left on board for use on the next load.
Leaving this field blank indicates that product remaining on board must be returned to inventory, charged to another customer, or recorded as a gain.
- Pre-load Quantities Allowed
-
Enter 1 to indicate that a load can be load confirmed even if the prior load left product on board.
Leaving this field blank indicates that the vehicle must be empty before the load can be confirmed.
- Multiple Pickup Allowed
-
Leave this field blank to indicate that all shipment routing steps on the load must have the same origin. Enter 1 to indicate that multiple pickup points are allowed on the load.
3.6.5 Setting Up Load Next Numbers
Access the Load Next Numbers Revisions form.
- Planning Depot
-
Enter the depot from which a trip originates. The Trip Depot and Trip Number fields identify the unique combination of vehicle, registration number, load date, and shift.
- Next Number
-
Review the number that the system assigns next. The system can use next numbers for voucher numbers, invoice numbers, journal entry numbers, employee numbers, address numbers, contract numbers, and sequential W-2s. You must use established next number types unless you provide custom programming.
3.7 Setting Up Mode of Transport Constants
This section provides an overview of mode of transport constants and discusses how to set up mode of transport constants.
3.7.1 Understanding Mode of Transport Constants
Use the Mode of Transport Constants program (P49004) to define all of the default information for the modes of transportation that you use. The mode of transport constants can vary by depot. You can set up information for the depot that includes default vehicle type and default load
Use the Mode of Transport Constants program to define information that for the various modes such as truck or rail. Row menu options enable you to review routing entries and routing restrictions. The mode of transport constants also control system processing that is unique to a particular mode.
3.7.2 Forms Used to Set Up Mode of Transport Constants
| Form Name | Form ID | Navigation | Usage |
|---|---|---|---|
| Work With Mode of Transport Constants | W49004A | Transportation Setup (G4941), Work With Modes | Access forms to set up mode of transport constants. |
| Mode of Transport Constants Revisions | W49004B | On Work With Mode of Transport Constants, click Add. | Set up mode of transport constants. |
3.7.3 Setting Up Mode of Transport Constants
Access the Mode of Transport Constants Revisions form.
Figure 3-5 Mode of Transport Constants Revisions form
Description of "Figure 3-5 Mode of Transport Constants Revisions form"
- Mode of Transport
-
(Optional) Enter the code that describes the nature of the carrier being used to transport goods to the customer, for example, by rail, by road, and so on.
- Default Vehicle Type
-
(Optional) Specify the type of vehicle that you use to transport items. The vehicle type identifies the mode of transport and assignments to dispatch groups.
- Default Load Type
-
Enter the code that controls how a load is handled by the load building and confirmation processes. Load types are defined in the load type table.
- Compartment Flag
-
Specify whether the compartment is a vehicle and physical compartment or a logical compartment. Values are:
V: Vehicle and physical compartment.
L: Logical compartment.
- Lead Days
-
(Optional) Specify the minimum number of days following order entry before loading is scheduled.
- G/L Offset
-
(Optional) Enter a code that determines the trade account that the system uses as the offset when you post invoices or vouchers. The system concatenates the value that you enter to the AAI item RC (for Accounts Receivable) or PC (for Accounts Payable) to locate the trade account. For example, if you enter TRAD, the system searches for the AAI item RCTRAD (for receivables) or PCTRAD (for payables).
You can assign up to four alphanumeric characters to represent the general ledger offset or you can assign the three-character currency code (if you enter transactions in a multi-currency environment). You must, however, set up the corresponding AAI item for the system to use; otherwise, the system ignores the general ledger offset and uses the account that is set up for PC or RC for the company that is specified.
If you set up a value in the general ledger Offset field of the customer or supplier record, the system uses the value during transaction entry unless you override it.
Note:
Do not use code 9999. It is reserved for the post program and indicates that offsets should not be created. - Job Type
-
Specify the job classifications for an organization. In the Load and Delivery Management system, the job type that you define is used specifically for operators. This value is defined in the Load and Delivery Management Constants table (F49001). You must have a staff defined with that job type to create a trip. The job type also defines both the vehicle and depot staff.
- Operator Registration/License Type
-
(Optional) Specify the operator's required license type. An operator can have multiple type of registration/license. The system checks this value and requires that you assign an operator with a license of this type before you can build a trip. If you leave this field blank, the system does not require an operator license of any type.
- Vehicle Registration/License Type
-
(Optional) Specify the vehicle's required license type. A vehicle can have multiple type of registration/license. The system checks this value and requires that you assign a vehicle with a license of this type before you can build a trip. If you leave this field blank, the system does not require a vehicle license of any type.
- Automated Gantry Loading Note
-
Specify whether the automated gantry system should cause a bulk loading note to be printed from the Load and Delivery Management system. Enter Y if the automated gantry system should print a bulk loading note.
- Process Control System ID
-
Enter the identification number of the process control system. You can identify one or more process control systems associated by depot, tank, or mode of transport. The system uses this field for downloads of automated gantry information.